Nortel交换模块用户指南
(精选文档)NORTEL北电中文手册

LD 10PBX 电话机管理提示和响应-LD 10标号提示响应注释1 REQ 请求CHG 修改现有的数据块CPY n 从指定的分机数据块自动拷贝或生成1至32个新的分机数据块对Option 11各模式无效,版本12和其后的软件。
END 退出覆盖程序MOV 将数据块从一个TN移到另一个。
对Option 11各模式无效。
NEW X 增加新的数据块NEW后是一个1-255的数值,以生成此数目的接连的电话机数据块OUT X 取消数据块OUT后是一个1-255的数值,以取消此数目的接连的电话机数据块2 TYPE 数据块类型500500/2500电话机数据块500 M7Option 11的500/2500模式电话机数据块CARD 自动话机移位(ASR)的500/2500卡板块CARDSLT 单线电话机用户线卡板(版本19和其后的软件)OOSSLT20停止运行单线终端单元3 MODL71-127 模式号码,对Option 11模式话机提示。
4 CFTN 1 s c u 从TN拷贝,在REQ=CPY时提示。
c u7用于Option11,用这个TN作为新话机的样板。
5 SFMT 对拷贝命令选用以下一种格式,在CLS=AGTA时,提示POS。
D N输入项可长达4位,配备DNXP软件包150则长达7位TNDN 人工选择TN,DN和ACD电话机的ACD座席IDTN,DN和POS提示-n-次,如在CPY命令中所规定。
TN l s c u 新话机的TNDN xxxx 新话机的DNPOS xxxx ACD座席IDTN 新DN和ACD电话机的ACD座席ID是由系统提供的,对您提示要求开始的DN,ACD座席ID和每一个TN。
TN提示n次,如在CPY命令中所规定。
DN xxxx 新话机的DNPOS xxxx ACD座席IDTN l s c u 新话机的TNDN 新TN都是由系统提供的,对您提示要求开始的TN和每一个DN以及ACD电话机的ACD座席ID。
N6 无缝切换器 用户手册说明书

N6无缝切换器V3.0.0用户手册版权所有©2020西安诺瓦星云科技股份有限公司。
保留一切权利。
非经本公司书面许可,任何单位和个人不得擅自摘抄、复制本文档内容的部分或全部,并不得以任何形式传播。
商标声明是诺瓦科技的注册商标。
声明欢迎您选用西安诺瓦星云科技股份有限公司(以下简称诺瓦科技)的产品,如果本文档为您了解和使用产品带来帮助和便利,我们深感欣慰。
我们在编写文档时力求精确可靠,随时可能对内容进行修改或变更,恕不另行通知。
如果您在使用中遇到任何问题,或者有好的建议,请按照文档提供的联系方式联系我们。
对您在使用中遇到的问题,我们会尽力给予支持,对您提出的建议,我们衷心感谢并会尽快评估采纳。
目录1 产品概述 (1)产品简介 (1)产品特性 (1)2 外观说明 (3)前面板 (3)后面板 (4)产品尺寸 (5)3 应用场景 (6)4 液晶屏菜单操作 (7)操作说明 (7)主界面 (7)屏体配置 (9)4.3.2 输出模式 (9)4.3.3 屏体结构 (10)4.3.4 输出设置 (10)4.3.5 输出接口配置 (11)窗口设置 (11)4.4.1 窗口分屏模板 (11)4.4.2 BKG配置 (12)4.4.3 窗口配置 (13)场景设置 (14)输入设置 (15)画面控制 (15)测试画面 (16)预监选择 (17)高级设置 (18)4.10.2 系统模式 (18)4.10.3 同步模式 (18)4.10.4 AUX (18)4.10.5 Fn键设置 (19)4.10.6 返回主界面时长 (20)4.10.7 工厂复位 (20)4.10.8 HDCP开关 (20)4.10.9 硬件版本 (20)4.10.10 设备自检 (21)4.10.11 关于我们 (21)通讯设置 (21)5 V-CAN控制 (23)6 C1控制 (25)7 常见问题 (27)8 规格参数 (28)1 产品概述产品简介N6是由诺瓦科技自主研发的集视频处理,画面拼接,特效切换和多画面显示的高性能无缝切换器。
EtherLite模块操作手册说明书

Microsoft Windows Operating SystemsGo to Start > Programs > Command Prompt.At the Command Prompt enter:ping IP addresswhere IP address is the IP address for the EtherLite module.UNIX/Linux Operating SystemsFrom the command prompt enter:ping IP addresswhere IP address is the IP address for the EtherLite module. Identifying the Firmware VersionMicrosoft Windows Operating SystemsUse the V erlog utility to determine what firmware version is installed on an EtherLite module with any Microsoft Windows operating system.1.Download the verlog utility from the Digi website at. The utility will be found with the EtherLite utilities under Support Tools. Locate the sts_els folder.2.Open the verlog.exe file. A screen for the IP address appears.3.Enter the EtherLite module's IP address and choose OK. Informationidentifying the specific model of EtherLite module will be displayed with the firmware information listed below. An example of the firm-ware version will be:FW V er: V7.2.UNIX/Linux Operating Systems1.From the command prompt, enter the command:rlogin IP addresswhere IP address is the IP address of the EtherLite module.2.Enter ver and the firmware version information is displayed.Copyright © 1999-2002 Digi International Inc. All Rights Reserved. Disclaimer. This manual may contain inaccurate or erroneous information. This manual is subject to change at any time. This manual, including all information contained herein, is provided “as is” without warranty of any kind, either express or implied, including, but not limited to, any implied warrantees of merchant-ability or fitness for particular purpose. Digi International Inc. makes no representations, warranties, or commitments with regard to any data or information contained in this manual. If you rely on data or infor-mationEtherLiteAdministrationCardIntroduction to Boot ConsoleBoot Console is a mini-operating system that enables a user to do severalthings in setting up their EtherLite module for use on a network. Basically,Boot Console gives you the ability to:•resolve problems with BootP and DHCP servers. Large network instal-lations may have several BootP and/or DHCP Servers. Because of thedynamic operation of DHCP, it is possible for an unintended server toassign an IP address to an Etherlite. You will not know what serverassigned the address and you will not know what the address is.•get an Etherlite up and running even when a network server is down.•configure an Etherlite for use on the network either because you do nothave or do not want to use a BootP or DCHP server.•use several additional diagnostic tools for defining network or Ether-Lite configuration problems.•update the module’s firmware without using a DHCP or BootP server.Setting Up Boot ConsoleUse this procedure to temporarily or permanently store an IP address in anEtherLite module.Note: For additional configuration information of the EtherLite module,see "Boot Console Commands".1.Attach a terminal or terminal emulator to Port 1 of the EtherLite.2.Attach a 3-wire connection: TxD, RxD, and GND.Note: EtherLite will not assert DTR or RTS. If your system is expect-ing these signals, loop them at the terminal side. Boot Console operatesat 19200 baud, 8 bits, 1 stop, and no parity.3.Activate the console by unplugging the power cable. Wait ten secondsand plug the power cable back into the EtherLite module.4.Repeatedly depress the # key at the terminal until you get a consoleprompt. It should only take three keystrokes.A prompt will appear with the module model and the firmware version.An example would be:--EL-32 V6.8--5.Enter the IP address by entering the command:ip x.x.x.xWhere x.x.x.x is the actual numerical address.6.Next, enter one of the following commands, depending on whether youwant the new IP address to be temporary or permanent.7.If you entered boot in the previous step, skip this step (the EtherLitemodule will do a soft reboot).If you entered store in the previous step, reboot the EtherLite moduleby unplugging, and then plugging in the power cable again.Note: The EtherLite module should remain off for at least 10 secondsbefore powering the unit back on.8.Verify the network connection of the EtherLite module by using thePing program. See Using Ping.Boot Console CommandsUse this command table to configure an EtherLite module with Boot Con-sole. A thorough reference on Boot Console is available on the Digi website at .Notes:•The commands are case-sensitive. The Ethernet cable must bereattached after the commands are entered to allow the changes to bestored and activated.•To store commands permanently in flash memory, such as gw, ip, sm,ahip, ahm, and tftp, be sure to follow that command with the storecommand.Temporary Permanentboot storeCommand Command Descriptionhelp Displays the command list with a brief descriptionshow Shows module settings including firmware version, IPsettings, boot host, and more.Assigning A Permanent IP Address: DgIPServUse this procedure to permanently store an IP address in an EtherLite mod-ule.Microsoft Windows Operating Systems1.Download the DgIPServ utility from the Digi website at. The utility will be found with the EtherLite utilities under Support Tools. Locate the sts_els folder.2.Connect the EtherLite module to the network.Note: Do not plug the power cable into the module at this time.3.Execute the DgIPServ.exe program. Choose Store IP settings.4.Enter the MAC address. The MAC address is found on the back panelnext to the power outlet.Note: The first six digits or letters (00AOE7) are already entered. Enter only the last six letters and digits.5.Enter the IP address assigned by the network administrator and theother IP settings if necessary. Each EtherLite module needs a separateIP address.6.Plug in the power cable and a confirmation message should appear dis-playing the IP address.7.V erify the network connection of the EtherLite module by using thePing program. See Using Ping.UNIX/Linux Operating SystemsOn UNIX/Linux systems, the driver must already be installed.1.Enter the following commands to locate the dgipserv utility on yoursystem. It was installed with the EtherLite driver.cd /find ./ -name dgipserv -print2.Change to the directory where dgipserv is located and execute the util-ity by entering the following command:dgipserv3.Follow the prompts and use the associated man pages.To view the UNIX/Linus man pages, enter the command:man dgipserv.Assigning A Temporary IP Address: Digi’sBootP ServerMicrosoft Windows Operating SystemsUse this procedure to store an IP address temporarily in an EtherLite mod-ule. Download the bootps utility file from the Digi website at. The utility will be found with the EtherLite utilitiesunder Support Tools. Locate the sts_els folder.1.Connect the EtherLite module to the network.Note: Do not plug the power cable in to the EtherLite module.2.Open the bootps.exe program. The message "Watching for BootpRequests" appears.3.Choose File then Edit Bootp Response.4.Enter the MAC address. The MAC address is found on the back panelnext to the power outlet.Note: The first six digits or letters (00AOE7) are already entered. Enteronly the last six letters and digits.5.Enter the Target IP Address for the EtherLite module and the Host IPAddress of the network server.6.Plug in the power cable and a confirmation message should appear dis-playing the MAC Address and the new IP address.7.Verify the network connection of the EtherLite module by using thePing program. See Using Ping.Updating FirmwareUse this procedure to upgrade the firmware on an Etherlite unit. Youshould have downloaded the latest firmware from the Digi web site at.Microsoft Windows Operating Systems1.Create a folder and extract the compressed firmware to the folder.2.Start the DgIPServ utility. It is located in the driver installation direc-tory.3.Follow the prompts to install the updated firmware.UNIX/Linux Operating SystemsOn UNIX/Linux systems, the driver must already be installed.1.Enter the following commands to locate the dgipserv utility on yoursystem. It was installed with the EtherLite driver.cd /find ./ -name dgipserv -print2.Change to the directory where dgipserv is located and execute the util-ity by entering the following command:dgipserv3.Follow the prompts and use the associated man pages.To view the UNIX/Linus man pages, enter the command:man dgipservUsing PingUse the Ping program to determine whether the EtherLite module is con-nected to the network. Pinging the EtherLite module from a system on thesame subnet eliminates several possible problems that might hinder trou-bleshooting procedures. If the EtherLite module is not found, a "Requesttimed out" reply will be given. Further troubleshooting will be necessary.(Using Ping is continued on other side of this document)Command Command Descriptionboot Resumes the boot process with status messages logged to the terminalip Sets the IP address (The default address is 0.0.0.0)gw Sets the gateway address (The default address is 0.0.0.0)sm Sets the subnet mask address (The default is 0.0.0.0)ahip Sets the authorized hosts IP address specifying which DHCP server can assign an IP address to the EtherLite module (The default address is 0.0.0.0)ahm Sets the authorized hosts mask address (The defaultaddress is 0.0.0.0)tftpip*Sets the server host for bootfile tftp address (The default address is 0.0.0.0)bf*Sets the bootfile name (The default name is elxx.prm)store Stores the settings in flash RAMerase Erases the settings in flash RAM and resets all defaultsreset Resets all defaultsping Pings an IP address*Note: These values are not supported by the store command, consequently when the EtherLite module loses power this information will be lost.。
ATEN Altusen CN9950 1-本地远程共享访问单端口 交换机说明书
1-Local / Remote Share Access Single PortKVM over IP SwitchCN9000 / CN9600 / CN9950User ManualCN9000 / CN9600 / CN9950CN9000 / CN9600 / CN9950 User Manual iiEMC InformationFEDERAL COMMUNICATIONS COMMISSION INTERFERENCESTATEMENT: This equipment has been tested and found to comply with the limits for a Class A digital device, pursuant to Part 15 of the FCC Rules. These limits are designed to provide reasonable protection against harmfulinterference when the equipment is operated in a commercial environment. This equipment generates, uses, and can radiate radio frequency energy and, if not installed and used in accordance with the instruction manual, may cause harmful interference to radio communications. Operation of this equipment in a residential area is likely to cause harmful interference in which case the user will be required to correct the interference at his own expense.The device complies with Part 15 of the FCC Rules. Operation is subject to the following two conditions: (1) this device may not cause harmful interference, and (2) this device must accept any interference received, includinginterference that may cause undesired operation.FCC Caution: Any changes or modifications not expressly approved by the party responsible for compliance could void the user's authority to operate this equipment.Warning: Operation of this equipment in a residential environment could cause radio interference.Achtung: Der Gebrauch dieses Geräts in Wohnumgebung kannFunkstörungen verursachen.KCC StatementRoHSThis product is RoHS compliant.Copyright © 2021 ATEN® International Co., Ltd.Released: 2021-03-23ATEN and the ATEN logo are registered trademarks of ATEN International Co., Ltd. All rights reserved. Allother brand names and trademarks are the registered property of their respective owners.CN9000 / CN9600 / CN9950 User Manual User InformationOnline RegistrationBe sure to register your product at our online support center:International Telephone SupportFor telephone support, call this number:International886-2-8692-6959China86-400-810-0-810Japan81-3-5615-5811Korea82-2-467-6789North America1-888-999-ATEN ext 49881-949-428-1111User NoticeAll information, documentation, and specifications contained in this manual are subject to change without prior notification by the manufacturer. The manufacturer makes no representations or warranties, either expressed or implied, with respect to the contents hereof and specifically disclaims any warranties as to merchantability or fitness for any particular purpose. Any of the manufacturer's software described in this manual is sold or licensed as is. Should the programs prove defective following their purchase, the buyer (and not the manufacturer, its distributor, or its dealer), assumes the entire cost of all necessary servicing, repair and any incidental or consequential damages resulting from any defect in the software.The manufacturer of this system is not responsible for any radio and/or TV interference caused by unauthorized modifications to this device. It is the responsibility of the user to correct such interference.The manufacturer is not responsible for any damage incurred in the operation of this system if the correct operational voltage setting was not selected prior to operation. PLEASE VERIFY THAT THE VOLTAGE SETTING IS CORRECT BEFORE USE.iiiCN9000 / CN9600 / CN9950 User Manual Package ContentsCN9000♦1CN9000 KVM over IP Switch♦1KVM cable (SPHD to VGA, PS/2, USB)♦1USB Type-A to USB Mini-B cable♦1power adapter♦1mounting kit♦1control terminal block♦1foot pad set (4 pcs)♦1user instructions*CN9600♦1CN9600 KVM over IP Switch♦1KVM cable (DVI-D, USB, audio)♦1USB Type-A to USB Mini-B cable♦1power adapter♦1mounting kit♦1user instructions*CN9950♦1CN9950 KVM over IP Switch♦1DisplayPort cable♦1USB Type-A to USB Type-B cable♦1USB Type-A to USB Mini-B cable♦1power adapter♦1mounting kit♦1control terminal block♦1foot pad set (4 pcs)♦1user instructions*ivCN9000 / CN9600 / CN9950 User Manual *Features may have been added to the CN9000 / CN9600 / CN9950 since this manual was published. Please visit our website to download the most up-to-date version.Check to make sure that all components are present and in working condition. If you encounter any problems, please contact your local dealer.Read this manual thoroughly and follow the installation and operation procedures to prevent any damage to the unit and/or any devices connected to it.ContentsEMC Information. . . . . . . . . . . . . . . . . . . . . . . . . . . . . . . . . . . . . . . . . . . . .ii RoHS. . . . . . . . . . . . . . . . . . . . . . . . . . . . . . . . . . . . . . . . . . . . . . . . . . . . . .ii User Information . . . . . . . . . . . . . . . . . . . . . . . . . . . . . . . . . . . . . . . . . . . . .iii Online Registration . . . . . . . . . . . . . . . . . . . . . . . . . . . . . . . . . . . . . . . .iii Telephone Support . . . . . . . . . . . . . . . . . . . . . . . . . . . . . . . . . . . . . . . .iii User Notice . . . . . . . . . . . . . . . . . . . . . . . . . . . . . . . . . . . . . . . . . . . . . .iii Package Contents. . . . . . . . . . . . . . . . . . . . . . . . . . . . . . . . . . . . . . . . . . . iv Contents . . . . . . . . . . . . . . . . . . . . . . . . . . . . . . . . . . . . . . . . . . . . . . . . . . .v About this Manual. . . . . . . . . . . . . . . . . . . . . . . . . . . . . . . . . . . . . . . . . . . xi Conventions . . . . . . . . . . . . . . . . . . . . . . . . . . . . . . . . . . . . . . . . . . . . . . . xii Product Information. . . . . . . . . . . . . . . . . . . . . . . . . . . . . . . . . . . . . . . . . . xii 1.IntroductionOverview. . . . . . . . . . . . . . . . . . . . . . . . . . . . . . . . . . . . . . . . . . . . . . . . . . .1 Features and Benefits. . . . . . . . . . . . . . . . . . . . . . . . . . . . . . . . . . . . . . . . .2 Hardware. . . . . . . . . . . . . . . . . . . . . . . . . . . . . . . . . . . . . . . . . . . . . . . .2 Management. . . . . . . . . . . . . . . . . . . . . . . . . . . . . . . . . . . . . . . . . . . . .3 Easy-to-Use Interface . . . . . . . . . . . . . . . . . . . . . . . . . . . . . . . . . . . . . .4 Advanced Security . . . . . . . . . . . . . . . . . . . . . . . . . . . . . . . . . . . . . . . .4 Virtual Media. . . . . . . . . . . . . . . . . . . . . . . . . . . . . . . . . . . . . . . . . . . . .4 Virtual Remote Desktop . . . . . . . . . . . . . . . . . . . . . . . . . . . . . . . . . . . .5 System Requirements. . . . . . . . . . . . . . . . . . . . . . . . . . . . . . . . . . . . . . . . .6 Remote User Computers. . . . . . . . . . . . . . . . . . . . . . . . . . . . . . . . . . . .6 Servers . . . . . . . . . . . . . . . . . . . . . . . . . . . . . . . . . . . . . . . . . . . . . . . . .6 Cables. . . . . . . . . . . . . . . . . . . . . . . . . . . . . . . . . . . . . . . . . . . . . . . . . .7 Supported Video Resolutions . . . . . . . . . . . . . . . . . . . . . . . . . . . . . . . .8 Operating Systems . . . . . . . . . . . . . . . . . . . . . . . . . . . . . . . . . . . . . . . .8 Browsers. . . . . . . . . . . . . . . . . . . . . . . . . . . . . . . . . . . . . . . . . . . . . . . .9vCN9000 / CN9600 / CN9950 User Manualvi Components. . . . . . . . . . . . . . . . . . . . . . . . . . . . . . . . . . . . . . . . . . . . . . .10 CN9000 Front View. . . . . . . . . . . . . . . . . . . . . . . . . . . . . . . . . . . . . . .10 CN9000 Rear View. . . . . . . . . . . . . . . . . . . . . . . . . . . . . . . . . . . . . . .11 CN9000/CN9950 Side View . . . . . . . . . . . . . . . . . . . . . . . . . . . . . . . .12 CN9950 Front View. . . . . . . . . . . . . . . . . . . . . . . . . . . . . . . . . . . . . . .13 9950 Rear View. . . . . . . . . . . . . . . . . . . . . . . . . . . . . . . . . . . . . . . . . .14 CN9600 Front View. . . . . . . . . . . . . . . . . . . . . . . . . . . . . . . . . . . . . . .15 CN9600 Rear View. . . . . . . . . . . . . . . . . . . . . . . . . . . . . . . . . . . . . . .162.Hardware SetupMounting. . . . . . . . . . . . . . . . . . . . . . . . . . . . . . . . . . . . . . . . . . . . . . . . . .17 Attaching the Bracket . . . . . . . . . . . . . . . . . . . . . . . . . . . . . . . . . .17Rack Mount. . . . . . . . . . . . . . . . . . . . . . . . . . . . . . . . . . . . . . . . . .18Wall Mount . . . . . . . . . . . . . . . . . . . . . . . . . . . . . . . . . . . . . . . . . .19 Hardware Installation . . . . . . . . . . . . . . . . . . . . . . . . . . . . . . . . . . . . . . . .20 CN9000. . . . . . . . . . . . . . . . . . . . . . . . . . . . . . . . . . . . . . . . . . . . . . . .21 CN9600. . . . . . . . . . . . . . . . . . . . . . . . . . . . . . . . . . . . . . . . . . . . . . . .22 CN9950. . . . . . . . . . . . . . . . . . . . . . . . . . . . . . . . . . . . . . . . . . . . . . . . . . .23 DCE and DTE Ports . . . . . . . . . . . . . . . . . . . . . . . . . . . . . . . . . . . . . . . . .24 3.Browser LoginLogging In. . . . . . . . . . . . . . . . . . . . . . . . . . . . . . . . . . . . . . . . . . . . . . . . .25 Main Screen . . . . . . . . . . . . . . . . . . . . . . . . . . . . . . . . . . . . . . . . . . . . . . .27 4.ConfigurationIntroduction. . . . . . . . . . . . . . . . . . . . . . . . . . . . . . . . . . . . . . . . . . . . . . . .29 Basic Setting. . . . . . . . . . . . . . . . . . . . . . . . . . . . . . . . . . . . . . . . . . . . . . .30 User Management. . . . . . . . . . . . . . . . . . . . . . . . . . . . . . . . . . . . . . . .30 User Information . . . . . . . . . . . . . . . . . . . . . . . . . . . . . . . . . . . . . .30Role. . . . . . . . . . . . . . . . . . . . . . . . . . . . . . . . . . . . . . . . . . . . . . . .30Permissions. . . . . . . . . . . . . . . . . . . . . . . . . . . . . . . . . . . . . . . . . .31 Account Policy. . . . . . . . . . . . . . . . . . . . . . . . . . . . . . . . . . . . . . . . . . .32 Sessions . . . . . . . . . . . . . . . . . . . . . . . . . . . . . . . . . . . . . . . . . . . . . . .33 Maintenance . . . . . . . . . . . . . . . . . . . . . . . . . . . . . . . . . . . . . . . . . . . .34 Upgrade Main Firmware . . . . . . . . . . . . . . . . . . . . . . . . . . . . . . . .34Update Display Information. . . . . . . . . . . . . . . . . . . . . . . . . . . . . .35Backup / Restore. . . . . . . . . . . . . . . . . . . . . . . . . . . . . . . . . . . . . .36Terminal . . . . . . . . . . . . . . . . . . . . . . . . . . . . . . . . . . . . . . . . . . . .38 Advanced Setting . . . . . . . . . . . . . . . . . . . . . . . . . . . . . . . . . . . . . . . . . . .39 Device Information . . . . . . . . . . . . . . . . . . . . . . . . . . . . . . . . . . . . . . .39 General . . . . . . . . . . . . . . . . . . . . . . . . . . . . . . . . . . . . . . . . . . . . .39 Network. . . . . . . . . . . . . . . . . . . . . . . . . . . . . . . . . . . . . . . . . . . . . . . .41 IP Installer. . . . . . . . . . . . . . . . . . . . . . . . . . . . . . . . . . . . . . . . . . .42Service Ports. . . . . . . . . . . . . . . . . . . . . . . . . . . . . . . . . . . . . . . . .42Redundant NIC . . . . . . . . . . . . . . . . . . . . . . . . . . . . . . . . . . . . . . .43CN9000 / CN9600 / CN9950 User Manual IPv4 Settings . . . . . . . . . . . . . . . . . . . . . . . . . . . . . . . . . . . . . . . . .43IPv6 Settings . . . . . . . . . . . . . . . . . . . . . . . . . . . . . . . . . . . . . . . . .44Network Transfer Rate. . . . . . . . . . . . . . . . . . . . . . . . . . . . . . . . . .44DDNS. . . . . . . . . . . . . . . . . . . . . . . . . . . . . . . . . . . . . . . . . . . . . . .44 ANMS . . . . . . . . . . . . . . . . . . . . . . . . . . . . . . . . . . . . . . . . . . . . . . . . .45 Event Destination. . . . . . . . . . . . . . . . . . . . . . . . . . . . . . . . . . . . . .45SMTP Settings. . . . . . . . . . . . . . . . . . . . . . . . . . . . . . . . . . . . . . . .46Authentication . . . . . . . . . . . . . . . . . . . . . . . . . . . . . . . . . . . . . . . .48 Security. . . . . . . . . . . . . . . . . . . . . . . . . . . . . . . . . . . . . . . . . . . . . . . .51 Login Failures . . . . . . . . . . . . . . . . . . . . . . . . . . . . . . . . . . . . . . . .51Filter. . . . . . . . . . . . . . . . . . . . . . . . . . . . . . . . . . . . . . . . . . . . . . . .52Encryption . . . . . . . . . . . . . . . . . . . . . . . . . . . . . . . . . . . . . . . . . . .54Security Level . . . . . . . . . . . . . . . . . . . . . . . . . . . . . . . . . . . . . . . .54Mode . . . . . . . . . . . . . . . . . . . . . . . . . . . . . . . . . . . . . . . . . . . . . . .55Private Certificate . . . . . . . . . . . . . . . . . . . . . . . . . . . . . . . . . . . . .55Certificate Signing Request. . . . . . . . . . . . . . . . . . . . . . . . . . . . . .57 Console Management. . . . . . . . . . . . . . . . . . . . . . . . . . . . . . . . . . . . .59 OOBC . . . . . . . . . . . . . . . . . . . . . . . . . . . . . . . . . . . . . . . . . . . . . .59Dial Out . . . . . . . . . . . . . . . . . . . . . . . . . . . . . . . . . . . . . . . . . . . . .61Serial Console. . . . . . . . . . . . . . . . . . . . . . . . . . . . . . . . . . . . . . . .63 Date/Time . . . . . . . . . . . . . . . . . . . . . . . . . . . . . . . . . . . . . . . . . . . . . .66 Time Zone . . . . . . . . . . . . . . . . . . . . . . . . . . . . . . . . . . . . . . . . . . .66Date / Time . . . . . . . . . . . . . . . . . . . . . . . . . . . . . . . . . . . . . . . . . .66Network Time. . . . . . . . . . . . . . . . . . . . . . . . . . . . . . . . . . . . . . . . .67 Customization . . . . . . . . . . . . . . . . . . . . . . . . . . . . . . . . . . . . . . . . . . .67 Mode . . . . . . . . . . . . . . . . . . . . . . . . . . . . . . . . . . . . . . . . . . . . . . .68USB IO Settings. . . . . . . . . . . . . . . . . . . . . . . . . . . . . . . . . . . . . . .68Multiuser Mode . . . . . . . . . . . . . . . . . . . . . . . . . . . . . . . . . . . . . . .68Exit Macro . . . . . . . . . . . . . . . . . . . . . . . . . . . . . . . . . . . . . . . . . . .69Reset. . . . . . . . . . . . . . . . . . . . . . . . . . . . . . . . . . . . . . . . . . . . . . .69 Preferences. . . . . . . . . . . . . . . . . . . . . . . . . . . . . . . . . . . . . . . . . . . . . . . .70 User Preferences . . . . . . . . . . . . . . . . . . . . . . . . . . . . . . . . . . . . . . . .70 Logs. . . . . . . . . . . . . . . . . . . . . . . . . . . . . . . . . . . . . . . . . . . . . . . . . . .71 Remote Console . . . . . . . . . . . . . . . . . . . . . . . . . . . . . . . . . . . . . . . . .72 Remote Console Preview . . . . . . . . . . . . . . . . . . . . . . . . . . . . . . .72Telnet Viewer. . . . . . . . . . . . . . . . . . . . . . . . . . . . . . . . . . . . . . . . .72 Download . . . . . . . . . . . . . . . . . . . . . . . . . . . . . . . . . . . . . . . . . . . . . .73 About. . . . . . . . . . . . . . . . . . . . . . . . . . . . . . . . . . . . . . . . . . . . . . . . . . . . .73 Viewer. . . . . . . . . . . . . . . . . . . . . . . . . . . . . . . . . . . . . . . . . . . . . . . . . . . .73 Logout. . . . . . . . . . . . . . . . . . . . . . . . . . . . . . . . . . . . . . . . . . . . . . . . . . . .74 5.Accessing Remote ServerIntroduction. . . . . . . . . . . . . . . . . . . . . . . . . . . . . . . . . . . . . . . . . . . . . . . .75 Web, Windows and Java Client Viewer . . . . . . . . . . . . . . . . . . . . . . . . . .76 The Windows Client AP . . . . . . . . . . . . . . . . . . . . . . . . . . . . . . . . . . . . . .77viiCN9000 / CN9600 / CN9950 User ManualviiiDownload . . . . . . . . . . . . . . . . . . . . . . . . . . . . . . . . . . . . . . . . . . . . . .77 Starting Up . . . . . . . . . . . . . . . . . . . . . . . . . . . . . . . . . . . . . . . . . . . . .77 The Java Client AP. . . . . . . . . . . . . . . . . . . . . . . . . . . . . . . . . . . . . . . . . .806.The Windows Client ViewerThe Win / Java Client Control Panel. . . . . . . . . . . . . . . . . . . . . . . . . . . . .81 Control Panel Functions . . . . . . . . . . . . . . . . . . . . . . . . . . . . . . . . . . .82 Macros . . . . . . . . . . . . . . . . . . . . . . . . . . . . . . . . . . . . . . . . . . . . . . . .85 Hotkeys. . . . . . . . . . . . . . . . . . . . . . . . . . . . . . . . . . . . . . . . . . . . .85User Macros . . . . . . . . . . . . . . . . . . . . . . . . . . . . . . . . . . . . . . . . .87System Macros . . . . . . . . . . . . . . . . . . . . . . . . . . . . . . . . . . . . . . .91 Video Settings. . . . . . . . . . . . . . . . . . . . . . . . . . . . . . . . . . . . . . . . . . .93 Gamma Adjustment. . . . . . . . . . . . . . . . . . . . . . . . . . . . . . . . . . . .94 The Message Board . . . . . . . . . . . . . . . . . . . . . . . . . . . . . . . . . . . . . .96 The Button Bar . . . . . . . . . . . . . . . . . . . . . . . . . . . . . . . . . . . . . . .96Message Display Panel. . . . . . . . . . . . . . . . . . . . . . . . . . . . . . . . .97Compose Panel. . . . . . . . . . . . . . . . . . . . . . . . . . . . . . . . . . . . . . .97User List Panel . . . . . . . . . . . . . . . . . . . . . . . . . . . . . . . . . . . . . . .97 Virtual Media. . . . . . . . . . . . . . . . . . . . . . . . . . . . . . . . . . . . . . . . . . . .98 Virtual Media Icons . . . . . . . . . . . . . . . . . . . . . . . . . . . . . . . . . . . .98Virtual Media Redirection . . . . . . . . . . . . . . . . . . . . . . . . . . . . . . .98Smart Card Reader. . . . . . . . . . . . . . . . . . . . . . . . . . . . . . . . . . .101 Zoom. . . . . . . . . . . . . . . . . . . . . . . . . . . . . . . . . . . . . . . . . . . . . . . . .101 The On-Screen Keyboard. . . . . . . . . . . . . . . . . . . . . . . . . . . . . . . . .102 Mouse Pointer Type . . . . . . . . . . . . . . . . . . . . . . . . . . . . . . . . . . . . .103 Mouse DynaSync Mode . . . . . . . . . . . . . . . . . . . . . . . . . . . . . . . . . .104 Automatic Mouse Synchronization (DynaSync) . . . . . . . . . . . . .104Manual Mouse Synchronization . . . . . . . . . . . . . . . . . . . . . . . . .104Mac and Linux Considerations . . . . . . . . . . . . . . . . . . . . . . . . . .105 Open GUI (Configuration). . . . . . . . . . . . . . . . . . . . . . . . . . . . . . . . .106 Control Panel Configuration . . . . . . . . . . . . . . . . . . . . . . . . . . . . . . .107 The Web Client Control Panel . . . . . . . . . . . . . . . . . . . . . . . . . . . . . . . .109 Web Client Video Settings . . . . . . . . . . . . . . . . . . . . . . . . . . . . . . . .110 Web Client On-Screen Keyboard . . . . . . . . . . . . . . . . . . . . . . . . . . .111 Web Client Mouse Pointer Type. . . . . . . . . . . . . . . . . . . . . . . . . . . .111 Virtual Media. . . . . . . . . . . . . . . . . . . . . . . . . . . . . . . . . . . . . . . . . . .112 Web Client Mouse Sync Mode . . . . . . . . . . . . . . . . . . . . . . . . . . . . .113 7.Local AccessLocal Console. . . . . . . . . . . . . . . . . . . . . . . . . . . . . . . . . . . . . . . . . . . . .115 Local OSD. . . . . . . . . . . . . . . . . . . . . . . . . . . . . . . . . . . . . . . . . . . . .117 Laptop USB Console (LUC) . . . . . . . . . . . . . . . . . . . . . . . . . . . . . . . . . .118 8.The Log FileThe Log File Screen. . . . . . . . . . . . . . . . . . . . . . . . . . . . . . . . . . . . . . . .121CN9000 / CN9600 / CN9950 User Manual 9.The Log ServerInstallation. . . . . . . . . . . . . . . . . . . . . . . . . . . . . . . . . . . . . . . . . . . . . . . .123 Starting Up . . . . . . . . . . . . . . . . . . . . . . . . . . . . . . . . . . . . . . . . . . . . . . .123 The Menu Bar. . . . . . . . . . . . . . . . . . . . . . . . . . . . . . . . . . . . . . . . . . . . .124 Configure. . . . . . . . . . . . . . . . . . . . . . . . . . . . . . . . . . . . . . . . . . . . . .125 Events. . . . . . . . . . . . . . . . . . . . . . . . . . . . . . . . . . . . . . . . . . . . . . . .126 Search. . . . . . . . . . . . . . . . . . . . . . . . . . . . . . . . . . . . . . . . . . . . .126Maintenance . . . . . . . . . . . . . . . . . . . . . . . . . . . . . . . . . . . . . . . .127 Options . . . . . . . . . . . . . . . . . . . . . . . . . . . . . . . . . . . . . . . . . . . . . . .127 Help. . . . . . . . . . . . . . . . . . . . . . . . . . . . . . . . . . . . . . . . . . . . . . . . . .128 The Log Server Main Screen . . . . . . . . . . . . . . . . . . . . . . . . . . . . . . . . .128 Overview. . . . . . . . . . . . . . . . . . . . . . . . . . . . . . . . . . . . . . . . . . . . . .128 The List Panel. . . . . . . . . . . . . . . . . . . . . . . . . . . . . . . . . . . . . . . . . .129 Panel Showing Logs of the Selected Units. . . . . . . . . . . . . . . . . . . .129 AppendixSafety Instructions. . . . . . . . . . . . . . . . . . . . . . . . . . . . . . . . . . . . . . . . . .131 General . . . . . . . . . . . . . . . . . . . . . . . . . . . . . . . . . . . . . . . . . . . . . . .131 Rack Mounting . . . . . . . . . . . . . . . . . . . . . . . . . . . . . . . . . . . . . . . . .133 Technical Support. . . . . . . . . . . . . . . . . . . . . . . . . . . . . . . . . . . . . . . . . .134 International. . . . . . . . . . . . . . . . . . . . . . . . . . . . . . . . . . . . . . . . . . . .134 North America. . . . . . . . . . . . . . . . . . . . . . . . . . . . . . . . . . . . . . . . . .134 IP Address Determination. . . . . . . . . . . . . . . . . . . . . . . . . . . . . . . . . . . .135 IP Installer. . . . . . . . . . . . . . . . . . . . . . . . . . . . . . . . . . . . . . . . . . . . .135 Browser. . . . . . . . . . . . . . . . . . . . . . . . . . . . . . . . . . . . . . . . . . . . . . .136 AP Windows Client . . . . . . . . . . . . . . . . . . . . . . . . . . . . . . . . . . . . . .136 IPv6. . . . . . . . . . . . . . . . . . . . . . . . . . . . . . . . . . . . . . . . . . . . . . . . . . . . .138 Link Local IPv6 Address . . . . . . . . . . . . . . . . . . . . . . . . . . . . . . . . . .138 IPv6 Stateless Autoconfiguration . . . . . . . . . . . . . . . . . . . . . . . . . . .139 Port Forwarding. . . . . . . . . . . . . . . . . . . . . . . . . . . . . . . . . . . . . . . . . . . .140 Keyboard Emulation . . . . . . . . . . . . . . . . . . . . . . . . . . . . . . . . . . . . . . . .141 Serial Port Pin Assignment. . . . . . . . . . . . . . . . . . . . . . . . . . . . . . . . . . .142 Trusted Certificates. . . . . . . . . . . . . . . . . . . . . . . . . . . . . . . . . . . . . . . . .143 Overview. . . . . . . . . . . . . . . . . . . . . . . . . . . . . . . . . . . . . . . . . . . . . .143 Installing the Certificate. . . . . . . . . . . . . . . . . . . . . . . . . . . . . . . . . . .144 Certificate Trusted. . . . . . . . . . . . . . . . . . . . . . . . . . . . . . . . . . . . . . .145 Mismatch Considerations . . . . . . . . . . . . . . . . . . . . . . . . . . . . . . . . .145 Self-Signed Private Certificates . . . . . . . . . . . . . . . . . . . . . . . . . . . . . . .147 Examples. . . . . . . . . . . . . . . . . . . . . . . . . . . . . . . . . . . . . . . . . . . . . .147 Importing the Files. . . . . . . . . . . . . . . . . . . . . . . . . . . . . . . . . . . . . . .147 Troubleshooting . . . . . . . . . . . . . . . . . . . . . . . . . . . . . . . . . . . . . . . . . . .148 General Operation. . . . . . . . . . . . . . . . . . . . . . . . . . . . . . . . . . . . . . .148 Windows . . . . . . . . . . . . . . . . . . . . . . . . . . . . . . . . . . . . . . . . . . . . . .150 Java. . . . . . . . . . . . . . . . . . . . . . . . . . . . . . . . . . . . . . . . . . . . . . . . . .151 Sun Systems. . . . . . . . . . . . . . . . . . . . . . . . . . . . . . . . . . . . . . . . . . .152ixCN9000 / CN9600 / CN9950 User ManualxMac Systems. . . . . . . . . . . . . . . . . . . . . . . . . . . . . . . . . . . . . . . . . . .153 The Log Server. . . . . . . . . . . . . . . . . . . . . . . . . . . . . . . . . . . . . . . . .153 Additional Mouse Synchronization Procedures . . . . . . . . . . . . . . . . . . .154 Windows:. . . . . . . . . . . . . . . . . . . . . . . . . . . . . . . . . . . . . . . . . . . . . .154 Sun / Linux . . . . . . . . . . . . . . . . . . . . . . . . . . . . . . . . . . . . . . . . . . . .155 Virtual Media Support. . . . . . . . . . . . . . . . . . . . . . . . . . . . . . . . . . . . . . .156 WinClient ActiveX Viewer / WinClient AP. . . . . . . . . . . . . . . . . . . . .156 Java Applet Viewer / Java Client AP. . . . . . . . . . . . . . . . . . . . . . . . .156 Administrator Login Failure. . . . . . . . . . . . . . . . . . . . . . . . . . . . . . . . . . .157 Specifications . . . . . . . . . . . . . . . . . . . . . . . . . . . . . . . . . . . . . . . . . . . . .158 CN9000. . . . . . . . . . . . . . . . . . . . . . . . . . . . . . . . . . . . . . . . . . . . . . .158 CN9600. . . . . . . . . . . . . . . . . . . . . . . . . . . . . . . . . . . . . . . . . . . . . . .159 CN9950. . . . . . . . . . . . . . . . . . . . . . . . . . . . . . . . . . . . . . . . . . . . . . .160 Limited Warranty. . . . . . . . . . . . . . . . . . . . . . . . . . . . . . . . . . . . . . . . . . .162CN9000 / CN9600 / CN9950 User Manual About this ManualThis User Manual is provided to help you get the most from your system. It covers all aspects of installation, configuration and operation. An overview of the information found in the manual is provided below.Chapter 1, Introduction, introduces you to the CN9000 / CN9600 / CN9950 KVM over IP Switch. Its purpose, features and benefits are presented, and its front and back panel components are described.Chapter 2, Hardware Setup,describes how to set up your installation. Diagrams showing the necessary steps are provided.Chapter 3, Browser Login, describes how to log into the CN9000 /CN9600 / CN9950 with a browser, and explains the functions of the icons and buttons that appear on the opening page.Chapter 4, Configuration, explains the administrative procedures that are employed to configure the CN9000 / CN9600 / CN9950’s working environment.Chapter 5, Accessing Remote Server, describes how to access theCN9000 / CN9600 / CN9950 remotely.Chapter 6, The Windows Client Viewer, explains how to use the control panel of the CN9000 / CN9600 / CN9950.Chapter 7, Local Access, describes how to access the CN9000 / CN9600 / CN9950 locally.Chapter 8, The Log File, shows how to use the log file utility to view the events that take place on the CN9000 / CN9600 / CN9950.Chapter 9, The Log Server, explains how to install and configure the Log Server.Appendix, provides specifications and other technical information regarding the CN9000 / CN9600 / CN9950.xiCN9000 / CN9600 / CN9950 User ManualxiiConventionsThis manual uses the following conventions:Product InformationFor information about all ATEN products and how they can help you connect without limits, visit ATEN on the Web or contact an ATEN AuthorizedReseller. Visit ATEN on the Web for a list of locations and telephone numbers:MonospacedIndicates text that you should key in.[ ]Indicates keys you should press. For example, [Enter] means to press the Enter key. If keys need to be chorded, they appear together in the same bracket with a plus sign between them: [Ctrl+Alt].1.Numbered lists represent procedures with sequential steps.♦Bullet lists provide information, but do not involve sequential steps.>Indicates consecutive selections, such as options on a menu or dialog box. For example, Start > Run means to open the Start menu, and then select Run .Indicates critical information.International North America。
7500系列模块化数据中心交换机快速入门指南说明书

Chapter3 Rack Mounting the SwitchThe accessory kit provides components for installing the switch in two-post and four-post racks.•Section3.1provides instructions for mounting the switch in a two-post rack.•Section3.2provides instructions for mounting the switch in a four-post rack.The rack mounting procedure is identical for all modular switches.Illustrations in this chapter depict themounting of an unpopulated DCS-7508chassis.After completing the instructions for your rack type,proceed to Chapter4.3.1Two-Post Rack MountTo mount the switch to a two-post rack,assemble mounting brackets to the middle of the chassis,thenattach the brackets to the rack.The switch does not support a front or rear mount into a two-post rack.The accessory kit includes the following two-post mounting parts:•2center-mount brackets•20M4x8panhead Phillips screwsFigure B-2on page30displays the two-post mounting parts.3.1.1Attaching Mounting Brackets to the ChassisStep1Orient the switch chassis and the two center-mount brackets(Figure3-1on page10).Position the flanges that attach to the rack posts toward the rear of the chassis.Step2Attach both center-mount brackets to the chassis.Each bracket requires ten M4x8panhead Phillips screws.Chapter3:Rack Mounting the Switch Four-Post Rack MountChapter3:Rack Mounting the Switch Four-Post Rack MountChapter3:Rack Mounting the Switch Four-Post Rack Mount。
易普特B5交换机快速配置指南说明书
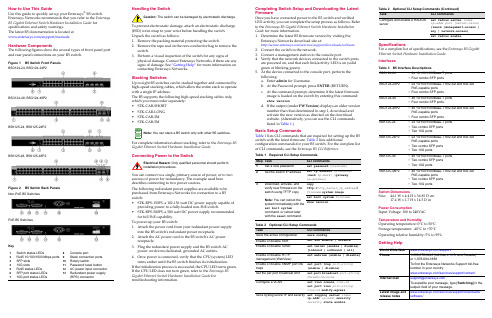
How to Use This GuideUse this guide to quickly set up your Enterasys ®B5 switch.Enterasys Networks recommends that you refer to the Enterasys B5 Gigabit Ethernet Switch Hardware Installation Guide for specifications and safety warnings.The latest B5 documentation is located at /support/manuals.Hardware ComponentsThe following figures show the several types of front panel port and rear panel connections on your B5 switch.Figure 1B5 Switch Front PanelsB5G124-24, B5G124-24P2B5G124-48, B5G124-48P2B5K125-24, B5K125-24P2B5K125-48, B5K125-48P2Figure 2 B5 Switch Back PanelsNon-PoE B5 SwitchesPoE B5 SwitchesKey1Switch status LEDs8Console port2RJ45 10/100/1000 Mbps ports 9Stack connection ports 3SFP slots 10Rotary switch410G slots11Password reset button 5RJ45 status LEDs 12AC power input connector 6SFP port status LEDs 13Redundant power supply 710G port status LEDs(RPS) connectorHandling the SwitchTo prevent electrostatic damage, attach an electrostatic discharge (ESD) wrist strap to your wrist before handling the switch.Unpack the switch as follows:1.Remove the packing material protecting the switch.2.Remove the tape seal on the non ‐conductive bag to remove theswitch.3.Perform a visual inspection of the switch for any signs ofphysical damage. Contact Enterasys Networks if there are any signs of damage. See “Getting Help” for more information on contacting Enterasys Networks.Stacking SwitchesUp to eight B5 switches can be stacked together and connected by high ‐speed stacking cables, which allow the entire stack to operate with a single IP address.The B5 supports the following high ‐speed stacking cables only, which you must order separately:•STK ‐CAB ‐SHORT •STK ‐CAB ‐LONG •STK ‐CAB ‐2M •STK ‐CAB ‐5MFor complete information about stacking, refer to the Enterasys B5 Gigabit Ethernet Switch Hardware Installation Guide.Connecting Power to the SwitchYou can connect to a single, primary source of power, or to two sources of power for redundancy. The example used here describes connecting to two power sources.The following redundant power supplies are available to be purchased from Enterasys Networks for connection to a B5 switch:•STK ‐RPS ‐150PS, a 102‐156 watt DC power supply capable ofproviding power to a fully ‐loaded non ‐PoE switch.•STK ‐RPS ‐500PS, a 500 watt DC power supply recommendedfor full PoE capability.To power ‐up your B5 switch:1.Attach the power cord from your redundant power supplyinto the B5 switch’s redundant power receptacle.2.Attach the AC power cord to the B5 switch’s AC powerreceptacle.3.Plug the redundant power supply and the B5 switch ACpower cords into dedicated, grounded AC outlets.4.Once power is connected, verify that the CPU (system) LEDturns amber until the B5 switch finishes its initialization.If the initialization process is successful, the CPU LED turns green. If the CPU LED does not turn green, refer to the Enterasys B5 Gigabit Ethernet Switch Hardware Installation Guide for troubleshooting information.Caution:The switch can be damaged by electrostatic discharge.You can stack a B5 switch only with other B5 switches.Only qualified personnel should perform Completing Switch Setup and Downloading the Latest FirmwareOnce you have connected power to the B5 switch and verified LED activity, you can complete the setup process as follows. Refer to the Enterasys B5 Gigabit Ethernet Switch Hardware Installation Guide for more information.1.Determine the latest B5 firmware version by visiting theEnterasys Networks download site at:/services/support/downloads/software2.Connect the switch to the network.3.Connect a management station to the console port.4.Verify that the network devices connected to the switch portsare powered on, and that each link/activity LED is on (solid green or blinking green).5.At the device connected to the console port, perform thefollowing:a.Enter admin for Username.b.At the Password prompt, press ENTER (RETURN).c.At the command prompt, determine if the latest firmwareimage is loaded on the switch by entering this command:show versiond.If the output (under FW Version ) displays an older versionnumber than that determined in step 1, download and activate the new version as directed on the download website. (Alternatively, you can use the CLI commands listed in Table 1.)Basic Setup CommandsTable 1 lists CLI commands that are required for setting up the B5 switch with the latest firmware. Table 2 lists additionalconfiguration commands for your B5 switch. For the complete list of CLI commands, see the Enterasys B5 CLI Reference .Table 1Required CLI Setup CommandsStep TaskCLI commands1Set a new password set password [username ]2Set the switch IP addressset ip address ip-address [mask ip-mask ] [gateway ip-gateway ]3Download, activate, and verify new firmware on the switch using TFTP copyNote: You can reboot the system immediately with the set boot systemcommand, or reboot later with the reset command.copytftp://tftp_server_ip_address /filename system:image set boot system filenameshow version Table 2Optional CLI Setup CommandsTaskCLI commands Save the active configuration save configEnable or disable SSH set ssh enable | disable Enable or disable Telnet set telnet {enable | disable} [inbound | outbound | all]Enable or disable HTTP management (WebView)set webview {enable | disable}Enable or disable SNMP port link trapsset port trap port-string{enable | disable}Set the per port broadcast limit set port broadcast port-string threshold-valueConfigure a VLANset vlan create vlan-id set port vlan port-string vlan-id modify-egress Set a Syslog server IP and severity set logging server indexip-addr ip-addr severity severity state enableSpecificationsFor a complete list of specifications, see the Enterasys B5 Gigabit Ethernet Switch Hardware Installation Guide . InterfacesSwitch DimensionsSize:44.1 W x 4.4 H x 36.85 D cm 17.4 W x 1.7 H x 14.5 D inPower ConsumptionInput Voltage: 100 to 240VACTemperature and HumidityOperating temperature: 0°C to 50°C Storage temperature: ‐40°C to +70°C Operating relative humidity: 5% to 95%Getting HelpConfigure and enable a RADIUS serverset radius server index ip-addr port [secret-value ]{realm {management-access | any | network-access} set radius enableTable 3B5 Interface DescriptionsB5G124-24•24 10/100/1000Base-T ports •Four combo SFP portsB5G124-24P2•24 10/100/1000Base-T 802.3af and 802.3at PoE-capable ports •Four combo SFP portsB5G124-48•48 10/100/1000Base-T ports •Four combo SFP portsB5G124-48P2•48 10/100/1000Base-T 802.3af and 802.3at PoE-capable ports •Four combo SFP portsB5K125-24•24 10/100/1000Base-T ports •Two combo SFP ports •Two 10G portsB5K125-24P2•24 10/100/1000Base-T 802.3af and 802.3at PoE-capable ports •Two combo SFP ports •Two 10G portsB5K125-48•48 10/100/1000Base-T ports •Two combo SFP ports •Two 10G portsB5K125-48P2•48 10/100/1000Base-T 802.3af and 802.3at PoE-capable ports •Two combo SFP ports •Two 10G portsWorld Wide Web /support/Phone1-800-872-8440 (toll-free in U.S. and Canada) or 1-978-684-1888To find the Enterasys Networks Support toll-free number in your country:/services/support/contact/Internet mail*********************To expedite your message, type [Switching ] in the subject field of your message.Latest image and release notes/services/support/downloads/software/Table 2Optional CLI Setup Commands (Continued)TaskCLI commandsRelated DocumentsThe latest B5 documentation is located online at: /support/manualsWarrantyWarranty information for the B5 switch is located online at:/support/warranty.aspx/company/literature/enterasys ‐lw ‐ds.pdfNoticeEnterasys Networks reserves the right to make changes in specifications and other information contained in this document and its web site without prior notice. The reader should in all cases consult Enterasys Networks to determine whether any such changes have been made.The hardware, firmware, or software described in this document is subject to change without notice.IN NO EVENT SHALL ENTERASYS NETWORKS BE LIABLE FOR ANY INCIDENTAL,INDIRECT, SPECIAL, OR CONSEQUENTIAL DAMAGES WHATSOEVER (INCLUDING BUT NOT LIMITED TO LOST PROFITS) ARISING OUT OF OR RELATED TO THIS DOCUMENT, WEB SITE, OR THE INFORMATION CONTAINED IN THEM, EVEN IF ENTERASYS NETWORKS HAS BEEN ADVISED OF, KNEW OF, OR SHOULD HAVE KNOWN OF, THE POSSIBILITY OF SUCH DAMAGES.Enterasys Networks,Inc.50 Minuteman Road Andover, MA 01810© 2010 Enterasys Networks,Inc. All rights reserved.Part Number:9034512‐02December 2010ENTERASYS, ENTERASYS NETWORKS, ENTERASYS SECURE NETWORKS, NETSIGHT, ENTERASYS NETSIGHT, and any logos associated therewith, are trademarks or registeredtrademarks of Enterasys Networks, Inc., in the United States and/or other countries. For a complete list of Enterasys trademarks, see /company/trademarks.aspx .All other product names mentioned in this manual may be trademarks or registered trademarks of their respective companies.Regulatory Compliance InformationFederal Communications Commission (FCC) NoticeThis device complies with Part 15 of the FCC rules. Operation is subject to the following twoconditions: (1) this device may not cause harmful interference, and (2) this device must accept any interference received, including interference that may cause undesired operation.NOTE:This equipment has been tested and found to comply with the limits for a class A digital device, pursuant to Part 15 of the FCC rules. These limits are designed to provide reasonable protection against harmful interference when the equipment is operated in a commercialenvironment. This equipment uses, generates, and can radiate radio frequency energy and if not installed in accordance with the operator’s manual, may cause harmful interference to radiocommunications. Operation of this equipment in a residential area is likely to cause interference in which case the user will be required to correct the interference at his own expense.WARNING:Changes or modifications made to this device which are not expressly approved by the party responsible for compliance could void the user’s authority to operate the equipment.Industry Canada NoticeThis digital apparatus does not exceed the class A limits for radio noise emissions from digital apparatus set out in the Radio Interference Regulations of the Canadian Department of Communications.Le présent appareil numérique n’émet pas de bruits radioélectriques dépassant les limitesapplicables aux appareils numériques de la class A prescrites dans le Règlement sur le brouillage radioélectrique édicté par le ministère des Communications du Canada.Class A ITE NoticeWARNING:This is a Class A product. In a domestic environment this product may cause radio interference in which case the user may be required to take adequate measures.Clase A. Aviso de ITEADVERTENCIA: Este es un producto de Clase A. En un ambiente doméstico este producto puede causar interferencia de radio en cuyo caso puede ser requerido tomar medidas adecuadas.Klasse A ITE AnmerkungWARNHINWEIS: Dieses Produkt zählt zur Klasse A ( Industriebereich ). In Wohnbereichen kann es hierdurch zu Funkstörungen kommen, daher sollten angemessene Vorkehrungen zum Schutz getroffen werden.VCCI NoticeThis is a class A product based on the standard of the Voluntary Control Council for Interference by Information Technology Equipment (VCCI). If this equipment is used in a domestic environment, radio disturbance may arise. When such trouble occurs, the user may be required to take corrective actions.BSMI EMC Statement — TaiwanThis isa class A product. In a domestic environment this product may cause radio interference in which case the user may be required to take adequate measures.AS/NZS CISPR 22Hazardous SubstancesThis product complies with the requirements of European Directive, 2002/95/EC, Restriction of Hazardous Substances (RoHS) in Electrical and Electronic Equipment.European Waste Electrical and Electronic Equipment (WEEE) NoticeIn accordance with Directive 2002/96/EC of the European Parliament on waste electrical and electronic equipment (WEEE):1.The symbol above indicates that separate collection of electrical and electronic equipment isrequired and that this product was placed on the European market after August 13, 2005, the date of enforcement for Directive 2002/96/EC.2.When this product hasreached the end of its serviceable life, it cannot be disposed of as unsortedmunicipal waste. It must be collected and treated separately.3.It has been determined by the European Parliament that there are potential negative effects onthe environment and human health as a result of the presence of hazardous substances in electrical and electronic equipment.4.It is the users’ responsibility to utilize the available collection system to ensure WEEE is properlytreated.For information about the available collection system, please go to/services/support/or contact Enterasys Customer Support at 353 61 705586 (Ireland).Safety InformationClass 1 Laser TransceiversThe single mode interface modules use Class 1 laser transceivers. Read the following safety information before installing or operating these modules.The Class 1 laser transceivers use an optical feedback loop to maintain Class 1 operation limits. This control loop eliminates the need for maintenance checks or adjustments. The output is factory set, and does not allow any user adjustment. Class 1 Laser transceivers comply with the following safety standards:•21 CFR 1040.10 and 1040.11 U.S. Department of Health and Human Services (FDA).•IEC Publication 825 (International Electrotechnical Commission).•CENELEC EN 60825 (European Committee for Electrotechnical Standardization).When operating within their performance limitations, laser transceiver output meets the Class 1 accessible emission limit of all three standards. Class 1 levels of laser radiation are not considered hazardous.When the connector is in place, all laser radiation remains within the fiber. The maximum amount of radiant power exiting the fiber (under normal conditions) is ‐12.6 dBm or 55 x 10‐6 watts.Removing the optical connector from the transceiver allows laser radiation to emit directly from the optical port. The maximum radiance from the optical port (under worst case conditions) is 0.8 W cm ‐2 or 8 x 10³ W m 2 sr ‐1.Do not use optical instruments to view the laser output. The use of optical instruments to view laser output increases eye hazard. When viewing the output optical port, power must be removed from the network adapter.Safety ComplianceWarning: Fiber Optic Port SafetyWhen using a fiber optic media expansion module, never look at the transmit laser while it is powered on. Also, never look directly at the fiber TX port and fiber cable ends when they are poweredon.Avertissment: Ports pour fibres optiques - sécurité sur le plan optiqueNe regardez jamais le laser tant qu’il est sous tension. Ne regardezjamais directement le port TX (Transmission) à fibres optiques et les emboutsde câbles à fibres optiques tant qu ʹils sont sous tension.Warnhinweis: Faseroptikanschlüsse - Optische SicherheitNiemals ein Übertragungslaser betrachten, während dieseseingeschaltet ist. Niemals direkt auf den Faser ‐TX ‐Anschluß und auf die Faserkabelenden schauen, während diese eingeschaltet sind.Declaration of ConformityApplication of Council Directive(s):2004/108/EC2006/95/ECManufacturer’s Name:Enterasys Networks,Inc.Manufacturer’s Address:50 Minuteman RoadAndover, MA 01810USAEuropean Representative Address:Enterasys Networks Ltd.Nexus House, Newbury Business ParkLondon Road, NewburyBerkshire RG14 2PZ, EnglandConformance toDirective(s)/Product Standards:EC Directive 2004/108/ECEN 55022:2006EN 55024:1998EN 61000‐3‐2:2006EN 61000‐3‐3:1995EC Directive 2006/95/EC EN 60950‐1:2006EN 60825‐1:2007EN 60825‐2:2004Equipment Type/Environment:Information Technology Equipment,for use in a Commercialor Light Industrial Environment.Enterasys Networks,Inc. declares that the equipment packaged with this notice conforms to the above directives.Enterasys ®B5Gigabit Ethernet SwitchQuick ReferenceB5G124-24, B5G124-24P2B5G124-48, B5G124-48P2B5K125-24, B5K125-24P2B5K125-48, B5K125-48P2P/N 9034512-02。
昆仑网络产品LNP-0500系列5-port工业级PoE+无管理以太网交换机说明书

LNP-0500 series5-port Industrial PoE+ Unmanaged Ethernet Switches 4*10/100Tx (30W/Port) + 1*10/100TxUser ManualFCC WarningThis Equipment has been tested and found to comply with the limits for a Class-A digital device, pursuant to Part 15 of the FCC rules. These limits are designed to provide reasonable protection against harmful interference in a residential installation. This equipment generates, uses, and can radiate radio frequency energy. It may cause harmful interference to radio communications if the equipment is not installed and used in accordance with the instructions. However, there is no guarantee that interference will not occur in a particular installation. If this equipment does cause harmful interference to radio or television reception, which can be determined by turning the equipment off and on, the user is encouraged to try to correct the interference by one or more of the following measures:⏹Reorient or relocate the receiving antenna.⏹Increase the separation between the equipment and receiver.⏹Connect the equipment into an outlet on a circuit different from that towhich the receiver is connected.⏹Consult the dealer or an experienced radio/TV technician for help. CE Mark WarningThis is a Class-A product. In a domestic environment this product may cause radio interference in which case the user may be required to take adequate measures.ContentIntroduction (1)Features (1)Package Contents (2)Hardware Description (3)Physical Dimension (3)Front Panel (4)Top View (4)LED Indicators (5)Ports (6)Cabling (7)Wiring the Power Inputs (8)Wiring the Fault Alarm Contact (9)Mounting Installation (10)DIN-Rail Mounting (10)Wall Mounting (12)Hardware Installation (13)Installation Steps (13)Network Application (14)Troubleshooting (15)Technical Specification (16)IntroductionAntaira’s LNP-0500 series switches are smart 5-port Industrial Unmanaged Ethernet Switches supporting IEEE-802.3at compliant (Power-over-Ethernet Plus) on ports 1 to 4.The switches are classified as power source equipment (PSE), and when used in this way, the LNP-0500 series switches enable centralization of the power supply andprovide up to 30 watts of power per port. The switches can be used to power IEEE802.3af or 802.3at compliant power devices (PD), eliminating the need for additional wiring, and support IEEE 802.3/802.3u/802.3x with 10/100BTx, full or half duplex,MDI/MDI-X auto sensing to provide an economical solution for the Industrial Ethernet Network.In addition, the Network Broadcast Storm Protection and built-in relay warning function alerts network engineers when power failures or port breaks occur.Features⏹System Interface/PerformanceRJ-45 ports support Auto MDI/MDI-X FunctionEmbedded 4-port 10/100Tx w/PoE+ and 1-port 10/100Tx Fast EthernetStore-and-Forward Switching ArchitectureBroadcast Storm Protection2K MAC Address TablePort Break Alarm Mask⏹Power SupplyDC 48 ~ 55V Redundant Power⏹Operating TemperatureStandard Operating Temperature model: -10°C ~ 70°CExtend Operating Temperature model with -T: -40°C ~ 75°C⏹Case/InstallationIP-30 ProtectionInstallation in Pollution Degree 2 EnvironmentDIN Rail and Wall Mount Design⏹Provides EFT protection 2,000 VDC for power line⏹Supports 6,000 VDC Ethernet ESD protection1Package ContentsPlease refer to the package contents list below.⏹LNP-0500 series - 5-Port Industrial PoE+ Unmanaged Ethernet Switch w/DIN RailBracket⏹User Manual⏹Removable Terminal Block⏹Wall-mount Kit (2 Wall-mount Plates with Screws)Compare the contents of the industrial switch with the checklist above. If any item is damaged or missing, please contact Antaira or Antaira’s authorized channel partners for service.2Hardware DescriptionThe Industrial switch’s hardware spec, port, cabling information, and wiring installation will be described.Physical DimensionThe LNP-0500 series - 5-Port Industrial PoE+ Unmanaged Ethernet Switch dimension: (W x D x H) is 30mm x 99mm x 142mm3Front PanelThe Front Panel of the PoE Industrial Switch is shown below:Front Panel of the PoE Industrial SwitchTop ViewThe top view of the PoE Industrial Switch has one terminal block connector of two DC power inputs and relay circuit contact.Top View of the PoE Industrial Switch4LED IndicatorsThe diagnostic LEDs located on the front panel of the industrial switch provide real-time information of the system and optional status. The following table provides the description of the LED status.LED Color DescriptionP1 Green On Power input 1 is active Off Power input 1 is inactiveP2 Green On Power input 2 is active Off Power input 2 is inactiveFault Red On Power input 1 or 2 has failed, port link is inactiveOffPower input 1 and 2 are both functional, or no powerinputs/port’s link is active/port alarm is disabledPoE Indicator (Port 1 ~ 4) GreenOn The port is supplying power to the powered-deviceOff No powered-device attached or power supplying failsLAN Port 1 ~ 5 (RJ-45) Green On Connected to network, 100Mbps Flashing Networking is activeOff Not connected to network Green On Connected to network, 10Mbps Flashing Networking is activeOff Not connected to network5Ports⏹RJ-45 portsThe (RJ-45) Fast Ethernet ports will auto-sense for 10Base-T or 100Base-TX connections. Auto MDI/MDIX means that the switch can connect to another switch or workstation without changing straight through or crossover cabling. Please refer to the table below for RJ-45 pin assignment.⏹RJ-45 Pin AssignmentsPin Number Assignment1 Rx+2 Rx-3 Tx+6 Tx-Note “+” and “-” signs represent the polarity of the wires that make up each wire pair.All ports on this industrial switch supports automatic MDI/MDI-X operation, users can use straight-through cables (See figure below) for all network connections to PCs or servers, or to other switches or hubs. With straight-through cable, pins 1, 2, 3, and 6, at one end of the cable, are connected straight through to pins 1, 2, 3 and 6 at the other end of the cable. The table below shows the 10BASE-T/100BASE-TX MDI and MDI-X port pin outs.Pin MDI-X Signal Name MDI Signal Name1 Receive Data plus (RD+) Transmit Data plus (TD+)2 Receive Data minus (RD-) Transmit Data minus (TD-)3 Transmit Data plus (TD+) Receive Data plus (RD+)6 Transmit Data minus (TD-) Receive Data minus (RD-)6The following figures show the cable schematic for both straight-through type andcrossover type.Straight Through Cable SchematicCross Over Cable SchematicCablingTwisted-pair segments can be connected with an unshielded twisted pair (UTP) or shielded twisted pair (STP) cable. The cable must comply with the IEEE 802.3u 100Base TX standard (e.g. Category 5, 5e, or 6). The cable between the equipment and the link partner (switch, hub, workstation, etc.) must be less than 100 meters (328 ft.) long.7Wiring the Power InputsPlease follow the steps below to insert the power wire.Insert the positive and negative wires into the PWR1 (V1+, V1-) and PWR2 (V2+,V2-) contacts on the terminal block connector.Tighten the wire-clamp screws to prevent the wires from loosening.Note Use Copper Conductors Only, 60/75°C, Tighten to 5 lb inThe wire gauge for the terminal block should range between 12 ~ 18 AWG.8Wiring the Fault Alarm ContactThe fault alarm contact is in the middle of the terminal block connector as the picture shows below. By inserting the wires, it will detect the fault status including power failure or port link failure (managed industrial switch only) and form a normally open circuit. An application example for the fault alarm contact is shown as below:Note Use Copper Conductors Only, 60/75°C, Tighten to 5 lb inThe wire gauge for the terminal block should range between 12 ~ 24AWG.9Mounting InstallationDIN-Rail MountingThe DIN-Rail is screwed on the industrial switch from the factory. If the DIN-Rail is not screwed on the industrial switch, please see the following pictures to screw the DIN-Rail on the switch. Follow the steps below to hang the industrial switch.1. Use the screws to screw the DIN-Rail bracket on the rear side of the industrialswitch.2. To remove the DIN-Rail bracket, reverse the step 1.3. After the DIN-Rail bracket is screwed on the rear side of the switch, insert the top of10DIN-Rail on to the track.4. Then, lightly pull down the bracket on to the rail.5. Check if the bracket is mounted tight on the rail.6. To remove the industrial switch from the rail, reverse steps above.11Wall MountingFollow the steps below to mount the industrial switch using the wall mount bracket.1. Remove the DIN-Rail bracket from the industrial switch; loosen the screws to removethe DIN-Rail.2. Place the wall mount bracket on the top and bottom of the industrial switch.3. Use the screws to screw the wall mount bracket on the industrial switch.4. Use the hook holes at the corners of the wall mount bracket to hang the industrialswitch on the wall.5. To remove the wall mount bracket, reverse steps above.Below is the dimension of the wall mount bracket.12Hardware InstallationThis section is to explain how to install the LNP-0500 series Industrial PoE+ Unmanaged Ethernet Switch.Installation Steps1. Unpack the Industrial switch packing.2. Check if the DIN-Rail bracket is screwed on the Industrial switch. If the DIN-Rail isnot screwed on the Industrial switch, please refer to the DIN-Rail Mounting section for DIN-Rail installation. If users want to wall mount the Industrial switch, then please refer to the Wall Mounting section for wall mount installation.3. To hang the Industrial switch on a DIN-Rail or wall, please refer to the MountingInstallation section.4. Power on the Industrial switch. Please refer to the Wiring the Power Inputs sectionfor information about how to wire power. The power LED on the Industrial switch will turn on. Please refer to the LED Indicators section for indication of LED lights.5. Prepare the twisted-pair, straight through Category 5/above cable for Ethernetconnection.6. Insert one side of the RJ-45 cable into the Industrial switch Ethernet port and on theother side to the network device’s Ethernet port, e.g. Switch PC or Server. The Ethernet port (RJ-45) LED on the Industrial switch will turn on when the cable is connected to the network device. Please refer to the LED Indicators section for LED light indication.7. When all connections are set and the LED lights all show normal, the installation iscomplete.13Network ApplicationThis segment provides an example of an industrial switch application.14Troubleshooting⏹Verify the right power cord/adapter, never use power supply/adapter with non-compliant DC output voltage, or it will burn the equipment.⏹Select the proper UTP/STP cable to construct the network with using the right cable.Use unshielded twisted-pair (UTP) or shield twisted-pair (STP) cable for RJ-45 connections: 100ΩCategory 5e/above cable for 10M/100Mbps. Also be sure that the length of any twisted-pair connection does not exceed 100 meters (328 feet).⏹Diagnosing LED Indicators: To assist in identifying problems, the Switch can beeasily monitored through LED indicators, which describe common problems a user may encounter and where the user can find possible solutions.⏹If the power indicator LED does not turn on when the power cord is plugged in, theuser may have a problem with the power cord. Check for loose power connections, power losses or surges at the power outlet. Please contact Antaira or Antaira’s authorized channel partners for technical support service, if the problem still cannot be resolved.⏹If the Industrial switch LED indicators are normal and the connected cables arecorrect but the packets still cannot transmit. Please check the system’s Ethernet devices’ configuration or status.15Technical SpecificationThe LNP-0500 series - 5-Port Industrial PoE+ Unmanaged Ethernet Switch technical specifications is shown below.Standard IEEE 802.3 10Base-T EthernetIEEE 802.3u 100Base-TX Fast Ethernet IEEE802.3x Flow Control and Back Pressure IEEE802.3at Power over EthernetProtocol CSMA/CDTransfer Rate 14,880 pps for 10Base-T Ethernet port148,800 pps for 100Base-TX Fast Ethernet portMAC Address 2K Table sizeRJ45 Port 4*10/100BaseT(X) auto negotiation speed, Full/Halfduplex mode, and auto MDI/MDI-X connectionPoE Pin Assignment RJ-45 port #1 ~ # 4 support IEEE 802.3at End-point, Alternative A mode.Positive (VCC+): RJ-45 pin 1, 2.Negative (VCC-): RJ-45 pin 3, 6.Data (1,2,3,6 )LED Per unit: Power 1 (Green), Power 2 (Green), Fault (Red) Per port: Link/Activity (Green)PoE: Feeding Power (Green)Network Cable 10Base-T: 2-pair UTP/STP Cat. 3, 4, 5, 5e cable EIA/TIA-568 100-ohm (100m)100Base-TX: 2-pair UTP/STP Cat. 5/5e, 6 cableEIA/TIA-568 100-ohm (100m)Over CurrentProtectionSingle-Blown FusePower Input Redundant Power DC 48 ~ 55V with Connective 1*6-Pin Removable Terminal Block16Max Power Consumption 110 Watts @ 48V, 130 Watts @ 51-55V Full Load with PoE FunctionInstallation DIN Rail Mounting, Wall MountingOperating Temp. Standard Operating Temperature: -10o C to 70o C Wide Temperature model: -40o C to 75o COperatingHumidity5% to 95% (Non-Condensing)StorageTemperature-40o C to 85o CCase Dimension IP-30, 30mm (W) x 99mm (D) x 142mm (H)EMI FCC Class ACE EN61000-4-2/3/4/5/6/8 CE EN61000-6-2CE EN61000-6-4Safety UL 508, UL Class 1 Division 2, ISA 12.12.01Stability testing IEC60068-2-32 (Free fall) IEC60068-2-27 (Shock) IEC60068-2-6 (Vibration)17。
上海贝尔LTE日常维护操作手册(用户版)1202

上海贝尔LTE基站日常维护操作手册2015年12月2日目录日常维护操作手册,便于现场维护人员快速处理相关故障。
涉及如下内容:1. 产品介绍2. 安装维护(温度、接地检查及电压范围)3. 基站侧故障维护(天馈类、光路类、脱管和GPS故障)4. 硬件更换流程(C板、B板、RRH和RUC模块)一、产品介绍1.1 9926 BBU v1(legacy BBU)产品特点:支持F/D/E 频段可以插入任何19英寸机架中,BBU 设备高度2U -48V 直流供电控制板,基带板可插拔 仅有2种模块,便于维护1 块控制板 eCCM; eCCM 控制板上有9个CPRI 光接口,通过光纤与RRU 相连。
通过Ge 接口与核心网连接。
3 块基带板,可灵活配置 (bCEM) 支持灵活工作带宽 (5-20Mhz ) 物理特性:重量 < 13kg尺寸 W482.6 x H88.9 x D275 mm 回传接口⏹ 标配:1个光口或1个电口⏹ 最大:2个光口或1个电口+1个光口 Ir 接口:9X9.8Gbps功耗:满配典型功耗:约250W(2A) /370W (8A)单板介绍eCCM-2 HR :BBU 的控制&接口板。
bCEM :基带处理板。
1.2 9926 BBU v2 (SOC BBU)产品特点:支持F/D/E频段可以插入任何19英寸机架中,BBU设备高度2U-48V直流供电4个插槽,仅有2种模块,可插拔,便于维护每块bCAM2或bCEM2控制板上有6x10G Ir 接口1 -2块控制板bCAM2; 1- 3 块基带板bCEM2,可灵活配置支持灵活工作带宽(5-20Mhz)物理特性:重量< 11kg尺寸W482.6 x H88.1 x D300 mm回传接口⏹标配:1个光口、1个电口⏹最大:2个光口、2电口Ir 接口:24x10Gbps功耗:典型功耗:250W(8A);120W(2A)单板bCAM2单板BCEM21.3 RRH 介绍B39a RRH8x10产品特点:支持F 频段 (1880-1915MHz) 支持2载波, 20+10MHz 无线接收器组成部分 发射功率:80W电源接口校准线接口直流(-48V)供电外接DC/AC转换盒支持AC供电支持灵活工作带宽(5-20Mhz)物理特性:重量:< 21kg;体积24L尺寸:400mm x 540mm x 110mmIr 接口:2 x 9.8Gbps温度:-40℃to +55℃典型功耗:203WTD-RRH2x50-2350产品特点:支持E频段;(2320-2370MHz)支持3载波:2*20MHz+10MHz发射功率:100W直流(-48V)供电交流(220V)供电支持灵活工作带宽(5-20Mhz )物理特性:重量:< 14kg;体积17L尺寸:300mm x 480mm x 120mmIr 接口:2 X 9.8Gbps温度:-40℃to +55℃典型功耗:250W9768 LR MRO 2X5W TD-LTE产品特点:基于lightRadioTM cube,集成RRH与天线频段:TDD 2575-2615MHz2Tx/2Rx, 2x2 MIMOCPRI光纤直联,支持Daisy Chain连接分布式组网架构,与BBU或BBU Pool连接 容量易扩展,用户数取决于BBU物理特性:功率2x5W,功耗满载80W两种定向波束配置:70°x70°或35°(垂直)x70° (水平)机械Tilt +/-30°尺寸:175x500x145mm <11.7L重量:< 9kg电源:AC/DC200000小时MTBF二、安装维护2.1 工作电压范围主设备BBU、RRH工作电压范围,见下表。
- 1、下载文档前请自行甄别文档内容的完整性,平台不提供额外的编辑、内容补充、找答案等附加服务。
- 2、"仅部分预览"的文档,不可在线预览部分如存在完整性等问题,可反馈申请退款(可完整预览的文档不适用该条件!)。
- 3、如文档侵犯您的权益,请联系客服反馈,我们会尽快为您处理(人工客服工作时间:9:00-18:30)。
主题
1. Nortel网络模块基本配置 Nortel网络模块基本配置 2. Telnet方式配置VLAN Telnet方式配置 方式配置VLAN 3. BBI方式配置VLAN BBI方式配置 方式配置VLAN
2
POWER Blade Work Shop
2007.03
© 2006 IBM Corporation
2.
• • • •
操作配置
执行了“apply但尚未执行“save”时的活动配置项 要查看与保存的配置的差异,请使用“diff flash” 要撤销更改,请使用” revert apply” 如果对交换机进行重新设置,所作的更改就会丢失
3.
• • • •
保存的配置
执行“save” 后保存在闪存中的配置项 更改保存在活动的配置块中 通过使用/boot/conf backup切换到备份配置块并使用/boot/reset重新设置交换机可撤销更改 如果对交换机进行重新设置,所作的更改就会丢失
2007.03
© 2006 IBM Corporation
IBM BladeCenter JS21
将int9和int10端口的pvid 号改为2
13
POWER Blade Work Shop
2007.03
© 2006 IBM Corporation
IBM BladeCenter JS21
可用/info/l2/vlan /info/l2/vlan查看vlan信息 在未apply apply之前所做 的所有配置是不会生 效的
IBM BladeCenter JS21
当前的微码版本为 1.2.4.1; 1.2.4.1 管理IP地址 为:192.168.28.127 192.168.28.127
主菜单
全局命令
5
POWER Blade Work Shop
2007.03
© 2006 IBM Corporation
IBM BladeCenter JS21
更改系统日期与时间
9
POWER Blade Work Shop
2007.03
© 2006 IBM Corporation
IBM BladeCenter JS21
更改operator密码
10
POWER Blade Work Shop
2007.03
© 2006 IBM Corporation
IBM BladeCenter JS21
IBM BladeCenter JS21
查看交换机IP地址
可通过点击System System Status查看交换机IP,也 Status 可通过I/O Module Tasks I/O 下的Configuration Configuration下查看
3
POWER Blade Work Shop
只有在配置模式才 进行交换的配置
18
POWER Blade Work Shop
2007.03
© 2006 IBM Corporation
IBM BladeCenter JS21
配置VLAN
点击Layer 2 Layer 2下的Virtual LANs Virtual 查看和管理已有VLAN,点击 Add VLAN VLAN增加新的VLAN
Telnet方式配置VLAN Telnet VLAN
11
POWER Blade Work Shop
2007.03
© 2006 IBM Corporation
IBM BladeCenter JS21
将int9和int10端口加入vlan 2,将 激活vlan 2
12
POWER Blade Work Shop
CLI与Unix命令相似
– – – – – – – 使用箭头键进行命令行编辑 “..”向上移动一个菜单级别,”/”移动到根菜单 通过输入路径(即/cfg/l2/vlan 1)可直接到达各个菜单 菜单项可以是缩写(即/c/l2/v 1) 使用“exit”注销 有些全局命令在所有菜单上都存在(例如: diff, apply, save, help ) 参数可在命令行中输入,如果不输入则会出现提示 oper, 与操作用户相关的命令 boot,控制交换机启动 maint,维护命令
对端口进行增加 与删除
20
POWER Blade Work Shop
2007.03
© 2006 IBM Corporation
IBM BladeCenter JS21
21
POWER Blade Work Shop
2007.03
© 2006 IBM Corporation
POWER Blade Work Shop
Nortel交 Nortel交换模块用户指南
叶荣耀 IBM Technology Product Company
Linux on POWER & POWER Blade Support
2007.03
© 2006 IBM Corporation
IBM BladeCenter JS21
VLAN 4095 4095是管理 VLAN,请不要对 其进行任何更改。 默认所有的端口都 在VLAN 1 VLAN
19
POWER Blade Work Shop
2007.03
© 2006 IBM Corporation
IBM BladeCenter JS21
更改已有VLAN
更改VLAN的名称、 ID、状态、生成 树组
命令行界面基础知识
交换机默认设置
– 默认管理员密码为”admin” – 默认IP地址是网络掩码为255.255.255.0的如下地址:
Bay 1 – 192.168.70.127 Bay 2 – 192.168.70.128
Bay 3 – 192.168.70.129 Bay 4 – 192.168.70.130
菜单按任务进行组织
Cfg,配置命令 Info,交换状态命令 Stats,历史数据
记得要应用所有更改,输入“apply” 如果要在下次重启时依然生效,输入”save”
6
POWER Blade Work Shop
2007.03
© 2006 IBM Corporation
IBM BladeCenter JS21
交换机配置基础知识
存在三种配置状态: 1. 当前配置
• • • • • 已经做出的“cfg”更改,但尚未执行“apply” 要查看与操作配置的差异,请使用“diff” 将其看作“可擦写板”,因为未执行“apply”前这些更改不会影响活动部分 要撤销更改,请使用” revert” 如果对交换机进行重新设置,所作的更改就会丢失
Tip:可用diff diff命令查看之 前修改而未应用的配置
14
POWER Blade Work Shop
2007.03
© 2006 IBM Corporation
IBM BladeCenter JS21
BBI方式配置VLAN
15
POWER Blade Work Shop
2007.03
© 20067.03
© 2006 IBM Corporation
IBM BladeCenter JS21
登录交换模块
使用Windows命令行或 Putty等工具以Telnet方 式登录管理模块 默认密码为admin admin
4
POWER Blade Work Shop
2007.03
© 2006 IBM Corporation
7
POWER Blade Work Shop
2007.03
© 2006 IBM Corporation
IBM BladeCenter JS21
更改登录欢迎标语
8
POWER Blade Work Shop
2007.03
© 2006 IBM Corporation
IBM BladeCenter JS21
IBM BladeCenter JS21
高级配置界面
恢复出厂设置
测试连接性
分别打开Telnet或Web管理界面
17
POWER Blade Work Shop
2007.03
© 2006 IBM Corporation
IBM BladeCenter JS21
BBI管理主界面
Nortel BBI管理有三种模式,分别 为CONFIGURE CONFIGURE配置模式, STATISTICS统计模式和 STATISTICS DASHBOARD仪表模式 DASHBOARD
IBM BladeCenter JS21
进行高级配置页面 点击I/O Module Tasks I/O Tasks下的 Configuration,再点击Nortel交换 Configuration 模块所在的槽位
16 POWER Blade Work Shop 2007.03 © 2006 IBM Corporation