view-source chrome newtab.htm
BD Spectrum Viewer 使用手册和常见问题解答说明书

BD® Spectrum Viewer User Guide and FAQsThe BD® Spectrum Viewer is an interactive, online tool to support flow cytometry fluorochrome comparison and selection. The tool enables you to:•Analyze and compare excitation (Ex) and emission (Em) spectra of a broadlibrary of dyes•Detect spillover and optimize fluorochrome selection for your instrument configuration/filters setup•Toggle between Combined Ex/Em Graph view or Stacked Ex/Em Graphs view for easier visibility between spectra•Visualize and analyze emission profiles on any standard flow cytometer or usethe BD FACSymphony™ A5 SE Spectral Cell Analyzer and access similarity and complexity indexes•Visualize peak intensities of spectral signatures in a unique heatmap, which is especially helpful when looking at large fluorochrome combinations•Save, export and/or share your panelUser GuideStandard configuration pathwayInstrument selection•Select from a list of preconfigured BD instruments using the drop-down list available in the Instrument Configuration tab under the graph.•Alternatively, build a unique configuration by clicking the blue Add Laser(s) & Filters(s) button.•Save unique instrument configurations by clicking the Save Configuration button. You must be signed into yourBD Biosciences account.TIP: You can start with a standard configuration as a template, then adjust/add/delete detectors, lasers and filters in the table. Use the Clear button to reset.TIP: Fluorochromes can be visualized without choosing an instrument configuration or by a specific laser through the Add Laser(s) & Filters(s) button from the Instrument Configuration tab. To start adding fluorochromes, see the Fluorochrome selection section below.Fluorochrome selection•Fluorochromes can be added by name, laser, range of excitation or range of emission. Select multiple fluorochromes from one set of search results, or add additional fluorochromes by continuing to search and clicking Add.•After a fluorochrome is selected, corresponding emission and excitation curves will be displayed. Deselect Ex or Em in the fluorochrome list to modify the view. Hover over an excitation or emission curve to highlight the individual spectrum.•Save fluorochrome combinations by clicking the Save Combination button. You must be signed into yourBD Biosciences account.•Check back often as new fluorochromes will be added periodically.Visualization and manipulation•Visualize fluorochromes in a single-laser stack by selecting Stacked Ex/Em Graphs in the drop-down menu above the graph. Default setting is normalized by laser.•Use the scrollbar on the right to view any additional laser lines. Toggle back to Combined Ex/Em Graph using the samedrop-down menu.•To zoom in to a particular area on the graph, use your cursor (+) to click and drag over the area of interest. Click Reset Zoom above the graph to return to the default view.•Additional selections can be made under Graph Display Options in the hamburger menu ().–Enable Mouseover Details–Show Background Grid–Normalize Emission to Laser Excitation–Show Fluorochrome Labels (hiding labels allows labels to be shown on hover)–Resolve Filter Overlap•Hover your cursor over an emission profile to see fluorochrome label information.TIP: You can export an image of the graph(s) by clicking on the hamburger menu (), expanding the Export and Import section and clicking Export next to Graph. To learn more about our export and import features, see the Save and share section below. Save and share•Save and share spectral graph images, fluorochrome combinations and customized instrument configurations.–Without logging in, you can export and import fluorochrome lists and customized instrument configurations as .csv files. These can be saved or shared locally and imported later using the Import option. Spectral graph images can be downloaded as a variety of file types that can be saved locally.–If you are logged in to your BD Biosciences account, you can save fluorochrome lists and instrument configurations as user-specific files within your account. These can be loaded from the Export and Import section of the hamburger menu ().Spectral configuration pathwayInstrument selection•For spectral flow cytometry experiments using the BD FACSymphony™ A5 SE Flow Cytometer, select this instrument from the instrument drop-down list. Spectral instruments are not configurable, so customization is not possible, and lasers, filters and other options are greyed out. There is no option to save this configuration.•The default view becomes the Spectral Signature Graph.TIP: Fluorochromes can be visualized without choosing an instrument configuration or by a specific laser through the Add Laser(s) & Filters(s) button from the Instrument Configuration tab. To start adding fluorochromes, see the Fluorochrome selection section below.Fluorochrome selection•Fluorochromes can be added by name, laser, range of excitation or range of emission. Select multiple fluorochromes from one set of search results, or add additional fluorochromes by continuing to search and clicking Add.•After a fluorochrome is selected, corresponding emission and excitation curves will be displayed. Deselect Ex or Em in the fluorochrome list to modify the view. Hover over an excitation or emission curve to highlight the individual spectrum.•Save fluorochrome combinations by clicking on the Save Combination button. You must be signed into yourBD Biosciences account.•Check back often as new fluorochromes will be added periodically.Visualization and manipulationThe default view for spectral instrument configurations is the Spectral Signature Graph.•Toggle to other views using the drop-down menu above the graph. You can choose between four available options: Combined Ex/Em Graph, Stacked Ex/Em Graphs, Spectral Signature Graph, and Spectral Signature Heat Map.•Visualize fluorochromes in a single-laser stack by selecting Stacked Ex/Em Graphs in the drop-down menu above the graph. Default setting is normalized by laser. Use the scrollbar on the right to view any additional laser lines. You can also view a multi-laser view by selecting Combined Ex/Em Graph.•The Spectral Signature Heatmap is an alternative way of visualizing the same information contained in the Spectral Signature Graph. The heatmap allows users to visualize and identify spectral signatures for all selected fluorochromes simultaneously and to assess areas of spectral overlap across the entire set. The heatmap is most useful for larger combinations of fluorochromes.•When a spectral instrument configuration is selected, the Similarity & Complexity matrix option becomes available to the right of the drop-down menu located above the graph. Click to view the matrix in a pop-up window.–Tip: You can export the matrix for future reference in the available file formats by using the Export button at the bottom right of the pop-up window.•Additional selections can be made under Graph Display Options in the hamburger menu ().–Enable Mouseover Details–Show Background GridTIP: You can export an image of the graph(s) by clicking on the hamburger menu (), expanding the Export and Import section and clicking Export next to Graph. To learn more about our export and import features, see the Save and share section below.Save and share•Save and share spectral graph images and fluorochrome combinations.–Without logging in, you can export and import fluorochrome lists as .csv files. These can be saved or shared locally and imported later using the Import option. Spectral graph images can be downloaded as a variety of file types that can be saved locally.–If you are logged in to your BD Biosciences account, you can save fluorochrome lists as user-specific files within your account. These can be loaded from the Export and Import” section of the hamburger menu ().Frequently Asked QuestionsGeneral FAQsQ: Will more fluorochromes be added to the new BD® Spectrum Viewer?A: Yes, BD plans to expand the fluorochrome library continuously as new fluorochromes are released from BD and other vendors. Q: Will the new BD® Spectrum Viewer work on mobile devices?A: Yes. The new tool was designed to be a mobile-friendly web application, but it is best used on desktop computers.Q: Are there any recommended web browsers to use for the new BD® Spectrum Viewer?A: The new tool was tested successfully on multiple browsers on both PC and Mac™ platforms—it should work comparably on all common browsers.Q: Will instruments from other manufacturers be added to the new BD® Spectrum Viewer?A: At this time, the BD® Spectrum Viewer only lists pre-configured BD instruments, but you can create a custom configuration to match your instrument requirements.Standard configuration FAQsQ: A few of the excitation and emission spectra look different between the legacy tool and the new BD® Spectrum Viewer, why?A: To ensure that the next generation tool has the most complete and comparable data possible, BD collected new excitation and emission spectra for most of the fluorochromes in the library using state-of-the-art instruments and verified them against existing data sets to ensure consistency. Any differences in spectra may be attributable to differences in instrumentation, improvement in dye manufacturing over time or sample types (free dye vs conjugated fluorochrome).Spectral configuration FAQsQ: How were the BD FACSymphony™ A5 SE Cell Analyzer data generated?A: Fluorochrome spectral signatures were generated on the respective instrument platform using recommended set-up protocols. Spectral signatures are dependent on the cytometer configuration and settings used; therefore, results on your individual instrument may differ from what is depicted herein.Q: Why am I seeing an unexpected spectral signature with some fluorochromes when using the BD FACSymphony™A5 SE Cell Analyzer configuration?A: You may notice an unexpected shape or peak laser/detector or a difference in the spectral signature compared to a different spectrum viewer when evaluating certain dyes. The exact shape of the spectral signature does not affect the final unmixed result so it should not be cause for concern if the spectrum looks different than expected. There could be several reasons for this:•The measured spectral signature is a function not only of the dye's excitation and emission curves but also the power ofeach laser on the flow cytometer, the specific filter band used for each detector and the choice of detector voltage or gain. This has always been true, regardless of whether an instrument is conventional or spectral, but it is more apparent with a spectral instrument.•The spectral filter bands on the BD FACSymphony™ A5 SE Cell Analyzer do not evenly split the spectrum but rather are designed to include a subset of conventional "peak" filters for commonly used dyes while filling in other parts of the spectrum.•In many cases, the unexpected signature is observed with a tandem dye. Tandem dyes can be excited both by their primary laser, intended to excite the tandem donor, and by other lasers that may excite the tandem acceptor directly. If a laser that excites the acceptor directly has substantially higher power than a laser that excites the donor, then it is possible and expected that the signal on the acceptor-exciting laser will be higher.•Even if spectral signatures look different than expected, we have determined that metrics related to spectral panel performance, such as similarity index, are consistent across BD FACSymphony™ A5 SE Cell Analyzer units.Q: When will the BD FACSDiscover™ S8 Cell Sorter be added to the new BD® Spectrum Viewer?A: BD is in the process of completing the work necessary to add the BD FACSDiscover™ S8 Cell Sorter to the list of pre-configured instruments included in the new BD® Spectrum Viewer; it is expected to be available later this year.For Research Use Only. Not for use in diagnostic or therapeutic procedures.BD Life Sciences, San Jose, CA 95131, USABD, the BD Logo, BD FACSDiscover and BD FACSymphony are trademarks of Becton, Dickinson and Company or its affiliates.All other trademarks are the property of their respective owners. © 2023 BD. All rights reserved. BD-88997 (v1.0) 0723。
GoogleChrome浏览器调试功能介绍
GoogleChrome浏览器调试功能介绍Chrome浏览器得益于其优秀的V8解释器,javascript执行速度和内存占有率表现非常优秀。
对于html+css+javascript前台技术的学习或者开发,浏览器developer tool的使用时必不可少的,也能极大的提高学习或者开发效率。
本文根据版本 23.0.1271.10。
在window下,开启developer tool的快捷键为F12。
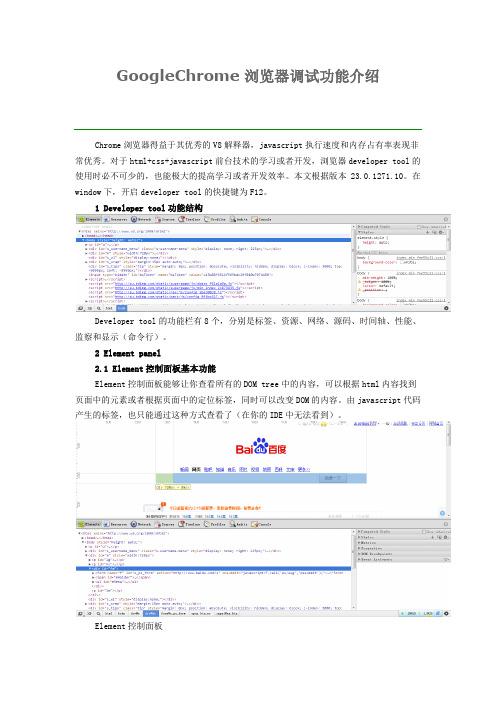
1 Developer tool功能结构Developer tool的功能栏有8个,分别是标签、资源、网络、源码、时间轴、性能、监察和显示(命令行)。
2 Element panel2.1 Element控制面板基本功能Element控制面板能够让你查看所有的DOM tree中的内容,可以根据html内容找到页面中的元素或者根据页面中的定位标签,同时可以改变DOM的内容。
由javascript代码产生的标签,也只能通过这种方式查看了(在你的IDE中无法看到)。
Element控制面板如上图所示,我选中标签之后,在页面中显示的对应的元素就会选中。
如果,我现在要定位百度一下这个按钮,我可以通过左下角的放大镜,在页面中选中百度一下,DOM中也会把对应的标签给你找出来。
这个功能在调试时绝对是利器。
最下面显示的是现在选中标签在DOM中的层次关系。
选元素找标签功能我们也可以对里面的内容进行临时性修改,如刚才找到的百度一下标签中的value改成“调试一下”后马上在页面中相应显示。
2.2 右侧功能栏2.2.1 style查看使用css时,存在着样式覆盖等问题,有的时候显示的样式可能出乎你的意料,或者对元素的大小位置(特别是窗口)的查看。
同时,我们也可以在这里进行临时修改,在页面中反应(真正的所见即所得,不是别的IDE所能替代的)。
修改样式或大小2.2.2 标签注册事件查看如果你想知道“百度一下”这个按钮注册了哪些功能,或者鼠标点击时执行了哪个javascript函数,就可以通过这个功能实现了。
如何用chrome扩展将网页变成黑底白字,用以保护视力

如何⽤chrome扩展将⽹页变成⿊底⽩字,⽤以保护视⼒不知道有没有科学依据,⾃⼰感觉⿊底⽩字对视⼒好些,于是动⼿加个chrome扩展:第⼀步:建个⽂件夹,名称⽐如叫changeColor;第⼆步:在changeColor⽂件夹中建三个⽂件:manifest.json 、 background.js 和 content_script.js第三步:编辑三个⽂件manifest.json放⼊以下代码{"name": "Page color","description": "Make the current page color","version": "2.0","permissions": ["activeTab"],"background": {"scripts": ["background.js"],"persistent": false},"browser_action": {"default_title": "change color"},"manifest_version": 2}background.js的代码// Copyright (c) 2011 The Chromium Authors. All rights reserved.// Use of this source code is governed by a BSD-style license that can be// found in the LICENSE file.// Called when the user clicks on the browser action.chrome.browserAction.onClicked.addListener(function(tab) {// No tabs or host permissions needed!console.log('Turning ' + tab.url + ' red!');chrome.tabs.executeScript(null, {file: "content_script.js"});});content_script.js代码document.body.style.backgroundColor="black";document.body.style.color="white";var myP = document.getElementsByTagName("p");for (var i=0;i<myP.length;i++){myP[i].style.backgroundColor = "black";myP[i].style.color = "white";};var myDiv = document.getElementsByTagName("div");for (var i=0;i<myDiv.length;i++){myDiv[i].style.backgroundColor = "black";myDiv[i].style.color = "white";};var myBlockquote = document.getElementsByTagName("blockquote");for (var i=0;i<myBlockquote.length;i++){myBlockquote[i].style.background = "grey";myBlockquote[i].style.color = "white";};var myA = document.getElementsByTagName("a");for (var i=0;i<myA.length;i++){myA[i].style.color = "white";};var myul = document.getElementsByTagName("ul");for (var i=0;i<myul.length;i++){myul[i].style.background = "black";myul[i].style.color = "white";};var myli = document.getElementsByTagName("li");for (var i=0;i<myli.length;i++){myli[i].style.background = "black";myli[i].style.color = "white";};var myspan = document.getElementsByTagName("span");for (var i=0;i<myspan.length;i++){myspan[i].style.background = "black";myspan[i].style.color = "white";};var mypre = document.getElementsByTagName("pre");for (var i=0;i<mypre.length;i++){mypre[i].style.background = "black";mypre[i].style.color = "white";};var mysection = document.getElementsByTagName("section");for (var i=0;i<mysection.length;i++){mysection[i].style.background = "black";mysection[i].style.color = "white";};var mytable = document.getElementsByTagName("table");for (var i=0;i<mytable.length;i++){mytable[i].style.background = "black";mytable[i].style.color = "white";};第四步打开chrome浏览器,在地址栏输⼊chrome://extensions 或者点最右边三个点-更多⼯具-扩展程序第五步钩选开发者模式,从资源管理器将changeColor⽂件夹拖放到扩展程序页⾯上或者点加载已解压的扩展程序也可。
userChrome

#context_bookmarkAllTabs, /*所有标签页加入书签*/
#context_bookmarkAllTabs+menuseparator, /*所有标签页加入书签下面的分割线*/
#context_closeTab, /*关闭标签页*/
.openintabs-menuseparator,.openintabs-menuitem{display: none !important;}*/
/*新建标签页按钮样式
.tabs-newtab-button {background: none !important;
border: none !important;}*/
#context-savelink, /*链接另存为*/
#context-openlinkincurrent, /*在当前标签页打开链接*/
#context-openlinkintab, /*在新标签页打开链接*/
#context-openlink, /*在新窗口打开链接*/
#context-sep-open, /*打开新窗口下面的分割线*/
#context-sendpage, /*发送页面链接到*/
#context-sep-copyimage, /*复制图片下面的分割线*/
#context-saveimage, /*图片另存为*/
#context-sendimage, /*发送图片到*/
#context-setDesktopBackground, /*设置为桌面背景*/
/*隐藏菜单栏白色背景*/
#main-menubar {background:none !important;}
教学视频:如何通过浏览器扩展快速保存网页内容?

教学视频:如何通过浏览器扩展快速保存网页内容??互联网时代,我们每天都会浏览各种不同的网站。
但是有时候我们会看到一些非常有用的信息或知识,想要保存下来,以备日后查阅。
新手可能不知道如何保存网页,一些高级用户则可能会使用一些比较复杂的方法进行保存,这些方法会浪费大量的时间和精力。
而现在有一种非常好用的方法,可以帮助您轻松快速地保存网页内容,即使用浏览器扩展。
浏览器扩展是一种能够增强网页浏览器功能的小型程序,它们可以为用户带来多种便利和实用的功能。
其中一种非常有用的功能就是帮助用户快速保存网页的内容。
本文将为您介绍如何通过几种常见的浏览器扩展来实现快速保存网页的内容。
一、Chrome浏览器Chrome浏览器是目前世界上最流行的浏览器之一,并且它已经成为了许多人生活和工作中不可或缺的一部分。
以下是在Chrome浏览器中如何通过扩展来保存网页内容的方法:1.OneTab扩展OneTab是Chrome浏览器中一种非常优秀的网页保存工具,它可以快速将多个浏览器会话转换为一个单独的标签页,从而使得您的浏览器更加轻松和高效。
以下是如何在Chrome中使用OneTab扩展:① 安装OneTab扩展。
在Chrome网上应用商店中搜索“OneTab”并安装扩展。
② 打开您需要保存的网页。
③ 单击OneTab图标。
这个图标通常会显示在浏览器的地址栏或者扩展栏中。
④ OneTab将会把您当前打开的所有标签页转换成一个单一的标签页,这样就可以轻松快速的保存所有的网页标签。
2.Save to Pocket扩展Pocket是一种非常流行的网页保存工具,它可以帮助用户快速保存自己发现的内容,从而可以随时随地进行阅读。
以下是如何在Chrome中使用Save to Pocket扩展:① 安装Save to Pocket扩展。
在Chrome网上应用商店中搜索“Save to Pocket”并安装扩展。
② 打开您需要保存的网页。
③ 单击Save to Pocket图标。
playwirght的用法 -回复

playwirght的用法-回复标题:Playwright的全面使用指南Playwright是一个强大的开源自动化测试工具,由微软开发,主要用于浏览器自动化和端到端测试。
它支持多种浏览器,包括Chrome、Firefox、Safari和WebKit,并且可以在Windows、Linux和macOS 平台上运行。
以下是一步一步的Playwright使用教程。
一、安装Playwright首先,我们需要在系统中安装Node.js,因为Playwright是基于Node.js的。
你可以从Node.js官方网站下载并安装适合你操作系统的版本。
安装Node.js后,我们可以通过npm(Node包管理器)来安装Playwright。
在命令行中输入以下命令:bashnpm install playwright这将会安装最新的Playwright版本及其所有依赖项。
二、启动浏览器安装完成后,我们可以使用Playwright来启动一个浏览器实例。
以下是一个简单的示例:javascriptconst { chromium } = require('playwright');(async () => {const browser = await unch();const page = await browser.newPage();await page.goto('await browser.close();})();在这个示例中,我们首先导入了`chromium`模块,然后通过`unch()`方法启动了一个Chromium浏览器实例。
接着,我们使用`browser.newPage()`方法创建了一个新的页面,并通过`page.goto()`方法导航到指定的URL。
最后,我们关闭了浏览器。
三、交互与操作Playwright提供了丰富的API来模拟用户交互和操作网页元素。
以下是一些常见的操作:1. 输入文本:javascriptawait page.fill('#username', 'testuser');await page.fill('#password', 'testpassword');这两个API分别用于在具有给定CSS选择器的输入字段中填写文本。
Firefox命令行参数MyChrome

Firefox命令行参数MyChrome说明:所有适用于 Firefox 的参数均可直接在MyFirefox设置窗口的“命令行参数”中添加或者加在MyFirefox的快捷方式目标路径后面,或者写入MyFirefox.ini文件中,这些参数会被传递给Firefox。
如何使用命令行参数以下是启动Firefox时打开mozilla firefox网站的例子:方法1:在开始菜单的”运行“中输入:firefox -url 对绿色版、免安装版或便携版则需加路径,如:D:\Program Files\Mozilla Firefox\Firefox\firefox.exe -url 方法2:在程序的快捷方式的属性-目标的后面加上参数:比如目标是:”D:\Program Files\Mozilla Firefox\Firefox\firefox.exe“则在它后面加上参数(参数前有个空格):”D:\Program Files\Mozilla Firefox\Firefox\firefox.exe“ -url 常用命令行参数:用户配置说明:Firefox的设置、书签等数据都保存在所谓的配置(profile)文件夹中。
不同用户可自定义配置。
如果您使用MyFirefox,则以下与用户配置文件有关的参数基本没什么用,MyFirefox本身就是用来自定义配置文件夹的。
-CreateProfile profile_name新建名为profile_name的配置,但不启动程序。
profile_name中不能包含空格( )。
firefox -CreateProfile JoelUser-CreateProfile "profile_name profile_dir"在profile_dir目录下新建名为profile_name的配置,但不启动程序。
注意profile_name和profile_dir要在同一对引号内。
SASS教程:基本概念和应用说明书

About the T utorialSASS (Syntactically Awesome Stylesheet) is a CSS pre-processor, which helps to reduce repetition with CSS and saves time. It is more stable and powerful CSS extension language that describes the style of document structurally. This tutorial covers the basics of SASS. AudienceThis tutorial will help both students as well as professionals, who want to make their websites or personal blogs more attractive.PrerequisitesBefore you proceed with this tutorial, we assume that you know:∙Basic word processing using any text editor.∙How to create directories and files.∙How to navigate through different directories.∙Internet browsing using popular browsers like Internet Explorer or Firefox.∙How to develop simple Web Pages using HTML or XHTML.If you are new to HTML and XHTML, then we would suggest you to go through our HTML Tutorial or XHTML Tutorial first.Copyright & Disclaimer© Copyright 2017 by Tutorials Point (I) Pvt. Ltd.All the content and graphics published in this e-book are the property of Tutorials Point (I) Pvt. Ltd. The user of this e-book is prohibited to reuse, retain, copy, distribute or republish any contents or a part of contents of this e-book in any manner without written consent of the publisher.We strive to update the contents of our website and tutorials as timely and as precisely as possible, however, the contents may contain inaccuracies or errors. Tutorials Point (I) Pvt. Ltd. provides no guarantee regarding the accuracy, timeliness or completeness of our website or its contents including this tutorial. If you discover any errors on our website or inthistutorial,******************************************T able of ContentsAbout the Tutorial (i)Audience (i)Prerequisites (i)Copyright & Disclaimer (i)Table of Contents (ii)1.SASS – Overview (1)What is SASS? (1)Why to Use SASS? (1)Features of SASS (1)Advantages of SASS (2)Disadvantages of SASS (2)2.SASS – Installation (3)Installation of Ruby (3)3.SASS – Syntax (11)SASS Indented Syntax (11)Syntax Differences of SASS (12)Multiline Selectors (12)Comments (14)@import (14)Mixin Directives (14)Deprecated Syntax (14)4.SAAS – Application (16)Rack/Rails/Merb Plugin (16)Caching (17)Options (17)Syntax Selection (19)Encodings (19)5.SASS – CSS Extensions (20)SASS – Nested Rules (20)SASS – Referencing Parent Selectors (23)SASS – Nested Properties (25)SASS – Placeholder Selectors (26)6.SASS – Comments (29)Sass – Interpolation in Multiline Comments (31)7.SASS – Script (33)SASS – Interactive Shell (34)SASS – Variables (34)SASS – Data Types (36)Strings (36)Lists (38)Maps (39)Colors (39)SASS – Operations (39)SASS – Number Operations (40)SASS – Color Operations (42)SASS – String Operations (44)SASS – Boolean Operations (45)SASS – Parentheses (47)SASS – Functions (49)SASS – Interpolation (51)SASS – & in SassScript (53)SASS – Variable Defaults (55)8.SASS – @-Rules and Directives (57)Sass – Import Directives (57)Sass – Media Directives (61)Sass – Extend Directives (63)Sass – At-root Directives (66)Sass – Debug Directives (69)Sass – Warn Directives (70)Sass – Error Directives (71)9.SASS – Control Directives & Expressions (73)SASS – if() Function (73)SASS – @if Directive (75)SASS – @if Directive (75)SASS – @else if Directive (77)SASS – @for Directive (79)SASS – through Keyword (79)SASS – to Keyword (81)SASS – @each Directive (83)SASS – @each Directive (84)SASS – @each Multiple Assignment (86)SASS – @each Multiple Assignment with Maps (88)SASS – @while Directive (90)10.SASS – Mixin Directives (92)Sass – Defining a Mixin (92)Sass – Including a Mixin (94)Sass – Mixin Arguments (96)Sass – Passing Content Blocks to a Mixin (99)11.SASS – Function Directives (102)Naming Conventions (103)12.SASS – Output Style (104):nested (104):expanded (104):compact (105):compressed (105)13.Extending SASS (106)Defining Custom SASS Functions (106)Cache Stores (106)Custom Importers (106)1.SASSWhat is SASS?SASS (Syntactically Awesome Stylesheet) is a CSS pre-processor, which helps to reduce repetition with CSS and saves time. It is more stable and powerful CSS extension language that describes the style of a document cleanly and structurally.It was initially designed by Hampton Catlin and developed by Natalie Weizenbaum in 2006. Later, Weizenbaum and Chris Eppstein used its initial version to extend the Sass with SassScript.Why to Use SASS?∙It is a pre-processing language, which provides indented syntax (its own syntax) for CSS.∙It provides some features, which are used for creating stylesheets that allows writing code more efficiently and is easy to maintain.∙It is a super set of CSS, which means it contains all the features of CSS and is an open source pre-processor, coded in Ruby.∙It provides the document style in a good, structured format than flat CSS. It uses re-usable methods, logic statements and some of the built-in functions such as color manipulation, mathematics and parameter lists.Features of SASS∙It is more stable, powerful, and compatible with versions of CSS.∙It is a super set of CSS and is based on JavaScript.∙It is known as syntactic sugar for CSS, which means it makes easier way for user to read or express the things more clearly.∙It uses its own syntax and compiles to readable CSS.∙You can easily write CSS in less code within less time.∙It is an open source pre-processor, which is interpreted into CSS.Advantages of SASS∙It allows writing clean CSS in a programming construct.SASS∙It helps in writing CSS quickly.∙It is a superset of CSS, which helps designers and developers work more efficiently and quickly.∙As Sass is compatible with all versions of CSS, we can use any available CSS libraries.∙It is possible to use nested syntax and useful functions such as color manipulation, mathematics and other values.Disadvantages of SASS∙It takes time for a developer to learn new features present in this pre-processor.∙If many people are working on the same site, then should use the same preprocessor. Some people use Sass and some people use CSS to edit the files directly. Therefore, it becomes difficult to work on the site.∙There are chances of losing benefits of browser's built-in element inspector.2.SASSIn this chapter, we will learn the step-by-step procedure to install Ruby, which is used for executing the SASS files.System Requirements for SASS∙Operating System :Cross-platform∙Browser Support :IE (Internet Explorer 8+), Firefox, Google Chrome, Safari, Opera∙Programming Language:RubyInstallation of RubyStep(1): Open the link https:///en/downloads/, you will see a screen as shown below:Download the Current stable version of the zip file.Step(2): Next, run the setup to install Ruby on the System.Step(3): Next, add Ruby bin folder to your PATH User Variable and System Variable to work with gem command.Path User Variable:∙Right Click the My Computer icon.∙Select Properties.∙Next, click the Advanced tab and click Environment Variables.In the Environment Variables window, double click the PATH as shown in the screenshot given below-You will get an Edit User Variable box as shown. Add ruby bin folder path in the Variable value field as C:\Ruby\bin. If path is already set for other files, then put semicolon after that and add the Ruby folder path as shown below.Click the OK button.SASSSystem Variable:Click the New button.Next,the New System Variable block is displayed as shown below.Enter RubyOpt in the Variable name field and rubygems in the Variable value field. After writing the Variable name and value, click the OK button.Step(4): Open the command prompt in your system and enter the following line-Step(5): Next, you will see the following screen after installing SASS successfully.ExampleFollowing is a simple example of SASS.Now, we will create file as style.scss, which is quite similar to CSS and the only one difference is that it will be saved with .scss extension. Both, .htm and .scss files should be created inside the folder ruby. You can save your .scss file in the folder ruby\lib\sass\ (Before this process, create a folder as sass in lib directory).using the following command:When you run the above command, it will create the style.css file automatically. Whenever you change the SCSS file, the style.css file will be updated automatically.The style.css file will have the following code when you run the above given command: style.cssLet us carry out the following steps to see how the above given code works: ∙Save the above given code in hello.html file.∙Open this HTML file in a browser.End of ebook previewIf you liked what you saw…Buy it from our store @ https://。