The dig command - CS 47505750 and ITS 47505750
report范文

r e p o r t范文(总15页) -CAL-FENGHAI.-(YICAI)-Company One1-CAL-本页仅作为文档封面,使用请直接删除Report on strategic analysis and position of the UK CooperativeGroupExecutive SummaryThis report aims to make a strategic analysis of the UK Cooperative Group. Through the analysis of the external environment, the internal environment, the SWOT analysis and the strategic position, this paper makes some suggestions for the future development of this organization.The report firstly gives the introduction of this paper’s purpose, then the operation environment this organization works in, the strength, the weakness, the opportunities and the treats it faces are done in the main body part. The strength of it mainly includes the largest geographic coverage, the strong bargaining power resulting from the CTRG and the good market image its value and faith bring. The weakness includes the weakness in the hypermarket and supermarket, the brand position is not so clear and the lack of the range of products. The opportunities include the quick development of the internet and the deceasing affording ability of the customers. The threats consist of the emerging of the online retailing and the penetration of the “big four” into the convenience sector. In the last part, the strategy position of this organization is suggested based on the previous analysis.After the analysis, this paper thinks that in the austere economy condition of UK, the UK Cooperative Group can use its location advantage and its low cost advantage to compete in the market. At least, at this kind of condition, it can attract more price sensitive customers and build up its image. As this organization is in the retailing industry and it focuses on the convenience sector which is mainly the price sensitive customers’ market and providing the satisfied products with the satisfied price fro the customers is their main target, so the price leading strategy is the right one for it.Table of contentIntroduction .................................................................................. 错误!未定义书签。
CF-33 Quick-Start Guide
JULY 2018TOUGHBOOK® 33QUICK-START GUIDEKELTEK Incorporated | CF-33 Quick-Start Guide2 // 14CF-33 TECHNICAL BULLETINYOU MAY NEED TO RESTORE THE GPS TO LEGACY SETTINGS:1. Ensure that you are logged into Windows as an administrator2. Download the following package:https:///d/s71df59562c243d983. Click the download button4. All GPS software must be closed5. Unzip the compressed zip file to the desktop of the computer6. Locate the run.bat file, right-click, and Run as Administrator7. The bat file will run for a few minutes, then it will initiate a reboot. The first run of this bat file installs the correct drivers8. Upon reboot, locate the run.bat file again, right-click it, and select Run as Administrator again.9. The second run-through of this bat file changes the sentences from the GPS device to Legacy mode.10. Once the bat file has finished, it will initiate another reboot.11. Once rebooted, click start and type Device Manager. SelectDevice Manager in the search results.12. Expand the Ports section of Device Manager and rememberwhich port the U-Blox device is on. There may be two ports for this device, but they are identical.13. Next click start and type GPS Viewer. The GPS Viewer softwareshould be an option in the search results. Select it.14. When the software opens, select the COM port that the U-bloxdevice is using and choose 4800 for the baud rate.17. Click Connect18. Your device should print out a sentence that starts with$GPRMC. If you don’t see it, you may need to click thedisconnect button and scroll through the list to locate it. If you still don’t see it, repeat steps 10 through 19.19. If you do see this sentence, you can now close the devicemanager and GPS Viewer and attempt to reconnect yourmapping software to the U-Blox COM Port.IS THE GPS MODULE PROVIDING GPS STRINGS?1. Ensure that all GPS Mapping software is completed exited out2. Click Start3. Type GPS Viewer or navigate to the Panasonic Folder and click GPS Viewer to open it.4. Click Start and type Device Manager, then open it. You can also access it by opening a file folder, right-clicking on either “My Computer” or “This PC” on the left, and selecting “Manage”, then selecting device manager on the left side5. Under the Ports section, locate the U-blox device to determine the correct COM port6. In GPS viewer select that COM port and select 9600 for the baud rate, click Connect7. If you are seeing GPS information flow through this COM port, then the module is working. If not, the module may need to be enabled in the bios of the computer.01 //02 //MAPPING SOFTWARE CAN‘T CONNECT TO THE GPS COM PORT:KELTEK Incorporated | CF-33 Quick-Start Guide5 // 14SETUP A VIRTUAL COM PORT THAT USES THE SAME GPS SOURCE In past versions of each line of Toughbooks, in order to have multiple pieces of software utilizing the same GPS source, you had to use a 3rd-party software called a COM Splitter. This software attached itself to the COM port assigned to the GPS source, then duplicated it to two additional COM ports for both of your applications to use.With the advent of the U-Blox GPS device, this is no longer required. The difference is that the U-Blox GPS device that his found in current mark series Toughbooks is a USB GPS device, not a serial device, so multiple applications can attach to the same device by creating virtual COM ports. This process explains how to do this.1. Click Start and type Device Manager, then open it. You can also access it by opening a file folder, right-clicking on either “My Computer” or “This PC” on the left, and selecting “Manage”, then selecting device manager on the left side2. Click the Actions menu at the top and select Add legacy Hardware(continued on next page)01 //USING TWO MAPPING APPLICATIONS FROM THE SAME COM PORT:KELTEK Incorporated | CF-33 Quick-Start Guide 6 // 14SETUP A VIRTUAL COM PORT THAT USES THE SAME GPS SOURCE3. Click the Next button4. Select “Install the hardware that I manually select from a list(Advanced)5. Click Next6. Scroll down and select “Ports (COM & LPT)”7. In the left list select U-blox, and in the right list select the U-blox device, then click Next8. Click Finish to complete the wizard. This now creates an additional COM port in device manager. Both of these COM ports can now be attached to your GPS software.01 //USING TWO MAPPING APPLICATIONS FROM THE SAME COM PORT:KELTEK Incorporated | CF-33 Quick-Start Guide7 // 14ARE THE DOCK ANTENNAS CONNECTED AND THE ANTENNA SWITCH ON?To ensure that the pass-through on a Panasonic Toughbook or Toughpad is configured and wired correctly, refer to the chart below, remembering that every Panasoniccomputer is setup for Cellular in the Upper location. Several of the docking stations listed below also have an external antenna switch that must be in the external or ON position in order for the pass-through to function properly. Havis docks have are listed in the matrix below. The only platform that is not listed is the new CF-33, which is configured as Upper(Cellular or Wi-Fi) in Antenna Port 1 and Lower(GPS) in Antenna Port 2. Gamber Johnson Docks are all setup the same. Antenna Port 2 is used for GPS and Antenna Port 1 is used for Cellular or Wi-Fi. See the image below for port and switch locations.Click or visit the following for a comprehensive breakdown of docking station pass through antenna information:• https://bit.ly/2mehuKL01 //MAPPING SOFTWARE GETTING POOR GPS RECEPTION WHILE IN THE DOCKING STATION:HOW TO INSTALL THE SIM ON A CF-33:ON A CF-33, THE CELLULAR SIM TRAY IS A LITTLE TRICKIER TO REACH.These steps will walk you through the process.1. If the CF-33 is powered up, please shut the machine down and disconnect it from any AC power source.2. If you have a keyboard attached to the CF-33 tablet, please remove it before beginning.3. If you have a rotating hand-strap as shown below, please unclip the bottom two clasps.01 //KELTEK Incorporated | CF-33 Quick-Start Guide8 // 14HOW TO INSTALL THE SIM ON A CF-33:ON A CF-33, THE CELLULAR SIM TRAY IS A LITTLE TRICKIER TO REACH.4. Both the right and left clasps must be undone, then the hand-strap body will fold backward.5. Once the clasps are removed and the strap is folded backward, you will see the silver body of the CF-33.6. At the lower edge of the CF-33, there is a grey slider that allows the top-half of the silver body to extend up and rotate open. Push the grey slider to the right to slide open the body of the CF-33.7. Once the body is slid up, you can rotate it back to lay against the rotating hand-strap.01 //KELTEK Incorporated | CF-33 Quick-Start Guide9 // 14 HOW TO INSTALL THE SIM ON A CF-33:ON A CF-33, THE CELLULAR SIM TRAY IS A LITTLE TRICKIER TO REACH.8. The SIM tray is located under the battery on the stylus side of the CF-33. To remove the battery locate the black slide switch directly above the battery shown below.9. Push the slide switch to the right to remove the battery.10. In the lower corner of the battery bay, you can see the SIM tray. To Open the SIM tray, push the black slider to the left.11. The SIM tray door pivots open. Be sure to insert the SIM as shown in the label. The SIM should click into place and easily be removed.12. Once the SIM is in place, re-assemble the CF-33 in the exact reverse order it was taken apart.01 //KELTEK Incorporated | CF-33 Quick-Start Guide 10 // 14ONCE THE SIM HAS BEEN INSERTED INTO THE CF-33 CONNECTION IS QUITE SIMPLE.In previous Toughbook and Toughpad models, a third-party connection software was needed to interface with the cellular card. This is no longer the case as Windows now manages the connection for you. Simply click on the Connection button down in the system tray near the clock, and ensure that the Cellular option is blue. If your SIM is inserted and activated, you will have the option to connect to it at the top of the menu.01 //CONNECTING TO YOUR LTE NETWORK:SETTING UP THE SHUT-DOWN/SLEEP OPTIONS IN WIN10:THIS PROCESS SHOWS YOU HOW TO FORCE THE COMPUTER TO STAY ACTIVE.By default, Windows encourages computers to dim the screen, go to sleep, andshutdown at specific intervals to save device battery life, however that is not always convenient for work-flow.1. In the system tray locate the battery symbol and right-click on it.2. Select Power Options from the list. This will open the Power Options window.3. Select Change plan settings for the Panasonic Power Management plan01 //KELTEK Incorporated | CF-33 Quick-Start Guide11 // 14 SETTING UP THE SHUT-DOWN/SLEEP OPTIONS IN WIN10:THIS PROCESS SHOWS YOU HOW TO FORCE THE COMPUTER TO STAY ACTIVE.4. This opens up the details of the plan. To force Windows to keep the device active indefinitely, adjust the options to never perform, like the following.Click the Save Changes button at the bottom of the screen to apply the settings.01 //CHANGING THE FUNCTION OF THE TABLET BUTTONS:BY DEFAULT, THE TABLET BUTTONS CONTROL SPECIFIC FUNCTIONS ON THE COMPUTER.By default, the tablet buttons on a Panasonic Toughpad control specific functionson the computer. These settings are configurable using the Windows Application “Panasonic Dashboard”. However, there is another location for altering the functions of these button that takes precedence to the Panasonic Dashboard application, which is located in the bios of the machine. To adjust these settings, follow this process.1. If the computer is currently running, restart it. If the computer is off, then boot it.2. When presented with the Panasonic Logo screen, perform one of the two following options:a. Repeatedly tap the F2 button until you are presented with the Blue andGrey themed Bios screen.b. Repeatedly tap the upper left corner of the screen until presented with theBlue and Grey themed Bios screen.3. Navigate to the Main tab using the right arrow or the touch screen, as shown below. (continued on next page)01 //KELTEK Incorporated | CF-33 Quick-Start Guide12 // 14CHANGING THE FUNCTION OF THE TABLET BUTTONS:BY DEFAULT, THE TABLET BUTTONS CONTROL SPECIFIC FUNCTIONS ON THE COMPUTER.By default, the tablet buttons on a Panasonic Toughpad control specific functionson the computer. These settings are configurable using the Windows Application “Panasonic Dashboard”. However, there is another location for altering the functions of these button that takes precedence to the Panasonic Dashboard application, which is located in the bios of the machine. To adjust these settings, follow this process.4. Use the down arrow or the touch screen to select the Tablet Button Configuration sub-menu.5. You will see a list of the available tablet buttons, which correspond to the buttons below the touchscreen.6. KELTEK’s best practice is to make the Up/Down buttons perform screen brightness operations instead of volume adjustments, like below.7. Once you have made the adjustments you would like on each button set, hit the escape button to go back. You can also click the keyboard button in the upper right corner to display the on-screen keyboard.8. Navigate to the Exit tab and select Save Values and Reboot to apply the changes made.9. Once the computer has rebooted, the settings will become active.01 //KELTEK Incorporated | CF-33 Quick-Start Guide13 // 14 THE BARCODE SCANNER ON MY CF-33 DOESN’T WORK WITH TRACSDOWNLOAD TOOLS AND CHANGE THE BARCODE MODULE INTO COM PORT.1. Download the Barcode Tools from any of the following links:a. ftp:///computer/knowlededocs/Barcode2COM.exeb. ftp://ftp.panasoni/computer/knowledgedocs/Barcode2KBW.zip2. To change barcode module into COM port mode, run the Barcode2COM.exeapplication as Administrator from the download link provided. This will perform the following changes:a. Convert Barcode module into COM port mode from USB HID Keyboard orUSB HID POS.b. Register the barcode module into Windows assigned port.3. To revert these change back to USB HID Keyboard, run the Barcode2KBW.exeapplication as Administrator, which will perform the following:a. Convert Barcode module into COM port mode from USB HID Keyboard orUSB HID POS.01 //KELTEK INCORPORATEDTHANK YOU FOR THE BUSINESS.。
Native Instruments MASCHINE MK3 用户手册说明书

The information in this document is subject to change without notice and does not represent a commitment on the part of Native Instruments GmbH. The software described by this docu-ment is subject to a License Agreement and may not be copied to other media. No part of this publication may be copied, reproduced or otherwise transmitted or recorded, for any purpose, without prior written permission by Native Instruments GmbH, hereinafter referred to as Native Instruments.“Native Instruments”, “NI” and associated logos are (registered) trademarks of Native Instru-ments GmbH.ASIO, VST, HALion and Cubase are registered trademarks of Steinberg Media Technologies GmbH.All other product and company names are trademarks™ or registered® trademarks of their re-spective holders. Use of them does not imply any affiliation with or endorsement by them.Document authored by: David Gover and Nico Sidi.Software version: 2.8 (02/2019)Hardware version: MASCHINE MK3Special thanks to the Beta Test Team, who were invaluable not just in tracking down bugs, but in making this a better product.NATIVE INSTRUMENTS GmbH Schlesische Str. 29-30D-10997 Berlin Germanywww.native-instruments.de NATIVE INSTRUMENTS North America, Inc. 6725 Sunset Boulevard5th FloorLos Angeles, CA 90028USANATIVE INSTRUMENTS K.K.YO Building 3FJingumae 6-7-15, Shibuya-ku, Tokyo 150-0001Japanwww.native-instruments.co.jp NATIVE INSTRUMENTS UK Limited 18 Phipp StreetLondon EC2A 4NUUKNATIVE INSTRUMENTS FRANCE SARL 113 Rue Saint-Maur75011 ParisFrance SHENZHEN NATIVE INSTRUMENTS COMPANY Limited 5F, Shenzhen Zimao Center111 Taizi Road, Nanshan District, Shenzhen, GuangdongChina© NATIVE INSTRUMENTS GmbH, 2019. All rights reserved.Table of Contents1Welcome to MASCHINE (25)1.1MASCHINE Documentation (26)1.2Document Conventions (27)1.3New Features in MASCHINE 2.8 (29)1.4New Features in MASCHINE 2.7.10 (31)1.5New Features in MASCHINE 2.7.8 (31)1.6New Features in MASCHINE 2.7.7 (32)1.7New Features in MASCHINE 2.7.4 (33)1.8New Features in MASCHINE 2.7.3 (36)2Quick Reference (38)2.1Using Your Controller (38)2.1.1Controller Modes and Mode Pinning (38)2.1.2Controlling the Software Views from Your Controller (40)2.2MASCHINE Project Overview (43)2.2.1Sound Content (44)2.2.2Arrangement (45)2.3MASCHINE Hardware Overview (48)2.3.1MASCHINE Hardware Overview (48)2.3.1.1Control Section (50)2.3.1.2Edit Section (53)2.3.1.3Performance Section (54)2.3.1.4Group Section (56)2.3.1.5Transport Section (56)2.3.1.6Pad Section (58)2.3.1.7Rear Panel (63)2.4MASCHINE Software Overview (65)2.4.1Header (66)2.4.2Browser (68)2.4.3Arranger (70)2.4.4Control Area (73)2.4.5Pattern Editor (74)3Basic Concepts (76)3.1Important Names and Concepts (76)3.2Adjusting the MASCHINE User Interface (79)3.2.1Adjusting the Size of the Interface (79)3.2.2Switching between Ideas View and Song View (80)3.2.3Showing/Hiding the Browser (81)3.2.4Showing/Hiding the Control Lane (81)3.3Common Operations (82)3.3.1Using the 4-Directional Push Encoder (82)3.3.2Pinning a Mode on the Controller (83)3.3.3Adjusting Volume, Swing, and Tempo (84)3.3.4Undo/Redo (87)3.3.5List Overlay for Selectors (89)3.3.6Zoom and Scroll Overlays (90)3.3.7Focusing on a Group or a Sound (91)3.3.8Switching Between the Master, Group, and Sound Level (96)3.3.9Navigating Channel Properties, Plug-ins, and Parameter Pages in the Control Area.973.3.9.1Extended Navigate Mode on Your Controller (102)3.3.10Navigating the Software Using the Controller (105)3.3.11Using Two or More Hardware Controllers (106)3.3.12Touch Auto-Write Option (108)3.4Native Kontrol Standard (110)3.5Stand-Alone and Plug-in Mode (111)3.5.1Differences between Stand-Alone and Plug-in Mode (112)3.5.2Switching Instances (113)3.5.3Controlling Various Instances with Different Controllers (114)3.6Host Integration (114)3.6.1Setting up Host Integration (115)3.6.1.1Setting up Ableton Live (macOS) (115)3.6.1.2Setting up Ableton Live (Windows) (116)3.6.1.3Setting up Apple Logic Pro X (116)3.6.2Integration with Ableton Live (117)3.6.3Integration with Apple Logic Pro X (119)3.7Preferences (120)3.7.1Preferences – General Page (121)3.7.2Preferences – Audio Page (126)3.7.3Preferences – MIDI Page (130)3.7.4Preferences – Default Page (133)3.7.5Preferences – Library Page (137)3.7.6Preferences – Plug-ins Page (145)3.7.7Preferences – Hardware Page (150)3.7.8Preferences – Colors Page (154)3.8Integrating MASCHINE into a MIDI Setup (156)3.8.1Connecting External MIDI Equipment (156)3.8.2Sync to External MIDI Clock (157)3.8.3Send MIDI Clock (158)3.9Syncing MASCHINE using Ableton Link (159)3.9.1Connecting to a Network (159)3.9.2Joining and Leaving a Link Session (159)3.10Using a Pedal with the MASCHINE Controller (160)3.11File Management on the MASCHINE Controller (161)4Browser (163)4.1Browser Basics (163)4.1.1The MASCHINE Library (163)4.1.2Browsing the Library vs. Browsing Your Hard Disks (164)4.2Searching and Loading Files from the Library (165)4.2.1Overview of the Library Pane (165)4.2.2Selecting or Loading a Product and Selecting a Bank from the Browser (170)4.2.2.1[MK3] Browsing by Product Category Using the Controller (174)4.2.2.2[MK3] Browsing by Product Vendor Using the Controller (174)4.2.3Selecting a Product Category, a Product, a Bank, and a Sub-Bank (175)4.2.3.1Selecting a Product Category, a Product, a Bank, and a Sub-Bank on theController (179)4.2.4Selecting a File Type (180)4.2.5Choosing Between Factory and User Content (181)4.2.6Selecting Type and Character Tags (182)4.2.7List and Tag Overlays in the Browser (186)4.2.8Performing a Text Search (188)4.2.9Loading a File from the Result List (188)4.3Additional Browsing Tools (193)4.3.1Loading the Selected Files Automatically (193)4.3.2Auditioning Instrument Presets (195)4.3.3Auditioning Samples (196)4.3.4Loading Groups with Patterns (197)4.3.5Loading Groups with Routing (198)4.3.6Displaying File Information (198)4.4Using Favorites in the Browser (199)4.5Editing the Files’ Tags and Properties (203)4.5.1Attribute Editor Basics (203)4.5.2The Bank Page (205)4.5.3The Types and Characters Pages (205)4.5.4The Properties Page (208)4.6Loading and Importing Files from Your File System (209)4.6.1Overview of the FILES Pane (209)4.6.2Using Favorites (211)4.6.3Using the Location Bar (212)4.6.4Navigating to Recent Locations (213)4.6.5Using the Result List (214)4.6.6Importing Files to the MASCHINE Library (217)4.7Locating Missing Samples (219)4.8Using Quick Browse (221)5Managing Sounds, Groups, and Your Project (225)5.1Overview of the Sounds, Groups, and Master (225)5.1.1The Sound, Group, and Master Channels (226)5.1.2Similarities and Differences in Handling Sounds and Groups (227)5.1.3Selecting Multiple Sounds or Groups (228)5.2Managing Sounds (233)5.2.1Loading Sounds (235)5.2.2Pre-listening to Sounds (236)5.2.3Renaming Sound Slots (237)5.2.4Changing the Sound’s Color (237)5.2.5Saving Sounds (239)5.2.6Copying and Pasting Sounds (241)5.2.7Moving Sounds (244)5.2.8Resetting Sound Slots (245)5.3Managing Groups (247)5.3.1Creating Groups (248)5.3.2Loading Groups (249)5.3.3Renaming Groups (251)5.3.4Changing the Group’s Color (251)5.3.5Saving Groups (253)5.3.6Copying and Pasting Groups (255)5.3.7Reordering Groups (258)5.3.8Deleting Groups (259)5.4Exporting MASCHINE Objects and Audio (260)5.4.1Saving a Group with its Samples (261)5.4.2Saving a Project with its Samples (262)5.4.3Exporting Audio (264)5.5Importing Third-Party File Formats (270)5.5.1Loading REX Files into Sound Slots (270)5.5.2Importing MPC Programs to Groups (271)6Playing on the Controller (275)6.1Adjusting the Pads (275)6.1.1The Pad View in the Software (275)6.1.2Choosing a Pad Input Mode (277)6.1.3Adjusting the Base Key (280)6.1.4Using Choke Groups (282)6.1.5Using Link Groups (284)6.2Adjusting the Key, Choke, and Link Parameters for Multiple Sounds (286)6.3Playing Tools (287)6.3.1Mute and Solo (288)6.3.2Choke All Notes (292)6.3.3Groove (293)6.3.4Level, Tempo, Tune, and Groove Shortcuts on Your Controller (295)6.3.5Tap Tempo (299)6.4Performance Features (300)6.4.1Overview of the Perform Features (300)6.4.2Selecting a Scale and Creating Chords (303)6.4.3Scale and Chord Parameters (303)6.4.4Creating Arpeggios and Repeated Notes (316)6.4.5Swing on Note Repeat / Arp Output (321)6.5Using Lock Snapshots (322)6.5.1Creating a Lock Snapshot (322)6.5.2Using Extended Lock (323)6.5.3Updating a Lock Snapshot (323)6.5.4Recalling a Lock Snapshot (324)6.5.5Morphing Between Lock Snapshots (324)6.5.6Deleting a Lock Snapshot (325)6.5.7Triggering Lock Snapshots via MIDI (326)6.6Using the Smart Strip (327)6.6.1Pitch Mode (328)6.6.2Modulation Mode (328)6.6.3Perform Mode (328)6.6.4Notes Mode (329)7Working with Plug-ins (330)7.1Plug-in Overview (330)7.1.1Plug-in Basics (330)7.1.2First Plug-in Slot of Sounds: Choosing the Sound’s Role (334)7.1.3Loading, Removing, and Replacing a Plug-in (335)7.1.3.1Browser Plug-in Slot Selection (341)7.1.4Adjusting the Plug-in Parameters (344)7.1.5Bypassing Plug-in Slots (344)7.1.6Using Side-Chain (346)7.1.7Moving Plug-ins (346)7.1.8Alternative: the Plug-in Strip (348)7.1.9Saving and Recalling Plug-in Presets (348)7.1.9.1Saving Plug-in Presets (349)7.1.9.2Recalling Plug-in Presets (350)7.1.9.3Removing a Default Plug-in Preset (351)7.2The Sampler Plug-in (352)7.2.1Page 1: Voice Settings / Engine (354)7.2.2Page 2: Pitch / Envelope (356)7.2.3Page 3: FX / Filter (359)7.2.4Page 4: Modulation (361)7.2.5Page 5: LFO (363)7.2.6Page 6: Velocity / Modwheel (365)7.3Using Native Instruments and External Plug-ins (367)7.3.1Opening/Closing Plug-in Windows (367)7.3.2Using the VST/AU Plug-in Parameters (370)7.3.3Setting Up Your Own Parameter Pages (371)7.3.4Using VST/AU Plug-in Presets (376)7.3.5Multiple-Output Plug-ins and Multitimbral Plug-ins (378)8Using the Audio Plug-in (380)8.1Loading a Loop into the Audio Plug-in (384)8.2Editing Audio in the Audio Plug-in (385)8.3Using Loop Mode (386)8.4Using Gate Mode (388)9Using the Drumsynths (390)9.1Drumsynths – General Handling (391)9.1.1Engines: Many Different Drums per Drumsynth (391)9.1.2Common Parameter Organization (391)9.1.3Shared Parameters (394)9.1.4Various Velocity Responses (394)9.1.5Pitch Range, Tuning, and MIDI Notes (394)9.2The Kicks (395)9.2.1Kick – Sub (397)9.2.2Kick – Tronic (399)9.2.3Kick – Dusty (402)9.2.4Kick – Grit (403)9.2.5Kick – Rasper (406)9.2.6Kick – Snappy (407)9.2.7Kick – Bold (409)9.2.8Kick – Maple (411)9.2.9Kick – Push (412)9.3The Snares (414)9.3.1Snare – Volt (416)9.3.2Snare – Bit (418)9.3.3Snare – Pow (420)9.3.4Snare – Sharp (421)9.3.5Snare – Airy (423)9.3.6Snare – Vintage (425)9.3.7Snare – Chrome (427)9.3.8Snare – Iron (429)9.3.9Snare – Clap (431)9.3.10Snare – Breaker (433)9.4The Hi-hats (435)9.4.1Hi-hat – Silver (436)9.4.2Hi-hat – Circuit (438)9.4.3Hi-hat – Memory (440)9.4.4Hi-hat – Hybrid (442)9.4.5Creating a Pattern with Closed and Open Hi-hats (444)9.5The Toms (445)9.5.1Tom – Tronic (447)9.5.2Tom – Fractal (449)9.5.3Tom – Floor (453)9.5.4Tom – High (455)9.6The Percussions (456)9.6.1Percussion – Fractal (458)9.6.2Percussion – Kettle (461)9.6.3Percussion – Shaker (463)9.7The Cymbals (467)9.7.1Cymbal – Crash (469)9.7.2Cymbal – Ride (471)10Using the Bass Synth (474)10.1Bass Synth – General Handling (475)10.1.1Parameter Organization (475)10.1.2Bass Synth Parameters (477)11Working with Patterns (479)11.1Pattern Basics (479)11.1.1Pattern Editor Overview (480)11.1.2Navigating the Event Area (486)11.1.3Following the Playback Position in the Pattern (488)11.1.4Jumping to Another Playback Position in the Pattern (489)11.1.5Group View and Keyboard View (491)11.1.6Adjusting the Arrange Grid and the Pattern Length (493)11.1.7Adjusting the Step Grid and the Nudge Grid (497)11.2Recording Patterns in Real Time (501)11.2.1Recording Your Patterns Live (501)11.2.2The Record Prepare Mode (504)11.2.3Using the Metronome (505)11.2.4Recording with Count-in (506)11.2.5Quantizing while Recording (508)11.3Recording Patterns with the Step Sequencer (508)11.3.1Step Mode Basics (508)11.3.2Editing Events in Step Mode (511)11.3.3Recording Modulation in Step Mode (513)11.4Editing Events (514)11.4.1Editing Events with the Mouse: an Overview (514)11.4.2Creating Events/Notes (517)11.4.3Selecting Events/Notes (518)11.4.4Editing Selected Events/Notes (526)11.4.5Deleting Events/Notes (532)11.4.6Cut, Copy, and Paste Events/Notes (535)11.4.7Quantizing Events/Notes (538)11.4.8Quantization While Playing (540)11.4.9Doubling a Pattern (541)11.4.10Adding Variation to Patterns (541)11.5Recording and Editing Modulation (546)11.5.1Which Parameters Are Modulatable? (547)11.5.2Recording Modulation (548)11.5.3Creating and Editing Modulation in the Control Lane (550)11.6Creating MIDI Tracks from Scratch in MASCHINE (555)11.7Managing Patterns (557)11.7.1The Pattern Manager and Pattern Mode (558)11.7.2Selecting Patterns and Pattern Banks (560)11.7.3Creating Patterns (563)11.7.4Deleting Patterns (565)11.7.5Creating and Deleting Pattern Banks (566)11.7.6Naming Patterns (568)11.7.7Changing the Pattern’s Color (570)11.7.8Duplicating, Copying, and Pasting Patterns (571)11.7.9Moving Patterns (574)11.7.10Adjusting Pattern Length in Fine Increments (575)11.8Importing/Exporting Audio and MIDI to/from Patterns (576)11.8.1Exporting Audio from Patterns (576)11.8.2Exporting MIDI from Patterns (577)11.8.3Importing MIDI to Patterns (580)12Audio Routing, Remote Control, and Macro Controls (589)12.1Audio Routing in MASCHINE (590)12.1.1Sending External Audio to Sounds (591)12.1.2Configuring the Main Output of Sounds and Groups (596)12.1.3Setting Up Auxiliary Outputs for Sounds and Groups (601)12.1.4Configuring the Master and Cue Outputs of MASCHINE (605)12.1.5Mono Audio Inputs (610)12.1.5.1Configuring External Inputs for Sounds in Mix View (611)12.2Using MIDI Control and Host Automation (614)12.2.1Triggering Sounds via MIDI Notes (615)12.2.2Triggering Scenes via MIDI (622)12.2.3Controlling Parameters via MIDI and Host Automation (623)12.2.4Selecting VST/AU Plug-in Presets via MIDI Program Change (631)12.2.5Sending MIDI from Sounds (632)12.3Creating Custom Sets of Parameters with the Macro Controls (636)12.3.1Macro Control Overview (637)12.3.2Assigning Macro Controls Using the Software (638)12.3.3Assigning Macro Controls Using the Controller (644)13Controlling Your Mix (646)13.1Mix View Basics (646)13.1.1Switching between Arrange View and Mix View (646)13.1.2Mix View Elements (647)13.2The Mixer (649)13.2.1Displaying Groups vs. Displaying Sounds (650)13.2.2Adjusting the Mixer Layout (652)13.2.3Selecting Channel Strips (653)13.2.4Managing Your Channels in the Mixer (654)13.2.5Adjusting Settings in the Channel Strips (656)13.2.6Using the Cue Bus (660)13.3The Plug-in Chain (662)13.4The Plug-in Strip (663)13.4.1The Plug-in Header (665)13.4.2Panels for Drumsynths and Internal Effects (667)13.4.3Panel for the Sampler (668)13.4.4Custom Panels for Native Instruments Plug-ins (671)13.4.5Undocking a Plug-in Panel (Native Instruments and External Plug-ins Only) (675)13.5Controlling Your Mix from the Controller (677)13.5.1Navigating Your Channels in Mix Mode (678)13.5.2Adjusting the Level and Pan in Mix Mode (679)13.5.3Mute and Solo in Mix Mode (680)13.5.4Plug-in Icons in Mix Mode (680)14Using Effects (681)14.1Applying Effects to a Sound, a Group or the Master (681)14.1.1Adding an Effect (681)14.1.2Other Operations on Effects (690)14.1.3Using the Side-Chain Input (692)14.2Applying Effects to External Audio (695)14.2.1Step 1: Configure MASCHINE Audio Inputs (695)14.2.2Step 2: Set up a Sound to Receive the External Input (698)14.2.3Step 3: Load an Effect to Process an Input (700)14.3Creating a Send Effect (701)14.3.1Step 1: Set Up a Sound or Group as Send Effect (702)14.3.2Step 2: Route Audio to the Send Effect (706)14.3.3 A Few Notes on Send Effects (708)14.4Creating Multi-Effects (709)15Effect Reference (712)15.1Dynamics (713)15.1.1Compressor (713)15.1.2Gate (717)15.1.3Transient Master (721)15.1.4Limiter (723)15.1.5Maximizer (727)15.2Filtering Effects (730)15.2.1EQ (730)15.2.2Filter (733)15.2.3Cabinet (737)15.3Modulation Effects (738)15.3.1Chorus (738)15.3.2Flanger (740)15.3.3FM (742)15.3.4Freq Shifter (743)15.3.5Phaser (745)15.4Spatial and Reverb Effects (747)15.4.1Ice (747)15.4.2Metaverb (749)15.4.3Reflex (750)15.4.4Reverb (Legacy) (752)15.4.5Reverb (754)15.4.5.1Reverb Room (754)15.4.5.2Reverb Hall (757)15.4.5.3Plate Reverb (760)15.5Delays (762)15.5.1Beat Delay (762)15.5.2Grain Delay (765)15.5.3Grain Stretch (767)15.5.4Resochord (769)15.6Distortion Effects (771)15.6.1Distortion (771)15.6.2Lofi (774)15.6.3Saturator (775)15.7Perform FX (779)15.7.1Filter (780)15.7.2Flanger (782)15.7.3Burst Echo (785)15.7.4Reso Echo (787)15.7.5Ring (790)15.7.6Stutter (792)15.7.7Tremolo (795)15.7.8Scratcher (798)16Working with the Arranger (801)16.1Arranger Basics (801)16.1.1Navigating Song View (804)16.1.2Following the Playback Position in Your Project (806)16.1.3Performing with Scenes and Sections using the Pads (807)16.2Using Ideas View (811)16.2.1Scene Overview (811)16.2.2Creating Scenes (813)16.2.3Assigning and Removing Patterns (813)16.2.4Selecting Scenes (817)16.2.5Deleting Scenes (818)16.2.6Creating and Deleting Scene Banks (820)16.2.7Clearing Scenes (820)16.2.8Duplicating Scenes (821)16.2.9Reordering Scenes (822)16.2.10Making Scenes Unique (824)16.2.11Appending Scenes to Arrangement (825)16.2.12Naming Scenes (826)16.2.13Changing the Color of a Scene (827)16.3Using Song View (828)16.3.1Section Management Overview (828)16.3.2Creating Sections (833)16.3.3Assigning a Scene to a Section (834)16.3.4Selecting Sections and Section Banks (835)16.3.5Reorganizing Sections (839)16.3.6Adjusting the Length of a Section (840)16.3.6.1Adjusting the Length of a Section Using the Software (841)16.3.6.2Adjusting the Length of a Section Using the Controller (843)16.3.7Clearing a Pattern in Song View (843)16.3.8Duplicating Sections (844)16.3.8.1Making Sections Unique (845)16.3.9Removing Sections (846)16.3.10Renaming Scenes (848)16.3.11Clearing Sections (849)16.3.12Creating and Deleting Section Banks (850)16.3.13Working with Patterns in Song view (850)16.3.13.1Creating a Pattern in Song View (850)16.3.13.2Selecting a Pattern in Song View (850)16.3.13.3Clearing a Pattern in Song View (851)16.3.13.4Renaming a Pattern in Song View (851)16.3.13.5Coloring a Pattern in Song View (851)16.3.13.6Removing a Pattern in Song View (852)16.3.13.7Duplicating a Pattern in Song View (852)16.3.14Enabling Auto Length (852)16.3.15Looping (853)16.3.15.1Setting the Loop Range in the Software (854)16.4Playing with Sections (855)16.4.1Jumping to another Playback Position in Your Project (855)16.5Triggering Sections or Scenes via MIDI (856)16.6The Arrange Grid (858)16.7Quick Grid (860)17Sampling and Sample Mapping (862)17.1Opening the Sample Editor (862)17.2Recording Audio (863)17.2.1Opening the Record Page (863)17.2.2Selecting the Source and the Recording Mode (865)17.2.3Arming, Starting, and Stopping the Recording (868)17.2.5Using the Footswitch for Recording Audio (871)17.2.6Checking Your Recordings (872)17.2.7Location and Name of Your Recorded Samples (876)17.3Editing a Sample (876)17.3.1Using the Edit Page (877)17.3.2Audio Editing Functions (882)17.4Slicing a Sample (890)17.4.1Opening the Slice Page (891)17.4.2Adjusting the Slicing Settings (893)17.4.3Live Slicing (898)17.4.3.1Live Slicing Using the Controller (898)17.4.3.2Delete All Slices (899)17.4.4Manually Adjusting Your Slices (899)17.4.5Applying the Slicing (906)17.5Mapping Samples to Zones (912)17.5.1Opening the Zone Page (912)17.5.2Zone Page Overview (913)17.5.3Selecting and Managing Zones in the Zone List (915)17.5.4Selecting and Editing Zones in the Map View (920)17.5.5Editing Zones in the Sample View (924)17.5.6Adjusting the Zone Settings (927)17.5.7Adding Samples to the Sample Map (934)18Appendix: Tips for Playing Live (937)18.1Preparations (937)18.1.1Focus on the Hardware (937)18.1.2Customize the Pads of the Hardware (937)18.1.3Check Your CPU Power Before Playing (937)18.1.4Name and Color Your Groups, Patterns, Sounds and Scenes (938)18.1.5Consider Using a Limiter on Your Master (938)18.1.6Hook Up Your Other Gear and Sync It with MIDI Clock (938)18.1.7Improvise (938)18.2Basic Techniques (938)18.2.1Use Mute and Solo (938)18.2.2Use Scene Mode and Tweak the Loop Range (939)18.2.3Create Variations of Your Drum Patterns in the Step Sequencer (939)18.2.4Use Note Repeat (939)18.2.5Set Up Your Own Multi-effect Groups and Automate Them (939)18.3Special Tricks (940)18.3.1Changing Pattern Length for Variation (940)18.3.2Using Loops to Cycle Through Samples (940)18.3.3Using Loops to Cycle Through Samples (940)18.3.4Load Long Audio Files and Play with the Start Point (940)19Troubleshooting (941)19.1Knowledge Base (941)19.2Technical Support (941)19.3Registration Support (942)19.4User Forum (942)20Glossary (943)Index (951)1Welcome to MASCHINEThank you for buying MASCHINE!MASCHINE is a groove production studio that implements the familiar working style of classi-cal groove boxes along with the advantages of a computer based system. MASCHINE is ideal for making music live, as well as in the studio. It’s the hands-on aspect of a dedicated instru-ment, the MASCHINE hardware controller, united with the advanced editing features of the MASCHINE software.Creating beats is often not very intuitive with a computer, but using the MASCHINE hardware controller to do it makes it easy and fun. You can tap in freely with the pads or use Note Re-peat to jam along. Alternatively, build your beats using the step sequencer just as in classic drum machines.Patterns can be intuitively combined and rearranged on the fly to form larger ideas. You can try out several different versions of a song without ever having to stop the music.Since you can integrate it into any sequencer that supports VST, AU, or AAX plug-ins, you can reap the benefits in almost any software setup, or use it as a stand-alone application. You can sample your own material, slice loops and rearrange them easily.However, MASCHINE is a lot more than an ordinary groovebox or sampler: it comes with an inspiring 7-gigabyte library, and a sophisticated, yet easy to use tag-based Browser to give you instant access to the sounds you are looking for.What’s more, MASCHINE provides lots of options for manipulating your sounds via internal ef-fects and other sound-shaping possibilities. You can also control external MIDI hardware and 3rd-party software with the MASCHINE hardware controller, while customizing the functions of the pads, knobs and buttons according to your needs utilizing the included Controller Editor application. We hope you enjoy this fantastic instrument as much as we do. Now let’s get go-ing!—The MASCHINE team at Native Instruments.MASCHINE Documentation1.1MASCHINE DocumentationNative Instruments provide many information sources regarding MASCHINE. The main docu-ments should be read in the following sequence:1.MASCHINE Getting Started: This document provides a practical approach to MASCHINE viaa set of tutorials covering easy and more advanced tasks in order to help you familiarizeyourself with MASCHINE.2.MASCHINE Manual (this document): The MASCHINE Manual provides you with a compre-hensive description of all MASCHINE software and hardware features.Additional documentation sources provide you with details on more specific topics:▪Controller Editor Manual: Besides using your MASCHINE hardware controller together withits dedicated MASCHINE software, you can also use it as a powerful and highly versatileMIDI controller to pilot any other MIDI-capable application or device. This is made possibleby the Controller Editor software, an application that allows you to precisely define all MIDIassignments for your MASCHINE controller. The Controller Editor was installed during theMASCHINE installation procedure. For more information on this, please refer to the Con-troller Editor Manual available as a PDF file via the Help menu of Controller Editor.▪Online Support Videos: You can find a number of support videos on The Official Native In-struments Support Channel under the following URL: https:///NIsupport-EN. We recommend that you follow along with these instructions while the respective ap-plication is running on your computer.Other Online Resources:If you are experiencing problems related to your Native Instruments product that the supplied documentation does not cover, there are several ways of getting help:▪Knowledge Base▪User Forum▪Technical Support▪Registration SupportYou will find more information on these subjects in the chapter Troubleshooting.1.2Document ConventionsThis section introduces you to the signage and text highlighting used in this manual. This man-ual uses particular formatting to point out special facts and to warn you of potential issues. The icons introducing these notes let you see what kind of information is to be expected:This document uses particular formatting to point out special facts and to warn you of poten-tial issues. The icons introducing the following notes let you see what kind of information can be expected:Furthermore, the following formatting is used:▪Text appearing in (drop-down) menus (such as Open…, Save as… etc.) in the software and paths to locations on your hard disk or other storage devices is printed in italics.▪Text appearing elsewhere (labels of buttons, controls, text next to checkboxes etc.) in the software is printed in blue. Whenever you see this formatting applied, you will find the same text appearing somewhere on the screen.▪Text appearing on the displays of the controller is printed in light grey. Whenever you see this formatting applied, you will find the same text on a controller display.▪Text appearing on labels of the hardware controller is printed in orange. Whenever you see this formatting applied, you will find the same text on the controller.▪Important names and concepts are printed in bold.▪References to keys on your computer’s keyboard you’ll find put in square brackets (e.g.,“Press [Shift] + [Enter]”).►Single instructions are introduced by this play button type arrow.→Results of actions are introduced by this smaller arrow.Naming ConventionThroughout the documentation we will refer to MASCHINE controller (or just controller) as the hardware controller and MASCHINE software as the software installed on your computer.The term “effect” will sometimes be abbreviated as “FX” when referring to elements in the MA-SCHINE software and hardware. These terms have the same meaning.Button Combinations and Shortcuts on Your ControllerMost instructions will use the “+” sign to indicate buttons (or buttons and pads) that must be pressed simultaneously, starting with the button indicated first. E.g., an instruction such as:“Press SHIFT + PLAY”means:1.Press and hold SHIFT.2.While holding SHIFT, press PLAY and release it.3.Release SHIFT.Unlabeled Buttons on the ControllerThe buttons and knobs above and below the displays on your MASCHINE controller do not have labels.。
DNS缓存投毒攻击原理与防御策略

17 2009.11
China Communications
II 服务器只记录本地资源的所有授权主 机,若想查询非本地的主机信息,则要向信息持有 者(权威 DNS 服务器)发送查询请求。为了避免每 次查询都发送请求,DNS 服务器会把权威 DNS 服务 器返回的查询结果保存在缓存中,并保持一定时间, 这就构成了 DNS 缓存(DNS Cache)。DNS 缓存投毒 攻击就是通过污染 DNS Cache,用虚假的 IP 地址信 息替换 Cache 中主机记录的真实 IP 地址信息来制造 破坏。
III.KAMINSKY缓存投毒攻击
2008 年夏天,Dan Kaminsky 发现了一种新型 DNS 缓存投毒攻击,引起了网络安全界的广泛关注。 该攻击方法克服了传统 DNS 缓存投毒攻击存在的攻 击所需时间长、成功率很低的缺陷。
3.1 Kaminsky攻击原理 传统的 DNS 缓存投毒攻击,污染的目标是应 答数据包中带有查询结果 IP 地址的回答资源记录部 分(参见表 1 (b)),而 Kaminsky 攻击上升了一个层 次,污染的目标是应答数据包中 Authority Records 部分(授权资源记录,参见表 1 (b))。图 4 显示了 Kaminsky 攻击流程。 (1) 攻 击 者 向 被 攻 击 的 目 标 服 务 器 发 送 一 个 DNS 查询请求,该查询请求中的域名主机使用随机 序 列 和 目 标 域 名 的 组 合, 如 图 4 中 的 www276930. ,其中 为目标域名,276930 是随 机生成的序列。显然,这个查询的域名主机是不存 在的,正常返回的应答数据包中回答资源记录部分 应为 NXDOMAIN(表示该域名主机不存在)。 (2)被攻击目标服务器会按 2.1 节中所述 DNS
Infoprint 250 導入と計画の手引き 第 7 章ホスト
SUBNETMASK
255.255.255.128
Type of service...............: TOS
*NORMAL
Maximum transmission unit.....: MTU
*LIND
Autostart.....................:
AUTOSTART
*YES
: xx.xxx.xxx.xxx
: xx.xxx.xxx.xxx
*
(
)
IEEE802.3
60 1500
: xxxx
48 Infoprint 250
31. AS/400
IP
MTU
1
1
IPDS TCP
CRTPSFCFG (V3R2)
WRKAFP2 (V3R1 & V3R6)
RMTLOCNAME RMTSYS
MODEL
0
Advanced function printing............:
AFP
*YES
AFP attachment........................:
AFPATTACH
*APPC
Online at IPL.........................:
ONLINE
FORMFEED
*CONT
Separator drawer......................:
SEPDRAWER
*FILE
Separator program.....................:
SEPPGM
*NONE
Library.............................:
NETGEAR GS305v3 和 GS308v3 5-Port 和 8-Port 无管理 Giga
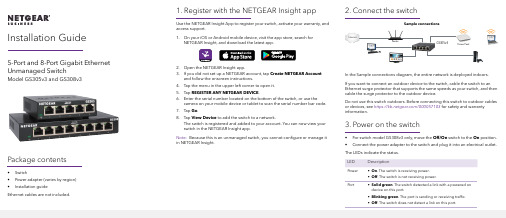
Installation Guide5-Port and 8-Port Gigabit Ethernet Unmanaged SwitchModel GS305v3 and GS308v3Package contents• Switch• Power adapter (varies by region)• Installation guideEthernet cables are not included.1. Register with the NETGEAR Insight appUse the NETGEAR Insight App to register your switch, activate your warranty, andaccess support.1. On your iOS or Android mobile device, visit the app store, search forNETGEAR Insight, and download the latest app.2. Open the NETGEAR Insight app.3. If you did not set up a NETGEAR account, tap Create NETGEAR Accountand follow the onscreen instructions.4. Tap the menu in the upper left corner to open it.5. Tap REGISTER ANY NETGEAR DEVICE.6. Enter the serial number located on the bottom of the switch, or use thecamera on your mobile device or tablet to scan the serial number bar code.7. Tap Go.8. Tap View Device to add the switch to a network.The switch is registered and added to your account. You can now view yourswitch in the NETGEAR Insight app.Note: Because this is an unmanaged switch, you cannot configure or manage itin NETGEAR Insight.2. Connect the switchIn the Sample connections diagram, the entire network is deployed indoors.If you want to connect an outdoor device to the switch, cable the switch to anEthernet surge protector that supports the same speeds as your switch, and thencable the surge protector to the outdoor device.Do not use this switch outdoors. Before connecting this switch to outdoor cablesor devices, see https:///000057103 for safety and warrantyinformation.3. Power on the switch• For switch model GS308v3 only, move the Off/On switch to the On position.• Connect the power adapter to the switch and plug it into an electrical outlet.The LEDs indicate the status.LED DescriptionPower• On. The switch is receiving power.• Off. The switch is not receiving power.Port• Solid green. The switch detected a link with a powered on device on this port.• Blinking green. The port is sending or receiving traffic.• Off. The switch does not detect a link on this port.Access PointRouterGS305v3Sample connectionsNETGEAR, Inc.350 East Plumeria DriveSan Jose, CA 95134, USA NETGEAR INTL LTDFloor 1, Building 3, University Technology Centre Curraheen Road, Cork,T12EF21, Ireland© NETGEAR, Inc., NETGEAR and the NETGEAR Logo are trademarks of NETGEAR, Inc. Any non‑NETGEAR trademarks are used for reference purposes only.Support and CommunityVisit /support to get your questions answered and access the latest downloads.You can also check out our NETGEAR Community for helpful advice at .Regulatory and LegalSi ce produit est vendu au Canada, vous pouvez accéder à ce document enfrançais canadien à https:///support/download/.(If this product is sold in Canada, you can access this document in Canadian French at https:///support/download/.)For regulatory compliance information including the EU Declaration of Conformity, visit https:///about/regulatory/.See the regulatory compliance document before connecting the power supply. For NETGEAR’s Privacy Policy, visit https:///about/privacy-policy. By using this device, you are agreeing to NETGEAR’s Terms and Conditions at https:///about/terms-and-conditions. If you do not agree, return the device to your place of purchase within your return period.April 2020。
中文AT Commands Manual 命令手册

2.1AT+CPIN PIN Control ........................................................................................................... 9 2.2 ATA Answer Incoming Call ................................................................................................ 9 2.3 ATD Dial................................................................................................................................ 10 2.4 ATH Hang up ....................................................................................................................... 11 2.5 ATL Monitor Speaker Loudness..................................................................................... 11 2.6 ATO Return to Online Data Mode................................................................................... 12 2.7 ATP Select Pulse Dialling ................................................................................................ 12 2.8 ATT Select Tone Dialling .................................................................................................. 12 2.9 ATX Call Progress Monitoring Control......................................................................... 12 2.10 AT+CHUP Hang up Call.................................................................................................. 13 2.11 AT+CMOD Call Mode....................................................................................................... 13 2.12 AT+CVHU Voice Hang-Up .............................................................................................. 13 2.13 AT+VTD DTMF tone duration........................................................................................ 14 2.14 AT+VTS DTMF and Tone Generation .......................................................................... 14 3.控制与状态........................................................................................................................................ 15
华为交换机初始化命令 怎么让Cisco3750交换机密码初始化
华为交换机初始化命令怎么让Cisco3750交换机密码初始化你还在为不知道怎么让Cisco3750交换机密码初始化而烦恼么?接下来是为大家收集的让Cisco3750交换机密码初始化教程,希望能帮到大家。
怎么让Cisco3750交换机密码初始化的方法分类:系统运维1. 连接交换机的console口到终端或PC仿真终端。
用无Modem的直连线连接PC的串行口到交换机的console口。
2. 拔掉交换机的电源.3. 按住交换机上的Mode按钮,与此同时,重新插上交换机的电源线.当交换机上SYST的LED长期亮的时候,可以松开Mode按钮。
4. 再通过超级终端连接交换机。
5. 交换机有如下显示:switch::switch: flash_init初始化flash文件系统Initializing Flash...flashfs怎么让Cisco3750交换机密码初始化: 83 files, 4 directoriesflashfs怎么让Cisco3750交换机密码初始化: 0 orphaned files, 0 orphaned directoriesflashfs怎么让Cisco3750交换机密码初始化: Total bytes: 15998976flashfs怎么让Cisco3750交换机密码初始化: Bytes used: 6472704flashfs怎么让Cisco3750交换机密码初始化: Bytes available: 9526272flashfs怎么让Cisco3750交换机密码初始化: flashfs fsck took 8 seconds....done Initializing Flash.Boot Sector Filesystem (bs) installed, fsid: 3Setting console baud rate to 9600...switch: rename flash:config.text flash:config.old更名含有password的配置文件switch: boot启动交换机Loading "flash:c3750-i9-mz.121-19.EA1d/c3750-i9-mz.121-19.EA1d.bin"...@@@@@@@@@@。
- 1、下载文档前请自行甄别文档内容的完整性,平台不提供额外的编辑、内容补充、找答案等附加服务。
- 2、"仅部分预览"的文档,不可在线预览部分如存在完整性等问题,可反馈申请退款(可完整预览的文档不适用该条件!)。
- 3、如文档侵犯您的权益,请联系客服反馈,我们会尽快为您处理(人工客服工作时间:9:00-18:30)。
The dig commandHans Kruse and Carl BruggemanJan7,2007The dig commandThe dig command is only found on modern Unix systems.Windows contains the predecessor to dig, nslookup.dig is used to make queries into the Domain Name System(DNS).We will use dig to convert names to addresses without using an application like a web browser(which might not give you good information about why a lookup might have failed).We also use dig to initiate queries that usually happen“behind the scenes”,such as looking up names for addresses(a“reverse”query),or looking up name servers for an organization.This document only shows very simple examples;check the man page for all the other options.What does the dig output mean?Below is a sample of what the dig command might produce:>dig ;<<>>DiG9.2.2<<>>;;global options:printcmd;;Got answer:;;->>HEADER<<-opcode:QUERY,status:NOERROR,id:6551;;flags:qr aa rd ra;QUERY:1,ANSWER:1,AUTHORITY:6,ADDITIONAL:6;;QUESTION SECTION:;.IN A;;ANSWER SECTION:.86400IN A132.235.67.21;;AUTHORITY SECTION:.86400IN NS ..86400IN NS ..86400IN NS ..86400IN NS ..86400IN NS ..86400IN NS .;;ADDITIONAL SECTION:.86400IN A132.235.64.1.86400IN A132.235.64.2.28800IN A132.235.1.1.28800IN A132.235.1.2.171639IN A128.174.5.104.171639IN A128.174.5.103;;Query time:1msec;;SERVER:132.235.64.1#53(132.235.64.1);;WHEN:Sun Jan714:55:232007;;MSG SIZE rcvd:299You can see that the output contains several distinct sections:•global options:starts a section that contains mainly program settings used for the query, and some information about the result.Look for the status:field,it should read NOERROR.Failed queries will still produce output very similar to the one above,but with a different status, such as NXDOMAIN for“non-existent domain name”.The ANSWER:field should show a number greater than zero.•The QUESTION section restates your query in DNS syntax.•The ANSWER section contains one or more DNS records that correspond to your query.We will talk about these in a later lab.The answer here says that corresponds to an Internet(IN)address(A),namely132.235.67.21;this answer is valid for86,400seconds(i.e.1day).•The remaining sections tell you which name servers have authority over the name you just looked up,and they helpfully provide the IP addresses for these servers in case you want to query them directly.Finally,the command prints some statistics about the performance of the query.The dig man page from Mac OS XDIG(1)DIG(1)NAMEdig-DNS lookup utilitySYNOPSISdig[@server][-b address][-c class][-f filename][-kfilename][-p port#][-t type][-x addr][-y name:key][ name][type][class][queryopt...]dig[-h]dig[global-queryopt...][query...]DESCRIPTIONdig(domain information groper)is a flexible tool for interrogating DNS name servers.It performs DNS lookups and displays the answers that are returned from the name server(s)that were queried.Most DNS admin-istrators use dig to troubleshoot DNS problems because of its flexibil-ity,ease of use and clarity of output.Other lookup tools tend to have less functionality than dig.Although dig is normally used with command-line arguments,it also hasa batch mode of operation for reading lookup requests from a file.Abrief summary of its command-line arguments and options is printed when the-h option is given.Unlike earlier versions,the BIND9implementa-tion of dig allows multiple lookups to be issued from the command line.Unless it is told to query a specific name server,dig will try each of the servers listed in/etc/resolv.conf.When no command line arguments or options are given,will perform an NS query for"."(the root).SIMPLE USAGEA typical invocation of dig looks like:dig@server name typewhere:server is the name or IP address of the name server to query.This can be an IPv4address in dotted-decimal notation or an IPv6addressin colon-delimited notation.When the supplied server argumentis a hostname,dig resolves that name before querying that nameserver.If no server argument is provided,dig consults/etc/resolv.conf and queries the name servers listed there.Thereply from the name server that responds is displayed.name is the name of the resource record that is to be looked up.type indicates what type of query is required--ANY,A,MX,SIG, etc.type can be any valid query type.If no type argument issupplied,dig will perform a lookup for an A record.OPTIONSThe-b option sets the source IP address of the query to address.This must be a valid address on one of the host’s network interfaces.The default query class(IN for internet)is overridden by the-coption.class is any valid class,such as HS for Hesiod records or CHfor CHAOSNET records.The-f option makes dig operate in batch mode by reading a list oflookup requests to process from the file filename.The file contains a number of queries,one per line.Each entry in the file should be organised in the same way they would be presented as queries to dig using the command-line interface.If a non-standard port number is to be queried,the-p option is used.port#is the port number that dig will send its queries instead of the standard DNS port number53.This option would be used to test a name server that has been configured to listen for queries on a non-standard port number.The-t option sets the query type to type.It can be any valid query type which is supported in BIND9.The default query type"A",unlessthe-x option is supplied to indicate a reverse lookup.A zone trans-fer can be requested by specifying a type of AXFR.When an incremental zone transfer(IXFR)is required,type is set to ixfr=N.The incremen-tal zone transfer will contain the changes made to the zone since the serial number in the zone’s SOA record was N.Reverse lookups-mapping addresses to names-are simplified by the-x option.addr is an IPv4address in dotted-decimal notation,or a colon-delimited IPv6address.When this option is used,there is no need toprovide the name,class and type arguments.dig automatically performsa lookup for a name like11.12.13.10.in-addr.arpa and sets the querytype and class to PTR and IN respectively.By default,IPv6addresses are looked up using the IP6.ARPA domain and binary labels as defined in RFC2874.To use the older RFC1886method using the IP6.INT domain and "nibble"labels,specify the-n(nibble)option.To sign the DNS queries sent by dig and their responses using transac-tion signatures(TSIG),specify a TSIG key file using the-k option.You can also specify the TSIG key itself on the command line using the -y option;name is the name of the TSIG key and key is the actual key.The key is a base-64encoded string,typically generated by dnssec-key-gen(8).Caution should be taken when using the-y option on multi-usersystems as the key can be visible in the output from ps(1)or in the shell’s history file.When using TSIG authentication with dig,the name server that is queried needs to know the key and algorithm that is being used.In BIND,this is done by providing appropriate key andserver statements in named.conf.QUERY OPTIONSdig provides a number of query options which affect the way in whichlookups are made and the results displayed.Some of these set or resetflag bits in the query header,some determine which sections of the answer get printed,and others determine the timeout and retry strate-gies.Each query option is identified by a keyword preceded by a plus sign (+).Some keywords set or reset an option.These may be preceded by the string no to negate the meaning of that keyword.Other keywords assignvalues to options like the timeout interval.They have the form+key-word=value.The query options are:+[no]tcpUse[do not use]TCP when querying name servers.The default be-haviour is to use UDP unless an AXFR or IXFR query is requested,in which case a TCP connection is used.+[no]vcUse[do not use]TCP when querying name servers.This alternatesyntax to+[no]tcp is provided for backwards compatibility.The"vc"stands for"virtual circuit".+[no]ignoreIgnore truncation in UDP responses instead of retrying with TCP.By default,TCP retries are performed.+domain=somenameSet the search list to contain the single domain somename,as ifspecified in a domain directive in/etc/resolv.conf,and enablesearch list processing as if the+search option were given.+[no]searchUse[do not use]the search list defined by the searchlist ordomain directive in resolv.conf(if any).The search list isnot used by default.+[no]defnameDeprecated,treated as a synonym for+[no]search+[no]aaonlyThis option does nothing.It is provided for compatibility withold versions of dig where it set an unimplemented resolver flag.+[no]adflagSet[do not set]the AD(authentic data)bit in the query.The AD bit currently has a standard meaning only in responses,not in queries,but the ability to set the bit in the query is pro-vided for completeness.+[no]cdflagSet[do not set]the CD(checking disabled)bit in the query. This requests the server to not perform DNSSEC validation of responses.+[no]recursiveToggle the setting of the RD(recursion desired)bit in the query.This bit is set by default,which means dig normally sends recursive queries.Recursion is automatically disabled when the+nssearch or+trace query options are used.+[no]nssearchWhen this option is set,dig attempts to find the authoritative name servers for the zone containing the name being looked up and display the SOA record that each name server has for the zone.+[no]traceToggle tracing of the delegation path from the root name servers for the name being looked up.Tracing is disabled by default. When tracing is enabled,dig makes iterative queries to resolve the name being looked up.It will follow referrals from the root servers,showing the answer from each server that was used to resolve the lookup.+[no]cmdtoggles the printing of the initial comment in the output iden-tifying the version of dig and the query options that have been applied.This comment is printed by default.+[no]shortProvide a terse answer.The default is to print the answer in a verbose form.+[no]identifyShow[or do not show]the IP address and port number that sup-plied the answer when the+short option is enabled.If short form answers are requested,the default is not to show the source address and port number of the server that provided the answer.+[no]commentsToggle the display of comment lines in the output.The default is to print comments.+[no]statsThis query option toggles the printing of statistics:when the query was made,the size of the reply and so on.The default be-haviour is to print the query statistics.+[no]qrPrint[do not print]the query as it is sent.By default,the query is not printed.+[no]questionPrint[do not print]the question section of a query when an answer is returned.The default is to print the question section as a comment.+[no]answerDisplay[do not display]the answer section of a reply.The default is to display it.+[no]authorityDisplay[do not display]the authority section of a reply.The default is to display it.+[no]additionalDisplay[do not display]the additional section of a reply.The default is to display it.+[no]allSet or clear all display flags.+time=TSets the timeout for a query to T seconds.The default time out is5seconds.An attempt to set T to less than1will result in a query timeout of1second being applied.+tries=TSets the number of times to retry UDP queries to server to T instead of the default,3.If T is less than or equal to zero, the number of retries is silently rounded up to1.+ndots=DSet the number of dots that have to appear in name to D for it to be considered absolute.The default value is that defined using the ndots statement in/etc/resolv.conf,or1if no ndots statement is s with fewer dots are interpreted as relative names and will be searched for in the domains listed in the search or domain directive in/etc/resolv.conf.+bufsize=BSet the UDP message buffer size advertised using EDNS0to B bytes.The maximum and minimum sizes of this buffer are65535 and0respectively.Values outside this range are rounded up ordown appropriately.+[no]multilinePrint records like the SOA records in a verbose multi-line for-mat with human-readable comments.The default is to print eachrecord on a single line,to facilitate machine parsing of thedig output.+[no]failDo not try the next server if you receive a SERVFAIL.Thedefault is to not try the next server which is the reverse ofnormal stub resolver behaviour.+[no]besteffortAttempt to display the contents of messages which are malformed.The default is to not display malformed answers.+[no]dnssecRequests DNSSEC records be sent by setting the DNSSEC OK bit(DO)in the the OPT record in the additional section of thequery.MULTIPLE QUERIESThe BIND9implementation of dig supports specifying multiple queries on the command line(in addition to supporting the-f batch fileoption).Each of those queries can be supplied with its own set of flags,options and query options.In this case,each query argument represent an individual query in the command-line syntax described above.Each consists of any of the stan-dard options and flags,the name to be looked up,an optional query type and class and any query options that should be applied to that query.A global set of query options,which should be applied to all queries,can also be supplied.These global query options must precede the first tuple of name,class,type,options,flags,and query options supplied on the command line.Any global query options(except the+[no]cmdoption)can be overridden by a query-specific set of query options.For example:dig+qr ns+noqrshows how dig could be used from the command line to make threelookups:an ANY query for ,a reverse lookup of127.0.0.1 and a query for the NS records of .A global query option of +qr is applied,so that dig shows the initial query it made for each lookup.The final query has a local query option of+noqr which meansthat dig will not print the initial query when it looks up the NSrecords for .FILES/etc/resolv.confSEE ALSOhost(1),named(8),dnssec-keygen(8),RFC1035. BUGSThere are probably too many query options. BIND9Jun30,2000DIG(1)。