Recommended Configuration for DVR Card
海康威视DVR产品操作指南

0301041050409
1
海康威视 DVR 产品快速操作指南
2 安全注意事项
1、硬盘录像机上请不要放置盛有液体的容器(例如花瓶) 。 2、硬盘录像机应放置在足够通风的空间,并防止堵塞通风口。 3、检查电源电压,防止出现电压不匹配导致器件损坏。 4、硬盘录像机应工作在技术指标允许的温度及湿度范围内。 5、硬盘录像机水平放置,并且避免安装在剧烈震动的环境下。 6、电路板上的灰尘在受潮后会引起短路,为了使硬盘录像机能长期正常工作,可以定 期用刷子对电路板、接插件、机箱等进行除尘。 7、电池更换不当会有爆炸危险,不建议用户自行更换电池;如需更换,只能用同样类 型或等效类型的电池来更换,切勿尝试打开或维修电池。 8、硬盘录像机安装施工等须符合规范,可参照相关国家或地方标准。 9、收到产品后,请打开包装盒,将设备取出并放置在适当的位置,依据盒内的装箱清 单确认装箱产品及附件。如果发现包装盒内物品有所损坏或任何配件短缺的情况,请 及时与经销商联系。
5
海康威视 DVR 产品快速操作指南
8 萤石云
“萤石云”是海康威视针对家庭和企业用户推出的视频服务类门户。 “萤石云”服务流程: 您也可以登录“萤石云”官方网站 ,单击主页上的“服务与下载→下载中心 →帮助文档下载”链接来获取。
萤石云手机客户端操作步骤
1、“萤石云视频”手机客户端安装 可通过扫描下方或设备开机向导界面的二维码下载“萤石云视频”手机客户端。 可登录 ,在“服务与下载→下载中心→客户端软件”中,根据手机系统 下载对应的移动客户端。
注意:1、配置“萤石云”服务前请确认设备外网连接是否正常。 2、确认外网访问端口是否开放,默认需要开放端口为 80、8000、554,可修改,详见 操作手册。 3、 设备支持手机监控, 手机客户端软件请登录海康威视官方网站 () 获得。 4、选择启用 UPnPTM,可以一键配置 UPnPTM(默认参数) 。 5、启用 PPPOE,可以在界面上直接输入 PPPOE 用户名、密码进行拨号上网,详见操 作手册。
Swann PRO-761 数字摄像头说明书
1PRO-761 DomeM761CAM190312EEnglishCongratulations on your purchase of this PRO-761 from Swann! You’ve chosen well: we think this is one of the finest CCTV video cameras available. The PRO-761 is great for monitoring a wide open space whilst maintaining a high level of detail, even in low-light situations.Placement GuideThe PRO-761 has a 3.6mm wide-angle lens built-in which allows it to see almost 80 degrees horizontally. What does this mean for you when placing it?• You will be able to see a really16.8mwide area. If it’s mounted high upin a square corner, you’ll probably beable to see along both walls. You’llbe able to monitor a large area withonly one camera.• Things may look further away thanthey really are. Anything furtherthan a few meters (ten feet or so)from the camera may appear to betoo small for the level of detail yourequire.• Vertical and horizontal lines might appear curved when they near the edge of the camera’s view. This is normal, and it’s the side effect of cramming so much viewing area onto one screen.The PRO-761 is great for monitoring rooms or areas as wide as, or wider than, they are long. For really wide areas, you may need a second camera.Typically, it is best mounted in a corner looking across and down into the room, so that it can look over intervening obstacles. The higher the ceiling the camera is mounted on, the more it will be able to see and the harder it’ll be for an intruder to access the camera or interfere with it.Tips:• T ry to aim the camera at an area which is evenly lit, as objects or people in shadows near brightly lit objects are very hard to see.• It’s better to have the camera in the shade looking into the light than vice-versa.• Avoid having bright light sources in your image. This includes the obvious (such as the sun or an artificial light source) but also things such as reflections. Cars are notorious for reflected light sources, as are buildings with a lot of windows, mirrors and so forth.23Installing the CameraThe camera mounts onto the underside of a flat, vertical or horizontal surface using screws. The surface must have sufficient strength to hold the camera. Materials such as hardwood, brick or masonry are good options, and we’ve included all the gear you’ll need to mount it there (except the tools - sorry, you’ll still need your own drill). You can mount the camera onto a metal surface, but you’ll need to supply your own mounting hardware.To mount the camera:• Using the small hex key(supplied), undo the two lockingscrews on the sides of the PRO-761 dome.• Remove the top of the dome.• Attach the base plate of thedome to the wall/ceiling in theposition you’d like using thesupplied screws. If mountingto brickwork, concrete orother masonry surface, use the included wall plugs.• Aim the camera in the direction you’d like. It can help to move a monitor or television out to the camera’s location to ensure you get it aimed and positioned properly.• Once the camera is aimed, re-attach the dome cover. Ensure that the black, protective plastic isn’t obscuring the camera’s vision.Tips: Positioning your Cables• When running your cable, try to avoid bending it at sharp angles.• Don’t put your cable near live electrical wiring. AC electricity generates radio “noise” which can interfere with the signal from your camera.Tips: Weatherproofing• The PRO-761 is built to be weather resistant. It’ll stand up to getting wet occasionally, but it’s not intended to be underwater all the time. When mounting the camera, ensure that it’s not in a location where water is likely to pool or build up over time.•Long term exposure to direct sunlight will adversely affect the camera. Over time, the infrared and ultraviolet radiation will eventually begin to degrade the integrity of the plastic cover, reducing transparency and making it brittle (and, therefore, more vulerable to vandalism or accidental damage). Basically, put it in the shade!The three screw holes, as seen from above.INPUTConnect a BNC to RCAadapter and connect to videoinput on your TV or VCR2Connect the camera’s DCand BNC socket cable to theextension cable’s DC and BNC plugs145The green plug is used to connect the OSD (on-screen display)controller. This is an advanced feature, and recommended onlyfor experienced users. To access a comprehensive guide for theadvanced features of this camera, log onto our website at:/osdproConnect the BNC extension cable to an open channel on the back of the DVR2Plug in the camera power adapter into a wall socket4Connect the extension cables DC socket to the DC plug on the power adapter3Problem: At night, all I see is white.Solution: The camera is most likely looking through a window. At night, the light from inside the room can ‘bounce back’ off a reflective surface (such as glass, water, spider webs, some ceramics and so on) and effectively blind the camera. If you want to see outside, mount the camera outside - we made it weather resistant for a reason!Problem: I see only a blank screen where my image should be.Solution: Check the wiring to the camera, and ensure the camera is being supplied power from the included power adapter. Try using a different video lead, or connecting the camera to a different television or monitor. Be sure there are no devices interrupting your signal, such as a DVR or VCR that isn’t outputting the signal correctly.Problem: I can’t see anything at night.Solution: The PRO-761 dome has great low-light vision (it’ll see better in the near dark than you do) but it’s just that - low light vision. It does need some light to see! Security light sets (essentially spotlights triggered by a passive infrared sensor [PIR]) are a good solution if you need targeted light - they’re available from most good hardware stores.Some additional, technical remarks:Low Light Vision• At 0.01lx, you’ll get an image (enough to see something moving, for example) but it will be very difficult or impossible to see any useful details.• At 0.1lx the quality will be significantly improved (enough to see an outline of WHAT is moving).• However, you’ll probably want to increase the amount of light significantly (to 1lx or more) before you’ll be able to tell who is moving about!Under aritficial lights, the average room is illuminated to somewhere in the vicinity of 40 ~ 60lx. If you’ve got bright lights and white walls, it may push over 100, whereas dim lights (or energy saving lamps) and dark walls might put the value below 20lx. The PRO-761 should work in these conditions, but there’s really no substitute for actually shining a light on what you want to see.6Technical SpecificationsVideoImage Sensor 1/3” Sony ‘Effio’ CCDVideo Quality 700 TV LinesEffective Pixels NTSC: 976 x 494PAL: 976 x 582Min. Illumination 0.1 LuxWhite Balance Automatic / Custom / ManualElectronic Shutter NTSC: 1/60 ~ 1/100 000PAL: 1/50 ~ 1/100 000Gain Control Automatic / ManualBacklight Comp. Yes (Adjustable)Wide Dynamic Range Yes (Adjustable)3.6mmL ensViewing Angle Avg: 75° (H: 80°, V: 70°)Night VisionNoneRangeIR Cut Filter NoNumber of IR LEDs 0Infrared Wavelength NAIR LED Life (Average) NAGeneralOperating Power DC 12V @ 300mAOperating Temp. -20°C ~ 45°C (-4°F ~ 113°F)AluminiumCasingDimensions 110mm x 110mm x 70mm(4.33” x 4.33” x 2.75”)Weight 368g / 0.8lbs (approx)78Swann T echnical SupportAllCountriesE-mail:**************T elephone Helpdesk1300 138 324 0800 479 266***********。
博世 安全系统-法拉登VIVIDIO应用程序 步骤配置 说明书

From Nuremberg BT-VS/MKP-XPT Product Management 20.04.2023Release LetterProduct: VIDEOJET decoder 7000 VJD-7513Version: Firmware 10.40.0055This letter contains latest information about the above-mentioned product.1. GeneralThis firmware release 10.40.0055 is a feature release based on FW 10.31.0005.Changes since last release FW 10.31.0005 are marked in blue.VIDEOJET decoder 7000 uses robust, fan-less technology designed for ambitious environmental conditions while providing maximum performance on minimum space in a nicely designed industrial housing.VIDEOJET decoder 7000 displays video from Standard Definition (SD), High Definition (HD), 4K Ultra High Definition (UHD), and Megapixel (MP) cameras and encoders using H.265, H.264 or MPEG-4 encoding at up to 60 frames per second over IP networks.VIDEOJET decoder 7000 is the successor of VIDEOJET decoder 8000 (VJD-8000, VJD-8000-N). It is using the same housing but comes with different video output interfaces and provides improved performance and functionality.Notes:•Firmware update may take several minutes due to a large cumulative Microsoft patch.•This firmware includes OpenSSL.From NurembergBT-VS/MKP-XPT Product Management 20.04.20232. Applicable products•VIDEOJET decoder 7000, VJD-75133. New Features•SRTP for encrypted multicast traffic is supported. This allows fully secured communication with and video streaming from CPP13 and CPP14 cameras in multicast environments.•SNMPv3 trap service has been added, including the support of SNMP-related RCP+ commands for configuration.• A JPEG snapshot is now possible from each of the displays, including JPEG quality settings parameter.•Display order can be re-arranged in case Windows display detection differs from mechanical order.•The default layout is depending on the display number to simplify the identification of display order. The number of video windows per display increases as square of the display number.•The web interface of the decoder has been updated to the latest style guide and re-structured to ease usage for installation, licensing, and integration purposes.o The new web pages provide links to documentation and include a live preview.o Maintenance log file creation and download is supported by a workflow mechanism.o A keyboard emulator supports initial setup for IP Matrix even without keyboard connected.From NurembergBT-VS/MKP-XPT Product Management 20.04.20234. Changes•The Video SDK as one of the core components for the decoder firmware has been updated to latest version 6.40, providing a great number of improvements and fixes, mainly aroundONVIF and RTSP support, increasing the overall robustness.•An issue is fixed for banner upload when banners are activated.•An issue is fixed for zooming out in client dewarping mode of panoramic camera streams.•An issue is fixed where client dewarping was not working on line 1 of a panoramic camera in onboard dewarping mode. Onboard dewarping is only available for lines 2 and higher, line 1 always provides the full warped image circle.•An issue with DNS server configuration is fixed.•An issue is fixed where CPP13 and CPP14 cameras were not correctly connected in camera sequences.•Maintenance log file download is improved, supported by the new web interface structure.•An issue is fixed where daylight saving time was incorrectly reflected in time zone offset calculation.5. System RequirementsFor configuration purposes:•Configuration Manager 7.61 or newerFor operation purposes:•Bosch Video Management System 12.0 or higherNote that not all features may be supported by BVMS yet.Please refer to BVMS release notes.From NurembergBT-VS/MKP-XPT Product Management 20.04.20236. Restrictions; Known Issues•Connecting encrypted streams without proper signalling may result in crashing the software decoder instance, resulting in black video displayed.•Alarms will not be signaled with a red border around the cameo if connection was established using CONNECT_PRIMITIVE.•Using CONNECT_PRIMITIVE via TCP is not possible.•CONNECT_PRIMITIVE does not support "first available" feature.•Audio may remain audible despite layout change to other than single view.•RCP+ command CONF_ALARM_CONNECT_TO_IP is not supported.•Alarm connection does not support audio, nor does it include metadata.•Maximum password length is 19 characters.•With “Reconnect last devices” active camera connections are stored and automatically reconnected after reboot. To avoid deadlock in case of an overload situation the automaticreconnect will be deactivated after the decoder was forced into reboot for ten times within 10 minutes.•Monitors may be swapped after update. Swap back is possible using Configuration Manager.•IP Matrix pre-requisites for multi-decoder clustering:o Fixed IP addresses must be assigned; DHCP configuration is not functional.o Passwords for service level must be same on all clustered decoders.o Passwords for user level must be same on all clustered decoders.•After removing a slave decoder from the IP Matrix master, both decoders must be restarted.•Camera sequences are paused when picture-in-picture mode is activated.•Time related settings may appear in Configuration Manager only with delay or after a reboot.•Monitors connected to the Display Port via USB-C may not always be detected during booting.In this case, unplug and reconnect the adapter or cable to the monitor. If only one monitor isused it is recommended to connect to the direct HDMI output.•Log file download stability may be affected by workload of decoder. As a workaround, the download may need to be repeated, or the workload of the decoder may need to be reduced (disconnect all camera streams).•Time zone configuration is only supported via TIME_ZONE_STRING.•The KBD-DIGITAL keyboard is locked automatically during start-up of the decoder, or with re-connect. It will be unlocked after entering the PIN but the lock screen will remain until the next action on the keyboard.•Certificates used with the decoder must not have any Windows policies defined.•DNS resolution is not implemented yet, thus time server entry only works with IP addresses.•Dewarping zoom does not work correctly for panoramic cameras in on-board dewarping mode for camera line 1.•Overload messages and traps may appear too sensitive in cases where display refresh rates are lower than video stream frame rates.From NurembergBT-VS/MKP-XPT Product Management 20.04.20237. Previous Revisions7.1. New Features with 10.31.0005•Support for HOST_NAME to get and set the device’s hostname; only supported in extended configuration mode.•Support for DNS_SERVER_IP_STRING to get and set primary and secondary DNS server IPv4 addresses.7.2. Changes with 10.31.0005•Optimized transparent data processing time to allow adequate transparent data pass-through for serial PTZ keyboard.•An issue is fixed to apply e-PTZ presets correctly in camera sequences.•Feature loss due to suppressing encrypted UDP multicast connections for Bosch IP cameras with firmware 8 and higher, and fall back to TCP, tunneled via HTTPS control connection.(This feature will be added again with FW 10.40.)From NurembergBT-VS/MKP-XPT Product Management 20.04.20237.3. New Features with 10.30.0005•The default setting for Automatic IPv4 address assignment is set to “DHCP plus Link-Local”.Though this might seem a small change, it may have an impact:The former default IP address 192.168.0.200 will virtually become obsolete.Instead, the camera will assign itself an auto-IP address out of the range 169.254.1.0 to169.254.254.255 as long as there is no other IP address assigned by a DHCP server.(https:///wiki/Link-local_address)The advantage is that there are no more duplicate IP addresses, which is consideredprohibited in a network.•Network authentication 802.1x with EAP/TLS has been added.Please note that the server certificate needs to get the usages ‘Trust’ and ‘EAP_TLS_Trusted’ assigned.The client certificate will get the necessary usages assigned automatically.•The possibility of large banner overlays has been introduced.o Banners can be uploaded as images that can be displayed over three areas: top, center and bottom. The images are scaled to fill the area and cropped wherenecessary.o Banners can be sequenced with a configurable dwell time.o Configuration Manager 7.60 is supporting this with upload and banner sequence configuration, including banner previews.•Set and recall prepositions for moving cameras (AUTODOME, MIC) as well as for ONVIF PTZ cameras via keyboard has been added to the IP Matrix functionality.•Images can be uploaded to the decoder for two purposes, using Configuration Manager. The images shall be in JPG format and must be named as follows:o‘monitor background’ image, shown as background of an empty video window: ‘Logo.jpg’o‘’no camera’ image, shown on connection failure: ‘NoCamLogo.jpg’7.4. Changes with 10.30.0005•An issue was fixed where uploading a new video loss image did not break the software seal.From NurembergBT-VS/MKP-XPT Product Management 20.04.20237.5. Changes with 10.23.0002• A security vulnerability has been fixed where a crafted configuration packet sent by an authenticated administrative user can be used to execute arbitrary commands in systemcontext (CVE-2021-23862).For more details refer to our Security Advisory BOSCH-SA-043434-BT, published at ourSecurity Advisory web pagehttps:///xc/en/support/product-security/security-advisories.htmlor visit our PSIRT website at https://.7.6. New Features with 10.22.0038•APIPA (link-local address, Auto-IP) is used instead of a default IP address when DHCP is on and no DHCP server responded.•Transparent data pass-through for serial PTZ keyboard (SERIAL_PORT_APP_VAL and TRANSFER_TRNSPARENT_DATA) has been added.•Support of RCP+ via CGI (including WRITE commands) has been added.•HTTP digest authentication is supported for RCP+ via CGI.•Display orientation can be changed per line via RCP+.•RCP+ WRITE command MONITOR_NAME now supported for custom monitor names.•Updated RCP+ documentation is now available via the VIDEOJET decoder webpage.•Download of screen and tile snapshots via snap.jpg is now supported (requires at least user privileges).•Firmware update on-screen countdown dialog now shows a heartbeat whenever a single update step takes longer.•Support of CONNECT_URL read queries to get current video connection details, including current digital and dewarping zoom settings, has been added.•Support of various digital and dewarping zoom persistence modes(DIGITAL_ZOOM_PERSISTENCE_MODE) has been added.•Support of SYSTEM_DATETIME_V2 to read/write UTC system time has been added.•Support for new Sentinel RMS licenses has been added. Legacy licenses can now also be based on new installation code (lock code from Sentinel RMS).From NurembergBT-VS/MKP-XPT Product Management 20.04.20237.7. Changes with 10.22.0038•IP Matrix initialization is now working also for camera lines larger than 1.•RCP+ response for query on connected cameras is now working correctly.•URL extension for camera configuration in IP Matrix is no longer truncated.•An issue with an unexpected application restart has been fixed.•The DECODER_GROUP command is no longer supported when decoder IP address is not static. This disables the whole IP matrix configuration pages in Configuration Manager until a static IP is configured in the decoder’s network settings.•Improvements were made for log export via webpage and via Configuration Manager.•KBD-DIGITAL keyboard PIN is now used immediately without application restart.•KBD-DIGITAL keyboard PIN is now required whenever keyboard is attached and at application start.•Display orientation is now working for further monitor types.•Support of further USB to serial COM port adapters for KBD-DIGITAL keyboard connectivity.o Current: Prolific PL2303 [hardware ID USB\VID_067B&PID_2303]o New: Prolific PL2303GT [hardware ID USB\VID_067B&PID_23C3]o New: ATEN UC232A [hardware ID USB\VID_0557&PID_2008]o New: Unitek Y-108 [hardware ID FTDIBUS\VID_0403+PID_6001]o CableCreation CD0489 (PL2303) [hardware ID USB\VID_067B&PID_2303] is compatible to the already supported Prolific PL2303 adapter.Please note that the KBD-DIGITAL keyboard connectivity requires continuous maintenance, since new or not listed USB-to-serial COM port adapters typically require the installation of a suitable driver on the VIDEOJET decoder and an adaption of the hardware ID filter in thekeyboard detection software module. Newer USB adapters may require a firmware update to become supported.From NurembergBT-VS/MKP-XPT Product Management 20.04.20237.8. New Features with 10.01.0036Security• A protected configuration mode has been implemented, allowing too enable SSD encryption (BitLocker) and too disable USB ports, e.g. for installation of the decoder in public areas.•The configuration of the decoder can be protected by Software Sealing, similar to IP cameras.•The latest Microsoft Windows security updates have been included.Miscellaneous• A dewarped cutout from panoramic cameras can be defined with PTZ coordinates.• A new way to control and integrate the decoder into a management system has been added by a JSON RPC API. This allows to send commands and retrieve status information via JSON remote procedure calls. The API documentation is added to the distribution package.• A video output capture service (VOCS) has been implemented which could be activated via a license, applicable per display output. This service captures the memory of the video outputand encodes it into a camera-like video stream, which can be recorded via Video StreamingGateway (VSG) onto iSCSI storage.• A time server can be added to synchronize the decoder.•Decoder log file can be downloaded via Configuration Manager. This is especially recommended when download of the log file is not working correctly via web browser.7.9. Changes with 10.01.0036•Upload of background image and connection loss image to the decoder and reverting them to default is now also possible with service password set. The former restriction is obsolete.•Various minor bug fixes.From NurembergBT-VS/MKP-XPT Product Management 20.04.20237.10. New Features with 9.60.0017IP Matrix enhancements•KBD-DIGITAL is supported in addition to KBD-UNIVERSAL XF.This keyboard requires a serial-to-USB adapter to connect to the decoder.Both keyboards can be mixed in a clustered multi-decoder IP Matrix, one keyboard perdecoder.•Playback from local recording is supported.Permission is configured via Configuration Manager for the whole IP Matrix, valid for all users.•Buttons for next and previous camera have been added to the KBD-UXF functions.•Audio can be switched on or off via keyboard.•Camera channels can be extended via license up to 64 cameras per decoder unit.Note:IP Matrix manual is now separated intoo One configuration manual for IP Matrixo One operation manual for IP Matrix using KBD-UXFo One operation manual for IP Matrix using KBD-DIGITALSecurity•The latest Microsoft Windows security updates have been included.Miscellaneous•Background image and connection loss image can be uploaded to the decoder, replacing the default images. Reverting them to default is done by uploading an empty image.Note: Upload is only possible in conjunction with an empty service password.7.11. Changes with 9.60.0017•Temperature control margin increased to improve maximum performance at the specified maximum temperature, covering component tolerances, and to ensure that all productsadhere fully to their specification.•Various minor bug fixes.Security SystemsFromNuremberg BT-VS/MKP-XPT Product Management 20.04.202311BOSCH and the symbol are registered trademarks of Robert Bosch GmbH, Germany 7.12. Features with initial release 9.51• VIDEOJET decoder 7000 displays video from Standard Definition (SD), High Definition (HD),4K Ultra High Definition (UHD), and Megapixel (MP) cameras and encoders using H.264 or MPEG -4 encoding at up to 60 frames per second over IP networks.• VIDEOJET decoder 7000 provides an HDMI and a DisplayPort (via USB-C connector) output, both capable of driving up to 4K UHD displays simultaneously.• Display settings are automatically discovered and set for optimal display performance. • Monitor layouts can be switched independently for each display.• Upright monitors (portrait mode) are supported.• Video window (cameo) aspect ratio can be set to 16:9, 9:16, 3:4, or 1:1.• Active camera connections and layout are stored and automatically reconnected after reboot if configured. To avoid deadlock in case of an overload situation the automatic reconnect will be deactivated after VIDEOJET decoder 7000 was forced into reboot for 3 times within 10 minutes.• Video smoothing can be configured.• RTSP connections are supported, enabling connectivity to 3rd party and ONVIF cameras. • Discovery port is configurable.• Cameo distance is configurable.• VIDEOJET decoder 7000 supports IP Matrix application as built-in feature.• VIDEOJET decoder 7000 is able to display VCA metadata.• VIDEOJET decoder 7000 provides bi-directional G.711 audio for the video stream shown in single view on the first monitor.• Configuration is done using the Configuration Manager.• The number of decoders presented in capabilities is configurable to regulate the consumption of VMS licenses. Default value is 30.• System access is password-protected with two levels.• The system firmware can be upgraded remotely.• System API is compatible to predecessor VIDEOJET decoder 8000 for easy plug-and-play integration.• Operating temperature iso 0 °C to +50 °C (+32 °F to +122 °F) ambient temperature, with airflow o 0 °C to +40 °C (+32 °F to +104 °F) ambient temperature, still airFor detailed functional description of inherited firmware features, please refer to the VIDEOJET decoder 8000 firmware 9.51 release notes.For detailed technical specification, please refer to the datasheet.。
洛雷技术1080P无线无线电视记录器用户手册说明书
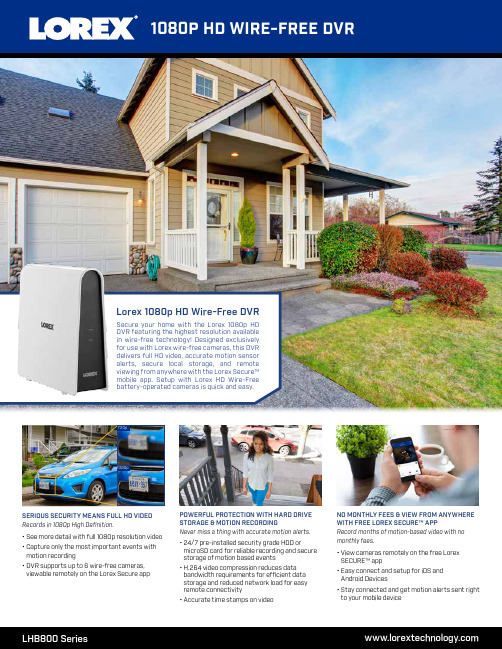
1080P HD WIRE-FREE DVRPOWERFUL PROTECTION WITH HARD DRIVE STORAGE & MOTION RECORDINGNever miss a thing with accurate motion alerts. • 24/7 pre-installed security grade HDD ormicroSD card for reliable recording and secure storage of motion based events• H.264 video compression reduces data bandwidth requirements for efficient data storage and reduced network load for easy remote connectivity• Accurate time stamps on videoNO MONTHLY FEES & VIEW FROM ANYWHERE WITH FREE LOREX SECURE™ APPRecord months of motion-based video with no monthly fees.• View cameras remotely on the free Lorex SECURE™ app• Easy connect and setup for iOS and Android Devices• Stay connected and get motion alerts sent right to your mobile deviceSERIOUS SECURITY MEANS FULL HD VIDEO Records in 1080p High Definition.• See more detail with full 1080p resolution video • Capture only the most important events with motion recording• DVR supports up to 6 wire-free cameras, viewable remotely on the Lorex Secure app720p1080pLHB800 Series Lorex 1080p HD Wire-Free DVRSecure your home with the Lorex 1080p H D DVR featuring the highest resolution available in wire-free technology! Designed exclusively for use with Lorex wire-free cameras, this DVR delivers full HD video, accurate motion sensor alerts, secure local storage, and remote viewing from anywhere with the Lorex Secure™ mobile app. Setup with Lorex H D Wire-Freebattery-operated cameras is quick and easy.Specifications1.For a list of compatible wire-free cameras please visit /compatibilityRecording time may vary based on recording resolution and motion / manual recordings.2. Accessing your security system remotely requires a high-speed Internet connection. Ensure yourDVR has a wired connection to a router (not included). An upload speed of 3.5Mbps is recommendedfor optimal video performance. Up to 3 devices may connect to the system at the same time. For thelatest list of supported apps and devices, please visit /compatibility.3. HDMI output (1920 x 1080) HD for high definition multi-channel live viewing only. 1080p recordingresolution is limited to a maximum of 1920 x 1080 per channel. Image quality and resolution isdependent on the type of camera connected to the DVR.*Frames Per Second (FPS) is affected by factors including signal strength, signal obstructions,range and the number of wireless/wire-free cameras installed in the same environment (maximum6 recommended).DisclaimersMODEL CONFIGURATION PACKAGE W x D x H(Inches & mm)WEIGHT CUBE UPC CODELHB8061T6CH 1080p HD Wire-free DVR with 1TB HDD Brown Box15.16 × 3.74 × 10.83”385 × 95 × 275mm4.4lb / 2.0kg0.35cft / 0.01cbm6-95529-01272-8LHB8061TP6CH 1080p HD Wire-free DVR with 1TB HDD Brown Box15.16 × 3.74 × 10.83”385 × 95 × 275mm4.4lb / 2.0kg0.35cft / 0.01cbm6-95529-01273-5LHB80616G6CH 1080p HD Wire-free DVR with 16GB HDD Brown Box15.16 × 3.74 × 10.83”385 × 95 × 275mm4.4lb / 2.0kg0.35cft / 0.01cbm6-95529-01373-2LHB80632G6CH 1080p HD Wire-free DVR with 32GB HDD Brown Box15.16 × 3.74 × 10.83”385 × 95 × 275mm4.4lb / 2.0kg0.35cft / 0.01cbm6-95529-01287-2CONTENTS Wire-free DVR, Mouse, Ethernet Cable, HDMI Cable, Power Adapter, Quick Setup Guides.DimensionsDVR Inputs & Outputs6 Channel DVR (LHB800 Series)。
Singtel TV 用户指南说明书

Welcome to your new Singtel TVYou are about to discover the latest and the most exciting TV entertainment. Find out everything you need to get started in this guide – from recording the entire series or multiple programmes simultaneously to managing recordings on-the-go and even pausing and replaying your favourite shows.Power on your set-top box to unlock a world of awesome TV entertainment.Fast Forward To Your Faves Easy AccessUseful Information OverviewVideo on Demand (VOD)Restart TV Recording Any Queries?How to Purchase VOD 17121310How to Record via DVR Set-Top Box How to Stop Recording via DVR Set-Top Box How to Goto Recorded TV Remote Recording via DVR Set-Top Box How to Retrieve Purchased VOD How to Restart Programme How to Identify Restart Channels Channel GuideCustomisation TipsTroubleshootingIssues with TV Service15 - 16Need More Information on Singtel TV?Want to Enhanceyour TV experience?Better WiFi Connectivity Showtimes (for specific channel)Showtimes (for specific day)Show Timings 3Easy BrowsingHow to Organise Your FavouritesFavourites, My Channels42Remote Control Quick Access8Yellow Button Catch-Up Recommendedfor You Channel Store, 4D/TOTO and Big Sweep,Shares, Netflix Parental ControlParental Lock 14Rental Lock R21 Lock Table of ContentsRemote ControlSubtitles, Audio, Zoom, Remote Pairing56ShortcutsHow to View Channels You Have SubscribedOverviewRemote ControlKnow your remote control shortcuts for easy access to TV features suchas Search, Record, Programme Guide and moreLearn how to access your Singtel TV features.Turn on and o yourSet-Top BoxAdd your favourite channeland set your preferred audioand subtitle languageAccess your recorded contentDisplay the main menuDisplay programme informationAccess various useful applicationsvia Quick Access, including Catch-UpChange channels /Scroll through the screensAccess your last 5browsed channelsChange your screen settingto your preferred mode Record your favouriteprogrammesDirect access toVideo on Demand MoviesReturn to theprevious screenActivate a selected itemon your Singtel TV screenReturn tolast viewed screenDisplay allProgramme Guide SchedulesLearn how to access your favourite shows. Channel GuideShow TimingsCheck the showtime of your favourite programmes,add shows and channels to your Favourites, and much more Showtimes (for specific channel)STEP 1 STEP 2STEP 3Press GUIDE on remote controltime slot & specific channelPress on remote control to view the selected channelOKShowtimes (for specific day)STEP 2 Select Jump to Day & Timeand pressSTEP 3OKSTEP 1 Press GUIDE on remote control and then press the OPTION buttonOKWant to find out when your favourite shows are on?Easy Browsing Favourites My ChannelsCurate the list of your most-watched channels and showsHow to Organise Your FavouritesHow to View Channels You Have SubscribedSTEP 1 Press GUIDE on remote control and then press the OPTION button STEP 1STEP 2Select from the following features to organise your favourite shows and channelsSTEP 2 Select My Channels and press OKOK Want to create a list of your most-watched channels instead of scrolling and navigating? To include a channel to your list of favourites, select your favourite channel and press Add to FavouritesWant to see all your favourite channels? Select Favourite Channels andpress . Then select My Favourite and press to view the list of your most-watched channels.To remove channels from My Favourite list, select Remove from Favourite and press ∞∞∞OK OKRemote Control SubtitlesFind out how to manage your Singtel TV Settings.STEP 2STEP 1Go to Subtitle Languages and press OK STEP 3Select chosen language and press OK PressOption AudioSTEP 2STEP 3STEP 1Go to Audio Language and press Select your preferred audio language and press OK OK Press OptionZoom How to Set the Screen SizeSTEP 2STEP 3STEP 1Go to Zoom and press Choose the optimum setting(Normal, Stretch, Zoom 1, Zoom 2, Zoom 3) and press OK OKPress Option Remote PairingHow to Use Singtel TV GO as a Remote Control STEP 2STEP 4STEP 5STEP 1STEP 3Ensure your mobile device’s WiFi is connected to the same network as your Set-Top Box Click on Remote Pairing Setup and choose Setup Nowwhen prompted Once the app prompts that the pairing is successful,your mobile device can be used as a remote controlGo to Singtel TV GO* on your mobile device Select and go to Settings2.STEP 1STEP 2*View Catch-Up for all your subscribed channelsSelect from the following functions:Search, Channel Guide, Favourites, Catch-Up*, Recorded TV, Store, SettingsSTEP 2Select from the following functions:Add to Favourites/Remove from Favourites, View Favourites, Change Favourites, Audio Languages, Subtitle Languages, Zoom STEP 1Select from a list of TV features to navigate with ease ShortcutsSTEP 1STEP 2STEP 1other channelsSTEP 2For DVR customers onlyWant to catch up on the programmes you missed?Easy AccessSTEP 1STEP 2Catch- Up* 1 Select Catch-Up and press 2 Select the show you would like to watch and press OKOK on remote control Select from the following functions:Catch-Up, Netflix, Recommended for You, VOD, 4D/TOTO, Shares, Channel Store on the Quick Access bar.Discover a suite of useful features at the touch of a button Quick Access3 Select Play and press to watchOK *For channels with Catch-Up viewingWant to access your Channel Store, lottery results and Netflix quicker?Easy AccessChannel Store 4D/TOTO and Big SweepNetflix HOOQ 1 Select Pack and press 2 Click on Subscribe and press 2 Press to confirm your subscription OK OK OK 1 Select 4D/TOTO and press 2 Select from 4D, TOTO and Big Sweep 3 Choose the respective draw date for the results OK 1 Select Netflix and press 1 SelectHOOQ and pressOK OK1. How to Record via DVR Set-Top Box2. How to Stop Recording via DVR Set-Top Box3. How to Go to Recorded TVSelect Recorded TV Select Stop Recording Select the show you would like to stop recording Choose to Play, Keep until or Erase after recording has stoppedSTEP 1STEP 1STEP 1STEP 3STEP 3STEP 2STEP 2STEP 2STEP 4STEP 4STEP 5STEP 6Press the Guide buttonRecordon remote control Select the particular show which you would like to record ARecording Message prompt is shown Record again Record once more to cancel recordingPlayKeepUntilErase 1 Select Play and press to play the show 1 Select Keep Until and press 2 Select Space needed or I erase . Select Don’t change to exit without changes 1 Select Erase , select Confirm and press to erase 2 Select Cancel and press to keep the showOK OK OK OK Press Recorded TV on remote control or press and go to Recorded TV and press Select By Date or By Title and select the recorded showOK Record your favourite shows via your DVR Set-Top Box or remotely with Singtel TV GO Recording4. Remote Recording via DVR Set-Top BoxTo Set Up Remote Recording in TV1 Press Menu in remote control2 Go to Settings and press3 Go to Remote Recording and press4 Go to User Name and press5 Choose yourUser Name (please use 8 characters)6 Create PIN (6-8 Digits) and confirm your PIN by selecting Confirmand press OKOK OKOKTo Set Up Remote Recording in Singtel TV GO1Download the Singtel TV GO app on your device 2Go to Settings 3Go to Account Setup 4Go to Remote TV Recording 5 Fill in User Name and PIN (as per set-up in TV)Remote Recording in Singtel TV GO6 Once set up, you can log into Singtel TV GO7 Select the programme to be recorded8 DVR Set-Top Box must be powered on or in standby mode iOS 7.1 or laterFor selected Android DevicesDon’t have a DVR Set-Top Box?Call 1609 to upgrade now!Big movie buff? Be spoilt for choice with over 600 exciting movies!Easy AccessVideo on Demand 1. How to Purchase VODSTEP 1STEP 2STEP 3Press Video on Demand on remote controland press to select Select Rent to purchase the videoOK STEP 4STEP 2STEP 3STEP 4STEP 52. How to Retrieve Purchased VODSTEP 1Go to My Rentals Go to Current Rental and press Select Resume to continue the VOD viewing Or select Restart to restart the VODPress Video on Demand on remote control OK Press Rent Now to complete the purchaseComplete access to Singapore’s largest VOD libraryMissed the start of the show? Watch it from the beginning anytime!CustomisationRestart TVSTEP 12. How to Identify Restart ChannelsSTEP 1 Press GUIDE on the remote controlSTEP 2 Supported channels will have beside itFast forward, rewind or repeat scenes in Restart mode usingREW / FF / PAUSE / REPLAY / FWDSTEP 2 Press to restart the programme.OKNeed to set Parental Control Locks?Customisation Parental ControlProtects your children from consuming undesirable content. Set locks on NC16 or M18 content (based on MDA ratings), or on specific channels.Locks R21 content by default to prevent children under 21 years old from watching it.Prevents unintended purchases by locking VOD and Channel Store.STEP 1STEP 1STEP 1STEP 2STEP 2STEP 3STEP 2STEP 4STEP 3STEP 7STEP 6As it is locked by default, call 1688 to acquire password so thatyou can unlock R21 content.Under Parental Control , select R21 Lock 3. R21 Lock2. Rental LockSTEP 1STEP 2Press Menu or on remote control Go to SettingsHow to Set Parental Control1. Parental LockSTEP 5STEP 4STEP 6STEP 5Set PIN Enter your default 4-digit PIN “1234”Go to Change PIN If you forget your PIN, call 1688 for more informationUnder Parental Control , select Rental LockEnter your default 4-digit PIN “1234”Go to Change PIN If you forget your PIN, call 1688 for more informationUnder Parental Control , select Parental LockIssues with TV Service Troubleshooting Power on Optical Network Router (ONR)STEP 2STEP 3STEP 1Power off your devices in the following sequence1 Set-Top Box2 Optical Network Router (ONR)Ensure POWER and PON LED indicators are lightedPower on Set-Top BoxPick up quick tips on troubleshooting issues with your TV service and maximising your home entertainmentIf you encounter an error message on your TV screen, follow the tips below to reboot your TV equipment.Better WiFi ConnectivityTip 2Tip 3Tip 1Reposition your router• Place your router in a central location, away from clutter andglass/metallic objects• Avoid placing the router on the floor• To extend your WiFi coverage further, you can also add on aWiFi Mesh Dual Pack• Different devices support different WiFi frequencies• When many neighbouring WiFi network or wireless devices run on the same 2.4GHz frequency, congestion may happen• A dual-band router can help ease congestion as it supports 2frequency bands (2.4GHz & 5.0GHz)1 Connect to your router wirelessly or via ethernet2 On your device web browser, type 192.168.1.254 to go tothe router’s Setting page 3 Click on General/Wireless , under Channel drop down box,select Automatic for 2.4GHz & 5GHz Wireless and click Apply4 Reboot your router by turning it off and on5 Now your router can automatically scan and connect tothe least congested WiFi channel Consider wireless dual-band routersReboot your router to reduce WiFi congestionNeed WiFi Mesh for your home?Call 1609to find out more!For more tips on maximising your WiFi connectivity, visit /wifimasterOptimise WiFi connectivity at home with these useful tips below.Useful InformationAny Queries?Call 1688Speak to our friendly customer service officers regarding billing enquires,troubleshooting, technical assistance and other general enquiries.Need More Information on Singtel TV?Visit .sgGet comprehensive information on Singtel TV including the monthlyshowtime guide, highlights, terms and conditions, events and promotions.Want to Enhance Your TV Experience?Subscribe to our other exciting TV content packs, recontract or purchase TVvalue-added services.Visit /singteltvCall 1609Or drop by any of these Singtel Shops!CentralBUGIS JUNCTION #01-50/50ACOMCENTRE #01-00 Comcentre 2NorthANG MO KIO HUB #B1-54/55/56/57CAUSEWAY POINT #03-03/04/05WATERWAY POINT #B1-30WestJURONG POINT #B1-98/99EastPARKWAY PARADE #B1-01/02TAMPINES MALL #02-13/14/15Visit /storelocator for the complete list of Singtel Shopsand Singtel Exclusive Retailers.。
欧博特纽维尔 IP7000系列产品数据手册说明书

From Product Management Telephone NurembergST-VS ST-VS/MKP1 +49 911 93456 0 12-Jan-2015 Release LetterProduct: DIVAR IP 7000 FamilyVersion: Maintenance Release DOM image v1.0.5This letter contains latest information about the above mentioned Bosch DIVAR IP 7000 Family.1. GeneralDIVAR IP 7000 is an affordable, simple and reliable all-in-one recording, viewing and management solution for network surveillance systems of up to 128 channels (with 32 channels pre-licensed).Running the full Bosch VMS (Video Management System) solution and powered by Bosch Video Recording Manager software, DIVAR IP 7000 is an intelligent IP storage device that eliminates the need for separate NVR (Network Video Recorder) server and storage hardware.It combines advanced recording management and state-of-the-art iSCSI storage into a single cost-effective, plug and play IP recording appliance for IT-minded customers which are seeking for a state-of-the-art “second generation” NVR recording solution.2. Restrictions; Known Issues•Graphics Port: The DVI port must be used for configuration. Do not use the VGA port for configuration.•Initial installation: During initial boot and installation the system must be connected to the network.Please note: All systems come with the same default IP address.•Transcoder: Maximum transcoder source stream resolution is 1920x1080p30•Mobile Video Service: the local MVS needs to be added to the system with the private IP address (not 127.0.0.1), if it shall serve as a fall-back transcoder for Operator Client access.•BVC needs to be upgraded to version 1.6.2 or higher, if it shall serve as replay client for DIVAR IP 7000 appliances with BVMS 5.0.5•VideoSDK needs to be upgraded to 5.81 MR1 or higher, if it shall serve as integration tool for DIVAR IP 3000 appliances with BVMS 5.0.5•3rd party device support restrictions are listed in the Bosch VMS release notes:o /documents/Release_Notes_5.0.5__Release_Note_enUS _16781064459.pdf3. New subcomponent software versions•Bosch VMS 5.0.5.1010 (alternative installation option: BVMS 4.5.9.359)From Product Management Telephone NurembergST-VS ST-VS/MKP1 +49 911 93456 0 12-Jan-2015•Video Recording Manager 3.00.0074•Video Streaming Gateway 5.91.0020•USB-Transcoder Service 5.60.00784. New FeaturesSystem Setup•Initial Setup procedure prompts a selection of two software installation options:o BVMS 5.0.5: recommended for most userso BVMS 4.5.9: recommended if system shall be integrated into existing BVMS 4.5.9 based infrastructureConfiguration Wizard (BVMS 5.0.5)•Remote access: DNS information can be entered in the Basic step. The port rules for router configuration can be retrieved from the detailed report in the last wizard step.•Network address of video devices to be added can be changed, if they are located in a different IP range.•Recording profiles and retention time settings can be changed individually per device or for a selection of devices.Management Server (BVMS 5.0.5)•Additional data: option to record text data together with video streamVideo Streaming Gateway (BVMS 5.0.5)•VSG supports alarm recording triggered by BVMS events5. Applied Changes / Bug FixesBVMS 5.0.5•Tested software/firmware versions, supported devices, bug fixes and change are listed in the Bosch VMS release notes:/documents/Release_Notes_5.0.5__Release_Note_enUS_16781 064459.pdfVideo Recording Manager•Bug fixes and change are listed in the VRM release notes:/downloads/nue-mkp/VRM/3_00/Bosch_Releaseletter_VRM3_00_0073.pdfMobile Video Service•Fixed: correct MVS entry shown in port mapping table for remote access•Fixed: local MVS priority settings prevent system overload•Changed: MVS web page can now be used: https://<system-IP>/mvsFrom Product Management Telephone NurembergST-VS ST-VS/MKP1 +49 911 93456 0 12-Jan-20156. Installation Notes•An upgrade from DOM Image v1.0.1 cannot be performed manually. DOM image v1.0.2 and later require a newer version of the system BIOS•All models are based on Windows Server 2008 R2, 64-bit, Standard Edition7. History7.1 DIVAR IP 7000 DOM image version 1.0.4Restrictions; Known Issues•Graphics Port: The DVI port must be used for configuration. Do not use the VGA port for configuration.•Initial installation: During initial boot and installation the system must be connected to the network.Please note: All systems come with the same default IP address.•Transcoder: Maximum transcoder source stream resolution is 1920x1080p30•ONVIF Support Restrictionso no support for event-based recordingo Audio on some 3rd Party cameras not fully supported which may result in non-availability of audio streamso TCP not supported for ONVIF cameras but with UDP protocol onlyo Motion JPEG is not supportedo VCA is always recorded for Bosch deviceso VCA is not available for ONVIF camerasFrom Product Management Telephone NurembergST-VS ST-VS/MKP1 +49 911 93456 0 12-Jan-2015New subcomponent software versions•BVMS 4.5.9.359•VRM 3.00.0057New FeaturesImage•Added support for 3TB hard drives (DIVAR IP 7000 2U)•Added support for party populated hard drive layouts; 3 to 8 hard drives as part of a RAID 5 configuration (DIVAR IP 7000 2U)Configuration Client and Configuration Wizard•To avoid security issues, a global default password must be set for all devices and all authorization levels (service, live, user) that are not password protected. You can disable this enforced password protection for BVIP devices.•VIP X16 XF E has been moved to Device Family 2 for support of 2nd stream for recording.Deviating from the behaviour of the other devices belonging to Device Family 2, VIP X16 XF Emust use the same stream for all recordings. Although the user can configure stream 1 forcontinuous recording and stream 2 for alarm recording, the second setting will not take effect. After an Bosch VMS upgrade, perform the update of the device family manually.To update the device family:Right-click the device and click Edit Encoder.Click OK.Applied Changes / Bug FixesImage•Fixed: DVD burner permission problem•Fixed: 30days password expiration problem (last fix didn’t apply in every case)•Changed: Client software and documentation updated on the local network share Operator Client•Fixed: Click on find video by event results jumped to wrong playback time.•Fixed: Live video images from NTSC cameras on DVR 670 were squeezed.•Fixed: Sometimes OpClient could crash on loading favorites.•Fixed: ONVIF domes could not be controlled.•Fixed: Under rare circumstances OpClient could crash on logon of dual authorization group.•Fixed: Video viewing via NAT/port mapping routes did not work on Windows XP.•Fixed: Manual focus/iris in automatic mode.•Tested software/firmware versions and supported devices (see BVMS 4.5.9 release notes for details http://144.76.6.227/downloads/support-cctv/DIVAR_IP_3000/BVMS_VERSION_4_5_9_ReleaseNotes.pdf)From Product Management Telephone NurembergST-VS ST-VS/MKP1 +49 911 93456 0 12-Jan-2015 Configuration Client•Fixed: OPC Server Connection for BIS license option was not available.Configuration Collector•Fixed: Config Collector freezed while zipping collected files.VRM•Fixed: Discovery is more stable•Fixed: Reliability of disconnecting transcoders improved•Fixed: Exporting Log-Files large than 100MB•Changed: iSCSI-password is also set on USB-Transcoder7.1 DIVAR IP 7000 DOM image version 1.0.2Restrictions; Known Issues•Graphics Port: The DVI port must be used for configuration. Do not use the VGA port for configuration.•Initial installation: During initial boot and installation the system must be connected to the network.Please note: All systems come with the same default IP address.•ONVIF Support Restrictionso no support for event-based recordingo Audio on some 3rd Party cameras not fully supported which may result in non-availability of audio streamso TCP not supported for ONVIF cameras but with UDP protocol onlyo Motion JPEG is not supportedo VCA is always recorded for Bosch deviceso VCA is not available for ONVIF camerasNew subcomponent software versions•BVMS 4.5.8.151•VSG 5.60.0073• Transcoder 5.60.0073•.NET Framework 4.5New Features•Unlisted Bosch BVIP video devices can be added as generic devices (see BVMS 4.5.5 release notes for details).•Server Lookup improvements (see BVMS 4.5.8 release notes for details).From Product Management Telephone NurembergST-VS ST-VS/MKP1 +49 911 93456 0 12-Jan-2015 •Minor changes in the user and workstation settings (see BVMS 4.5.8 release notes for details).•Client software and documentation can be downloaded from local network share.Applied Changes / Bug Fixes•Fixed: 30days password expiration problem•Fixed: Windows activation problem•Fixed: iSCSI LUN preparation problem•Fixed: firewall rule exceptions•Wizard prompts system reboot option when Network settings are changed•Minor fixes in new subcomponent software versions (BVMS, VRM, VSG, Transcoder)•Minor improvements in the initial installation procedure•Tested software/firmware versions and supported devices (see BVMS 4.5.8 release notes for details → http://144.76.6.227/downloads/support-cctv/DIVAR_IP_3000/BVMS_VERSION_4_5_8_ReleaseNotes_v1.pdf).•Bosch VMS default screen now shows text labels below the icons.•The default network settings now match the default network settings of other Bosch video devices o IP Address: 192.168.0.200o Subnet mask: 255.255.255.0Installation Notes•An upgrade from DOM Image v1.0.1 cannot be performed manually. DOM image v1.0.2 requires a newer version of the system BIOS•All models are based on Windows Server 2008 R2, 64-bit, Standard Edition7.2 DIVAR IP 7000 DOM image version 1.0.1Restrictions; Known Issues•Graphics Port: The DVI port must be used for configuration. Do not use the VGA port for configuration.•Password of limited operational Windows user expires after 30 days:o The password of limited user must be set manually to “never expires” on DIVAR IP 7000 by logging on to the DIVAR IP via remote desktop with user administrator user “BVRAdmin”.In the “Server Manager” the password can be changed to “Password never expires”(Configuration → Local Users and Groups → User (→ user limited)).o For details s. Bosch Security Knowledge Basehttps:///al/12/2/article.aspx?aid=7400&tab=search&bt=4&r= •Default IP Address: The system comes with the following network settingso IP Address: 192.168.178.200o Subnet mask: 255.255.0.0From Product Management Telephone NurembergST-VS ST-VS/MKP1 +49 911 93456 0 12-Jan-2015 •Initial installation: During initial boot and installation the system must be connected to the network.Please note: All systems come with the same default IP address.•Network Settings Change: The DIVAR IP needs to be restarted, if network settings are changed in the Wizard. This applies for the initial setup as well as for changes during standard operation.•Adding Storage: If the wizard stops at Step 8 “Add storage”, because the LUNs aren’t formatted, the LUNs have to be formatted using the Bosch VMS Config Client.•ONVIF Support Restrictionso no support for event-based recordingo Audio on some 3rd Party cameras not fully supported which may result in non-availability of audio streamso TCP not supported for ONVIF cameras but with UDP protocol onlyo Motion JPEG is not supportedo VCA is always recorded for Bosch deviceso VCA is not available for ONVIF camerasNew FeaturesThe DIVAR IP 7000 Family is an all-in-one management solution that comes with BVMS/VRM including Video Streaming Gateway pre-installed and with 32 channels pre-licensed. The system will come with one built-in Transcoder channel.Applied Changes / Bug Fixesn/a。
SW2001 规格说明书

SW2001Datasheet Designed for Illegal Copy ProtectionVersion1.02015-7-9Revision HistoryData Revision Code Description 2014-11V0.1Framework 2015-06V0.4Initial Version 2015-07V1.0Public VersionCopyright StatementThe digital copy of this document is protected by the Copyright Act(China),compiled and owned by iSmartWare(iSW).This profile may be consulted by you,provided you comply with the provisions of the Act and the following conditions of use:•Any use you make of these documents or images must be for marketing only,and you may not make them available to any other purpose.•iSW control the copyright of this document.You will recognize the owner’s right to be identifies as the owner of this profile,and due acknowledgment will be made to the owner where appropriate.•You will obtain the owner’s permission before publishing any material from this document. To request permissions please contact to the owner by using the website below: Table of Content1.General Description (5)2.Applications (5)3.Features (5)4.Schematic Circuit Diagram (6)5.Chip Series Revision (6)6.Pin Configuration and Function (7)6.1Pin Configuration (7)6.2Pin Descriptions (7)7.Application Flow (8)8.Absolute Maximum Ratings (9)9.I2C Interface and Sleep (9)10.Register List (11)10.1REG00:Decrypt Control (11)10.2REG10-1F:Cipher Text(Write Only)/Plain Text(Read Only) (11)10.3REG A1-A7:Chip ID (11)11.Mechanical and Packaging (12)11.1Package Summary (12)11.2Package Outline and Dimensions (13)1.General DescriptionSW2001is one of the series of Encryption IC SW200X which is based on AES-128to prevent your intellectual property from been illegal copy.Typically,the Internal Chip-ID memory provides an unique56bits ID to product that could help to manage the product authorization.Generally,the SW2001always works as an slave that accessed by the processor through the series bus in the system.2.ApplicationsPOS and Two Way RadioSecurity Device(electronic lock)Digital Set-top Box(STB)Tablet Personal Computer(Pad)Printer CartridgeEntertaining and Education MachineDigital Video Recorder(DVR)Portable Media Player(PMP)3.Features☆Symmetric Cryptography Algorithm:AES-128Algorithm☆Series bus speed up to400KHz☆56bits Chip-ID☆<20uA@3.3V Standby Current☆ 2.8V-5.5V Supply V oltage Range☆Small SOT23-66L package4.Schematic Circuit Diagram5.Chip Series RevisionModel Type Main FunctionsSW2001AES+Chip IDSW2002AES+Chip ID+POR+WDSW2003AES++Chip ID+LOCK+PWM6.Pin Configuration and Function6.1Pin Configuration6.2Pin DescriptionsItem Name Type Function Description1NC//2GND G Ground3SCK I Serial Clock Input4SDA I/O Serial Data I/O5VPP PI Power Supply for Internal Memory Program6VCC PI Power Supply7.Application FlowHOSTSLA VEKEY KKEY KRandom MSleep ModeC 1=Encryption (K,M)C 2=Odd_Check (M)Send C 1/C 2to SlaveStart SlaveDecryptionCompleted?Read M’from SlaveYESM=M’?YESVerify SuccessSystem Stop NOAccess ?YES NOWake UpStart ?YESNOM’=Decryption (K,C 1)C 2’=Odd_Check (M’)C 2=C 2’?Set Complete FlagNONo Access to 5s Sleep ModeYESCheck SuccessCheck Fail?8.Absolute Maximum RatingsOver operating free-air temperature range(unless otherwise specified)Parameters Symbol MIN MAX UNIT Input Supply Voltage V IN 2.8 5.5V Voltage to Current Converter VCC 2.8 5.5V Operating Temperature-40125℃Storage Temperature Range-40150℃Electronic Static Discharge ESD2KV【Notice】Stresses beyond those listed under absolute maximum ratings may cause permanent damage to the device.These are stress ratings only,and functional operation of the device at these or any other conditions beyond those indicated under recommended operating conditions is not implied.Exposure to absolute-maximum-rated conditions for extended periods my affect device reliability9.I2C Interface and SleepThe SW2001support with one-byte read and one-byte write only.The bit2and bit3of device address(7 bits)is program by internal memory which is fixed as“011xx00”.SW2001will release the SDA when SDA holding low state for more than2seconds.SleepWaveform:The SW2001will enter into the “sleep mode”when device is in the idle state (idle=1)or not accessed for 5seconds.The SW2001will wake up to the “active mode”when receive the access signal from incoming external message.Parameter Symbol MIN TYP MAX UNIT Sleep Mode on Time t SLON 4.27 5.12 6.56s Sleep Mode off Timet SLOFFs10.Register List10.1REG00:Decrypt ControlDefault:0x00HBit Description R/W Default 7///6///5Decrypt_StatusDecrypt status0:decrypt complete1:decrypt in processThis bit will set automatically when bit0set to1,and cleared whendecryption completed.R0x04-1AES decrypt reference bit R/W0x00Decrypt_StartDecrypt start;0:disable;1:enableThis bit will be cleared automatically after decrypt started.R/W0x010.2REG10-1F:Cipher Text(Write Only)/Plain Text(Read Only)These registers act as cipher text register before decrypt start,and act as plain text register after decrypt completed.The most significant byte of128bit text(cipher text or plain text)is stored in address0x10,the least significant byte of128bits is stored in address0x1F.10.3REG A1-A7:Chip IDBit Description R/W Default 7-0Chip ID R0xFF11.Mechanical and PackagingThe following pages include mechanical packaging information.This information is the most current data available for the designated devices.This data is subject to change without notice and revision of this document.11.1Package Summary11.2Package Outline and DimensionsSymbolDimension in MillimetersMIN NOM MAXA-- 1.25 A10-0.15 A2 1.00 1.10 1.20 A30.600.650.70 b0.36-0.50 b10.360.380.45 c0.14-0.20 C10.140.150.16D 2.826 2.926 3.026E 2.60 2.80 3.00 E1 1.526 1.626 1.726 e0.900.95 1.00 e1 1.80 1.90 2.00 L0.350.450.60 L10.59REFL20.25BSCR0.10--R10.10-0.20θ0º-8ºθ13º5º7ºθ26º-14º。
Hikvision HikCentral Professional产品介绍说明书

HikCentral Professional is a software platform provided by Hikvisionfor integrating and managing security systems. It is designed to meeta variety of security challenges on a single platform. With HikCentralProfessional, you can manage multiple individual systems with ease,such as video security, access control, security alarms, and more, aswell as explore cross-system functionalities.Daily operations become more efficient while protection of peopleand property improve all around. Users of all kinds are makingsmarter decisions.Key FeatureLight and Efficient●Lightweight architecture features reduced consumption of system resources●Capable of managing multiple systems of varying sizes with consistent efficiencyUnified and Flexible●Supports combining various application plug-ins under a unified, on-demand architecture for collaborationacross business segments●New plug-ins can be continuously developed to meet new business needsIntegrated and Open●Compatible with virtually all Hikvision products and their abundance of applications, including deep-learning-basedanalytics and statistics●Open architecture permits easy integration with third-party systems and hardwareSoftware SpecificationThe following table shows the maximum performance of the SYS (System Management Server). For other detailed data and performance, refer to Software Requirements and Performance .FeaturesMaximum PerformanceGeneralManaged Devices*Including Encoding Devices, Access Control Devices,Elevator Control Devices, Security Control Devices, 2,048Digital Signage Terminals, Interactive Flat Panels,Remote Sites, Guidance Terminals, and IP SpeakersVideo Intercom Devices 5,000 Guidance Screens 512 Visitor Terminals 32 Dock Stations1,500 Network Transmission Devices 128 Mobile Devices1,000 Entrance/Exit Stations 40 Query Terminals 16 DeepinMind Server 64 Recording Servers 64 Streaming Servers 64Manageable ResourceAreas 3,000Cameras10,000With RSM: 100,000Alarm Inputs 5,000 Alarm Outputs3,000 Security Radars and Radar PTZ Cameras 30 Zones of Security Control Partitions 2,048 Security Control Partitions (Areas)256DS-5600 Series Face Recognition Terminals When 32Applied with Hikvision TurnstilesANPR Cameras3,000People Counting Cameras Recommended: 300 Heat Map Cameras Recommended: 70 Thermal CamerasRecommended: 20① Queue Management Cameras Recommended: 300 Cameras per Area 256Alarm Inputs per Area 256 Alarm Outputs per Area 256 Event and Alarm Rules10,000Storage of Events or Alarms Without Pictures1,000/sStorage of Events or Alarms with Pictures 20/s (Stored in SYS)80/s (Stored in Recording Server)Event & AlarmEvents or Alarms Sent to Clients120/s*The clients include Control Clients and Mobile Clients. 100 Clients/s Combined Alarm 10/s User-Defined Events 10,000Concurrent Accesses via Web Clients and Control100ClientsUser and RoleConcurrent Accesses via Mobile Clients 100Users 3,000Roles 3,000 Users for Double Authentications 50PersonPerson Group 3,000Person Group Hierarchies10Size of a Profile Picture300 KBTotal Size of Profile Pictures300 GBData Retention Period Stored for 3 YearsPeople Counting 5 millionHeat Map0.25 millionANPR Records60 millionEvents60 millionAlarms60 million Data Storage Access Records 1.4 billionAttendance Records55 millionVisitor Records10 millionOperation Logs 5 millionService Information Logs 5 millionService Error Logs 5 millionRecording Tags60 millionScheduled Report Rules of Event and Alarm100Event or Alarm Rules in One Event/Alarm Report Rule32 Report Records in One Sent Report10,000 or 10 MBResources Selected in One Report*With this limitation, you can generate a neat and20clear report via the Control Client and it costs less time.Video & Intelligent AnalysisRecording Recording Schedule30,000 Recording Schedule Template200 Face Pictures for Comparison1,000,000 Face Comparison Groups64Face Comparison Persons in One Face Comparison Group1,000,000Storage of Face Comparison Events Without Pictures1,000/sStorage of Face Comparison Events with Pictures100/s (Stored in Recording Server)Intelligent Analysis Groups1,000Intelligent Recognition Resources in One Group64Persons for Intelligent Recognition1000,000Evidence Management Evidences100,000 Evidence Files5,000,000 Decoding Devices32 Smart Walls32Smart Wall Views1,000 View Groups100 Views in One View Group10 Cameras in One View256Streaming Server Video Input Bandwidth per Streaming Server200 × 2 Mbps Video Output Bandwidth per Streaming Server200 × 2 MbpsAccess Control & Time and Attendance & VisitorPersons with Credentials for Access Control50,000Total Credentials (Card + Fingerprint)250,000Cards250,000Fingerprints100,000 Access Control Profiles50,000Access Points (Doors + Floors)1,024Access Levels512Access Schedules32Templates for Card Printing32Persons for Time and Attendance10,000 Time and Attendance Shift Schedules128Major Leave Types64Minor Leave Types of One Major Type128 Holidays32 Break Timetable128 Custom Rules for T&A Status on Device128 Visitors20,000Visitor Management Visitor Check-In or Reservation Records100,000 Visitor Email Templates20 Entities in Watch List10,000Vehicle and Parking ManagementVehicles per List5,000 Vehicles500,000 Custom Vehicle Types10 Under Vehicle Surveillance Systems (UVSSs)4 Vehicle Undercarriage Pictures3,000 Storage of ANPR Alarm Without Pictures1,000/sStorage of ANPR Alarm with Picture 20/s (Stored in SYS)100/s (Stored in Recording Server)Parking Lots10Lanes Total: 40In One Parking Lot: 32Parking Spaces Total: 3,000In One Floor: 1,024Floors in All Parking Lots128Cards Linked with Vehicles250,000Temporary Cards in One Parking Lot10,000Vehicle Passing Frequency in Each Lane 1 Vehicle/sMobile MonitoringFence Rules for One Vehicle4Vehicles Can Be Located in One Client64Retention Period of GPS Data 6 MonthsRetention Period of Statistics Data 3 YearsDigital SignageMaterials10,000Programs2,000Schedules1,000Release Records1,000Video Walls512Applications for Interactive Flat Panel1,000Security InspectionAnalyzers8Walk-Through Metal Detectors64Security Inspection Channels1,000BroadcastBroadcast Group128Media Libraries100①: This recommended value refers to the number of thermal cameras connected to the system directly. It depends on the maximum performance (data processing and storage) in the situation when the managed thermal cameras uploading temperature data to the system. For thermal cameras connected to the system via NVR, there is no such limitation.System Requirement* For high stability and good performance, the following system requirements must be met.Microsoft® Windows 11 64-bitMicrosoft® Windows 10 64-bitMicrosoft® Windows 8.1 64-bit*Microsoft® Windows 7 SP1 64-bitOS for HikCentral Professional Microsoft® Windows Server 2019 64-bit Microsoft® Windows Server 2016 64-bitServerMicrosoft® Windows Server 2012 R2 64-bitMicrosoft® Windows Server 2012 64-bitMicrosoft® Windows Server 2008 R2 SP1 64-bitCentOS 7.2 64-bit**CentOS 7.4 64-bit**CentOS 7.6 64-bit***For Windows 8.1 and Windows Server 2012 R2, make sure it is installed with the rollup (KB2919355)updated in April, 2014.** Special Version edition to support LINUX environment installation, contact Hikvision technicalcenter for more detailsMicrosoft® Windows 11 64-bitMicrosoft® Windows 10 64-bitMicrosoft® Windows 8.1 64-bitMicrosoft® Windows 7 SP1 64-bitMicrosoft® Windows Server 2019 64-bitOS for Control Client Microsoft® Windows Server 2016 64-bitMicrosoft® Windows Server 2012 R2 64-bitMicrosoft® Windows Server 2012 64-bitMicrosoft® Windows Server 2008 R2 SP1 64-bit*For Windows 8.1 and Windows Server 2012 R2, make sure it is installed with the rollup (KB2919355)updated in April, 2014.Google Chrome® 84 and aboveFirefox® 84 and aboveBrowser Version Safari® 11 and aboveMicrosoft® Edge 89 and aboveInternet Explorer® 11 and aboveDatabase PostgreSQL V11.8OS for Mobile Client iOS 10.0 and aboveAndroid 6.0 and aboveVMware® ESXi™ 6.xMicrosoft® Hyper-V with Windows Server 2012/2012 R2/2016 (64-bit)Virtual Machine *The Control Client cannot run on the virtual machine.*Refer to the Deployment Guide of HikCentral Professional on VMware Virtual Machines for how the streaming server running on the virtual machine.*Virtual server migration is not supported.Typical ApplicationFacial Recognition pStor RSM DecoderServer Smart WallCluster Storage Server Hybrid SAN KeyboardHikCentralDock StationSecurity Control Panic Alarm RadarPanel StationAnalog Camera DVRUnder-VehicleSurveillance SystemsIP Camera Switch NVRMobile Client Web Client Remote Client Access Controller Card Reader ElevatorControllerDigital Signage Wall-Mounted Access ControlVideo Intercom Player Digital Signage Vertical Digital Signage TerminalRecommended Hardware Specification Processor Intel® Xeon® E-2124Memory 16G DDR4 DIMM slots, Supports UDIMM, up to 2666 MT/s, 64GB Max. Supports registered ECCInternal Controllers: SAS_H330Software RAID: PERC S140Storage Controllers External HBAs: 12Gbps SAS HBA (non-RAID)Boot Optimized Storage Subsystem: 2x M.2 240GB (RAID 1 or No RAID), 1x M.2 240GB (NoRAID Only)Drive Bays1T 7.2K SATA×2Power Supplies Single 250W (Bronze) power supplyForm Factor: Rack (1U)Dimensions Chassis Width: 434.00mm (17.08 in)Chassis Depth: 595.63mm (23.45 in) (3.5”HHD)Note: These dimensions do not include: bezel, redundant PSUDimensions with Package750 mm × 614 mm × 259 mm(W × D × H)(29.53" × 24.17" × 10.2")Net Weight12.2 kgWeight with Package18.5 kgEmbedded NIC 2 x 1GbE LOM Network Interface Controller (NIC) portsDevice Access Front Ports: 1x USB 2.0, 1 x IDRAC micro USB 2.0 management port Rear Ports: 2 x USB 3.0, VGA, serial connectoriDRAC9 with Lifecycle ControllerEmbedded Management iDRAC DirectDRAC RESTful API with RedfishIntegrations:Connections:Microsoft® System CenterNagios Core & Nagios XIIntegrations and Connections VMware® vCenter™Micro Focus Operations Manager i (OMi)BMC Truesight (available from BMC)IBM Tivoli Netcool/OMNIbusRed Hat AnsibleCertify XenServerCitrix® XenServer®Operating Systems Microsoft Windows Server® with Hyper-VNote: This model is installed with Microsoft Windows Server® 2016 multilingual operatingsystem.Virtual Machines VMware® ESXi。
- 1、下载文档前请自行甄别文档内容的完整性,平台不提供额外的编辑、内容补充、找答案等附加服务。
- 2、"仅部分预览"的文档,不可在线预览部分如存在完整性等问题,可反馈申请退款(可完整预览的文档不适用该条件!)。
- 3、如文档侵犯您的权益,请联系客服反馈,我们会尽快为您处理(人工客服工作时间:9:00-18:30)。
Recommended Configuration for DVR CardContents1.RECOMMENDED CONFIGURA TION FOR 4-CH D1 (1)2.RECOMMENDED CONFIGURA TION FOR 8-CH D1 (2)3.RECOMMENDED CONFIGURA TION FOR 12-CH D1 (2)4.RECOMMENDED CONFIGURA TION FOR 16-CH D1 (2)5.RECOMMENDED CONFIGURA TION FOR BELOW 16-CH CIF (3)6.RECOMMENDED CONFIGURA TION FOR 20-CH/24-CH CIF (3)7.RECOMMENDED CONFIGURA TION FOR 32-CH/48-CH CIF (3)APPENDIX: RECOMMENDED MOTHERBOARD LIST (4)G IGABYTE G31 SERIES (4)S EA VO DVR SERIES (4)1.Recommended Configuration for 4-ch D1Name Spec. and Model Brand NoteMainboard GA-G31M-S2L /G31MX-S2/G31-S3G/G31-S3LDVR SV-T6234/SV-G4134/SV-T8225/SV-V6225Gigabyte/SeavoAbove 945 chipsetgroup. Betterperformance forG31.CPU Intel Dual Core E1400 or above IntelMemory DDR2, 256M or above×2 Kingston Dual-channel mustbe used.DisplaycardIntegrated display card A TI/Nvidia/IntelHard disk 320G or above SeagatePower 250W GreatWall/HuntKey Rated power2.Recommended Configuration for 8-ch D1Name Spec. and Model Brand NoteMainboard GA-G31M-S2L /G31MX-S2/G31-S3G/G31-S3LDVR SV-T6234/SV-G4134/SV-T8225/SV-V6225Gigabyte/SeavoAbove 945 chipsetgroup. Betterperformance forG31CPU Intel Dual Core E4300 or above IntelMemory DDR2, 256M or above×2 Kingston Dual-channel mustbe used.DisplaycardIntegrated display card A TI/Nvidia/IntelHard disk 320G or above SeagatePower 300W GreatWall/HuntKey Rated power 3.Recommended Configuration for 12-ch D1Name Spec. and Model Brand NoteMainboard GA-G31M-S2L /G31MX-S2/G31-S3G/G31-S3LDVR SV-T6234/SV-G4134/SV-T8225/SV-V6225Gigabyte/SeavoAbove 945 chipsetgroup. Betterperformance forG31CPU Intel Dual Core E5200 or above IntelMemory DDR2, 512M or above×2 Kingston Dual-channel mustbe used.Display Integrated display card A TI/Nvidia/IntelHard disk 320G or above SeagatePower 300W GreatWall/HuntKey Rated power 4.Recommended Configuration for 16-ch D1Name Spec. and Model Brand NoteMainboard GA-G31M-S2L /G31MX-S2/G31-S3G/G31-S3LDVR SV-T6234/SV-G4134/SV-T8225/SV-V6225Gigabyte/SeavoBetter performancefor above G31chipset group.CPU Intel Four Core Q8200 or above IntelMemory DDR2, 512M or above×2 Kingston Dual-channel mustbe used.Display Integrated display card A TI/Nvidia/IntelHard disk 320G or above SeagatePower 300W GreatWall/HuntKey Rated power5.Recommended Configuration for below 16-ch CIFName Spec. and Model Brand NoteMainboard GA-G31M-S2L /G31MX-S2/G31-S3G/G31-S3LDVR SV-T6234/SV-G4134/SV-T8225/SV-V6225Gigabyte/SeavoCPU Intel Dual Core E1400 or above IntelMemory DDR2 512M KingstonDisplay Integrated display card A TI/Nvidia/IntelHard disk 320G SeagatePower 250W GreatWall/HuntKey Rated power 6.Recommended Configuration for 20-ch/24-ch CIFName Spec. and Model Brand NoteMainboard GA-G31M-S2L /G31MX-S2/G31-S3G/G31-S3LDVR SV-T6234/SV-G4134/SV-T8225/SV-V6225Gigabyte/SeavoCPU Intel Dual Core E4300 or above IntelMemory DDR2 1G KingstonDisplay Integrated display card A TI/Nvidia/IntelHard disk 320G SeagatePower 300W GreatWall/HuntKey Rated power 7.Recommended Configuration for 32-ch/48-ch CIFName Spec. and Model Brand NoteMainboard GA-G31M-S2L /G31MX-S2/G31-S3G/G31-S3LDVR SV-T6234/SV-G4134/SV-T8225/SV-V6225Gigabyte/SeavoCPU Intel Dual Core E5200 or above IntelMemory DDR2 1G KingstonDisplay Integrated display card A TI/Nvidia/IntelHard disk 320G SeagatePower 350W GreatWall/HuntKey Rated power Notes:(1) Please use INTEL CPU. The cards do not support AMD platform and other platforms currently.(2) The testing result shows that symmetric dual-channel memory (two same memory bars) must be used when using D1 coding form, which will reduce the CPU utilization rate by about 15%.(3) Please use Gigabyte, Asus, Seavo and other famous motherboards because of their advanced technologies, and good quality, stability and compatibility. Please use Intel chipset group and do not use motherboards with VIA,SIS,A TI,nVIDIA and other chipset group to avoid incompatibility.The above recommended motherboards have passed strict testing. And users are strongly recommended to use the recommended motherboards. Otherwise, the excessive CPU utilization rate will disable the software.Appendix: Recommended motherboard listGigabyte G31 seriesModel Picture Model PictureGA-G31-S3G GA-G31M-S2LGA-G31-S3LGA-G31MX-S2Seavo DVR seriesModel Picture Model PictureDVR SV-T6234 DVR SV-G4134DVR SV-T8225 DVR SV-V6225。