HPEliteUSB-C衔接基座使用指引-UserManualwiki
HPc安装指南

HP 笔记本电脑 驱动器 说明书

驱动器用户指南© Copyright 2008 Hewlett-Packard Development Company, L.P.Microsoft 和 Windows 是 Microsoft Corporation 在美国的注册商标。
本文档中包含的信息如有更改,恕不另行通知。
随 HP 产品和服务附带的明确有限保修声明中阐明了此类产品和服务的全部保修服务。
本文档中的任何内容均不应理解为构成任何额外保证。
HP 对本文档中出现的技术错误、编辑错误或遗漏之处不承担责任。
第一版:2008 年 11 月文档部件号:501592-AA1产品通告本用户指南介绍大多数机型的常用功能。
您的计算机上可能未提供某些功能。
目录1 取放驱动器2 使用光驱识别安装的光驱 (3)使用光盘 (4)选择正确的光盘 (5)CD-R 光盘 (5)CD-RW 光盘 (5)DVD±R 光盘 (5)DVD±RW 光盘 (5)LightScribe DVD+R 光盘 (5)蓝光光盘 (BD) (6)播放光盘 (7)配置自动播放 (8)更改 DVD 的区域设置 (9)遵守版权警告 (10)复制 CD 或 DVD (11)创建(刻录)CD 或 DVD (12)取出光盘 (13)3 提高硬盘驱动器性能使用磁盘碎片整理程序 (14)使用磁盘清理程序 (15)4 更换硬盘驱动器5 故障排除光盘托盘没有打开 (18)笔记本计算机检测不到光驱 (19)光盘无法播放 (20)光盘无法自动播放 (21)DVD 影片停止、跳过或无法正常播放 (22)在外接显示器上看不见 DVD 影片 (23)光盘刻录过程无法启动,或者在完成之前停止 (24)在 Windows Media Player 中播放的 DVD 没有声音或不显示图像 (25)必须重新安装设备驱动程序 (25)获取 Microsoft 设备驱动程序 (25)获取 HP 设备驱动程序 (25)iii索引 (27)iv1取放驱动器驱动器是容易损坏的计算机组件,取放时应格外小心。
HP电脑说明书

iv 安全警告通告
目录
1 使用入门 使用 HP QuickWeb(仅限某些机型) .................................................................................................. 2
2 了解部件 识别硬件 ............................................................................................................................................... 3 顶部组件 .............................................................................................................................. 3 触摸板 ................................................................................................................. 3 指示灯 ................................................................................................................. 4 按键 ..................................................................................................................... 5 前部组件 .............................................................................................................................. 5 右侧组件 .............................................................................................................................. 6 左侧组件 .............................................................................................................................. 7 显示屏组件 ........................................................................................................................... 8 底部组件 .............................................................................................................................. 9 取下盖罩 .............................................................................................................................. 9 装回盖罩 ............................................................................................................................ 11 无线天线 ............................................................................................................................ 12 其他硬件组件 ..................................................................................................................... 13 识别标签 ............................................................................................................................................. 13
HP OMEN Keyboard 用户指南说明书

User Guide© Copyright 2019 HP Development Company, L.P.The information contained herein is subject to change without notice. The only warranties for HP products and services are set forth in the express warranty statements accompanying such products and services. Nothing herein should be construed as constituting an additional warranty. HP shall not be liable for technical or editorial errors or omissions contained herein.First Edition: August 2019Document Part Number: L70791-001Table of contents1 Getting started (1)Downloading the software (1)Opening the software (1)Enabling or disabling the Windows key (1)2 Using the software (2)Keyboard menu (2)Lighting (2)Static mode (2)Animation mode (3)Key Assignments (3)Configuring the OMEN key (3)Creating a macro (3)Editing a macro (4)Assigning a macro (4)3 Accessibility (5)HP and accessibility (5)Finding the technology tools you need (5)The HP commitment (5)International Association of Accessibility Professionals (IAAP) (5)Finding the best assistive technology (6)Assessing your needs (6)Accessibility for HP products (6)Standards and legislation (7)Standards (7)Mandate 376 – EN 301 549 (7)Web Content Accessibility Guidelines (WCAG) (7)Legislation and regulations (7)Useful accessibility resources and links (8)Organizations (8)Educational institutions (8)Other disability resources (8)HP links (9)Contacting support (9)iiiiv1Getting startedDownloading the softwareNOTE:This software might be preinstalled on select computers.This software requires a Windows® 10 operating system (64-bit), version 1709 or later.1.On your computer, select the Start button, and then select Microsoft Store.2.Search for OMEN Command Center, and then download the app.Opening the software1.Select Start.2.Select OMEN Command Center.– or –Press the OMEN key .Enabling or disabling the Windows keyBy default, the Windows key is disabled.▲Press FN + F12.Downloading the software12Using the softwareYou can use OMEN Command Center to configure the keyboard settings. The keyboard remembers and usesthese settings, even if connected to a device without OMEN Command Center.▲To restore default settings, select Reset to default.Keyboard menuTo open the keyboard menu:▲After the app opens, select OMEN ENCODER.TIP:This option is available only when the keyboard is connected to the computer.Using the main menu tabs, you can configure the keyboard lighting and macro settings.LightingSelect the Lighting tab to configure the lighting.1.Select a lighting mode.2.To configure the mode you selected, go to the corresponding section.●Static mode on page 2●Animation mode on page 3Static modeCustomize the keys in the static colored zones on the keyboard.1.Select a template.●All Keys: Selects every key.●WASD: Selects the W, A, S, D, and arrow keys.●FPS: Selects the W, A, S, D, R, Shift, and Ctrl keys.●MOBA: Selects the 1 through 6 integrated number keys and Q, W, E, and R keys.●MMO: Selects the 1 through 6 integrated number keys and W, A, S, D, Shift, and Ctrl keys.●M1–M5: Selects the M1 through M5 keys.2.To select additional keys, press and hold Ctrl while simultaneously clicking individual keys or clicking anddragging the mouse.3.Select the Brightness of the lighting, from 0 to 100%.4.To save changes, select Apply. To return to the beginning of the procedure, select Discard changes.2Chapter 2 Using the softwareAnimation modeSelect a keyboard lighting pattern.1.Select an effect.●Breathing: Fades in and out on the full keyboard.●Ripple: Fades in and out in a ring shape from each key that is pressed.●Left Wave: Moves across the keyboard from the left.●Right Wave: Moves across the keyboard from the right.2.Select the Speed of the animation.3.Select the Brightness of the lighting, from 0 to 100%.4.To save changes, select Apply. To return to the beginning of the procedure, select Discard changes. Key AssignmentsNOTE:The first time you select the Key Assignments tab, a tutorial starts. Follow the on-screen instructionsto complete the tutorial. You can select View later to dismiss it. To view the tutorial at any time, selectTutorial.A macro is a keystroke sequence that is executed when you press a key.You can assign up to five macros, from M1 to M5. Each macro is limited to 47 actions in the keystrokesequence.If the Windows key is enabled, press FN + MN to execute a macro.There is a list that displays all macros you have created that can be assigned to a mouse M-button orkeyboard M-key. Select KEYBOARD to display only the keyboard macros.To clear all assigned macros, select Reset to default.Configuring the OMEN keyBy default, the OMEN key launches OMEN Command Center. It can also perform the scroll lock function.▲Under OMEN Key Options, select Scroll lock or Launch OMEN Command Center.Creating a macro1.Select the plus sign (+).– or –Select an M-key, and then select New from the pop-up menu.2.Select a macro mode.●KEYSTROKE: Creates a shortcut with a combination of key presses.●MULTI-KEY: Records a combination of key presses and mouse clicks with customizable recorded orfixed delays.●MOUSE ACTION: Assigns any standard mouse button function.Key Assignments3●LAUNCHER: Launches an app or game.●TEXT: Pastes a custom text message to automate in-game chatting.3.Enter a Macro name.4.Enter the keystroke sequence.●If you selected KEYSTROKE, in the Key combination box, press the keys in the combination to beexecuted.TIP:Select Clear to restart the sequence.●If you selected MULTI-KEY, select the number of loops. Then, in the Input sequence box, selectRecorded delay (the actual delay as you enter the key combination), Fixed delay (enter up to99999 ms), or No delay. Select Record, enter the keystroke sequence, and then select Stoprecording. You can select any part of the sequence to clear it, or to add or replace a key.NOTE:There is an upstroke and downstroke for every key.●If you selected MOUSE ACTION, select the mouse button function.●If you selected LAUNCHER, enter the name of the Application to open.TIP:Select Browse to select the application from your program files.●If you selected TEXT, enter the Key modifier (the key that the macro presses before pasting thecustom text), and then enter the Custom text.5.To save changes, select Save. To return to the beginning of the procedure, select Cancel.6.If you did not select an M-key in step 1, drag and drop the macro from the macro list to an M-key. Editing a macro1.Select an M-key, and then select Edit from the pop-up menu.2.Edit the macro. See Creating a macro on page3.3.To save changes, select Save. To return to the beginning of the procedure, select Cancel. Assigning a macroYou can assign a single macro to up to three keys.You can assign a macro to a key in either of the following ways:▲Select a macro from the list, and then drag and drop the macro to a key.– or –1.Select an M-key, and then select Assign from the pop-up menu.2.Select the macro, and then select Assign.4Chapter 2 Using the software3AccessibilityHP and accessibilityBecause HP works to weave diversity, inclusion, and work/life into the fabric of the company, it is reflected ineverything HP does. HP strives to create an inclusive environment focused on connecting people to the powerof technology throughout the world.Finding the technology tools you needTechnology can unleash your human potential. Assistive technology removes barriers and helps you createindependence at home, at work, and in the community. Assistive technology helps increase, maintain, andimprove the functional capabilities of electronic and information technology. For more information, seeFinding the best assistive technology on page 6.The HP commitmentHP is committed to providing products and services that are accessible for people with disabilities. Thiscommitment supports the company's diversity objectives and helps ensure that the benefits of technologyare available to all.The HP accessibility goal is to design, produce, and market products and services that can be effectively usedby everyone, including people with disabilities, either on a stand-alone basis or with appropriate assistivedevices.To achieve that goal, this Accessibility Policy establishes seven key objectives to guide HP actions. All HPmanagers and employees are expected to support these objectives and their implementation in accordancewith their roles and responsibilities:●Raise the level of awareness of accessibility issues within HP, and provide employees with the trainingthey need to design, produce, market, and deliver accessible products and services.●Develop accessibility guidelines for products and services, and hold product development groupsaccountable for implementing these guidelines where competitively, technically, and economicallyfeasible.●Involve people with disabilities in the development of accessibility guidelines and in the design andtesting of products and services.●Document accessibility features, and make information about HP products and services publiclyavailable in an accessible form.●Establish relationships with leading assistive technology and solution providers.●Support internal and external research and development that improves assistive technology relevant toHP products and services.●Support and contribute to industry standards and guidelines for accessibility.International Association of Accessibility Professionals (IAAP)IAAP is a not-for-profit association focused on advancing the accessibility profession through networking,education, and certification. The objective is to help accessibility professionals develop and advance theircareers and to better enable organizations to integrate accessibility into their products and infrastructure.HP and accessibility5As a founding member, HP joined to participate with other organizations to advance the field of accessibility.This commitment supports HP’s accessibility goal of designing, producing, and marketing products andservices that people with disabilities can effectively use.IAAP will make the profession strong by globally connecting individuals, students, and organizations to learnfrom one another. If you are interested in learning more, go to to jointhe online community, sign up for newsletters, and learn about membership options.Finding the best assistive technologyEveryone, including people with disabilities or age-related limitations, should be able to communicate,express themselves, and connect with the world using technology. HP is committed to increasing accessibilityawareness within HP and with our customers and partners. Whether it’s large fonts that are easy on the eyes,voice recognition that lets you give your hands a rest, or any other assistive technology to help with yourspecific situation—a variety of assistive technologies make HP products easier to use. How do you choose? Assessing your needsTechnology can unleash your potential. Assistive technology removes barriers and helps you createindependence at home, at work, and in the community. Assistive technology (AT) helps increase, maintain,and improve the functional capabilities of electronic and information technology.You can choose from many AT products. Your AT assessment should allow you to evaluate several products,answer your questions, and facilitate your selection of the best solution for your situation. You will find thatprofessionals qualified to do AT assessments come from many fields, including those licensed or certified inphysical therapy, occupational therapy, speech/language pathology, and other areas of expertise. Others,while not certified or licensed, can also provide evaluation information. You will want to ask about theindividual's experience, expertise, and fees to determine if they are appropriate for your needs. Accessibility for HP productsThe following links provide information about accessibility features and assistive technology, if applicable,included in various HP products. These resources will help you select the specific assistive technologyfeatures and product(s) most appropriate for your situation.●HP Elite x3–Accessibility Options (Windows 10 Mobile)●HP PCs–Windows 7 Accessibility Options●HP PCs–Windows 8 Accessibility Options●HP PC’s–Windows 10 Accessibility Options●HP Slate 7 Tablets–Enabling Accessibility Features on Your HP Tablet (Android 4.1/Jelly Bean)●HP SlateBook PCs–Enabling Accessibility Features (Android 4.3,4.2/Jelly Bean)●HP Chromebook PCs–Enabling Accessibility Features on Your HP Chromebook or Chromebox (ChromeOS)●HP Shopping–peripherals for HP productsIf you need additional support with the accessibility features on your HP product, see Contacting supporton page 9.Additional links to external partners and suppliers that may provide additional assistance:●Microsoft Accessibility information (Windows 7, Windows 8, Windows 10, Microsoft Office)●Google Products accessibility information (Android, Chrome, Google Apps)6Chapter 3 Accessibility●Assistive Technologies sorted by impairment type●Assistive Technologies sorted by product type●Assistive Technology vendors with product descriptions●Assistive Technology Industry Association (ATIA)Standards and legislationStandardsSection 508 of the Federal Acquisition Regulation (FAR) standards was created by the US Access Board toaddress access to information and communication technology (ICT) for people with physical, sensory, orcognitive disabilities. The standards contain technical criteria specific to various types of technologies, as wellas performance-based requirements which focus on functional capabilities of covered products. Specificcriteria cover software applications and operating systems, web-based information and applications,computers, telecommunications products, video and multimedia, and self-contained closed products. Mandate 376 – EN 301 549The EN 301 549 standard was created by the European Union within Mandate 376 as the basis for an onlinetoolkit for public procurement of ICT products. The standard specifies the functional accessibilityrequirements applicable to ICT products and services, together with a description of the test procedures andevaluation methodology for each accessibility requirement.Web Content Accessibility Guidelines (WCAG)Web Content Accessibility Guidelines (WCAG) from the W3C's Web Accessibility Initiative (WAI) helps webdesigners and developers create sites that better meet the needs of people with disabilities or age-relatedlimitations. WCAG advances accessibility across the full range of web content (text, images, audio, and video)and web applications. WCAG can be precisely tested, is easy to understand and use, and allows webdevelopers flexibility for innovation. WCAG 2.0 has also been approved as ISO/IEC 40500:2012.WCAG specifically addresses barriers to accessing the web experienced by people with visual, auditory,physical, cognitive, and neurological disabilities, and by older web users with accessibility needs. WCAG 2.0provides characteristics of accessible content:●Perceivable (for instance, by addressing text alternatives for images, captions for audio, adaptability ofpresentation, and color contrast)●Operable (by addressing keyboard access, color contrast, timing of input, seizure avoidance, andnavigability)●Understandable (by addressing readability, predictability, and input assistance)●Robust (for instance, by addressing compatibility with assistive technologies)Legislation and regulationsAccessibility of IT and information has become an area of increasing legislative importance. The links listedbelow provide information about key legislation, regulations, and standards.●United States●Canada●EuropeStandards and legislation7●United Kingdom●Australia●WorldwideUseful accessibility resources and linksThe following organizations might be good resources for information about disabilities and age-relatedlimitations.NOTE:This is not an exhaustive list. These organizations are provided for informational purposes only. HPassumes no responsibility for information or contacts you encounter on the Internet. Listing on this pagedoes not imply endorsement by HP.Organizations●American Association of People with Disabilities (AAPD)●The Association of Assistive Technology Act Programs (ATAP)●Hearing Loss Association of America (HLAA)●Information Technology Technical Assistance and Training Center (ITTATC)●Lighthouse International●National Association of the Deaf●National Federation of the Blind●Rehabilitation Engineering & Assistive Technology Society of North America (RESNA)●Telecommunications for the Deaf and Hard of Hearing, Inc. (TDI)●W3C Web Accessibility Initiative (WAI)Educational institutions●California State University, Northridge, Center on Disabilities (CSUN)●University of Wisconsin - Madison, Trace Center●University of Minnesota computer accommodations programOther disability resources●ADA (Americans with Disabilities Act) Technical Assistance Program●ILO Global Business and Disability network●EnableMart●European Disability Forum●Job Accommodation Network●Microsoft Enable8Chapter 3 AccessibilityHP linksOur contact webformHP comfort and safety guideHP public sector salesContacting supportNOTE:Support is in English only.●Customers who are deaf or hard of hearing who have questions about technical support or accessibilityof HP products:–Use TRS/VRS/WebCapTel to call (877) 656-7058 Monday through Friday, 6 a.m. to 9 p.m. Mountain Time.●Customers with other disabilities or age-related limitations who have questions about technical supportor accessibility of HP products, choose one of the following options:–Call (888) 259-5707 Monday through Friday, 6 a.m. to 9 p.m. Mountain Time.–Complete the Contact form for people with disabilities or age-related limitations.Contacting support9。
hp 蓝卡使用说明

蓝卡系统集成方案使用指南(特别为惠普定制)北京易生创新科技有限公司.前言◎欢迎使用蓝卡!◆◆◆◆◆◆◆◆◆◆◆◆◆◆◆◆◆◆◆◆◆◆◆◆◆◆◆◆◆◆◆◆◆◆◆◆◆◆◆◆◆◆◆◆◆◆◆◆◆◆※本手册所有的产品商标与产品名称均属于北京易生创新科技有限公司。
※本手册所有图形仅供参考,请您以实际软件界面为准。
※请您保护好您的蓝卡密码,如果密码遗失,请您告之购货渠道,否则我们无法为您提供服务。
※请您在做安装、移除、修改蓝卡操作时,备份好您的硬盘数据,如果数据丢失,本公司不予找回。
◆◆◆◆◆◆◆◆◆◆◆◆◆◆◆◆◆◆◆◆◆◆◆◆◆◆◆◆◆◆◆◆◆◆◆◆◆◆◆◆◆◆◆◆◆◆◆◆◆◆蓝卡系统集成方案(以下简称蓝卡)是对局域网内计算机机房进行搭建、部署、维护的一种专用解决方案,集网络安装、数据恢复和网络更新功能于一身。
该方案广泛应用于学校机房、企事业单位或网吧等局域网环境,成为广大机房管理者的得力助手。
它以方便、快捷、安全的优势备受机房管理者的青睐。
◎质量保证及其升级说明蓝卡实行一年质保,其间本公司将竭诚为您提供主版本内的免费升级服务,升级后的版本和使用手册中的界面或内容有所出入的,请您以实际界面为准,如有需要解答的问题,请您及时联系我们的技术部门。
感谢您对本公司产品的厚爱!目录本手册阅读导航1.产品介绍 ............................................................................61.1.产品说明......................................................................... 61.2.功能简介......................................................................... 61.3.支持的操作系统* ........................................................... 71.4.支持的文件系统............................................................. 72.快速开始指南 ....................................................................82.1.选择安装方式(全新安装)......................................... 82.2.安装操作系统和蓝卡驱动......................................... 112.2.1.安装操作系统及应用软件................................ 112.2.2.安装蓝卡驱动 ................................................... 122.2.3.安装完成 ........................................................... 152.3.网络拷贝、自动修改IP ............................................ 152.3.1.网络拷贝 ........................................................... 162.3.2.自动修改IP ....................................................... 203.计算机已经安装好操作系统安装蓝卡 ........................233.1.选择安装方式............................................................. 233.1.1.保留安装 ........................................................... 233.1.2.安装蓝卡系统驱动............................................ 243.1.3.网络拷贝 ........................................................... 253.1.4.自动修改IP ....................................................... 254.高级使用指南 ................................................................264.1.安装多个操作系统..................................................... 264.1.1.选择安装方式(全新安装)............................ 264.1.2.用蓝卡划分硬盘分区........................................ 274.1.3.安装操作系统及应用软件................................ 294.1.4.安装蓝卡驱动 ................................................... 294.1.5.网络拷贝、自动修改IP ................................... 294.2.Linux安装指南 .......................................................... 304.2.1.蓝卡分区界面 ................................................... 304.2.2.选择安装类型时,选择“定制”: .................. 314.2.3.磁盘分区设置请选择“用手工分区”。
HP USB设备和1394设备使用手册说明书

External Devices User Guide© Copyright 2007 Hewlett-Packard Development Company, L.P.The information contained herein is subject to change without notice. The only warranties for HP products and services are set forth in the express warranty statements accompanying such products and services. Nothing herein should be construed as constituting an additional warranty. HP shall not be liable for technical or editorial errors or omissions contained herein.First Edition: June 2007Document Part Number: 443963-001Product noticeThis user guide describes features that are common to most models. Some features may not beavailable on your computer.iiiiv Product noticeTable of contents1 Using a USB deviceConnecting a USB device (2)Stopping and removing a USB device (2)Using USB legacy support (3)2 Using a 1394 deviceConnecting a 1394 device (5)Stopping a 1394 device (5)3 Using the docking connectorIndex (7)vvi1Using a USB deviceUniversal Serial Bus (USB) is a hardware interface that can be used to connect an optional externaldevice, such as a USB keyboard, mouse, drive, printer, scanner, or hub. Devices can be connected to the computer or an optional docking device.Some USB devices may require additional support software, which is usually included with the device.For more information about device-specific software, refer to the manufacturer's instructions.The computer has 6 USB 2.0 ports, which support USB 1.0, USB 1.1, and USB 2.0 devices. An optional docking device or USB hub provides additional USB ports that can be used with the computer.1Connecting a USB deviceCAUTION:To prevent damage to a USB connector, use minimal force to connect a USB device.▲To connect a USB device to the computer, connect the USB cable for the device to the USB port.You will hear a sound when the device has been detected.NOTE:The first time you connect a USB device, the “Installing device driver software” message isdisplayed in the notification area, at the far right of the taskbar.Stopping and removing a USB deviceCAUTION:To prevent loss of information or an unresponsive system, stop the USB device beforeremoving it.CAUTION:To prevent damage to a USB connector, do not pull on the cable to remove the USB device.1.Double-click the Safely Remove Hardware icon in the notification area, at the far right of thetaskbar.NOTE:To display the Safely Remove Hardware icon, click the Show Hidden Icons icon (< or<<) in the notification area.2.Click the name of the device in the list.NOTE:If the USB device is not listed, you do not have to stop the device before you remove it.3.Click Stop, and then click OK.4.Remove the device.2Chapter 1 Using a USB deviceUsing USB legacy supportUSB legacy support (enabled by default) permits the following actions:●Using a USB keyboard, mouse, or hub connected to a USB port on the computer during startup orin an MS-DOS-based program or utility●Starting or restarting from an optional external MultiBay or an optional USB bootable deviceUSB legacy support is enabled at the factory. To disable or enable USB legacy support:1.Open Computer Setup by turning on or restarting the computer, and then pressing f10 while the“f10 = ROM Based Setup” message is displayed in the lower-left corner of the screen.e the arrow keys to select System Configuration > Device configurations, and then pressenter.e the arrow keys to enable or disable USB legacy support, and then press f10.4.To save your preferences and exit Computer Setup, use the arrow keys to select File > Savechanges and exit. Then follow the instructions on the screen.Your preferences go into effect when the computer restarts.Using USB legacy support32Using a 1394 deviceIEEE 1394 is a hardware interface that can be used to connect a high-speed multimedia or data storage device to the computer. Scanners, digital cameras, and digital camcorders often require a 1394connection.Some 1394 devices may require additional support software, which is usually included with the device.For more information about device-specific software, refer to the user guide for the device.The 1394 port also supports IEEE 1394a devices.4Chapter 2 Using a 1394 deviceConnecting a 1394 deviceCAUTION:To prevent damage to a 1394 port connector, use minimal force to connect a 1394 device.To connect a 1394 device to the computer, connect the 1394 cable for the device to the 1394 port. You will hear a sound when the device has been detected.Stopping a 1394 deviceCAUTION:To prevent loss of information or an unresponsive system, stop the 1394 device beforeremoving it.CAUTION:To prevent damage to a 1394 connector, do not pull on the cable to disconnect the 1394 device.1.Double-click the Safely Remove Hardware icon in the notification area, at the far right of thetaskbar.NOTE:To display the Safely Remove Hardware icon, click the Show Hidden Icons icon (< or<<) in the notification area.2.Click the name of the device in the list.NOTE:If the device is not displayed, you do not have to stop the device before you remove it.3.Click Stop, and then click OK.Connecting a 1394 device53Using the docking connectorThe docking connector connects the computer to an optional docking device. An optional docking device provides additional ports and connectors that can be used with the computer.6Chapter 3 Using the docking connectorIndexSymbols/Numerics1394 cable, connecting51394 devicesconnecting5description4stopping51394 port4Ccables13945USB2Ddocking connector6Hhubs1Pports13944USB1UUSB cable, connecting2USB devicesconnecting2description1removing2stopping2USB hubs1USB legacy support3USB ports, identifying1Index7。
HP Color LaserJet Pro M454 使用指南说明书
HP Ultralight 轻量级连接设备说明书
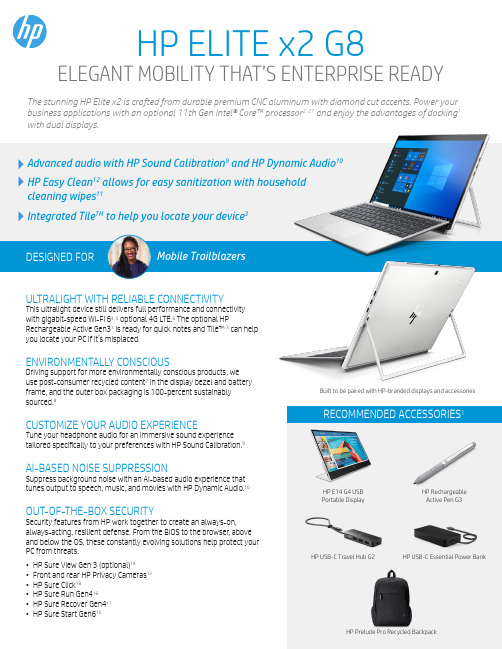
ULTRALIGHT WITH RELIABLE CONNECTIVITYThis ultralight device still delivers full performance and connectivitywith gigabit-speed Wi-Fi 64, 5 optional 4G LTE.6 The optional HPRechargeable Active Gen31 is ready for quick notes and Tile™ 3 can helpyou locate your PC if it’s misplaced.ENVIRONMENTALLY CONSCIOUSDriving support for more environmentally conscious products, weuse post-consumer recycled content 7 in the display bezel and batteryframe, and the outer box packaging is 100-percent sustainablysourced.8CUSTOMIZE YOUR AUDIO EXPERIENCETune your headphone audio for an immersive sound experiencetailored specifically to your preferences with HP Sound Calibration. 9AI-BASED NOISE SUPPRESSIONSuppress background noise with an AI-based audio experience thattunes output to speech, music, and movies with HP Dynamic Audio.10OUT-OF-THE-BOX SECURITYSecurity features from HP work together to create an always-on,always-acting, resilient defense. From the BIOS to the browser , aboveand below the OS, these constantly evolving solutions help protect yourPC from threats.• HP Sure View Gen 3 (optional)14• Front and rear HP Privacy Cameras 13• HP Sure Click 18• HP Sure Run Gen416• HP Sure Recover Gen417• HP Sure Start Gen615HP ELITE x2 G8ELEGANT MOBILITY THAT’S ENTERPRISE READYBuilt to be paired with HP-branded displays and accessoriesand HP Dynamic Audio 10allows for easy sanitization with householdThe stunning HP Elite x2 is crafted from durable premium CNC aluminum with diamond cut accents. Power your business applications with an optional 11th Gen Intel® Core™ processor 2, 27 and enjoy the advantages of docking 1 with dual displays. RECOMMENDED ACCESSORIES 1HP E14 G4 USBPortable Display HP Rechargeable Active Pen G3HP USB-C Travel Hub G2HP USB-C Essential Power BankHP Prelude Pro Recycled BackpackFOOTNOTES1. Sold separately or as an optional feature.2. Multicore is designed to improve performance of certain software products. Not all customers or software applications will necessarily benefit from use of this technology. Performance and clock frequencywill vary depending on application workload and your hardware and software configurations. Intel’s numbering, branding and/or naming is not a measurement of higher performance.3. Some features require optional subscription to Tile Premium. Tile application for Windows 10 available for download from the Windows Store. Mobile phone app available for download from App Storeand Google Play. Requires iOS 11 and greater or Android 6.0 and greater see https:///hc/en-us/articles/200424778 for more information. HP Tile will function as long as the PC has battery power.4. Wireless access point and internet service required and sold separately. Availability of public wireless access points limited. Wi-Fi 6 is backwards compatible with prior 802.11 specs. The specifications forWi-Fi 6 (802.11ax) are draft and are not final. If the final specifications differ from the draft specifications, it may affect the ability of the PC to communicate with other 802.11ax devices.5. Wi-Fi® supporting gigabit data rate is achievable with Wi-Fi 6 (802.11ax) when transferring files between two devices connected to the same router. Requires a wireless router, sold separately, thatsupports 160MHz channels.6. Gigabit-class 4G LTE module is optional and must be configured at the factory. Module designed for up to 1 Gbps download speeds as carriers deploy 5 carrier aggregation and 100Mhz channel bandwidth,requires activation and separately purchased service contract. Backwards compatible to HSPA 3G technologies. Check with service provider for coverage and availability in your area. Connection, upload, and download speeds will vary due to network, location, environment, network conditions, and other factors. 4G LTE not available on all products, in all regions.7. Display bezel components made with 75% post-consumer recycled content and battery frame made from 35% post-consumer recycled content.8. 100% outer box packaging made from sustainably sourced certified and recycled fibers. Fiber cushions made from 100% recycled wood fiber and organic material. Any plastic cushions are made from>90% recycled plastic.9. HP Sound Calibration is coming soon and will be delivered automatically through Windows update or can be downloaded from https:///us-en/drivers when available. Requires Windows 10,analog headset, and setup.10. H P Dynamic Audio is coming soon and will be delivered automatically through Windows update or can be downloaded from https:///us-en/drivers when available. Requires Windows 10,compatible with internal PC speakers and analog headsets.11. S elect household wipes can be safely used to clean HP Elite and Workstation, and HP ProBook 635 Aero PCs up to 1,000 wipes: See wipe manufacturer’s instructions for disinfecting and the HP cleaningguide for HP tested wipe solutions at How to Sanitize Your HP Device Whitepaper (/v2/GetDocument.aspx?docname=4AA7-7610ENW) not applicable to HP Elite c1030 Chromebook.12. HP Easy Clean requires Windows 10 RS3 and will disable the keyboard, touchscreen, and clickpad only. Ports are not disabled. See user guide for cleaning instructions. Expected availability March 2020.13. HP Privacy Camera only available PCs equipped with HD or IR camera and must be installed at the factory.14. HP Sure View Gen3 integrated privacy screen is an optional feature that must be configured at purchase and is designed to function in landscape orientation.15. HP Sure Start Gen6 is available on select HP PCs and requires Windows 10.16. HP Sure Run Gen4 is available on select HP PCs and requires Windows 10.17. HP Sure Recover Gen4 with Embedded Reimaging is an optional feature which requires Windows 10 must be configured at purchase. You must back up important files, data, photos, videos, etc. before useto avoid loss of data. Network based recovery using Wi-Fi is only available on PC’s with Intel Wi-Fi Module.18. HP Sure Click requires Windows 10. See https://bit.ly/2PrLT6A_SureClick for complete details19. H P Manageability Integration Kit can be downloaded from /go/clientmanagement.20. R equires Internet access and Windows 10 PC preinstalled with HP QuickDrop app and either an Android device (phone or tablet) running Android 7 or higher with the Android HP QuickDrop app, and /or aniOS device (phone or tablet) running iOS 12 or higher with the iOS HP QuickDrop app.21. H P WorkWell requires Windows 10, is not available in all countries, and can be downloaded from the Windows Store.22. M IL STD 810H testing is not intended to demonstrate fitness for U.S. Department of Defense contract requirements or for military use. Test results are not a guarantee of future performance under thesetest conditions. Accidental damage requires an optional HP Accidental Damage Protection Care Pack.23. T est results are not a guarantee of future performance under these test conditions. Accidental damage requires an optional HP Accidental Damage Protection Care Pack.24. W MI installation required. Requires Windows 10.25. R echarges your battery up to 90% within 90 minutes when the system is off or in standby mode. Power adapter with a minimum capacity of 65 watts is required. After charging has reached 50% capacity,charging will return to normal. Charging time may vary +/-10% due to System tolerance.26. F or storage drives, GB = 1 billion bytes. Actual formatted capacity is less. Up to 30GB (for Windows 10) is reserved for system recovery software.27. C oming January 2021. The 11th Gen Intel® Core TM i5 and i7 U-Series Quad-Core Processors have optional vPro support. The 11th Gen Intel® Core TM i3 U-Series Dual-core processor does not support vPro.28. A ctual brightness will be lower with HP Sure View or touch screen.29. A ctual battery Watt-hours (Wh) will vary from design capacity. Battery capacity will naturally decrease with shelf life, time, usage, environment, temperature, system configuration, loaded apps, features,power management settings and other factors.30. 3 year limited warranty or 1000 cycles. Battery cycles are the total number of full charge/discharge cycles a battery yields before it can no longer hold a useful amount of charge31. M iracast is a wireless technology your PC can use to project your screen to TVs, projectors, and streaming.© Copyright 2020 HP Development Company, L.P. The information contained herein is subject to change without notice. The only warranties for HP products and services are set forth in the express warranty statements accompanying such products and services. Nothing herein should be construed as constituting an additional warranty. HP shall not be liable for technical or editorial errors or omissions contained herein.Intel, Intel Core, Intel vPro and Intel Optane are trademarks of Intel Corporation or its subsidiaries in the U.S. and/or other countries. Thunderbolt is a trademark of Intel Corporation or its subsidiaries in the U.S. and/or other countries. Bluetooth is a trademark owned by its proprietor and used by HP Inc. under license. USB Type-C® and USB-C®are registered trademarks of USB Implementers Forum. DisplayPort™ and the DisplayPort™ logo are trademarks owned by the Video Electronics Standards Association (VESA®) in the United States and other countries. Members of Wi-Fi Alliance® are bound to follow the requirements of the Brand Styleguide pursuant to the Certification Mark License Agreement. Please ***************************************************************************.requirements.AMDandRadeonaretrademarksofAdvancedMicroDevices,Inc. December 2020。
- 1、下载文档前请自行甄别文档内容的完整性,平台不提供额外的编辑、内容补充、找答案等附加服务。
- 2、"仅部分预览"的文档,不可在线预览部分如存在完整性等问题,可反馈申请退款(可完整预览的文档不适用该条件!)。
- 3、如文档侵犯您的权益,请联系客服反馈,我们会尽快为您处理(人工客服工作时间:9:00-18:30)。
使用指南©Copyright 2015, 2016 HP Development Company, L.P.Windows 是 Microsoft Corporation 在美國和/或其他國家/地區的註冊商標或商標。
DisplayLink™ 是正式的軟體開發夥伴。
本文件包含的資訊可能有所變更,恕不另行通知。
HP 產品與服務的保固僅列於隨產品及服務隨附的明確保固聲明中。
本文件的任何部份都不可構成任何額外的保固。
HP 不負責本文件在技術上或編輯上的錯誤或疏失。
第二版: 2016 年 1 月第一版: 2015 年 12 月文件編號: 845650-AB2目錄1 快速入門 (1)識別組件 (1)頂部元件 (2)右側元件 (2)正面元件 (3)背面組件 (4)安裝 USB 銜接基座 (5)步驟 1: 連接 AC 電源 (5)步驟 2: 連接到電腦 (5)步驟 3: 預防睡眠或休眠 (6)設定軟體 (6)設定外接式顯示器 (6)使用 DisplayLink (6)使用 Windows (7)使用其他軟體功能 (7)睡眠、休眠、關機及重新啟動 (8)2 使用銜接基座 (9)銜接基座指導方針 (9)連接網路 (10)連接 USB 裝置 (11)連接至 DisplayPort 裝置 (12)連接至 HDMI 裝置 (12)連接音訊 (13)連接類比音效裝置 (13)連接選購的安全纜線 (14)3 斷開銜接基座 (15)4 疑難排解 (16)解決常見問題 (16)一般使用和連線問題 (16)音訊問題 (17)視訊問題 (17)iii取得更多相關資訊 (18)連絡支援 (18)5 規格 (19)輸入電源 (19)操作環境 (19)索引 (20)iv1快速入門識別組件本章說明了 HP Elite USB-C 銜接基座的可見硬體功能,並提供安裝指示。
附註:HP Elite USB-C 銜接基座的部分功能在您的電腦上可能無法使用。
識別組件1元件說明電源指示燈●亮起: 銜接基座已開啟。
●閃爍: 銜接基座處於待機狀態,這是一種省電狀態。
如果不連接任何裝置或所有裝置都閒置超過10 分鐘,銜接基座就會進入待機狀態。
右側元件組件說明(1)USB Type-C 纜線可將接銜接基座連接到筆記型電腦或平板電腦。
(2)安全纜線鎖孔將選用的安全纜線連接到銜接基座。
附註:安全纜線的設計目的是遏阻,但並不能避免銜接基座遭受不當處理或失竊。
2第 1 章 快速入門元件說明(1)音訊輸出(耳機)/音訊輸入(麥克風)複合式插孔連接選用的供電式立體聲喇叭、耳機、耳塞式耳機、頭戴式耳機或電視音訊纜線。
也可以連接選用的頭戴式耳機麥克風。
此插孔不支援選用的獨立麥克風。
警告!為降低傷害人體的風險,請在戴上耳機、耳塞式耳機或頭戴式耳機前先調整音量。
如需其他安全資訊,請參閱《法規、安全與環境公告》。
若要存取本指南:Windows 10依序選取開始按鈕、所有應用程式、HP 說明及支援以及 HP 說明文件。
Windows 8請在「開始」畫面中依序選取 HP Support Assistant 應用程式、我的電腦和使用指南。
Windows 7依序選取開始、所有程式、HP 說明及支援以及 HP 說明文件。
附註:當裝置連接到插孔時,電腦喇叭會停用。
如果音訊沒有自動切換到銜接基座,請在您的電腦設定中將銜接基座設為預設音訊裝置。
(2) USB Type-C (SuperSpeed 充電)連接埠可使用 Type-C 接頭連接任何 USB 裝置。
附註:此 USB Type-C 連接埠可以為行動電話、膝上型電腦、平板電腦和 MP3 播放機等產品充電。
附註:可能需要變壓器(需另外購買)。
(3)USB 2.0 連接埠可連接選用的 USB 裝置,例如鍵盤、滑鼠、外接式磁碟機、印表機、掃描器或 USB 集線器。
識別組件3元件說明(1)電源接頭連接 AC 變壓器。
(2)USB 3.0 充電(供電式)埠連接選用的 USB 裝置,例如鍵盤、滑鼠、外接式光碟機、印表機、掃描器或 USB 集線器。
標準 USB 連接埠不會為所有 USB 裝置充電,或使用低電流充電。
某些USB 裝置要求供電,並且要求您使用供電式連接埠。
附註:即使電腦已關閉,USB 充電埠仍可對特定機型的行動電話和 MP3 播放器進行充電。
(3)USB 2.0 連接埠(兩個)可連接選用的 USB 裝置,例如鍵盤、滑鼠、外接式磁碟機、印表機、掃描器或 USB 集線器。
(4)RJ-45(網路)插孔連接網路線。
(5)HDMI 連接埠可連接選用的視訊或音訊裝置,例如高畫質電視、任何相容的數位或音訊元件,或高速高畫質多媒體介面(HDMI) 裝置。
(6)Dual-Mode DisplayPort連接選用的數位顯示裝置,例如高效能顯示器或投影機。
4第 1 章 快速入門安裝 USB 銜接基座步驟 1: 連接 AC 電源將電源線連接到隨手可及的接地插座。
從電源插座拔出電源線,切斷設備電源。
請不要停用電源線的接地插頭。
此接地插頭具有重要的安全功能。
為確保所有銜接基座功能均發揮良好效能,請使用銜接基座電源線將銜接基座連接到 AC 電源。
1.將電源線的一端連接到 AC 變壓器 (1),另一端連接到電源插座 (2)。
2.將 AC 變壓器連接到銜接基座上的電源接頭 (3)。
步驟 2: 連接到電腦若要將電腦連接到銜接基座:▲將與銜接基座連接的 USB Type-C 纜線連接到您電腦上的 USB Type-C 連接埠。
安裝 USB 銜接基座5步驟 3: 預防睡眠或休眠使用外接式顯示器時,您可能需要關閉電腦。
如需設定外接式顯示器的詳細資訊,請參閱位於第 6 頁的設定外接式顯示器。
若要確認闔上顯示器時,電腦不會啟動睡眠或休眠模式:1.開啟「控制台」,然後選取電源選項頁面。
2.按一下選擇蓋上螢幕時的行為。
按一下不執行任何動作,然後按一下確定。
3.在一般電源底下,選取不執行任何動作,然後按一下儲存變更。
附註:如需存取「電源選項」頁面的指示,請參閱電腦上的「說明及支援」。
設定軟體本節說明了如何在執行 Windows®10、Windows 8 或 Windows 7 作業系統的電腦上安裝 HP Elite USB-C 銜接基座軟體。
該軟體已預先安裝在銜接基座的快閃記憶體中。
1.在電腦電源已開啟、正在執行 Windows 且已連線網際網路的情況下,將 USB 纜線從銜接基座連接到電腦。
裝置驅動程式應會自動安裝。
2.如果裝置驅動程式沒有自動安裝,請執行下列步驟:●Windows 10 — 依序按一下開始、檔案總管、這台電腦,然後連按兩下 HP Dock。
連按兩下HP Elite USB-C Docking Station Installer.exe。
●Windows 8 — 按一下 HP Dock 應用程式。
或者,按一下這台電腦,然後按一下 HP Dock。
連按兩下 HP Elite USB-C Docking Station Installer.exe。
●Windows 7 — 按一下開始,然後按一下電腦。
連按兩下 HP Dock,然後連按兩下 HP EliteUSB-C Docking Station Installer.exe。
3.歡迎畫面便會出現。
按下一步。
4.當使用者授權合約出現時,接受,然後按下一步。
5.按一下安裝。
6.選擇立即重新啟動還是稍後重新啟動。
銜接基座可能在下次重新啟動後才會正常運作。
如果您選擇重新啟動電腦,請先取出電腦磁碟機中的所有磁碟。
按一下完成。
7.請確定您已安裝最新的驅動程式。
前往 /support 並選取您所處的國家或地區。
選取軟體與驅動程式、輸入銜接基座型號(位於銜接基座底部),然後選取搜尋我的產品。
按一下您特定銜接基座的連結,然後下載最新的驅動程式。
設定外接式顯示器使用 DisplayLink使用 DisplayLink 來設定與銜接基座相連的顯示器螢幕。
1.按一下工作列中的 DisplayLink 圖示。
2.若要將外接式顯示器設定為主要顯示器的延伸,請按延伸。
- 或 -若要將外接式顯示器設定為主要顯示器的複本,請按鏡像。
6第 1 章 快速入門- 或 -若要將外接式顯示器設為唯一的顯示器,請按一下筆記型電腦顯示器關閉。
- 或 -若要將外接式顯示器設為主要顯示器,請按一下設定為主顯示器。
DisplayLink 可讓您最佳化視訊顯示、檢查更新以及設定進階設定。
DisplayLink 選項可能視作業系統而有所不同。
如需使用 Windows 設定外接式顯示器的相關指示,請參閱位於第 7 頁的使用 Windows。
使用 Windows使用 Windows 來設定與銜接基座相連的顯示器螢幕。
附註:當您首次將銜接基座連接到使用 Windows 7 的電腦時,會顯示「Windows 內容」畫面,並且外接式顯示器會在鏡像模式下自動設定為預設顯示器。
1.如果電腦執行的是 Windows 10,請在工作列搜尋方塊中輸入「控制台」,然後選取控制台。
選取外觀及個人化。
– 或 –如果電腦執行的是 Windows 8,請從畫面的右上角向下移動指標,然後按一下裝置。
按一下第二個螢幕。
- 或 -如果電腦執行的是 Windows 7,請在桌面上按一下滑鼠右鍵,然後選取螢幕解析度。
2.若要在執行 Windows 10 或 Windows 8 的電腦上將外接式顯示器設為主要顯示器,請選取僅第二個螢幕。
若要在執行 Windows 7 的電腦上將外接式顯示器設為主要顯示器,請選取使其成為主顯示器。
- 或 -若要在執行 Windows 10 或 Windows 8 的電腦上將外接式顯示器設為主要顯示器的延伸,請選取延伸。
若要在執行 Windows 7 的電腦上將外接式顯示器設為主要顯示器的延伸,請選取延伸這些顯示器。
- 或 -若要在執行 Windows 10 或 Windows 8 的電腦上將外接式顯示器設為主要顯示器的複本,請選取複製。
若要在執行 Windows 7 的電腦上將外接式顯示器設為主要顯示器的複本,請選取在這些顯示器上同步顯示。
您也可以透過按下 Windows 鍵 + p 來存取顯示設定。
使用其他軟體功能DisplayLink 軟體可提供更多功能來設定與銜接基座相連的顯示器:●螢幕解析度 - 變更外接式顯示器的解析度。
●螢幕旋轉 - 將外接式顯示器的顯示幕旋轉 90、180 或 270 度。
●關閉 - 關閉外接式顯示器。
●進階 - 開啟 Windows 內容方塊。
設定外接式顯示器7睡眠、休眠、關機及重新啟動如果電腦啟動「睡眠」或「休眠」,顯示器就會關閉。