08_Transocean-SC-Navigator
nvenc分割编码

nvenc分割编码
NvEnc(NVIDIA视频编码器)是NVIDIA显卡中的硬件加速视频编码器。
要进行分割编码,即将一个视频流分割成多个片段进行独立编码,您可以使用以下步骤:
1. 视频分割:将原始视频分割成多个片段,每个片段都是一个独立的视频流。
可以使用视频编辑软件、转码工具或自定义脚本等方式来完成分割。
2. NvEnc编码:对每个单独的视频片段使用NvEnc进行编码。
您可以使用NVIDIA的视频编码SDK(包括NVENC API)或支持NvEnc 编码的其他软件(如FFmpeg)来实现。
3. 编码参数设置:根据需求,设置适当的编码参数,例如分辨率、比特率、帧率、编码质量等。
您可以参考NvEnc编码器的文档以及相关的编码软件文档来了解可用的参数选项。
4. 并行处理:考虑使用多个GPU进行并行的分割编码,以加快整个过程的速度。
NvEnc支持多GPU加速,您可以设置适当的并行编码策略来利用多个GPU。
需要注意的是,NvEnc编码是一个计算密集型任务,对显卡的性能要求较高。
请确保您的显卡支持NvEnc编码,并具备足够的性能来处理分割编码任务。
另外,不同的编码参数和设置可能会对编码质量和文件大小产生影响,您可能需要进行实验和调优来达到预期的效果。
最后,建议在进行任何实际的分割编码任务之前,详细阅读NvEnc
编码器的文档,并参考相关的编码工具和库的文档和示例以了解更多细节和最佳实践。
高质量DXT压缩使用CUDA技术(2009年)说明书

March 2009High Quality DXT Compression using OpenCL for CUDAIgnacio Castaño*******************Document Change HistoryVersion Date Responsible Reason for Change0.1 02/01/2007 Ignacio Castaño First draft0.2 19/03/2009 Timo Stich OpenCL versionAbstractDXT is a fixed ratio compression format designed for real-time hardware decompression of textures. While it’s also possible to encode DXT textures in real-time, the quality of the resulting images is far from the optimal. In this white paper we will overview a more expensivecompression algorithm that produces high quality results and we will see how to implement it using CUDA to obtain much higher performance than the equivalent CPU implementation.MotivationWith the increasing number of assets and texture size in recent games, the time required to process those assets is growing dramatically. DXT texture compression takes a large portion of this time. High quality DXT compression algorithms are very expensive and while there are faster alternatives [1][9], the resulting quality of those simplified methods is not very high. The brute force nature of these compression algorithms makes them suitable to be parallelized and adapted to the GPU. Cheaper compression algorithms have already been implemented [2] on the GPU using traditional GPGPU approaches. However, with the traditional GPGPU programming model it’s not possible to implement more complex algorithms where threads need to share data and synchronize.How Does It Work?In this paper we will see how to use CUDA to implement a high quality DXT1 texturecompression algorithm in parallel. The algorithm that we have chosen is the cluster fit algorithm as described by Simon Brown [3]. We will first provide a brief overview of the algorithm and then we will describe how did we parallelize and implement it in CUDA.DXT1 FormatDXT1 is a fixed ratio compression scheme that partitions the image into 4x4 blocks. Each block is encoded with two 16 bit colors in RGB 5-6-5 format and a 4x4 bitmap with 2 bits per pixel. Figure 1 shows the layout of the block.Figure 1. DXT1 block layoutThe block colors are reconstructed by interpolating one or two additional colors between the given ones and indexing these and the original colors with the bitmap bits. The number of interpolated colors is chosen depending on whether the value of ‘Color 0’ is lower or greater than ‘Color 1’.BitmapColorsThe total size of the block is 64 bits. That means that this scheme achieves a 6:1 compression ratio. For more details on the DXT1 format see the specification of the OpenGL S3TCextension [4].Cluster FitIn general, finding the best two points that minimize the error of a DXT encoded block is a highly discontinuous optimization problem. However, if we assume that the indices of the block are known the problem becomes a linear optimization problem instead: minimize the distance from each color of the block to the corresponding color of the palette.Unfortunately, the indices are not known in advance. We would have to test them all to find the best solution. Simon Brown [3] suggested pruning the search space by considering only the indices that preserve the order of the points along the least squares line.Doing that allows us to reduce the number of indices for which we have to optimize theendpoints. Simon Brown provided a library [5] that implements this algorithm. We use thislibrary as a reference to compare the correctness and performance of our CUDAimplementation.The next section goes over the implementation details.OpenCL ImplementationPartitioning the ProblemWe have chosen to use a single work group to compress each 4x4 color block. Work items that process a single block need to cooperate with each other, but DXT blocks are independent and do not need synchronization or communication. For this reason the number of workgroups is equal to the number of blocks in the image.We also parameterize the problem so that we can change the number of work items per block to determine what configuration provides better performance. For now, we will just say that the number of work items is N and later we will discuss what the best configuration is.During the first part of the algorithm, only 16 work items out of N are active. These work items start reading the input colors and loading them to local memory.Finding the best fit lineTo find a line that best approximates a set of points is a well known regression problem. The colors of the block form a cloud of points in 3D space. This can be solved by computing the largest eigenvector of the covariance matrix. This vector gives us the direction of the line.Each element of the covariance matrix is just the sum of the products of different colorcomponents. We implement these sums using parallel reductions.Once we have the covariance matrix we just need to compute its first eigenvector. We haven’t found an efficient way of doing this step in parallel. Instead, we use a very cheap sequential method that doesn’t add much to the overall execution time of the group.Since we only need the dominant eigenvector, we can compute it directly using the Power Method [6]. This method is an iterative method that returns the largest eigenvector and only requires a single matrix vector product per iteration. Our tests indicate that in most cases 8iterations are more than enough to obtain an accurate result.Once we have the direction of the best fit line we project the colors onto it and sort them along the line using brute force parallel sort. This is achieved by comparing all the elements against each other as follows:cmp[tid] = (values[0] < values[tid]);cmp[tid] += (values[1] < values[tid]);cmp[tid] += (values[2] < values[tid]);cmp[tid] += (values[3] < values[tid]);cmp[tid] += (values[4] < values[tid]);cmp[tid] += (values[5] < values[tid]);cmp[tid] += (values[6] < values[tid]);cmp[tid] += (values[7] < values[tid]);cmp[tid] += (values[8] < values[tid]);cmp[tid] += (values[9] < values[tid]);cmp[tid] += (values[10] < values[tid]);cmp[tid] += (values[11] < values[tid]);cmp[tid] += (values[12] < values[tid]);cmp[tid] += (values[13] < values[tid]);cmp[tid] += (values[14] < values[tid]);cmp[tid] += (values[15] < values[tid]);The result of this search is an index array that references the sorted values. However, this algorithm has a flaw, if two colors are equal or are projected to the same location of the line, the indices of these two colors will end up with the same value. We solve this problem comparing all the indices against each other and incrementing one of them if they are equal:if (tid > 0 && cmp[tid] == cmp[0]) ++cmp[tid];if (tid > 1 && cmp[tid] == cmp[1]) ++cmp[tid];if (tid > 2 && cmp[tid] == cmp[2]) ++cmp[tid];if (tid > 3 && cmp[tid] == cmp[3]) ++cmp[tid];if (tid > 4 && cmp[tid] == cmp[4]) ++cmp[tid];if (tid > 5 && cmp[tid] == cmp[5]) ++cmp[tid];if (tid > 6 && cmp[tid] == cmp[6]) ++cmp[tid];if (tid > 7 && cmp[tid] == cmp[7]) ++cmp[tid];if (tid > 8 && cmp[tid] == cmp[8]) ++cmp[tid];if (tid > 9 && cmp[tid] == cmp[9]) ++cmp[tid];if (tid > 10 && cmp[tid] == cmp[10]) ++cmp[tid];if (tid > 11 && cmp[tid] == cmp[11]) ++cmp[tid];if (tid > 12 && cmp[tid] == cmp[12]) ++cmp[tid];if (tid > 13 && cmp[tid] == cmp[13]) ++cmp[tid];if (tid > 14 && cmp[tid] == cmp[14]) ++cmp[tid];During all these steps only 16 work items are being used. For this reason, it’s not necessary to synchronize them. All computations are done in parallel and at the same time step, because 16 is less than the warp size on NVIDIA GPUs.Index evaluationAll the possible ways in which colors can be clustered while preserving the order on the line are known in advance and for each clustering there’s a corresponding index. For 4 clusters there are 975 indices that need to be tested, while for 3 clusters there are only 151. We pre-compute these indices and store them in global memory.We have to test all these indices and determine which one produces the lowest error. In general there are indices than work items. So, we partition the total number of indices by the number of work items and each work item loops over the set of indices assigned to it. It’s tempting to store the indices in constant memory, but since indices are used only once for each work group, and since each work item accesses a different element, coalesced global memory loads perform better than constant loads.Solving the Least Squares ProblemFor each index we have to solve an optimization problem. We have to find the two end points that produce the lowest error. For each input color we know what index it’s assigned to it, so we have 16 equations like this:i i i x b a =+βαWhere {}i i βα, are {}0,1, {}32,31, {}21,21, {}31,32 or {}1,0 depending on the index and the interpolation mode. We look for the colors a and b that minimize the least square error of these equations. The solution of that least squares problem is the following:∑∑⋅∑∑∑∑= −i i i i i ii i i i x x b a βαββαβαα122 Note: The matrix inverse is constant for each index set, but it’s cheaper to compute it everytime on the kernel than to load it from global memory. That’s not the case of the CPU implementation.Computing the ErrorOnce we have a potential solution we have to compute its error. However, colors aren’t stored with full precision in the DXT block, so we have to quantize them to 5-6-5 to estimate the error accurately. In addition to that, we also have to take in mind that the hardware expands thequantized color components to 8 bits replicating the highest bits on the lower part of the byte as follows:R = (R << 3) | (R >> 2); G = (G << 2) | (G >> 4); B = (B << 3) | (B >> 2);Converting the floating point colors to integers, clamping, bit expanding and converting them back to float can be time consuming. Instead of that, we clamp the color components, round the floats to integers and approximate the bit expansion using a multiplication. We found the factors that produce the lowest error using an offline optimization that minimized the average error.r = round(clamp(r,0.0f,1.0f) * 31.0f); g = round(clamp(g,0.0f,1.0f) * 63.0f); b = round(clamp(b,0.0f,1.0f) * 31.0f); r *= 0.03227752766457f; g *= 0.01583151765563f; b *= 0.03227752766457f;Our experiment show that in most cases the approximation produces the same solution as the accurate solution.Selecting the Best SolutionFinally, each work item has evaluated the error of a few indices and has a candidate solution.To determine which work item has the solution that produces the lowest error, we store the errors in local memory and use a parallel reduction to find the minimum. The winning work item writes the endpoints and indices of the DXT block back to global memory.Implementation DetailsThe source code is divided into the following files:•DXTCompression.cl: This file contains OpenCL implementation of the algorithm described here.•permutations.h: This file contains the code used to precompute the indices.dds.h: This file contains the DDS file header definition. PerformanceWe have measured the performance of the algorithm on different GPUs and CPUscompressing the standard Lena. The design of the algorithm makes it insensitive to the actual content of the image. So, the performance depends only on the size of the image.Figure 2. Standard picture used for our tests.As shown in Table 1, the GPU compressor is at least 10x faster than our best CPUimplementation. The version of the compressor that runs on the CPU uses a SSE2 optimized implementation of the cluster fit algorithm. This implementation pre-computes the factors that are necessary to solve the least squares problem, while the GPU implementation computes them on the fly. Without this CPU optimization the difference between the CPU and GPU version is even larger.Table 1. Performance ResultsImage TeslaC1060 Geforce8800 GTXIntel Core 2X6800AMD Athlon64 DualCore 4400Lena512x51283.35 ms 208.69 ms 563.0 ms 1,251.0 msWe also experimented with different number of work-items, and as indicated in Table 2 we found out that it performed better with the minimum number.Table 2. Number of Work Items64 128 25654.66 ms 86.39 ms 96.13 msThe reason why the algorithm runs faster with a low number of work items is because during the first and last sections of the code only a small subset of work items is active.A future improvement would be to reorganize the code to eliminate or minimize these stagesof the algorithm. This could be achieved by loading multiple color blocks and processing them in parallel inside of the same work group.ConclusionWe have shown how it is possible to use OpenCL to implement an existing CPU algorithm in parallel to run on the GPU, and obtain an order of magnitude performance improvement. We hope this will encourage developers to attempt to accelerate other computationally-intensive offline processing using the GPU.High Quality DXT Compression using CUDAMarch 2009 9References[1] “Real-Time DXT Compression”, J.M.P. van Waveren. /cd/ids/developer/asmo-na/eng/324337.htm[2] “Compressing Dynamically Generated Textures on the GPU”, Oskar Alexandersson, Christoffer Gurell, Tomas Akenine-Möller. http://graphics.cs.lth.se/research/papers/gputc2006/[3] “DXT Compression Techniques”, Simon Brown. /?article=dxt[4] “OpenGL S3TC extension spec”, Pat Brown. /registry/specs/EXT/texture_compression_s3tc.txt[5] “Squish – DXT Compression Library”, Simon Brown. /?code=squish[6] “Eigenvalues and Eigenvectors”, Dr. E. Garcia. /information-retrieval-tutorial/matrix-tutorial-3-eigenvalues-eigenvectors.html[7] “An Experimental Analysis of Parallel Sorting Algorithms”, Guy E. Blelloch, C. Greg Plaxton, Charles E. Leiserson, Stephen J. Smith /blelloch98experimental.html[8] “NVIDIA CUDA Compute Unified Device Architecture Programming Guide”.[9] NVIDIA OpenGL SDK 10 “Compress DXT” sample /SDK/10/opengl/samples.html#compress_DXTNVIDIA Corporation2701 San Tomas ExpresswaySanta Clara, CA 95050 NoticeALL NVIDIA DESIGN SPECIFICATIONS, REFERENCE BOARDS, FILES, DRAWINGS, DIAGNOSTICS, LISTS, AND OTHER DOCUMENTS (TOGETHER AND SEPARATELY, “MATERIALS”) ARE BEING PROVIDED “AS IS.” NVIDIA MAKES NO WARRANTIES, EXPRESSED, IMPLIED, STATUTORY, OR OTHERWISE WITH RESPECT TO THE MATERIALS, AND EXPRESSLY DISCLAIMS ALL IMPLIED WARRANTIES OF NONINFRINGEMENT,MERCHANTABILITY, AND FITNESS FOR A PARTICULAR PURPOSE.Information furnished is believed to be accurate and reliable. However, NVIDIA Corporation assumes no responsibility for the consequences of use of such information or for any infringement of patents or otherrights of third parties that may result from its use. No license is granted by implication or otherwise under any patent or patent rights of NVIDIA Corporation. Specifications mentioned in this publication are subject to change without notice. This publication supersedes and replaces all information previously supplied. NVIDIA Corporation products are not authorized for use as critical components in life support devices or systems without express written approval of NVIDIA Corporation.TrademarksNVIDIA, the NVIDIA logo, GeForce, and NVIDIA Quadro are trademarks or registeredtrademarks of NVIDIA Corporation in the United States and other countries. Other company and product names may be trademarks of the respective companies with which they are associated. Copyright© 2009 NVIDIA Corporation. All rights reserved.。
Solaris 8 (SPARC 平台版) 发行说明说明书

Solaris8(SP ARC平台版)10/00发行说明更新Sun Microsystems,Inc.901San Antonio RoadPalo Alto,CA94303-4900U.S.A.部件号码806-6267–102000年10月Copyright2000Sun Microsystems,Inc.901San Antonio Road,Palo Alto,California94303-4900U.S.A.版权所有。
本产品或文档受版权保护,其使用、复制、发行和反编译均受许可证限制。
未经Sun及其授权者事先的书面许可,不得以任何形式、任何手段复制本产品及其文档的任何部分。
包括字体技术在内的第三方软件受Sun供应商的版权保护和许可证限制。
本产品的某些部分可能是从Berkeley BSD系统衍生出来的,并获得了加利福尼亚大学的许可。
UNIX是通过X/Open Company,Ltd.在美国和其他国家独家获准注册的商标。
Sun、Sun Microsystems、Sun标志、、AnswerBook、AnswerBook2、Java,JDK,DiskSuite,JumpStart,HotJava,Solstice AdminSuite,Solstice AutoClient,SunOS,OpenWindows,XView,和Solaris是Sun Microsystems,Inc.在美国和其他国家的商标、注册商标或服务标记。
所有SPARC商标均按许可证使用,它们是SPARC International,Inc.在美国和其他国家的商标或注册商标。
带有SPARC商标的产品均以Sun Microsystems,Inc.开发的体系结构为基础。
PostScript是Adobe Systems,Incorporated的商标或注册商标,它们可能在某些管辖区域注册。
Netscape Navigator(TM)是Netscape Communications Corporation的商标或注册商标。
Oracle Developer Studio 12.5:代码分析器 用户指南说明书

目录
使用本文档 ........................................................................................................... 9
1 使用代码分析器 ............................................................................................... 11 代码分析器分析的数据 ................................................................................. 11 静态代码检查 ...................................................................................... 11 动态内存访问检查 ............................................................................... 12 代码覆盖检查 ...................................................................................... 12 使用代码分析器的要求 ................................................................................. 12 代码分析器 GUI .......................................................................................... 13 代码分析器命令行界面 ................................................................................. 13 远程桌面分发 .............................................................................................. 14 快速启动 ..................................................................................................... 14 ▼ 快速启动 ....................................................................................... 14
Navigatie System 8 用户指南说明书
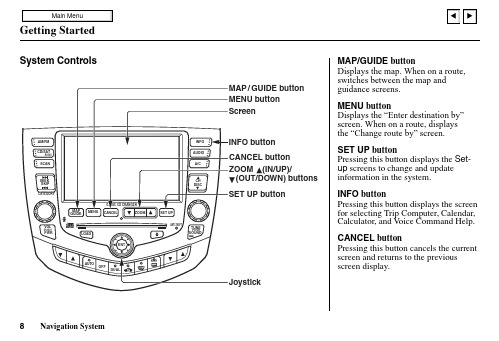
Displays the map. When on a route, switches between the map and guidance screens.MENU buttonDisplays the “Enter destination by”screen. When on a route, displaysthe “Change route by” screen.SET UP buttonPressing this button displays the Set-up screens to change and update information in the system.INFO buttonPressing this button displays the screen for selecting Trip Computer, Calendar, Calculator, and V oice Command Help. CANCEL buttonPressing this button cancels the current screen and returns to the previousscreen display.ScreenAll selections and instructions are displayed on the screen. In addition, the display is a “touch screen” –– you can enter information into the system by touching the images (icons) on the screen with your finger.For example, when you need to enter a street name, a keyboard will be displayed. You can “type in” the street name by touching the individual characters on the screen.Clean the screen with a soft, damp cloth. You may use a mild cleaner intended for eyeglasses or computer screens. Harsher chemicals may damage the screen.JoystickThe joystick moves left, right, up, and down. Use the joystick to move the highlighting around the display, to scroll through a list, or to look around a displayed map. After making a selection in a menu or list, push in on the joystick to enter the selection into the system.In almost all cases, you can enter a selection into the system by pushing in on the joystick, or by touching the appropriate image on the screen.ZOOM (IN/UP)/ (OUT/DOWN) buttonsWhen you are displaying a map, these buttons allow you to change the scale. ZOOM IN reduces the scale, showing less area with greater detail. It is also used to scroll UP a page in a list. ZOOM OUT increases the scale, showing more area with less detail. It is also used to scroll DOWN a page in a list.Other buttons (Audio and Climate Control functions)See the vehicle owner’s manual for information on the rest of the buttons. Most of the audio and climate control functions may be controlled by voice.Voice Control BasicsYour Honda has a voice control system that allows hands-free operation of most of the navigation system functions. You can also control the audio system and the climate control system. The voice control system uses the TALK and BACK buttons on the steering wheel and a microphone nearthe map light on the ceiling.NOTE: While using the voice control system, all of the speakers are muted.BACK buttonThis button has the same function as the CANCEL button. When you press it, the display returns to the previous screen. When the previous screen appears, the system replays the last prompt. This button is enabled for the navigation system commands only.However, it can be used to cancel an audio or climate control voicecommand up to one second after the command confirmation.Using the Voice Control System Most of the system’s functions can be controlled by voice commands. The voice control system is activated with the TALK button. To control your navigation system by voice, press and release the TALK button, wait for the beep, then give a voice command. Once the microphone picks up your command, the system changes the display in response to the command and prompts you for the next command. Answer the prompts as required.If you hear a prompt such as “Pleaseuse the touch screen to...” or “Pleasechoose an area with the joystick.” thesystem is asking for input that cannotbe performed using the voice controlsystem.If the system does not understand acommand or you wait too long to give acommand, it responds with “Pardon,”“Please repeat,” or “Would you sayagain.” If the system cannot perform acommand or the command is notappropriate for the screen you are on, itsounds a beep.Anytime you are not sure of what voicecommands are available on a screen,you can always say “Help.” at anyscreen. The system then reads the listof commands to you.When you speak a command, thesystem generally either repeats thecommand as a confirmation or asks youfor further information. If you do notwish to hear this feedback, you can turnit off. See Voice Feedback setting onSet-up screen 3.Improving Voice RecognitionTo achieve optimum voice recognition, the following guidelines should be followed:NOTE: Make sure the correct screen is displayed for the voice command that you are using. See Voice Command Index on page 85.•Close the windows and the sunroof.•Set the fan speed to low (1 or 2).•Adjust the air flow from the dashboard vents so they do not blow against the microphone on the ceiling.•After pressing the TALK button, wait for the beep, then give a voice command.•Give a voice command in a clear, natural speaking voice without pausing between words.•If the system cannot recognize your command, speak louder.•If the microphone picks up voices other than yours, the system may not interpret your voice commands correctly.•If you speak a command with something in your mouth, or your voice is either too high or too husky, the system may misinterpret your voice commands.。
Transcend 8X Slim Portable CD DVD Writer TS8XDVDS

User’s Manual Slim Portable CD/DVD WriterTS8XDVDS(Version 1.1)Table of ContentsIntroduction︱ (1)Features︱ (2)System Requirements︱ (2)General Use (2)Writing Data (3)Power (3)Reminders (4)Product Overview︱ (5)Basic Operation︱ (6)Plugging in the CD/DVD Writer (6)Inserting a Disc (6)Ejecting a Disc (9)Disconnecting from a Computer︱ (11)Software Download︱ (11)Troubleshooting︱ (13)System Requirements︱ (14)Ordering Information︱ (14)Recycling & Environmental Considerations︱ (15)Two-year Limited Warranty︱ (16)Introduction︱Congratulations on purchasing Transcend’s 8X Slim Portable CD/DVD Writer.This slim, elegant high-speed portable CD/DVD writer is perfect for playing, backing up your vital data and discs. With its slim easy-to-carry size and advanced high-speed media writing capabilities, the CD/DVD Writer is ideal for playing movies, installing software, or backing up your files, folders, documents, photos, music and videos when using a compact notebook computer or netbook. In addition, the CD/DVD Writer comes with a full-version of CyberLink’s extremely useful Power2Go* software that lets you easily create your own CDs and DVDs. This User’s Manual is designed to help you get the most from your new device. Please read it in detail before using the CD/DVD Writer.*Power2Go is a registered trademark of CyberLink®. This software can be only used in Windows®XP, Windows Vista® , Windows®7 and Windows®8.Features︱USB 2.0 interface for high-speed data transfer8x DVD±R read/write, 24x CD-R/RW read/writeCompatible with CD-R/RW, DVD±R, DVD±RW, DVD±R DL, DVD-RAM mediaReads and writes Dual Layer discsUSB powered –No external power adapter neededElegant slim modern design with rounded edgesCompact and easy-to-carryEasy Plug and Play installationAnti-slip rubber feetSystem Requirements︱Desktop or notebook computer with two working USB ports.One of following Operating Systems:•Windows®XP•Windows Vista®•Windows® 7•Windows® 8•Mac OS® X 10.4 or laterSafety Precautions︱These usage and safety guidelines are IMPORTANT! Please follow them carefully.Please ensure that you connect the USB cable to the CD/DVD Writer and your computer correctly (small end CD/DVD Writer, large end PC)General Use•During operation, avoid exposing your CD/DVD writer to extreme temperatures above 40℃or below 5℃.•Never drop your CD/DVD Writer.•Only use the CD/DVD Writer face-up, on a stable flat surface•Do not allow your CD/DVD Writer to come in contact with water or any other liquids.•Do not use a damp/wet cloth to wipe or clean the exterior case.•Never look directly into the laser lens, as it can be harmful to your eyes.•Do not attempt to open the outer case (doing so will void your product warranty).•Do not store your CD/DVD Writer in any of the following environments:o Direct sunlighto Next to an air conditioner, electric heater or other heat sourceso In a closed car that is in direct sunlighto In an area with strong magnetic fields or excessive vibration• Never touch the laser lens.Writing Data• Do not touch, pick up, or move the CD/DVD Writer during the write process. This candamage the device and will cause errors on the disc being written• Transcend does not take any responsibility for data loss or damage resulting fromuse of this product . If using this product to backup data, we strongly advise using high-quality recordable media, and that you fully test and verify the contents of all written discs. It is also a good idea to regularly backup important data to a different computer or other storage medium.• To ensure High-Speed USB 2.0 data transfer rates when using your CD/DVD Writer witha computer, please check that the computer has the relevant USB drivers. If you are unsure about how to check this, please consult the computer or motherboard User’sManual for USB driver information.Power• The CD/DVD Writer is powered directly from your computer’s USB port. However, theUSB ports of certain computers may not supply enough power to use the CD/DVD Writer when using a single USB port. Please make sure to connect both large connector ends of the provided USB Cable to the USB ports on your computer. This will ensure the CD/DVD Writer receives adequate power for stable operation.• Only use the USB cable that came with the CD/DVD Writer to connect it to a computer,and always ensure that the cable is in good condition. NEVER use a cable that is frayedThe second USB connector provides additional power forthe CD/DVD Writer. Please make sure to connect bothUSB connectors to your computer’s USB ports.or damaged.•Ensure nothing is resting on the USB cable and that the cable is not located where it can be tripped over or stepped on.•If you have connected all ends of the USB cable and still have power-related problems while reading / writing data, we recommend that you purchase a Transcend USB Power Adapter (TS-PA2A) to provide the power necessary to operate the CD/DVD Writer.Reminders•Always follow the procedures in the “Disconnecting from a Computer” section to remove the CD/DVD Writer from your computer.Product Overview︱A Disc TrayB Read/Write Activity IndicatorC Eject ButtonD Emergency EjectE Anti-slip Rubber FeetF USB ConnectorBasic Operation︱Plugging in the CD/DVD Writer1. Plug the small end of the USB Cable into the Mini USB port on the CD/DVD Writer.2. Plug the large end(s) of the cable into available USB ports on your desktop computer, notebookor netbook.Note: Please be sure to connect the CD/DVD Writer to two USB ports on your computer using the provided USB Cable.3. When the CD/DVD Writer is successfully connected to a computer, a new drive with a newlyassigned drive letter will appear in the My Computer window, and a Removable Hardwareicon will appear on the Windows System Tray.*D: is an example drive letter. The letter in your "My Computer" window may differ4. Once properly connected, you can use the CD/DVD Writer as an optical device to read CDsand DVDs, and create/write your own discs with the included Power2Go software.Inserting a Disc1. Press the Eject Button on the front of the CD/DVD Writer to release the disc tray.2. Gently pull the disc tray out until it stops.3. Place a CD or DVD onto the tray.4. Using two or more fingers, press down on the center of the disc until it snaps into place.5. Push the disc tray back into the CD/DVD Writer. When completely closed, the LED indicatorwill flash.Ejecting a Disc1. Press the Eject Button on the front of the CD/DVD Writer to release the disc tray.2. Gently pull the disc tray out until it stops.3. Place your thumb on the spindle and use your other fingers to gently pry the disc upwards untilit pops free.Disconnecting from a Computer︱NEVER disconnect the CD/DVD Writer from a Computer when the disc is spinning.1. Select the Hardware icon on the system tray.2. The Safely Remove Hardware pop-up window will appear. Select it to continue.3. A window will appear stating, “The ‘USB Mass Storage Device’ device can now be safelyremoved from the system.”Always use this procedure to safely remove the device from a Windows computer.Software Download︱The free software download includes: CyberLink® Power2Go (LE Version) and CyberLink®MediaShow (trial version).Note: CyberLink®Power2Go and MediaShow can only be installed in Windows® XP/Vista/7/8.Make sure that the DVDS is connected to your computer before installing:1. Download the CyberLink Media Suite 10 from Transcend’s online Download Center at/downloads.2. Double click on the CyberLink.Media.Suite.10.zip Zip file you have just downloaded fromthe Transcend website.3. Extract the file to a temporary directory on your hard disk and double click on the fileCyberLink.Media.Suite.10.exe to run the setup program.4. Follow the on-screen instructions to complete the installation process.CyberLink Power2Go: Power2Go lets you burn music, data, video and even bootable discs in a variety of CD and DVD formats. CyberLink Power2Go also includes several handy discutilities and an express mode that makes burning convenient and easy.CyberLink MediaShow: MediaShow is a useful tool for compiling, arranging, and producing media files with a simple and straightforward software interface.Troubleshooting︱If a problem occurs with your CD/DVD Writer,please check the information listed below before sending your CD/DVD Writer in for repair. If you are unable to remedy a problem after trying the following suggestions, please consult your dealer, service center, or local Transcend branch office. We also have FAQ and Support services on our website at .Operating system cannot detect the CD/DVD WriterCheck the following:1. Is your CD/DVD Writer properly connected to the USB port? If not, unplug it and plug it inagain. If it is properly connected, try using another available USB port.2. Are you using the USB cable that came in the CD/DVD Writer package? If not, try using theTranscend-supplied USB cable to connect the CD/DVD Writer to your computer.3. The CD/DVD Writer is powered directly via a computer USB port; however, the power suppliedby the USB port on some older computers is below the 5V DC required to power the CD/DVD Writer. Please make sure to connect the USB cable to both USB ports on your computer. This will provide the additional power necessary to run the drive.Both USB connectors are required to provide adequate power.4. Is the USB port enabled? If not, refer to the user’s manual of your computer (or motherboard)to enable it.5. If you have connected all ends of the USB cable and still have power-related problems whilereading / writing data, we recommend that you purchase a Transcend USB Power Adapter (TS-PA2A) to provide the power necessary to operate the CD/DVD Writer. (Please see the Transcend Website or contact your local dealer for availability)My computer does not recognize CD/DVD Writer1. A single USB port may not provide enough power for the CD/DVD Writer to function. Makesure you plug both large ends of the USB cable directly into your computer’s USB ports.2. Avoid connecting the CD/DVD Writer through a USB hub.The CD/DVD Writer does not Power On (LED does not flash)Check the following:1. Ensure that the CD/DVD Writer is properly connected to the USB port(s) on your computer.2.Ensure that the USB port is working properly. If not, try using an alternate USB port.The CD/DVD Writer Cannot Read a DiscThe disc may be dirty, scratched or damaged. Try cleaning the disc with water or a CD/DVDcleaning solution.Writing to a Blank Disc FailsIn most cases, this problem is a result of trying to write to poor quality recordable media. For best results, please use only retail-packaged name brand recordable discs.System Requirements ︱Hardware CPU: Intel Pentium III 800 MHz or equivalent (minimum )Intel Pentium IV 2.0 GHz or higher (recommended )Memory: 256MB or greaterHard Drive: 20GB of free space requiredSoftwareOperating System: Windows ® XP , Windows Vista ® , Windows ® 7 or Windows ® 8Ordering Information ︱Device Description Transcend P/N USB Power Adapter TS-PA2ARecycling & Environmental Considerations︱Recycling the Product (WEEE): Your product is designed and manufactured with high quality materials and components, which can be recycled and reused. When you see the crossed-out wheel bin symbol attached to a product, it means the product is covered by the European Directive 2002/96/EC:Never dispose of your product with other household waste. Please inform yourself about the local rules on the separate collection of electrical and electronic products. The correct disposal of your old product helps prevent potential negative consequences on the environment and human health.Battery Disposal: Your product contains a built-in rechargeable battery covered by the European Directive 2006/66/EC, which cannot be disposed of with normal household waste.Please inform yourself about the local rules on separate collection of batteries. The correct disposal of batteries helps prevent potentially negative consequences on the environment and human health.For products with non-exchangeable built in batteries: The removal of (or the attempt to remove) the battery invalidates the warranty. This procedure is only to be performed at the end of the product’s life.Two-year Limited Warranty︱This product is covered by a Two-year Limited Warranty.Should your product fail under normal use within two years from the original purchase date, Transcend will provide warranty service pursuant to the terms of the Transcend Warranty Policy. Proof of the original purchase date is required for warranty service. Transcend will inspect the product and in its sole discretion repair or replace it with a refurbished product or functional equivalent. Under special circumstances, Transcend may refund or credit the current value of the product at the time the warranty claim is made. The decision made by Transcend shall be final and binding upon you. Transcend may refuse to provide inspection, repair or replacement service for products that are out of warranty, and will charge fees if these services are provided for out-of-warranty products.LimitationsAny software or digital content included with this product in disc, downloadable, or preloaded form, is not covered under this Warranty. This Warranty does not apply to any Transcend product failure caused by accident, abuse, mishandling or improper usage (including use contrary to the product description or instructions, outside the scope of the product’s intended use, or for tooling or testing purposes), alteration, abnormal mechanical or environmental conditions (including prolonged exposure to humidity), acts of nature, improper installation (including connection to incompatible equipment), or problems with electrical power (including undervoltage, overvoltage, or power supply instability). In addition, damage or alteration of warranty, quality or authenticity stickers, and/or product serial or electronic numbers, unauthorized repair or modification, or any physical damage to the product or evidence of opening or tampering with the product casing will also void this Warranty. This Warranty shall not apply to transferees of Transcend products and/or anyone who stands to profit from this Warranty without Transcend’s prior written authorization. This Warranty only applies to the product itself, and excludes integrated LCD panels, rechargeable batteries, and all product accessories (such as card adapters, cables, earphones, power adapters, and remote controls). Transcend Warranty PolicyPlease visit /warranty to view the Transcend Warranty Policy.By using the product, you agree that you accept the terms of the Transcend Warranty Policy, which may be amended from time to time.Online registrationTo expedite warranty service, please access /register to register your Transcend product within 30 days of the purchase date.Transcend Information, Inc.*The Transcend logo is a registered trademark of Transcend Information, Inc.*The specifications mentioned above are subject to change without notice.*All logos and marks are trademarks of their respective companies.。
C-NaviGator软件更新安装说明书(版本4)

C-NaviGator Software Update Installation ProcedureRevision 4Revision Date: March 20, 2018C-Nav Positioning Solutions730 E. Kaliste Saloom RoadLafayette, LA 70508 U.S.A./cnavC-NaviGator Software Update Installation ProcedureRelease NoticeThis is the March 2018 release of the C-NaviGator Software Update Installation Procedure.Revision HistoryC-NaviGator Software Update Installation ProcedureTrademarksThe Oceaneering logo is a trademark of Oceaneering International, Inc. C-Nav is a trademark of Oceaneering International, Inc. All other brand names are trademarks of their respective holders.Disclaimer of WarrantyEXCEPT AS INDICATED IN “LIMITED WARRANTY” HEREIN, OCEANEERING INTERNATIONAL, INC. SOFTWARE, FIRMWARE AND DOCUMENTATION ARE PROVIDED “AS IS” AND WITHOUT EXPRESSED OR LIMITED WARRANTY OF ANY KIND BY EITHER OCEANEERING INTERNATIONAL, INC., OR ANYONE WHO HAS BEEN INVOLVED IN ITS CREATION, PRODUCTION, OR DISTRIBUTION INCLUDING BUT NOT LIMITED TO THE IMPLIED WARRANTIES OF MERCHANTABILITY AND FITNESS FOR A PARTICULAR PURPOSE. THE ENTIRE RISK, AS TO THE QUALITY AND PERFORMANCE OF THE OCEANEERING INTERNATIONAL, INC. HARDWARE, SOFTWARE, FIRMWARE AND DOCUMENTATION, IS WITH YOU. SOME STATES DO NOT ALLOW THE EXCLUSION OF IMPLIED WARRANTIES, SO THE ABOVE EXCLUSION MAY NOT APPLY TO YOU. Limitation of LiabilityIN NO EVENT WILL OCEANEERING INTERNATIONAL, INC., OR ANY PERSON INVOLVED IN THE CREATION, PRODUCTION, OR DISTRIBUTION OF THE OCEANEERING INTERNATIONAL, INC. SOFTWARE, HARDWARE, FIRMWARE AND DOCUMENTATION BE LIABLE TO YOU ON ACCOUNT OF ANY CLAIM FOR ANY DAMAGES, INCLUDING ANY LOST PROFITS, LOST SAVINGS, OR OTHER SPECIAL, INCIDENTAL, CONSEQUENTIAL, OR EXEMPLARY DAMAGES, INCLUDING BUT NOT LIMITED TO ANY DAMAGES ASSESSED AGAINST OR PAID BY YOU TO ANY THIRD PARTY, RISING OUT OF THE USE, LIABILITY TO USE, QUALITY OR PERFORMANCE OF SUCH OCEANEERING INTERNATIONAL, INC. SOFTWARE, HARDWARE, AND DOCUMENTATION, EVEN IF OCEANEERING INTERNATIONAL, INC., OR ANY SUCH PERSON OR ENTITY HAS BEEN ADVISED OF THE POSSIBILITY OF DAMAGES, OR FOR ANY CLAIM BY ANY OTHER PARTY. SOME STATES DO NOT ALLOW THE LIMITATION OR EXCLUSION OF LIABILITY FOR INCIDENTAL OR CONSEQUENTIAL DAMAGES SO, THE ABOVE LIMITATIONS MAY NOT APPLY TO YOU.C-NaviGator Software Update Installation ProcedureTable of ContentsTrademarks (3)Disclaimer of Warranty (3)Limitation of Liability (3)Table of Contents (4)Manual Organization (5)Manual Conventions (6)Section 1 - Overview (7)Introduction (7)Section 2 - Required Items (8)Software Update (8)Rescue Install (8)Section 3 - Software Update (9)Section 4 - Rescue Install (10)C-NaviGator Software Update Installation ProcedureManual OrganizationThe purpose of this document is to provide instruction on the installation of software updates for the C-NaviGator touch-screen Control and Display Unit (CDU) using a USB Drive. Sections are organized in a manner that facilitates quick operator orientation.Section 1 - Overview (Page 7) gives a brief overview of the purpose of this document.Section 2 - Required Items (Page 8) lists the items required to perform both a software update and a rescue install.Section 3 - Software Update (Page 9) describes a normal software update procedure.Section 4 - Rescue Install (Page 10) describes the procedure to use the rescue installer to recover a corrupt software installation.C-NaviGator Software Update Installation ProcedureManual ConventionsArial font is used for plain text in this document.Arial italic font is used for settings names.“Arial quoted” font is used for settings values.Arial Bold font is used for button names.Arial Bold Italic font is used for menu items.Arial Blue font is used for cross-references.Arial Blue Underline font is used for hyperlinks.Arial red italic is used for typed commands.Arial Bold font size 10 is used for captions.ARIAL BLACK ALL-CAPS font is used for port connection names.This symbol means Reader Be Careful. It indicates a caution, care, and/or safety situation. The user might do something that couldresult in equipment damage or loss of data.This symbol means Danger. You are in a situation that could cause bodily injury. Before you work on any equipment, be aware of thehazards involved with electrical and RF circuitry and be familiarwith standard practices for preventing accidents.Important notes are displayed in shaded text boxes.Simple file content is displayed in Courier New Black font in a text box.C-NaviGator Software Update Installation ProcedureSection 1 - OverviewIntroductionThe purpose of this document is to provide instructions on the installation of software updates for the C-NaviGator touch-screen Control and Display Unit (CDU) using a USB Drive. To obtain copies of C-Nav software updates, contact C-Nav Support at *************************** or visit /cnav.C-NaviGator Software Update Installation ProcedureSection 2 - Required ItemsSoftware Update∙C-NaviGator CDU∙USB drive (>100 MB) formatted as FAT (not NTFS)∙Software Update cng or cng3 file, available by contacting C-Nav Support at ***************************or by visiting/positioning-solutions/customer-access-and-resources/∙ A Windows PCRescue Install∙C-NaviGator CDU∙USB drive (>100 MB) formatted as FAT (not NTFS)∙USB keyboard to connect to the C-NaviGator∙Software Update zip file, available by contacting C-Nav Support at *************************** or by visiting/positioning-solutions/customer-access-and-resources/∙ A Windows PC and WinZip or equivalent file extraction softwareC-NaviGator Software Update Installation ProcedureSection 3 - Software Update1. Contact C-Nav Support at ***************************or visit/positioning-solutions/customer-access-and-resources/ to obtain the latest software update for the C-NaviGator. Download thefirmware file to the top-level folder of the USB.A. For the C-NaviGator II, the firmware file will be a .cng file.B. For the C-NaviGator III, the firmware file will be a .cng3 file.2. Attach a USB drive to the Windows PC.3. Ensure the computer has finished writing to the USB drive (use the SafelyRemove Hardware tray icon if necessary) then remove the USB drive from the computer.4. Reboot the C-NaviGator.5. When the boot menu appears, press the Update Software button.6. Connect the USB drive to the C-NaviGator.7. Press the Scan USB button to scan for the software update file.8. In the C-NaviGator Software Update table, select the firmware with aStatus of “compatible”.9. Press Start Update.10. When the installation is complete, press Restart to continue.11. The C-NaviGator software update is now complete.C-NaviGator Software Update Installation ProcedureSection 4 - Rescue InstallThe C-NaviGator CDU rescue installation is a procedure to recover a corrupt software installation. This should only be used as a last resort if regular a software update cannot be completed.1. Contact C-Nav Support at ***************************or visit/positioning-solutions/customer-access-and-resources/ to obtain the latest rescue installer for the C-NaviGator. Download thezipped file to the local drive of the Windows PC.2. Attach a USB drive to the Windows PC.3. Using WinZip or equivalent Windows file extraction software, extract thezipped file into the top-level folder of the USB drive. This will create afolder called syslinux when complete.4. Install the rescue installer onto the USB drive. The steps are differentdepending on what version of Windows the PC is running.A. Windows XP:I. Open the USB drive on the Windows PC via My Computerand navigate into the syslinux folder.II. Double-click on the file called install.bat. A commandprompt window will pop up to show the results. Press Enterto continue.B. Windows 7I. Click on the Start Menu button.II. In the Search bar, type cmd, then press Ctrl+Shift+Enter(all at the same time). This will open a command promptwindow with Administrator rights.III. Type DRIVE_LETTER: and press Enter. WhereDRIVE_LETTER is the drive letter of the USB drive.C-NaviGator Software Update Installation ProcedureIV. Type cd syslinux and press Enter.V. Type install.bat and press Enter.VI. Once finished, press Enter and close the command promptwindow.5. Ensure the computer has finished writing to the USB drive (use the SafelyRemove Hardware tray icon if necessary) then remove the USB drive from the computer.6. Power off the C-NaviGator via the front panel On/Off switch.7. Connect the USB keyboard to the C-NaviGator and disconnect all otherUSB devices from the C-NaviGator.8. Connect the USB drive to the C-NaviGator.9. Turn on the C-NaviGator.10. The next step is to boot the C-NaviGator CDU off of the USB drive. Thesteps are different depending on which type of C-NaviGator CDU.A. C-NaviGator II:I. When the blue C-Nav logo screen appears, hit Delete on thekeyboard. This will open C-NaviGator CDU’s BIOSconfiguration screen. If the BIOS configuration screen doesnot appear, power off the C-NaviGator and try again.II. At the main BIOS configuration screen, select AdvancedBIOS Features. Within that screen, set First Boot Device to“USB-ZIP”. All other boot devices should be set to“Disabled”. Press F10 to save and exit the BIOS screen.B. C-NaviGator III:I. When the screen appears, press F11 on the keyboard.Continue to press F11 until the boot-device menu appears.C-NaviGator Software Update Installation ProcedureII. Select the device that starts with USB and press Enter.11. The C-NaviGator will now boot off of the USB drive. Messages will printon the C-NaviGator screen from the installation program; it will take a few seconds for the installation program to locate the appropriate files on theUSB drive. When complete, press Enter to begin the installation.12. When the installation is complete, press Enter or touch the screenanywhere to continue.13. At this point the C-NaviGator will prompt the user to turn off the unit. Doso via the front panel On/Off switch and disconnect the USB drive.14. The following step applies only to the C-NaviGator II.A. When the blue C-Nav logo screen appears, hit Delete on thekeyboard. This will open C-NaviGator CDU’s BIOS configurationscreen. If the BIOS configuration screen does not appear, poweroff the C-NaviGator and try again.B. As before, select Advanced BIOS Features. Within that screen, setFirst Boot Device to “Hard Disk”. Leave the other boot devices as“Disabled”. Press F10 to save and exit the BIOS screen.15. The C-NaviGator rescue installation is now complete.。
katalon的编码格式 -回复

katalon的编码格式-回复标题:深入理解Katalon的编码格式Katalon是一款强大的自动化测试工具,它支持多种编程语言和编码格式,使得测试人员能够更加灵活和高效地进行自动化测试。
在本文中,我们将详细探讨Katalon的编码格式,包括其主要特性、使用方法以及最佳实践。
一、Katalon的编码格式概述Katalon Studio默认使用Groovy语言进行脚本编写,Groovy是一种基于Java平台的动态编程语言,其语法简洁、灵活,且与Java高度兼容。
因此,Katalon的编码格式主要是Groovy的编码规则。
Groovy的编码格式遵循一般的编程规范,包括但不限于以下几点:1. 使用UTF-8字符集:这是互联网上最常用的字符集,能够支持全球大多数语言的字符。
2. 采用四个空格作为缩进:这是一般的代码风格规范,可以提高代码的可读性。
3. 使用驼峰命名法:对于变量、函数和类的命名,通常采用驼峰命名法,即首字母小写,后续单词首字母大写。
4. 注释的使用:Groovy支持单行注释()和多行注释(/* */),用于解释代码的功能和逻辑。
二、Katalon编码格式的实际应用在Katalon Studio中,我们可以利用Groovy的编码格式来编写各种测试脚本。
以下是一个简单的示例,展示如何使用Katalon的编码格式来编写一个Web UI测试脚本:groovyimport staticcom.kms.katalon.core.testcase.TestCaseFactory.findTestCase import staticcom.kms.katalon.core.testdata.TestDataFactory.findTestData import staticcom.kms.katalon.core.testobject.ObjectRepository.findTestObject importcom.kms.katalon.core.mobile.keyword.MobileBuiltInKeywords as Mobileimportcom.kms.katalon.core.webui.keyword.WebUiBuiltInKeywords as WebUI定义测试数据def testData = findTestData('TestData/ Login Data')循环遍历测试数据for (def row : testData.getRows()) {获取测试对象def usernameField = findTestObject('ObjectRepository/Page_Login/input_Username')def passwordField = findTestObject('ObjectRepository/Page_Login/input_Password')def loginButton = findTestObject('ObjectRepository/Page_Login/button_Login')输入用户名和密码WebUI.setText(usernameField, row['username'])WebUI.setText(passwordField, row['password'])点击登录按钮WebUI.click(loginButton)验证登录成功def successMessage = findTestObject('ObjectRepository/Page_Home/text_Success_Message')WebUI.verifyElementText(successMessage, 'Login successful!') }在这个示例中,我们首先导入了Katalon的内置关键字,然后定义了测试数据,并使用for循环遍历每一行测试数据。
- 1、下载文档前请自行甄别文档内容的完整性,平台不提供额外的编辑、内容补充、找答案等附加服务。
- 2、"仅部分预览"的文档,不可在线预览部分如存在完整性等问题,可反馈申请退款(可完整预览的文档不适用该条件!)。
- 3、如文档侵犯您的权益,请联系客服反馈,我们会尽快为您处理(人工客服工作时间:9:00-18:30)。
Safety Case NavigatorJulian Soles DrillSafe Forum March 2013, PerthOverview• Safety y Case• Operational Integrity MajorHazards• Safety Case Navigator y • Summary2DrillSafe Forum Perth 20132Safety Case•A safety case is a document produced by the operator of a facility which(1): Identifies the hazards and risks Describes how the risks are controlled D Describes ib th the safety f t management t system t in i place l t to ensure the th controls t l are effectively ff ti l and d consistently applied•The safety safet case m must st identif identify the safety safet critical aspects of the facilit facility, both technical and managerial• •The workforce must be involved Major Accident Events (MAEs) assessed until the risks are reduced to As Low As Reasonably Practical (ALARP)Source: (1) NOPSEMA website3DrillSafe Forum Perth 20133Operational“Operational Integrity is the management of major hazards whereby consistent operational discipline and asset integrity is assured, verified, and continuously improved”• Any y hazard with p potential consequences q that could result in:• • •Multiple fatalities / permanent total disabilities Extensive damage to the installation Massive effect to the environment4DrillSafe Forum Perth 201345DrillSafe Forum Perth 20135Operational Integrity• Creating and improving awareness of Process Safety v Personal Safety • Process Safety is focused further preventing Major Hazards • Safety Case regime in Australia encompasses these elements • How well does the workforce know their Safety Case? • Safety Case is key component of Operational Integrity• •Transocean currently developing a safety case for every vessel in the fleet Australia regime puts us ahead of most areas in the world6DrillSafe Forum Perth 20136Safety Case DocumentQ. Can the workforce access the safety case? A. As the key health and safety document for a facility, access to and understanding of the safety case by the workforce is essential to meet the duties of the operator • Fundamental requirement that the workforce understands the Vessel Safety Case Safety Case documents can be very large and diffi lt to t find fi d information i f ti difficult •Deepwater Frontier Jack Bates Transocean Legend2011 2009 20081,475 pgs 1,854 pgs 1,628 pgs7DrillSafe Forum Perth 20137Safety Case Navigator• • •Knowing and Understanding roles and responsibilities for the management of safety Training on the Safety Case contents for all crew members The ‘safety case navigator’ is designed to help you find relevant information quickly and easily• •All the workforce and our Customers will have access to the Safety Case Navigator Development St t d in Started i January J 2012 Worked with RPS in Perth to create functional specification RPS developed p the Safety y Case Navigator g tool8DrillSafe Forum Perth 20138Safety Case Navigator9DrillSafe Forum Perth 20139Enter the website address into an internet browserEnter the provided usernameEnter the provided passwordClick Login to access the system10DrillSafe Forum Perth 201310Safety Case InfoYou can view a summary of the Safety Case from this menu11DrillSafe Forum Perth 201311Searching the Major Hazard RegisterEnter the search phrase i thi in this t text tb boxChoose which Ch hi h part t of f the register you want to search hereChoose any major hazard to view the full hazard reportSearch in the safety case documents for this major hazard12DrillSafe Forum Perth 201312Searching the Major Hazard RegisterAs you type in search words it will return a list of matches from the major hazard register that match. These could be: • • • • • Controls C Causes Consequences Position titles D Document t refs fYou don’t have to choose these results, b t can search but hf for any word or partial word.13DrillSafe Forum Perth 201313Searching the Major Hazard RegisterThe search results will show anything in the major hazard register that matched your search words.You can print the search results from here You can use the filter tool to refine the search results to show more or less data from the major hazard register. registerSearch in the safety case documents for this major hazard14DrillSafe Forum Perth 201314Navigating by Responsible PersonThis menu will show you the major hazards by responsible personChoose the job titleChoose the major hazardChoose the cause or consequenceThe search results are refined based on what you choose y15DrillSafe Forum Perth 201315Navigating by Major Hazard (MAE)You can also navigate the major hazard register by HazardChoose the major hazardChoose the cause or consequenceChoose the job titleThe search results are refined based on what you choose16DrillSafe Forum Perth 201316Focusing on each controlWhen you click on any control, a control summary report will be shown. This summary shows you: • • The responsible person The bowtie context of what is being g controlled Control type and effectiveness Relevant document references• •17DrillSafe Forum Perth 201317Viewing safety case documentsThis menu shows you the safety case documentsEnter the search phrase in this text boxChoose which document you want to search hereChoose any document to browser page by pageSome personnel can download the document in PDF format18DrillSafe Forum Perth 201318Searching within safety case documentsThe search results will show anything in the documents that matched your search words words. The search results show you: • • • • Which document contains the words What section of the document What page of the document A summary of the text around the matched words19DrillSafe Forum Perth 201319Reading safety case documentsSome personnel can download the document in PDF formatWhen you open a document you get a document browser menu. This menu lets you: • Choose the section of the document to view Jump to a specific page Zoom in and out Jump forward and back a page• • •20DrillSafe Forum Perth 201320Summary•Important that the workforce can relate their day to day actions to preventing Major Hazards •Our role is to facilitate this understanding and demonstrate our commitment•Initial feedback from workforce is positive and further development of the tool is plannedyInclusion of Vessel Safety Case RevisionsAudit functionality of controls•Safety Case Navigator is currently being rolled out across Transocean Australia units2121DrillSafe Forum Perth 2013 。