方正文杰A321说明书
FSX默认机 Airbus A321飞行说明
FSX默認機Airbus A321飛行說明很多因素影響飛行計畫和飛行操控,包括飛機重量,天氣,跑道表面條件。
以下推薦的飛行參數是在白天國際標準大氣(ISA)條件下最大起飛和著陸重量的近似值。
重要這些說明只是為了用於飛行模擬中的飛行,不能代替實際的飛行器手冊和真實的飛行指令。
對於所有飛行類比中的飛行器,V速度和檢查表都在膝板(Kneeboard)中,快速鍵為SHIFT + F10,或者到菜單的Aircraft->Kneeboard這個說明中的所有速度都是指示速度,即空速表的指示速度。
如果你使用這個速度作為參考,那麼請在真實度設置對話方塊中選擇顯示指示空速("Display Indicated Airspeed") 。
而飛行器規格中的速度資料是真空速。
默認的,飛機有最大燃油和最大載重。
要求的跑道長度1)起飛7500英尺(2286米)襟翼5度2)著陸5150英尺(1570米)襟翼30度這個長度要求是起飛和著陸的眾多因素決定的,較低高度和溫度可以得到更好的性能,因為大氣密度高。
這裡給出的數字是保守的且假設:1. 重量: 205000磅(93181公斤)2. 高度: 海平面3. 風向: 無風4. 溫度: 15度重量和溫度越低,飛行性能越好,如果同時迎風飛行的話會更好。
較高的海拔和溫度會降低性能。
5. 跑道: 硬表面,典型的硬表面跑道是混凝土跑道。
發動機啟動每次開始飛行時,引擎會自動運行。
如果你關閉引擎的話,你可以使用CTRL+E複合鍵來自動啟動引擎。
如果你想使用手動的啟動程式,可以參考膝板中的檢查表順序檢查。
滑行大多數情況下慢車推力足夠滑行,如果飛機要轉彎的話,你需要稍微增加一些推力。
每次改變推力的時候,要讓飛機有個反應時間,不要連續的多次改變推力。
A321在HIS上有地面速度指示。
正常的直線滑行速度不要超過30節。
轉彎時,8-12節指示空速對於幹跑道面是合適的範圍。
在飛行模擬中,滑行時的轉彎是用腳跺來控制的。
方正文杰A321打印机安装及使用1

• Win XP下安装 下安装USB设备驱动 下安装 设备驱动
由于A321打印机非即插即用 打印机非即插即用USB设备,所以将打印机连接至电脑时,在弹出 设备, 由于 打印机非即插即用 设备 所以将打印机连接至电脑时, 发现新硬件设备窗口,需要安装光盘中的 文件夹中的驱动, 发现新硬件设备窗口,需要安装光盘中的usbdrv文件夹中的驱动,具体步骤 文件夹中的驱动 如下
Windows XP驱动安装及设置 驱动安装及设置
Windows XP驱动安装及设置 驱动安装及设置
注意:仅支持 位操作系统 不支持64位操作系统 位操作系统, 注意:仅支持32位操作系统,不支持 位操作系统
Page20
Windows XP驱动安装及设置 驱动安装及设置
Page5
方正文杰A321打印机介绍 方正文杰A321打印机介绍 A321
• 特点介绍
二、主要技术规格: 主要技术规格: 速度: 速度:21PPM 分辨率: 分辨率:1200*600DPI 打印语言: 打印语言:GDI、PS 、 内存:16M 内存: 接口: 接口:USB2.0、并口 、 字库: 字库:123款方正兰亭字库 款方正兰亭字库 下纸盒与手动送纸两种进纸方式 支持操作系统: 支持操作系统:Windows2000、 、 Windows XP、Windows Vista、 、 、 Windows 7等主流操作系统(仅限 等主流操作系统( 等主流操作系统 32bit操作系统) 操作系统) 操作系统
Page10
方正文杰A321打印机介绍 方正文杰A321打印机介绍 A321
• 特点介绍
低耗电模式、为您节省每一分钱: 低耗电模式、为您节省每一分钱: 文杰A321打印机具有省电模式,如果机器接通, 打印机具有省电模式,如果机器接通, 文杰 打印机具有省电模式 而在一定时间内不运行, 而在一定时间内不运行,则机器自动切换到休眠 状态( 状态(控制面板上的就绪指示灯和错误指示灯交 替闪烁。)在休眠状态下,机器电能消耗15w, 替闪烁。)在休眠状态下,机器电能消耗 。)在休眠状态下 , 默认的休眠状态启动时间为15分钟。 默认的休眠状态启动时间为 分钟。 分钟 附带123款中文字库,提升业务水平 款中文字库, 附带 款中文字库 标配方正自主开发的123款中文办公字库(61款 款中文办公字库( 款 标配方正自主开发的 款中文办公字库 简体、 款繁体),这套字库符合国际 款繁体), 简体、62款繁体),这套字库符合国际 BG2312-80编码,可运行于Windows 2000、 编码,可运行于 编码 、 XP、Vista、Win7等系统,满足您在普通办公中 、 等系统, 、 等系统 的排版、表格、 文稿、 的排版、表格、PPT文稿、网页设计、平面设计 文稿 网页设计、 等的输出需要。 等的输出需要。
Acer 投影机 P3151 P3251 G210 PK-X01 系列 说明书

“HDMITM、 HDMI 标志和 High-Definition Multimedia Interface 是 HDMI Licensing LLC 的商标
11
如何通过调节距离和变焦倍数来获得首选的图像尺寸 13
用户控制
15
安装菜单
15
Acer Empowering Technology
16
屏幕显示 (OSD) 菜单
17
色彩
18
图像
19
设置
22
投影设定
24
音频
25
定时器
25
语言
26
附录
27
故障处理
27
LED 和警告定义列表
31
更换灯泡
32
规格
33
兼容模式
变热和变形甚至导致火灾。如需临时关闭灯泡,可以按遥控器上的隐藏。
• 灯泡在使用过程中温度非常高。在卸下灯泡组件进行更换之前,应让投影机散
热约 45 分钟。
• 灯泡达到额定使用寿命后,不要继续使用。否则,在极少情况下可能会导致其
碎裂。
• 切勿在未拔掉投影机电源线的情况下更换灯泡组件或任何电子元件。 • 本产品将自行检测其灯泡使用寿命。投影机显示警告消息时一定要更换灯泡。 • 更换灯泡时,请等待设备冷却后再行操作,操作要按照全部更换说明进行。 • 更换灯泡模块后,在屏幕显示的 “投影设定”菜单中重新设置 “灯泡已用时间
目录
关于您的安全和舒适的信息
iii
重要事项
viii
方正文杰A1000打印机说明书

35
术语表
36
索引
40
目录 _9
简介
以下是本机的主要组件:
本章包括: • 打印机概观 • 控制面板概览 • 了解控制面板
打印机概观 前视图
1 顶盖 2 出纸盘 (朝下) 3 输出支架 4 控制面板 5 前盖手柄 6 前盖 7 进纸盘 8 墨粉盒 9 后导板 10 侧导板
选定的多张纸上打印,然后再拼成一张海报。请参见软件 部分。 • 您可以使用普通纸预打印表格和信头纸。请参见软件部分。
节省时间和成本 • 要节省纸张,可以在一张纸上打印多个页面。 • 在不使用时,本款机器会大幅降低耗电量,自动节省能源。
.
在各种环境下打印 • 可以在 Windows 2000、 Windows XP/2003/Vista 以及
打印期间按此按钮。当您从机器和计 算机中清除打印作业时,联机 / 错误 LED 将闪烁, 然后返回就绪模式。这可能需要一些 时间,具体取决于打印作业的大小。 在手动进纸模式下,您可以通过按此 按钮来取消打印作业。
机器发生错误,例如卡纸。
状态
说明
红色
开
墨粉已用完,机器将停止打印。更换墨粉盒。
闪烁
墨粉不足,请尽快更换墨粉。
快速闪烁 墨粉用尽,请更换墨粉。
所有打印错误都会出现在 状态监视器 程序窗口中。
取消按钮
状态 打印演示页 取消打印作业
手动打印
说明
在就绪模式下,按住此按钮,直至状 态指示灯闪烁时再松开。
打印期间按此按钮。从机器和计算机 上清除打印作业时红色指示灯闪烁, 然后机器恢复到就绪模式。这可能需 要一些时间,具体取决于打印作业的 大小。
方正文杰A321打印机Win7驱动安装指南
开始安装
第பைடு நூலகம்步
安装完毕,点击关闭按钮
最后在设备管理器中确认
在通用串行总线控制器中,显示设备名称为
“Founder USB2.0 Device, A321 Printer”
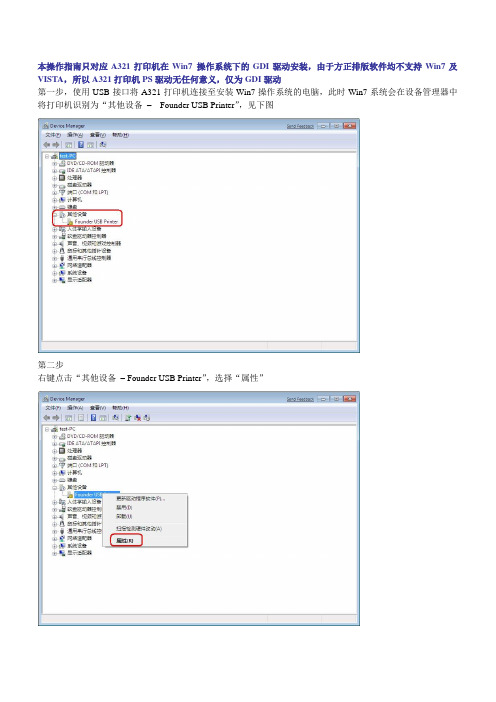
本操作指南只对应A321打印机在Win7操作系统下的GDI驱动安装,由于方正排版软件均不支持Win7及VISTA,所以A321打印机PS驱动无任何意义,仅为GDI驱动
第一步,使用USB接口将A321打印机连接至安装Win7操作系统的电脑,此时Win7系统会在设备管理器中将打印机识别为“其他设备–Founder USB Printer”,见下图
第二步
右键点击“其他设备–Founder USB Printer”,选择“属性”
第三步
在弹出的新页面中选择“Update Driver”
第四步
在弹出的新页面中选择“浏览计算机以查找驱动程序软件”
第五步
点击“浏览”按钮
第六步
选中“Win7_A321GDI”文件夹,点击确定
第七步
在弹出的对话框中选择“始终安装此驱动程序软件”
方正文杰A321打印机安装及使用1

Page36
Win Vista / Win7 驱动安装及设置
• Vista / Win7 下安装USB设备驱动
将搜索驱动程序软件目录指向事先准备好的Win7 A321 GDI 驱动目录,点击 下一步
Page37
Win Vista / Win7 驱动安装及设置
如有缺少,请与供应商联系
Page13
目录
• 安装前准备工作
三、安装硒鼓 水平握住硒鼓,水平方向轻轻摇动大约78 次,使盒内碳粉均匀分布 将硒鼓放于平台上,一手扶住硒鼓,将塑 料封条水平均匀抽出,封条抽出后,切记 不要摇晃硒鼓 感光鼓对光线特别敏感,须避免阳光直射 ,在室内光线下拿出打印机外也不要超过 5分钟。 握住打印机硒鼓的手柄,将硒鼓插入打印 机内部凹糟。前端向下插入,并检查是否 完全置入到底
一、场地要求: 打印机应放在坚固而平坦的平台或桌面上 将要为打印机留出充足的安装、操作空间,以便操作、维护和通风 承载打印机的平台面积要大于打印机底面的面积,承重量要大于22Kg 电源一定要接地
Page12
目录
• 安装前准备工作
二、检查清单及附件 打印机 标配送纸盒 硒鼓 电源线 驱动光盘 USB线和说明书 快速安装指南 三包卡
• Win XP下安装USB设备驱动
选择【从列表或指定位置安装(高级)】,点击【下一步】
Page22
Windows XP驱动安装及设置
• Win XP下安装USB设备驱动
选择【在这些位置上搜索最佳驱动程序】,只勾选【在搜索中包括这个位 置】,点击【浏览】,选择【光盘:\ …\usbdrv】确定并点击【下一步】
点击【完成】,至e25
方正科技扫描仪 说明书

Table of Contents 目录方正科技扫描仪系列产品服务承诺(A版) (1)一、扫描仪的安装与设定 (1)安全注意事项 (1)拆开扫描仪包装 (2)安装扫描仪硬件 (2)步骤一、扫描仪自动保护锁 (3)步骤二、连接您的扫描仪*和计算机 (3)安装扫描仪软件 (4)二、扫描仪的使用与维护 (6)测试扫描仪* (7)扫描正负片 (8)安装透扫器 (8)透扫片夹 (8)使用透扫片夹扫描正负片 (9)扫描正负片的相关注意事项 (12)亮灯控制 (13)维护 (13)三、扫描仪的按键使用 (15)Copy复印按键 (15)OCR光学文字识别按键 (16)Power Save 省电开关按键 (17)E-Mail电子邮件按键 (17)SCAN 扫描按键 (18)四、方正扫描仪TWAIN程序 (20)方正扫描仪TWAIN程序简介 (20)方正扫描仪TWAIN程序功能 (21)高级控制设定窗口 (26)偏好窗口 (27)颜色校正的高级窗口 (29)通道 (30)色调分布图 (30)色彩浓度 (32)iGamma (33)扫描小秘诀 (34)附录:规格 (35)I. H OW TO S ET U P Y OUR S CANNER (37)Safety Precautions (37)Box Contents (38)Install the Scanner’s Hardware (38)Step 1. Hassle-Free Lock Mechanism (39)Step 2. Connecting the Scanner to Your Computer (40)Install the Software (41)II. O PERATING THE S CANNER (43)Testing the Scanner (44)Scanning the Films (45)Installing the Transparency Adapter (45)Founderscan Negative and Positive Film Holders (46)Scanning Negative and Positive films (46)Important Notes about Scanning Film (50)Lamp Control (51)Maintenance (51)III. S CANNER B UTTONS (53)Copy Button (53)OCR Button (54)Power Save Button (55)E-Mail Button (55)Scan Button (56)IV. T HE F OUNDERSCAN TWAIN P ROGRAM (58)Introduction (58)Founderscan Dialog Box Features (59)Advanced Settings Window (65)Preferences Window (65)Advanced Windows for Color Correction (69)Color Channels (69)Histogram (70)Tone Map (72)Image Gamma (73)Scanning Tips (74)iiA PPENDIX: S PECIFICATIONS (75)iii方正科技扫描仪系列产品服务承诺(A版)前言尊敬的用户:您好!感谢您选购方正科技扫描仪系列产品,谨致谢意!为了保护您的合法权益,免除您的后顾之忧,方正科技集团股份有限公司(以下简称“方正科技”)秉承“关爱无限完美体验”的服务理念,将以优质、规范、专业、快捷的服务答谢您对方正科技产品的信任!方正科技除向您提供国家有关部门颁布的《微型计算机商品修理更换退货责任规定》(以下简称“微型计算机三包规定”)的服务之外,还特别向您提供了更多、更为贴心的增值服务。
3英寸x21英寸电动带子剃面器指南说明书

3" x 21" Electric Belt Sander8005684Owner’s ManualSpecifications• Sands wood or metal and removes paint and rust• 120V, 60 Hz• 7.5 Amp• 1,240 ft/min. (6.3 m/sec)• 3" x 21" belt• Dust collection bag• Double insulated <--- checking on this....• Trigger switch with lock-on button General Safety Rules1. Warning!Read and understand all instructions before using power tool. Save these instructions.2. Work Area.• Keep your work area clean and well lit. Do not operate power tools in explosive atmospheres, such as in the presence of flammable liquids or gases. Keep bystanders, children and visitors away while operating a power tool.3. Electrical safety.• Grounded tools must be plugged into an outlet properly installed and grounded in accordance with all codes and ordinances. Never remove the grounding prong or modify the plug in any way. Do not used any adapter plugs. Check with a qualified electrician if you are in doubt as to whether the outlet is properly grounded.• Double insulated tools are equipped with a polarized plug (one blade is wider than the other.) This plug will fit in a polarized outlet only one way. If the plug does not fit fully in the outlet, reverse the plug. If it still does not fit, contact a qualified electrician to install a polarized outlet. Do not change the plug in any way.• Avoid body contact with grounded surfaces such as pipes, radiators, ranges and refrigerators.• Do not expose power tools to rain or wet conditions.• Do not abuse the cord. Never use the cord to carry the tool or pull the plug from an outlet. Keep cord away from heat, oil, sharp edges or moving parts. Replace damaged cords immediately.4. Personal safety.• Stay alert, watch what you are doing and use common sense when operating a power tool. Do not use tool while tired or under the influence of drugs, alcohol, or medication.• Dress properly. Do not wear loose clothing or jewellery. Tie back long hair. Keep hair, clothing and gloves away from moving parts. • Avoid accidental starting. Be sure switch is off before plugging in.• Remove adjusting keys or switches before turning the tool on.• Do not over reach Keep proper footing and balance at all times.• Use appropriate safety equipment. Always wear eye, hearing and breathing protection.5. Tool use and care.• Use clamps or other practical ways to secure and support the workpiece on a stable platform• Do not force tool, use the correct tool for the required application.• Do not use tool if switch does not turn it on or off.• Disconnect the plug from the power source before making any adjustments, changing accessories, or storing the tool.• Store tools out of reach of children and other untrained persons.• Maintain tools with care.• Check for misalignment or binding of moving parts, breakage of parts, and any other condition that may affect the tool’s operation. If damaged, have the tool serviced before further use.• Only use accessories that are recommended by the manufacturer for your model.6. Service.•Tool service must be performed only by qualified repair personnel.• When servicing a tool, use only identical replacement parts. Follow instructions in the maintenance section of this manual.Belt Sander Safety Hazards1.Observe the applicable regulations when sanding painted surfaces Warning:• Some dust created by power sanding, sawing, grinding and other construction activities contains chemicals known to cause cancer, birth defects or other reproductive harm. Some examples of these chemicals are: lead from lead-based paints, crystalline silica from bricks and cement and other masonry products, arsenic and chromium from chemically treated lumber. Risk from these exposures varies depending on frequency and duration of exposure. To reduce exposure to these chemicals, work in a well ventilated area. Wear approved safety equipment, such as a respirator with filters rated for the debris produced by the job.• Children and pregnant women must not enter the work area.• Do not eat, drink or smoke in the work area.2.Whenever possible, use a vacuum extractor for dust collection.3.Remove dust and other waste materials in an environmentally safe manner. All persons entering the work area must wear a mask specially designed for protection against lead paint dust and fumes. AssemblyWarning:Always ensure that the power cord of the belt sander is unplugged from its electrical outlet prior to assembly,adding any accessories, or making adjustments to the tool.Changing a sanding belt:1.Pull out the tension lever of the front wheel frame and slide the sanding belt out.2.Slide a new sanding belt on, then push on the tension lever of the front wheel frame.3.Plug in the sander.4.Grip the sander firmly with both hands. Lift the tool and squeeze the power switch. As the sanding belt turns, watch it to see if it is turning on-centre and not moving to the left or right. If the sanding belt is moving to the left or right, turn the tension adjuster left or right until the sanding belt turns on center. Then turn off the belt sander.To Attach the dust bag:1.To attach the dust bag, simply clip the opening onto the dust port located on the left housing. Operating InstructionsThe power switch:1.To start the belt sander, depress the power switch. To stop the tool, release pressure on the power switch.2.To lock the power switch in the ON position for continuous operation, depress the power switch and push in on the switch lock. The tool will continue to run. To turn off the tool squeeze and release the power switch once.Warning:Prior to each use of the belt sander, ensure the switch lock mechanism is working properly. Always release the switchlock mechanism before disconnecting the belt sander fromits electrical outlet. Failure to do so will cause the tool tostart immediately the next time it is plugged into an outlet,resulting in possible injury or property damage.Sanding procedure:1.When sanding a work piece, always push and pull the sander over the workpiece with both hands firmly gripping the tool. Never pass hands or fingers directly in front of, to the rear, or below the sanding belt.2.Ensure the work piece is free from nails and any other foreign objects which could damage the sanding belt.3.Make sure the work piece is supported at all times. Whenever possible, secure the workpiece in a vise or with clamps (not included.) If necessary, use a roller stand with larger workpieces.4. Plug the power cord into the nearest receptacle5.Firmly grip the sander with both hands, then squeeze the power switch to turn on the tool. If desired, use the switch lock to run the belt sander in its continuous mode.6.Allow the sanding belt to turn up to full speed before feeding the sanding belt into the workpiece.7.To avoid damaging the workpiece, always sand parallel to the grain of the wood.8.Do not force the belt sander to remove material faster than it isdesigned to. Push and pull the sanding belt gradually along the surface of the work piece.9.Once the sanding job is completed turn off the belt sander and wait until the sanding belt stops turning. Then unplug the power cord from its electrical outlet. Inspection, maintenance and cleaning Warning: Ensure the power switch of the belt sander is in its off position and that the tool is unplugged from its electricaloutlet before performing any inspection, maintenance, orcleaning procedures.2.Before each use inspect the general condition of the belt sander. Check for loose screws, misalignment or binding of moving parts, damaged electrical wiring, dull or damaged sanding belt, and any other condition that may affect its safe operation. If abnormal noise or vibrations occurs, have the problem corrected before further use. Do NOT use damaged equipment.3.Carbon brushes. To maintain peak efficiency of the belt sander motor it is recommended that every two to six months the carbon brushes be examined. The carbon brush should be free of dust and dirt. The carbon brush should be replaced when it wears down to 3/16" in length. the carbon brush should slide freely in and out of the brush holder without sticking. To check the carbon brush, remove the brush holder cover located at the front of the belt sander. Lift out the carbon brush to inspect. If cleaning is necessary, rub the carbon brush thoroughly with a pencil eraser. Next, clean the brush holder opening with compressed air or a clean cloth. Then replace the carbon brush and the cover.4.To clean, the ventilation openings should be kept clean and free of sawdust and debris. The most effective way to clean the ventilation openings with is with compressed air. The outer body may be cleaned with a clean cloth and a mild detergent. Do not use solvents. Do not immerse in liquids.Parts List1Close cover2Bearing3Shaft gear4Bearing5Dust suction cover 6Fan7Screw8Plain washer9Cover10Large belt wheel 11Belt cover12Screw13Switch14Cable cover15Cable plug16Right housing17Cable pressure18Left housing19Bearing20Plain washer21Large gear22Column23Retainer24Nameplate25Carbon brush frame 26Nut27Carbon brush28Brush holder cover 29Plain washer30Adjustment spring 31Adjustment nut 32Orientation Pin33Screw34Oil bearing35Ring washer36Rear wheel37Ball bearing38Brake wheel axis39Nameplate40Screw41Spring42Screw43Bearing seat44Front cover45Screw46Sanding belt47Cushion48Bottom plate49Belt50Small belt wheel51Front wheel52Front wheel drive axis 53Front wheel frame54Screw55Screw56Stator57Retainer58Rotor59Grip。
- 1、下载文档前请自行甄别文档内容的完整性,平台不提供额外的编辑、内容补充、找答案等附加服务。
- 2、"仅部分预览"的文档,不可在线预览部分如存在完整性等问题,可反馈申请退款(可完整预览的文档不适用该条件!)。
- 3、如文档侵犯您的权益,请联系客服反馈,我们会尽快为您处理(人工客服工作时间:9:00-18:30)。
1.3 本手册中的符号和术语 ············································································ 2
1.4 说明书所含全部内容················································································ 3
ii
方正激光打印机文杰 A321 说明书
第 4 章 打印任务 ································································································· 41 4.1 多功能送纸盒··························································································41 4.1.1 多功能送纸盒···············································································41 4.1.2 将打印用纸装入送纸盒 ································································42 4.2 纸张信息 ·································································································42 4.3 执行打印任务··························································································46 4.3.1 打印机的开启与关闭····································································46
1.5 安全声明 ·································································································· 3
第 2 章 安装打印机硬件 ························································································ 4 2.1 为打印机准备安放场地 ············································································ 4 2.2 拆箱·········································································································· 6 2.3 打印机部件及其位置················································································ 8 2.3.1 正视图··························································································· 8 2.3.2 状态指示灯 ··················································································· 9 2.3.3 后视图··························································································· 9 2.3.4 内部图··························································································10 2.4 安装硒鼓 ·································································································10 2.5 放置纸张 ·································································································12 2.5.1 纸盒 ·······························································································13 2.5.2 手送进纸器 ····················································································17 2.6 连接打印机电源线 ··················································································19
方正文杰 A321 使用说明书
目录Biblioteka 第 1 章 概述1
1.1 方正文杰打印机的卓越品质和突出性能 ·················································· 1
1.2 推荐计算机配置 ······················································································· 2
第 6 章 打印机维护······························································································ 65 6.1 清洁打印机 ·····························································································65 6.1.1 清洁打印机的外部 ·······································································65 6.1.2 清洁打印机的内部 ·······································································66 6.2 硒鼓的寿命 ·····························································································66 6.3 硒鼓的管理 ·····························································································68 6.3.1 硒鼓的日常管理与养护 ································································68 6.3.2 更换硒鼓 ······················································································69
第 3 章 安装打印机驱动软件 ··············································································· 21 3.1 安装打印机驱动软件···············································································21 3.1.1 在 Windows 98 下安装 USB 设备驱动程序 ·································21 3.1.2 在 Windows 95\98\Me 下安装打印机驱动 ····································24 3.1.3 在 Windows 2000\NT 下安装 USB 设备驱动 ································28 3.1.4 在 Windows 2000\NT 下安装打印机驱动 ·····································31 3.2 安装网络打印机 ······················································································35 3.2.1 网络打印机的安装方法 ································································35 3.2.2 共享打印 ······················································································39
第 5 章 排除打印故障 ·························································································· 48 5.1 缺纸·········································································································48 5.1.1 给送纸盒添纸···············································································48 5.1.2 检查送纸盒的安装 ·······································································48 5.2 清除卡纸 ·································································································49 5.2.1 清除纸盒中的卡纸 ·······································································49 5.2.2 清除定影区的卡纸 ·······································································50 5.2.3 取出硒鼓处的卡纸 ·······································································51 5.3 硒鼓故障 ·································································································54 5.3.1 纠正模糊的文本打印····································································54 5.4 纠正打印质量··························································································55 5.5 打印故障及排除 ······················································································62