GTA4 Video Editor Manual
[分享] GTA4 目前已知密技,各平台 Xbox360 、PS3 及 PC 版本皆适用 第 1 页 _ GTA4 _ 侠盗猎车手 讨论板 _
![[分享] GTA4 目前已知密技,各平台 Xbox360 、PS3 及 PC 版本皆适用 第 1 页 _ GTA4 _ 侠盗猎车手 讨论板 _](https://img.taocdn.com/s3/m/0d676effc8d376eeaeaa3151.png)
= =
=
=
= E
建議檢舉 記s
P
V =
=
T
密技用法大改變,不再使用手把各按鍵為啟動方式 GTA4 中使用密技方式為叫出遊戲中的 再輸入特定數字即可,Xbox360 及 PS3 版本皆適用
= = d = O=
= R S S T R R R
舉
= R R R R
[分享] GTA4 目前已知密技,各平台 Xbox360 、PS3 及 PC 版本皆適用 第 1 頁 :: GTA4 :: 俠盜獵車手 討論板 :: 遊戲基地 gamebase
[分享] GTA4 目前已知密技,各平台 Xbox360 、PS3 及 PC 版本皆適用 第 1 頁 :: GTA4 :: 俠盜獵車手 討論板 :: 遊戲基地 gamebase
遊戲基地首頁
=
Submit
星城5PK搶先玩快來當贏家
神魔大戰 就等你開戰!
﹥
﹥單機遊戲 ﹥
﹥
﹥[分享] GTA4 目前已知密技,各平台 Xbox360 、PS3 及 PC 版本皆適用 第 1 頁
S
S
= V = O
才能撥號碼喔
= d = = =
比較好玩吧。 而且用秘技玩,系統很容易錯亂。
檢舉此文 =
= O = V S
? 不然玩起來沒有成就感ˊˋ
= = d = =
能
檢舉此文 x=
神諭小舖 歡迎大家來唷!
舉
[分享] GTA4 目前已知密技,各平台 Xbox360 、PS3 及 PC 版本皆適用 第 1 頁 :: GTA4 :: 俠盜獵車手 討論板 :: 遊戲基地 gamebase
= O = d = 者 =
省
侠盗猎车手副城市官方说明中文版

感谢您购买侠盗猎车手:副城。
这个ReadMe包含最后一分钟的信息和故障排除技巧。
_______________________________________________________ ______________________________内容_____1)的系统需求2)安装3)一般信息4)配置5)PC特定的临时演员6)的已知问题7)司机8)的联系信息_______________________________________________________ ______________________________1)的系统需求________________________侠盗猎车手:使用微软副城市房屋署,以及对DirectX 9.0。
受支持的操作系统:Windows 98windows98第二版Windows年Windows 2000专业(工作站)和服务包3Windows XP(家庭和职业)加上Service Pack 1以下的操作系统不支持:Windows 95(任何版本)Windows NT(任何版本)最低硬件要求800 MHz奔腾III或AMD Athlon 800 MHz或1.2 GHz英特尔赛扬处理器或1.2 GHz AMD毒龙128 MB的RAM8速度CD / DVD光驱915 MB的可用硬盘空间(+ 635 MB如果视频卡不支持房屋署,以及对DirectX纹理压缩)32 MB的视频卡和房屋署,以及对DirectX 9.0兼容的驱动程序(“GeForce”或更高)声卡和房屋署,以及对DirectX 9.0兼容的驱动程序键盘鼠标推荐硬件需求英特尔奔腾IV或AMD Athlon XP处理器256(+)MB的RAM16速度CD / DVD光驱1.55 GB的可用硬盘空间(+ 635 MB如果视频卡不支持房屋署,以及对DirectX纹理压缩)64(+)MB视频卡和房屋署,以及对DirectX 9.0兼容的驱动程序(“GeForce 3”/“Radeon 8500”或更好房屋署,以及对DirectX纹理压缩支持)房屋署,以及对DirectX 9.0兼容的声卡和环绕声另外(USB或操纵杆端口)键盘鼠标_______________________________________________________ ______________________________2)安装_________________插入侠盗猎车手:碟一副城(“安装”光盘)到CD /DVD光驱。
GTA4 PC版默认操控指南 by 1
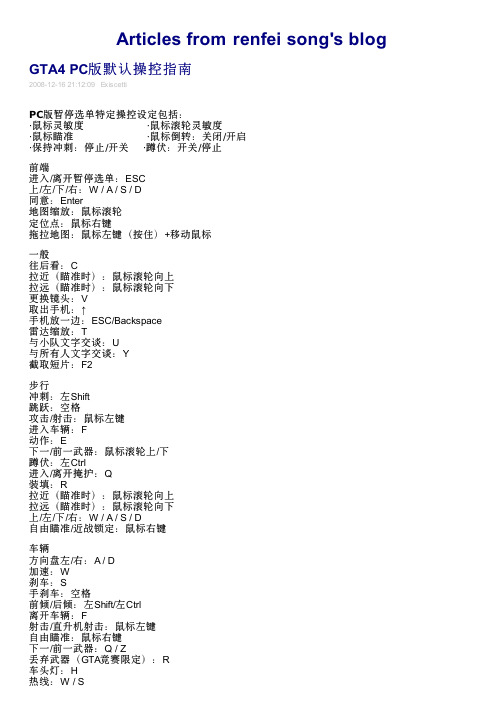
GTA4 PC版 默 认 操 控 指 南
2008-12-16 21:12停 选 单 特 定 操 控 设 定 包 括 : ·鼠标灵敏度 ·鼠标滚轮灵敏度 ·鼠标瞄准 ·鼠标倒转:关闭 /开启 ·保持冲刺:停止 /开关 ·蹲伏:开关 /停止
武器快捷键 徒手:1 近战:2 手枪: 3(车辆中也有作用) 散弹枪:4 冲锋枪: 5(车辆中也有作用) 自动步枪:6 狙击步枪:7 重装武器:8 手榴弹 /汽油弹: 9(车辆中也有作用) 特殊武器:0
作者网站:
车辆 方向盘左 /右: A / D 加速:W 刹车:S 手刹车:空格 前倾 /后倾:左 Shift/左 Ctrl 离开车辆:F 射击 /直升机射击:鼠标左键 自由瞄准:鼠标右键 下一 /前一武器: Q / Z 丢弃武器( GTA竞赛限定): R 车头灯:H 热线:W / S
喇叭:G 往后看:C 变更镜头:V 电影模式: CapsLock 下一 /前一电台:鼠标滚轮上 /下 下一 /前一歌曲: N / B 关闭收音机:X
直升机 加速 /减速: W / S 左 /右转:数字键 4 / 数字键 6 左 /右倾斜飞行: A / D 前 /后倾:数字键 8 / 数字键 2 旋转镜头:按住鼠标右键并移动鼠标 射击:鼠标左键 /数字键 0
战斗 目标锁定:鼠标右键 殴打 1:鼠标左键 殴打 2: R 踢(锁定时):Q 阻挡(锁定时):空格键
前端 进入 /离开暂停选单: ESC 上 /左 /下 /右: W / A / S / D 同意: Enter 地图缩放:鼠标滚轮 定位点:鼠标右键 拖拉地图:鼠标左键(按住) +移动鼠标
一般 往后看:C 拉近(瞄准时):鼠标滚轮向上 拉远(瞄准时):鼠标滚轮向下 更换镜头:V 取出手机:↑ 手机放一边: ESC/Backspace 雷达缩放:T 与小队文字交谈:U 与所有人文字交谈:Y 截取短片: F2
侠盗猎车4中英文2D5完整版安装说明

======================912u娱乐论坛/GBT小组侠盗猎车手4 中英文D5完整版======================版本及安装说明:①游戏基于RAS硬盘版修改制作,完整无删减。
—————————————————————②版本整合内容及注意事项:★游戏版本已升级至1.04,并打上1911完美破解补丁+NoRGSC补丁。
(必须安装)★[MOD破解保护]整合最新asi脚本。
(必须安装)★[安裝MOD必備]ScriptHook。
(必须安装)★整合live屏蔽补丁0.99b1版,用于屏蔽Game For Windows Live,不用安装Game For Windows Live就可以运行游戏。
彻底解决无法找到xlive.dll的问题。
集成功能:1.屏蔽Game For Windows Live2.带有NoRGSC功能3.内置aliceloader功能注意:如果安装了live屏蔽补丁,存档位置更改至我的文档下Rockstar Games\GTA IV\savegames目录中,如想使用以前的存档请手动转移以前位置的存档(可选安装)★整合3DM汉化1.5b版,不安装游戏则为英文版。
(可选安装)★整合SparkIV 0.6.2.2版,用于提取和替换游戏资源,所有需要自己导入的替换类MOD都需要此工具。
(可选安装)★整合超真实血液补丁,血液效果比原来更加真实。
(可选安装)★整合ingametrainer修改器1.91,超强修改器,功能超多,详细请查看游戏目录里的ingametrainer修改器1.91使用说明。
(可选安装)如完全安装以上组件则为1.04简体中文完美整合版,安装好即可游戏,也可以根据自己的需要自由选择组件进行安装。
—————————————————————③此版本没有打任何的优化补丁和MOD。
—————————————————————④安装前请确定硬盘空间至少20G以上,游戏完整安装后大概15G左右。
《黑道圣徒4》人物编辑器教程_编辑器指南(一帖全,包教会)
《黑道圣徒4》人物编辑器教程_编辑器指南(一帖全,包教会)好吧,其实人物编辑器昨天已经放出了下载资源:/thread-5176980-1-1.html,并且不少人已经进入体验了吧,不过具体步骤我一开始也是不理解,后来查了一些相关的信息,也靠自己摸索,写了如下的步骤,同时我也分享一下自己的一些感受吧:一、安装方法1.先下载上面那个链接里面的资源(这个不用多说),如果你网速不好的话,推荐百度网盘,速度很快的。
同时再下载一个STEAM工具并安装,这里推荐一个我已经有的安装文件,原下载网址有时候会上不了:STEAM安装好之后,第一次双击运行时会提示更新文件,需要花费不少时间,我这里一般是5分钟左右,具体视当地网络环境而定。
接着如果你没有STEAM的账号,点击下方的“创建一个新的账号”注册,步骤不是很复杂,填写基本的个人信息之后即可,之后便可以登录了:不过此时先不用登录STEAM,先完成下面的步骤。
2.把人物编辑器下载好放在硬盘中(最好是空间足够大的分区),应该有了三个压缩包文件了,如果你的电脑中有WINRAR之类的解压缩工具的话,鼠标单击任意一个压缩包,再按鼠标右键,选择“解压缩到当前文件夹”,此时应该出现一个名称为Saints Row IV Inauguration Station的文件夹以及游侠网的信息文件,而Saints Row IV Inauguration Station文件夹里面包含这些文件:3.把Saints Row IV Inauguration Station这个文件夹整个复制粘贴到STEAM安装目录下的\SteamApps\common里面,有的人可能没有common这个文件夹,那么就另外新建一个。
之后打开你的浏览器,在地址栏输入steam://install/242590 ,会跳出一个对话框:选择“允许”,如果你已经登录了STEAM,那么会出现STEAM安装对话框(如果之前没有登录STEAM,那么会自动跳出登录对话框,登录后的步骤同下面的),点击“下一步”:[pagesplitxx]出现生成快捷方式复选对话框,一般情况下默认即可,会自动帮你生成开始菜单和桌面快捷方式,之后点击下一步:开始工具的安装:安装进度条满之后出现下图的界面,点击“完成”:[pagesplitxx]出现这样的界面:程序进行最后的运行库的安装,稍等片刻就正式进入工具执行前的CG动画了,至此,安装方法就到这里结束了:一如即往的搞怪LOGO。
gta4enb设置参数翻译

用记事本打开ENB的配置文件enbse ries.ini 参数都在里面;[PRO XY]E NABle Proxy Libra ry=fa lseI nitPr oxyFu nctio ns=tr uePr oxyLi brary=[G LOBAL]Ad ditio nalCo nfigF ile=e nbser ies2.iniU seEff ect=t rue //开启特效Cycl icCon figRE Ading=fals e //轮回争夺参数,若想切回原版后不雅,建议封闭Forc eNVid iaCar d=tru eFor ceNVi diaCa ps=fa lse[ENGI NE] //引擎F orceD ispla ySize=fals e //强制显示除夜小For ceAnt ialia sing=true//开启反锯齿Fo rceDi splay Refre shRat e=fal se //强制画面刷新频率F orceA nisot ropic Filte ring=true//强制各相异性过滤MaxA nisot ropy=4 //过滤倍数?Antia liasi ngQua lity=2 //0-分辩率3x3,相当于9AA;1-分辩率2x2相当于4AA;2-分辩率2x2,后不雅较1差些Dis playR efres hRate Hz=60 //画面刷新频率Displ ayWid th=1440 //分辩率宽Displ ayHei ght=900 //分辩率高Refle ction sForc eHigh Preci sion=true//反射高正确度R eflec tions Extre mePre cisio n=fal se //反射极高正确度[EFFE CT] //特效E nable Bloom=true //开启Bloon特效En ableA mbien tOccl usion=true //开启AO(环境光掩蔽)特效Ena bleSk yLigh ting=true//开启天空相关特效U搜索引擎优化ri ginal PostP roces sing=false //开启原版画面处理[I NPUT] //输入KeyU seEff ect=123 //开启特效的按键设定KeyCo mbina tion=16 //组合的按键设定?K eyScr eensh ot=44 //屏幕截图的按键设定Ke yAmbi entOc clusi on=121 //开启环境光掩蔽后不雅的按键设定[BLO OD] //血Re flect ionAm ount=0.8 //光影反射量Spe cular Power=0.8[TR EE] //树Le avesR eflec tionA mount=0.15 //树叶光影反射量Leav esSpe cular Power=0.2Leave sAmbi entAm ount=0.3 //树叶光影掩蔽量L eaves Color Multi plier=1.2Leave sColo rPow=1.5 //树叶色彩对比[BUILD ING]//建筑物Windo wLigh tInte nsity=1.5//建筑玻璃的光影强度[L IGHT1] //s irenand s ome i ntern al 警铃相关Li ghtIn tensi ty=2.0 ////警铃光照处强度L ightA OAmou nt=1.4 //警铃光照处物体暗影局限Ligh tILAm ount=0.0 //警铃光照处物体反光局限Ed geLig hteni ngAmo unt=0.0 //边缘亮度Color Pow=1.5 //光照局限的亮度对比,越高越暗Light Curve=1.0[LI GHT2] //st reetlight道路相关(夜晚较明明)Li ghtIn tensi ty=2.0 //加强光照处亮度Lig htAOA mount=0.0//光照处暗影局限Light ILAmo unt=1.5 //光照处亮光局限Ed geLig hteni ngAmo unt=0.3Co lorPo w=1.5 //光照局限的亮度对比,越高越暗Li ghtCu rve=0.7[L IGHT3] //c ar fr ont l ight车前灯L ightI ntens ity=1.7 //车前灯照射强度Li ghtAO Amoun t=0.0 //车前灯照射到的物体暗影局限Lig htILA mount=6.0//车前灯照射到的物体亮光局限Edge Light ening Amoun t=0.4Colo rPow=1.5 //光照局限的亮度对比,越高越暗Ligh tCurv e=1.0[LI GHT4] //se conda ry 车尾灯Lig htInt ensit y=2.0 //车尾灯照射强度Ligh tAOAm ount=0.0 //车尾灯照射到的物体暗影局限Light ILAmo unt=4.0 //车尾灯照射到的物体亮度局限E dgeLi ghten ingAm ount=1.0C olorP ow=1.5 //光照局限的亮度对比,越高越暗L ightC urve=1.0[LIGH T5] //ambi ent s phere s 室内Light Inten sity=1.5 //室内光线强度Li ghtAO Amoun t=1.0 //室内物体暗影局限Lig htILA mount=0.0//室内物体亮光局限Edge Light ening Amoun t=0.0Colo rPow=1.0 //光照局限的亮度对比,越高越暗Ligh tCurv e=0.7[LI GHT6] //am bient sphe res f or om ni li ght 室内泛光灯Light Inten sity=1.5 //泛光灯强度Lig htAOA mount=1.0//泛光灯照射物体的暗影局限Light ILAmo unt=0.0 //泛光灯照射物体的亮光局限Ed geLig hteni ngAmo unt=0.0Co lorPo w=1.0 //光照局限的亮度对比,越高越暗Li ghtCu rve=0.7[CARHE ADLIG HT] //车头灯Emiss iveMu lipli er=1.5 //发亮参数L ightI ntens ity=4.0 //光线强度[LIG HTSPR ITE]//闪电UseEx terna lText ure=t rue //哄骗额外材质In tensi ty=1.0 //各光源强度,包含车灯等Inte nsity InRef lecti on=0.6 //反射强度U seRay s=tru e //开启闪光R aysNu mber=3 //闪光数量-闪电完后,面前蓝色光晕的数量R aysIn tensi ty=0.2 //闪光强度-数值高,光源的放射性越强Ray sRate OfCha nge=10.0 //闪光改变速度?R aysLe ngth=2.0 //闪光长度?[C ARWIN DOWGL ASS]//车窗玻璃Ref lecti onAmo unt=0.6 //反射量S pecul arPow er=100.0 Specu larAm ount=1.0[CHRO ME] Refle ction Front=0.8Refl ectio nSide=1.0Spec ularP ower=10.7Side Fade=1.0M etall icAmo unt=0.05 [WHE ELS]//车轮Refle ction Front=3.0Refl ectio nSide=0.2Spec ularP ower=0.02SideF ade=1.0Me talli cAmou nt=0.1[REFLE CTION1] //反射1,车体Ref lecti onFro nt=0.4Ref lecti onSid e=0.8Spec ularP ower=100.0Side Fade=0.6M etall icAmo unt=0.05[REFL ECTIO N2] //反射2Refle ction Front=0.6Refle ction Side=1.2S pecul arPow er=1.0Sid eFade=0.5[REFL ECTIO N3] //反射2Refle ction Front=0.4Refle ction Side=0.8S pecul arPow er=10.0Si deFad e=0.3[BL OOM]//BLO OM特效Bloom Quali ty=1.0 //品质Blu eShif tAmou nt=1.1 //蓝色偏移量-数值影响B LOOM色彩,数值高偏蓝紫色Radiu s1=0.5 //半径1Ra dius2=1.0//半径2Cont rast=0.7 //对比[SSAO_SSIL] //屏幕空间环境光掩蔽和借居照明A pplyA ntial iasin g=fal se //哄骗反锯齿Samp lingQ ualit y=1 //取样品质Samp lingR ange=0.8 //取样局限Size Scale=0.4//规模除夜小So urceT extur esSca le=0.4 //材质起原除夜小Fil terQu ality=1 //过滤器品质AOAm ount=1.5 //AO(环境光掩蔽)量-扩散物体暗影局限ILAm ount=0.3 //IL(借居照明)量-扩散物体亮光局限EdgeL ighte ningA mount=5.2//边缘亮度[S HADOW] //光影Fil terQu ality=2 //过滤器品质[AD APTAT ION]Force MinMa xValu es=tr ue //强制最除夜最小值A dapta tionT ime=1.3Ad aptat ionMi n=0.6 //最小值,数值袈浣小,画面光影越亮Adapt ation Max=1.2 //最除夜值,数值袈浣小,画面光影越亮Ad aptat ionMi nMult iplie r=1.0Adap tatio nMaxM ultip lier=1.0[ENVI RONME NT] //环境D irect Light ingIn tensi ty=1.4 //日间亮度N ightL ighti ngInt ensit y=0.5 //晚上亮度Di rectL ighti ngCur ve=0.8 //数值袈浣高,画面稍偏白Refl ectio nAmou ntMul tipli er=1.1 //画面反射量,影响建筑及路面等S pecul arAmo untMu ltipl ier=1.0 //反光强度Specu larPo werMu ltipl ier=1.0 /数值袈浣小,反光局限越除夜Co lorPo w=2.2 //色彩对比Am bient SunMu ltipl ier=1.0 //橘黄色Ambie ntSky Multi plier=1.0 //蓝白色Amb ientS unSat urati on=0.7Amb ientS kySat urati on=0.7[S KYLIG HTING] //天空光线F ilter Quali ty=1//过滤器品质Am bient SunMi x=4.0 //橘黄色Amb ientS kyMix=4.0//蓝白色Ambi entCo ntras t=1.4 //环境色彩亮暗度,越高越暗,改变幅度小Amb ientM inLev el=0.3 //数值介于0~1之间,影响Ambi entCo ntras t的改变[PROX Y]En ableP roxyL ibrar y=fal seIn itPro xyFun ction s=tru ePro xyLib rary=[GL OBAL]Addi tiona lConf igFil e=enb serie s2.in iUse Effec t=tru eCyc licCo nfigR eadin g=fal seFo rceNV idiaC ard=t rueF orceN Vidia Caps=false[EN GINE]Forc eDisp laySi ze=fa lseF orceA ntial iasin g=fal seFo rceDi splay Refre shRat e=fal seFo rceAn isotr opicF ilter ing=t rueM axAni sotro py=8Antia liasi ngQua lity=0Dis playR efres hRate Hz=60Disp layWi dth=800Di splay Heigh t=600Refl ectio nsFor ceHig hPrec ision=true Refl ectio nsExt remeP recis ion=t rue [EFF ECT]Enabl eBloo m=tru eEna bleAm bient Occlu sion=trueEnabl eSkyL ighti ng=tr ueUs eOrig inalP ostPr ocess ing=f alse[INP UT]K eyUse Effec t=123KeyC ombin ation=16K eyScr eensh ot=44KeyA mbien tOccl usion=121[BLO OD]R eflec tionA mount=0.8Specu larPo wer=0.8[TREE]Leav esRef lecti onAmo unt=0.15 //0.15 Leav esSpe cular Power=0.2//0.2Leav esAmb ientA mount=0.3Leave sColo rMult iplie r=1.2 //1.2Lea vesCo lorPo w=1.8 //1.5[B UILDI NG]W indow Light Inten sity=1.3[LIGH T1] //sire n and some inte rnalLight Inten sity=2.0L ightA OAmou nt=1.4Lig htILA mount=0.0EdgeL ighte ningA mount=0.0Color Pow=1.5Li ghtCu rve=0.4[LIGHT2] //stree t lig htLi ghtIn tensi ty=4.0 //2.0Li ghtAO Amoun t=0.0Ligh tILAm ount=3.0 //1.5EdgeL ighte ningA mount=0.3Color Pow=3.0Li ghtCu rve=0.05 //0.7[LIG HT3]//car fron t lig htLi ghtIn tensi ty=1.7Lig htAOA mount=0.0Light ILAmo unt=6.0Ed geLig hteni ngAmo unt=0.4Co lorPo w=1.5Ligh tCurv e=1.0[LI GHT4] //se conda ryLi ghtIn tensi ty=2.0Lig htAOA mount=0.0Light ILAmo unt=8.0Ed geLig hteni ngAmo unt=1.0Co lorPo w=1.5Ligh tCurv e=0.3[LI GHT5] //am bient sphe resL ightI ntens ity=1.5Li ghtAO Amoun t=1.0Ligh tILAm ount=0.0E dgeLi ghten ingAm ount=0.0C olorP ow=1.0Lig htCur ve=0.8[L IGHT6] //a mbien t sph eresfor o mni l ightLight Inten sity=1.5L ightA OAmou nt=1.0Lig htILA mount=0.0EdgeL ighte ningA mount=0.0Color Pow=1.0Li ghtCu rve=0.8[CARHE ADLIG HT]E missi veMul iplie r=1.5Ligh tInte nsity=4.0[LIG HTSPR ITE]UseEx terna lText ure=t rueI ntens ity=1.0In tensi tyInR eflec tion=0.6 U seRay s=tru eRay sNumb er=3RaysI ntens ity=0.2Ra ysRat eOfCh ange=10.0RaysL ength=2.0[CAR WINDO WGLAS S] Re flect ionAm ount=0.6S pecul arPow er=100.0S pecul arAmo unt=1.0[CHROM E]Re flect ionFr ont=0.8 //0.8 R eflec tionS ide=1.0 //1.0 S pecul arPow er=10.7 //10.7SideF ade=1.0 //1.0M etall icAmo unt=0.05[WHEE LS]R eflec tionF ront=0.5R eflec tionS ide=1.0Sp ecula rPowe r=0.02Si deFad e=1.0Met allic Amoun t=0.1[RE FLECT ION1] //ca r Ref lecti onFro nt=1.0Ref lecti onSid e=1.0Spec ularP ower=1.0S ideFa de=1.0 //1.0Me talli cAmou nt=0.0[R EFLEC TION2]Ref lecti onFro nt=0.5Ref lecti onSid e=0.5Spec ularP ower=1.0 SideF ade=0.5[REFL ECTIO N3]R eflec tionF ront=0.5R eflec tionS ide=0.5Sp ecula rPowe r=1.0Sid eFade=0.3[BL OOM]Bloom Quali ty=1.0Blu eShif tAmou nt=1.1Rad ius1=0.5R adius2=1.0Cont rast=0.7[SSAO_SSIL]App lyAnt ialia sing=trueSampl ingQu ality=0Sa mplin gRang e=0.8 //0.8Siz eScal e=0.4 //0.4Sou rceTe xture sScal e=0.4 //0.4 Fil terQu ality=0AO Amoun t=1.5ILAm ount=0.3 //0.3EdgeL ighte ningA mount=5.2[SHA DOW]Filte rQual ity=0[AD APTAT ION]Force MinMa xValu es=tr ueAd aptat ionTi me=1.0Ada ptati onMin=0.7Adapt ation Max=1.2Ad aptat ionMi nMult iplie r=1.0 Adap tatio nMaxM ultip lier=1.0 [ENVI RONME NT]D irect Light ingIn tensi ty=1.4Nig htLig hting Inten sity=1.3D irect Light ingCu rve=0.7Re flect ionAm ountM ultip lier=1.5 S pecul arAmo untMu ltipl ier=1.0 Sp ecula rPowe rMult iplie r=1.0 Colo rPow=2.5A mbien tSunM ultip lier=1.0A mbien tSkyM ultip lier=1.0A mbien tSunS atura tion=0.6A mbien tSkyS atura tion=0.6[SKYL IGHTI NG]F ilter Quali ty=0Ambie ntSun Mix=4.0Am bient SkyMi x=4.0 //4.0Amb ientC ontra st=1.4 //1.4Am bient MinLe vel=0.3备注:如果不喜欢补丁里面的天空(太蓝,不真实)、十字车灯(这个推荐保留)、树叶(树叶确实丑),请将相对应顺序的文件删除:MOD\PC\t extur es\sk ydome(天空)或者coro nas(车灯)或者s tippl e(树叶)。
GTA4 XliveLess(免Live补丁)下载和使用详细说明 by 1

Articles from renfei song's blog
GTA4 XliveLess( 免 Live补 丁 ) 下 载 和 使 用 详 细 说 明 ( 补
2011-05-07 14:05:18 ExisTAForums 的 listener,替换 xlive.dll 文件,有多种功能。最新版本是 0.999beta7,2010年5月29日更新。 特色: 屏蔽原 Games For Windows – LIVE 系统以及 Rockstar Games Social Club,完全取代“免RGSC补丁”, 还可以解决任何和 RGSC 以及 LIVE 相关的错误。包括但不限于“没有找到xlive.dll,因此这个应用 程序未能启动。重新安装应用程序可能会修复此问题。” 恢复圣安地列斯和罪恶都市的存档方式,无需注册任何账号即可直接存档与读取,也可以读取他人存 档。 特别说明: 请运行 LaunchGTAIV.exe 来开始游戏(不要使用 GTAIV.exe,以免触发醉酒模式;也不要使用 RGSC)。 存档位置有所改变(见下文)。 功能列表: 完全把原始的 xlive.dll 替换为新的 xlive.dll,可以解决找不到 xlive.dll 而无法启动游戏的问题; 移除了所有多人游戏模式; 移除了文件保护检查,可以自由修改所有的游戏文件(取代 File Check Fix 或 Magic Patch); 内置了 Asi-Loader 的功能; 移除了存档文件的保护,可以直接离线存档和读取,而不用注册任何账号; 禁用了 Rockstar Games Social Club(取代免 RGSC 补丁); 更改了存档位置。 安装和使用方法: 1. 解压缩文件,把 xlive.dll 拷贝到游戏跟目录。 2. 由于 XliveLess 内置了 Asi-Loader,所以如果原先安装有 Asi-Loader 的话(比如 dsound.dll 文 件),请把它移除。 3. 存档目录转移到了“我的文档”中(更加便于管理!)手动把以前的存档转移到新位置。 新存档位置如下: Windows 7 和 Windows Vista: %USERPROFILE%DocumentsRockstar GamesGTA IVsavegames Windows XP: %USERPROFILE%My DocumentsRockstar GamesGTA IVsavegames 下载地址: /gta4/xliveless-0.999b7.rar 如果你想把这个文件分发给他人下载,可以直接使用上面的地址。 作者网站:
GTA41.03各MOD+修改器使用说明
如何开启第一人称视角:安装此MOD,进入游戏后,先不要切换视角,就常规的那俩全身的视角就行。
①.先摁下B键,这时屏幕没有任何图标提示,但是已经切换了②.摁V键切换视角,切到游戏自带的那个只显示上半身的视角③.这时请长时间摁一下V键,切换视角成功如何关闭第一人称视角:①.摁下L键,镜头会换到航拍模式②.再摁一次L键,关闭成功烟花按K键。
性感保镖使用方法:INSERT添加一个保镖。
(貌似有时会跳出来一个公的)按SHIFT + INSERT的切换保镖无敌。
按Delete删除最近的保镖。
好像最多7个!坐公交车或会其它车的副坐位按G1.03修改器操作方法:F1 叫出菜单NUMPAD 4/6 左右浏览NUMPAD 2/8 上下浏览NUMPAD 5 确定Backspace 返回这些按键可以在inGameTrainer.ini文件中自定义修改和添加.具体看inGameTrainerKeys.txt 的说明●4月17日补一个详尽版的使用说明书,如有需要请到下面下载●一款集合了刷车、无敌、刷钱、刷武器、超人、瞬移、游戏时间+系统时间、时间锁定、速度表、车载灯具、车门控制、人海、更换隐藏衣服……等功能的强大作弊器,真的太强大了,自己体会吧。
※※※※v1.9使用说明书※※※※ㄨ殘翼ゞ首发3DM论坛,转载需注明,否则后果自负====================================================●Vehicle Options : 车选项+V ehicle selector : 车辆选择(进入后按4或6左右选择载具, 按5刷车)+Color Selector : 车辆颜色选择(必须先坐上载具, 然后调整颜色, 即调即见) 选择颜色时, 可用数字键(非numpad)直接输入颜色编号+Door opener : 开启车门--Front left : 左前门--Front right : 右前门--Rear left : 左后门--Rear right : 右后门--Hook : 引擎盖--Trunk : 后车厢--Open all doors : 开启所有车门--Close All doors : 关闭所有车门+Light editor : 车灯编辑--Interior lights : 车内灯--Taxi lights : 计程车(租车)灯--Hazard lights : 方向(警示)灯+V ehicle component : 载具组件+Neon colour selector:霓虹灯色彩选择(就是车底灯的颜色,20种。
- 1、下载文档前请自行甄别文档内容的完整性,平台不提供额外的编辑、内容补充、找答案等附加服务。
- 2、"仅部分预览"的文档,不可在线预览部分如存在完整性等问题,可反馈申请退款(可完整预览的文档不适用该条件!)。
- 3、如文档侵犯您的权益,请联系客服反馈,我们会尽快为您处理(人工客服工作时间:9:00-18:30)。
Clip CaptureBefore you can begin making Videos, you need to capture some footage from the game. The segments of game footage you capture and store are known as Clips. Clip Capture can be turned On or Off in the Game subsection of the Pause menu, and is set to On by default. When Clip Capture is On, the game is constantly recording everything you see. When you experience something you want to save, press F2. Captured footage will be the action that occurs PRIOR to pressing F2.A message will appear letting you know a Clip is being captured. The game will capture 30 to 40 second long Clips, depending on your game settings and computerspecs, so you should have a bit of time after an event occurs to save it. The game is continuously recording, even while you are saving your current Clip. Capturing a Clip right after saving a Clip will result in some overlap of Clip content. Note that the game will only record gameplay and not cutscenes or mini-games. Once you’ve recorded a few Clips, you can head into the Video Editor by accessing it through your in-gamemobile phone.Video EditorEntering the Video Editor from the in-game mobile phone first brings you to the Clips section. This section organizes all your captured Clips chronologically in named menus (Favorites, Today, This Week and Archives).Clip ViewerDouble click a Clip to watch it in the Clip Viewer. The Clip will begin playing automatically. To stop it at any time, click the Pause button, or press the Spacebar. You can also Rewind or Fast Forward the Clip by clicking the buttons on the Clip Viewer’s Toolbar, or by pressing the Left and Right Arrow keys on your keyboard. Right clicking the Rewind and Fast Forward buttons advance or reverse your Clip one frame at a time, the Up and Down Arrow keys are the keyboard shortcuts for this feature.You can also hold the Right Mouse button down and move the mouse to maneuver the camera around your character. While holding the Right Mouse button, you can also use the W and S keys to zoom in and out. At any time, you can update the Clip’s thumbnail by hitting U on your keyboard. This makes the frame you’re on the new thumbnail for the Clip, which will help you locate it later on when you want to use it in a Video. Once you’ve finished reviewing your Clip and setting a thumbnail, you can back out of the Clip Viewer by pressing the Esc button on your keyboard.FavoritesNow that you’ve updated your thumbnail, you can makethe Clip a Favorite, so it will be even easier to find later on.To mark a Clip as a Favorite, drag it on top of the Favoritesmenu. Clips that have been added to your Favorites folderwill be marked with a star. Your Favorites folder is likea playlist; you can add or delete Clips from it withoutaffecting your Archives. However, deleting a Clip fromyour Archives will permanently remove it.Once you’re done organizing your Clips, you can moveon to the Editor section. The first area of the Editorsection you will see is your Video Archives. All of yourworking Videos are stored and organized in the VideoArchives in the order they were most recently workedon. From here you can decide to continue editing anexisting Video, or create a new one by double clickingthe Create New thumbnail.Clip EditorTo edit a Clip, drag it from the Clips menu on the left side of the screen to the Storyboard area. Double click it to load the Clip in the Clip Editor.Toolbar / Time BarOnce you load a Clip into the Clip Editor, you’ll notice a Time Bar at the top of the screen with a Toolbar underneath it. Like the Clip Viewer, you can pause or resume Clip playback by using the Play/Pause button on the Toolbar or the Spacebar on your keyboard. The Fast Forward button can be clicked up to three times for varying speeds (Rewind only has a single speed), or if you like keyboard shortcuts, you can use the Left and Right Arrow keys. You can right click the Fast Forward and Rewind buttons or use the Up or Down Arrow keys to step forward or backward through your Clip frame-by-frame. This type of control is very useful when you want to make precise edits. You can jump to the beginning of your Clip at any time by hitting the Back button, or B on your keyboard. Edits to your Clip can be saved by pressing F6 or clicking the Save button on the Toolbar.While your Clip is playing, you’ll notice a Tab moving across the Time Bar. The Time Bar Tab represents your location in the Clip. If you want to jump around your Clip, you can drag the Time Bar Tab along the Time Bar to advance or reverse your Clip - or click anywhere on the Time Bar to jump to that spot instantly. You can grab and drag the Time Bar Extents at the far left and right ends of the Time Bar to trim the length of your Clip.The Timer on the right side of the Toolbar indicates your position in time. Clicking on this Timer will toggle between the Clip Timer and the Video Timer. The Clip Timer indicates your position in the Clip relative to the length of the Clip itself. When the Video Timer is toggled, it indicates your position in the overall Video relative to its total length. This is helpful if you want a song or piece of text to appear at a specific moment in your Video. All you need to do is note your position relative to the Video Timer while in the Clip Editor and then slide your text or audio to that time on the Video Timer once you’re back in the Video Editor.Adding MarkersOther than the overall length of your Clip, which is controlled by the Time Bar Extents at either end of the Time Bar, all edits to your Clip are controlled within Markers. The Marker button looks like an upside down triangle. Clicking this button places a Marker into the Clip on your current frame. Hitting M on your keyboard will do the same thing. Markers can be dragged along the Time Bar, as long as the camera remains within range of your character. Markers cannot be dragged past one another, but can be snapped together so they’re a single frame apart, allowing you to make instantaneous camera cuts. You can cycle through your Markers by using the Next/Previous Marker button located next to the Place Marker button on the Toolbar. The Greater Than and Less Than keys, better known as the Period and Comma keys, on your keyboard, act as the shortcut for this button. If you don’t have a Marker selected, these buttons will jump you to the nearest Marker relative to the Time Bar Tab. This feature comes in handy as you begin to get the hang of the Clip Editor and want to move around your Clip quickly to make your edits.Cameras – PresetClicking on a Marker will open the Marker Controls boxunder the Toolbar. Click on the Camera menu to expandit. By default, your Camera Type is set to Preset and thefirst preset you see is the Game Camera. This camerashows you exactly what you saw when you captured theClip in the game. You can click the View option or scrollyour Mouse Wheel to cycle through the various PresetCameras available. Preset Cameras are locked on yourcharacter from various angles. They provide a good wayto set up Videos quickly. Once you’ve specified a certaintype of camera within a Marker, all subsequent Markerswill inherit that Camera Type until you change it.Custom Cameras – TargetFor more control over your cameras, click the Type field in the Camera menu to switch your Camera Type to Custom. There are two types of Custom Cameras available: Free and Target. A Target Camera locks onto people in your Clip and can be maneuvered relative to that person. Much like the camera in the Clip Viewer, you can hold down the Right Mouse button and move the camera around. You can use W and S to move the camera in and out as well as the Mouse Wheel to lower or raise the Target Camera Offset. (Hold Shift to move the camera more quickly.) Q and E will control the camera’s tilt. The Target Camera also has a Lock setting: Position locks the camera’s horizontal position, and Orientation locks the camera’s horizontal and vertical position around the player. Play around with these options and see if you can find an interesting angle to hold on your target for a few moments. The camera will automatically adjust when it comes into contact with walls or objects, so keep that in mind when trying to set a distance between the target and the camera.The Target Camera is locked onto your character by default, but you can target other people in your Clip by scrolling through the Target field in the Camera menu. This can often reveal events you weren’t even aware of.Custom Cameras – Target continuedFOVThe camera’s Field of View can also be controlled by changing the FOV value in the Camera menu.MovementMovement allows you to transition the camera between two Markers with different camera positions. Target Cameras move in an orbit around their target. Place two Markers a few seconds apart from each other on the Time Bar. Set each Marker’s Camera Type to Custom with the View set to Target. The speed of the camera’s movement depends on the distance the Markers are from each other so keep that in mind when thinking about how you want the camera to move. Once you have selected locations for the two cameras, click the first camera’s Marker and select the Orbit option in the Movement field. Now the camera will transition between the two Markers when you play your Clip. Move the cameras around and play with the spacing between the Markers to get different, sweeping views of the characters in your Clip.If you wish to do a complete rotation around a target it will require more than two Target Cameras with Orbit active. Place Markers that control Movement Cameras as evenly as possible so their speed doesn’t fluctuate.The Ease option allows you to ease the camera out of one Marker and into another. It’s a good way to soften your camera movements. You can also use Ease to slow the camera as it moves through one Marker on the way to another by selecting the In/Out option. These sudden camera speed reductions in the middle of a move can place emphasis on an event you want to highlight.HandheldThere’s a Handheld field in the Camera menu that enables you to add a Low, Medium or High degree of random movement to your camera. This can help make your shots feel more natural or spontaneous.Custom Cameras – FreeThe second type of Custom Camera is the Free Camera.With Custom still selected in the Camera’s Type field,click the View field to change the camera from Targetto Free. The Free Camera, as its name suggests, givesyou many options when setting up your shots. It allowsyou to fly around the world and look at anything youlike. The Free Camera’s controls function much like theTarget Camera’s, but the Free Camera has a greater rangeof motion because it’s not attached to anything. PressW, A, S, D to move Forward, Left, Backward, and Right.Holding the Right Mouse button and moving the mousearound allows you to rotate your camera heading. As withthe Target Camera, the mouse wheel moves the cameraup and down and Q and E will tilt the camera. Hold downthe Shift button on your keyboard while moving thecamera to increase its speed.MovementLike the Target Camera, you can use the Free Camera to set up moves. The Free Camera has two different options in its Movement field: Linear and Blend. Linear will take a more direct route between Markers while Blend will try to soften transitions between two or more Markers. The orientation and position of your cameras relative to one another will determine which option best suits your camera move. Experiment with both to see which one works best.Custom Cameras – Free continuedFree Camera RadarWhen you have a Free Camera selected, you’ll notice a Radar appear in the bottom left-hand corner of the screen. The Free Camera Radar indicates your Free Camera’s range of motion relative to your character. Like in the game, your character is represented by an arrow icon, and will always be in the middle of the Free Camera Radar. The Camera icon represents the position and heading of your Free Camera relative to your character. The Free Camera Radar has two circles. While inside the inner circle of the Radar, the camera can face in any direction. Once the camera leaves the first ring, it must begin facing back toward your character. In other words, you can move the camera further away from your character if you’re facing that character’s direction. If you start to get close to the first Radar boundary and you aren’t facing back toward your character a message will appear on-screen to warn you that you’re approaching the camera’s extents.Like the Target Camera, you can use the Free Camera to set up moves. The Free Camera has two different options in its Movement field: Linear and Blend. Linear will take a more direct route between Markers while Blend will try to soften and smooth out transitions between two or more Markers. The orientation and position of your cameras relative to one another will determine which option best suits your camera move. Experiment with both to see which one works best.Marker ControlsNow that the different types of cameras and movements available to you have been discussed, we can move on to the other Marker properties you can adjust.FilterThe first menu in the Marker Controls box is Filter. Filter applies a screen effect to your Clip. An effect will remain active until you change it in a subsequent Marker. This prevents you from having to apply the same effect to dozens of Markers if you’ve been working on a Clip for a while and decide you’d like to see how the whole thing looks under the Steel filter for example. However, once you’ve adjusted an effect in a Marker, that Marker will always have its Filter set manually.SpeedThe second Marker field you can change is Speed. You can adjust the speed of your Clip from extremely slow to very fast. Play around with these to find something that works for you. Speed can be changed as many times as you like during a Clip; however, unlike the Filter menu, each new Marker you place will have its Speed value reset to 100 (normal speed). Speed changes must be set on each individual Marker. The Time Bar, Video Timer and Marker spacing will all adjust as you change speeds since slowing down or speeding up your Clips affects the overall length of your Video. Speed changes are represented by subtle differences in the gray color of the Time Bar.AudioThe Audio menu in the Marker Controls box allows you to adjust sound levels in your Clip for as long or brief a period as you like. If you’ve placed a song in your Video and you want to emphasize a particular moment, you can use a Marker to turn the sound effects down or off with the SFX Volume field. On the other hand, if you want the sound effects to overpower the music or wish to adjust the music’s volume throughout the Clip to build suspense, you can change the volume using the Music Volume field. You can also turn recorded character dialogue on or off using the Speech field. Like all the Marker menus you’ve seen so far, you can adjust these as much as you like within a Clip.Remember that you can trim a Clip at any time by dragging the Time Bar Extents at the far left and right of the Time Bar. The Time Bar Extents also snap to Markers so you can start the Clip off with one of your Custom Camera shots.Tools MenuClicking on the Tools button will give you someadditional options and their Hotkeys.Hide HUDPress H to toggle the game’s interface on and offso that you can get a better view of the action.Toggle HotkeyBrings up a menu with a list of all the differentHotkeys and their functions within the ClipEditor. Familiarizing yourself with the variousHotkeys and their functions will make the editingprocess more efficient and enjoyable for you.Toggle TimeSwap the Video Timer between the Clip Time and the entire Video Time, so you can see where you are in relation to length of your Clip, or where you are in relation to the length of your entire Video. Remember you can do this by clicking on the Timer itself as well.Set ThumbRecords the frame you’re currently on and creates a new thumbnail for that instance of the Clip you’re editing on the Storyboard. This makes it easy to tell which instance of a Clip contains different edits on the Storyboard if you happen to reuse a Clip multiple times in a Video.Toggle Tool TipsDisplay or hide rollover tips in all the sections of the Video Editor. When first starting out, the Tool Tips will be set to On by default.SaveSave your Video by pressing F6.Global AudioAllows you to lower or raise the global volumes of SFX and Music in your Clip. You can turn in-game dialogue on or off by toggling Speech. These setting will affect your entire Video.Creating VideosPress the Esc button to get back into the Video Editor from the Clip Editor. Begin assembling your footage by dragging more Clips from the Clips menu onto the Storyboard. It is a good idea to give your Video a title and save it before you begin editing. If you decide not to name your Video, it will be given the default name. Click on “Enter title” and type something in. If you’re not happy with the title, you can edit it later. Press F6 to save.On the left side of the screen, there is a list of expandable menus: Clips, Songs, Text and Transitions. In the Clips menu, you’ll see your Clip thumbnails organized the same way they are in the Clips section. Click on the different headings (Favorites, Today, Archives, etc.) to gain access to your Clips. This is where the Favorites menu can come in handy. If you’ve used the Favorites menu to gather a group of Clips, and you’ve assigned them all custom thumbnails, sorting through your desired footage and deciding what order to place it on the Storyboard will be a much easier process.StoryboardYou can drag and place Clips on the Storyboard in any order you choose. Double clicking a Clip in the Clips menu will automatically place it at the end of the sequence. The order of Clips already on the Storyboard can be rearranged by dragging them around, or you can cut and paste them using Ctrl+X and Ctrl+V. If you wish to duplicate a Clip and the edits you’ve made to it, you can copy and paste it using Ctrl+C and Ctrl+V. The sequence of Clips on the Storyboard determines the order in which the Clips will render out in your final Video.As you add Clips and move them around on the Storyboard, the time they appear in your Video is updated in the bottom left hand corner of the Clip. As you highlight Clips, their total individual length is displayed in the top left hand corner of the Clip thumbnail.Video TimelinesDirectly beneath the Storyboard is a section called the Video Timeline. The Video Timeline is comprised of the Time Scale, the Clip Timeline, the Audio Timeline, and the Text Timeline. The upper most timeline is the Clip Timeline; it indicates how long each Clip is relative to your entire Video. The size of the thumbnails on the Clip Timeline, as well as the Time Scale above it, adjust as you add or remove footage from your Video. As your Videos grow in length and complexity, the Video Timeline as a whole becomes very useful. When you have many Clips of differing lengths, clicking on one of the thumbnails on the Clip Timeline will jump to the corresponding Clip on the Storyboard for quick access. The thumbnails on the Clip Timeline can also be used to highlight and select Clips on the Storyboard.Below the Clip Timeline are the Audio and Text Timelines. You can drag and drop songs from the game, or text you have entered into these timelines. By lining up text or audio with the thumbnails in the Clip Timeline, you can ensure everything is playing exactly when you want it to. As you move text or audio around on their timelines, you’ll also see a counter changing below your Video’s title. This is the Video Counter and it indicates where your selection falls relative to the entire length of the Video. You can even use the Left and Right Arrow keys on your keyboard to nudge audio and text by hundredths of a second to ensure precise placement. The Video Timeline as a whole plays a crucial part in illustrating how all the elements of your Video fit together.Once you’ve selected a Clip you want to edit for your Video, press Enter on your keyboard or double click the Storyboard thumbnail to edit that individual Clip.Adding MusicAt some point during the editing process you maydecide you’d like to add music to your Video. Click on the Songs menu to open a list of tracks available for use in your Videos. Click on it to open a list of tracks available for use in your Videos. You can preview any of these songs by double clicking them or clicking the play button beside them when they’re selected. To add a song to your Video, drag it onto the Audio Timeline. Drag the song left and right on the Audio Timeline to adjust when you want it to begin playing.You can use the arrow keys on the keyboard to nudge the song left or right by small increments. If you want your song to begin at a precise moment in your Video; pay attention to the Video Timer underneath your Video’s title to place it exactly where you want.Adding TextThe Text menu is a way for you to display a messageon-screen during your Video. Open the Text menu and then double click the Enter Text box. You can now enter your message and then adjust the Font, Size, Color, and Duration fields while the text area is active to customize the message. Then, like songs, you can drag your text onto the Text Timeline and manipulate it in the same way you do songs to have the text appear at a precise moment.Adding TransitionsWhen you open the Transitions menu, you see fouroptions represented by different icons; Cut, Fade In, Fade Out, and Fade In/Out. Cut is the default transition between all your Clips in a Video. A Fade In transition will fade the Clip in from a black screen, while a Fade Out will place a fade to black at the end of the Clip it’s assigned to. Fade In/Out means the two Clips joined by that Transition icon will have a fade to black between them. Drag your desired Transition icon to the transition space on the Clip where you want the transition to occur. Every Clip in the Storyboard has space to drag a Transition In and a Transition Out icon. The transitions will not show up until you render your Video.Previewing, Rendering and ExportingYou can Preview your entire Video from the Video Editor by pressing the Spacebar. During a preview, all the Clips in your Video will play out sequentially with loads between each Clip. If you’ve added music to your Video it will pause during the loads between Clips and resume at the correct time to stay in synch with the preview. To stop the preview and return to the Video Editor at any time hit the Esc button. To Pause a Clip during a preview and resume editing it, press the Spacebar. This will cancel the preview, and activate the Clip Editor for the current Clip. To preview the Video again, exit the Clip Editor by hitting the Esc key and restart the preview from the Video Editor.While in the Video Editor you can update the thumbnail image for your Video by pressing U on your keyboard when you have a Clip on your Storyboard selected. This will make the thumbnail for your Video match the thumbnail for that Clip. Your Video’s thumbnail is important because, along with your Video’s title, the thumbnail will help you recognize it in the Video Archives, the Gallery section and the Upload section. It’s also the image that will represent your Video if you decide to upload it to Rockstar Games Social Club TV. If you don’t update the Video’s thumbnail, it will be the first frame of your Video by default.Once you’re happy with your Video and you’ve chosen a name, finished your editing, and added any text, music or transitions you want—you can export it. Exporting Videos will automatically place them in your Gallery. There are three different resolutions at which you can render your Video: Web quality (for upload to Rockstar Games Social Club TV), 720p and 1080p. Your in-game resolution (which can be set in the “Graphics” section of the Pause menu) needs to be set to a value that meets or exceeds the resolution at which you want to export to Video. If you cannot export at a certain resolution, the button will be grayed out and unresponsive. Click any of the three export options and the Editor will begin to export to Video. A bar along the top of your screen represents the progress of the render. High resolution Videos take longer to render than low resolution ones.Gallery SectionWhen your Video has finished exporting, you can watchit in the viewer located in the Gallery section. TheGallery organizes and stores all of your rendered Videoschronologically, so your latest Video will be at the top ofthe list. From here, you can preview all of your Videos todetermine if they are ready to be uploaded to RockstarGames Social Club TV.Upload SectionWhen you open the Upload section, you’ll see all the Videos you’ve exported at Web quality on the left side of the screen and the Videos you’ve previously uploaded on the right. To upload a new Video, select it and click on the Upload button. You will be prompted to enter tags and a brief description of the Video. When the Video has finished uploading, you will see it in the menu on the right. When the Video has finished uploading you will see it in the menu on the right. You can return here to quickly check the number of views and the ratings your Videos are receiving on Social Club TV.Online SectionRemember to check Rockstar Games Social Club TV (/socialclub/tv) to compare your Videos with others from the community, rate and comment on Videos, and take part in contests. Click the Online Section if you want to open Social Club TV from the Video Editor.Tips•Remember that Clip capture is enabled by default in both single and multiplayer modes. In single player mode, as long as something is in range of your character, you’ll be able to create Clips based around that. It is sometimes beneficial to think of your character as a Cameraman.•Vehicles can be utilized to create long sweeping shots if you drive or fly, by the scene you wish to capture. In the Clip Editor, you’ll be able to create Linear or Blending movement shots with the Free Camera to exclude the vehicle you used to create the original Clip.•Multiplayer modes like Free Mode and Party Mode are a great place to assemble a group of friends or strangers to collaborate on a Video. Multiplayer characters will give you a wide range of actors and wardrobes for your Videos and the endless supply of vehicles, weapons and scenarios will allow you to create a Video in any genre you choose.ControlsKeyboard and MousePlay/Pause – SpaceBack – BRewind – Left ArrowFast Forward – Right ArrowFrame Advance – Up ArrowFrame Rewind – Down ArrowPlace Marker – MCycle to Left Marker – < or ,Cycle to Right Marker – > or .Delete Marker – DeleteDisplay Tools – THide Hud – HToggle Hotkeys – KSet Thumb – UToggle Time – CToggle Tool Tips – VSave – F6Target Camera:Rotate – Right Mouse button + MouseZoom – W / STilt – Q / EOffset – Mouse WheelAccelerate – Left ShiftFree Camera:Rotate – Right Mouse button + MouseMove – W / S / A / DTilt – Q / EHeight – Mouse WheelAccelerate – Left ShiftThe Video Editor has been designed for keyboard control. Please note that some controls will be limited with the controller. ControllerMouse – Right StickLeft Mouse button – LTRight Mouse button – RTFree and Target Cameras:Mouse – Right StickMovement – Left StickMouse Wheel – D-pad Up / Down。