Magic 3D Easy View 软件说明书
FreeStyler及Magic 3D使用的方法

D512 DMX512硬件如何应用FreeStyley软件控制电脑灯及Magic 3D EasyView在电脑中模拟3D效果的使用方法第一章:预备知识及背景电脑灯控制台应用PC 机(电脑)进行控制电脑灯的方案,早期最有名的莫不过于Martin 的控制台了,记得当时经典的Martin 3032 就是用PC 加块卡(接口是ISA 接口),进行控制电脑灯的,当时好像要几千块,当然现在还有改进和升级的用电脑加个USB 盒子的Martin LightJockey 也是系出同门。
其实,现在PC 加USB 盒电脑灯控制台的方案最有名的要数SUNLITE 了,现在大部分软件采用的3D 模拟软件Magic 3D EasyView 就是这家公司出品的,国内珠江的PR512好像也是这家公司的OEM 版,其他比如ACME 啊等等,好像也是。
SUNLITE 的网站是:/建议看看。
记得那是刚刚从学校出来,看到Martin 3032 用电脑控制电脑灯那个高科技哟,别提有多羡慕,但是看看那个卡,元器件不多,当时好想拥有这样的卡啊,于是乎就去模仿,可惜的是,当时的16V8 加密芯片我不懂,白白化了一千多元没有制作成功,后来广州番禺有人仿制出来了,为了生存,就没有再去搞这张卡了。
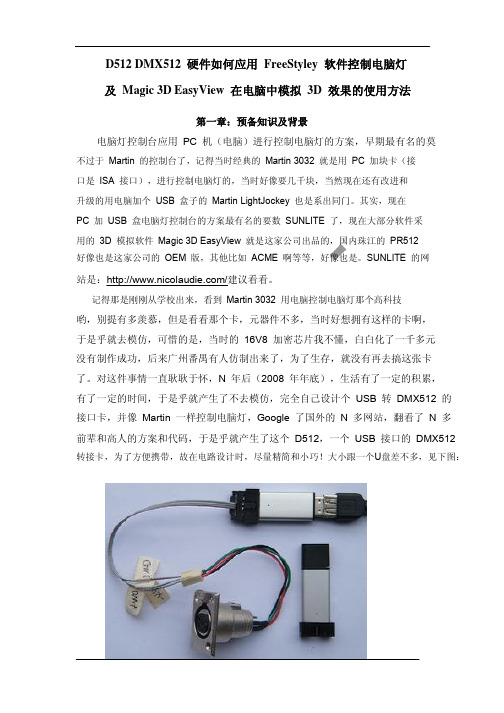
对这件事情一直耿耿于怀,N 年后(2008 年年底),生活有了一定的积累,有了一定的时间,于是乎就产生了不去模仿,完全自己设计个USB 转DMX512 的接口卡,并像Martin 一样控制电脑灯,Google 了国外的N 多网站,翻看了N 多前辈和高人的方案和代码,于是乎就产生了这个D512,一个USB 接口的DMX512 转接卡,为了方便携带,故在电路设计时,尽量精简和小巧!大小跟一个U盘差不多,见下图:为了试验这个D512,买了大量的贴片元器件放在家,为了平摊成本,故让LP 在淘宝上/item_detail.jhtml?item_id=366496e964ea5473e546ea4be25efa94&x_id=db2以白菜价出售,方便大家尝用。
KDView软件V2.0.1使用手册说明书

KDView软件V2.0.1 KDView软件V2.0.1用户手册广州市科缔智能科技有限公司二0二三年一月文件修改记录目录文件修改记录 (2)1.产品简介 (3)1.1产品概述 (3)1.2产品主要功能 (3)2.软件安装 (4)2.1运行环境要求 (4)2.2 获取软件 (4)3.软件操作说明 (5)3.1登录界面简介 (5)3.2 设备管理 (7)3.3 实时预览 (12)3.4 远程回放 (14)3.5 报警管理 (15)3.6 通用/功能设置 (17)3.7 图像浏览/分享 (19)3.8 个人中心 (21)3.9 注销登录 (22)3.10 语言切换 (22)1.产品简介1.1产品概述“KDView”监控软件为互联网时代最佳的手机视频监控解决方案,由前端采集设备、平台服务器和远程观看端三部分构成。
1.2产品主要功能主要功能:⚫注册登录、忘记密码⚫设备管理(添加、删除、修改、设置)⚫实时预览(对讲、转动摄像机、回放、报警信息)⚫远程回放(云存/SD卡)⚫报警管理⚫通用/功能设置⚫图像浏览和分享⚫个人中心(用户管理、系统设置、我的分享、关于)⚫注销登录⚫语言切换2.软件安装2.1运行环境要求苹果手机客户端要求ios9.0以上的系统;安卓手机客户端要求android 4.2及以上的系统。
2.2 获取软件苹果手机用户:在苹果应用市场(appstore)上搜索“KDView”安装。
安卓手机用户:在谷歌市场(google play)、应用宝、安卓市场等各大应用市场上搜索“KDView”安装。
3.软件操作说明3.1登录界面简介安装成功后,在程序列表点击KDView软件图标,软件就可以运行了。
启动程序进入登录界面,如图3.1a:⚫用户注册首次使用需要注册一个账号,该账户用于云存储我们的用户信息及相关设备列表,在登录菜单中,点击“注册账号”按钮,默认跳转到手机注册界面(如图3.1 b),点击右下角可切换到邮箱注册界面(图3.1 c),可点击左下角可切换回手机注册界面:图 3.1 b 图 3.1c⚫忘记密码在登录界面中,点击“忘记密码”按钮,跳转到“忘记密码”手机找回界面,可点击右下角的通过邮箱方式找回密码,可点击左下角可切换回手机找回密码界面。
3dMagics用户手册

3D Magics v3.02用户手册目录1配置环境 (3)4.1 配置规格表 (3)4.2 显视优化 (4)2安装和注册 (6)3模块说明 (7)4使用说明 (8)4.1 菜单 (8)4.1.1 文件 (8)4.1.2 工作台 (15)4.1.3 帮助 (15)4.2 模式栏 (17)4.2.1 加载模型/项目 (17)4.2.2 卸载模型 (17)4.2.3 模型基础信息 (18)4.2.4 修复模型 (19)4.2.5 生成支撑 (21)4.2.6 卸载项目(模型) (23)4.3 工具栏 (24)4.3.1 模型运动控制 (24)4.3.2 视图缩放分栏 (24)4.3.3 视图选择分栏 (25)4.3.4 平台移动工具分栏 (25)4.3.5 测量工具分栏 (26)4.4 信息栏 (27)4.4.1 零件概况及自动排列 (27)4.4.2 移动、旋转 (27)4.4.3 指定顶面/底面 (28)4.5 支撑参数详解 (29)4.5.1 公共 (29)4.5.2 基础支撑 (31)4.5.3 支架支撑 (32)4.5.4 点支撑 (33)4.5.5 辅助支撑 (34)1配置环境4.1 配置规格表4.2 显视优化3dMagics在三维视觉方面进行了大量的研究与优化,因此在其运行时要求有高质量的显卡性能。
但与部分显卡处于“节能”或“性能(运行速度)优先”的电脑,请将显卡设置为“质量优先”或“高质量”。
图 1部分电脑上正常零件上出现红色的错误提示这里以Windows7/8系统下NVIDIA显卡为例,对电脑显卡进行设置。
1.鼠标右击桌面,或者打开控制面板(查看方式为:大图标/ 小图标),打开NVIDIA 控制面板。
(如图2、图3所示)2.在“3D设置”下选择“通过预览调整图像设置”,点击选择“使用我的有线选择”并将滑块指针移动到“质量”一侧。
(部分机器选择“由3D应用程序决定”亦可)点击“应用”(如图4、图5所示)3.重启电脑。
O R A C L E Smart View用户手册说明书

F U S I O N E D I T I O NR E L E A S E11.1.2C ONTENTS I N B RIEFOverview (2)Smart View Panel (2)Context-Sensitive Ribbons (2)Integration with Outlook (3)Redesigned Options Dialog Box (3)Planning Features (4)Financial Management Features (5)Smart View and Disclosure Management Integration (5)New VBA Functions (5)EPM System New Features (6)OverviewThis document describes the new features introduced in Oracle Hyperion Smart View for Office, Fusion Edition Release 11.1.2.It is our goal to make Oracle products, services, and supporting documentation accessible to the disabled community. Smart View Release 11.1.2 supports accessibility features, which are described in Appendix A of the Smart View for Office User's Guide.Smart View PanelFrom the Smart View Panel, you can manage data source connections, access data and task lists, create reports, and open Oracle Crystal Ball Enterprise Performance Management, Fusion Edition workbooks if you are licensed for Crystal Ball EPM.The Smart View Panel, opened from the Smart View ribbon, is displayed by default on the right side of the Microsoft Office application. You can move, re-size, or close the Smart View Panel from the down arrow in the title bar.The Smart View Panel contains the following panes:l Home: A panel that displays links to shared connections and private connections as well asa list of recently used items - ad hoc grids, data forms, and tasks - which you can click toestablish a connection.l Shared Connections: A drop-down menu of available connections from Oracle's Hyperion®Shared Services and a tree view of the contents of the currently selected connection.l Private Connections: A drop-down menu of available connections saved on the local computer and a tree view of the contents of the currently selected connection. You can also enter a URL to connect directly to a data source here.l Task Lists: A tree list of tasks from which you can manage your tasks. This pane opens only when you select a task list from shared connections or private connections.l Simulation Workbook: (only if you are licensed for Crystal Ball EPM) A tree list of available Oracle Crystal Ball Enterprise Performance Management, Fusion Edition workbooks that you can open in Smart View.l Action Panel: A list of operations available based on the selection in the shared connection.private connection, or task list tree list.Context-Sensitive RibbonsSmart View operations in Microsoft Office applications are available through ribbon commands. The Smart View ribbon, which contains commands for common Smart View operations, is always present. When you connect to a data source (other than Oracle's Hyperion Reporting and Analysis), the corresponding data source ribbon is also displayed. For Oracle Hyperion Planning, Fusion Edition, Oracle Hyperion Financial Management, Fusion Edition, and Oracle's Hyperion® Enterprise®, when you enter ad hoc analysis, the data source ribbon is automatically 2New Featuresreplaced by its ad hoc version. Each ribbon displays only the commands permitted for that datasource, mode, and Office application.These are the new ribbons:l Smart Viewl Essbasel Planningl Planning Ad Hocl HFM (Financial Management )l HFM Ad Hocl Enterprise (Oracle's Hyperion® Enterprise®)l Enterprise Ad Hocl OBIEE (Oracle Business Intelligence Enterprise Edition)Note:Microsoft Office 2003 users can still access Smart View operations via menus.Integration with OutlookPlanning and Financial Management task lists are now integrated into Outlook, so users canintegrate their tasks into Outlook tasks and perform these tasks from within Outlook. Data formtasks are seamlessly launched from Outlook into the familiar Excel interface.Redesigned Options Dialog BoxThe Smart View Options dialog box has been redesigned to make options more easily accessible.Options are organized into categories to provide better user experience and accommodateprovider-specific options. Like other components of Smart View in this release, options areavailable to users only if they are supported by the currently connected data source.The following new options are available from the Options dialog box:l Change the language in which Smart View is displayed without having to re-install Smart Viewl In shortcut menus, choose whether to display Smart View and Microsoft items or only Smart View itemsl Reset all options to default setting with a click of the Reset buttonNew Features3Figure 1 Options Dialog BoxPlanning FeaturesThis release of Smart View supports a greatly expanded set of Planning functionality.l Planning task lists are now integrated into Outlook, so planners can integrate their tasks into Outlook tasks, and can perform these tasks from within Outlook. Planning data form tasks are seamlessly launched from Outlook into the familiar Excel interfacel Planning task lists are available in Office, including task status and task reports; users can perform tasks in Excel, and have them automatically synchronized with the Webl All process management end-user functionality can be accessed from Outlook and Excel l Data validation, including validation indicators and messagesl The ability to monitor the status of Planning jobs in the Job Consolel Composite data forms in Microsoft Office with shared dimensions that are automatically synchronized across multiple data formsl Mass Allocate and Grid Spread for spreading valuesl Copy data across versions for scenario-entity combinationsl Dynamic user variables that allow end users to select and change user variable values directly in data formsl Custom right-click menus for data and metadatal Member formula display4New Featuresl Setting Planning user preferences within Smart Viewl Data forms enabled for ad hoc allow users to slice data and save a slice to create reports or share with other usersFor information about Planning, see the Oracle Hyperion Planning New Features and OracleHyperion Planning User's Guide.Financial Management FeaturesIn this release, Smart Slices are available toFinancial Management users who connect to SmartView. Using Smart Slices, Financial Management users can create and save reports from theReport Designer and cascade reports across a selected dimension.Smart View and Disclosure Management IntegrationCustomers who use Smart View in Excel or Word to assemble financial reports can also useOracle Hyperion Disclosure Management, which allows you to assemble a reporting packagefor submission to a regulatory agency that includes financial statements, as well as supportingschedules and commentary which may exist in Excel, Word, or an Oracle Hyperion FinancialReporting, Fusion Edition report.The first release of Oracle Hyperion Disclosure Management offers a complete XBRL creationand management solution with Enterprise level XBRL mapping; XBRL Taxonomy management,editing and viewing; and Instance document creation, validation and viewing. While viewingSmart View queries in Word or Excel, users can perform data source level mapping with theXBRL Taxonomy Mapping Tool, that allows for re-usable taxonomy element mapping withinOracle Hyperion Financial Management, Fusion Edition, Oracle Hyperion Planning, FusionEdition, and Oracle Essbase.New VBA FunctionsThis release features the following new VBA functions.l HypFindMemberEx retrieves member information like dimension, alias, generation and level names.l HypSetAsDefault creates a connection default.l HypOpenForm opens a data form.l HypSetPages sets page members for the selected sheet.l HypGetPagePOVChoices returns the available member names and member description fora given dimension.l HypDeleteMetaData deletes Oracle Hyperion Smart View for Office, Fusion Edition metadata from the workbook.New Features5l HypGetSharedConnectionsURL returns the Shared Connections URL to be used (also shown in the Options dialog box).l HypSetSharedConnectionsURL sets the Shared Connections URL in the config file and Options dialog box.l HypIsConnectedToSharedConnections checks whether SmartView is connected to Shared Connections.EPM System New Featuresl Most Oracle Hyperion Enterprise Performance Management System products have adopted Oracle Diagnostic Logging (ODL) as the logging mechanism. The ODL framework provides uniform support for managing log files, including log file rotation, maximum log file size, and the maximum log directory size. For more information, see the “Using EPM System Logs” chapter of the Oracle Hyperion Enterprise Performance Management System Installation and Configuration Troubleshooting Guide.l Oracle Configuration Manager (OCM) integrates with My Oracle Support and provides configuration information for Oracle software. It assists in the troubleshooting,maintenance, and diagnostics of your EPM System deployment. For more information about Oracle Configuration Manager see the Oracle Hyperion Enterprise PerformanceManagement System Installation and Configuration Guide.l With this release, many EPM System products support hostnames that resolve to IPv6 addresses. See the Oracle Hyperion Enterprise Performance Management System Certification Matrix. IPv4 support (both hostname and IP address) remains unchanged from earlier releases.l Oracle Hyperion Enterprise Performance Management System supports the following types of SSL configurations:m Full SSL Deployment (including data access)m SSL Terminating at the Web Serverm SSL Accelerators (Off-loading)m Two-way SSLFor more information on the SSL configurations, see the Oracle Hyperion EnterprisePerformance Management System Security Administration Guide.6New FeaturesNew Features7COPYRIGHT NOTICESmart View New Features, 11.1.2Copyright © 2004, 2010, Oracle and/or its affiliates. All rights reserved.Authors: EPM Information Development TeamThis software and related documentation are provided under a license agreement containing restrictions on use and disclosure and are protected by intellectual property laws. Except as expressly permitted in your license agreement or allowed by law, you may not use, copy, reproduce, translate, broadcast, modify, license, transmit, distribute, exhibit, perform, publish, or display any part, in any form, or by any means. Reverse engineering, disassembly, or decompilation of this software, unless required by law for interoperability, is prohibited. The information contained herein is subject to change without notice and is not warranted to be error-free. If you find any errors, please report them to us in writing.If this software or related documentation is delivered to the U.S. Government or anyone licensing it on behalf of the U.S. Government, the following notice is applicable:U.S. GOVERNMENT RIGHTS:Programs, software, databases, and related documentation and technical data delivered to U.S. Government customers are "commercial computer software" or "commercial technical data" pursuant to the applicable Federal Acquisition Regulation and agency-specific supplemental regulations. As such, the use, duplication, disclosure, modification, and adaptation shall be subject to the restrictions and license terms set forth in the applicable Government contract, and, to the extent applicable by the terms of the Government contract, the additional rights set forth in FAR 52.227-19, Commercial Computer Software License (December 2007). Oracle USA, Inc., 500 Oracle Parkway, Redwood City, CA 94065.This software is developed for general use in a variety of information management applications. It is not developed or intended for use in any inherently dangerous applications, including applications which may create a risk of personal injury. If you use this software in dangerous applications, then you shall be responsible to take all appropriate fail-safe, backup, redundancy, and other measures to ensure the safe use of this software. Oracle Corporation and its affiliates disclaim any liability for any damages caused by use of this software in dangerous applications.Oracle is a registered trademark of Oracle Corporation and/or its affiliates. Other names may be trademarks of their respective owners.This software and documentation may provide access to or information on content, products, and services from third parties. Oracle Corporation and its affiliates are not responsible for and expressly disclaim all warranties of any kind with respect to third-party content, products, and services. Oracle Corporation and its affiliates will not be responsible for any loss, costs, or damages incurred due to your access to or use of third-party content, products, or services.。
3DViewer软件操作手册

3DViewer软件操作手册3DViewer6软件操作手册1、双击打开3DViewer6文件夹中的可执行文件,打开的界面如下图:图1 3Dviewer初始界面2、依次点击菜单栏中的:文件—>打开DEM数据—>打开DEM 文件,这样就打开一个弹出窗口,选择路径,路径为解压文件存放的路径,选择该文件下的文件,如下图所示:图2 打开dem路径图 3 选择dem路径场景示意图如下:图 4 打开dem后的场景3、点击菜单栏中的:文件—>打开DOM数据—>打开DOM文件,这样就打开一个弹出窗口,打开文件。
场景示意图如下:图 5 打开dom操作图 6 选择dom路径图7 打开dom后的场景3、点击菜单栏中的:文件—>打开模型数据—>打开三维工作区文件,这样就打开一个如下图的弹出窗口。
图8 打开三维场景图9 打开工作区路径打开上图中选中的,打开该文件夹中文件。
5、点击菜单栏中的:参数设置—>模型显示方式—>景观图。
图10 点击景观图点击软件左边树状图中的左边的,请稍等,现在场景在加载数据,大概几十秒后,数据加载完毕,具体时间视电脑配置情况,场景示意图如下:图11 打工作区后的场景6、场景操作如下:从左到右依次为:放大操作、拉框放大操作、缩小操作、旋转操作、移动操作(另外也可以滚动鼠标中键进行放大或者缩小操作)。
注意:若是机器上装有,可以通过以下操作提高3DVIEWER的浏览与操作速:1、将C:\ 文件做如下修改:[boot loader]timeout=30default=multi(0)disk(0)rdisk(0)partition(2)\WINDOWS[operating systems]multi(0)disk(0)rdisk(0)partition(2)\WINDOWS="Microsoft Windows XP Professional" /3GB2、若的安装目录为D:\Program Files\Microsoft Visual Studio 8 ,则目录下D:\Program Files\Microsoft Visual Studio 8\VC\bin找到editbin 这个可执行文件,然后进行以下操作①点击电脑的,在弹出的面板上点击②在点击“运行”后,会弹出的面板如下图左,输入“cmd”③上一步操作后会弹出则输入“cd D:\Program Files\Microsoft Visual Studio 8\VC\bin”,如下图④然后输入editbin /LARGEADDRESSAWARE 这里的需要输入的是你的3DViewer程序的路径名加文件名。
EASY 3D手册

Easy 3D 使用手册目 录1. 简介 (3)2. 安装 (3)3. Easy3D指南 (4)3.1 任务 (4)3.2 处理和创建3D物体 (6)4.主菜单 (10)4.1 文件 (10)4.2 视图-工具 (10)4.3 任务 (15)4.4 报告 (15)4.5 滤波 (16)4.6 选项 (16)1. 简介EASY 3D是WINDOWS下的雷达数据成图软件,由MALA公司研制。
EASY 3D采用一系列由RAMAC雷达采集的剖面进行成图。
EASY 3D包括数据视图,数据滤波,断面或时间切片自动回放,缩放功能,它有报告编辑器用来将物体插入3D立方体中作为辅助解释工具。
它可以将直线,曲线,双曲线,圆形和3D物体插入3D雷达剖面中,用来表示确定的物体及埋藏体等。
雷达剖面将物体和层加到立方体中产生地下的3维图像EASY 3D软件给雷达用户一个快速简单的方法在3维空间中观看数据。
因此它对计算机的配置要求不高,实际上它可以让用户在采集完数据后直接将剖面放到3D软件中。
由于多数用户用笔记本采集数据,而笔记本通常速度太慢,因此我们建议计算机配置应达到:WIN95,98,2000或NT300MHz奔腾II处理器128MB内存2. 安装安装软件:a) 运行“Easy_3D_Setup.exe”文件来安装软件b) 安装时输入名称,单位和产品密码。
你可以在CD盘上和手册中发现密码。
3. Easy3D指南EASY 3D指南可以指导你产生3D任务和观看地下水管。
开始运行程序时可以在屏幕上看到:1.不同视图的主屏幕(主屏幕,前面,侧面,顶部和布局)(第4.2.8到4.2.12)2.任务管理器,产生剖面信息,物体(报告)和滤波(第4.2.4)3.特性编辑器,用于改变不同特性设置(第4.2.5)4.主菜单(第4章)5.工具条(第4.2.1)6.报告条(第4.2.3)7.状态条,剖面和X、Y坐标的信息等(第4.2.2)用于任务管理器的工具也可在主菜单中找到。
magicstudio软件操作指南

magicstudio软件操作指南Geomagic studio软件操作指南⽬录AA004XNCEY软件介绍 (1)1.1 Geomagic公司及其主要产品 (1)1.2 Geomagic Studio软件的使⽤范围 (1)1.3 Geomagic Studio软件的主要功能 (1)1.4 Geomagic Studio软件的优势 (1)1.5 计算机要求 (2)2. 软件安装 (3)3. 软件功能介绍 (10)3.1 Geomagic studio软件及流程简介 (10)3.2 Geomagic Studio 中⿏标控制和主要快捷键 (11)3.3 Geomagic Studio 软件的基本模块 (11)4.点阶段 (15)4.1 点阶段主要操作命令列表 (15)4.2 实验 (15)5.多边形阶段 (25)5.1多边形阶段主要操作命令列表 (25)5.2实验 (26)(26)5.2.2 实验⼆:建筑物单⾯墙体建模 (39)6.精确曲⾯阶段 (46)6.1 精确曲⾯阶段主要命令列表 (46)6.2 实验 (47)1软件介绍1.1 Geomagic公司及其主要产品Geomagic是⼀家世界级的软件及服务公司,在众多⼯业领域如汽车、航空、医疗设备和消费产品得到⼴泛应⽤。
公司旗下主要产品为Geomagic Studio、Geomagic Qualify和Geomagic Piano。
其中Geomagic Studio是被⼴泛应⽤的逆向⼯程软件,可以帮助⽤户从点云数据中创建优化的多边形⽹格、表⾯或CAD模型。
Geomagic Qualify 则建⽴了CAD和CAM 之间所缺乏的重要联系纽带,允许在CAD 模型与实际构造部件之间进⾏快速、明了的图形⽐较,并可⾃动⽣成报告;⽽Geomagic?Piano是专门针对⽛科应⽤的逆向软件。
本项⽬所使⽤的主要是Geomagic Studio软件。
1.2 Geomagic Studio软件的使⽤范围:(1)零部件的设计;(2)⽂物及艺术品的修复;(3)⼈体⾻骼及义肢的制造;(4)特种设备的制造;(5)体积及⾯积的计算,特别是不规则物体。
Magics使用说明书

1 配置环境
4.1 配置规格表
输入接口格式 INTERFACE OF INPUT
标准接口格式
STL 文件(*.stl)
支持接口格式
STEP 文件(*.stp/step) IGES 文件(*.igs/iges)
2 安装和注册 .............................................................................................................6 3 模块说明.................................................................................................................7 4 使用说明.................................................................................................................8
4.5 支撑参数详解........................................................................................................................ 29
4.5.1 公共............................................................................................................................. 29 4.5.2 基础支撑 ................................................................................................................................................ 31 4.5.3 支架支撑 ................................................................................................................................................ 32 4.5.4 点支撑 .................................................................................................................................................... 33 4.5.5 辅助支撑 ................................................................................................................................................ 34
- 1、下载文档前请自行甄别文档内容的完整性,平台不提供额外的编辑、内容补充、找答案等附加服务。
- 2、"仅部分预览"的文档,不可在线预览部分如存在完整性等问题,可反馈申请退款(可完整预览的文档不适用该条件!)。
- 3、如文档侵犯您的权益,请联系客服反馈,我们会尽快为您处理(人工客服工作时间:9:00-18:30)。
舞台显示选项 ... 分辨率 ... 摄影机 视角... DMX 值 通过打开“标准”工具栏中的窗口,可以显示 4 个域中的不同的 DMX 值。 接驳 DMX 域 如果不与其它的软件一起使用,3D 视窗可以通过 Art-Net... 录制电影 ...
个人视角 除了默认的视角之外,您可以在“摄影机”菜单栏中选择"保存"选项来存储多达 4 个不同的摄影机位置。那么当前视角(定位与定向)会被 保留。 可以从菜单或者用键盘 6 到 9 数字健来重新使用这些视角。 自动旋转 可以在“摄影机”菜单栏中选择自动旋转或使用数字健 0 来激活照相机的自动旋转功能。 屏幕捕捉功能 "屏幕捕捉"功能可以实现舞台场景拍照,并且将之存储在一个 BMP 文件里。 您可以通过激活“摄影机”菜单中选项来实现这一点。
您可以加入道具来设计个性化舞台场景,比如:从我们的物料库中或是从其他的 CAD 软件中导入各种支撑架、舞台器具等等。只需稍 稍练习,您就可以设造一个逼真的舞台和场地。
注意:要得到精确的 3D 显示效果,必须细心建立舞台灯的资料库。
3D 效果软件有不同模式,每个模式都可以通过不同的资源(软件、控制台、网络等等)接收 DMX 信号。软件还可以同时显示 4 个 DMX 域。
2D 平面图 视窗的安排... 舞台场景的颜色及尺寸 ... 添加物体 ... 添加灯具 ... 简单物体编辑器 ... 物体的设置 ... 层 ...
Magic 3D Easy View 软件
2D 平面图
2D Байду номын сангаас面图
视窗的安排 就像我们所看到的那样,构造模式的视窗是由三个分开的部分组成:一个舞台的 3D 视觉效果窗口、以及一个物体属性窗口和 2D 平面 图。
序言 第一步
o 3D 舞台 o 您的第一个舞台场景 用户模式 o 舞台显示选项 o 分辨率 o 摄影机 o DMX 值 o 接驳 DMX 域 o 录制电影
构造模式 o 2D 平面图 o 舞台场景的颜色及尺寸 o 添加物体 o 添加灯具 o 简单物体编辑器 o 物体的设置 o层
附录 o 菜单 o 工具栏 o 快捷键 o 故障解决方法
3D 舞台
3D 舞台
您所创建的 3D 舞台将会以*.evs 格式的文件被存储起来,并且您可以任意打开、修改及再存储这些文件。您对舞台进行的所有设置, 包括尺寸、颜色、花纹以及您所加入的各种灯光、道具和人物都会被保存在文件之中。
您同样可以在“舞台”的菜单栏中选择“导入/导出”选项,来将 3D 舞台导入到一个压缩文件中/将 3D 舞台从一个压缩文件中导出。我 们也可以存储一个舞台和它所需要的所有文件(比如背景图案的 X 文件或 bmp 文件、jpg 文件等等),并可以将它们在另一台没有这 些文件的电脑上重新打开。
设置格子选项
Magic 3D Easy View 软件
舞台场景的颜色及尺寸
舞台场景的颜色及尺寸
可以在下面的窗口(在“菜单”栏中或工具栏中)设定舞台场景的颜色和尺寸(长、宽、高)。 颜色和图案 首先您得选择给哪面墙设置颜色,或给整个舞台设置成单一颜色。要改变颜色,您不能选择“默认”栏,然后在下面的窗口中选择您所希 望的颜色。
Magic 3D Easy View 软件
DMX 值
DMX 值
通过打开“标准”工具栏中的窗口,可以显示 4 个域中的不同的 DMX 值。
Magic 3D Easy View 软件
接驳 DMX 域
接驳 DMX 域
如果不与其它的软件一起使用,3D 视窗可以通过 Art-Net 等不同的协议接收多达 4 个 DMX 域。 用户必须在下面的窗口里指明每个 域的正确输入口(在标准工具栏中找到这个窗口)。
Magic 3D Easy View 软件
第一步
第一步
这一部分介绍了简单使用 3D 视窗的基本步骤。 它包括一个用来存储节目程序的描述文件和如何创造一个 3D 舞台场景的第一步。
3D 舞台 您所创建的 3D 舞台将会以*.evs... 您的第一个舞台场景 Magic 3D Easy View 软件
当 3D 软件被别的软件所控制时,它可以直接接收插入/修改的的设备的地址。有两种模式: - 自动模式:自动插入控制器路径下的所有设备,并删除控制器中没有的但保存在 3D 软件里的当前设备 - 手动模式:可以载入任何一个来自于/不来自于控制器的设备 (若干灯具可以被连接到同一个 DMX 地址)。
如果在"手动" 模式下使用这个窗口会导致丢失所做的修改,所以最好在“自动”模式下使用。左边的列表显示从控制器上收到的灯光设备 的信息。"橙色"的灯光设备是那些已经存在控制器里并且其地址也存在在 3D 软件中的灯光设备。"蓝色"的表示其地址存在在 3D 软件 中但却不存在在控制器里的那些灯光设备。用户能选择哪些灯光设备要被插入而哪些不被插入。点击" Patch " 来插入那些选中的灯光 设备。
分辨率
分辨率
您可以在 5 个不同的分辨率中选择一个来显示 3D 图,当然分辨率还取决于您电脑的显示卡的质量。这个操作可以让软件与您的显卡的 性能相适配。如果显示的频率太慢,您就要选择一个较低级的显示模式。
Magic 3D Easy View 软件
摄影机
摄影机
视角 如果“摄影机”菜单栏中的“移动”选项被选中(在"选择"菜单查看按钮任务),您就可以用鼠标来移动照相机。 可以从菜单栏或是从工具栏 中选择不同的视角(正面、侧面等等)。当然您也可以在“摄影机”菜单栏中或是使用键盘 1 到 5 数字健选择视角。
-插入的物体将置于舞台的中心。您可以使用鼠标来移动加入的物体。 而且, 使用物体编辑工具(绿色箭头),您可以在清单里改变选中 的物体的位置、方向、尺寸等等。这些工具会在手册的后面部分详细解释。 -重复这些步骤来添加更多的物体。
Magic 3D Easy View 软件
用户模式
用户模式
软件有两个模式:用户模式和构造模式。用户模式用于清楚呈现舞台场景,所有修改场景的功能都不能生效。这一部分介绍了所有的有 关于可视化的特点,尽管在其他的模式下也具有很多相同的特点。
Magic 3D Easy View 软件
录制电影
录制电影
从“摄像机”菜单或从工具栏中选择“录制电影”工具,我们就可以实现录制录像功能。 第一个功能表可以指定在哪几个不同的点设置摄像机以及等待时间和渐变时间。点击播放按钮,您可以预览电影效果(可选择是否重复 播放)。 在开始录制之前,要设定目标文件及压缩质量。之后,然后只要点击录制按钮就可以开始录制了。 摄像机的位置也会保存在舞台文件中。通过点击“新建”按钮,我们可以重设这些位置。通过选择声音选项,我们也可以在录像中添加声 音。在录制录像时,添加的声音要在 Windows 媒体播放器中播放。您需要确定 Windows 录制操作设置正确。
Magic 3D Easy View 软件
您的第一个舞台场景
您的第一个舞台场景
下面这部分阐述了如何创建第一个舞台的步骤,并向您介绍了 3D 软件的基本功能。还包括了对用来保存各种灯光工程的文件的描述。 您的第一个舞台场景 1.在“舞台”的菜单中选择“新舞台”
2. 在“舞台”菜单栏中,选择“舞台设置”,将会跳出一个“舞台设置”窗口。在这个窗口中,您可以通过下拉菜单来设置和修改地板、天花 板、四周的墙壁的颜色、尺寸和背景图案。注意您可以使用一些选项选择某个墙,显示或隐藏墙,在 X、Y 轴重复图案,转换成公制或 英式单位。
如果您希望在各面墙上显示不同的图案,您就不能选择“不要图案”选项。然后通过"..."键选择一张图案(BMP 格式或 JPG 模式)。使用 “图案重复(X 轴和 Y 轴)”控制键,可以让图案在水平方向或垂直方向重复。 测量单元 测量单元可以为米或英尺,您在选择的单位前画上记号。
Magic 3D Easy View 软件
第二个功能表可以显示已录制的录像,或者跟踪鼠标的移动来录制录像。 “播放”键可以开始播放选的录像。
Magic 3D Easy View 软件
构造模式
构造模式
这一章介绍软件的第二种功能模式,舞台结构模式。它是专门用于显示您所设计的舞台的结构图。在这个模式下,荧屏被分成几个部分: 一个舞台的 3D 视觉效果窗口、以及一个物体属性窗口和 2D 平面图。 在“舞台结构”的模式中,荧屏的左上角始终显示 3D 效果图。您可以在显示菜单栏中选择适当的选项,来按照您的意愿来隐藏或重新设 置其它的三个部分。
Magic 3D Easy View 软件
舞台显示选项
舞台显示选项
有几个操作可以修改您的舞台及其透视图,这些操作都位于“选项”菜单中 氛围灯光
您可以通过位于“选项工具栏”中的光量调节器来修改氛围灯光的强度(“视觉”菜单,“工具栏操作”)
光束强度
您可以在您的舞台设计中改变光束强度。要实现这一点,您必须进入到“光束”菜单中,然后选择“增加”或“减小”("选项"菜单)。您也可 以在“工具栏操作”中或用键盘的向左向右箭头来调整修改它的强度。
如果连接了一个软件控制器,软件就会自动地在 3D 软件中创建灯具地址,否则就需手动创建地址。所有 DMX 域都遵循相同的规则。 另外,您也可以在软件中划分 DMX 域,比如域 1 连接到 USB/DMX-IN 接口,而域 2 连接到 Art-Net 协议中。
3D 软件中的 DEMO 模式可以让用户用最少的操作创建舞台场景。但是不可以用这个模式将 DMX 信号连接到 3D 软件中
Magic 3D Easy View 软件
序言
序言
我们的视觉效果软件可以为您设计的舞台场景提供 3D 立体效果图。通过它,您可以预览机械灯具或智能灯具(iris 灯、strobe 灯等各 种舞台灯)所拥有的功能,比如:灯光的运动、颜色和其他效果。传统的灯具,包括 PAR 灯的效果也可以在软件中显示。
