EPSON 打印机安装指南
Epson LW-1000P 打印机安装说明书
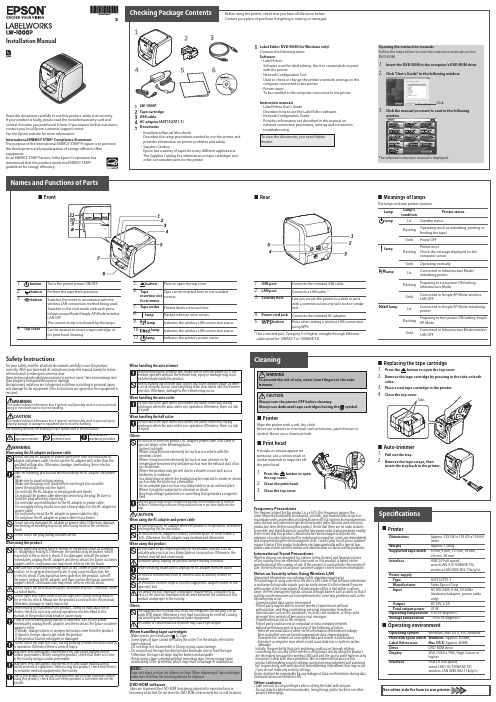
Click "User's Guide" in the following window.Click the manual you want to read in the following window.The selected instruction manual is displayed.For your safety, read the attached documents carefully to use this productcorrectly. After you have read all instructions, keep this manual handy for future reference and to make your concerns clear.Items below indicate safety precautions to protect users, their surroundings and their property from possible injury or damage.Precautionary notations are categorised as follows according to personal injury and damage to the equipment if the instructions are ignored or the equipment is WARNINGWhen handling the auto cutterWhen using the AC adapter and power cableDo not unplug the AC adapter while the product is in operation, otherwise printing may not be successful.Do not use the AC adapter in a small, confined space, or cover it with a cloth. Otherwise, the AC adapter may overheat and deteriorate.When handling tape cartridges• Make sure to use a dedicated LC Tape.• Some types of tape cannot be cut by the cutter. For the details, refer to the tape's manual.• Do not drop it or disassemble it. Doing so may cause damage.• Do not pull out the tape forcibly by hand. But make sure to feed the tape. Otherwise, the tape cartridge may be broken and unusable.• Avoid using a tape cartridge without remaining tape. Doing so may cause overheating of the printhead, which may result in damage or malfunction.DVD-ROM softwareTake care to prevent the DVD-ROM from being subjected to excessive force orbecoming scratched. Do not store the DVD-ROM in excessively hot or cold locations.Safety InstructionsFrequency PrecautionsThe frequency band for this product is 2.4 GHz. This frequency range is thesame frequency bandwidth as industrial, scientific, and medical devices such as microwave ovens and mobile unit identification (RF-ID) systems (licensed premises radio stations and unlicensed specified low-power radio stations) used in factory production lines. Before using this product, check that there are no radio stations for mobile unit identification or specified low-power radio station premises nearby. In the event that this product should interfere electromagnetically with thepremises of a radio station used for mobile unit recognition, cease use immediately and stop generating the electromagnetic field. Contact your local Epson customer support center if this product interferes electromagnetically with a special low-power radio station used for mobile unit identification or causes similar problems.International Travel PrecautionsWireless devices are designed to conform to the channel and frequency limits of the country they are intended to be used in. This product is based on thespecifications of the country of sale. If this product is used outside the country of sale, check with your local Epson customer support center for more information.Notes on Security when Using Wireless LAN(Important information on customer rights (maintaining privacy))The advantage of using a wireless LAN over a LAN cable is that, because information is exchanged using radio signals, you can easily connect to the network if you are within range of the radio signals. A disadvantage of this is that within a certainrange, the electromagnetic signals can pass through barriers such as walls, so that if security countermeasures are not implemented in some way, problems such as the following may occur.• Communicated data can be interceptedA third party may be able to receive wireless transmissions without authorization, and they could obtain personal information from thesetransmissions such as IDs, passwords, or credit card numbers, or they could intercept the contents of personal e-mail messages.• Unauthorized access to the networkA third party could access an individual or intra-company network without permission and carry out any of the following activities.- Retrieve personal data or other secret information (information leakage)- Pose as another user and send inappropriate data (impersonation)- Overwrite the contents of intercepted data and resend it (falsification)- Introduce a computer virus which could cause data loss or system crashes (damage)Initially, the possibility that such problems could occur through settingsconcerning the security of the wireless LAN product and by using the product are decreased, because the wireless LAN card and the access point have security measures to deal with these problems. We recommend that you use thisproduct after making security settings using your own judgment and assuming full responsibility, and with your full understanding of problems that may occur if you do not make any security settings.Epson shall not be responsible for any leakage of data or information during data communication over wireless LAN.Other cautions• Take care not to cut your fingers when cutting the label with scissors.• Do not attach a label on human bodies, living things, public facilities ore other people’s belongings.1.Peel off the backing paper.Backing paperInstall the printer driver after installing the Label Editor software.Install the software after making the printer and access point network settings.1. Specifying the network connection method2. Printer and access point operations3. Software installation1. Installing the "Label Editor" software in the computer2. Installing the printer driverCAUTIONAlways perform the tape feed operation after inserting a tape cartridge in the printer.1.Remove any slack in the tape inside the tape cartridge.Use a pen or a pencil.2.Press thebutton to open the top cover.CAUTIONAlways use the AC adapter provided.1.Connect the AC adapterprovided (AST1527Z1-1) to the printer, and plug the power plug into a power outlet.Use the label editing software "Label Editor" to create labels.See the Label Editor User's Guide for the detailed procedures.s Label Editor User’s GuideMEMOEpson has a variety of custom tapes available for many different applications.For more information, see the Supplies Catalog provided with the printer. s Supplies CatalogMEMOIf you set the tape cutting method to "Half cut", only the label surface is cut when several labels are printed consecutively, making it easier to peel off the labels.See the Label Editor User's Guide for the detailed procedures.s Label Editor User’s GuideCutting rounded label cornersYou can use the auto-trimmer to round off label corners.1. Insert the tape in the tapeinsertion slot, following the guide.The tape is cut to form rounded label corners.2.Attach the label and rub it firmly.Printer SetupCan the computer to be connected to the printer be connected to the Internet?Does the computer have a wireless LAN function?Is there a broadband router or access point, and is a wireless LAN function supported?Connect theprinter with a USB cable.Printer'sbutton does not light.Check that the power cable is properly connected. If the button still does not light, contact your place of purchase or the Epson customer support center.Printer does not print when print operation is directed.• If a message is displayed on your computer screen, check the message information.• Check that connection cables are connected properly, that the tape cartridge is mounted properly, and that the cover is closed properly.• Have you selected the printer to be used? Printing will not be done properly if another printer is selected.• Did you restart the computer after installing the printer driver? The printer driver may not be installed correctly if the computer was not restarted. Reinstall the printer driver.Text is not printed properly.• Check that the tape cartridge is properly mounted.• Print at a low speed. Change the setting in the printer settings of the printer driver.Lines appear on printed labels.The print head is dirty. Clean the print head.Canceling a print jobCheck the printer's power in ON, then press the button on the front of the printer briefly once.Labels are not cut automatically• Check if the cut setting is set to “Don’t cut” in the printer settings of the Label Editor software. s Label Editor User’s Guide• Is the cutter blade worn? Prolonged use of the cutter can wear down and blunt the blade. Contact the Epson customer support center.Half cut function doesn't work properly.• Is the printer set to "Half cut" or "Don't cut"? Check the settings.• Is the cutter blade worn? Prolonged use of the cutter can wear down and blunt the blade. Contact the Epson customer support center.Trimmer doesn't cut properly.• Is the printer printing? The trimmer doesn't operate during printing.• Was the label inserted properly in the trimmer tape insertion slot? Insert the label into the slot following the guide.• Is the printer clogged with tape scraps? Remove the trimmer cover, and remove the tape scraps.• Are you using 6 millimeter-wide tape? You cannot cut 6 millimeter-wide tape with the trimmer.• Is the cutter blade worn? Prolonged use of the cutter can wear down and blunt the blade. Contact the Epson customer support center.This section describes how to resolve printer operation and label printing problems.See the Network Configuration Guide for how to deal with network settings or connection problems.TroubleshootingThe printer supports wireless LAN connection, wired LAN connection and USB cable connection.The connection method will vary according to the environment it is installed in. Use the flowchart below to carry out the connection procedure.Connect the printer on a Wireless LAN (Infrastructure Mode).Does the access point have a WPS button?Use the push button auto-connection function to set the connection.s Network Configuration Guide "Setting up a wireless LAN connection (Simple AP Mode)"s Network Configuration Guide "Wireless LAN settings using a PIN code (when automatically acquiring the IP address from the printer)", "Setting the IP address for the printer manually"s Network Configuration Guide "Configuring settings for a wired LAN connection"USB Cable Connection to ComputerCreating a LabelWireless LAN Connection to Computer1. Connecting the power cable2. Inserting the tape cartridge in the printer1. Creating a labelPrinting operations are done from the computer connected to the printer.See the Label Editor User's Guide for the detailed procedures.s Label Editor User’s Guide2. Printing a label3. Attaching a label StartMEMOWireless LAN connection, wired LAN connection and USB connection can be used at the same time in any combination.3.Place a tape cartridge in the printer as shown.Pass the end of the tape through the gap.4.Close the top cover.5.Perform the tape feed operation.1) Press the button to turn the printer power ON.2) Press thebutton.Connect the printer on a Wireless LAN (Simple AP Mode).Use one of the following methods to set the connection:• Use a PIN code to set the connection • Set the connection manuallyIf a LAN cable is connected to the computer, a wired LAN connection can be used.Determining the computer connection method1.Insert the DVD-ROM provided in the DVD-ROM drive of the computer to be connected.2.1. Select thelanguage to use.3.4.The "License Agreement" screen appears. Read the information, then click "Agree".5.6.Perform the operations described in the on-screen instructions.When the installation completion messageappears, click "Finish".Application software installation is now completed.2. Click1. Click1. Select2. Click1.2.1. Select2. Click1. Select2. Click3.1. Turn the printer power ON.2. Connect the computer and printer with the USB cable.4.When the installation completion screen appears, click "Finish".The setup procedure is now completed.Start the Label Editor software to create a label.MEMOThe procedure given here applies when making the printer's network settings for the first time.If you have already made the network settings, see the Network Configuration Guide.1.Insert the DVD-ROM provided in the DVD-ROM drive of the computer to be connected.2.1. Select thelanguage to use.3.4.The "License Agreement" screen appears. Read the information, then click "Agree".5.Install the Network Configuration Tool if needed.6.7.8.9.10.1.1. Turn the printer power ON as directed inthe on-screen instructions.2. Press the button until the lamp flashes.2.Press the printer’s button as directed in the on-screen instructions.3.Press the WPS button for the access point as directed in the on-screen instructions.The settings have been made when the printer’s lamp stops flashing and lights steadily. The settings information is saved in the printer.1.2.3.When the installation completion screenappears, click "Finish".The setup procedure is now completed.Start the Label Editor software to create a label.1. Click1. SelectNext, install the printer driver. Go to Procedure.Next, make the printer and access point settings. Go to Procedure .Next, install the software in the computer. Go to Procedure .2. Click3. Click1. Click1. Select2. Click1. Select2. Click2. Click2. ClickAuto power-offThe printer's power turns offautomatically when the printer has not been used for about 8 hours.NoNoNoNoYesYesYesYes1. Select2. Click1. Select2. Click1. Select2. Click1. Select2. Click。
EPSON USB打印软件TN BA EU打印机USB设备驱动安装指南说明书
EPSON USB Printing Software for TM/BA/EU PrintersUSB Device DriverInstallation ManualMay 23, 2000,Revision ASeiko Epson CorporationRevision HistoryRevision RevisionContents SHEET DateA2000/5/23Newly Created-Contents1. INTRODUCTION (1)2. OPERATING ENVIRONMENT (1)3. VERIFYING THE COMPUTER'S USB PORT (2)4. CONNECTION (4)5. INSTALLING THE USB DEVICE DRIVER (5)6. UPDATING OLD VERSIONS OF THE USB DEVICE DRIVER (13)NoEPSON TITLE EPSON USB Printing Software for TM/BA/EU PrintersUSB Device DriverRevision A NEXT 2SHEET 11. IntroductionTo use USB-connectable EPSON TM/BA/EU printers, it is necessary to install the USB device driver.This manual explains how to install the USB device driver.2. Operating environmentPersonal computer• AT compatibles∗This is restricted to devices that have USB ports and for which the manufacturer of the computer guarantees the operation of the USB port.OS• Microsoft Windows 2000• Microsoft Windows 98 Second EditionNoEPSON TITLE EPSON USB Printing Software for TM/BA/EU PrintersUSB Device DriverRevision A NEXT 3SHEET23. Verifying the computer's USB portCheck that the computer can use a USB before installing the USB device driver.For Windows 20001. Right click on the My Computer icon and open [Properties].2. Select the [Hardware] tab and click the [Device Manager] button to open [Device Manager].3. Check that [USB (Universal Serial Bus) controllers] is displayed.∗If [USB (Universal Serial Bus) controllers] is not displayed, the USB device driver cannot be used.NoEPSON TITLE EPSON USB Printing Software for TM/BA/EU PrintersUSB Device DriverRevision ANEXT 4SHEET 3For Windows 98 Second Edition1. Right click on the My Computer icon and open [Properties].2. Select the [Device Manager] tab and check that [Universal Serial Bus controllers] is displayed.∗If [Universal Serial Bus controllers] is not displayed, the USB device driver cannot be used.NoEPSON TITLE EPSON USB Printing Software for TM/BA/EU PrintersUSB Device DriverRevision A NEXT 5SHEET 44. ConnectionThe printer must be connected following the sequential order described in this manual.If a different order is used, the printer may not function normally.When connecting a printer directly to the computer1. Switch on the power to the computer.2. Connect the printer's AC adapter to the printer.3. Connect the AC adapter to the power outlet.4. Connect the USB cable's B connector to the printer's upstream port.5. Switch on the power to the printer.6. Connect the A connector for the already connected cable to the computer's USB port.Next, proceed to [5. Installing the USB device driver].When connecting a printer to a USB hub that is connected to the computer1. Switch on the power to the computer and check that the connected USB hub is functioning normally.2. Connect the printer's AC adapter to the printer.3. Connect the AC adapter to the power outlet.4. Connect the USB cable's B connector to the printer's upstream port.5. Switch on the power to the printer.6. Connect the A connector for the already connected cable to the downstream port for the USB hub that is connected to the computer.Next, proceed to [5. Installing the USB device driver].NoEPSON TITLE EPSON USB Printing Software for TM/BA/EU PrintersUSB Device DriverRevisionA NEXT6SHEET 55. Installing the USB device driverIf the printer is connected according to the procedure outlined in [4. Connection], [Generic USB Hub] will be detected and installed. After this, the [EPSON UB-U01/02] will be detected.For Windows 20001. The [EPSON UB-U01/02] is detected and the [Found New Hardware Wizard] appears.2. Click the [Next] button to display the following screen.NoEPSON TITLEEPSON USB Printing Software for TM/BA/EU Printers USB Device DriverRevision A NEXT7SHEET 63. Select [Search for a suitable drive for my device{recommended}] and click the [Next] button to display the following screen.4. Select [Specify a location] and click the [Next] button to display the following screen. Click the [Browse] button,installation folder location of USB device driver is specified.Exp.) C:¥Program Files¥EPSON Advanced Printer¥USB ControllerClick the [OK] button to start the search for the driver.NoEPSONTITLE EPSON USB Printing Software for TM/BA/EU PrintersUSB Device DriverRevision ANEXT 8SHEET 75. Once the driver is found, the following screen will appear.6. Check that [EPSON UB U01/02] is displayed. Click the [Next] button to begin installing the driver.7. After the driver has been installed, the following screen will appear.8. Click the [Finish] button to complete the installation process.NoEPSON TITLE EPSON USB Printing Software for TM/BA/EU PrintersUSB Device DriverRevision A NEXT 9SHEET 89. After the driver has been installed, check that [Generic USB Hub] and [EPSON USB Controller for TM/BA/EU Printers]are displayed under [USB (Universal Serial Bus) controllers] in [Device Manager].10. A fter the printer has been correctly connected and the USB device driver installed, only connection is required for the printer to function, as the USB device driver will be loaded automatically.NoEPSON TITLE EPSON USB Printing Software for TM/BA/EU PrintersUSB Device DriverRevisionA NEXT 10SHEET 9For Windows 98 Second Edition1. The [EPSON UB-U01/02] is detected and the [Add New Hardware Wizard] appears.2. Click the [Next] button to display the following screen.NoEPSON TITLE EPSON USB Printing Software for TM/BA/EU PrintersUSB Device DriverRevision A NEXT 11SHEET103. Select [Search for the best driver for your device.(Recommended)] and click the [Next] button to display the following screen.4. Click the [Browse] button, installation folder location of USB device driver is specified.Exp.) C:¥Program Files¥EPSON Advanced Printer¥USB ControllerClick the [OK] button to start the search for the driver.5. Once the driver is found, the following screen will appear.NoEPSON TITLE EPSON USB Printing Software for TM/BA/EU PrintersUSB Device DriverRevision A NEXT 12SHEET 116. Check that [EPSON USB Controller for TM/BA/EU Printers] is displayed and click the [Next] button to begin installing the driver.7. After the driver has been installed, the following screen will appear.8. Click the [Finish] button to complete the installation process.NoEPSON TITLE EPSON USB Printing Software for TM/BA/EU PrintersUSB Device DriverRevision A NEXT 13SHEET 129. After the driver has been installed, check that [Generic USB Hub] and [EPSON USB Controller for TM/BA/EU Printers] are displayed under [Universal Serial Bus controllers] in the [Device Manager].tab of [System Properties].10. After the printer has been correctly connected and the USB device driver installed, only connection is required to for the printer to function, as the USB device driver will be loaded automatically.NoEPSON TITLE EPSON USB Printing Software for TM/BA/EU PrintersUSB Device DriverRevision A NEXT 14SHEET 136. Updating old versions of the USB device driverThis section explains how to update an old version of the USB device driver being used with Windows 98 Second Edition.1. Connect the printer to the computer and select [EPSON USB Controller for TM/BA/EU Printers] under [Universal SerialBus controllers] in the [Device Manager].tab of [System Properties].NoEPSON TITLEEPSON USB Printing Software for TM/BA/EU PrintersUSB Device DriverRevision A NEXT 15SHEET 142. Click the [Properties] button to open the Properties screen. Select the [Driver] tab.3. Click the [Update Driver] button and the [Update Device Driver Wizard] will appear.NoEPSONTITLE EPSON USB Printing Software for TM/BA/EU PrintersUSB Device DriverRevision A NEXT 16SHEET 154. Click the [Next] button to display the following screen.5. Select [Search for a better driver than the one your device is using now. (Recommended)] and click the [Next] button to display the next screen.6. Click the [Browse] button, installation folder location of USB device driver is specified.Exp.) C:¥Program Files¥EPSON Advanced Printer¥USB ControllerClick the [OK] button to start the search for the driver.NoEPSON TITLEEPSON USB Printing Software for TM/BA/EU PrintersUSB Device DriverRevision A NEXT 17SHEET 167. Once the driver is found, the following screen will appear.8. Select [The updated driver (Recommended)] and click the [Next] button to display the following screen.NoEPSON TITLE EPSON USB Printing Software for TM/BA/EU PrintersUSB Device DriverRevision A NEXT 18SHEET 179. Check that [EPSON USB Controller for TM/BA/EU Printers] is displayed. Click the [Next] button to begin installing the driver.10. After the driver has been installed, the following screen will appear.11. Click the [Finish] button to complete the installation process.NoEPSONTITLE EPSON USB Printing Software for TM/BA/EU PrintersUSB Device DriverRevision A NEXT 19SHEET 1812. After the driver has been installed, check that the date on the Properties [Driver] tab is 5-19-2000.13. Click the [Driver File Details] button to open the [Driver File Details] screen.NoEPSON TITLEEPSON USB Printing Software for TM/BA/EU PrintersUSB Device DriverRevision A NEXT 20SHEET 1914. Select [WINDOWS¥SYSTEM32¥DRIVERS¥TMUSB90.SYS] to verify that file version 1.10 is being used.15. If [WINDOWS¥SYSTEM¥TMUSB90.SYS] is displayed in the [Driver File Details] screen, use Windows Explorer to delete TMUSB90.SYS in the WINDOWS¥SYSTEM directory, then reconnect the printer.NoEPSONTITLE EPSON USB Printing Software for TM/BA/EU PrintersUSB Device DriverRevision A NEXT 21SHEET 2016. Open the [Driver File Details] screen and verify that [WINDOWS¥SYSTEM¥TMUSB90.SYS] is not displayed.17. This completes the driver update process.。
EPSON无线打印机 使用手册
Epson Connect用户指南NPD4945-00 SC此手册中出现的打印机/一体机以下简称“打印机”。
爱普生产品使用说明或网页等可能描述了其他公司(非爱普生)的硬件/软件产品、功能及服务,爱普生对于其他公司生产的产品和提供的服务(包括但不限于其内容、性能、准确性、兼容性、可靠性、合法性、适当性和连续性)不做任何明示和/或默示担保。
注释:其他信息,可查看产品本身、产品包装和其他形式的资料,包括爱普生网页()Epson Connect和其他移动解决方案Epson Connect是什么?Epson Connect提供移动服务,可让您在任何地方发送任务实现打印和扫描。
您可使用智能手机、平板电脑或笔记本电脑发送任务实现打印照片和文档。
如果您发送扫描的数据到与Epson Connect兼容的打印机,此时的打印机类似于彩色传真机。
您还可使用您的爱普生打印机扫描文档并将其上传到指定的地方,如:在线存储设备或“云(Colud)”帐户。
可使用下面服务。
一旦您已注册了您的打印机和帐户,您可使用下面的所有服务。
有关如何注册到Epson Connect、如何使用服务和故障排除的详细信息,参见Epson Connect入口网页:https:///服务概述Email Print从任何地方仅通过发送邮件即可实现打印照片和文档。
扫描至云(Cloud)扫描您的文档和照片至“云(Cloud)”帐户。
Epson iPrint对于iOS或Android智能手机和平板电脑的无线打印应用软件。
Epson iPrint具有二项有用的功能。
首先是本地打印,允许您打印并扫描至与本地相同Wi-Fi网络连接的打印机作为您的设备打印。
第二是远程打印,允许您通过互联网远程打印。
如果您未安装Epson iPrint,从下面的URL下载它并安装,然后注册。
http://ipr.toRemote Print Driver通过互联网远程打印。
注释:O扫描至云(Cloud)为Scan to cloud。
惠普 LaserJet Pro M12w 打印机系列联网安装指南说明书
11
• If your Windows computer cannot connect automatically, you see the screen below. Go to step 11.
• If your Mac computer cannot connect automatically, you can complete setup using a temporary USB connection. See the link for those instructions below.
5
Control Panel Buttons and Lights
1 The power button and light 2 The Wi-Fi button and light 3 The network status button and light 4 The ink button and light 5 The paper/cancel button and light
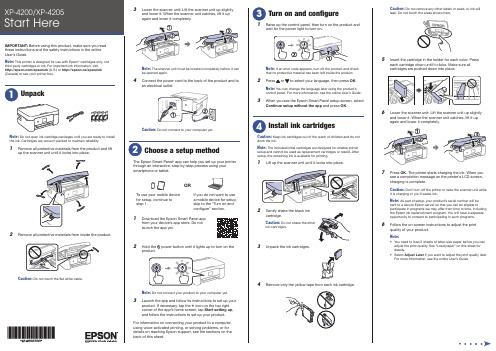
Epson打印机安装和设置指南说明书
Note:• A n Internet connection is required to obtain the product software.• T o print from a Chromebook™, go to/support/chromebookprint (U.S.) or http://epson.ca/support/chromebookprint (Canada) for instructions.Firmware Update Notice: The printer is designed to work only with genuine Epson-branded cartridges. Other brands of ink cartridges and ink supplies are not compatible and, even if described as compatible, may not function properly or at all. Epson periodically providesfirmware updates to address issues of security, performance, minor bug fixes and ensure the printer functions as designed. These updates may affect the functionality of third-party ink. Non-Epson branded or altered Epson cartridges that functioned prior to a firmware update may not continue to function.1 M ake sure the product is NOT CONNECTED to yourcomputer.W indows ®: If you see a Found New Hardware screen, clickCancel and disconnect the USB cable.2 D ownload and run your product’s software package. Forthe latest software, visitXP-4200/support/xp4200 (U.S.) http://epson.ca/support/xp4200 (Canada)XP-4205/support/xp4205 (U.S.) http://epson.ca/support/xp4205 (Canada)3 F ollow the instructions on the computer screen to run thesetup program.4 W hen you see the Select Your Connection screen, selectone of the following and follow the on-screen instructions:•Wireless connectionIn most cases, the software installer automatically attempts to set up your wireless connection. If setup is unsuccessful, you may need to enter your network name (SSID) and password.•Direct USB connectionM ake sure you have a USB cable (not included).Mobile and voice-activated printing• Print directly from your Android™ (v4.4 or later) device*.Simply connect your printer and device to the same network and tap the menu icon to select the print option. • Turn your mobile device into an intuitive, easy-to-useprinting and scanning control center with Epson Smart Panel. Download the app from your mobile device’s app store.• Print remotely with Epson Connect™. See your onlineUser’s Guide for instructions or learn more at /connect (U.S.) or http://epson.ca/connect (Canada).Ensure brilliant results with Epson specialtySee the online User’s Guide for information about loading capacity, available paper types and sizes, and loading envelopes.1 M ake sure the product is done charging the ink. Openthe feeder guard, then raise the paper support and tilt it backwards slightly.3 L4 S5 P6 F ollow the instructions on the LCD screen to select yourpaper settings and to adjust the print quality of yourproduct, if necessary.• Use voice-activated assistants to print a variety of creativeand everyday items from your Epson product. Simply add your product to an Epson Connect account, then link the account to a voice-activated assistant. See/voice (U.S.) or http://epson.ca/voice (Canada) for more information.* M ay require the Epson Print Enabler or Mopria Print Service app fromGoogle Play™.Any problems?Network setup was unsuccessful.• Print a network connection report to identify networkproblems and solutions. See your online User’s Guide for instructions.• M ake sure you select the right network name (SSID).• Restart your router (turn it off and then on), then try toconnect to it again.• T he printer can only connect to a network that supports2.4 GHz connections. If your router offers both 2.4 GHz and 5 GHz connections, make sure the 2.4 GHz connection is enabled.• I f you see a firewall alert message, click Unblock or Allow to let setup continue.• I f your network has security enabled, make sure you enteryour network password (WEP key or WPA passphrase) correctly. Be sure to enter your password in the correct case.There are lines or incorrect colors in my printouts.Run a nozzle check to see if there are any gaps in the printout. Then clean the print head, if necessary. See the online User’s Guide for more information.The product’s screen is dark.Make sure your product is turned on, and press any button to wake it from sleep mode.Setup is unable to find my printer after connecting itwith a USB cable.Make sure your product is turned on and the USB cable is securely connected.Any questions?User’s GuideWindows: Click the icon on your desktop or Apps screen to access the online User’s Guide .Mac: Click the icon in Applications/Epson Software/Guide to access the online User’s Guide .If you don’t have a User’s Guide icon, go to the Epson website, as described below.VideosVisit /support (U.S.) orhttp://epson.ca/support (Canada) and search for your product to view support videos (videos available only in English).EPSON, Claria, and Epson Smart Panel are registered trademarks, EPSON Exceed Your Vision is a registered logomark, and Epson Connect is a trademark of Seiko Epson Corporation.Designed for Excellence is a trademark of Epson America, Inc.Windows is a registered trademark of Microsoft Corporation in the United States and/or other countries.Mac is a trademark of Apple Inc., registered in the U.S. and other countries.Android, Chromebook, and Google Play are trademarks of Google LLC.General Notice: Other product names used herein are for identification purposes only and may be trademarks of their respective owners. Epson disclaims any and all rights in those marks.This information is subject to change without notice.© 2022 Epson America, Inc., 1/22Printed in XXXXXXCPD-61850。
惠普 LaserJet Pro MFP M25-M27 用户指南说明书
爱普生LQ-300K+Ⅱ简单操作指南
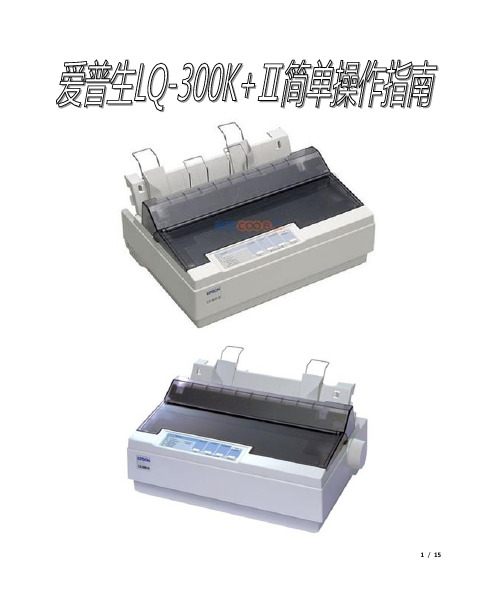
打印机部件a. 导轨b. 托纸支架c. 导纸器d. 过纸控制杆e. 旋钮f. 控制面板g. 打印机盖h. 导纸器盖a. 串口b. 色带盒c. 纸厚控制杆d. 紧纸部件e. 电源开关f. 电源线g. USB电缆支架h. 拖纸器i. USB接口j. 并口告诫当打印机关闭时才能使用打印机右侧的进纸旋钮来清除卡纸。
否则,会损坏打印机并导致打印纸的页顶位置失准。
按照如下面步骤操作取出已打印的文档:按下切纸(字体)按键,确保切纸(字体)指示灯在闪烁。
(这表明打印纸处于当前切纸位置。
)打开导纸器盖,然后用切纸刀口撕下已经打印的文档。
切换回到单页纸按下进纸/退纸按键将切换到单页纸;打印机将打印纸退回到等待位置。
然后按照装入单页纸步骤装入单页纸。
调整页顶位置页顶位置是打印机在打印纸上的开始打印位置。
如果打印位置太高或太低,使用微调整功能调整页顶位置。
注意不更改页顶位置设置,即使打印机关闭,页顶位置一直有效。
一些应用程序软件的页顶的页边距区域设置将覆盖用户用微调整功能定义的页顶位置的设置。
如果需要,用户在自己应用程序软件中调整页顶位置。
确保打印机开机。
如果需要,按照本章所描述的装入打印纸。
取下打印机盖。
按下暂停按键三秒钟,打印机的暂停指示灯将开始闪烁此时打印机进入微调整模式。
按下换行/换页按键向上移动页顶位置或按下进纸/退纸按键可以向下移动页顶位置。
* 塑料色带盖注意:•打印机的页面位置有上限和下限,调整页面位置超出上限和下限,打印机将鸣叫并停止走纸。
•当打印纸到达默认的页面位置时,打印机将鸣叫并立即停止走纸。
当调整页顶位置时,可以使用默认位置作为参照位置点。
为了调整安装在牵引式拖纸器上的连续打印纸的页顶位置,请参见如下例子:首先在页缝上2.5毫米(0.1英寸)位置标记一点,然后使这个标记点与塑料色带盒盖的上边缘保持平齐以定位打印纸位置。
在下一张打印纸上留下8.5毫米(0.33英寸)的页边距,意味打印机可以在页缝下8.5毫米(0.33英寸)处打印,如果在页缝上2.5毫米(0.1英寸)上标记一点,则在下一张打印纸上留下8.5毫米(0.33英寸)的页边距。
菜鸟必读:最初级打印机使用步骤指南
7、再单击“下一步”按钮按钮时,打印机向导窗口将提示你是否要打印测试页,本文在这里建议各位选中“是”选项,这样打印机就能自动进行测试打印,测试打印结束后安装向导还会询问你打印是否正常,要是正常的话,你可以单击“确定”按钮,这样系统就能自动复制好打印驱动文件,并结束打印机驱动程序的安装任务。
2、进行数据传输线的连接。在连接该线缆之前,应确保打印机和计算机的电源都已经关闭,然后检查一下打印机随机配备的数据传输线到底属于什么类型的接口,由于EpsonColorstylus1520K打印机数据传输线的接口为并口,因此你可以将该线缆的一端插入到打印机的数据端口中(如图2所示),将另外一端插入到计算机的并行端口中,再分别用螺丝刀将打印线缆的两端固定好,最后用手轻轻拉一下数据传输线缆,看看它是否已经被牢固地连接好了。当然打印线缆的接口类型,除了并口之外,还有串行口、USB接口等,不管打印机的传输线缆接口属于什么类型,你只要在打印机背面板中找到和对应接口类型相吻合的接口,再将其直接插入进去就可以了。
第三步、进行打印作业
到了这里,你就能开始使用打印机,打印所需要的目标文档了。为了能让各位更好地将目标文档打印出来,下面本文就以打印编辑好了的Word文档为例,向各位详细介绍一下如何用打印机打中,依次单击菜单栏中的“文件”/“页面设置”命令,在弹出的页面设置对话框中,单击“纸型”标签,在打开的图16所示的标签页面中,单击“纸型”处的下拉按钮,从弹出的下拉列表中选中所需要的纸张类型,例如是A4还是A3等;倘若列表中没有自己想要的纸型时,你可以在“高度”、“宽度”设置框中,直接输入当前所用打印纸的实际高度和宽度大小;同时要设置好打印方向,在默认状态下打印方向为“纵向”,要是你想让打印纸按“横向”进行打印的话,就必须要在“方向”设置项处选中“横向”项目。