EPSON打印机说明书
Epson 打印机用户手册说明书
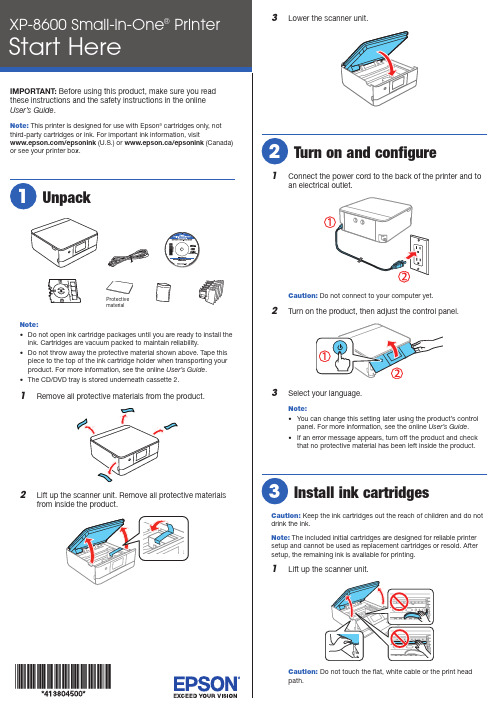
3 L ower the scanner unit.1 C onnect the power cord to the back of the printer and toan electrical outlet.Caution: Do not connect to your computer yet.2 T urn on the product, then adjust the control panel.3 S elect your language.Note:• Y ou can change this setting later using the product’s control panel. For more information, see the online User’s Guide .• I f an error message appears, turn off the product and check that no protective material has been left inside the product.Caution: Keep the ink cartridges out the reach of children and do notdrink the ink.Note: The included initial cartridges are designed for reliable printer setup and cannot be used as replacement cartridges or resold. After setup, the remaining ink is available for printing.1 L ift up the scanner unit.Caution: path.See the instructions below for loading paper in cassettes1 and 2.Note: See the online User’s Guide for a complete list of compatible1 Lower the front cover and raise the control panel.2Pull out a paper cassette.Cassette 23 Slide the side edge guides outward.Cassette 1Cassette 24 I nsert the paper with the glossy or printable sidefacedown.Cassette 1Cassette 2N ote: Make sure the paper is loaded against the back of thecassette and not sticking out from the front of the cassette.2 Unpack the ink cartridges.C aution: •D o not shake the ink cartridges.• D o not touch the areas shown below. Doing so may preventnormal operation and printing.3 R emove the cap from each ink cartridge. Store the caps inthe included plastic bag.Note: Save the caps and use them to recap the ink cartridgesafter removing them for storage or disposal.4 I nsert the cartridges at an angle in the holder for eachcolor. Press each cartridge down until it clicks.5 Lower the scanner unit.6 S elect Installed . Ink charging takes approximately 10minutes. When you see a completion message on theprinter’s LCD screen, charging is complete.Caution: Don’t turn off the printer or raise the scanner unit while the printer is charging or you’ll waste ink.Note: As part of setup, your product’s serial number will be sent to a secure Epson server so that you can be eligible to participate in programs we may offer from time to time, including the Epson ink replenishment program. You will have a separate opportunity to consent to participating in such programs.7 F ollow the on-screen instructions to adjust the printquality of your product.Note:• Y ou need to load paper before you can adjust the print quality. See the “Load paper” section for details.• S elect Adjust Later if you want to adjust the print quality later. For more information, see the online User’s Guide .4 W hen you see the Select Your Connection screen, selectone of the following and follow the on-screen instructions:• Wireless connectionIn most cases, the software installer automatically attempts to set up your wireless connection. If setup is unsuccessful, you may need to enter your network name (SSID) and password.• Direct USB connectionM ake sure you have a USB cable (not included).Mobile and voice-activated printing• Print directly from your iOS device. Simply connect your printer and device to the same network and tap the action icon to select the print option.• Print directly from your Android™ (v4.4 or later) device*.Simply connect your printer and device to the same network and tap the menu icon to select the print option. • Print from wherever you are, next to your printer or remotely, with Epson Connect™ and Google Cloud Print™. Learn more at /connect (U.S.) or www.epson.ca/connect (Canada).• Use voice-activated assistants to print a variety of creative and everyday items from your Epson product. Simply add your product to an Epson Connect account, then link the account to a voice-activated assistant. See/voice (U.S.) or www.epson.ca/voice (Canada) for more information.* M ay require the Epson Print Enabler or Mopria Print Service app from Google Play™.Any problems?Network setup was unsuccessful.• Print a network connection report to identify network problems and solutions. See your online User’s Guide for instructions.• Make sure you select the right network name (SSID).• Restart your router (turn it off and then on), then try to connect to it again.• The printer can only connect to a network that supports 2.4 GHz connections. If your router offers both 2.4 GHz and 5 GHz connections, make sure the 2.4 GHz network is enabled.• If you see a firewall alert message, click Unblock or Allow to let setup continue.• If your network has security enabled, make sure you enter your network password (WEP key or WPA passphrase) correctly. Be sure to enter your password in the correct case.There are lines or incorrect colors in my printouts.Run a nozzle check to see if there are any gaps in the printout. Then clean the print head, if necessary. See the online User’s Guide for more information.5 S lide the side edge guides against the paper, but not tootight. Make sure the paper is under the tabs on the sideedge guides.6Keep the cassette flat as you insert it all the way.Cassette 1Cassette 27 Lower the control panel.8 S elect the paper settings on the product’s control panel.Install softwareNote:• I f you are using a Mac or your computer does not have aCD/DVD drive, an Internet connection is required to obtain the product software.• T o print from a Chromebook™, go to /support/gcp (U.S.) orwww.epson.ca/support/gcp (Canada) for instructions.Firmware Update Notice: Epson periodically provides firmware updates to address issues of security, performance, minor bug fixes and ensure your printer functions as designed. Your printer was designed to work only with genuine Epson ink cartridges, therefore some updates may affect the functionality of third-party ink.1 M ake sure the product is NOT CONNECTED to yourcomputer.Windows ®: If you see a Found New Hardware screen, click Cancel and disconnect the USB cable.2I nsert the product CD (Windows only) or download andrun your product’s software package. For the latestsoftware, visit /support/xp8600 (U.S.) or www.epson.ca/support/xp8600 (Canada).3 F ollow the instructions on the computer screen to run thesetup program.Color Standard-capacity High-capacity。
爱普生官方产品说明书-爱普生光盘打印机PP-100NII型号
爱普生官方微博爱普生官方微信爱普生官方网站图片仅供参考,外观以实物为准。
本说明若有任何细节之更改,恕不另行通知。
爱普生(中国)有限公司在法律许可的范围内对以上内容有解释权。
爱普生(中国)有限公司北京市朝阳区建国路 号华贸中心 号楼 层爱普生官方天猫旗舰店:官方网站: 服务导购热线:400-810-997781 1 4官方微信/微博:爱普生中国ESS201107ADPP -50II/100III/100NII 爱普生光盘印刷刻录机● BD(蓝光)/DVD/CD 多媒体高速光盘刻录与盘面印刷● 爱普生微压电喷墨打印技术,精准色彩控制● 6色分体墨水系统,影像级盘面效果● AcuGrip 机械手确保光盘生产安全可靠●一次性批量生产高达100张光盘PP-100III 爱普生光盘印刷刻录机● BD (蓝光)/DVD/CD 多媒体高速光盘刻录与盘面印刷● 爱普生微压电喷墨打印技术,精准色彩控制● 6色分体墨水系统,影像级盘面效果● 提供以太网接口,实现网络管理功能● 自带主机和硬盘,加快数据处理速度●一次性批量生产高达100张光盘PP-100NII 爱普生光盘印刷刻录机● BD(蓝光)/DVD/CD 多媒体高速光盘刻录与盘面印刷● 爱普生微压电喷墨打印技术,精准色彩控制● 6色分体墨水系统,影像级盘面效果● AcuGrip 机械手确保光盘生产安全可靠●一次性批量生产高达50张光盘PP-50II 爱普生光盘印刷刻录机备注:PP-50I I 一次批量生产高达50张光盘,PP-100III 与PP-100NII 一次批量生产高达100张光盘在爱普生实验室选择的特定光盘介质进行测试,测试数据容量: 600MB(CD), 3.8GB(DVD),23.8GB(BD)纯打印时间,不包括完成50张以后添加光盘的时间*1*2*3Discproducer 系列刻录机是爱普生全新开发的用于刻录和印刷光盘的专业设备。
PP 系列光盘印刷刻录机,以便捷可靠、高品质、低成本完成光盘生产、复制等,满足各行业光盘制作的需求。
Epson 打印机初始设置指南.pdf_1701926596.673964说明书

8 Close the ink tank cover, then close the scanner unit.9 R aise the control panel, then press the power button toturn on the product. Thepower light flashes.Note: If an error code appears, turn off the product and check that no protective material has been left inside the product.10 S elect your language.Note: You can change these settings later using the product’scontrol panel. For more information, see the online User’s Guide .11 W hen an Epson Smart Panel setup message appears onthe LCD screen, select the option to continue setup.12 W hen the message to see the Start Here sheet appearson the LCD screen, press and hold the help button for5 seconds .13 F ollow the on-screen instructions to start ink charging. Inkcharging takes about 10 minutes .Note: When the power light stops flashing, ink charging iscomplete. Once initial setup of the printer is complete, you can top off the ink tanks with any remaining ink. See the online User’s Guide for instructions.C aution: Do not unplug or turn off the product, or raise thescanner unit while the product is charging or you’ll waste ink.Note:printing.14 P ress the OK button to proceed with initial setup.15 F ollow the on-screen instructions to adjust the printquality of your product.Note:• Y ou need to load paper before you can adjust the print quality. See “Load paper” on this sheet for details.• S elect Adjust Later if you want to adjust the print quality later.For more information, see the online User’s Guide .Caution:do not fall below the lowest lines on the tanks. Prolonged use when User’s Guide for refilling instructions.Do not open the ink bottles until you are ready to fill the ink tanks. The ink bottles are vacuum packed to maintain reliability.emove all protective materials from the product.The Epson Smart Panel ® app can help you set up your printer through an interactive, step-by-step process using your smartphone or tablet.If you do not want to use a mobile device for setup, skip to the “Fill ink tanks” section below.To use your mobile device for setup, continue to step 1.or1 D ownload the Epson Smart Panel appfrom your device’s app store. Do notlaunch the app yet.2 P ress thepower button to turn on the product.Note: Do not connect your product to your computer yet.3 L aunch the app and follow its instructions to set up yourproduct.For information on connecting your product to a computer,using voice-activated printing, or solving problems, or for details on reaching Epson support, see the sections on the back of this sheet.Warning: Keep the ink bottles out of the reach of children and do notdrink the ink.Caution: This product requires careful handling of ink. If ink spills, wipe it off immediately with a damp towel to avoid permanent stains. If ink gets on your clothes or belongings, it may not come off.Note:• E pson cannot guarantee the quality or reliability of third-party ink.• U se the ink bottles included with the printer to set up the product. Part of the ink will be used to charge the print head. These bottles will print fewer pages compared with replacement ink bottles.• E pson strongly recommends the use of genuine ink to ensure optimal print quality and performance.1 W ith the scanner unit raised, open the ink tank cover, thenopen the cap for the black (BK) ink tank.each tank.2 U npack the black (BK) ink bottle. Hold the ink bottleupright and slowly turn the bottle cap to remove it.Caution:3 I 4 W Do not squeeze the bottle orallow it to contact any other surface.Note: Ink flows into the tank and stops automatically when the ink tank is filled to the upper line. If ink reinsert the bottle.5 W hen the ink tank is full, remove the ink bottle andsecurely close it with the bottle cap. If any ink remains in the bottle, close the bottle and store it for later use.Start HereL6270Note:• I f you are using a Mac or if your computer does not have a CD/DVD drive, an Internet connection is required to obtain the product software.• T o print from a Chromebook™, go to/support/chromebookprint for instructions.1 M ake sure the product is NOT CONNECTED to yourcomputer.W indows ®: If you see a Found New Hardware screen, clickCancel and disconnect the USB cable.2 I nsert the product CD (Windows only) or download andrun your product’s software package. For the latestsoftware, visit /support/L6270.3 F ollow the instructions on the computer screen to run thesetup program.4 W hen you see the Select Your Connection screen, selectone of the following and follow the on-screen instructions:•Wireless connectionIn most cases, the software installer automatically attempts to set up your wireless connection. If setup is unsuccessful, you may need to enter your network name (SSID) and password.• Direct USB connectionMake sure you have the USB cable ready.•Wired network connectionMake sure you have an Ethernet cable (not included).Mobile and voice-activated printing• Print directly from your Android™ (v4.4 or later) device*.Simply connect your printer and device to the same networkand tap the menu icon to select the print option.• Turn your mobile device into an intuitive, easy-to-useprinting and scanning control center with Epson Smart Panel. Download the app from your mobile device’s app store.• Print from wherever you are, next to your printer orremotely, with Epson Connect™. Learn more at /connect .• Use voice-activated assistants to print a variety of creativeand everyday items from your Epson ® product. Simply addyour product to an Epson Connect account, then link the account to a voice-activated assistant. See/support/voice for more information.* M ay require the Epson Print Enabler or Mopria Print Service app from Google Play™.EPSON and Epson Smart Panel are registered trademarks, EPSON Exceed Your Vision is a registered logomark, and Epson Connect is a trademark of Seiko Epson Corporation.Designed for Excellence is a trademark of Epson America, Inc.Windows is a registered trademark of Microsoft Corporation in the United States and/or other countries.Mac is a trademark of Apple Inc., registered in the U.S. and other countries.Android, Chromebook, and Google Play are trademarks of Google LLC.General Notice: Other product names used herein are for identification purposes only and may be trademarks of their respective owners. Epson disclaims any and all rights in those marks.This information is subject to change without notice.© 2021 Epson America, Inc., 2/21Printed in XXXXXXCPD-60026See the online User’s Guide for information about loading capacity, available paper types and sizes, loading envelopes, and using the ADF .1 M ake sure the product is not charging ink, and then open2 S3 INote: Make sure the paper is loaded against the front edge guide and not sticking out from the end of the cassette.4 S lide the side edge guides against the paper, but not too5 K eep the cassette flat as you insert it all the way .67 S elect the paper settings on the product’s control panel.Any problems?Network setup was unsuccessful.• Make sure you select the right network name (SSID).• Restart your router (turn it off and then on), then try toconnect to it again.• The printer can only connect to a network that supports2.4 GHz connections. If your router offers both 2.4 GHz and 5 GHz connections, make sure 2.4 GHz is enabled.• If you see a firewall alert message, click Unblock or Allow to let setup continue.• If your network has security enabled, make sure you enteryour network password (WEP key or WPA passphrase) correctly. Be sure to enter your password in the correct case.• Print a network connection report to identify networkproblems and solutions. See your online User’s Guide forinstructions.There are lines or incorrect colors in my printouts.Run a nozzle check to see if there are any gaps in the printout. Then clean the print head, if necessary. See the online User’s Guide for more information.The product’s screen is dark.Make sure your product is turned on and press any button to wake it from sleep mode.Setup is unable to find my product after connecting itwith a USB cable.Make sure your product is on and the USB cable is securelyconnected.Any questions?User’s GuideWindows: Click the icon on your desktop or Apps screen to access the online User’s Guide .Mac: Click the icon in Applications/Epson Software/Guide to access the online User’s Guide.If you don’t have a User’s Guide icon, go to the Epson website, as described in “Technical support.”Technical supportVisit /support/L6270 to download drivers, view manuals, get FAQs, or contact Epson.You can also speak to a service technician by calling one of these numbers:Argentina (54 11) 5167-0300 Guatemala * 1-800-835-0358 0800-288-37766 Mexico 01-800-087-1080Bolivia * 800-100-116 Mexico City (52 55) 1323-2052Chile (56 2) 2484-3400 Nicaragua * 00-1-800-226-0368Colombia 018000-915235Panama * 00-800-052-1376 Bogota (57 1) 592-2200 Paraguay 009-800-521-0019Costa Rica 800-377-6627 Peru 0800-10126DominicanLima (51 1) 418-0210 Republic * 1-888-760-0068 Uruguay 00040-5210067Ecuador * 1-800-000-044 Venezuela (58 212) 240-1111El Salvador * 800-6570* C ontact your local phone company to call this toll-free number from a mobile phone.If your country does not appear on the list, contact your nearest Epson sales office. Toll or long distance charges may apply.Need paper and ink?Ensure brilliant results with Epson specialtyand plain papers, engineered specifically for Epson printers. You can purchase them from an Epson authorized reseller. To find the nearest one, visit or contact Epson as described in “Anyquestions?” on this sheet.L6270 replacement inks。
Epson LW-1000P 打印机安装说明书
Click "User's Guide" in the following window.Click the manual you want to read in the following window.The selected instruction manual is displayed.For your safety, read the attached documents carefully to use this productcorrectly. After you have read all instructions, keep this manual handy for future reference and to make your concerns clear.Items below indicate safety precautions to protect users, their surroundings and their property from possible injury or damage.Precautionary notations are categorised as follows according to personal injury and damage to the equipment if the instructions are ignored or the equipment is WARNINGWhen handling the auto cutterWhen using the AC adapter and power cableDo not unplug the AC adapter while the product is in operation, otherwise printing may not be successful.Do not use the AC adapter in a small, confined space, or cover it with a cloth. Otherwise, the AC adapter may overheat and deteriorate.When handling tape cartridges• Make sure to use a dedicated LC Tape.• Some types of tape cannot be cut by the cutter. For the details, refer to the tape's manual.• Do not drop it or disassemble it. Doing so may cause damage.• Do not pull out the tape forcibly by hand. But make sure to feed the tape. Otherwise, the tape cartridge may be broken and unusable.• Avoid using a tape cartridge without remaining tape. Doing so may cause overheating of the printhead, which may result in damage or malfunction.DVD-ROM softwareTake care to prevent the DVD-ROM from being subjected to excessive force orbecoming scratched. Do not store the DVD-ROM in excessively hot or cold locations.Safety InstructionsFrequency PrecautionsThe frequency band for this product is 2.4 GHz. This frequency range is thesame frequency bandwidth as industrial, scientific, and medical devices such as microwave ovens and mobile unit identification (RF-ID) systems (licensed premises radio stations and unlicensed specified low-power radio stations) used in factory production lines. Before using this product, check that there are no radio stations for mobile unit identification or specified low-power radio station premises nearby. In the event that this product should interfere electromagnetically with thepremises of a radio station used for mobile unit recognition, cease use immediately and stop generating the electromagnetic field. Contact your local Epson customer support center if this product interferes electromagnetically with a special low-power radio station used for mobile unit identification or causes similar problems.International Travel PrecautionsWireless devices are designed to conform to the channel and frequency limits of the country they are intended to be used in. This product is based on thespecifications of the country of sale. If this product is used outside the country of sale, check with your local Epson customer support center for more information.Notes on Security when Using Wireless LAN(Important information on customer rights (maintaining privacy))The advantage of using a wireless LAN over a LAN cable is that, because information is exchanged using radio signals, you can easily connect to the network if you are within range of the radio signals. A disadvantage of this is that within a certainrange, the electromagnetic signals can pass through barriers such as walls, so that if security countermeasures are not implemented in some way, problems such as the following may occur.• Communicated data can be interceptedA third party may be able to receive wireless transmissions without authorization, and they could obtain personal information from thesetransmissions such as IDs, passwords, or credit card numbers, or they could intercept the contents of personal e-mail messages.• Unauthorized access to the networkA third party could access an individual or intra-company network without permission and carry out any of the following activities.- Retrieve personal data or other secret information (information leakage)- Pose as another user and send inappropriate data (impersonation)- Overwrite the contents of intercepted data and resend it (falsification)- Introduce a computer virus which could cause data loss or system crashes (damage)Initially, the possibility that such problems could occur through settingsconcerning the security of the wireless LAN product and by using the product are decreased, because the wireless LAN card and the access point have security measures to deal with these problems. We recommend that you use thisproduct after making security settings using your own judgment and assuming full responsibility, and with your full understanding of problems that may occur if you do not make any security settings.Epson shall not be responsible for any leakage of data or information during data communication over wireless LAN.Other cautions• Take care not to cut your fingers when cutting the label with scissors.• Do not attach a label on human bodies, living things, public facilities ore other people’s belongings.1.Peel off the backing paper.Backing paperInstall the printer driver after installing the Label Editor software.Install the software after making the printer and access point network settings.1. Specifying the network connection method2. Printer and access point operations3. Software installation1. Installing the "Label Editor" software in the computer2. Installing the printer driverCAUTIONAlways perform the tape feed operation after inserting a tape cartridge in the printer.1.Remove any slack in the tape inside the tape cartridge.Use a pen or a pencil.2.Press thebutton to open the top cover.CAUTIONAlways use the AC adapter provided.1.Connect the AC adapterprovided (AST1527Z1-1) to the printer, and plug the power plug into a power outlet.Use the label editing software "Label Editor" to create labels.See the Label Editor User's Guide for the detailed procedures.s Label Editor User’s GuideMEMOEpson has a variety of custom tapes available for many different applications.For more information, see the Supplies Catalog provided with the printer. s Supplies CatalogMEMOIf you set the tape cutting method to "Half cut", only the label surface is cut when several labels are printed consecutively, making it easier to peel off the labels.See the Label Editor User's Guide for the detailed procedures.s Label Editor User’s GuideCutting rounded label cornersYou can use the auto-trimmer to round off label corners.1. Insert the tape in the tapeinsertion slot, following the guide.The tape is cut to form rounded label corners.2.Attach the label and rub it firmly.Printer SetupCan the computer to be connected to the printer be connected to the Internet?Does the computer have a wireless LAN function?Is there a broadband router or access point, and is a wireless LAN function supported?Connect theprinter with a USB cable.Printer'sbutton does not light.Check that the power cable is properly connected. If the button still does not light, contact your place of purchase or the Epson customer support center.Printer does not print when print operation is directed.• If a message is displayed on your computer screen, check the message information.• Check that connection cables are connected properly, that the tape cartridge is mounted properly, and that the cover is closed properly.• Have you selected the printer to be used? Printing will not be done properly if another printer is selected.• Did you restart the computer after installing the printer driver? The printer driver may not be installed correctly if the computer was not restarted. Reinstall the printer driver.Text is not printed properly.• Check that the tape cartridge is properly mounted.• Print at a low speed. Change the setting in the printer settings of the printer driver.Lines appear on printed labels.The print head is dirty. Clean the print head.Canceling a print jobCheck the printer's power in ON, then press the button on the front of the printer briefly once.Labels are not cut automatically• Check if the cut setting is set to “Don’t cut” in the printer settings of the Label Editor software. s Label Editor User’s Guide• Is the cutter blade worn? Prolonged use of the cutter can wear down and blunt the blade. Contact the Epson customer support center.Half cut function doesn't work properly.• Is the printer set to "Half cut" or "Don't cut"? Check the settings.• Is the cutter blade worn? Prolonged use of the cutter can wear down and blunt the blade. Contact the Epson customer support center.Trimmer doesn't cut properly.• Is the printer printing? The trimmer doesn't operate during printing.• Was the label inserted properly in the trimmer tape insertion slot? Insert the label into the slot following the guide.• Is the printer clogged with tape scraps? Remove the trimmer cover, and remove the tape scraps.• Are you using 6 millimeter-wide tape? You cannot cut 6 millimeter-wide tape with the trimmer.• Is the cutter blade worn? Prolonged use of the cutter can wear down and blunt the blade. Contact the Epson customer support center.This section describes how to resolve printer operation and label printing problems.See the Network Configuration Guide for how to deal with network settings or connection problems.TroubleshootingThe printer supports wireless LAN connection, wired LAN connection and USB cable connection.The connection method will vary according to the environment it is installed in. Use the flowchart below to carry out the connection procedure.Connect the printer on a Wireless LAN (Infrastructure Mode).Does the access point have a WPS button?Use the push button auto-connection function to set the connection.s Network Configuration Guide "Setting up a wireless LAN connection (Simple AP Mode)"s Network Configuration Guide "Wireless LAN settings using a PIN code (when automatically acquiring the IP address from the printer)", "Setting the IP address for the printer manually"s Network Configuration Guide "Configuring settings for a wired LAN connection"USB Cable Connection to ComputerCreating a LabelWireless LAN Connection to Computer1. Connecting the power cable2. Inserting the tape cartridge in the printer1. Creating a labelPrinting operations are done from the computer connected to the printer.See the Label Editor User's Guide for the detailed procedures.s Label Editor User’s Guide2. Printing a label3. Attaching a label StartMEMOWireless LAN connection, wired LAN connection and USB connection can be used at the same time in any combination.3.Place a tape cartridge in the printer as shown.Pass the end of the tape through the gap.4.Close the top cover.5.Perform the tape feed operation.1) Press the button to turn the printer power ON.2) Press thebutton.Connect the printer on a Wireless LAN (Simple AP Mode).Use one of the following methods to set the connection:• Use a PIN code to set the connection • Set the connection manuallyIf a LAN cable is connected to the computer, a wired LAN connection can be used.Determining the computer connection method1.Insert the DVD-ROM provided in the DVD-ROM drive of the computer to be connected.2.1. Select thelanguage to use.3.4.The "License Agreement" screen appears. Read the information, then click "Agree".5.6.Perform the operations described in the on-screen instructions.When the installation completion messageappears, click "Finish".Application software installation is now completed.2. Click1. Click1. Select2. Click1.2.1. Select2. Click1. Select2. Click3.1. Turn the printer power ON.2. Connect the computer and printer with the USB cable.4.When the installation completion screen appears, click "Finish".The setup procedure is now completed.Start the Label Editor software to create a label.MEMOThe procedure given here applies when making the printer's network settings for the first time.If you have already made the network settings, see the Network Configuration Guide.1.Insert the DVD-ROM provided in the DVD-ROM drive of the computer to be connected.2.1. Select thelanguage to use.3.4.The "License Agreement" screen appears. Read the information, then click "Agree".5.Install the Network Configuration Tool if needed.6.7.8.9.10.1.1. Turn the printer power ON as directed inthe on-screen instructions.2. Press the button until the lamp flashes.2.Press the printer’s button as directed in the on-screen instructions.3.Press the WPS button for the access point as directed in the on-screen instructions.The settings have been made when the printer’s lamp stops flashing and lights steadily. The settings information is saved in the printer.1.2.3.When the installation completion screenappears, click "Finish".The setup procedure is now completed.Start the Label Editor software to create a label.1. Click1. SelectNext, install the printer driver. Go to Procedure.Next, make the printer and access point settings. Go to Procedure .Next, install the software in the computer. Go to Procedure .2. Click3. Click1. Click1. Select2. Click1. Select2. Click2. Click2. ClickAuto power-offThe printer's power turns offautomatically when the printer has not been used for about 8 hours.NoNoNoNoYesYesYesYes1. Select2. Click1. Select2. Click1. Select2. Click1. Select2. Click。
爱普生L3218打印机说明书
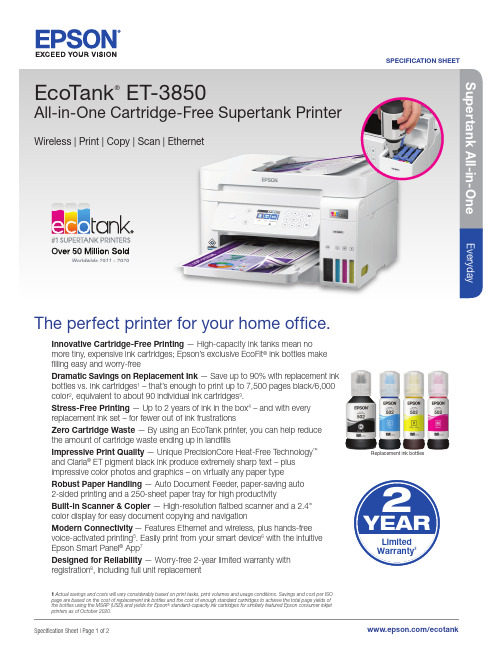
Specification Sheet | Page 1 of 2The perfect printer for your home office.Innovative Cartridge-Free Printing — High-capacity ink tanks mean nomore tiny, expensive ink cartridges; Epson’s exclusive EcoFit ® ink bottles make filling easy and worry-freeDramatic Savings on Replacement Ink — Save up to 90% with replacement ink bottles vs. ink cartridges 1 – that’s enough to print up to 7,500 pages black/6,000 color 2, equivalent to about 90 individual ink cartridges 3.Stress-Free Printing — Up to 2 years of ink in the box 4 – and with every replacement ink set – for fewer out of ink frustrationsZero Cartridge Waste — By using an EcoTank printer, you can help reduce the amount of cartridge waste ending up in landfillsImpressive Print Quality — Unique PrecisionCore Heat-Free Technology ™ and Claria ® ET pigment black ink produce extremely sharp text – plus impressive color photos and graphics – on virtually any paper typeRobust Paper Handling — Auto Document Feeder, paper-saving auto 2-sided printing and a 250-sheet paper tray for high productivityBuilt-in Scanner & Copier — High-resolution flatbed scanner and a 2.4"color display for easy document copying and navigationModern Connectivity — Features Ethernet and wireless, plus hands-free voice-activated printing 5. Easily print from your smart device 6 with the intuitive Epson Smart Panel ® App 7Designed for Reliability — Worry-free 2-year limited warranty with registration 8, including full unit replacement/ecotankReplacement ink bottles2YEARLimited Warranty81 Actual savings and costs will vary considerably based on print tasks, print volumes and usage conditions. Savings and cost per ISO page are based on the cost of replacement ink bottles and the cost of enough standard cartridges to achieve the total page yields of the bottles using the MSRP (USD) and yields for Epson ® standard-capacity ink cartridges for similarly featured Epson consumer inkjet printers as of October 2020.All-in-One Cartridge-Free Supertank PrinterWireless | Print | Copy | Scan | EthernetSpecification Sheet | Page 2 of 2Scan Bed Size 8.5" x 11.7"Max. Scan Size (ADF) 8.5" x 14"Scan Features Scan to Computer, Scan to Cloud 9Auto Document Feeder30 sheets: 1-side to 2-side, Max. size: 8.5" x 14"/legalConnectivityStandard Connectivity Hi-Speed USBWi-Fi 4 (802.11 b/g/n)10Ethernet (10/100 Mbps)Wi-Fi Direct ®10Operating SystemsWindows ® 10, Windows 8, 8.1 (32-bit, 64-bit), Windows 7 (32-bit, 64-bit)Mac ® OS X ® 10.6.8 – macOS ® 10.15.x 11Windows Server ®2003 – Windows Server 201912 (32-bit, 64-bit)Approx. 5.3 W (Standby)Approx. 0.9 W (Sleep)Approx. 0.2 W (Power off)Safety ApprovalsSafety standards UL60950, CSA C22.2 No. 60950EMI FCC Part 15 subpart B class B CAN/CSA-CEI/IEC CISPR 22 class B Weight and Dimensions (W x D x H)Printing: 16.4" x 19.8" x 10.0", 417 x 503 x 255 mm Storage: 14.8" x 13.7" x 9.1", 375 x 347 x 231 mm Weight: 14.8 lb, 6.7 kg Packaging Dimensions19.9" x 16.2" x 12.3", 506 x 412 x 313 mm Packaging Weight 16.1 lb, 7.3 kgSpecifications and terms are subject to change without notice. EPSON, EcoTank, Epson ESC/P , Epson Smart Panel and MicroPiezo are registered trademarks, EPSON Exceed Your Vision is a registered logomark and Better Products for a Better Future, Epson Connect, Epson iPrint and PrecisionCore Heat-Free Technology are trademarks of Seiko Epson Corporation. EcoFit is a registered trademark of Epson America, Inc. AirPrint, Apple, Mac, macOS and OS X are trademarks of Apple Inc., registered in the U.S. and other countries. Android is a trademark of Google LLC. Windows, Windows Server and Windows Vista are either registered trademarks or trademarks of Microsoft Corporation in the United States and/or other countries. Wi-Fi ® and Wi-Fi Direct ® are registered trademarks and Wi-Fi CERTIFIED™ is a trademark of Wi-Fi Alliance ®. SmartWay is a registered trademark of the U.S. Environmental Protection Agency. All other product and brand names are trademarks and/or registered trademarks of their respective companies. Epson disclaims any and all rights in these marks. All other product and brand names are trademarks and/or registered trademarks of their respective companies. Epson disclaims any and all rights in these marks. Copyright 2021 Epson America, Inc. CPD-61375 6/21All images simulated.† Black and color print speeds are measured in accordance with ISO/IEC 24734. Actual print times will vary based on factors including system configuration, software, and page complexity. For more information, visit /printspeed | †† Black and color copy speeds are determined in accordance with ISO/IEC 29183. Actual copy times will vary based on factors including system configuration and page complexity. For more information, visit /copyspeed | 1 Actual savings and costs will vary considerably based on print tasks, print volumes and usage conditions. Savings and cost per ISO page are based on the cost of replacement ink bottles and the cost of enough standard cartridges to achieve the total page yields of the bottles using the MSRP (USD) and yields for Epson standard-capacity ink cartridges for similarly featured Epson consumer inkjet printers as of May 2021. | 2 Part of the ink from the included bottles is used for initial setup; yields are lower than those of replacement ink bottles. Replacement and included ink bottle yields based on the ISO/IEC 24712 pattern with Epson’s methodology. Actual ink yields will vary considerably for reasons including images printed, print settings, temperature and humidity. Yields may be lower when printing infrequently or predominantly with one ink color. All ink colors are used for printing and printer maintenance, and all colors must be available for printing. For more information, visit /inkinfo | 3 Individualcartridges estimate based on print yields of a replacement set of black and color ink bottles as compared to Epson standard-capacity ink cartridges for similarly featured printers as of May 2021. | 4 Based on average monthly document print volumes of about 200 pages. | 5 See /voice for device compatibility. Epson Connect account and voice-activated account registration required. | 6 Most features require an Internet connection to the printer, as well as an Internet- and/or email-enabled device. For a list of Epson Connect enabled printers andcompatible devices and apps, visit /connect | 7 Requires Epson Smart Panel App download. Data usage fees may apply. | 8 12 months of standard limited warranty or 50,000 plain paper sheets (whichever happens first). For an additional 12-month extended service plan (total of 24 months or 50,000 plain paper sheets, whichever happens first), you must register your product and use Epson genuine ink bottles. See Limited Warranty for details. | 9 Requires an Internet connection, a free Epson Connect account and a destination email address or cloud storage account. For a list of supported cloud services, visit /connect | 10 Wi-Fi CERTIFIED TM ; level of performance subject to the range of the router being used. Wi-Fi Direct may require printer software. | 11 Some applications and/or functions may not be supported under Mac OS X. | 12 Only printing and scanning are supported under Windows Server OS. |13 Monthly duty cycle is the highest duty a user could expect in a month, based on near-constant operation of a device of this kind. It is not recommended that the device be run at this duty. For best device performance, run the device at the recommended duty. | 14 Internet access is required to install OS X drivers and software. | 15 For convenient and reasonable recycling options, visit /recycle | 16 SmartWay is an innovative partnership of the U.S. Environmental Protection Agency that reduces greenhouse gases and other air pollutants and improves fuel efficiency.Epson America, Inc.3131 Katella Ave., Los Alamitos, CA 90720Epson Canada Limited185 Renfrew Drive, Markham, Ontario L3R 6G3 www.epson.ca/ecotankContact:。
Epson 打印机产品说明书
Standards and ApprovalsThe following standards are applied only to the printers that are so labeled.(EMC is tested using the Epson power supplies.)North America: FCC Class A, CAN ICES-3 (A)/NMB-3 (A)Europe: CE markingOceania (PP-100III only): Radiocommunications (Electromagnetic Compatibility) Standard, Class AFor Users in EuropeCE Markingwww.epson.eu/conformityCautions on Handling the Ink Cartridge1,2-benzisothiazolin-3-one, 2,4,7,9-tetramethyldec-5-yne-4,7-diol, CI DIRECT YELLOW 173, FYS-109, S186260For Users in the AmericasWarningThe connection of a non-shielded printer interface cable to this printer will invalidate the EMC standards of this device. You are cautioned that changes or modifications not expressly approved by Seiko Epson Corporation could void your authority to operate the equipment.The cords included with this product contain chemicals, including lead, known to the State of California to cause birth defects or other reproductive harm. Wash hands after handling. (This notice is provided in accordance with Proposition 65 in Cal. Health & Safety Code §25249.5 and following.)FCC Compliance Statement For American UsersThis equipment has been tested and found to comply with the limits for a Class A digital device, pursuant to Part 15 of the FCC Rules.These limits are designed to provide reasonable protection against harmful interference when the equipment is operated in a commercial environment.This equipment generates, uses, and can radiate radio frequency energy and, if not installed and used in accordance with the instruction manual, may cause harmful interference to radio communications. Operation of this equipment in a residential area is likely to cause harmful interference, in which case the user will be required to correct the interference at his own expense.For Users in Oceania (PP-100III only)WARNINGThis is a Class A product. In a domestic environment this product may cause radio interference in which case the user may be required to take adequate measures.面向中国用户保留备用。
Epson 打印机用户指南.pdf_1701920180.8475633说明书
Do not open ink cartridge packages until you are ready to installthe ink. Cartridges are vacuum packed to maintain reliability.emove all protective materials from the product.1 C onnect the power cord to the back of the product and toCaution: Do not connect to your computer yet.2 T urn on the product and wait for the ink light to turn on.Note: If all of the printer lights are flashing, an error has occurred.Turn off the printer, lift the scanner unit and remove any protectivematerial that has been left inside. Then turn the printer back on.Caution: Keep ink cartridges out of the reach of children and do notdrink the ink.Note: The included initial cartridges are designed for reliable printersetup and cannot be used as replacement cartridges or resold. Aftersetup, the remaining ink is available for printing.1 L ift up the scanner unit until it locks into place.2 G ently shake the black ink cartridge.Note: Do not shake the other ink cartridges.See the online User’s Guide for information about loading capacity, available paper types and sizes, and loading envelopes.1 M ake sure the product is not charging. Then flip thefeeder guard forward, raise the paper support and tilt itbackwards slightly, and slide out the output tray.2 S lide the edge guide all the way out.Mobile printingConnect wirelessly from your smartphone, tablet, or computer. Print documents and photos from across the room or around the world:• Print directly from a smartphone or tablet using iOS orAndroid™ with Epson iPrint™. Simply connect your printer and device to the same network and tap the action icon to select the print option.• Print directly from your Android (v4.4 or later) devices*.Simply connect your printer and device to the same network and tap the menu icon to select the print option.• Print from wherever you are, next to your printer or remotely, with Epson Connect™ and Google Cloud Print™. Learn more at .jm/connect .* M ay require the Epson Print Enabler or Mopria Print Service app from Google Play™.Any problems?Network setup was unsuccessful.• M ake sure you select the right network name (SSID).• Restart your router (turn it off and then on), then try to connect to it again.• T he printer can only connect to a network that supports 2.4 GHz connections. If your router offers both 2.4 GHz and 5 GHz connections, make sure the 2.4 GHz connection is enabled.• I f you see a firewall alert message, click Unblock or Allow to let setup continue.• I f your network has security enabled, make sure you enter your network password (WEP key or WPA passphrase) correctly. Be sure to enter your password in the correct case.• Press the button to print a network connection report. For more detailed information, hold this button down for at least 5 seconds to print a network status sheet.There are lines or incorrect colors in my printouts.Run a nozzle check to see if there are any gaps in the printout.Then clean the print head, if necessary. See the online User’s Guide for more information.Setup is unable to find my printer after connecting it with a USB cable.Make sure the printer is turned on and that it is securelyconnected as shown:Note:• I f you are using a Mac or your computer does not have a CD/DVD drive, an Internet connection is required to obtain the product software.• T o print from a Chromebook™, go to.jm/support/gcp for instructions.Firmware Update Notice: Epson periodically provides firmware updates to address issues of security, performance, minor bug fixes and ensure your printer functions as designed. Your printer was designed to work only with genuine Epson ink cartridges, therefore some updates may affect the functionality of third-party ink.1 M ake sure the product is NOT CONNECTED to yourcomputer.W indows ®: If you see a Found New Hardware screen, clickCancel and disconnect the USB cable.2 I nsert the product CD (Windows only) or download andrun your product’s software package. For the latestsoftware, visit .jm/support/xp2101.3 F ollow the instructions on the computer screen to run the setup program.4 W hen you see the Select Your Connection screen, selectone of the following and follow the on-screen instructions:• Wireless connectionIn most cases, the software installer automatically attempts to set up your wireless connection. If setup is unsuccessful, you may need to enter your network name (SSID) and password.• Direct USB connectionM ake sure you have the USB cable.。
EPSONME1+打印机操作指南
EPSON ME1+喷墨打印机+连供使用指南一、安装连接电脑和打印机,开启打印机按钮,待计算机识别打印机后,安装驱动程序(win10可自动识别)。
二、使用方法打印须知:打印前可进行打印测试,查看图案清晰后再打印。
1、原装墨盒更换方法按照打印机软件提示更换即可。
2、连供墨盒更换方法。
方法a首先关闭打印机电源,稍等片刻后执行以下操作:按住打印机上的墨水按键,然后再打开电源开关,打开电源开关的时候,墨水按键不能松开,大概过2到5秒钟,然后松开,机器会自动进入清洗状态,当机器清洗完成以后,打印机会自动进纸打印出一张喷嘴测试页,打印完成以后,用户通过测试页判断喷嘴是否仍然堵头。
如果清洗不够彻底,用户还可以把电源关闭,仍然按照上述方法再次清洗。
方法b关机情况下,使用工具按下打印机右侧滑动皮带后方凹槽内的白色控制开关(需使用手电探照寻找),即可直接轻拨出小车。
方法c1)执行更换墨盒操作,弹出打印车。
2)拨掉电源线。
3)手动拨到可以安装的位置。
3、连供注墨方法将外置墨盒两边气孔全部开启,否则会出现堵墨现象。
适量注墨,过量注墨会引起打印头漏墨现象。
三、问题处理1、颜色不正确清晰多数情况下,打印头并没有堵塞,引起无法打印的原因如下:原因1:外置墨盒的进墨盒墨水量低解决方法:盖上所有墨盒盖子,平放外置墨盒,将外置墨盒进墨盒的墨水位提高,确认成功后打开进墨盒盖子。
原因2:内置墨盒墨水量低解决方法:高置外置墨盒,将外置墨盒墨水注入内置墨盒内。
原因3:堵头猜想解决方法:开启打印头软件选项的维护选项,清洗打印头1次,图形测试通过后停止清洗。
如不成功,再次清洗。
如果图形已经清晰正确,停止清洗。
如不成功,连续清洗打印头2次,等待1分钟左右,进行喷嘴检查,通过后打印。
2、无法识别墨盒有墨原因:排除问题1的原因,可能是软件显示不能正确刷新为实际数据。
解决方法:如果红灯闪烁,按下打印机的更换墨盒键10秒左右,如果墨盒有墨,会重新识别出墨水容量。
Epson 宽幅超高清打印机说明书
D E S I G N E D F O R C R E AT I V I T Y• Brilliant large-size photos — borderless photosup to 13" x 19"• Ultra Hi-Definition prints — Claria ® 6-color ink for the ultimate in photo quality and longevity (prints last up to four times longer than photo lab prints)1• Connect to your wireless network inseconds — Wi-Fi CERTIFIED TM n makes it easy; up to 2.5 times faster transfer speeds than theprevious 802.11g2• Superior image enhancement tools —automatic color and lighting correction for the best quality photos• Remarkable image quality — DX5TMMicroPiezo ® printhead technology, up to 5760 x 1440 dpiresolution and ink droplets as small as 1.5 picoliters• Professional looking CDs/DVDs — print right onto inkjet printable CDs/DVDs without labels • Individual ink cartridges — replace only the color you need• Epson Connect TM— easy iPad ®, iPhone ®, tablet and smartphone 3 printing• Borderless photos in popular sizes — from 4" x 6" to 13" x 19"; 12" x 12" is also available, for scrapbooking projects• Achieve the results you want — choose from a variety of paper finishes; the Artisan 1430 supports over 50 media types and sizesArtisan ®1430Wireless | Wide-format | Photo | CD/DVDD E S I G N E D F O R C R E AT I V I T Y ULTRAHDMaximum Print Resolution 5760 x 1440 optimized dpiPhoto Print Speed 44" x 6" borderless photo in as fast as 46 sec8" x 10" borderless photo in as fast as 1 min 51 sec11" x 14" borderless photo in as fast as 2 min 53 sec13" x 19" borderless photo in as fast as 3 minISO Print Speed†Black 2.8 ISO ppmColor 2.8 ISO ppmCONNECTIVITYConnectivity Hi-Speed USB 2.0Wi-Fi CERTIFIED 802.11 (b/g/n) 2Direct Camera Connection PictBridge™ port (cameras/phones)ExifOperating Systems Windows® 8.x (32-bit, 64-bit), Windows 7 (32-bit, 64-bit),Windows Vista® (32-bit, 64-bit), Windows XP SP1or higher (32-bit), Windows XP Professional x64 EditionMac® OS X 10.4.11 – 10.10.x5PAPER HANDLINGMaximum Paper Size User definable up to 13" x 44"Paper Sizes 4" x 6", 5" x 7", 8" x 10", A4 (8.3" x 11.7"), letter (8.5" x 11"),legal (8.5" x 14"), 11" x 14", 12" x 12", B (11" x 17"),A3 (11.7" x 16.5") and Super B (13" x 19")Borderless Photo Sizes4" x 6", 5" x 7", 8" x 10", A4 (8.3" x 11.7"), letter (8.5" x 11"), 11" x 14", B (11" x 17"), 12" x 12" and Super B (13" x 19")Paper Types Supports plain paper, Epson® Bright White Paper,Photo Paper Glossy, Premium Photo Paper Glossy,Ultra Premium Photo Paper Glossy, Premium PhotoPaper Semi-gloss, Ultra Premium Photo Paper Luster,Presentation Paper Matte, Premium Presentation Paper Matte,Ultra Premium Presentation Paper Matte andUltra Premium Presentation Paper Matte Double-sided Envelope Types No. 10Input Paper Capacity 100 sheets plain paper20 sheets Premium Photo Paper GlossyDirect CD/DVD Printing Inkjet printable CDs and DVDs Temperature Operating: 50 ° to 95 °F (10 ° to 35 °C),Storage: 4 ° to 104 °F (-20 ° to 40 °C) [one month at 40 °C] Relative Humidity Operating: 20 – 80%Storage: 5 – 85% (no condensation)Sound Level 43 dB(A) per ISO 7779Power Requirements Rated voltage: 100 – 120 VACRated frequency: 50 – 60 HzRated current: 0.5 A (Max .06 A)Power Consumption Approx. 18 W ISO 24712Approx. 7 W (Ready)ENERGY STAR® qualifiedSafety Approvals Safety standards UL60950-1-CAN/CSA-22.2No. 60950-1EMC FCC Part 15 subpart B class B,CAN/CSA-CEI/IEC CISPR 22 class BPrinter Weight and Dimensions (W x D x H) Printing: 24.3" x 31.4" x 16.3"Storage: 24.3" x 12.7" x 8.5"Weight: 26.0 lb (no ink and power cable)What’s In The Box Artisan 1430 wide-format color inkjet printer, CD/DVD tray, setupand instruction manuals, CD-ROM containing software and drivers(Windows and Mac®), power cord, 6 Claria Hi-Definition High-capacity ink cartridges 6 : one 79 Black ink cartridge, five 79 colorink cartridges: Cyan, Magenta, Yellow, Light Cyan, Light Magenta Software Included Epson printer driver, Epson Print CDWarranty One-year limited in the U.S. and CanadaCountry of Origin IndonesiaINKInk Type Claria Hi-Definition Ink(smudge, scratch, water and fade resistant photos)7Ink Palette Black, Cyan, Magenta, Yellow, Light Cyan and Light MagentaInk Cartridge Configuration 6 individual ink cartridgesFade Resistance/Print Longevity1Up to 98 years under glassUp to 200 years album storageMinimum Ink Droplet Size 1.5 picolitersReplacement Ink Cartridges 679 Black79 Cyan79 Magenta79 Yellow79 Light Cyan79 Light MagentaECO FEATURES• Save by printing multiple pages on a single sheet• Supports printing on recycled paper• Recyclable product 8• RoHS compliant• ENERGY STAR qualified• Epson America, Inc. is a SmartWay SM Transport Partner 9www.epson.ca† I SO ppm is based on ISO 24734. Black and color print speeds are determined in default, single-side mode, in accordance with ISO/IEC 24734. Actual print times will vary based on system configuration, software, and page complexity. See /printspeed for details, including complete ISO reports.1 D isplay permanence based on accelerated testing of prints displayed under glass in indoor display conditions; album permanence based on accelerated testing of prints in dark storage conditions. Actual print stability will vary according to media, printed image, display conditions, light intensity, temperature, humidity and atmospheric conditions. Epson does not guarantee the longevity of prints. For maximum print life, display all prints under glass or UV filter or properly store them.。
Epson 打印机初始设置指南说明书
8 Close the ink tank cover, then close the scanner unit.9 R aise the control panel, then press the power button toturn on the product. Thepower light flashes.Note: If an error code appears, turn off the product and check that no protective material has been left inside the product.10 E T -3830/ET -3850: Select your language.ET -4850: Select your language, country, date, and timesettings.Note: You can change these settings later using the product’s control panel. For more information, see the online User’s Guide .11 W hen an Epson Smart Panel setup message appears onthe LCD screen, select the option to continue setup.12 W hen the message to see the Start Here sheet appearson the LCD screen, press and hold the help button for5 seconds .13 F ollow the on-screen instructions to start ink charging. Inkcharging takes about 10 minutes .Note: When the power light stops flashing, ink charging iscomplete. Once initial setup of the printer is complete, you can top off the ink tanks with any remaining ink. See the online User’s Guide for instructions.C aution: Do not unplug or turn off the product, or raise thescanner unit while the product is charging or you’ll waste ink.Note:14 E T -3830/ET -3850: Press the OK button to proceed withinitial setup.ET -4850: Select To adjustment to proceed with initialsetup.o not open the ink bottles until you are ready to fill the ink tanks. The ink bottles are vacuum packed to maintain reliability.Some products may not include a CD.The Epson Smart Panel ® app can help you set up your printer through an interactive, step-by-step process using your smartphone or tablet.If you do not want to use a mobile device for setup, skip to the “Fill ink tanks” section below.To use your mobile device for setup, continue to step 1.or1 D ownload the Epson Smart Panel appfrom your device’s app store. Do notlaunch the app yet.2 P ress thepower button to turn on the product.Note: Do not connect your product to your computer yet.3 L aunch the app and follow its instructions to set up yourproduct.For information on setting up the fax (ET -4850), connecting your product to a computer, using voice-activated printing, or solving problems, or for details on reaching Epson support, see the sections on the back of this sheet.Warning: Keep the ink bottles out of the reach of children and do notdrink the ink.Caution: This product requires careful handling of ink. If ink spills, wipe it off immediately with a damp towel to avoid permanent stains. If ink gets on your clothes or belongings, it may not come off.Note:• E pson cannot guarantee the quality or reliability of third-party ink.• U se the ink bottles included with the printer to set up the product. Part of the ink will be used to charge the print head. These bottles may print fewer pages compared with replacement ink bottles.• E pson strongly recommends the use of genuine ink to ensure optimal print quality and performance.1 W ith the scanner unit raised, open the ink tank cover, thenopen the cap for the black (BK) ink tank.each tank.2 U npack the black (BK) ink bottle. Hold the ink bottleupright and slowly turn the bottle cap to remove it.Caution:3 I 4 W Do not squeeze the bottle orallow it to contact any other surface.Note: Ink flows into the tank and stops automatically when the ink tank is filled to the upper line. If ink reinsert the bottle.5 W hen the ink tank is full, remove the ink bottle andsecurely close it with the bottle cap. If any ink remains inthe bottle, close the bottle and store it for later use.Start HereET-3830/ET-3850/ET-48505 K eep the cassette flat as you insert it all the way .67 Select the paper settings on the product’s control panel.C onnect the fax line(ET-4850)1 C onnect a phone cord to a telephone wall jack and to theLINE port on your product. See the online User’s Guidefor more information.2 S elect Proceed on the LCD screen to set up the fax, orselect Set Up Laterto set it up later.Note:• I f your product did not include a CD, if you are using a Mac, or if your computer does not have a CD/DVD drive, an Internet connection is required to obtain the product software. • T o print from a Chromebook™, go to/support/chromebookprint (U.S.) or www.epson.ca/support/chromebookprint (Canada) for instructions.1 M ake sure the product is NOT CONNECTED to yourcomputer.W indows ®: If you see a Found New Hardware screen, clickCancel and disconnect the USB cable.2 I nsert the product CD (Windows only) or download andrun your product’s software package. For the latestsoftware, visit /support (U.S.) or www.epson.ca/support (Canada) and search for your product. 3 F ollow the instructions on the computer screen to run the setup program.4 W hen you see the Select Your Connection screen, selectone of the following and follow the on-screen instructions:•Wireless connectionIn most cases, the software installer automaticallyattempts to set up your wireless connection. If setup is unsuccessful, you may need to enter your network name (SSID) and password.• Direct USB connectionM ake sure you have a USB cable (not included).•Wired network connectionMake sure you have an Ethernet cable (not included).EPSON and Epson Smart Panel are registered trademarks, EPSON Exceed Your Vision is a registered logomark, and Epson Connect is a trademark of Seiko Epson Corporation.Designed for Excellence is a trademark of Epson America, Inc.Windows is a registered trademark of Microsoft Corporation in the United States and/or other countries.Mac is a trademark of Apple Inc., registered in the U.S. and other countries.Android, Chromebook, and Google Play are trademarks of Google LLC.General Notice: Other product names used herein are for identification purposes only and may be trademarks of their respective owners. Epson disclaims any and all rights in those marks.This information is subject to change without notice.© 2021 Epson America, Inc., 2/21Printed in XXXXXXCPD-6003115 F ollow the on-screen instructions to adjust the printquality of your product.Note:• Y ou need to load paper before you can adjust the print quality. See “Load paper” on this sheet for details.• S elect Adjust Later if you want to adjust the print quality later. For more information, see the online User’s Guide .Caution:do not fall below the lowest lines on the tanks. Prolonged use whenUser’s Guide for refilling instructions.See the online User’s Guide for information about loadingcapacity, available paper types and sizes, using the ADF (ET -3850/ET -4850), and loading envelopes.1 M ake sure the product is not charging ink, and then open2 S3 INote: Make sure the paper is loaded against the front edge guide and not sticking out from the end of the cassette.4 S lide the side edge guides against the paper, but not tooMobile and voice-activatedprinting• Print directly from your Android™ (v4.4 or later) device*.Simply connect your printer and device to the same network and tap the menu icon to select the print option.• Turn your mobile device into an intuitive, easy-to-useprinting and scanning control center with Epson Smart Panel. Download the app from your mobile device’s app store.• Print from wherever you are, next to your printer orremotely, with Epson Connect™. Learn more at /connect (U.S.) or www.epson.ca/connect (Canada).• Use voice-activated assistants to print a variety of creativeand everyday items from your Epson product. Simply add your product to an Epson Connect account, then link the account to a voice-activated assistant. See/voice (U.S.) or www.epson.ca/voice (Canada) for more information.* M ay require the Epson Print Enabler or Mopria Print Service app fromGoogle Play™.Any problems?Network setup was unsuccessful.• Make sure you select the right network name (SSID).• Restart your router (turn it off and then on), then try toconnect to it again.• If you see a firewall alert message, click Unblock or Allowto let setup continue.• If your network has security enabled, make sure you enteryour network password (WEP key or WPA passphrase) correctly. Be sure to enter your password in the correct case.• Print a network connection report to identify networkproblems and solutions. See your online User’s Guide for instructions.There are lines or incorrect colors in my printouts.Run a nozzle check to see if there are any gaps in the printout. Then clean the print head, if necessary. See the online User’s Guide for more information.The product’s screen is dark.Make sure your product is turned on, and press any button(ET -3830/ET -3850) or touch the screen (ET -4850) to wake it from sleep mode.Setup is unable to find my product after connecting it with a USB cable.Make sure your product is on and the USB cable is securely connected.Any questions?User’s GuideWindows: Click the icon on your desktop or Apps screen to access the online User’s Guide .Mac: Click the icon in Applications/Epson Software/Guide to access the online User’s Guide.If you don’t have a User’s Guide icon, go to the Epson website, as described in “Technical support.”Technical supportVisit /support (U.S.) orwww.epson.ca/support (Canada) and search for your product to download drivers, view videos and manuals, get FAQs, or contact Epson.Call (562) 276-4382 (U.S.) or (905) 709-3839 (Canada), 6 am to 8 pm , Pacific Time, Monday through Friday, and 7 am to 4 pm , Pacific Time, Saturday. Days and hours of support are subject to change without notice. Toll or long distance charges may apply.RecyclingEpson offers a recycling program for end-of-life hardware and ink bottles. Please go to /recycle (U.S.) or www.epson.ca/recycle (Canada) for information on how to return your products for proper disposal.Need paper and ink?Ensure brilliant results with Epson specialty and plain papers, engineered specifically for Epson printers. Find Epson papers and Epson Genuine Ink at (U.S. sales) or www.epson.ca (Canadian sales) and at Epson authorized resellers. Call 800-GO-EPSON (800-463-7766).ET -3830/ET -3850/ET -4850 replacement inks。
- 1、下载文档前请自行甄别文档内容的完整性,平台不提供额外的编辑、内容补充、找答案等附加服务。
- 2、"仅部分预览"的文档,不可在线预览部分如存在完整性等问题,可反馈申请退款(可完整预览的文档不适用该条件!)。
- 3、如文档侵犯您的权益,请联系客服反馈,我们会尽快为您处理(人工客服工作时间:9:00-18:30)。
数码照片精细打印指南版权和商标版权所有,翻版必究No part of this publication may be reproduced, stored in a retrieval system, or transmitted in any form or by any means, electronic, mechanical, photocopying, recording, or otherwise, without the prior written permission of Seiko Epson Corporation. The information contained herein is designed only for use with this Epson printer. Epson is not responsible for any use of this information as applied to other printers.Neither Seiko Epson Corporation nor its affiliates shall be liable to the purchaser of this product or third parties for damages, losses, costs, or expenses incurred by the purchaser or third parties as a result of accident, misuse, or abuse of this product or unauthorized modifications, repairs, or alterations to this product, or (excluding the U.S.) failure to strictly comply with Seiko Epson Corporation's operating and maintenance instructions.Seiko Epson Corporation shall not be liable for any damages or problems arising from the use of any options or any consumable products other than those designated as Original Epson Products or Epson Approved Products by Seiko Epson Corporation.Seiko Epson Corporation shall not be held liable for any damage resulting from electromagnetic interference that occurs from the use of any interface cables other than those designated as Epson Approved Products by Seiko Epson Corporation.EPSON® is a registered trademark, and EPSON STYLUS™ and Exceed Your Vision are trademarks of Seiko Epson Corporation.Microsoft® and Windows® are registered trademarks of Microsoft Corporation.Apple® and Macintosh® are registered trademarks of Apple Inc.Adobe®, Illustrator®, Photoshop®, Photoshop® Elements, Adobe® Gamma, Adobe® RGB and Adobe® RGB (1998) are registered trade marks of Adobe Systems Incorporated.General Notice: Other product names used herein are for identification purposes only and may be trademarks of their respective owners. Epson disclaims any and all rights in those marks.Copyright© 2007 Seiko Epson Corporation. All rights reserved.本产品信息如有更改,恕不另行通知。
对其中涉及的描述和图像,以包装箱内实际内容为准,在中国法律法规允许的范围内,爱普生(中国)有限公司保留解释权。
本产品、相关资料及光盘以针对在大陆地区销售产品的中文内容为准。
英文及其他语种内容针对全球销售产品,仅供用户对照。
本资料仅供参考。
除中国现行法律法规规定,爱普生(中国)有限公司不承担任何由于使用本资料而造成的直接或间接损失的责任。
目录介绍步骤1:系统配置步骤 2:色彩管理色彩管理系统 . . . . . . . . . . . . . . . . . . . . . . . . . . . . . . . . . . . . . . 8色彩空间 . . . . . . . . . . . . . . . . . . . . . . . . . . . . . . . . . . . . . . . 9色彩管理方法 . . . . . . . . . . . . . . . . . . . . . . . . . . . . . . . . . . . . . .10显示器校准 . . . . . . . . . . . . . . . . . . . . . . . . . . . . . . . . . . . . . .12步骤 3:如何为您的作品选择最好的纸张和墨水介质综述 . . . . . . . . . . . . . . . . . . . . . . . . . . . . . . . . . . . . . . . .14墨水综述 . . . . . . . . . . . . . . . . . . . . . . . . . . . . . . . . . . . . . . . .15介质和墨水的组合 . . . . . . . . . . . . . . . . . . . . . . . . . . . . . . . . . . . .15步骤 4:数据输入如何输入数据 . . . . . . . . . . . . . . . . . . . . . . . . . . . . . . . . . . . . . .16彩色照片 . . . . . . . . . . . . . . . . . . . . . . . . . . . . . . . . . . . . . . .16黑白照片 . . . . . . . . . . . . . . . . . . . . . . . . . . . . . . . . . . . . . . .16适合输出尺寸的正确的分辨率 . . . . . . . . . . . . . . . . . . . . . . . . . . . . . . .18分辨率 . . . . . . . . . . . . . . . . . . . . . . . . . . . . . . . . . . . . . . . .18图像数据的分辨率和打印尺寸之间的关系 . . . . . . . . . . . . . . . . . . . . . . . . .18输入数据 . . . . . . . . . . . . . . . . . . . . . . . . . . . . . . . . . . . . . . . .21色彩空间 . . . . . . . . . . . . . . . . . . . . . . . . . . . . . . . . . . . . . . .21数码相机 . . . . . . . . . . . . . . . . . . . . . . . . . . . . . . . . . . . . . . .21扫描 . . . . . . . . . . . . . . . . . . . . . . . . . . . . . . . . . . . . . . . . .22在应用软件中编辑图像 . . . . . . . . . . . . . . . . . . . . . . . . . . . . . . . . .26步骤 5:调整数据调整数据的准备 . . . . . . . . . . . . . . . . . . . . . . . . . . . . . . . . . . . . .27应用软件 . . . . . . . . . . . . . . . . . . . . . . . . . . . . . . . . . . . . . . .27测试打印 . . . . . . . . . . . . . . . . . . . . . . . . . . . . . . . . . . . . . . .29调整照片数据 . . . . . . . . . . . . . . . . . . . . . . . . . . . . . . . . . . . . . .30谨慎的调整 . . . . . . . . . . . . . . . . . . . . . . . . . . . . . . . . . . . . . .30数字处理 . . . . . . . . . . . . . . . . . . . . . . . . . . . . . . . . . . . . . . .30黑白照片 . . . . . . . . . . . . . . . . . . . . . . . . . . . . . . . . . . . . . . .32调整数据的注意事项 . . . . . . . . . . . . . . . . . . . . . . . . . . . . . . . . . . .32用柱状图浏览数据 . . . . . . . . . . . . . . . . . . . . . . . . . . . . . . . . . . .32分辨率 . . . . . . . . . . . . . . . . . . . . . . . . . . . . . . . . . . . . . . . .34步骤 6: 打印打印彩色照片 . . . . . . . . . . . . . . . . . . . . . . . . . . . . . . . . . . . . . .37色彩管理设置 . . . . . . . . . . . . . . . . . . . . . . . . . . . . . . . . . . . . .37其他色彩管理设置 . . . . . . . . . . . . . . . . . . . . . . . . . . . . . . . . . . .40打印黑白照片 . . . . . . . . . . . . . . . . . . . . . . . . . . . . . . . . . . . . . .50打印黑白照片的高级设置 . . . . . . . . . . . . . . . . . . . . . . . . . . . . . . . .50故障解决 . . . . . . . . . . . . . . . . . . . . . . . . . . . . . . . . . . . . . . . .54显示器显示的颜色和打印的颜色不同。