Sun安装文档
Sun ONE Directory Proxy Server 版本 5.2 安装指南说明书

安装指南Sun TM ONE Directory Proxy Server版本 5.22003 年 6 月817-3796-10版权所有 © 2003 Sun Microsystems, Inc. 部分版权所有 © 2001 Netscape Communications Corporation。
版权所有 © 1996-1998 Critical Angle Inc. 版权所有 © 1998-2001 Innosoft International, Inc. 保留所有权利。
Sun、Sun Microsystems 和 Sun 徽标是 Sun Microsystems, Inc. 在美国和其他国家(地区)的商标或注册商标。
Netscape 和Netscape N 徽标是 Netscape Communications Corporation 在美国和其他国家(地区)的注册商标。
其他 Netscape 徽标、产品名称和服务名称也是 Netscape Communications Corporation 的商标,它们可能已在其他国家(地区)注册。
部分 Sun ONE Directory Proxy Server 产品源自 University of Michigan(密歇根大学)、the University of California at Berkeley(位于伯克利的加州大学)和 Harvard University(哈佛大学)分别拥有版权的软件。
事先未经明确的书面许可,这些大学的名称不得用于认可或促销由此处描述的产品或文档所衍生的产品。
部分 Sun ONE Directory Proxy Server 文档的版权属 The Internet Society (1997) 所有。
保留所有权利。
联邦采购:商业软件 - 政府用户遵守标准许可条款和条件本文档中所述的产品根据限制其使用、复制、分销和反编译的许可证进行分销。
Sun SPARC Enterprise M3000 服务器安装指南说明书
This guide describes the minimum steps you must perform to power on and boot your server for the first time.Before installing the Sun SPARC Enterprise M3000server,check for late breaking information about patches and known rmation found in the Sun SPARC Enterprise M3000Server Product Notes supersedes the information in this documents.Detailed installation information can be found in the Sun SPARC Enterprise M3000Server Installation Guide ,which is available at the Sun documentation web site:/app/docs/prod/servers.entry#hicSafety and Compliance InformationBefore performing an installation,refer to the following documents for safety information regarding the Sun SPARC Enterprise M3000Server :■Important Safety Information for Sun Hardware Systems (816-7190)–Printed document included in the ship kit.■Sun SPARC Enterprise M3000Server Safety and Compliance Manual (820-5582)–Available online at the Sun documentation web site.Prepare the Site for Installation1.Verify power,air conditioning,and floor area requirements.See the Sun SPARC Enterprise M3000Server Site Planning Guide.2.Check the delivered items against the “LIST OF ATTACHMENT”that came with the server.Register the System1.Locate the serial number for your system or the customer information sheet that came with the system.2.Go to the following web site to register your system:/service/warranty/index.xml#regSun SPARC ® Enterprise M3000Server Getting Started GuideInstall Optional ComponentsBefore installing the server into the rack,you must first install any optional components that you ordered with the server,such as DIMMs,PCIe cards,and so on.Refer to the Sun SPARC Enterprise M3000Server Service Manual for the instructions on installing optional components.Mount the System In a RackFor rackmounting instructions,refer to the instructions in the Sun SPARC Enterprise Rack Mounting Guide (online)and the Rail Kit Instructions which ships with the rails.Installation Steps for SPARC Enterprise M3000ServerFor quick installation and configuration,follow these steps.For more detailed information,see the SPARC Enterprise M3000Server Installation Guide .Caution –Make sure that the AC power source circuit breaker is in the OFF position beforeplugging in the AC power cables.▼Connecting the Cables1.Connect the power cables to the power supply units on the rear panel of the server.2.Connect the power cables to AC power supply system.This server is shipped with grounding-type (three-wire)power cables.Always connect the power cables into grounded power outlets.FIGURE 1Rear Panel of the ServerFigure Legend Location NumberComponent1Power supply unit 2PCIe slot3Serial port (for XSCF)4LAN port (for XSCF)5Gigabit Ethernet (GbE)port (for OS)12345e the brown RS232C cable (serial cable,RJ-45to DB-9)supplied with the server,and connect theadministration console to the serial port (see FIGURE 1,#3)on the rear panel of the server.You can use any of the following devices with a DB-9serial port as the administration console:ASCII terminal,workstation,terminal server (or a patch panel connected to a terminal server),or personal computer.A Serial-to-USB port adapter may be required for laptops.▼Initialize the XSCFThe following steps will log in to the XSCF Shell and initialize the XSCF settings.XSCF is a system control facility to set up and control the server.1.Set the mode switch on the operator panel to the Service mode ().The key for the operator panel is supplied with the server.FIGURE 2Operator Panel2.Turn the AC power source circuit breaker to "ON".After AC power is turned on,the server starts the XSCFinitialization that can take up to 5or more minutes.When the initialization completes,the XSCF STANDBY LED ()on the operator panel lights.3.After the XSCF initialization completes,enter default at the login prompt.Figure Legend Location No.Name1POWER LED 2XSCF STANDBY LED 3CHECK LED 4Power button5Mode switch (Key switch)login:default123454.Operate the mode switch within one minute according to the messages to change the mode switch.A login authentication timeout will occur after one minute.5.Confirm that the XSCF Shell prompt is displayed on the administration console.6.Initialize the XSCF settings.The following are the required settings for installation.To apply the settings,the XSCF unit must be reset with the applynetwork and rebootxscf commands.For details on the setting procedure,see the Sun SPARC Enterprise M3000/M4000/M5000/M8000/M9000Servers XSCF User’s Guide .7.Log in to the XSCF Shell with the user account and password that were set in the Step 6.▼Power On the Server1.The following steps will power on the server.a.Confirm that the mode switch on the operator panel is set to the Service mode ().b.From the XSCF Shell,enter the following console command:This switches you from the XSCF Shell to the domain console.c.Confirm that the XSCF STANDBY LED ()on the operator panel is on.d.Push the Power button ()on the operator panel to power on the server.The server starts and begins a self-diagnosis.Confirm that no error messages are displayed on the administration console during the boot process.e.Confirm that the POWER LED ()on the operator panel is turned on.f.Confirm that ok prompt is displayed on the domain console.The ok prompt is displayed after the self-diagnosis completes.Change the panel mode switch to Locked and press return...Leave it in that position for at least 5 seconds.Change the panel mode switch to Service, and press return...XSCF>SettingsCommandRegistration of an XSCF user account,password,and user privilegesRegistration of an user account of a field engineer (FE)(for maintenance)adduser ,password ,setprivileges Date and time settingssetdate ,settimezone Confirmation of the XSCF host public key showsshSSH/telnet settingssetssh ,settelnet Network interface,routing,and DNS-related settings setnetwork,setroute ,setnameserver etc.Altitude administration setting setaltitude Dual power feed option settingsetdualpowerfeedXSCF>console -d 0Connect to DomainID 0?[y|n]:yg.Press the Enter key,and then press the"#"and“.”(period)keys.This switches you from the domain console to the XSCF Shell.h.From the XSCF Shell,execute the fmdump command or showlogs command,and confirm that no errorsare found.2.Connect the system control network to a LAN port(see FIGURE1,#4)on the rear panel of the server withan Ethernet cable.3.Verify the hardware configuration by using the following commands on the administration consoleconnected to the system control network.Command Prompt Descriptionshowhardconf XSCF Shell All the components installed in the server and their statuses are displayed.Confirm that no asterisk(*)is displayed in front of any FRUs.showhardconf-u XSCF Shell Check the number of FRUs mounted on the server against the“PRODUCTTEST RECORD“that came with the server.probe-scsi-all ok Prompt Confirm that the CD-RW/DVD-RW drive unit and hard disk driveinstalled in the server are recognized.show-devs ok Prompt Confirm that each installed PCIe card is recognized.To switch from the XSCF console to the ok prompt,enter the console-d0command.To switch from the ok prompt to the XSCF console,press the enter key,and then press the"#"and"."(period)keys.4.Install additional hardware or peripheral devices.If not needed,proceed to the Step5.For details on how to add optional devices,such as additional memory or an additional PCIe card,see the Sun SPARC Enterprise M3000Servers Service Manual.To add an additional storage device or other peripheral device,see the manual supplied with the device.5.The following steps will connect the domain to the user network.If you isolate the domain from thenetwork,proceed to the Step1.The user network is a network which enables users to access the domain.a.Connect one end of an Ethernet cable to a GbE port(for the OS)(see FIGURE1,#5)on the rear panel ofthe server.You can connect the Ethernet cable to a GbE port(for the OS)or to the LAN port on a LAN card mounted in a PCIe slot(see FIGURE1,#2).b.Connect the other end of the Ethernet cable to the customer’s network environment.▼Boot the Solaris Operating System1.The following steps will boot the Solaris TM Operating System.The Solaris OS is preinstalled in the slot0of the hard disk drives.a.From the ok prompt of the domain console,execute the boot command.ok bootb.After the login prompt is displayed,log in with root account.2.Confirm the status of hardware operations and device connection by using SunVTS.For details,see the SunVTS User’s Guide.Manual Code C120-E549-01EN Part No. 820-5581-10, Rev. A October 2008Sun Microsystems, Inc.3.Make the initial settings for the domain.For details,see the Sun SPARC Enterprise M3000/M4000/M5000/M8000/M9000Servers Administration Guide .Sun SPARC Enterprise M3000Server Related DocumentationSun Contact InformationSystem Planning and Site Preparation •Sun SPARC Enterprise M3000Server Overview Guide •Sun SPARC Enterprise M3000Server Site Planning Guide System Installation •Sun SPARC Enterprise Equipment Rack Mounting Guide •Sun SPARC Enterprise M3000Server Installation Guide Administration•Sun SPARC Enterprise M3000Server Product Notes•Sun SPARC Enterprise M3000/M4000/M5000/M8000/M9000Servers Administration Guide •Sun SPARC Enterprise M3000/M4000/M5000/M8000/M9000Servers XSCF User’s Guide•Sun SPARC Enterprise M3000/M4000/M5000/M8000/M9000Servers XSCFReference ManualRepair and Troubleshooting •Sun SPARC Enterprise M3000Server Service ManualTopicURLTechnical support/service/contacting Submitting comments on this document /hwdocs/feedback Patch and firmware updates/support/index.jspCopyright 2008Sun Microsystems,Inc.All rights reserved.FUJITSU LIMITED provided technical input and review on portions of this material.Copyright 2008Sun Microsystems,Inc.Tous droits réservés.Entrée et revue tecnical fournies par FUJITSU LIMITED sur des parties de ce matériel.。
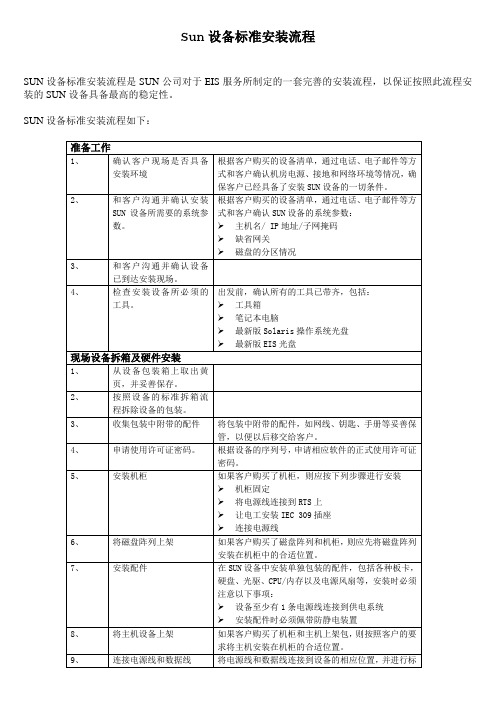
SUN标准安装流程
启用新的root用户的配置文件
以root用户运行下列命令:
# . /.profile
3、
安装V880的backplane的软件包
如果客户购买的是V880服务器,则必须先按照下列步骤升级背板的Firmware:
将Solaris 8或9的Supplement CD插入光驱,进入Sun_Fire_880_FC_AL_Backplane_Firmware_1.0目录下的Product目录,安装SUNWfcbpl.u软件包
将
mpxio_disable=”yes”
修改为
mpxio_disable=”no”
2、
和客户沟通并确认安装SUN设备所需要的系统参数。
根据客户购买的设备清单,通过电话、电子邮件等方式和客户确认SUN设备的系统参数:
主机名/ IP地址/子网掩码
缺省网关
磁盘的分区情况
3、
和客户沟通并确认设备已到达安装现场。
4、
检查安装设备所必须的工具。
出发前,确认所有的工具已带齐,包括:
工具箱
笔记本电脑
# pkgadd –d . SUNWfcbpl.u
4、
升级V880的backplane
用以下命令确认V880的backplane的版本:
# luxadm display FCloop
得到的DPM_xxxx即为目前Firmware的版本
从EIS CD上安装V880的backplane软件包的补丁:
# cd /cdrom/cdrom0/sun/patch/firmware
10、
对A5000磁盘阵列进行设置
如果设备中包含A5000磁盘阵列,应先在前面板的触摸屏上对阵列做以下配置:
华为SUN2000-(50KTL, 50KTL-C1)快速指南说明书
SUN2000-(50KTL, 50KTL-C1)快速指南文档版本:09部件编码:31509128发布日期:2020-08-04HUAWEI TECHNOLOGIES CO., LTD.1产品简介1.由于产品版本升级或其他原因,本文档内容会不定期进行更新。
除非另有约定,本文档仅作为使用指导,文档中的所有陈述、信息和建议不构成任何明示或暗示的担保。
2.安装设备前请详细阅读《SUN2000-(50KTL,50KTL-C1) 用户手册》,了解产品信息及安全注意事项。
3.设备所有操作必须由训练有素的专业电气技术人员进行。
操作人员应充分熟悉整个光伏并网发电系统的构成、工作原理,及项目所在国家/地区的相关标准。
4.安装设备前请根据《装箱清单》检查交付件是否完整齐备,有无任何明显的外部损坏。
如果缺少任何物件或存在任何损坏,请联系您的经销商。
5.安装设备时必须使用绝缘工具。
为了人身安全,请佩戴绝缘手套,穿安全鞋。
6.未按照本文档与用户手册的内容存储、搬运、安装和使用设备而导致的设备损坏,不在设备质保范围内。
电缆防水固定接头,后文简称为“接头”。
(1)PV 连接指示灯(2)并网指示灯(3)通信指示灯(4)告警/维护指示灯(5)维护腔门(6)主机面板机箱正面端口说明(1)电缆防水固定接头(AC OUTPUT 1)(3)USB 接口(USB )(5)直流开关2(DC SWITCH 2)(7)直流输入端子(由DC SWITCH 1控制)(2)电缆防水固定接头(AC OUTPUT 2)(4)直流开关1(DC SWITCH 1)(6)电缆防水固定接头(COM1/COM2/COM3)(8)直流输入端子(由DC SWITCH 2控制)机箱尺寸工程安装件尺寸2安装要求安装角度2.1倒置前倾竖直后仰水平安装空间2.2为了便于将逆变器安装到工程安装件上,同时便于逆变器底部接线和后续维护,建议600mm≤ 底部空间≤ 730mm。
3安装逆变器2.标记打孔位置。
SUN2000-(50KTL) 用户手册
SUN2000-(50KTL,50KTL-C1)用户手册文档版本 Draft A 发布日期2016-01-30华为技术有限公司版权所有© 华为技术有限公司2016。
保留一切权利。
非经本公司书面许可,任何单位和个人不得擅自摘抄、复制本文档内容的部分或全部,并不得以任何形式传播。
商标声明和其他华为商标均为华为技术有限公司的商标。
本文档提及的其他所有商标或注册商标,由各自的所有人拥有。
注意您购买的产品、服务或特性等应受华为公司商业合同和条款的约束,本文档中描述的全部或部分产品、服务或特性可能不在您的购买或使用范围之内。
除非合同另有约定,华为公司对本文档内容不做任何明示或默示的声明或保证。
由于产品版本升级或其他原因,本文档内容会不定期进行更新。
除非另有约定,本文档仅作为使用指导,本文档中的所有陈述、信息和建议不构成任何明示或暗示的担保。
华为技术有限公司地址:深圳市龙岗区坂田华为总部办公楼邮编:518129网址:客户服务邮箱:support@客户服务电话:4008302118前言概述本文档主要介绍了SUN2000-50KTL/50KTL-C1(后文简称SUN2000)的安装、电气连接、调试、维护和故障处理的方法。
请在安装、使用逆变器之前,认真阅读本手册,了解安全信息并熟悉逆变器的功能和特点。
读者对象本手册适用于光伏电站操作人员及具备相应资质的电气技术人员。
符号约定在本文中可能出现下列标志,它们所代表的含义如下。
修改记录修改记录累积了每次文档更新的说明。
最新版本的文档包含以前所有文档版本的更新内容。
文档版本Draft A (2016-01-30)试验局版本。
目录前言 (ii)1 安全注意事项 (1)2 产品介绍 (3)2.1 产品简介 (3)2.2 外观说明 (4)2.3 标签说明 (8)2.4 工作原理 (10)3 逆变器存储 (12)4 系统安装 (13)4.1 安装前检查 (13)4.2 准备安装工具 (13)4.3 挂墙安装 (17)4.3.1 选择安装位置 (17)4.3.2 搬运逆变器 (22)4.3.3 安装工程安装件 (23)4.3.4 安装逆变器 (26)4.4 支架安装 (29)4.4.1 选择安装位置 (29)4.4.2 搬运逆变器 (32)4.4.3 安装工程安装件 (32)4.4.4 安装逆变器 (34)5 电气连接 (35)5.1 开维护腔门 (35)5.2 连接保护地线(PE) (36)5.3 连接交流输出线 (38)5.4 连接直流输入线 (42)5.5 连接通信线 (48)5.5.1 通信方式说明 (48)5.5.2 连接RS485通信线 (49)5.6 关维护腔门 (55)6 系统调试 (57)6.1 上电前检查 (57)6.2 系统上电 (57)6.3 系统下电 (58)7 系统维护 (59)7.1 日常维护 (59)7.2 故障处理 (60)8 逆变器处置 (65)8.1 拆卸逆变器 (65)8.2 包装逆变器 (65)8.3 报废逆变器 (65)9 技术数据 (66)A 缩略语 (69)1 安全注意事项人员要求●所有针对SUN2000的操作必须由训练有素的专业电气技术人员进行。
sun ultra 24 工作站操作系统安装指南说明书

Sun Ultra™ 24 工作站操作系统安装指南Sun Microsystems, Inc.文件号码 820-3656-102007 年 11 月,修订版 A请到以下网址提交您对本文档的意见和建议:/hwdocs/feedback请回收版权所有 © 2007 Sun Microsystems, Inc., 4150 Network Circle, Santa Clara, California 95054, U.S.A.保留所有权利。
本发行版本可能包含由第三方开发的材料。
Sun 、Sun Microsystems 、Sun 徽标、Java 、Netra 、Solaris 、Sun Ray 、Sun Ultra 、Java Coffee Cup 徽标、Solaris 徽标、Sun Ultra 24、Ultra 24、Sun 和 Sun Microsystems Inc. 是 Sun Microsystems, Inc. 在美国和其他国家/地区的商标和注册商标。
Intel ® Intel 是 Intel Corporation 或其子公司在美国和其他国家/地区的商标或注册商标。
Intel Inside® Intel Inside 是 Intel Corporation 或其子公司在美国和其他国家/地区的商标或注册商标。
本产品受美国出口控制法律的保护和约束,也可能受其他国家/地区的进出口法律的约束。
严禁(直接或间接)用于核、导弹、生化武器或核海事最终用途或最终用户。
严禁出口或转口到美国对其实行禁运的国家/地区,或在美国出口排除列表中标明的机构,包括但不限于,被拒绝的人士和特别指定的国家/地区列表。
对于根据美国出口法规出口的产品,CPU 备件或更换件只能用于修理 CPU 或以“一对一更换”方式更换 CPU 。
除非经过美国政府授权,否则严禁将 CPU 用于产品升级。
Copyright © 2007 Sun Microsystems, Inc., 4150 Network Circle, Santa Clara, California 95054, Etats-Unis. Tous droits réservés. Cette distribution peut inclure des éléments développés par des tierces parties.Sun, Sun Microsystems, le logo Sun, Java, Netra, Solaris, Sun Ray, Sun Ultra , le logo Java Coffee Cup, le logo Solaris, Sun Ultra 24, Ultra 24, Sun et Sun Microsystems Inc. sont des marques de fabrique ou des marques déposées de Sun Microsystems, Inc. aux Etats-Unis et dans d'autres pays.Intel est une marque de fabrique ou une marque déposée de Intel Corporation ou de sa filiale aux Etats-Unis et dans d'autres pays.. Intel Inside est une marque de fabrique ou une marque déposée de Intel Corporation ou de sa filiale aux Etats-Unis et dans d'autres pays.Ce produit est soumis à la législation américaine sur le contrôle des exportations et peut être soumis à la règlementation en vigueur dansd'autres pays dans le domaine des exportations et importations. Les utilisations finales, ou utilisateurs finaux, pour des armes nucléaires, des missiles, des armes biologiques et chimiques ou du nucléaire maritime, directement ou indirectement, sont strictement interdites. Les exportations ou reexportations vers les pays sous embargo américain, ou vers des entités figurant sur les listes d'exclusion d'exportationaméricaines, y compris, mais de maniere non exhaustive, la liste de personnes qui font objet d'un ordre de ne pas participer, d'une façon directe ou indirecte, aux exportations des produits ou des services qui sont régis par la législation américaine sur le contrôle des exportations et la liste de ressortissants spécifiquement désignés, sont rigoureusement interdites. L'utilisation de pièces détachées ou d'unités centrales deremplacement est limitée aux réparations ou à l'échange standard d'unités centrales pour les produits exportés, conformément à la législation américaine en matière d'exportation. Sauf autorisation par les autorités des Etats-Unis, l'utilisation d'unités centrales pour procéder à des mises à jour de produits est rigoureusement interdite.目录前言v1.安装概述1–12.安装 Solaris2–12.1选择和更新操作系统2–12.2为 Solaris 设置 BIOS2–22.3设置 LSI RAID 配置2–22.4擦除当前安装的操作系统2–32.4.1关于诊断分区2–32.4.2当前安装的操作系统的擦除步骤2–32.5安装 Solaris 操作系统2–42.6安装驱动程序2–43.安装 Linux3–13.1选择和更新操作系统3–13.2为 Linux 设置 BIOS3–23.3设置 LSI RAID 配置3–23.4擦除当前安装的操作系统3–33.4.1关于诊断分区3–33.4.2当前安装的操作系统的擦除步骤3–3iii3.5安装 Linux 操作系统3–43.6安装驱动程序3–43.6.1安装 Linux 驱动程序3–44.安装 Windows 操作系统和驱动程序4–14.1为 Windows 操作系统设置 BIOS4–24.1.1为 Windows 操作系统及 Intel SATA 和 RAID 设置系统 BIOS4–24.1.2设置 Intel 矩阵存储管理器选项 ROM4–34.1.3设置 LSI RAID 配置4–34.2了解诊断分区4–44.3擦除启动硬盘驱动器上的分区4–44.4手动安装 Windows4–54.4.1创建 Intel SATA 和 RAID 驱动程序软盘4–54.4.2使用软盘安装 Windows4–64.4.3使用软盘安装 Windows Vista4–74.4.4安装 NVIDIA 显卡和 RealTek 音频驱动程序4–74.5使用 XpReburn 脚本创建包含驱动程序的 Windows 光盘4–84.5.1要求4–84.5.2使用 2003Reburn 或 XpReburn4–8A.安装 Linux 和 Solaris 操作系统远程映像A–1A.1从 PXE 服务器中安装 LINUX A–1A.2从 JumpStart™ 服务器中安装 Solaris A–2iv Sun Ultra 24 工作站操作系统安装指南•2007 年 11 月前言《Sun Ultra 24 工作站操作系统安装指南》包含配置 Solaris™、Linux 和 Windows 操作系统所需的信息。
SUN操作系统安装说明1

SUN操作系统安装说明一、安装solaris 8基本操作系统(SUN Blade 100)注:需要Solaris 8 software光盘两张准备:将Solaris 8操作系统software 1/2光盘放入光驱,在OK提示符下(可按stop+A出现),键入boot cdrom。
1、在“Select a Language”窗口下,选择0 : English2、在“Select a Locals”窗口下: 选择0 : English3、在“The Solaris Installation Program”窗口下,选择Continue4、在“Identify This System”窗口下,选择Continue5、在“Network Connectivity”窗口下,选择yes Continue6、在“DHCP”窗口下,选择no Continue7、在“Host name”窗口下,输入节点名,如:gtxmain1 选择Continue8、在“Ip Address”窗口下,输入IP地址,如192.9.200.101 选择Continue9、在“Subnets”窗口下,选择yes Continue10、在“Netmask”窗口下,输入掩码地址,255.255.255.0 选择Continue11、在“Ipv6”窗口下,选择no Continue12、在“Comfirm Information”窗口下,选择Continue13、在“Configure Security Policy”窗口下,选择No Continue14、在“Comfirm Information”窗口下,选择Continue15、在“Name Service”窗口下,选择None Continue16、在“Confirm Information”窗口下,选择Continue17、在“Time zone”窗口下,选择Geographic region set….18、在“Geographic Region”窗口下,选择Regions栏: Asia,EastenTime zone栏:HongKong Continue19、在“Date and Time”窗口下,输入Year,Month,Day,Hour,Minute选择Continue20、在“Confirm Information”窗口下,选择Continue21、在“Solaris Interactive Installation”窗口下,选择Initial Contince22、在“Select Geographic Region”窗口下,选择Asia Continue23、在“Select Software”窗口下,选择Entire Distribution plus OEM support Continue 24、在“Select Disks”窗口下,选择Select Boot Disk Continue25、在“Preserve Data”窗口下,选择Continue26、在“Automatically Layout File System”窗口下,选择Manual Layout27、在“File System and Disk Layout”窗口下,选择Customize28、在“Customize Disks”窗口下手动分区,指定各区空间大小,单位MB 例:0 / 5121 swap 512 (内存的2倍)2overlap5 /opt 10246 /usr 15367/export/home 剩余空间大小选择OK29、在“File System and Disk Layout”窗口下,选择Continue30、在“Mount Remote File Systems”窗口下,选择Continue31、在“Profile”窗口下,选择Begin Installation若出现“Warning: unused disk space (c0t0d0) , 选择OK32、选择Auto Reboot33、安装完后,设置root用户口令34、在“Sepecify Media”窗口下,选择CD Next35、在“Insert CD”窗口下,放入Solaris 8 Software 2/2 光盘, 选择OK36、在“Installation Summary”窗口下,选择Next37、在“Sepecify Media”窗口下,选择Skip38、在“Reboot”窗口下,选择Reboot Now二、安装workshop5.0开发系统1、在root用户下,将workshop5.0光盘放入光驱2、“File Manager”窗口中,双击workshop_install选择OK选择Y3、“Workshop Install”窗口下Software栏选择:FLEXLm License Manager Software and UtilitiesWS compiler C/C++/SPARC 5.0WS AnswerBook2 Document Collections 5.04、选择Install;开始安装,直至“Installation Complete ”窗口出现,按OK5、选择Install Licenses“License Installation Tool”窗口下选择“Loaded From an Email Message Sared to File”选择“Load File”指定Licenses文件为/tmp/lic.dat (lic.dat文件内容见《六、C语言license安装补充说明》)选择“Install”选择“Exit”6、选择Exit三、SUN操作系统加nari用户及组1、root用户下,输入admintool2、“Adminitool:Users”窗口下“Browse”菜单选择Groups“Edit”菜单选择add3、“Admintool : Add Group”窗口下输入Group Name: narigrpGroup ID: 200选择OK4、“Browse”菜单选择User“Edit”菜单选择add5、“Admintool : Add User”窗口下,选择或输入以下栏目:User name:nariUser ID : 268Primary Group : 200Secondary Group : rootLogin shell : cshPassword : Normal Passord,输入两次口令:选择OKPath : /export/home/nariOK6、“File”菜单选择exit四、自启动配置文件1、~/.login文件内容为:./.start2、~/.start文件内容为:if [ -f /export/home/nari/NARI ]then/usr/bin/rm –f /export/home/nari/NARI/usr/openwin/bin/openwinfi改变文件属性chmod +x .start3、~/.xinitrc文件内容为:cpu=`hostname | sed -e 's/\..*//'`if [ -z $DISPLAY ]; thenDISPLAY=$cpu:0fi/usr/dt/bin/dtwm &cd /export/home/nari/exe./startmain > /dev/null 2>&1xterm -g 80x25+1500+1200 -sb -C4.~/.dt/dtwmrc, ~/Dtwm, ~/.cshrc, ~/.Xdefaults在ss3:/data3/sun/config/下。
Sun StorEdge D2 阵列机箱安装指南说明书

Sun Microsystems, Inc.4150 Network CircleSanta Clara, CA 95054 U.S.A.650-960-1300請將您對本文件的意見寄到:*******************Sun StorEdge™ D2陣列機箱安裝指南文件編號:816-4750-10 2002年4月,修訂版ACopyright 2002 Sun Microsystems, Inc., 4150 Network Circle, Santa Clara, CA 95054 U.S.A. 版權所有。
本產品或文件依版權所製並受版權保護,且按照限制其使用、複製、分發和反編譯的授權許可進行分發。
未經Sun及其授權許可頒發機構的書面授權,不得以任何方式、任何形式複製本產品或本文件的任何部分。
協力廠商軟體,包括字型技術,由Sun供應商提供許可和版權。
本產品的某些部分從Berkeley BSD系統衍生而來,經University of California許可授權。
UNIX是在美國和其它國家註冊的商標,經 X/Open Company, Ltd. 獨家許可授權。
Sun、Sun Microsystems、Sun標誌、AnswerBook2、、Sun StorEdge、Sun Fire以及Solaris是Sun Microsystems, Inc. 在美國和其他國家的商標、註冊商標或服務標記。
所有的SPARC商標都按授權許可使用,是SPARC International, Inc. 在美國和其它國家的商標或註冊商標。
具有SPARC商標的產品都基於Sun Microsystems, Inc. 開發的架構。
能源之星標誌是EPA的註冊商標。
Adobe是Adobe Systems, Incorporated的註冊商標。
OPEN LOOK和Sun™ 圖形使用者介面是Sun Microsystems, Inc. 為其使用者和授權許可持有人開發的。
- 1、下载文档前请自行甄别文档内容的完整性,平台不提供额外的编辑、内容补充、找答案等附加服务。
- 2、"仅部分预览"的文档,不可在线预览部分如存在完整性等问题,可反馈申请退款(可完整预览的文档不适用该条件!)。
- 3、如文档侵犯您的权益,请联系客服反馈,我们会尽快为您处理(人工客服工作时间:9:00-18:30)。
自检
出现版本号后,等出现:
Reboot with command :boot后输入:Ctl + PauseBreak
输入boot cdrom
开始光驱启动,等待一段时间
选择语言:6
选择终端模式:3
F2继续
选择联网
选择网卡,随便选择一个就好
是否选择DHCP,选择否
输入主机名
输入IP地址
根据情况选择
输入掩码,禁用IPv6
指定默认路由
设置默认路由
确认信息
安全策略选择否
命名服务选择none
选择系统派生的。
选择地理位置
设置时间
设置口令
设置
选择标准
自动弹出光盘
选择自动引导
选择初始安装F4
初始化
接受
选择地理区域和默认语言
附加产品:无
选择文件系统:UFS
选择完整分发
选择一块硬盘
选择继续,不保留
格式化文件系统,选择手工设置F4(可选自动)
设置分区
自己设定分区,设定分区时必须命名,正确设置分区大小
选择继续
检查配置
开始安装。