MANUAL_程序安装说明文档
FIELD MANUAL SAKER ASR 潜行枪安装和维护指南说明书

WarningFailure to follow installation and maintenance instructions detailed in this manual may result in serious personal injury and damage to the firearm. Do not attempt to use this product unless you have specific training and experience in the use of firearms.Because suppressed firearms make less noise than unsuppressed firearms, it is easy to forget that they are still firearms and capable of causing bodily injury and property damage. Remember, a suppressed firearm should be treated with the same safety and caution as an unsuppressed firearm.Firearm silencers are user-attached firearm muzzle devices, and as such are subject to improper attachment issues unless the procedures outlined in this manual are followed precisely.Before installing the silencer from the host firearm, be sure that the firearm is unloaded and the action is opened so that the firearm is visibly clear of any ammunition. If you are at all unsure as to the proper procedures to ensure that your firearm is unloaded, please consult your firearm user’s manual/instructions and/or contact a properly licensed dealer or the manufacturer of your firearm.Check the fit between barrel and silencer before firing! The thread mount must be fully shouldered on the barrel. There should be no visible gap between the barrel shoulder and the face of the silencer thread mount. If there is any gap DO NOT fire the host with the silencer attached. Poor accuracy and product damage may result if the silencer is not fully shouldered.Silencers must be free of obstructions such as mud, dirt, etc. DO NOT attempt to shoot through an obstructed silencer.The silencer is designed to suppress the initial muzzle blast and subsequent projectile de-corking pressure. The silencer doesn’t contact or otherwise interact with the bullet, allowing the projectile to travel at its default speed. Because of this, a sonic crack may be produced by the projectile as it breaks the sound barrier.Depending on the geography of the area, the sonic crack may vary in volume. This is solely a function of the projectile breaking the sound barrier and is not related to product performance.CONTINUED ON NEXT PAGEWarningTo ensure your silencer remains secure while firing, it is of the utmost importance that you frequently verify the silencer is securely tightened onto the barrel. We recommend checking the security of the attachment after 30 discharges of the firearm.Before removing the silencer from the host firearm, be sure that the firearm is unloaded and the action is opened so that it is visibly clear of any ammunition. When removing the silencer, use extreme caution as it may be hot to the touch after firing. Use gloves to avoid burns or other injuries. Once the silencer is removed from the host firearm, SilencerCo recommends using a thread protector or other muzzle device to protect the muzzle threads and crown, during storage or transport.Overview & Product SpecsThe Saker® ASR sets the industry standard for ease of use, modularity, and durability. The Saker ASR was designed for bolt action, semi-auto, and full-auto firearms. In addition to its performance, the Saker ASR’s design allows for maximum user adaptability and convenience.ASR™ (Active Spring Retention) Mount technology facilitates attachment via a variety of different flash hiders, muzzle brakes, and direct thread mounts.The Hoplon Baffle® deflects debris and increases silencer lifespan on short barreled rifle and full auto applications using Stellite™ (Saker ASR 556 and Saker ASR 556K only).The Saker ASR is full-auto rated and is compatible with a range of ammunition from 22 Hornet to 300 Win Mag.The Saker ASR series is rated down to 7” barrels for 5.56mm NATO and the Saker ASR 762 is also rated down to 7” barrels on 300 BLK, 12” barrels for 7.62mm NATO and 20” barrels for magnum calibers up to 300 Win Mag.The Saker ASR was designed to be used “dry” and free of any ablative media, such as grease and water. If submerged in water, the user must allow a minimum 6 second drain time after exiting the water.The Saker ASR comes with an ASR Mount already installed. All other Saker ASR accessories, including additional muzzle devices and front caps, are sold separately.The Saker ASR includes a Charlie multi-tool and Charlie Basic Tools.The Saker ASR 556 and Saker ASR 556K include an ASR flash hider (1/2 x 28) while the Saker ASR 762 includes an ASR muzzle brake (⅝5/8 x 24) and a shim kit to be used for timing the brake.MATERIALSStellite & Stainless SteelDIAMETER1.50”CHARLIE MULTI-TOOLCHARLIE BASIC TOOLMUZZLE BRAKE762 ONLYFLASH HIDER556 & 556K ONLYIncludedCALIBERS & RESTRICTIONS 5.56 NATO LENGTH 6.37” – 7.33”WEIGHT 16.7 OZ MUZZLE AVERAGE 5.56 NATO: 134.0 dB CALIBERS & RESTRICTIONS5.56 NATOLENGTH5.46 –6.42”WEIGHT14.2 OZMUZZLE AVERAGE5.56 NATO: 136.1 dB CALIBERS & RESTRICTIONS 22 HORNET TO 300 WIN MAG LENGTH 8.5-10.0”WEIGHT 23.4 OZ MUZZLE AVERAGE 5.56 NATO: 129.6 DB 308 WIN: 132.9 DB 300 BLK: 119.0 DB 300 WM: 137.7 DBSAKER 556SAKER 556KSAKER 762Assembly & ModularityMOUNTING OPTIONSFor optimum performance and to avoid damage to your silencer, SilencerCo recommends using only SilencerCo approved mounts and accessories.Whether you prefer the simple, shorter nature of a direct thread setup or the quick attach/detach features of the ASR, you should take care to ensure that the Saker ASR is mounted securely to your firearm before firing. SilencerCo offers mounts in all of the popular barrel thread patterns. Users must ensure they are using the proper mounts that match their barrel threads and that there is a proper shoulder for the mount to seat against. These instructions will help to prevent the problems and dangers that can arise from improper installation.Once you decide on a method of attachment, it is recommended to use Rocksett™ or another high-temp threadlocker to make it semi-permanent and avoid having the suppressor separate from the mount. To remove the mount once one of these is applied, consult the thread locker manufacturer’s instructions before attempting removal.DIRECT THREAD MOUNTEnsure the taper surfaces of the silencer and mount are clean before installation. Thread the mount into the Saker ASR silencer body by hand, taking care not to cross-thread. Use the included Charlie Tools to tighten the mount to the Saker ASR body. To remove, perform steps in reverse order.CONTINUED ON NEXT PAGEMOUNTING TO THE FIREARMAfter confirming your firearm is unloaded, place the direct threaded mount of the Saker ASR in line with the threads of the barrel. Taking care not to cross-thread, screw the silencer onto the barrel until it is firmly secured and no additional barrel threading is visible. Hand tighten only. To remove, perform steps in reverse order.READY FOR USE Assembly & ModularityASR MOUNTThe ASR Mount is a proprietary quick-attach/detachmounting system, and as such requires a compatiblemuzzle device (muzzle brake or flash hider). SilencerCorecommends the use of the included shim kit if anyindexing of the muzzle device is required. Crush washersare NOT recommended as they do not crush uniformlyand WILL cause improper mounting and baffle strikes.For proper alignment, it is essential that the muzzle deviceseats against a 90° barrel shoulder.UNLOCKEDLOCKEDEnsure the taper surfaces of the silencer and mount areclean before installation. Thread the ASR Mount assemblyonto the Saker ASR silencer body by hand, taking care notto cross-thread. Using the Charlie Basic Tools to grasp thenotches in the base of the ASR mount, tighten the mount.Torque to approximately 25-35 ft-lbs. To remove, performsteps in reverse order.Assembly & ModularityMUZZLE BRAKE FLASHHIDERMUZZLE DEVICESRemove your existing muzzle device. Remove the crushwasher and/or any other thread spacers from barrelthreads. Clean the threads and shouldering surface of thebarrel. Install the ASR muzzle device by threading it ontothe barrel. Use a shim kit (included with muzzle brakes) toensure proper muzzle brake alignment. Tighten onto barrelusing a 3/4” open end wrench on the wrench flats at therear of the brake. Use of Rocksett™ or another high-tempthreadlocker is recommended to secure the muzzle device.The flash hider/muzzle brake should be torqued to 20–30ft-lbs.MOUNTING TO THE FIREARMVerify the ASR collar is in the unlocked position beforeinstalling. Install the Saker ASR by sliding the back end overthe muzzle device, then screw the silencer onto the muzzledevice until it stops (hand tight, approximately 8-15 ft-lbs.).Rotate the ASR collar to the locked position. To remove,perform steps in reverse order.Since the Saker ASR is capable of using a variety ofmounts, we don’t list instructions for all of them. If youare not using an ASR or direct thread mount, please visit for more information on compatibleaccessories.READY FOR USEAssembly & ModularityFRONT CAPSTo remove the included flat front caps from the Saker ASR, line up the three pegs on the Charlie Multi-Tool with the holes on top of the front cap. Holding the silencer with a firm grip, rotate the tool counter-clockwise until the front cap is removed. To install other Charlie Saker front caps such as the Flash Hider or Standoff front caps, perform steps in reverse order, starting the thread by hand to avoid cross-threading.WARNING Firing the Saker ASR without a SilencerCo front cap will negate benefits of using a silencer and will void thewarranty.MaintenanceWhile the Saker ASR typically requires limited maintenance, the mounts should periodically be cleaned with any standard gun cleaning solvent and a brush to remove any carbon or fouling. If the finish becomes discolored, wipe the silencer with any high quality gun oil; this should restore the black oxide finish to the factory condition. If necessary, run a cleaning brush through the bore to remove any light fouling. Do not run cleaning patches through the bore as the patches might become lodged in the silencer and cause damage upon firing.CAUTION Always read the warning label on any cleaner or solvent, and remember that virtually all solvents are inherently dangerous and potentially toxic. Always use adequate ventilation and both skin and eye protection when using solvents.Lifetime WarrantyWe proudly stand behind the quality of our products with a lifetime warranty, no matter what—even if it’s not a product defect. Our 48 hour repair turnaround even warranties stupid… once. If you experience any issues, please refer to the SUPPORT section of our website or contact our Customer Service team at ******************* or 801.417.5384.If your silencer has a defect in manufacturing or materials, there will be no charges for service or replacement through our SilencerCo facility. If we determine that a claim is not covered under warranty, a discounted replacement option will be granted.This warranty does not cover damage to the silencer or host firearm resulting from careless or irresponsible handling, adjustments or modifications to design, negligence, or other abuse. SilencerCo assumes no liability for unsafe or illegal use of the silencer by its purchaser or any other user that comes in contact with the product after purchase. SilencerCo assumes no responsibility for physical injury or property damage resulting from careless or irresponsible handling or by any use contrary to the recommendations, warnings, and cautions generally listed in this manual. SilencerCo does not cover damage to the silencer or host firearm resulting from improper hand-loaded or reloaded ammunition or defective ammunition.*********************。
Maxtor OneTouch USB驱动程序手动安装说明说明书
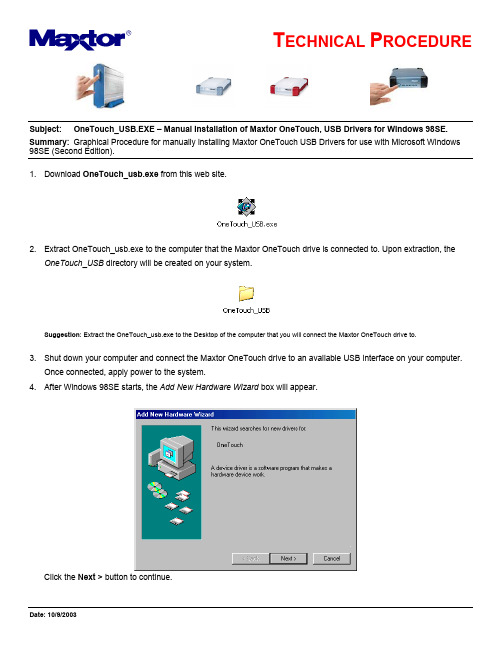
Subject: OneTouch_USB.EXE – Manual Installation of Maxtor OneTouch, USB Drivers for Windows 98SE. Summary: Graphical Procedure for manually installing Maxtor OneTouch USB Drivers for use with Microsoft Windows 98SE (Second Edition).1. Download OneTouch_usb.exe from this web site.2. Extract OneTouch_usb.exe to the computer that the Maxtor OneTouch drive is connected to. Upon extraction, theOneTouch_USB directory will be created on your system.Suggestion: Extract the OneTouch_usb.exe to the Desktop of the computer that you will connect the Maxtor OneTouch drive to.3. Shut down your computer and connect the Maxtor OneTouch drive to an available USB interface on your computer.Once connected, apply power to the system.4. After Windows 98SE starts, the Add New Hardware Wizard box will appear.Click the Next > button to continue.5. On the next page, select "Search for the best driver for your device..." and click the Next > button to continue.6. On the next page, check the "Specify a location:" checkbox and click on the Browse... button.7. In the Browse for Folder Window, locate the OneTouch_USB directory and click the OK button.8. Click on the Next > button to accept the selection of the driver.NOTE: The path identified in the image will vary depending on the location of the file. At this point the Maxtor OneTouch software driver will load on your Windows 98SE computer.9. Click Next > again…10. To complete the installation, click on the Finish button and restart your Windows 98SE computer.11. At this point the Safely Remove Devices Icon will appear in the TaskBar.12. When finished, the Add New Hardware Wizard will appear for a second time. Repeat Steps 1-9 to install theStorage Adapter Bridge Module.。
Manual_1
4
注解
步骤1
从包装箱中取出打印机并 进行安装
• 随打印机一同提供的硒鼓不同于替换所用硒鼓。 如果需要购买替换用硒
鼓,请参阅
CD-ROM
用户指南中的第 5 章 “日常维护” 。
步骤 1
• 仅对于亚洲国家 / 地区的 220-240 V 机型提供一根 USB 电缆。 对于其它国
注解
对于使用超声波增湿器的客户 如果超声波增湿器使用的是自来水或井水,水中的杂质可能会散布于空气 中并被吸附到打印机内部,从而导致影像质量变差。 如果您使用的是此类 增湿器,建议您使用纯净水或其它不含杂质的水。
● 请将打印机安装在以下环境中
安装位置
• 保证有足够空间的地方 • 通风良好的室内 • 平整的表面 • 可承受打印机和可选设备重量的稳固平台
约定
本手册中使用下列符号来说明为安全起见应遵守的各种过程、限制、操作注 意事项和说明。
警告
表示警告,如未正确遵守可能导致人身伤害或死亡。为安全地使用本产 品,请务必遵守这些警告。
注意
表示警示,如未正确遵守可能导致人身伤害或财产损失。为安全使用本产 品,请务必遵守这些警示。
重要事项
表示需要遵守的重要内容和限制。为避免操作打印机时出现问题,请务必 仔细阅读这些内容。
Windows 98 Windows Me Windows 2000 Server/Professional Windows XP Professional/Home Edition* Windows Server 2003* Windows Vista* * (仅限 32 位处理器版本) - 系统要求 (要求的最小值)
MANUAL_程序安装说明文档

1 安装windows server 2003 SP2 操作系统z 必须安装windows server 2003 SP2版本,否则会安装不了SQL SERVER2005。
z C 盘必须为NTFS 系统,否则安装IIS 会出现安全性降低的情况。
z 确认SQL2000的数据库文件位置:点击开始---所有程序---server2000---企业管理器---将左侧目录树展开,找到JFXT 数据库,右键单击JFXT ,选择“数据库文件”选项卡,然后查看数据库具体位置。
2 安装IIS6.0 1. 在控制面板中点击“添加或删除程序”。
2. 在左侧点击“添加\删除windows 组件”。
please insert windows server cd2 ????reinstall winrar & daemon tools,1. 要附加 已转换过的数据库 cqdj.mdf,2. 打印模板的调试, 选 打印纸大小, 每次都是怎么调得? EXCEL 模板 文件夹 必须在 D: 的根目录下3. 系统管理员手册, 操作及权限 设置 模板.4. 如何通过QQ 远程 登入 做支持?1.添加 IIS 6.0 在 MS SQL SERVER 之前2.3.在组件下面的列表中找到“应用程序服务器”,将前面的复选框打勾。
服务器应用程序不可用您试图在此 Web 服务器上访问的 Web 应用程序当前不可用。
请点击 Web 浏览器中的“刷新”按钮重试您的请求。
管理员注意事项: 详述此特定请求失败原因的错误消息可在 Web 服务器的系统事件日志中找到。
请检查此日志项以查明导致 该错误发生的原因。
先自动安装,删除 wwwroot\cqdj\ 解压,move cqdj 到 wwwroot,from IIS 网站-》默认网站权限,添加 IUSE_xxxxxxxxxxxfrom IIS “应用程序池” 右键新建应用程序池标识-》预定义帐号(本地系统)网站-》默认网站-》权限添加高级立即查找 Network Service 确定先自动安装,删除 wwwroot\cqdj\ 解压,move cqdj 到 wwwroot,4.选择后点击“下一步”。
MANUAL GUIDE说明手册

一、參數設定 (3)二、MANUAL GUIDE主畫面說明 (3)1、模式選擇開關切換到EDIT(編輯) (3)2、按下MANUL UGIDE按鍵出現如圖所示畫面 (3)3、功能鍵說明 (4)三、功能鍵功能說明- WRK-CO(工作座標)模式 (4)1、功能鍵說明 (5)2、OFFSET-刀具補償標準 (5)四、[ SETTNG ] (6)1、功能鍵說明 (6)五、LIST-程式目錄 (7)1、功能鍵說明 (7)六、編輯選單說明 (8)1、編輯選單的說明如下 (8)1、功能鍵說明 (9)七、MSF CODE-M、S、F碼軟鍵 (10)2、功能鍵說明 (10)八、EDIT-編輯程式 (11)1、模式選擇開關切換到EDIT(編輯) (11)2、按下MANUL UGIDE按鍵出現如圖所示畫面 (11)3、設定「OFFSET(刀具補正)」 (11)九、編輯程式「LIST」 (12)1、按下「LIST」出現如圖 (12)2、輸入程式號碼例-1 (12)3、按下「POSTIN」,逐一按下選擇「G91」模式,出現如圖 (13)4、按下「G91」模式,出現如圖 (13)6、設定「平面加工」指令 (18)7、設定「TOOL(刀具定義)」 (19)8、設定鑽孔加工 (25)9、設定「MSF(MSF值)」 (26)10、設定袋狀輪廓加工 (31)11、設定「MSF(MSF值)」 (32)一、參數設定OPTION參數:P9984#7=1PMC訊號:G62.4=1示波器功能需OFF(會影響MANUAL GUIDE的圖形顯示) 其他參數:P6500#5=1P6515=10P9100=8000P9125=224P9126=234P9127=235P9140=20P9141=20P9150=800二、M ANUAL GUIDE主畫面說明1、模式選擇開關切換到EDIT(編輯)2、按下MANUL UGIDE按鍵出現如圖所示畫面3、功能鍵說明●EDIT(編輯 ): 製造或者編輯一個程式。
浪潮英信服务器 操作系统安装指南说明书

浪潮英信服务器操作系统安装指南文档版本V1.0发布日期2022-05-20版权所有© 2022浪潮电子信息产业股份有限公司。
保留一切权利。
未经本公司事先书面许可,任何单位和个人不得以任何形式复制、传播本手册的部分或全部内容。
内容声明您购买的产品、服务或特性等应受浪潮集团商业合同和条款的约束。
本文档中描述的全部或部分产品、服务或特性可能不在您的购买或使用范围之内。
除非合同另有约定,浪潮集团对本文档内容不做任何明示或暗示的声明或保证。
由于产品版本升级或其他原因,本文档内容会不定期进行更新。
除非另有约定,本文档仅作为使用指导,本文档中的所有陈述、信息和建议不构成任何明示或暗示的担保。
商标声明●Inspur浪潮和“英信”是浪潮集团有限公司的注册商标。
●Windows是微软公司的注册商标。
●Intel、Xeon是Intel公司的注册商标。
●其他商标分别属于其相应的注册公司。
使用声明在您正式使用本服务器系统之前,请您先阅读以下声明。
只有您阅读了以下声明并且同意以下各条款后,方可正式开始使用本服务器系统;如果您对以下条款有任何疑问,请和您的供货商联系或直接与我们联系。
如您未向我们就以下条款提出疑问并开始使用本系统,则是默认您已经同意了以下各条款。
●我们提醒您特别注意:在任何时候,除了我们提示您可以修改的参数以外,您不要修改本服务器系统主板BIOS中的任何其他参数。
●在您使用的服务器系统出现任何硬件故障或您希望对硬件进行任何升级时,请您将机器的详细硬件配置反映给我们的客户服务中心;您不要自行拆卸服务器系统机箱及机箱内任何硬件设备。
●本服务器系统的内存、CPU、CPU散热片、风扇、硬盘托架、硬盘、电源等都是特殊规格的,请您不要将它们和任何其他型号机器的相应设备混用。
●您在使用服务器系统过程中遇到的任何软件问题,我们希望您首先和相应软件的提供商联系,由他和我们联系,以方便我们沟通、共同解决您遇到的问题。
对于如数据库、网络管理软件或其他网络产品等的安装、运行问题,我们尤其希望您能够这样处理。
深度软件安装管理工具 - 说明文档
Deepin Softprep深度软件安装管理工具软件说明文档深度技术论坛木头云2009.1.221.软件说明1.1软件截图截图1 - Fantastic 软件安装管理器截图2 - 关于对话框1.2Demo程序中包含的软件列表以上软件,均为免费或共享版软件,无任何盗版,及版权或知识产权纠纷问题.2.软件使用说明书此工具是用于用户装机,方便一键安装一些软件的,类似的工具有萝卜的软件安装管理工具,雨林木风软件安装管理器等等...同时也可作为个人的下载软件管理及备份工具,如果配置得当,本工具将极大的方便与简化软件的批量管理及自动安装工作.本工具的配置文件中给每一个软件提供两个调用接口,一个用于手动安装,一个用于自动安装. 接口本身并不完成自动与手动安装的区分,仅仅用于相关安装包的调用,因此用户需利用AutoIt之类的工具或命令行脚本写好对应软件的自动安装程序方可利用本工具进行自动安装.下面对本工具的配置文件进行说明.本工具的配置文件主要分为4部分.2.1总体配置,段名为[Config].具体定义如下:●MainWidth - 定义主窗口宽度,不写的话默认为800●MainHeight - 定义主窗口高度,不写的话默认为500●TitleText - 定义主窗口标题,不写的话默认为"Deepin Softprep"●SavePath - 定义默认的安装包保存路径,不写的话在保存安装包时会自动提示选择路径●Default - 定义默认的自动安装方式,0为手动安装,1为自动安装.不写的话默认为自动安装2.2分类列表,段名为[Type].具体定义如下:●Sort[n] - 定义分类名,并且也指定了此分类配置的段名.其中的n为数字,从1开始可任意增大,但不可中间中断,否则仅仅读取到中断处.如:[Type]Sort1=网络浏览Sort2=媒体播放Sort3=图形图像Sort4=办公处理Sort5=安全防护2.3每个分类的详细配置信息,段名有两部分.一为此分类的总体配置,段名为此分类的名字;二为此分类所包含的项目名列表,段名为[分类名.List].如:分类名为"网络浏览",则此时此分类的项目名列表段段名为:[网络浏览.List].其中,在分类的总体配置里:●WorkingDir - 定义此分类配置中的工作路径,当此处填写"%CurrDir%"时即代表当前路径.此处的工作路径仅仅用于分类本身,而非此分类下的项目工作路径.每个项目有自己单独的工作路径定义.●IconPath - 定义此分类所对应的图标路径.此处的路径为相对此分类WorkingDir的路径.如:[网络浏览]WorkingDir=%CurrDir%IconPath=Sort\net.ico在分类包含的项目列表里:●List[n] - 定义项目名,同时也定义了此项目配置段的段名.其中的n为数字,从1开始可任意增大,但不可中间中断,否则仅仅读取到中断处.如:[网络浏览.List]List1=遨游(Maxthon)List2=世界之窗List3=PPStreamList4=QQList5=迅雷2.4分类下每个项目的详细配置段.段名为此项的项目名.如:此项名称为"遨游(Maxthon) 1.6.3.80",则此项目配置段段名为[遨游(Maxthon) 1.6.3.80].其中:●WorkingDir - 定义了此项目的工作路径.当此处填写"%CurrDir%"时即代表当前路径.●IconPath - 定义了此项目所对应的图标路径.此处的路径为相对此项目WorkingDir的路径.●Checked - 定义了此项目是否默认选中.0为默认不选中,1为默认选中.●AutoInstall - 定义此项目的自动安装命令行.此处可填写自动安装脚本exe的路径,也可直接填写带静默参数的安装包exe路径.●ManualInstall - 定义此项目的手动安装命令行.一般可直接填写安装包路径.●Description - 定义此项目的说明文字.如:[遨游(Maxthon)]WorkingDir=%CurrDir%IconPath=ICO\maxthon.icoChecked=1AutoInstall=Install\maxthonsetup.exeManualInstall=Install\maxthonsetup.exeDescription=一款强大的多页面浏览器,提供了大量的实用功能改善用户的上网体验.3.更新列表●Version 1.0.0.1(Build 921.122)= [调整]当分类列表项过多时窗体自动调整高度以适应分类! [修正]当分类列表项过多时分类栏出现滚动条的问题! [修正]在某些情况下窗口置中错误的问题●Version 1.1.0.4(Build 1208.800)= [调整]项目整个代码迁移到VS2005下编译! [修正]当某一列表项描述文字过多时的文字显示问题●Version 1.1.0.5(Build 125.1400)= [调整]窗口大小判断时自动调整的高度! [修正]在某些时候无法正确判断窗口大小的问题。
Manual2013-DT 使用手册要点
DT系列智能型定位器使用手册DIGITAL TRAK POSITIONER INSTRUCTION MANUALManual2013-DT大连万讯电力仪表有限公司Dalian Maxonic Electric Apparatus Co.,Ltd.目录1. 用户须知 (1)1.1概述 (1)1.2安全指示 (1)1.3开箱清单 (1)1.4安全信息提示 (2)1.5定位器铭牌 (2)1.6产品认证文件 (3)2. 产品介绍 (4)2.1功能介绍 (4)2.2特点 (4)3. 技术参数 (5)4. 安装说明 (6)4.1外形尺寸图 (6)4.2安装 (6)4.3定位器安装于直行程执行机构 (7)4.4定位器安装于角行程执行机构 (9)4.5气路连接 (10)4.6电气连接 (11)5. 操作规程 (12)5.1操作界面说明 (12)5.2用户菜单 (13)5.3初始化 (15)5.4诊断 (17)5.5报警 (18)6. 参数说明 (22)7. 故障及维护说明 (26)7.1异常状况排除 (26)7.2维护保养 (27)8. 运输和贮存 (27)9. 订货须知 (28)9.1选型表 (28)1. 用户须知本手册对DT定位器的安全使用以及预期功能进行了必要的说明,为了正确操作产品实现产品功能并确保操作者安全请按照本手册执行。
在对产品进行任何操作前请认真阅读本手册并且将手册保存以作参考。
1.1概述STI定位器设计和加工符合EN-ISO 9001国际质量控制系统标准。
1.1.1适用标准机械安全基本概念与设计通则UNI EN ISO 12100-1:2005第一部分。
机械安全基本概念与设计通则UNI EN ISO 12100-2:2005第二部分。
欧盟机械标准2006/42/EC欧盟低压电器标准2006/95/EC欧盟电磁兼容性标准2004/108/EC1.1.2声明STI保证产品不存在制造缺陷,产品应严格按照手册要求进行安装和使用。
JET Heavy Duty Manual Trolley 安装说明书
Heavy Duty Manual Trolley – Installation and Safety InstructionsThe JET Heavy Duty Manual Trolleys comply with OSHA, and ANSI/ASME B30.11 and B30.17 standards. They are designed to be used on either "Ι" or “H” wide flange beams.1. Beam must be properly installed and rated for anticipated loads.2. Do not install trolley on beams of unknown capacity.3. Do not install trolley on damaged or deformed beams.4. JET trolleys are designed to be used with hoists of the same rated capacity. Never use a hoist with acapacity greater than the capacity of the trolley.5. Never subject trolley to a side pull or load. Load must be centered directly under the hoist / trolley assembly.6. Make sure load is stable and secure before moving.7. Never lift load more than is necessary to safely move it.8. Always follow installation instructions.9. Do not use if under the influence of drugs, alcohol, or medication.Installation Instructions(refer to drawing at right)1. Trolley must be installed on a beam with aminimum clearance (wheels to flange) of 1/16"to a maximum of 1/8". Reference "A" on bothsides of the beam.2. To extend trolley width, remove split pins andhex nuts. Remove washer spacers from centerbolt and place between hanger bracket andfixed spacer. Note: Washer spacers must bemoved in sets of two, one on either side of thehanger bracket, as the hanger bracket mustalways remain centered between the trolleyside plates.3. Once trolley width is spaced properly, installremaining washer spacers on the center bolt(same number on both sides) on the outside ofthe side plates. Install hex nuts and split pins.Do not over tighten nuts. Tighten nuts andthen back nuts off to align the nut with hole inshaft for split pin. Insert split pin through each hex nut and bend one end of split pin.4. Re-check wheel clearance "A" and re-adjust if necessary.JET427 New Sanford RoadLaVergne, Tennessee 37086 Part No. M-262005 Ph.: 800-274-6848 Revision A2 05/2014 Copyright © 2014 JET, a Division of JPW Industries, Inc.Specifications:CapacityStock No.Beam Flange Width “G” (min–max) (in.) Beam Height (min–max) (in.) Minimum Radius Curve (in.) Shipping Weight (lbs.) A B C D E FHI J1/2 Ton 262005 2-1/2 – 8 3 – 24.5 35 12 7-3/8 5-7/8 5-7/8 4-5/8 2-1/16 3-9/16 4 1-1/4 15/161 Ton 262010 3 – 8 5 – 24.5 39 18 8-3/8 6-1/4 6-1/45-1/8 2-1/2 3-15/16 4-11/16 1-11/16 1-3/162 Ton 262020 3-1/4 – 8 6 – 24.5 43 32 10-3/16 6-1/2 6-1/2 6-5/16 3-1/16 4-13/16 5-3/8 21-1/23 Ton 2620304 – 8 8 – 24.5 51 53 12-3/8 6-7/8 6-7/87-7/16 3-15/16 5-15/16 6-7/16 2-9/16 1-3/45 Ton2620504-5/8 – 810 – 24.5559014-9/167-3/87-3/8 8-9/16 4-3/4 6-7/8 7-11/16 3-3/8 2-1/2Specifications were current at time of publication, but because of our policy of continuous improvement, JET reserves the right to change specifications at any time and without prior notice, without incurring obligations.。
程序安装说明书
程序安装说明书导语:本文是对程序安装的详细步骤进行说明。
请按照以下步骤操作,以确保正确安装和使用程序。
第一步:准备工作1. 确保您的计算机符合程序的最低系统要求。
查看程序的官方网站或相关文档,了解操作系统、处理器、内存和硬盘空间等方面的要求。
2. 备份您计算机上的重要数据。
在进行任何软件安装之前,我们强烈建议您备份所有重要的文件和数据,以防万一发生意外情况。
第二步:下载程序1. 打开您的浏览器,前往程序的官方网站。
2. 寻找并点击下载程序的链接。
一般来说,您可以在网站的首页或者下载页面找到下载链接。
3. 根据您的操作系统选择合适的版本进行下载。
如果您不确定应该选择哪个版本,请咨询官方网站或者参考相关文档。
第三步:安装程序1. 打开下载的安装程序。
通常,双击下载的文件即可开始安装程序。
2. 按照安装向导的指示进行操作。
一般来说,您需要点击“下一步”按钮,选择安装目录,并同意许可协议等。
3. 如果程序提供了自定义安装选项,请根据您的需求进行相应的选择。
例如,您可以选择是否创建桌面快捷方式,或者是否将程序添加到系统的启动项中。
4. 等待安装过程完成。
安装过程时间长度因程序的大小和您的计算机性能而有所不同。
第四步:启动程序1. 找到您刚刚安装的程序的快捷方式或者启动图标。
通常,您可以在桌面、开始菜单或者启动器中找到。
2. 双击程序的快捷方式或者启动图标,启动程序。
第五步:初次设置1. 首次运行程序时,您可能需要进行一些初次设置。
这些设置可能包括选择语言、创建账户或者设置首选项等。
2. 根据程序的提示进行相应的设置,确保程序能够按照您的需求正常运行。
第六步:常见问题和解决方案1. 如果您在安装过程中遇到了问题,可以参考程序的官方网站或者文档中的常见问题和解决方案部分。
2. 如果您无法解决问题,请联系程序的技术支持团队或者寻求专业人士的帮助。
结束语:通过按照以上步骤安装程序,您应该能够成功地将程序安装在您的计算机上,并开始使用。
- 1、下载文档前请自行甄别文档内容的完整性,平台不提供额外的编辑、内容补充、找答案等附加服务。
- 2、"仅部分预览"的文档,不可在线预览部分如存在完整性等问题,可反馈申请退款(可完整预览的文档不适用该条件!)。
- 3、如文档侵犯您的权益,请联系客服反馈,我们会尽快为您处理(人工客服工作时间:9:00-18:30)。
1 安装windows server 2003 SP
2 操作系统
z 必须安装windows server 2003 SP2版本,否则会安装不了SQL SERVER2005。
z C 盘必须为NTFS 系统,否则安装IIS 会出现安全性降低的情况。
z 确认SQL2000的数据库文件位置:点击开始---所有程序---server2000---企业管理器---将左侧目录
树展开,找到JFXT 数据库,右键单击JFXT ,选择“数据库文件”选项卡,然后查看数据库具
体位置。
2 安装IIS6.0 1. 在控制面板中点击“添加或删除程序”。
2. 在左侧点击“添加\删除windows 组件”。
please insert windows server cd2 ????
reinstall winrar & daemon tools,
1. 要附加 已转换过的数据库 cqdj.mdf,
2. 打印模板的调试, 选 打印纸大小, 每次都是怎么调得? EXCEL 模板 文件夹 必须在 D: 的根目录下
3. 系统管理员手册, 操作及权限 设置 模板.
4. 如何通过QQ 远程 登入 做支持?
1.添加 IIS 6.0 在 MS SQL SERVER 之前
2.
3.在组件下面的列表中找到“应用程序服务器”,将前面的复选框打勾。
服务器应用程序不可用
您试图在此 Web 服务器上访问的 Web 应用程序当前不可用。
请点击 Web 浏览器中的“刷新”按钮重试您的请求。
管理员注意事项: 详述此特定请求失败原因的错误消息可在 Web 服务器的系统事件日志中找到。
请检查此日志项以查明导致 该错误发生的原因。
先自动安装,删除 wwwroot\cqdj\ 解压,move cqdj 到 wwwroot,
from IIS 网站-》默认网站权限,添加 IUSE_xxxxxxxxxxx
from IIS “应用程序池” 右键新建应用程序池
标识-》预定义帐号(本地系统)
网站-》默认网站-》权限添加高级立即查找 Network Service 确定
先自动安装,删除 wwwroot\cqdj\ 解压,move cqdj 到 wwwroot,
4.选择后点击“下一步”。
5.等待windows组件向导安装完毕。
6.安装完毕后点击“完成”按钮。
3 安装SQL SERVER 2005 服务器版
1.选择“我接受许可条款和条件”后点击“下一步”。
based on 86
based on 64
select based on 86"
install sql components,
2.点击“安装”。
3.点击“下一步”。
4.点击“下一步”。
5.点击“下一步”。
6.点击“下一步”。
7.选择所有可选项后点击“下一步”。
8. 点击“命名实例”,并输入自定义的实例名后点击“下一步”。
Click 1st one and last one.
9.选择“使用内置系统帐户”后点击“下一步”。
10.选择“混合模式(windows身份验证和SQL SERVER身份验证)”。
11.输入sa登陆密码后点击“下一步”。
SA password, by default it is BLANK ??????
13.点击“下一步”。
14.点击“下一步”。
15.点击“安装”。
16.等待系统安装完毕后点击“下一步”。
SQL SERVER安装时间一般为40分钟左右。
17.点击“完成”按钮,至此SQL SERVER2005安装完毕。
4 安装.NET FRAMEWORK 3.5
5 配置网站
1.打开IIS6.0。
只安装 前两项, .net 3.5 和 语言库 所有选项 by default.
2.打开默认网站。
3.右键单击“默认网站”,选择“新建”——“虚拟目录”,并单击“虚拟目录”。
4.点击“下一步”。
5.填写网站别名(cqdj)。
并点击“下一步”。
6.选择网站目录所在的物理路径。
7.点击“下一步”。
8.点击“完成”。
9.在默认网站下右键单击刚才所建的别名为“cqdj”的网站,并点击“属性”。
10.选择执行权限为“纯脚本”。
11.点击“创建”按钮。
12.点击“应用”按钮。
13.选择“目录安全性”选项卡,并点击最上面的“编辑”按钮。
名和密码都为默认,不要修改。
15.选择“”选项卡,在版本中选择“2.0.50727”。
16.最后点击“确定”按钮。
17.在默认网站下右键单击“cqdj”,并选择“权限”。
18.点击“添加”按钮。
19.点击“高级”按钮。
20.点击“立即查找”按钮。
21.在搜索结果中查找“IUSER_机器名”用户名,并选中双击。
22.点击“确定”按钮。
23.点击“确定”按钮。
至此网站已经配置完毕。
24.在网站目录下找到web.config文件。
25.双击打开,在web.config文件中找到下面三张图中的位置。
并将“server”后的项改为当前数据
库服务器名或者服务器IP地址。
26.点完后点击“保存”按钮。