Check Point教程
checkpointr77初始化配置文档
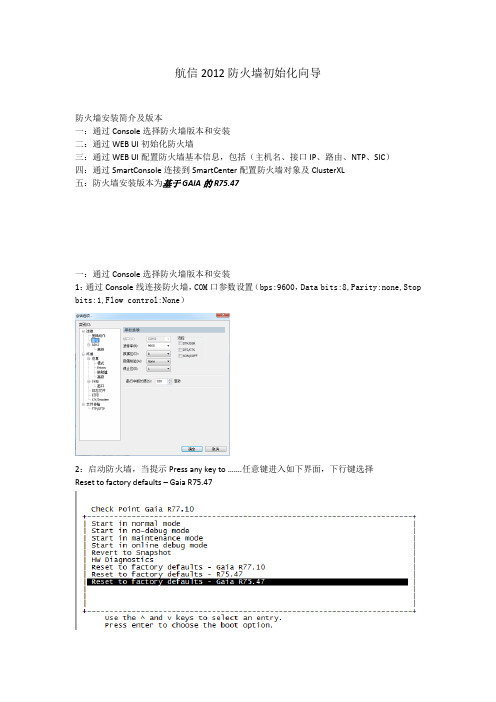
航信2012防火墙初始化向导防火墙安装简介及版本一:通过Console选择防火墙版本和安装二:通过WEB UI初始化防火墙三:通过WEB UI配置防火墙基本信息,包括(主机名、接口IP、路由、NTP、SIC)四:通过SmartConsole连接到SmartCenter配置防火墙对象及ClusterXL五:防火墙安装版本为基于GAIA的R75.47一:通过Console选择防火墙版本和安装1:通过Console线连接防火墙,COM口参数设置(bps:9600,Data bits:8,Parity:none,Stop bits:1,Flow control:None)2:启动防火墙,当提示Press any key to …….任意键进入如下界面,下行键选择Reset to factory defaults – Gaia R75.473:当提示将清空所有配置,你是否继续,输入yes4:当命令行进入如下界面开始从Web UI初始化防火墙二:通过WEB UI初始化防火墙1:本机电脑IP配置成192.168.1.xxx/24,通过RJ45网线连接防火墙Mgmt端口,Web界面输入https://192.168.1.1进入如下界面:2:输入User name:admin Password:admin(默认用户名和密码)进入如下界面3:点击Next,进入如下界面,选择Continue with configuration of Gaia R75.474:点击Next进入如下界面,输入密码:njhgfc123$ 并确认密码5:点击Next进入如下界面:选择日期、时间及时区6:点击Next进入如下界面:输入Host Name: TSN-FW4600-JC1A (此主机名仅为举例)7:点击Next进入如下界面:输入分配的管理地址:DHCP Server选择Disabled8:点击Next,出现如下对话框,意思是管理口IP已经改变,为了保持当前浏览器不关闭,系统保留了192.168.1.1为第二个IP地址作为管理。
checkpoint笔记(带实验手册)
Checkpoint 笔记2012/12/11目录1实验拓扑1.2实验网卡桥接1.3 DynamipsGUI来制作1.4实验平台与教程2 checkpoint 初始化与配置…….2.1 smartConsole2.2 chekcpoint理论基础2.2.1 Policy packet2.2.2 Policy design2.2.3完全卸载安全策略2.2.4 cp 的implied Rules 隐含的策略2.2.5 Checkpoint NAT种类2.2.6 Checkpoint 认证方式2.2.7 Vpn3 Checkpoint 实验手册3.1 Remote access vpn 实验3.2 Site to site vpn 实验3.3 Context filter 实验3.4用户认证实验3.4.1 user auth3.4.2 session auth3.4.3 client auth3.5 NAT实验3.5.1 Hide nat动态配置方法:3.5.2手动配置Hide nat3.5.3静态转换动态配置3.5.4静态转换手动的配置3.5.5端口转换3.6 开启Smartportal 实验1、实验拓扑:1.2实验网卡桥接1.3通过DynamipsGUI来制作桥接的三台虚拟路由器生成BA T文件就可以了。
1.4实验平台与教程Checkpoint 防火墙图形化界面配置Checkpoint IoS: CheckPoint_NGX_R65_Suite_SPLAT_Linux30.ISO 视频教程: 秦柯CheckPoint防火墙.isz虚拟机安装vmware 9需要通过web进去初始化,初始化完成后,会应该默认的deny 策略。
(只支持IE浏览器)二、checkpoint 初始化与配置基本的信息都可以通过web去做修改和查看。
全功能版的授权只有15天,如果15天后想继续使用,只能够重装checkpoint 系统,授权是跟网卡绑在一起,暂时还没有找到办法去破解。
CheckPoint防火墙故障处理流程
1.1.防火墙故障处理流
流程说明:从防火墙的排障的总体流程来看,首先必须确定故障点设备,再从故障点设备进 行排错。流程主要集中在防火墙的问题进行说明,以下对流程进行说明:
1.2.故障级别定义:
故障级别 1级 影响 对业务运营造成灾难性影响 网络或系统停机,导致客户业务完全停止服务; • 连续不断或经常发生的不稳定性, 影响大部分网络的流量处理能力; • 大部分网络连接中断或被隔离; • 发生危险或紧急情况,比如自然环境灾难或误操作导致。 严重影响业务运营。• 对最终客户造成间歇影响的网络或系统事件; • 主或备做冗余设备发生故障; • 无法进行例行管理或诊断功能; • 需要的关键功能无法实现;
如果设备完全挂起,接入 console 口没有任何输出的情况下,或者如下情况: System hang Complete loss of connectivity No console login prompt Transient failure/performance conditions Out of memory conditions Out of swap conditions 请通过如下步骤搜集信息,首先准备如下设备, 一个 DTE (Date Terminal Equipment) 支持数据通信标准 EIA/TIA-232 的 console 线 连接到 IPSO console 接口. 必须通过如下 Terminal 工具登录: HyperTerm,SecureCRT (Windows) cu or tip (UNIX) Serial console (terminal) server. Dumb terminal. DTE 串口属性设置参数 9600 bps 8 data bits 1 stop bit No parity No flow control --------------------------------------------------------------------------1. 在发生故障时,接入 console 线到设备, 2. 在 console 工具上启用会话记录, 3. 首先敲键盘 “Break”键,然后立即执行”ddb”,屏幕上不会显示任何输出。 4. 如果发生 Crash 你将会看到有输出,否则重复步骤 1~3 5. 如果有输出信息后,输入 ps 命令 (观察并且搜集进程信息) 6. 输入 trace 命令 (观察并且搜集 trace 信息) 7. 输入一个 continue 命令 返回 IPSO 8. 重复 3 到 6 的步骤多次,直到输出信息相同。 9. 输入 panic 命令 (系统将 dump 一个 core 文件并且重启) 10. 保存完整的会话日志和 core 文件并且上传给 support。 到 ipso 系统使用命令[admin]# find / -name "*core*"确认找到 core 文件, 同时从 $FWDIR/bin/boot/modules 目录下尽量搜索并且得到所有的*.o 文件。 -------------------------------------------------------------------------------
Flink之Checkpoint的设置和使用

Flink之Checkpoint的设置和使⽤具体实现代码如下所⽰:val env: StreamExecutionEnvironment = StreamExecutionEnvironment.getExecutionEnvironmentenv.setParallelism(2)env.setStreamTimeCharacteristic(TimeCharacteristic.EventTime)/*** 配置状态后端,知道checkpoint的存储路径(在最新的flink中需要使⽤ StreamExecutionEnvironment 来直接设置,但在1.10.2中还不能使⽤该⽅法) */// StreamExecutionEnvironment.setStateBackend(new FsStateBackend(""))env.setStateBackend(new FsStateBackend(checkpointPath))/*** checkpoint的相关设置*/// 启⽤检查点,指定触发checkpoint的时间间隔(单位:毫秒,默认500毫秒),默认情况是不开启的env.enableCheckpointing(1000L)// 设定语义模式,默认情况是exactly_onceenv.getCheckpointConfig.setCheckpointingMode(CheckpointingMode.EXACTLY_ONCE)// 设定Checkpoint超时时间,默认为10分钟env.getCheckpointConfig.setCheckpointTimeout(60000)// 设定两个Checkpoint之间的最⼩时间间隔,防⽌出现例如状态数据过⼤⽽导致Checkpoint执⾏时间过长,从⽽导致Checkpoint积压过多,// 最终Flink应⽤密切触发Checkpoint操作,会占⽤了⼤量计算资源⽽影响到整个应⽤的性能(单位:毫秒)env.getCheckpointConfig.setMinPauseBetweenCheckpoints(500)// 默认情况下,只有⼀个检查点可以运⾏// 根据⽤户指定的数量可以同时触发多个Checkpoint,进⽽提升Checkpoint整体的效率env.getCheckpointConfig.setMaxConcurrentCheckpoints(1)// 外部检查点// 不会在任务正常停⽌的过程中清理掉检查点数据,⽽是会⼀直保存在外部系统介质中,另外也可以通过从外部检查点中对任务进⾏恢复env.getCheckpointConfig.enableExternalizedCheckpoints(ExternalizedCheckpointCleanup.RETAIN_ON_CANCELLATION)// 如果有更近的保存点时,是否将作业回退到该检查点env.getCheckpointConfig.setPreferCheckpointForRecovery(true)// 设置可以允许的checkpoint失败数env.getCheckpointConfig.setTolerableCheckpointFailureNumber(3)/*** 重启策略的配置*/// 重启3次,每次失败后等待10000毫秒env.setRestartStrategy(RestartStrategies.fixedDelayRestart(3, 10000L))// 在5分钟内,只能重启5次,每次失败后最少需要等待10秒env.setRestartStrategy(RestartStrategies.failureRateRestart(5, Time.of(5, TimeUnit.MINUTES), Time.of(10, TimeUnit.SECONDS)))val resultStream: DataStream[SensorReading] = env.readTextFile(sensorPath).map(new MyMapToSensorReading).map(data => {Thread.sleep(1000)data}).keyBy(_.id).reduce((x, y) => SensorReading(x.id, y.timestamp, x.temperature + y.temperature))resultStream.print()env.execute("CheckPointDemo")。
中国移动CheckPoint_VPN安全配置手册
目录1CHECKPOINT VPN概述 (2)1.1 简介 (2)1.2 分类及其工作原理 (3)1.3 功能与定位 (3)1.4 特点与局限性 (4)2CHECKPOINT VPN适用环境及部署原则 (5)2.1 适用环境 (5)2.2 安全部署原则 (5)3CHECKPOINT VPN的安全管理与配置 (5)3.1 服务器端设置 (5)3.2 客户端设置 (18)3.3 登陆过程 (23)3.4 日志查询 (23)1Checkpoint VPN概述1.1 简介VPN(Virtual Private Network)虚拟专用网,是企业网在因特网等公共网络上的延伸,通过一个私有的通道在公共网络上创建一个安全的私有连接,可以形象地看做是一条穿过混乱的公用网络的安全、稳定的隧道,所以VPN中使用的加密传输协议被称为隧道协议。
用户使用VPN使需要在PC机上安装一个客户端软件,该客户端和企业的VPN Server互相配合,能保证用户端到企业内部的数据是被加密,无法监听。
VPN的设计目标是保护流经Internet的通信的保密性和完整性,在数据在互联网上传输之前进行加密,在到达最终用户之前进行解密。
但尽管如此,VPN并不完备,许多用户在使用VPN时,密码经常被窃,使整个VPN系统失去安全。
这种密码盗窃是VPN中经常遭受的、最具危害性的攻击。
一般来说,大多数对用户身份的确认是通过用户名和固定的密码实现的,然而,固定密码容易被窃或被黑客随处可得的“Cracker”工具破译,某些软件可以自动完成猜测密码的工作,更糟糕的是,某些特定的单词,如“password”或“123456”等,经常被用做密码。
对密码保护的最好办法就是不要密码――不采用固定密码,采用动态密码,俗称一时一密,每个密码只能用一次,每次的有效时间只有很短的时间。
对VPN采用动态密码,很好解决了数据的传输安全和密码安全,是一个完美结合。
目前企业有的内部应用系统也采用了动态密码,但对一些来自外网的黑客而言,这些动态密码对他们毫无作用。
Checkpoint 1 登录指南说明书
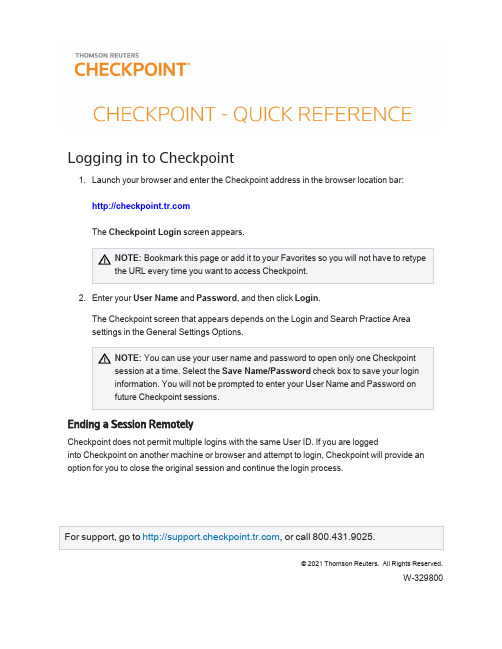
Logging in to Checkpointunch your browser and enter the Checkpoint address in the browser location bar:The Checkpoint Login screen appears.NOTE:Bookmark this page or add it to your Favorites so you will not have to retypethe URL every time you want to access Checkpoint.2.Enter your User Name and Password,and then click Login.The Checkpoint screen that appears depends on the Login and Search Practice Areasettings in the General Settings Options.NOTE:You can use your user name and password to open only one Checkpointsession at a time.Select the Save Name/Password check box to save your logininformation.You will not be prompted to enter your User Name and Password onfuture Checkpoint sessions.Ending a Session RemotelyCheckpoint does not permit multiple logins with the same User ID.If you are loggedinto Checkpoint on another machine or browser and attempt to login,Checkpoint will provide an option for you to close the original session and continue the login process.©2021Thomson Reuters. All Rights Reserved.W-329800U SING THE H OME S CREENCheckpoint -Quick Reference -2Using the Home ScreenThe Home screen provides quick links to Checkpoint tools and documents,access to current news of interest to Checkpoint subscribers,updates related to Checkpoint features and content,and easy access to training and support.You can change the contentandcustomize the features as needed.Choose from several Home screen views that organize content by practice area.Eachview's layout and content can be modified to match your preferences.Create your ownview consisting of selected content panes.My Quick Links provides quick access to frequently used areas of Checkpoint.You can tailor My Quick Links to your specific needs by modifying the list to reflect your areas of interest and frequent use.The Support &Product Training links make it easy to access instructor-led and self-study product training,user guides and other reference materials,support and trainingU SING THE H OME S CREENCheckpoint -Quick Reference -3news,support contact information and Checkpoint user options.Keep up-to-date with news and product developments.Consult Today's Headlines forlinks to current news.Review New in My Subscription to learn about new features and enhancements specific to your version of Checkpoint.Use Home screen features to display the results of Scheduled Searches ,ongoingcitation tracking (Track It)and proposed legislation being followed (Follow It).Enter your keyword in the Quick Search box and click Search to perform a keywordsearch.You can perform a keyword search in two ways:Intuitive Search recognizesquestions,common phrases,connectors,or citations,and interprets your queryaccordingly to retrieve the most relevant results,including relevant variations.Terms &Connectors will limit your search to the exact words you typed,without any variations.The search AutoComplete feature will suggest keywords as you type in the field.You can also perform a Quick Search on a predefined source set you create by selecting from the Choose Source Set drop-down list.U SING THE S EARCH S CREENCheckpoint -Quick Reference -4Using the Search ScreenThe Search screen provides a launch point from which to perform keyword searches on selected sources in several practice e the left navigation bar to access customized search templates andtoolsbased on the practice area.Select a practice area to use sources and search tools specific to an area of research.Practice areas include Federal ,State &Local ,Estate Planning ,Pension &Benefits ,International Tax ,International Trade ,Payroll ,and Accting,Audit &Corp Finance .To perform a keyword search enter search terms,select the sources to search,andthen click the Search icon.You can perform a keyword search in two ways:IntuitiveSearch recognizes questions,common phrases,connectors,or citations,and interprets your query accordingly to retrieve the most relevant results,including relevant variations.Terms &Connectors will limit your search to the exact words you typed,without anyU SING S EARCH C ONNECTORSCheckpoint -Quick Reference -5variations.The search AutoComplete feature will suggest keywords as you type in thefield.Open the Thesaurus/Query Tool to enhance your keywords with such features as aspell checker,a thesaurus of alternative terms,a list of connector symbols,andpreviously used keyword combinations.Select a search template to perform a search by filling in requested information.Forexample,use Find by Citation to request a code section from an official documentation source.Using Search ConnectorsUsing Connectors in Intuitive SearchIf the Terms &Connectors search method is selected,the AND,SPACE,or &connectors can all be used to require more than one term in each of the documents of your search results.However,if Intuitive Search is left as the default search method,Checkpoint will read the word "AND"and any SPACE as it would any other word used in your query.Although the most relevant documents are likely to have all words used,you may get results that have only most of the words.U SING S EARCH C ONNECTORSAlso,when using the Intuitive Search method,the use of quotations to search for a phrase will find the most relevant documents that include the exact phrase and relevant variations that contain the keywords within3words of one another.Checkpoint-Quick Reference-6U SING THE D OCUMENT S CREENCheckpoint -Quick Reference -7Using the Document ScreenThe Document screen provides the format for viewing and managing Checkpoint documents,with various tools and features for navigating,saving,printing,sharing,exporting,adding notes,and flagging the content.You can also highlight document text and savethehighlighted text as a note.Within a document,you can use the Context Panel on the right to take advantage ofadditional navigation and features.The available tabs listed in the Context Panel willdepend on the document displayed and how you arrived at that document (by Keyword or Table of Contents).Document tools include Print,Export,E-mail,Save,Open in New Window,Selected Text Option,Show Permalinks,Full Screen,Document Display Options,Flag this document,Add Note,and Reset view.Use the Navigate by field and arrow buttons to advance to the next Best result orDocument found by your search,the next document listed in the Table of Contents ,or the next occurrence of a Keyword .Keyword occurrences appear with yellow highlighting throughout the open document.Use the top line and side line link buttons that appear across the top of a document orembedded within the document to link to related documents in the Links section of the Context Panel .U SING THE T ABLE OF C ONTENTS S CREENCheckpoint -Quick Reference -8Using the Table of Contents ScreenThe Table of Contents screen,accessed from the menu bar on Checkpoint,provides access to all of the sources available to you through your subscription.Content is organized hierarchically into broad practice area categories.You can drilldown through levels of content to find individual documents.Click the "+"symbol next to a title to view its contents,or click the title name toU SING THE N EWS S CREENCheckpoint -Quick Reference -9Using the News ScreenThe News screen provides the latest news updates in the areas of tax,audit,accounting,trade,corporate finance,and employee benefits.Most of the news services provide access to earlier editions and e-mail delivery options.Headlines,summaries,or opening paragraphs are generally provided for each news article.In some news sources,the headline is a link to the full article.In others,a"document"symbol at the end of the paragraph links you to the full article.Select from news sources included in your Checkpoint subscription.Available newssources may include (depending on your subscription)Checkpoint Daily Updates ,L EGENDCheckpoint -Quick Reference -10News &Insight ,Accounting & Compliance Alert ,PPC's Daily Update ,IBFD Tax News Service ,Willis Towers Watson ,EBIA Weekly ,AAEI International Trade Alert ,TR Global Indirect Tax Update ,and EY Tax News .Click a date on the Date drop-down list,if available,to access earlier editions.Document tools let you print,export,e-mail,and manage the news content.Advance to a section of the news update by selecting the section title from the Outline on the left navigation bar.Click Set Display/E-mail Preferences and arrange to receive any of your subscribed news updates by e-mail.Options include receiving a Daily Update version or a Weekly Update (or Complete Newsletter)version offered on a less frequent schedule.This option is not available for all news sources.Click Checkpoint Weekly Updates to view all articlesfrom (depending on yoursubscription)the Federal Tax,State &Local Tax,Estate Planning,Pension &Benefits,and Payroll Updates for the most recently completed week (Monday through Friday).LegendL EGENDCheckpoint-Quick Reference-11。
checkpoint-4200-R77.20版本安装及Gaia初始化手顺v1.0
checkpoint-4200-R77.20版本安装及Gaia初始化手顺v1.0checkpoint R77.20版本安装及Gaia初始化手顺制作检查核准发行日期版本1、插入制作好的R77.20版本启动U盘,Secure CRT采用 serial连接(9600,8,0,1,无Flow Control),console登录设备后,进入启动选择界面:输入serial回车;进入安装界面,不需操作:2、提示安装结束,下电重启:在选择界面,回车默认从设备硬盘启动:3、配置管理口Mgmt IP地址、expert-password 密码、保存配置:set interface Mgmt ipv4-address 192.168.1.1 mask-length 24set expert-passwordsave config4、登录WEB GUI初始化(Gaia 初始登录用户名、密码均为admin),配置admin's password,mgmt ip,hostname,time,sic,smartconsoleuser&password点击next点击next设置管理员密码:admin123点击next点击next设置hostname:选择时区,点击next:勾选Security Gateway和Security Management (此配置仅Internet环境适用,当局网用到HA 功能时,需勾选Unit is a part of a cluster ,type:)设置security management 管理员用户名、密码:smsadmin, admin123点击next:点击next取消选项Improve product experience by sending data to Check Point,点击finish进入配置初始化:提示成功:点击OK,可进入Gaia管理主页5、进入serial连接,以admin账号登录,进入expert模式,为admin用户更改shell chsh -s /bin/bash admin6、利用winscp上传补丁程序,至/home/admin目录下:传输完毕:核实、查看文件:7、进入expert模式,至/home/admin目录,解压安装补丁,逐行执行以下命令:cd /home/admintar -zxvf Check_Point_R77.20.linux.tgz./UnixInstallScript进行安装:8、补丁安装完毕,选择yes,重启reboot,至此,checkpoint 4200 R77.20版本安装及Gaia 初始化完成。
Checkpoint 简单配置手册
Checkpoint 简单配置手册一.客户端软件SmartConsole安装1.运行CheckPoint集成安装包安装管理防火墙的客户端2只选择安装SmartConsole,别的都不选选择安装SmartConsole的所有组件二.配置CheckPoint防火墙1.运行SmartConsole中的SmartDashboard组件2.登录防火墙管理模块SmartCenter输入用户名,密码,防火墙管理模块的IP地址;SmartDashboard要求验证防火墙的指纹属性,选择“Approve”通过验证即可进入防火墙配置界面3.建立被防火墙管理的网络对象1.主机(Nodes)对象的建立右键选择界面左侧的对象栏里的Nodes,从弹出菜单里选择new nodes->host添加主机对象IP10.19.0.34填写Name:IP10.19.0.34填写IP:10.19.0.34选择是否“Web Server”;如果选中了“Web Server”则CheckPoint会自动打开对该机的http 服务的相关防护措施;静态NAT配置因为该Server需要被静态映射到外网段的219.239.38.138地址上去,所以必须必须选择该主机属性里的“NAT”选项配置NA T选择“Add Automatic Address Translation(自动地址翻译)”选项✧在Translation下拉选项框中选择“Static”✧在Translate to IP文本框中填写该主机映射之后的IP地址:219.239.36.13✧点击“OK”2.网络服务对象(Services)的添加进入services对象栏,右键点击TCP对象,从弹出菜单里选择New TCP在弹出对话框里填入必要的信息填写Name: CaiWuPort: 84443.安全规则(Rules)的添加从菜单栏里选择Rules->Add Rules->Bottom系统添加的默认策略是“any any drop”,即全部丢弃,需要对其进行修改右键点击第一条规则“DESTINA TION”栏里的“Any”对象,从弹出菜单里选择“Add”从弹出对话框里选择“IP10.11.0.1”对象右键点击第一条规则“SERVICE”栏里的“Any”对象,从弹出菜单里选择“Add”从弹出对话框里选择“CaiWu”对象右键点击第一条规则“ACTION”栏里的“drop”对象,从弹出菜单里选择“accept”;以使匹配该规则的数据包被允许通过配该规则的数据包作日志纪录按照上面的方法添加其余规则,以允许IP10.19.0.34访问Range10.11.0.2-5对象的sqlnet1服务最后下发防火墙的安全规则。
CheckPoint SSLVPN 配置手册V1.0
rcctu l<J bú~: Ll ιAL
light:
r. 一川 d
Cl assification:
&.
[Cùnlidential
For (he(k Point usel - and 柳川 ed .hird parlies
固自四百回
立档悻 lT 记录
标题
:k墙 SeC lJr eRelDO te \'P可配置说明
二』 j
4槽如
f$
N巾 d 阳剧叩刷…酬捕Y 咱叫割
十…m l <;9$ and MðSle
Advanced
v 垒u. 酣回佣盼 3 细 0' 臼 51 阳 臼剪 d酬h c 抱 euV阳 c阳酣阳眩
C部鹤即 Optr.旭,.盼的
谧~组上所有配置 cli .ftl
ι C昭潮州 E r101c酬
可以边,摩 don' ‘ " k
·l
édd...
~
V巳J--.!旦斗
」旦J 主型巳」 二旦旦」
•
』
一 OK
第三步,定义 Office Mode 选项启用 Office Mode 模式 在 office mode 选项中选择支持 office mode 功能的 VPN 用户组
Cancel
I __ "巳」
在 Using one of the following 皿ethods 选项中选择 Manual (I P pool 选择一个 IP 地址池) 选择个地址段,用户在使用 SSL VPN 和 SecureCl ent VPN 时分配地址用
缸咖S阳d....
r
Eerfα m A<现 Spoofl!"lg
1-checkpoint安装
当前最新版本NGX R65(试用版,官方网站下载,十五天内可以使用checkpoint全部功能,要想到期再使用,需要购买许可证(每一种功能需要相应的许可证)的,Checkpoint许可证一般是和网卡进行绑定的),在R60之前Checkpoint防火墙叫做NG(Next Generation 下一代网管),在R60以后称之为叫NGX(下一代防火墙增强版)1、按回车键进行安装,否则90秒后讲终止安装2、Device list显示checkpoint所支持的硬件列表,如果是特殊硬件,可以选择“Add Driver”进行添加硬件驱动。
OK——开始安装(此过程是安装的checkpoint的系统——secureplatform)3、选择checkpoint的操作系统(都是基于linux)SecurePlatform——标准版系统,SecurePlatform Pro——专业版操作系统,增加新特性,支持登录到系统的用户名和密码可以支持radius服务器认证,支持动态路由协议Check Point SecurePlatform Std- Delivered on bootable CD- Automatically installed pre-hardened operating system 自动安装预硬操作系统- Automatically installs Check Point security solutions 自动安装Check Point的安全解决方案- CLI for management 命令行管理- Web interface for management web管理界面- SNMP Support- FIPS 140-2 Compliance Mode- Add new drivers- Kernel based Red Hat ES 3.0Check Point SecurePlatform Pro (aditionallicense required)有许可证要求 - All features SecurePlatform Std and拥有标准版所以特性- Centralized administrator management through RADIUS支持Radius认证 - Supported Dynamic Routing Protocols支持动态路由协议- RIP-1、RIP-2、OSPF、BGP- Multicast Protocols支持组播协议- PIM-DM、PIM-SM、IGMP4、选择键盘类型,默认US5、为CheckPoint选择一个作为管理用的网络接口6、为选定的管理接口配置相关IP地址(一般是公网IP)7、指定在通过HTTPS对Checkpoint进行管理的时候所用的端口,默认是443,可以进行修改8、选择OK,Checkpoint讲对硬盘进行格式化9、开始执行SecurePlatform安装过程10、系统安装完成、选择OK进行重启,11、默认帐户是admin 密码admin登陆之后需要修改密码,同时需要修改admin帐户名可以不修改用户名(直接输入admin)12、登陆系统后,接下来需要进行初始化,两种方式初始化,第一种是图形,通过htttps,第二种是在命令行执行sysconfig命令,基于命令的初始化(这里以命令行做演示)13、欢迎界面,“q”退出,“n”继续14、网络配置菜单,提供5个菜单选项,逐个进行配置,先配置主机名,选择对应代码“1”15、主机名的菜单选项,“1”设置一个主机名;“2”查看主机名,我们选择“1”,然后回车16、输入主机名17、输入“e”退回到主界面18、选择“2”配置域名(可以不设),如要设置,跟设置主机名步骤相同,选择“3”设置域名服务器(DNS)地址,这个必须设,checkpoint很多功能需要DNS解析19、选择“1”添加一个DNS地址,“2”是删除一个DNS地址,“3”是查看DNS设置,设置完成后输入“e”,回到主菜单20、选择“4”,进行设置网卡21、选择“2”,配置网络连接22、选择要设置的网卡23、选择“1”,对eht0网卡进行IP地址的设置24、设置完成后,“e”回到上一级菜单25、在这仍然选择“2”,对其他网卡进行设置,步骤相同26、IP设置完成后,回到主菜单,选择“5”设置网关27、选择“1”,设置缺省网关28、设置完成后,输入“n”继续29、在这个菜单中,主要是对时间以及时区进行设置,具体方法按照向导操作30.时区和时间设置完成后,继续“n”,在这问你是从TFTP服务器上导入配置文件31、输入“n”继续32、试用版license许可协议,输入“y”继续总部;“UTM”要低端一些,适用于中小企业,输入“n”继续34、输入“n”全新安装35、选择安装的组件、“VPN-1 Power”是必须安装的,接下来一直继续36、开始安装37、此处我们输入“n”,因为我们用的试用版没有licenses38、此处要求添加一个管理员,这个管理员必须添加,他是不是用来登陆系统的,是用来通过控制台连接防火墙时候用的帐户39、添加访问端,指定从哪里能通过控制台40、配置完成。
- 1、下载文档前请自行甄别文档内容的完整性,平台不提供额外的编辑、内容补充、找答案等附加服务。
- 2、"仅部分预览"的文档,不可在线预览部分如存在完整性等问题,可反馈申请退款(可完整预览的文档不适用该条件!)。
- 3、如文档侵犯您的权益,请联系客服反馈,我们会尽快为您处理(人工客服工作时间:9:00-18:30)。
Check point防火墙基本操作手册CheckPoint(中国)TEL:(86)10 8419 3348 FAX:(86)10 8419 3399©2010 Check Point Software Technologies Ltd. All rights reserved.Classification:目录目录 (2)防火墙架构 (3)防火墙的Web管理 (3)配置IP: (4)配置DNS和Host: (5)配置路由: (5)通过防火墙的管理客户端管理 (5)添加防火墙 (7)添加策略步骤 (10)IP节点添加 (10)添加网段 (11)IPS的配置 (13)更新IPS库 (14)新建IPS动作库 (14)应用控制 (16)更新数据库 (16)添加应用控制策略 (17)App Wike (18)自定义添加应用 (18)QOS配置 (20)Qos策略的添加 (20)日志工具的使用 (20)筛选日志 (21)临时拦截可以连接 (22)©2010 Check Point Software Technologies Ltd. All rights reserved.Classification:©2010 Check Point Software Technologies Ltd. All rights reserved.Classification:防火墙架构Check point 防火墙的管理是通过一个三层架构来实现的。
首先我们可以在任意的机器上安装防火墙客户端控制台,然后利用控制台的图形化界面登录check point 的管理服务器,定义出各个网络对象,定义企业各条策略,最后下发到防火墙执行模块。
具体实现过程见图示:防火墙的Web 管理首先打开Web 管理界面,出现登录界面:登陆后的界面设备的Web界面只能配置设备的IP地址,网关,DNS和路由。
还可以针对设备的事件,SNMP监控,代理等信息。
配置IP:©2010 Check Point Software Technologies Ltd. All rights reserved.Classification:©2010 Check Point Software Technologies Ltd. All rights reserved.Classification:配置DNS 和Host:配置路由:通过防火墙的管理客户端管理打开管理客户端。
管理客户端的界面介绍。
SmartDashboard是配置防火墙策略和对象的一个控制软件,我们定义对象和规则时就利用他来实现,SmartUpdate是用于添License时要用到的一个控制软件,SmartView Tracker是查看日志时用到的客户端软件。
点击SmartDashboard后出现登录界面,如图:©2010 Check Point Software Technologies Ltd. All rights reserved.Classification:©2010 Check Point Software Technologies Ltd. All rights reserved.Classification:这里输入用户名,密码,以及管理服务器的ip 地址。
点击ok 登录到配置界面。
第一个选项Demo Mode 是查看防火墙的演示界面。
点击Demo Mode 选择下拉列表框中的Advance 选项可以查看Check point 公司定义的各项配置演示。
Cetificate (证书) 选项是替代管理员用户名和密码验证的一种选择,这个证书有管理服务器生成,用户自己保存在本地,需要用它验证时点击旁边的小方块,添加这个证书,然后选择管理服务器地址,然后点击ok 登录。
最下面的Read Only 选项是以只读方式登录防火墙。
没有改配置的权限。
注意:防火墙一次只可以容许一个用户以管理员身份登录,可以修改火墙配置,其他以管理员身份登录防火墙的用户,要么强制断开当前已登陆的帐户,要么以只读身份登录。
登陆SmartConsole 配置界面:添加防火墙设备有两种模式。
一种是独立模式,一种是分布式。
独立式则把防火墙和管理平台都装在一台设备上面。
分布式则把防火墙和管理平台分别安装在两台设备上面。
管理平台需要管理防火墙则要通过SIC 来进行管理。
独立式只需要安装管理软件则可以直接管理防火墙。
分布式在安装好后则只有Smart Center 。
右键点击Check Point 点击Security Gateway/Management …。
右键添加设备,添加有两种模式。
一种为向导模式,一种为自定义模式。
这里选择自定义添加设备。
选择需要的对象,然后回出现弹出界面以便我们配置其具体属性。
具体见图示:©2010 Check Point Software Technologies Ltd. All rights reserved.Classification:©2010 Check Point Software Technologies Ltd. All rights reserved.Classification:编辑防火墙的相关属性,见图所示,所标记的地方都是必须要做相应配置的。
然后点击Topology 点击Get interface with Topology 的到防火墙接口信息。
添加防火墙必须通过topology 获取到设备上面的相关接口IP ,否则策略下发后将不生效。
配置完成,点击ok 。
完成防火墙配置。
然后下面的配置节点对象以及网络对象都是相同意思,做好相应配置。
设备添加完成后我们可以在树形栏中看到设备添加成功后会出现一个新设备。
添加策略步骤添加完设备之后我们要添加公司内部需要经过防火墙的网段。
可以只添加需要做策略的网段或者IP。
首先添加IP节点,右键Nodes点击Node-Host添加IP节点。
IP节点添加设备IP节点的名称©2010 Check Point Software Technologies Ltd. All rights reserved.Classification:©2010 Check Point Software Technologies Ltd. All rights reserved.Classification:添加网段添加网段。
右键NetWork 点击Network添加网段。
添加网段的属性。
©2010 Check Point Software Technologies Ltd. All rights reserved.Classification:添加策略,源/目的 地址可以套用建立的节点或者网段。
添加完策略之后需要对策略进行下发。
下发策略到防火墙有两种方式 1. 通过点击快捷按钮来进行下发。
1、 测试策略是否有错误。
2、 下发策略到防火墙3、 显示策略下发的防火墙4、显示策略下发记录2.通过点击菜单中的Policy中的Install进行下发IPS的配置Check Point的IPS功能在防火墙上面开启后可以基本拦截70%的攻击,如果需要做更精确的配置可以通过手动自定义IPS的拦截事件。
IPS界面©2010 Check Point Software Technologies Ltd. All rights reserved.Classification:更新IPS库初次开启IPS需要先对IPS的库进行更新。
通过点击Download Update更新数据库更新完库后我们可以针对IPS的项目进行修改。
首先我们新建一个动作库。
新建IPS动作库©2010 Check Point Software Technologies Ltd. All rights reserved.Classification:新建完之后可以看到。
该库名为test模式为扫描。
如果需要进一步对设备进行测试。
可以针对这个规则进行修改。
点开在Test这一列针对需要修改的进行修改。
默认为全扫描模式。
只需要双击你需要修改的规则。
选择你需要修改的动作库,这里选择test©2010 Check Point Software Technologies Ltd. All rights reserved.Classification:应用控制应用控制可以限制用户的应用访问和url访问。
做到内网的应用控制初次使用应用控制需要更新应用数据库到最新。
更新数据库©2010 Check Point Software Technologies Ltd. All rights reserved.Classification:©2010 Check Point Software Technologies Ltd. All rights reserved.Classification:添加应用控制策略选择应用控制模块后点击Policy 然后点击添加策略进行添加。
Check Point 的应用控制是通过云端去识别应用,你可以到应用库中查看目前可以识别的应用或者URL,还可以针对类型进行控制,如果限制shoppint 则可以针对所有购物网站进行限制。
它会通过网站的特征码来匹配。
匹配成功后来进行限制。
App Wike点击App Wike可以检索到防火墙上更新到的所有应用。
自定义添加应用点击Next©2010 Check Point Software Technologies Ltd. All rights reserved.Classification:点击Next©2010 Check Point Software Technologies Ltd. All rights reserved.Classification:点击完成。
QOS配置默认打开Qos页面有一条默认策略,无限制。
右键点击添加策略,添加新策略Qos策略的添加日志工具的使用Smart Tracket 日志查看工具:©2010 Check Point Software Technologies Ltd. All rights reserved.Classification:©2010 Check Point Software Technologies Ltd. All rights reserved.Classification:Check Point 自带的日志查看工具可以对设备的日志进行筛选,分类。
图中我们看到有相应注释,左边All Records 是显示防火墙的所有日志,Firewall 是显示防火墙的日志,VPN 是显示的VPN 的日志,如果我们点击图中上面的向下的小箭头,即显示最新出现的日志。