P2160中文资料
ZR36060PQC中文资料(List Unclassifed)中文数据手册「EasyDatasheet - 矽搜」

应用
s 桌面视频编辑子系统 s PCMCIA视频采集卡 s 数码相机
Байду номын сангаас
ZR36060
综合JPEG编解码器
s 接口各种主机控制器,范围从 专用高性能ZR36057 PCI控制器
以通用低成本微控制器
s 灵活压缩数据接口: - 8位主模式下,支持高达30兆字节传输/ sec - 16位从模式,支持高达16.7转移 兆字节/秒 - 8位从模式,支持高达8.3兆字节传输/ sec
芯片中文手册,看全文,戳
集成JPEG编解码器
特征 . . . . . . . . . . . . . . . . . . . . . . . . . . . . . . . . . . . . 1
应用. . . . . . . . . . . . . . . . . . . . . . . . . . . . . . . . . 1
引脚说明. . . . . . . . . . . . . . . . . . . . . . . . . . . . . . . 6
视频接口. . . . . . . . . . . . . . . . . . . . . . . . . . . . . . . 8
视频可同步 - 主从模式. . . . . . . . . . . . . . . . . . . . . . 8 主模式. . . . . . . . . . . . . . . . . . . . . . . . . . . . . . . . . . . . . . . . . . . . . . 0.8 从模式. . . . . . . . . . . . . . . . . . . . . . . . . . . . . . . . . . . . . . . . . . . . . . . 0.9
飞利浦 HR2170 2168 2167 2161 2160 说明书

HR2170,HR2168,HR2167,HR2161,HR2160234H R 2170, H R 2168, H R 2167, H R 2161, H R 2160EnglisH 6繁體中文 16简体中文 25Congratulations on your purchase and welcome to Philips! T o fully benefit from the support that Philips offers,register your product at /welcome.The appliance is equipped with a built-in safety system that prevents the appliance from functioning if the accessories have been assembled incorrectly or have not been assembled at all.general description (Fig. 1)1 Motor unit with control knob2 Pulse setting3 Speed settings4 Ice button5 Plastic blender blade unit6 Plastic blender jar (HR2168/HR2167/HR2161/HR2160)7 Level indication8 Lid of plastic blender jar9 Opening in lid10Measuring cup11Filter (HR2168/HR2167 only)12Glass blender blade unit13Glass blender jar (HR2170 only)14Level indication15Lid of glass blender jar16Opening in lid17Measuring cup18Coupling unit19Chopper bowl (HR2168 only)20Chopper blade unit21Chopper lid22Mill blade unit23Mill beaker (HR2168/HR2167/HR2161 only)importantRead this user manual carefully before you use the appliance and save it for future reference.generalDanger-Never immerse the motor unit in water or any other liquid,nor rinse it under the e onlya moist cloth to clean the motor unit.Warning-Check if the voltage indicated on the appliance corresponds to the local mains voltage before you connect the appliance.-If the mains cord is damaged,you must have it replaced by Philips,a service centre authorised by Philips or similarly qualified persons in order to avoid a hazard.-Do not use the appliance if the plug,the mains cord or other parts are damaged.-Never use the blender jar,mill beaker (specific types only) or chopper bowl (specific types only) to switch the appliance on and off.-Never let the appliance run unattended.-This appliance is not intended for use by persons (including children) with reduced physical, sensory or mental capabilities,or lack of experience and knowledge,unless they have been given supervision or instruction concerning use of the appliance by a person responsible for their safety.EnglisH7 -Children should be supervised to ensure that they do not play with the appliance.-Do not touch the blades,especially when the appliance is plugged in.The blades are very sharp.Caution-Always unplug the appliance before you assemble,disassemble or make adjustments to any of the parts.-Never use any accessories or parts from other manufacturers or that Philips does not specifically recommend.If you use such accessories or parts,your guarantee becomesinvalid.-Do not exceed the maximum indication on the blender jar,the mill (specific types only) beaker and the chopper bowl (specific types only).-Do not exceed the maximum quantities and processing times indicated in the relevant table.-The appliance can only be switched on if the blender jar,the mill beaker (specific types only) or the chopper bowl (specific types only) is assembled on the motor unit correctly.BlenderWarning-Never reach into the blender jar with your fingers or an object while the appliance is running. -Make sure the blade unit is securely fastened to the blender jar before you assemble the blender jar onto the motor unit.-Do not touch the cutting edges of the blender blade unit when you handle or clean it.They are very sharp and you could easily cut your fingers on them.-If the blade unit gets stuck,unplug the appliance before you remove the ingredients that block the blades.Caution-Never fill the blender jar with ingredients hotter than 80ºC.-T o prevent spillage,do not put more than 1.5 litres of liquid in the blender jar,especially when you process at a high speed.Do not put more than 1 litre in the blender jar when you process hot liquids or ingredients that tend to foam.-If food sticks to the wall of the blender jar,switch off the appliance and unplug it.Then use a spatula to remove the food from the wall.-Always make sure the lid is properly closed/assembled on the jar and the measuring cup is inserted properly in the lid before you switch on the appliance.-HR2170 only:The jar is made of glass and therefore breakable.Do not drop the jar on a hard floor.Also avoid extreme thermal shocks.If the jar is very cold,rinse it well with lukewarm water before you pour hot liquid into it.If the glass jar cracks,stop using it.Mill (HR2168/HR2167/HR2161 only)Warning-Make sure the blade unit is securely fastened to the mill beaker before you assemble the mill beaker onto the motor unit.-Do not touch the cutting edges of the mill blade unit when you handle or clean it.They are very sharp and you could easily cut your fingers on them.-Never use the mill to grind very hard ingredients such as nutmeg and ice cubes.Caution-Never use the mill for more than 30 seconds without interruption.Let the mill cool down to room temperature between processing cycles.-Always process cloves,star anise and aniseed together with other ingredients.If processed separately,these ingredients may attack the plastic materials of the appliance.-The mill beaker may become discoloured when you use the mill to process ingredients such as cloves,anise and cinnamon.-The mill is not suitable for chopping raw e the blender or chopper instead.-Do not use the mill to process liquids such as fruit juice.Chopper (HR2168 only) Warning-Make sure the coupling unit is securely fastened to the chopper bowl before you assemble the chopper onto the motor unit.-Do not touch the cutting edges of the chopper blade unit when you handle or clean it. They are very sharp and you could easily cut your fingers on them.-Never reach into the chopper bowl with your fingers or an object while the appliance is running.-If the blade unit gets stuck, unplug the appliance before you remove the ingredients that block the blades.Caution-Always make sure the lid is properly assembled on the chopper bowl before you switch on theappliance.-If food sticks to the wall of the chopper bowl, switch off the appliance and unplug it. Then use aspatula to remove the food from the wall.Filter (HR2168/HR2167 only)Caution-Never use the filter to process ingredients hotter than 80°C.-Never overload the filter. Do not fill the filter beyond its metal part.-Always make sure the lid of the blender jar is closed/assembled properly and the measuring cup is inserted properly in the lid before you switch on the appliance. -Cut fruit into smaller pieces before you put it in the filter.-Soak dried ingredients, such as soy beans, before you put them in the filter.Electromagnetic fields (EMF)This Philips appliance complies with all standards regarding electromagnetic fields (EMF). If handled properly and according to the instructions in this user manual, the appliance is safe to use based on scientific evidence available today.Built-in safety lockThis feature ensures that you can only switch on the appliance if the blender jar and lid, the mill beaker or the chopper bowl and lid (specific types only) are assembled on the motor unit properly. If the blender jar and lid, the mill beaker or the chopper bowl and lid are correctly assembled, the built-in safety lock will be unlocked.Motor circuit protectorThe appliance is equipped with a motor circuit protector that switches off the motor if the motor jams (which might occur during heavy processing jobs or if the appliance is not used according to the instructions in the user manual). If this happens, first switch off and unplug the appliance and let it cool down to room temperature. Then check if the quantity of ingredients you are processing does not exceed the quantity mentioned in the user manual or if something is blocking the blade unit.Thoroughly clean the parts that come into contact with food before you use the appliance for the first time (see chapter ‘Cleaning’).EnglisH8EnglisH9 Blender,The blender is intended for:-Blending fluids,e.g.dairy products,sauces,fruit juices,soups,mixed drinks,shakes.-Mixing soft ingredients,e.g.pancake batter or mayonnaise.-Pureeing cooked ingredients,e.g.for making baby food.Preparing the blender for use1 Screw the blender blade unit clockwise onto the blender jar (Fig. 2).2 Mount the blender jar with the blade unit attached to it onto the motor unit and turn itclockwise until it locks into position (Fig. 3).3 Put the ingredients in the blender jar.Let hot ingredients cool down before you put them in the blender jar (max.temperature80°C/175°F).4 HR2170 only: fasten the lid on the jar by pressing it down (1) and turning it clockwise(2). (Fig. 4)Note:Make sure that the sieve in the lid is positioned in front of the spout of the jar to be able to pour out liquids.5 HR2168/HR2167/HR2161/HR2160 only: close the lid.6 Insert the measuring cup into the lid (Fig. 5).Note:To disassemble the blender,follow the instructions above in reverse order and direction.Using the blenderNever reach into the jar with your fingers or an object (e.g. a spatula), while the blender is running.Do not exceed the maximum level indicated on the blender jar.1 Put the mains plug in the wall socket.2 Switch on the appliance. (Fig. 6)Note:See the blender table at the end of this user manual for the recommended quantities,speed settings and processing times.-T o process ingredients at a particular speed,turn the control knob to the required speed setting. Do not let the appliance run for more than 2 minutes at a time. Let the appliance cool down to room temperature before you continue processing.-T o process ingredients very briefly,turn the control knob to the pulse setting (P) several times. Never use the pulse setting longer than a few seconds at a time.-T o crush ice,press the ICE button.3 When you have finished processing, set the control knob to 0 and unplug the appliance. Always set the control knob to 0 before your open the lid.Tips-T o prevent spillage,do not put more than 1.5 litres of liquid in the blender jar,especially when you process at a high speed.Do not put more than 1 litre in the blender jar when you process hot liquids or ingredients that tend to foam.-Y ou can use the opening in the lid to add ingredients while the appliance is running (Fig.7).-Do not process dry ingredients for more than 1 minute.-Cut solid ingredients into smaller pieces before you put them in the blender jar. Do not processa large quantity of solid ingredients at the same time. Process these ingredients in a series of small batches instead.-If you are not satisfied with the results when you blend solid ingredients, use the pulse setting afew times to let the blender run briefly. If you want to use a spatula, switch off the appliance, open the lid and then stir the ingredients. Y ou can also remove some of the contents of the jar and process smaller amounts.-T o crush ice cubes, put max. 5 cubes in the jar at a time and press the ICE button a few times.HR2170 only: The jar is made of glass and therefore breakable. Do not drop the jar on a hard floor. Also avoid extreme thermal shocks. If the jar is very cold, rinse it well with lukewarm water before you pour hot liquid into it. If the glass jar cracks, stop using it.Filter (HR2168/HR2167 only)Y ou can use the filter to obtain extra finely blended sauces, fresh fruit juices or cocktails. All pips and skins are caught in the filter.HR2170/HR2160: Y ou can order the filter (type number HR2963) from your Philips dealer.Never fill the filter beyond its metal part.Do not use the filter to process hot ingredients.Preparing the filter for use1 Assemble the blender jar onto the motor unit (see section ‘Preparing the blender for use’ inthis chapter). 2 Put the filter in the blender jar (Fig. 8).Make sure the filter is placed properly on the bottom of the jar.The grooves of the filter and the ribs inside the blender jar help you put the filter in the right position. 3 Close the lid.Using the filter1 Put the ingredients in the filter through the opening in the lid.Cut fruits into smaller pieces and soak dried pulses, such as soy beans, before you process them in the filter.2 Add water or another liquid.3 Put the measuring cup in the lid, set the control knob to the highest speed and let theappliance run for max. 40 seconds. 4 Set the control knob to 0 and remove the blender jar from the motor unit.5 Pour out the drink through the spout of the blender jar (Fig. 9).Make sure the lid is closed and the measuring cup is in the lid. This prevents pulp and skins from ending up in your drink.6 For optimal results, put the jar with the remaining ingredients back onto the appliance,without opening/removing the lid. Then let the appliance run for a few more seconds. 7 Pour out the rest of the drink.8 When you have finished processing, set the control knob to 0 and unplug the appliance.EnglisH10EnglisH11 Tips-When you process a large quantity,we advise you not to put all the ingredients in the filter at the same time.Start to process a small quantity and let the appliance run for a few seconds.Then switch off the appliance and add another small quantity.Repeat this procedure until you have processed all the ingredients.Always keep the lid on the blender jar during processing.-T o get the best result when you make fruit juices and cocktails,add approx.300ml water to 150g fruit.Y ou can also use other liquids,e.g.to make cocktails.-T o make tomato juice,cut the tomatoes in four and drop the pieces through the opening in the lid onto the rotating blades.Mill (HR2168/HR2167/HR2161 only)Y ou can use the mill to grind and chop ingredients such as peppercorns,sesame seeds,rice,wheat, coconut flesh,nuts (shelled),coffee beans,dried soy beans,dried peas,cheese,breadcrumbs,etc. Always process cloves, star anise and aniseed together with other ingredients. If processed separately, these ingredients may attack the plastic materials of the appliance.The mill is not suitable for chopping very hard ingredients like nutmeg and ice cubes.Do not exceed the maximum level indicated on the mill beaker.Preparing the mill for use1 Put the ingredients in the mill beaker (Fig. 10).Note:See the mill table at the end of this user manual for the recommended quantities and processing times.2 Screw the mill blade unit clockwise onto the mill beaker (Fig. 11).3 T urn the assembled mill upside down and screw it clockwise onto the motor unit (Fig. 12).Using the mill1 Switch on the appliance.We advise you to use the pulse setting or speed setting 5.Never let the mill run for more than 30 seconds without interruption.2 When you have finished processing, set the control knob to 0 and unplug the appliance.3 T o remove the mill from the motor unit, turn the mill anticlockwise.Chopper (HR2168 only)Y ou can use the chopper to chop ingredients such as onions,meat,herbs,vegetables,fruit,chocolate, firm cheese,baby food and nuts.HR2170/HR2161/HR2160:Y ou can order the chopper (type number HR2965) from your Philips dealer.Do not use the chopper to mix liquids. Use the blender for this purpose.1 Insert the coupling unit of the chopper into the bottom of the chopper bowl (1). T urn thecoupling unit anticlockwise to fix it (2) (Fig. 13).2 Place the chopper bowl (1) on the motor unit and turn it clockwise to fix it (2). (Fig. 14)3 Place the chopper blade unit in the chopper bowl (Fig. 15).4 Put the ingredients in the chopper bowl (Fig. 16).Note: See the chopper table at the end of this user manual for the recommended quantities and processing times.Do not exceed the maximum quantities indicated in the table.Tip: Precut large pieces of food into pieces of 1-2cm.5 Put the lid on the chopper bowl (1) and turn it clockwise to fix it (2) (Fig. 17).Note: Make sure the lid is properly fixed before you switch on the appliance.6 Switch on the appliance.Note: If the appliance shakes because the food is not evenly distributed, put your hand on the lid.Note: The chopper does its work in a few seconds. Never let it run longer than a few seconds.7 When you have finished processing, set the control knob to 0 and unplug the appliance. 8 T urn the chopper bowl anticlockwise (1) and remove it from the motor unit (2). (Fig. 18) 9 T urn the coupling unit clockwise (1) and remove it from the bottom of the chopper bowl (2) (Fig. 19).10 Remove the lid and the blade unit from the chopper bowl.Be careful when you handle the blade unit. The cutting edges of the blade unit are sharp. 11 Empty the chopper bowl.Always remove blade unit from the chopper bowl and the chopper from the motor unit before you empty the chopper bowl.Never use scouring pads, abrasive cleaning agents or aggressive liquids such as petrol or acetone to clean the appliance.1 Switch off and unplug the appliance.2 Disassemble all removable parts before you clean them.3 Clean the different parts of the appliance as indicated in the cleaning table.Tips: -Cleaning the appliance and its parts is easiest immediately after use. -If necessary, clean the mesh of the filter with a very soft brush.Quick-cleaning the blender jar1 Fill the blender halfway with warm water and add a few drops of washing-up liquid.2 T urn the control knob to the pulse setting a few times.3 Detach the blender jar, empty it and rinse it under the tap.1 T o store the mains cord, push it into the cord storage compartment in the base (Fig. 21).2 Store the appliance in a safe and dry place.EnglisH12EnglisH13-Do not throw away the appliance with the normal household waste at the end of its life,but hand it in at an official collection point for recycling.By doing this,you help to preserve the environment (Fig.22).If you need service or information or if you have a problem,please visit the Philips website at or contact the Philips Consumer Care Centre in your country (you find its phone number in the worldwide guarantee leaflet).If there is no Consumer Care Centre in your country, go to your local Philips dealer.For more recipes,visit our website /kitchen.Baby foodingredients-250g cooked chicken meat-250g cooked potatoes-250g cooked green beans-450ml milk1 Assemble the blender jar onto the motor unit (see section ‘Using the appliance’).2 Precut the ingredients into pieces of 2x2x2cm.3 Put the ingredients in the blender jar.4 Blend the ingredients for 25 seconds (or longer for a finer result).Note:If you want to prepare a larger quantity,let the appliance cool down to room temperature before you process the next batch of ingredients.soy milkingredients-180g soy beans (soaked)-500ml warm water1 Soak the soy beans in fresh water for at least 4 hours until they are soft.2 Process the soaked soy beans with 500ml warm water in the blender for approx 60 secondsuntil you have obtained a smooth liquid.Note:If you want to prepare a larger quantity,let the appliance cool down to room temperature before you process the next batch of ingredients.Five spice powderingredients-2g aniseed-2g star anise-2g Chinese cassia-2g cloves-2g Chinese liquorice1 Put all ingredients in the mill beaker.2 Grind the ingredients for 30 seconds.Note: If you want to prepare a larger quantity, let the appliance cool down to room temperature before you process the next batch of ingredients.Thai massamaningredients -20g shallots -15g garlic -7g galangal -9g lemongrass - 2 cloves - 1 tbsp coriander seeds - 1 tbsp cumin seeds - 3 dried chillies - 5 peppercorns - 1 tbsp shrimp paste - 1 tbsp salt1 Cut the galangal into slices of approx. 1cm.2 Put all ingredients in the mill beaker.3 Grind the ingredients for 30 seconds.Note: If you want to prepare a larger quantity, let the appliance cool down to room temperature before you process the next batch of ingredients.Chilli pasteingredients -20g fresh red chillies -30g shallots - 2 cloves garlic1 Cut the chillies and shallots into large pieces that fit into the chopper bowl.2 Put the chillies, shallots and garlic in the chopper bowl.3 Chop the ingredients for 30 seconds.Note: If you want to prepare a larger quantity, let the appliance cool down to room temperature before you process the next batch of ingredients.EnglisH14EnglisH15If the appliance does not work or does not work properly,first check the list below or visit the Philips website at /welcome.If the problem is not mentioned in this list or on theinternet,the appliance probably has a defect.In that case we advise you to take the appliance to恭喜您購買本產品並歡迎加入飛利浦!請於 /welcome 註冊您的產品,以善用飛利浦提供的支援。
BYT60P-1000中文资料

BYT60P-1000BYT261PIV-1000October 1999 - Ed: 4BFAST RECOVERY RECTIFIER DIODES®Dual or high single voltage rectifier devices suited for Switch Mode Power Supplies and other power converters.These devices are packaged in ISOTOP or in SOD93.DESCRIPTIONVERY LOW REVERSE RECOVERY TIME VERY LOW SWITCHING LOSSES LOW NOISE TURN-OFF SWITCHING INSULATED PACKAGE: ISOTOP Insulation voltage: 2500 V RMS Capacitance = 45 pF Inductance < 5 nH FEATURES AND BENEFITSSymbol ParameterValue Unit V RRM Repetitive peak reverse voltage 1000V I FRMRepetitive peak forward current tp=5 µs F=1kHz 1000A I F(RMS)RMS forward currentISOTOP 140A SOD93100I F(AV)Average forward current δ = 0.5Tc = 50°C ISOTOP 60A Tc = 60°CSOD9360I FSM Surge non repetitive forward current tp = 10 ms Sinusoidal400A T stg Storage temperature range- 40 to + 150°C TjMaximum operating junction temperature150°CABSOLUTE RATINGS (limiting values, per diode)I F(AV) 2 x 60 A V RRM 1000 V V F (max) 1.8 V trr (max)70 nsMAJOR PRODUCT CHARACTERISTICSISOTOP TM(Plastic)K2A2A1K1BYT261PIV-1000TM: ISOTOP is a registered trademark of STMicroelectronics.KA SOD93(Plastic)1/7l t l c )Ob so e t ePr od u c (s ) -O bs o e t eP r od u t (sb c l c )Os ol e t ePr od u t (s ) -O bs o e t eP r od u t (sSymbol Parameter Test ConditionsMin.Typ.Max.Unit V F *Forward voltage drop Tj = 25°C I F = 60 A1.9VTj = 100°C 1.8I R **Reverse leakage currentTj = 25°C V R = V RRM 100µA Tj = 100°C6mAPulse test :* tp = 380 µs, δ < 2%** tp = 5 ms, δ < 2%STATIC ELECTRICAL CHARACTERISTICS (per diode)Symbol ParameterValue Unit R th(j-c)Junction to caseISOTOP Per diode Total 0.80.45°C/WSOD93Total 0.7R th(c)Coupling0.1°C/W When the diodes 1 and 2 are used simultaneously :∆ Tj(diode 1) = P(diode) x R th(j-c) (Per diode) + P(diode 2) x R th(c)THERMAL RESISTANCES To evaluate the conduction losses use the following equation:P = 1.47 x I F(AV) + 0.005 I F 2(RMS)Symbol Test ConditionsMin.Typ.Max.Unit t rrTj = 25°CI F = 1A V R = 30V dI F /dt = - 15A/µs170nsI F = 0.5A I R = 1A I rr = 0.25A70RECOVERY CHARACTERISTICS (per diode)Symbol ParameterTest ConditionsMin.Typ.Max.Unitt IRM Maximum reverserecovery time dI F /dt = - 240 A/µs V CC = 200 V I F = 60 A L p ≤ 0.05 µH Tj = 100°C (see fig. 13)200nsdI F /dt = - 480 A/µs 120I RMMaximum reverse recovery currentdI F /dt = - 240 A/µs 40AdI F /dt = - 480 A/µs44C =V RPV CCTurn-off overvoltage coefficientTj = 100°C V CC = 200V I F = I F(AV)dI F /dt = - 60A/µs L p = 2.5µH (see fig. 14)3.34.5/TURN-OFF SWITCHING CHARACTERISTICS BYT60P-1000 / BYT261PIV-10002/7l t l c )Ob so e t ePr od u c (s ) -O bs o e t eP r od u t (s0.00.10.20.30.40.50.60.70.80.91.0050100150200250300350400450500IM(A)P=100WP=20WP=70WP=40WTδ=tp/TtpδFig. 2-1: Peak current versus form factor (per diode, ISOTOP).025507510012515010203040506070Tamb(°C)IF(av)(A)Rth(j-a)=2.5°C/WRth(j-a)=Rth(j-c)ISOTOPSOD93Tδ=tp/Ttp Fig. 3: Average forward current versus ambient temperature (δ=0.5, per diode for ISOTOP).102030405060700102030405060708090100110120130IF(av) (A)PF(av)(W)T δ=tp/Ttpδ= 1δ= 0.5δ= 0.2δ= 0.1δ= 0.05Fig. 1-1: Average forward power dissipation versus average forward current (per diode,ISOTOP).0.00.10.20.30.40.50.60.70.80.9 1.0050100150200250300350400450500IM(A)P=100WP=20WP=70W P=40WTδ=tp/TtpδFig. 2-2: Peak current versus form factor (SOD93).10203040506070102030405060708090100110120130IF(av) (A)PF(av)(W)Tδ=tp/Ttpδ= 1δ= 0.5δ= 0.2δ= 0.1δ= 0.05Fig. 1-2: Average forward power dissipation versus average forward current (SOD93).BYT60P-1000 / BYT261PIV-10003/7l d l c )Ob so e t ePr ou ct (s )- O bs o e t eP r od u t (s11010020020406080100VR(V)C(pF)F=1MHz Tj=25°CFig. 7: Junction capacitance versus reverse voltage applied (typical values, per diode for ISOTOP).0.00.51.01.52.02.53.03.54.0110100500VFM(V)IFM(A)T ypical values Tj=100°CTj=25°CTj=100°CFig. 6: Forward voltage drop versus forward current (maximum values, per diode for ISOTOP).1E-31E-21E-11E+00.10.20.51.0tp(s)K=[Zth(j-c)/Rth(j-c)]Tδ=tp/TtpSingle pulseδ= 0.1δ= 0.2δ= 0.5Fig. 5-1: Relative variation of thermal impedance junction to case versus pulse duration (per diode,ISOTOP).1E-31E-21E-11E+0050100150200250300350400t(s)IM(A)Tc=60°CTc=25°CI Mtδ=0.5Fig. 4-1: Non repetitive surge peak forward current versus overload duration (SOD93).1E-31E-21E-11E+0050100150200250300350400Tc=50°CTc=25°Ct(s)IM(A)I Mtδ=0.5Fig. 4-2: Non repetitive surge peak forward current versus overload duration (per diode, ISOTOP).1E-31E-21E-11E+00.10.20.51.0tp(s)K=[Zth(j-c)/Rth(j-c)]Tδ=tp/TtpSingle pulseδ= 0.1δ= 0.2δ= 0.5Fig. 5-2: Relative variation of thermal impedance junction to case versus pulse duration (SOD93).BYT60P-1000 / BYT261PIV-10004/7l d l c )Ob so e t ePr ou ct (s )- O bs o e t eP r od u t (s1002003004005000.000.250.500.751.001.251.50tfr(µs)IF=IF(av)90% confidence Tj=100°CdIF/dt(A/µs)Fig. 11: Forward recovery time versus dI F /dt (per diode for ISOTOP).2550751001251500.250.500.751.001.251.50Tj(°C)Qrr;IRM[Tj] / Qrr;IRM[Tj=100°C]IRMQrrFig. 12: Dynamic parameters versus junction temperature.010020030040050051015202530354045VFP(V)IF=IF(av)90% confidence Tj=100°CdIF/dt(A/µs)Fig. 10: Transient peak forward voltage versus dI F /dt (per diode for ISOTOP).10205010020050001020304050607080IRM(A)IF=IF(av)90% confidence Tj=100°CdIF/dt(A/µs)Fig. 9: Recovery current versus dI F /dt (per diode for ISOTOP).1020501002005000246810dIF/dt(A/µs)Qrr(µC)IF=IF(av)90% confidence Tj=100°CFig. 8: Recovery charges versus dI F /dt (per diode for ISOTOP).BYT60P-1000 / BYT261PIV-10005/7l s l c )Ob so e t ePr od u c t () -O bs o e t eP r od u t (sLCDUTVCCIFVFIRMVCCtIRMdiF/dtFig. 13: Turn-off switching characteristics (without serie inductance).LCDUTVCCLPIFVFVRPVCCdiF/dtFig. 14: Turn-off switching characteristics (with serie inductance).PACKAGE MECHANICAL DATA ISOTOPREF.DIMENSIONSMillimetersInches Min.Max.Min.Max.A 11.8012.200.4650.480A18.909.100.3500.358B 7.88.200.3070.323C 0.750.850.0300.033C2 1.95 2.050.0770.081D 37.8038.20 1.488 1.504D131.5031.70 1.240 1.248E 25.1525.500.990 1.004E123.8524.150.9390.951E224.80 typ.0.976 typ.G 14.9015.100.5870.594G112.6012.800.4960.504G2 3.50 4.300.1380.169F 4.10 4.300.1610.169F1 4.60 5.000.1810.197P 4.00 4.300.1570.69P1 4.00 4.400.1570.173S30.1030.301.185 1.193BYT60P-1000 / BYT261PIV-10006/7l s l c )Ob so e t ePr od u c t () -O bs o e t eP r od u t (sInformation furnished is believed to be accurate and reliable. However, STMicroelectronics assumes no responsibility for the consequences of use of such information nor for any infringement of patents or other rights of third parties which may result from its use. No license is granted by implication or otherwise under any patent or patent rights of STMicroelectronics. Specifications mentioned in this publication are subject to change without notice. This publication supersedes and replaces all information previously supplied.STMicroelectronics products are not authorized for use as critical components in life support devices or systems without express written ap-proval of STMicroelectronics.The ST logo is a registered trademark of STMicroelectronics © 1999 STMicroelectronics - Printed in Italy - All rights reserved.STMicroelectronics GROUP OF COMPANIESAustralia - Brazil - China - Finland - France - Germany - Hong Kong - India - Italy - Japan - MalaysiaMalta - Morocco - Singapore - Spain - Sweden - Switzerland - United Kingdom - U.S.A.Ordering type Marking Package Weight Base qtyDeliverymode BYT60P-1000BYT60P-1000SOD93 3.79 g.30Tube BYT261PIV-1000BYT261PIV-1000ISOTOP28 g. (without screws)10TubeCooling method: by conduction (C)Recommended torque value (ISOTOP): 1.3 N.m (MAX 1.5 N.m) for the 6 x M4 screws. (2 x M4 screws recommended for mounting the package on the heatsink and the 4 screws given with the screw ver-sion).The screws supplied with the package are adapted for mounting on a board (or other types of terminals) with a thickness of 0.6 mm min and 2.2 mm max.Recommended torque value (SOD93): 0.8 N.m.Maximum torque value (SOD93): 1.0 N.m.Epoxy meets UL94,V0PACKAGE MECHANICAL DATA SOD93 PlasticREF.DIMENSIONSMillimeters Inches Min.Typ.Max.Min.Typ.Max.A 4.70 4.900.1850.193C 1.17 1.370.0460.054D 2.500.098D1 1.270.050E 0.500.780.0200.031F 1.10 1.300.0430.051F3 1.750.069G 10.8011.100.4250.437H 14.7015.200.5780.598L 12.200.480L216.200.638L318.00.709L5 3.95 4.150.1560.163L631.001.220O4.004.100.1570.161BYT60P-1000 / BYT261PIV-10007/7。
菲利普5000系列智能超高清电视(4K超高清2160p)说明书

Philips5000 series Smart Ultra HDTV with Net TV and Dolby Vision50" class/po4K Ultra HD 2160p BrightProEnhanced Color Gamut50PFL5903Smart 4K UltraHDTVYour favorite online content in UltraHDDolby Vision™ transforms your TV experience with dramatic imaging - incredible brightness, contrast, and color that bring entertainment to life before your eyes.Enjoy the beauty of 4K Ultra HD•The beauty of 4K UltraHD TV is in savoring every detail •Pixel Precise UltraHD for vivid, natural, and real images •120 Perfect Motion Rate for increased pixel response times •An intelligent dimming backlight for dynamic contrast •Enjoy HD content in 4K UHD with a 4K upscaling engine •Dolby Vision for Dramatic Imaging at HomeAuthentic and clear sound experience.•20 Watts RMS of rich surround sound to complement 4K images •Immersive sound with clear voice designed by sonic emotion •Dolby Audio for the ultimate movie experienceComplete digital TV connectivity made simple.•Wireless LAN 802.11ac with MIMO for seamless streaming of 4K •Wirelessly mirror the screen of smart device on your TV •NetTV with Wireless access to online services on your TVHighlights4K UltraHD4 times the resolution of Full HD brings your viewing experience to the whole new level. Enjoy every detail and the breathtaking beauty of the pictures.Dolby VisionDolby Vision is a powerful cinema technology that now transforms your TV experiencee. It brings entertainment to life with dramaticimaging - incredible brightness, color, contrast, detail and dimensionality. And with the advanced capabilities in Dolby Vision, you'll see there's more to the story than generic HDR can reveal.Pixel Precise UltraHDThe beauty of 4K Ultra HD TV is in savoring every detail. The picture-processing algorithmsof our Pixel Precise Ultra HD engine convert any input picture into UHD resolution on your screen. The result? Whether you watch a video online or native 4K Ultra-HD content, you'll experience exceptional sharpness, motion, clarity, color and contrast from Philips.Bright ProBrightPro backlith boosts brighter areas of the image by up to twice as much as a regular LED backlight. Bright Pro enables to display exceptional brightness and contrast even in brightly lit rooms. Video scenes which feature bright light sources such as sunlight, fireworks, police lights, flashlights, etc. look more realistic and lifelike.Macro dimmingUsing a proprietary video processing algorithm which measures average luminance level of each video frame, Philips' Macro Dimming intelligent backlight dims the backlight to match every video frame to ensure you have a strain-free life-like viewing experience with bright whites, vivid colors and dark blacks.120 Perfect Motion Rate120 Perfect Motion Rate (PMR) creates extreme motion sharpness for clear and vibrant images in fast action movies. The new Philips PMRstandard reduces response time of the HDTV to produce faster picture transitions and reduces motion artifacts.Net TVPhilips NetTV is built for streaming. With a simple push of a button, gain instant access to popular streaming applications such as Netflix, Vudu, YouTube, all within a clutter-free, easy to use interface. Visit the App Store to download additional content from our extensive entertainment library, with entertainmentoptions to suit everyone. Surf the web on your big screen TV, all without the need ofconnecting a computer. Enjoy smooth streaming of up-to 4K content with the powerful, built-inWireless 802.11ac MIMO Dual-Band chipset.SpecificationsPicture/Display•Aspect ratio: Widescreen(16:9)•Contrast ratio (typical): 5000:1•Response time (typical): 9.5 ms•Viewing angle: 178º (H) / 178º (V)•Diagonal screen size: 50 inch / 127 cm•Visible screen diagonal (inch): 49.5 inch •Display screen type: LED UltraHD Display •Panel resolution: 3840x2160p•Picture enhancement: Pixel Plus UltraHD, Black stretch, Digital Noise Reduction, MPEG artifact reduction, 120 PMR, Color Enhancement, Dynamic contrast, Gamma, Macro DimmingSupported Display Resolution •Computer formatsResolution Refresh rate640 x 480 60Hz720 x 480 60Hz800 x 600 60Hz1024 x 768 60Hz1280 x 768 60Hz1280 x 1024 60Hz1360 x 768 60Hz1440 x 900 60 Hz1920 x 1080 60Hz1680 x 1050 60Hz1400 x 1050 60Hz3840 x 2160 60Hz4096 x 2160 60Hz•Video formatsResolution Refresh rate480i 60Hz480p 60Hz720p 60Hz1080i 60Hz1080p 24,30,60Hz2160p 24, 30, 60HzSound•Equalizer: 5-bands•Output power (RMS): 2 x 10W•Sound System: Sonic Emotion Premium, Stereo, SAP, Dolby Audio Loudspeakers•Built-in speakers: 2Convenience•Child Protection: Child Lock+Parental Control•Clock: Sleep Timer•Ease of Installation: Autostore•Ease of Use: AutoPicture, AutoSound, Settingsassistant Wizard, Auto Volume Leveling•Remote Control: TV•Screen Format Adjustments: 4:3, Movie expand 14:9,Movie expand 16:9, Super Zoom, Widescreen,unscaled (1080p dot by dot), Full, Automatic•Multimedia: auto slideshow, USB media browserMultimedia Applications•Multimedia connections: USB Storage Device•Playback Formats: MP3, JPEG Still pictures, MPEG1,MPEG2, H.264/MPEG-4 AVC, H.265/HEVC, AAC,WAVE, AC3, MPEG4Tuner/Reception/Transmission•Aerial Input: 75 ohm F-type•TV system: ATSC, NTSC•Video Playback: NTSC•Tuner bands: UHF, VHFConnectivity•AV 1: Shared audio L/R in, CVBS/YPbPr•Audio Output - Digital: Optical (TOSLINK)•Other connections: Ethernet, Headphone out,Wireless LAN 802.11ac MIMO•USB: USB•HDMI1:Shared audio L/R in,HDMI•HDMI 2: Shared audio L/R in, HDMI (Audio ReturnChannel)•HDMI 3: HDMI, Shared audio L/R in•EasyLink (HDMI-CEC): One touch play, Powerstatus, System info (menu language), Remote controlpass-through, System audio control, System standbyPower•Ambient temperature: 5°C to 40°C (41°F to 104°F)•Mains power: 120V/60Hz•Power consumption: 125 W•Standby power consumption: < 0.5WDimensions•Set dimensions in inch (W x H x D):44.2 x 25.6 x 3.7 inch•Product weight (lb): 21.6 lb•Set dimensions with stand in inch (W x H x D):44.2 x 27.6 x 8.9 inch•Product weight (+stand) (lb): 22.1 lb•Box dimensions in inch (W x H x D):51.2 x 29.4 x 6.4 inch•Weight incl. Packaging (lb): 29.8 lb•VESA wall mount compatible: 300 x 200 mmAccessories•Included accessories: Table top stand, Quick startguide, User Manual, Remote Control, Batteries forremote control, Screws•Power cord: 59.05 inchNetwork Services•NetTV Apps: Netflix, Vudu, Vewd browser,YouTube, Pandora, Vewd app store, Youtube TV,Showtime Streaming•Network Features: Home Network, WirelessScreencastingIssue date 2018-08-15 Version: 2.1.112 NC: 8670 001 53114 UPC: 6 09585 25196 0© 2018 Koninklijke Philips N.V.All Rights reserved.Specifications are subject to change without notice. Trademarks are the property of Koninklijke Philips N.V. or their respective owners.。
S186P中文资料

S186PDocument Number 81536Rev. 1.5, 27-Nov-06Vishay Semiconductors194 8632Silicon PIN PhotodiodeDescriptionS186P is a high speed and high sensitive PIN photo-diode in a flat side view plastic package. The epoxypackage itself is an IR filter, spectrally matched to GaAs or GaAs on GaAlAs IR emitters (λ p ≥ 900 nm).The large active area combined with a flat case gives a high sensitivity at a wide viewing angle.Features•Fast response times•Small junction capacitance •High radiant sensitivity •Large radiant sensitive area A = 7.5 mm 2 •Wide angle of half sensitivity ϕ = ± 65° •Plastic case with IR filter (950 mm) •Suitable for near infrared radiation •Lead (Pb)-free component•Component in accordance to RoHS 2002/95/EC and WEEE 2002/96/ECApplications•High speed photo detectorAbsolute Maximum RatingsT amb = 25°C, unless otherwise specifiedElectrical CharacteristicsT amb = 25°C, unless otherwise specifiedParameterT est conditionSymbol Value Unit Reverse Voltage V R 60V Power Dissipation T amb ≤ 25°CP V 215mW Junction T emperature T j 100°C Storage Temperature Range T stg - 55 to + 100°C Soldering T emperature t ≤ 5 s T sd 260°C Thermal Resistance Junction/AmbientR thJA350K/WParameterT est conditionSymbol Min T yp.MaxUnit Breakdown Voltage I R = 100 μA, E = 0V (BR)60V Reverse Dark Current V R = 10 V , E = 0I ro 230nA Diode capacitanceV R = 0 V , f = 1 MHz, E = 0C D 70pF V R = 3 V , f = 1 MHz, E = 0C D2540pF 2Document Number 81536Rev. 1.5, 27-Nov-06S186PVishay Semiconductors Optical CharacteristicsT amb = 25°C, unless otherwise specifiedTypical CharacteristicsT amb = 25°C unless otherwise specifiedParameterTest conditionSymbol MinTyp.Max Unit Open Circuit Voltage E e = 1 mW/cm 2, λ = 950 nm V o 350mV Short Circuit Current E e = 1 mW/cm 2, λ = 950 nm I k 38µA Reverse Light Current E e = 1 mW/cm 2, λ = 950 nm, V R = 5 VI ra 4345µA Angle of Half Sensitivity ϕ± 65deg Wavelength of Peak Sensitivity λp 950nm Range of Spectral Bandwidth λ0.5870 to 1050nmNoise Equivalent Power V R = 20 V , λ = 950 nmNEP 4 x 10-14W/√ Hz Rise Time V R = 10 V , R L = 1 k Ω, λ = 820 nm t r 100ns Fall TimeV R = 10 V , R L = 1 k Ω, λ = 820 nmt f100nsFigure 1. Reverse Dark Current vs. Ambient Temperature Figure 2. Relative Reverse Light Current vs. Ambient Temperature 20406080110100100010094 8403T am b - Am b ient Temperat u re (°C)I r o - R e v e r s e D a r k C u r r e n t (n A)0.60.81.01.21.494 840910080604020I - R e l a t i v e R e v e r s e L i g h t C u r r e n t T - Am b ient Temperat u re (°C)am br ar e l Figure 3. Reverse Light Current vs. IrradianceFigure 4. Reverse Light Current vs. Reverse Voltage0.010.110.11101001000I - R e v e r s e L i g h t C u r r e n t (µA )r a E e - Irradiance (m W /cm²)1094 84140.1110110100V R - Re v erse V oltage (V )10094 8415I - R e v e r s e L i g h t C u r r e n t (µA )r aS186PDocument Number 81536Rev. 1.5, 27-Nov-06Vishay Semiconductors3Figure 5. Diode Capacitance vs. Reverse VoltageFigure 6. Relative Spectral Sensitivity vs. WavelengthFigure 7. Relative Radiant Sensitivity vs. Angular Displacement020406080948407C D - D i o d e C a p a c i t a n c e (p F )V R - Re v erse V oltage (V )0.1100110750850 950 1050 00.2 0.4 0.6 0.8 1.2 S ( ) - R e l a t i v e S p e c t r a l S e n s i t i v i t y r el - W a v elength (nm)115094 84081.0 0.40.20.20.4S -R e l a t i v e S e n s i t i v i t yr e l 0.69484060.60.90.80°30°10°20°40°50°60°70°80°0.71.0 4Document Number 81536 Rev. 1.5, 27-Nov-06S186PVishay SemiconductorsPackage Dimensions in mmS186PDocument Number 81536Rev. 1.5, 27-Nov-06Vishay Semiconductors5Ozone Depleting Substances Policy StatementIt is the policy of Vishay Semiconductor GmbH to1.Meet all present and future national and international statutory requirements.2.Regularly and continuously improve the performance of our products, processes, distribution and operating systems with respect to their impact on the health and safety of our employees and the public, as well as their impact on the environment.It is particular concern to control or eliminate releases of those substances into the atmosphere which are known as ozone depleting substances (ODSs).The Montreal Protocol (1987) and its London Amendments (1990) intend to severely restrict the use of ODSs and forbid their use within the next ten years. Various national and international initiatives are pressing for an earlier ban on these substances.Vishay Semiconductor GmbH has been able to use its policy of continuous improvements to eliminate the use of ODSs listed in the following documents.1.Annex A, B and list of transitional substances of the M ontreal Protocol and the London Amendments respectively2.Class I and II ozone depleting substances in the Clean Air Act Amendments of 1990 by the Environmental Protection Agency (EPA) in the USA3.Council Decision 88/540/EEC and 91/690/EEC Annex A, B and C (transitional substances) respectively.Vishay Semiconductor GmbH can certify that our semiconductors are not manufactured with ozone depleting substances and do not contain such substances.We reserve the right to make changes to improve technical designand may do so without further notice.Parameters can vary in different applications. All operating parameters must be validated for each customer application by the customer. Should the buyer use Vishay Semiconductors products for any unintended or unauthorized application, the buyer shall indemnify Vishay Semiconductors against all claims, costs, damages, and expenses, arising out of, directly or indirectly, any claim of personaldamage, injury or death associated with such unintended or unauthorized use.Vishay Semiconductor GmbH, P.O.B. 3535, D-74025 Heilbronn, GermanyDocument Number: 91000Revision: 18-Jul-081DisclaimerLegal Disclaimer NoticeVishayAll product specifications and data are subject to change without notice.Vishay Intertechnology, Inc., its affiliates, agents, and employees, and all persons acting on its or their behalf (collectively, “Vishay”), disclaim any and all liability for any errors, inaccuracies or incompleteness contained herein or in any other disclosure relating to any product.Vishay disclaims any and all liability arising out of the use or application of any product described herein or of any information provided herein to the maximum extent permitted by law. The product specifications do not expand or otherwise modify Vishay’s terms and conditions of purchase, including but not limited to the warranty expressed therein, which apply to these products.No license, express or implied, by estoppel or otherwise, to any intellectual property rights is granted by this document or by any conduct of Vishay.The products shown herein are not designed for use in medical, life-saving, or life-sustaining applications unless otherwise expressly indicated. Customers using or selling Vishay products not expressly indicated for use in such applications do so entirely at their own risk and agree to fully indemnify Vishay for any damages arising or resulting from such use or sale. Please contact authorized Vishay personnel to obtain written terms and conditions regarding products designed for such applications.Product names and markings noted herein may be trademarks of their respective owners.。
数字音频处理器介绍

数字音频处理器LSP2160主要参数:LSP2160是基于数字信号处理技术、具有2输入6输出的数字音箱处理器。
在LSP2160音箱处理器中,两个输入通道均有31段图示均衡处理模块,每个输出通道均有6段参量均衡、高低通滤波器等处理模块,可以精细地对音箱特性进行修正和补偿,也可以对音源特性进行调整和修饰,使得扩声系统更好地适应建筑环境的声学特性;每个输出通道还设计有压缩器和限幅器,可对输出信号大小进行限制,避免后级设备长时间过载以保护功放和音箱。
在LSP2160音箱处理器中,内置了两进六出的混音矩阵,每一路输入信号可以不同的比例大小任意地分配到每一路输出通道。
两组信号输入可接受外部控制信号自动切换,实现不同音源之间的远程自动切换。
LSP2160音箱处理器采用数字信号处理的方法实现音频信号的调整和补偿,功能强大,界面友好,使用简捷,适用于对音箱特性的补偿、音频信号的修饰等,以弥补音箱特性和建筑声学特性的不足。
产品性能特点:◆24bitA/D、D/A转换器,44.1kHz取样频率◆两组音频输入,每组两个通道,增益分别独立可调;一组为XLR端子,一组为RCA端子,可远程自动切换或手动切换◆六路线路输出,XLR端子形式◆两个输入通道均具有31段图示均衡、信号电平表等处理模块◆内置2×6的输出混音器,两个通道的信号分量在六路输出中的混音比例可独立调整◆六路输出通道均设计了六段参量均衡、以24dB/oct滚降的高通滤波器和低通滤波器、信号压缩器和限幅器以及输出电平表等处理模块◆输入输出信号在面板上有+6、0、-10、-20、-40dB等量程的五段LED电平表◆多组工厂或用户参数预置◆带有计算机控制接口,现场调整方便◆液晶屏显示,直观简洁◆有配套红外控制器材,实现与点歌设备的红外无线连接◆供电要求:交流180~245 V,整机功耗<15W◆整机重量:3kg◆外形尺寸:480mm(含两侧安装把手)×44mm×180mm(W×H×D)◆使用环境:0℃到70℃,相对湿度为5%到95%数字音频处理器LSP4160主要参数:◆24bitA/D、D/A转换器,44.1kHz取样频率◆四路线路输入,XLR端子◆六路线路输出,XLR端子◆四个输入通道均具有31段图示均衡、信号电平表等处理模块◆内置4×6的输出混音器,四个输入通道的信号分量在六个输出通道中的混音比例可独立调整◆六个输出通道均设计了六段参量均衡、24dB/oct滚降的高通滤波器和低通滤波器、信号压缩器和限幅器◆以及输出电平表等处理模块◆输入输出信号在面板上有+6、0、-10、-20、-40dB等量程的五段LED电平表◆多组工厂或用户参数预置◆带有计算机控制接口,现场调整方便◆液晶屏字符显示,直观简洁◆有红外遥控输入接口,与配套的红外接收器连接后实现红外遥控IPS DSP-3145 前级处理器DSP-3145 音频信号处理器采用定制的数字信号处理芯片,在算法设计上参考了使用人员的丰富经验,使得DSP-3145在人声和音乐的数码处理上都具有优异的表现。
飞利浦 HTL2160 用户手册说明书

10
8 注意
11
ZH-CN 1
1 重要信息
请在使用本产品之前阅读并理解所有说 明。因未遵守说明而造成的损坏不在保修 范围内。
帮助和支持
飞利浦提供广泛的在线支持。请访问我们
的网站:/support,以
便: • 下载用户手册和快速入门指南 • 观看视频教程(仅限于选定的型号)
连接至电视或数字设备的同轴音频输 出插孔。
c DIGITAL IN-OPTICAL
连接至电视或数字设备的光学音频输 出插孔。
d SUBWOOFER
连接至随附的低音扬声器。
e AC MAINS~
连接至电源。
3 连接
本节旨在帮助您将回音璧连接至电视及其 他设备。 有关回音璧和附件基本连接的详细信息, 请参阅快速入门指南。
1 按 SURR 可选择环绕声模式。
• [虚拟环绕声] :可营造高度环绕声 听觉体验。主装置上的 SURR 指示
灯会亮起。
• [立体声] :双声道立体声。非常适
合于聆听音乐。
均衡器
更改回音璧的高频(高音)和低频(低 音)设置。
1 按 TREBLE +/- 或 BASS +/- 可更改 频率。 »» 高音或低音设置为最大或最小值 时,主装置上的所有 来源指示灯 会闪烁两次。
目录
1 重要信息
2
帮助和支持
2
安全
2
爱护产品
3
爱护环境
3
2 您的回音璧
3
组装回音璧
3
主装置
3
遥控器
4
接口
4
3 连接
5
摆放
5
连接电视或其他设备的音频
6
DMP2160U-7;中文规格书,Datasheet资料
Symbol Min
BVDSS
-20
IDSS
⎯
IGSS
⎯ ⎯
VGS(th)
-0.4
Static Drain-Source On-Resistance
RDS (ON)
⎯
Forward Transconductance Diode Forward Voltage (Note 5) DYNAMIC CHARACTERISTICS (Note 6)
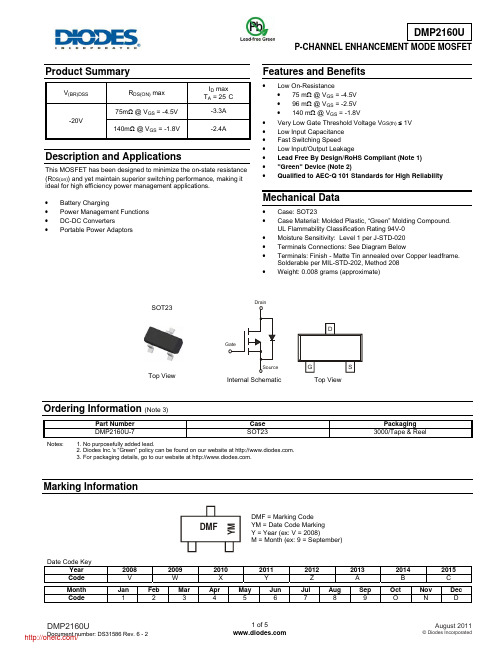
• Battery Charging • Power Management Functions • DC-DC Converters • Portable Power Adaptors
Features and Benefits
• Low On-Resistance • 75 mΩ @ VGS = -4.5V • 96 mΩ @ VGS = -2.5V • 140 mΩ @ VGS = -1.8V
Solderable per MIL-STD-202, Method 208 • Weight: 0.008 grams (approximate)
SOT23 Top View
Drain
Gate Source
Internal Schematic
D
G
S
Top View
Ordering Information (Note 3)
Packaging 3000/Tape & Reel
Marking Information
Date Code Key Year Code
Month Code
DMF
YM
DMF = Marking Code YM = Date Code Marking Y = Year (ex: V = 2008) M = Month (ex: 9 = September)
- 1、下载文档前请自行甄别文档内容的完整性,平台不提供额外的编辑、内容补充、找答案等附加服务。
- 2、"仅部分预览"的文档,不可在线预览部分如存在完整性等问题,可反馈申请退款(可完整预览的文档不适用该条件!)。
- 3、如文档侵犯您的权益,请联系客服反馈,我们会尽快为您处理(人工客服工作时间:9:00-18:30)。
High Frequency LCD Panel EMI Reduction IC FEATURES• FCC approved method of EMI attenuation• Provides up to 20 dB of EMI suppression• Generates a low EMI spread spectrum clock of the input frequency• 40 MHz to 166 MHz input frequency range• Optimized for SVGA, XGA and high resolution SXGA and UXGA LCD panels• Internal loop filter minimizes externalcomponents and board space• 2 selectable spreading options• SSON# control pin for spread spectrum enable and disable options • 2 selectable modulation rates• Low cycle-to-cycle jitter• 3.3V operating range• 16 mA output drives• TTL or CMOS compatible outputs• Low power CMOS design• Supports most mobile graphic accelerator specifications• Available in 8 pin SOIC and TSSOPPRODUCT DESCRIPTIONThe P2160 is a selectable spread spectrum frequency modulator designed specifically for digital flat panel applications. The P2160 reduces electromagnetic interference (EMI) at the clock source which provides system wide reduction of EMI of all clock dependent signals. The P2160 allows significant system cost savings by reducing the number of circuit board layers and shielding that are traditionally required to pass EMI regulations.The P2160 uses the most efficient and optimized modulation profile approved by the FCC and is implemented in a proprietary all-digital method. The P2160 modulates the output of a single PLL in order to “spread” the bandwidth of a synthesized clock and, more importantly, decreases the peak amplitudes of its harmonics. This results in significantly lower system EMI compared to the typical narrow band signal produced by oscillators and most frequency generators. Lowering EMI by increasing a signal’s bandwidth is called “spread spectrum clock generation”.APPLICATIONSThe P2160 is targeted towards digital flat panel applications for Notebook PCs, Palm-size PCs, Office Automation Equipments, and LCD Monitors, Digital Still Cameras and GPS Devices.Figure 1 – P2160 Pin DiagramCLKINFS0MRAVSSVDDSR0ModOUTSSON#May, 2002 PulseCore – A Division of Alliance SemiconductorFigure 2 – P2160 Block DiagramTable 1 - Modulation SelectionFS0 MRA SR0 Frequency Range Spread Range Modulation Rate0 0 0 40-80MHz +/- 0.5% (Fin/40) * 34.72 KHz0 0 1 40-80MHz +/- 1.0% (Fin/40) * 34.72 KHz0 1 0 40-80MHz +/- 0.5% (Fin/40) * 20.83 KHz0 1 1 40-80MHz +/- 1.0% (Fin/40) * 20.83 KHz1 0 0 80-166MHz +/- 0.5% (Fin/80) * 34.72 KHz1 0 1 80-166MHz +/- 1.00% (Fin/80) * 34.72 KHz1 1 0 80-166MHz +/- 0.5% (Fin/80) * 20.83 KHz1 1 1 80-166MHz +/- 1.00% (Fin/80) * 20.83 KHzPin DescriptionPIN # Name Type Description1 CLKIN I External reference frequency input.Connect to externally generatedreference signal. Select appropriate frequency range for the intended inputfrequency (see Table 1).2 FS0 I Digital logic input used to select Frequency Range (see Table 1). This pinhas an internal pull-up resistor.3 MRA I Digital logic input used to select Modulation Rate (see Table 1). This pinhas an internal pull-up resistor.4 VSS P Ground Connection. Connect to system ground.5 SSON# I Digital logic input used to enable Spread Spectrum function (Active Low).Spread Spectrum function enable when low. This pin has an internal pull-low resistor.6 ModOUT O Spread Spectrum Clock Output.7 SR0 I Digital logic input used to select Spreading Range (see Table 1). This pinhas an internal pull-up resistor.8 VDD P Connect to +3.3VMay, 2002 PulseCore – A Division of Alliance SemiconductorSPREAD SPECTRUM SELECTIONTable 1 illustrates the possible spread spectrum options. The optimal setting should minimize system EMI to the fullest without affecting system performance. The spreading is described as a percentage deviation of the center frequency (Note: the center frequency is the frequency of the external reference input on CLKIN, Pin 1).Example: P2160 is designed for high-resolution flat panel applications and is able to support UXGA (1600 X 1200) flat panel that operates on 162 MHz (Fin) clock speed. A spreading selection of FS0=1, SR0=1 and modulation rate selection MRA=1, enables input frequency range from 80 ~ 166 MHz and provides a percentage deviation of +/-1.00% (see Table 1) of the input frequency (Fin). This results in frequency on ModOUT being swept from 160.38 MHz to 163.62 MHz at a modulation rate of 42.18 KHz (162 MHz/80 MHz X 20.83KHz). This particular example (see Figure 3) given here is a common EMI reduction method for notebook and LCD monitor manufacturers and has already been implemented by most of the leading OEM and mobile graphic accelerator manufacturers.Figure 3 - P2160 Application Schematic for Mobile LCD Graphics ControllersMay, 2002 PulseCore – A Division of Alliance SemiconductorEMC SOFTWARE SIMULATIONBy using PulseCore Semiconductor, Inc.’s proprietary EMC simulation software – EMI-lator®, radiated system level EMI analysis can be made easier to allow a quantitative assessment on PulseCore’s EMI reduction products. The simulation engine of this EMC software has already been characterized to correlate with the electrical characteristics of PulseCore EMI reduction IC’s. Figure 4 below is an example of the simulation result. Please visit our web site at for information on how to obtain a free copy and demonstration of EMI-lator®.Figure 4 - Simulation Result from EMI-lator®May, 2002 PulseCore – A Division of Alliance SemiconductorABSOLUTE MAXIMUM RATINGSSymbol Parameter Rating UnitV DD, V IN Voltage on any pin with respect to GND -0.5 to +7.0 VT STG Storage Temperature -65 to +125 ºCT A Operating Temperature 0 to +70 ºCDC ELECTRICAL CHARACTERISTICSSymbol Parameter Min Typ Max Unit V IL Input Low Voltage GND – 0.3 - 0.8 V V IH Input High Voltage 2.0 - V DD + 0.3 V I IL Input Low Current (pull-up resistor on inputsFS0, SR0 and MRA)- - -35 µAI IH Input High Current (pull-down resistor oninput SSON#)- - 35 µAV OL Output Low Voltage(V DD=3.3V, I OL = 20 mA)- - 0.4 VV OH Output High Voltage(V DD=3.3V, I OH = 20 mA)2.5 - - VI DD Static Supply Current, measured @ FS0=0@ FS0=1 - 3.270.67- mAI CC Dynamic Supply Current FS0=0 (see f IN )(3.3V and 15 pF loading) FS0=1 (see f IN ) 7.9210.9101612.922.1mAV DD Operating Voltage 2.7 3.3 3.8 V t ON Power Up Time(First locked clock cycle after power up)0.18 ms Z OUT Clock Output Impedance 50 ΩAC ELECTRICAL CHARACTERISTICSSymbol Parameter Min Typ Max Unitf IN Input Frequency when FS0=0FS0=1 40806512080166MHzMHzt LH Note 1 Output Rise Time(measured at 0.8V to 2.0V)0.7 0.9 1.1 nst HL Note 1 Output Fall Time(measured at 2.0V to 0.8V)0.6 0.8 1.0 nst JC Jitter (cycle to cycle) - - 360 pst D Output Duty Cycle 45 50 55 % Note1: t LH and t HL are measured into a capacitive load of 15pFMay, 2002 PulseCore – A Division of Alliance SemiconductorMay, 2002 PulseCore – A Division of Alliance SemiconductorFigure 5 - Mechanical Package Outline (8 Pin SOIC)Figure 6 - Mechanical Package Outline (8 Pin TSSOP)L o t #Y W WINCHES MILLIMETERS SYMBOL MIN NOR MAX MIN NOR MAXA0.057 0.064 0.071 1.45 1.63 1.80 A10.004 0.007 0.010 0.10 0.18 0.25 A20.053 0.061 0.069 1.35 1.55 1.75 B0.012 0.016 0.020 0.31 0.41 0.51 C0.004 0.006 0.001 0.10 0.15 0.25 D0.186 0.194 0.202 4.72 4.92 5.12 E0.148 0.156 0.164 3.75 3.95 4.15 e0.050 BSC 1.27 BSC H0.224 0.236 0.248 5.70 6.00 6.30 L0.012 0.020 0.028 0.30 0.50 0.70 a0° 5° 8° 0° 5° 8° Note: Controlling dimensions are millimeters.INCHES MILLIMETERSSYMBOL MIN NOR MAX MIN NOR MAXA- - 0.047 - - 1.10 A10.002 - 0.006 0.05 - 0.15 A2 0.031 0.039 0.041 0.80 1.00 1.05 B0.007 - 0.012 0.19 - 0.30 C0.004 - 0.008 0.09 - 0.20 D0.114 0.118 0.122 2.90 3.00 3.10 E0.169 0.173 0.177 4.30 4.40 4.50 e0.026 BSC 0.65 BSC H0.244 0.252 0.260 6.20 6.40 6.60 L0.018 0.024 0.030 0.45 0.60 0.75 a0° - 8° 0° - 8° Note: Controlling dimensions are millimeters.ORDERING INFORMATIONOrdering Number Marking Package Type QTY / Reel TemperatureP2160A-08ST P2160A 8 PIN SOIC, TUBE 0°C TO 70°CP2160A-08SR P2160A 8 PIN SOIC, TAPE & REEL 2,500 0°C TO 70°CP2160A-08TT P2160A 8 PIN TSSOP, TUBE 0°C TO 70°CP2160A-08TR P2160A 8 PIN TSSOP, TAPE & REEL 2,500 0°C TO 70°C"Licensed under U.S. Patent Nos. 5,488,627 and 5,631,920"May, 2002 PulseCore – A Division of Alliance Semiconductor。