黑底白字快闪视频
jvc说明书

ENGLISHGR-D290GR-D270L YT1383-001AENTERMS Dear Customer,Thank you for purchasing this digital video camera. Before use, please read the safety information and precautions contained in the pages 3–4 and 10 to ensure safe use of this product.Please visit our Homepage on the World Wide Web for Digital Video Camera:For Accessories :INSTRUCTIONSDIGITAL VIDEO CAMERAGETTING STARTED6VIDEO RECORDING & PLAYBACK18DIGITAL STILL CAMERA (D.S.C.) RECORDING & PLAYBACK25ADVANCED FEATURES31REFERENCES47To deactivate the demonstration, set “DEMO MODE” to “OFF”. (੬pg.31,33)Back cover4 ENDo not point the lens or the viewfinder directly into the sun. This can cause eye injuries, as well as lead to the malfunctioning of internal circuitry. There is also a risk of fire or electric shock. CAUTION!The following notes concern possible physical damage to the camcorder and to the user.When carrying, be sure to always securely attach and use the provided strap. Carrying or holding the camcorder by the viewfinder and/or the LCD monitor can result in dropping the unit, or in a malfunction.Take care not to get your finger caught in the cassette holder cover. Do not let children operate the camcorder, as they are particularly susceptible to this type of injury.Do not use a tripod on unsteady or unlevel surfaces. It could tip over, causing serious damage to the camcorder.CAUTION!Connecting cables (Audio/Video, S-Video, etc.) to the camcorder and leaving it on top of the TV is not recommended, as tripping on the cables will cause the camcorder to fall, resulting in damage.EN5CONTENTSGETTING STARTED 6Index.................................................................6Provided Accessories.....................................11Power..............................................................13Operation Mode..............................................14Date/Time Settings.........................................15Grip Adjustment..............................................15Viewfinder Adjustment....................................16Brightness Adjustment Of The Display...........16Tripod Mounting..............................................16Loading/Unloading A Cassette.......................16Loading/Unloading A Memory Card. (17)VIDEO RECORDING & PLAYBACK 18VIDEO RECORDING (18)Basic Recording..............................................18Tape Remaining Time................................18LCD Monitor And Viewfinder......................18Zooming......................................................19Journalistic Shooting ..................................19Time Code..................................................19Quick Review..............................................20Recording From The Middle Of A Tape (20)VIDEO PLAYBACK (20)Normal Playback.............................................20Still Playback..............................................20Shuttle Search............................................21Blank Search..............................................21Connections To A TV Or VCR........................22Playback Using The Remote Control.. (23)DIGITAL STILL CAMERA (D.S.C.) RECORDING & PLAYBACK 25D.S.C. RECORDING............................................25Basic Shooting (D.S.C. Snapshot)..................25Interval Shooting.........................................25D.S.C. PLAYBACK. (26)Normal Playback Of Images...........................26Auto Playback Of Images...............................27Index Playback Of Files..................................27Removing On-Screen Display (27)ADDITIONAL FEATURES FOR D.S.C (28)Dubbing Still Images Recorded On A Tape To A Memory Card..............................................28Resetting The File Name................................28Protecting Files...............................................28Deleting Files..................................................29Setting Print Information (DPOF Setting)........29Initialising A Memory Card (30)ADVANCED FEATURES 31MENUS FOR DETAILED ADJUSTMENT (31)Changing The Menu Settings.........................31Recording Menus............................................32Playback Menus (35)FEATURES FOR RECORDING (37)LED Light........................................................37Live Slow........................................................375-Second Recording.......................................37Night-Scope....................................................38Snapshot (For Video Recording)....................38Manual Focus.................................................38Exposure Control............................................39Iris Lock..........................................................39Backlight Compensation.................................40Spot Exposure Control....................................40White Balance Adjustment..............................40Manual White Balance Adjustment.................41Wipe Or Fader Effects....................................41Program AE With Special Effects. (42)EDITING (43)Dubbing To Or From A VCR...........................43Dubbing To Or From A Video Unit Equipped With A DV Connector (Digital Dubbing)..............44Connection To A Personal Computer.............45Audio Dubbing................................................46Insert Editing (46)REFERENCES 47TROUBLESHOOTING..........................................47USER MAINTENANCE.........................................51CAUTIONS........................................................52SPECIFICATIONS (55)TERMS Back cover6 EN GETTING STARTED IndexEN7GETTING STARTEDG E T T I N G S T A R T E DControlsA Stop Button [8] (੬pg.20)Index Button [INDEX] (੬pg.27)Backlight Compensation Button [BACK LIGHT] (੬pg.40)B Play/Pause Button [4/9] (੬pg.20)Manual Focus Button [FOCUS] (੬pg.38)C Rewind Button [3] (੬pg.20)Menu select Button [pg.15)੬pg.20)D ੬pg.20)Menu select Button [+] (੬pg.15)Night Button [NIGHT] (੬pg.38)E Menu Button [MENU] (੬pg.31)Data Battery Button [DA T A] (੬pg.14)F VIDEO/MEMORY Switch (੬pg.14)G LED Light Button [LIGHT] (੬pg.37)H Dioptre Adjustment Control (੬pg.16)I Snapshot Button [SNAPSHOT] (੬pg.25,38)Live Slow Button [SLOW] (੬pg.31,37)J Power Zoom Lever [T/W] (੬pg.19)Speaker Volume Control [VOL. +,–] (੬pg.20)K Battery Release Button [PUSH BA TT.] (੬pg.13)L Recording Start/Stop Button (੬pg.18)M Power Switch [A , M , PLAY, OFF] (੬pg.14)N Lock Button (੬pg.14)O Cassette Open/Eject Switch [OPEN/EJECT] (੬pg.16)ConnectorsThe connectors are located beneath the covers.P USB (Universal Serial Bus) Connector (੬pg.45)Q S-Video/Audio/Video Input/Output Connector [S/AV] (੬pg.22,43)R DC Input Connector [DC] (੬pg.13)S Digital Video Connector [DV IN/OUT] (i.Link*) (੬pg.44,45)T Microphone connector [MIC] (੬pg.34,46)(An optional microphone can be used during video recording and audio dubbing. T ostabilise the microphone, use of an optional shoe adapter is recommended.)*i.Link refers to the IEEE1394-1995 industryspecification and extensions thereof. The logo is used for products compliant with the i.Link standard.IndicatorsU POWER/CHARGE Lamp (੬pg.13,18)Other PartsV Monitor Latch (੬pg.18)W LCD Monitor (੬pg.18,19)X Viewfinder (੬pg.16)Y Card Cover [MEMORY CARD] (੬pg.17)Z Battery Pack Mount (੬pg.13)a Shoulder Strap Eyelet (੬pg.11)b Speaker (੬pg.20)c Grip Strap (੬pg.15)d Lense LED Light (੬pg.37)(When using an optional conversion lens, it may cover this area and block the light.)f Remote Sensor (੬pg.23)g Camera Sensor(Be careful not to cover this area, a sensor necessary for shooting is built-in here.)h Stereo Microphone (੬pg.46)i Stud Hole (੬pg.16)j T ripod Mounting Socket (੬pg.16)k Cassette Holder Cover (੬pg.16)GETTING STARTED8 EN LCD Monitor/Viewfinder Indications(੬pg.41)B Tape Running Indicator (੬pg.18)(Rotates while tape is running.)੬pg.33)੬pg.37)੬pg.38)੬pg.32)F Tape Remaining Time (੬pg.18)G REC: (Appears during recording.) (੬pg.18)PAUSE: (Appears during Record-Standby mode.) (੬pg.18)H Insert Editing/Insert Editing Pause Mode (੬pg.46)I 5S/Anim.: Displays the 5-Second Recording mode or Animation recording mode. (੬pg.33)J Wind Cut Indicator (੬pg.33)K Time Code (੬pg.34,36)L Digital Image Stabiliser (“DIS”) (੬pg.32)M SOUND 12BIT/16BIT: Sound Mode Indicator (੬pg.32) (Appears for approx. 5 seconds Auxiliary Microphone Level Indicatorconnected. ੬pg.36, “AUX MIC” )(640x 480) (੬pg.34)B Interval Shooting Icon (੬pg.25)C Shooting Icon (੬pg.25)(Appears and blinks during shooting.)D Card Icon (੬pg.25): Appears during shooting.: Blinks in white when a memory card is not loaded.: Blinks in yellow while the camcorder is reading the data in the memory card.E Picture Quality: (FINE) and(STANDARD) (in order of quality) (੬pg.34)F Remaining Number Of Shots (੬pg.25)(Displays the approximate remaining number of shots that can be stored during D.S.C. recording.)G Clock Icon (੬pg.25)੬pg.14)੬pg.38)੬pg.32)੬pg.37)੬pg.41)40)40)±: Exposure Adjustment Indicator (੬pg.39)F Selected Program AE With Special Effects Indicator (੬pg.42)G Iris Lock Indicator (੬pg.39)EN9GETTING STARTEDG E T T I N G S T A R T E DH Approximate Zoom Ratio (੬pg.19)I Zoom Indicator (੬pg.19)J O : (Appears when taking Snapshot.) (੬pg.25,38)SLOW : (Appears when using Live Slow.) (੬pg.37)K Brightness Control Indicator (LCD monitor/Viewfinder) (੬pg.16)L Battery Remaining Power Indicator (੬pg.49)M Date/Time (੬pg.15)N Manual Focus Adjustment Indicator (੬pg.38)B Blank Search Indicator (੬pg.21)੬pg.37)੬pg.35,38)੬pg.32)E 4: Playback5: Fast-Forward/Shuttle Search 3: Rewind/Shuttle Search9: Pause9 U : Forward Frame-By-Frame Playback/Slow-MotionY 9: Reverse Frame-By-Frame Playback/Slow-MotionD : Audio Dubbing9D : Audio Dubbing Pause(Appear while a tape is running.)FSound Input For Audio Dubbing (੬pg.46)G Battery Remaining Power Indicator (੬pg.49)H Date/Time (੬pg.34,36)I VOLUME: Volume Level Indicator (੬pg.20)BRIGHT: Brightness Control Indicator (LCD monitor/Viewfinder) (੬pg.16)੬pg.34,36)Auxiliary Microphone Level Indicatorconnected during Audio Dubbing. ੬pg.46)B Folder/File Number (੬pg.27)C Battery Remaining Power Indicator (੬pg.49)D Brightness Control Indicator (LCD monitor/Viewfinder) (੬pg.16)GETTING STARTED 10 ENBefore Using This CamcorderMake sure you only use cassettes with the Mini DV mark .markThis camcorder is designed exclusively for the digital video cassette, SD Memory Card and MultiMediaCard. Only cassettes marked “” and memory cards marked “” or” can be used with this unit. Remember that this camcorder is notcompatible with other digital video formats. Remember that this camcorder is intended for private consumer use only.Any commercial use without proper permission is prohibited. (Even if you record an event such as a show, performance or exhibition for personal enjoyment, it is strongly recommended that you obtain permission beforehand.)Before recording important video, be sure to make a trial recording.Play back your trial recording to make sure the video and audio have been recorded properly.We recommend cleaning your video heads before use.If you haven’t used your camcorder for a while, the heads may be dirty. We recommend periodically cleaning the video heads with a cleaning cassette (optional).Be sure to store your cassette tapes and camcorder in the proper environment.Video heads can become dirty more easily if your cassette tapes and camcorder are stored in a dusty area. Cassette tapes should be removed from the camcorder and stored in cassette cases. Store the camcorder in a bag or other container.Use SP (Standard) mode for important video recordings.LP (Long Play) mode lets you record 50% more video than SP (Standard) mode, but you may experience mosaic-like noise during playback depending on the tape characteristics and the usage environment.So, for important recordings, we recommend using SP mode.It is recommended that you use JVC brand cassette tapes.Y our camcorder is compatible with all brands of commercially available cassette tapes complying with the MiniDV standard, but JVC brand cassette tapes are designed and optimized to maximize the performance of your camcorder.Also read “CAUTIONS” on pages 52–54.●Microsoft® and Windows® are either registered trademarks or trademarks of Microsoft Corporation in the United States and/or other countries.●Macintosh is a registered trademark of Apple Computer, Inc.●QuickTime is a registered trademark of Apple Computer, Inc.EN11GETTING STARTEDG E T T I N G S T A R T E Db Power Cord (only for AP-V14E)c Battery Pack BN-VF707Ud S/AV Cable e USB Cablef Core Filter (for USB cable, ੬pg.12 for attachment)g CD-ROMh Remote Control Unit RM-V720Ui Lithium Battery CR2025* (for remote control unit)j Memory Card 8MB (Already inserted in the camcorder) (GR-D290 only)k Shoulder Strap (see the right column for attachment)lLens Cap (see the right column for attachment)*the insulation sheet.NOTES:●In order to maintain optimum performance of the camcorder, provided cables may be equipped with one or more core filter. If a cable has only one core filter, the end that is closest to the filter should be connected to the camcorder.●Make sure to use the provided cables for connections. Do not use any other cables.How To Attach The Shoulder StrapFollow the illustration.1Thread the strap through the eyelet.2Fold it back and thread it through the strapguide and the buckle.●To adjust the length of the strap, loosen and then tighten the strap in the buckle.3Slide the strap guide fully towards the eyelet.Provided AccessoriesGETTING STARTED12 ENHow To Attach The Core FilterAttach the core filters to the cables. The core filter reduces interference.1Release the stoppers on both ends of thecore filter.2Run the cable through the core filter, leavingapprox. 3cm of cable between the cable plug and the core filter.Wind the cable once around the outside of the core filter as shown in the illustration.Close the core filter until it clicks shut.NOTES:●Take care not to damage the cable.●When connecting a cable, attach the end with the core filter to the camcorder.Core filterEN13GETTING STARTEDG E T T I N G S T A R T E DThis camcorder’s 2-way power supply system lets you choose the most appropriate source of power. Do not use provided power supply units with other equipment.1Set the Power Switch to “OFF”.2With the arrow on the battery pack pointing downward, push the battery pack slightly against the battery pack mount a .3Slide down the battery pack until it locks inplace b .4Connect the AC Adapter to the camcorder.5Connect the Power Cord to the AC Adapter.(AP-V14E only)6Plug the AC Adapter into an AC outlet. ThePOWER/CHARGE lamp on the camcorder blinks to indicate charging has started.7When the POWER/CHARGE lamp goes out,charging is finished. Unplug the AC Adapter from the AC outlet. Disconnect the AC Adapter from the camcorder.To detach the battery packSlide the battery pack upward while pressing PUSH BATT. to detach it.*ProvidedNOTES:●It is recommended that only genuine JVC batteries are used in this camcorder. Usinggeneric non-JVC batteries can cause damage to the internal charging circuitry.●If the protective cap is attached to the battery pack, remove it first.●During charging, the camcorder cannot be operated.●Charging is not possible if the wrong type of battery is used.●When charging the battery pack for the first time or after a long storage period, the POWER/CHARGE lamp may not light. In this case, remove the battery pack from the camcorder, then try charging again.●If the battery operation time remains extremely short even after having been fully charged, the battery is worn out and needs to be replaced. Please purchase a new one.●Since the AC Adapter processes electricityinternally, it becomes warm during use. Be sure to use it only in well-ventilated areas.●Using the optional AA-VF7 Battery Charger, you can charge the BN-VF707U/VF714U/VF733U battery pack without the camcorder.●After 5 minutes has elapsed in Record-Standby mode with the cassette inserted, the camcorder will automatically turn off its power supplied from the AC adapter. In this case, the battery charge starts if the battery is attached to the camcorder.Using The Battery PackPerform steps 2 – 3 in “Charging The Battery Pack”.Maximum continuous recording time*ProvidedPowerBattery pack Charging time BN-VF707U*Approx.1hr.30min.BN-VF714U Approx.2hr.40min.BN-VF733U Approx.5hr.40min.Battery pack LCD monitoron Viewfinder on BN-VF707U*1hr.5min.1hr.25min.BN-VF714U 2hr.20min.3hr.BN-VF733U 5hr.25min.7hr.5min.CONTINUED ON NEXT PAGEGETTING STARTED14 ENNOTES:●Recording time is reduced significantly under the following conditions:•Zoom or Record-Standby mode is engaged repeatedly.•The LCD monitor is used repeatedly.•The playback mode is engaged repeatedly.•The LED Light is used.●Before extended use, it is recommended that you prepare enough battery packs to cover 3times the planned shooting time.ATTENTION:Before detaching the power source, make sure that the camcorder’s power is turned off. Failure to do so can result in a camcorder malfunction.Data Battery SystemY ou can check the remaining battery power and the recordable time.1)Make sure the battery is attached and the Power Switch is set to “OFF”.2)Open the LCD monitor fully.3)Press DATA , and the battery status screen appears.●It can be displayed on the viewfinder when the LCD monitor is closed.●It is displayed for 5 seconds if the button is pressed and released quickly, and for 15 seconds if the button is pressed and hold forseveral seconds.●If “COMMUNICATION ERROR” appearsinstead of the battery status even though you tried to press DATA several times, there may be a problem on the battery. In such a case, consult your nearest JVC dealer.Using AC PowerPerform steps 4 – 5 in “Charging The Battery Pack”.NOTE:The provided AC Adapter features automatic voltage selection in the AC range from 110V to 240V .About BatteriesDANGER! Do not attempt to take the batteries apart, or expose them to flame or excessive heat, as it may cause a fire or explosion.WARNING! Do not allow the battery or itsterminals to come in contact with metals, as this can result in a short circuit and possibly start a fire.To resume the original function of the accurate battery power indicationIf the battery power indication differs from the actual operating time, fully charge the battery, and then run it down. However this function may not turn back if the battery was used for a long period of time under extremely high/low temperature condition or charged too many times.T o turn on the camcorder, set the Power Switch to any operation mode except “OFF” while pressing down the Lock Button located on the switch.Choose the appropriate operation modeaccording to your preference using the Power Switch and VIDEO/MEMORY Switch.Operation ModePower Switch PositionA (Full Auto Recording):Allows you to record using NO special effects or manual adjustments. Suitable for standard recording.The “A ” indicator appears on the display.M (Manual Recording):Allows you to set various recording functions using the Menus. (੬pg.31)If you want more creative capabilities than Full Auto Recording, try this mode.OFF :Allows you to switch off the camcorder.PLAY:●Allows you to play back a recording on the tape.●Allows you to display a still image stored in the memory card or to transfer a still image stored in the memory card to a PC.●Allows you to set various playback functions using the Menus. (੬pg.31)EN15GETTING STARTEDG E T T I N G S T A R T E DPower-Linked OperationWhen the Power Switch is set to “A ” or “M ”, you can also turn on/off the camcorder by opening/closing the LCD monitor or pulling out/pushing in the viewfinder.INFORMATION:The following explanations in this manual supposes the use of LCD monitor in your operation. If you want to use the viewfinder, close the LCD monitor and pull out the viewfinder fully.The language on the display can be changed. (੬pg.31,34,36)1Set the Power Switch to “M ” while pressingdown the Lock Button located on the switch.2Open the LCD monitor fully. (੬pg.18)3Press MENU . The Menu Screen appears.4Press + or – to select“n ”, and press MENU .The CAMERA DISPLAY Menu appears.5Press + or – to select “LANGUAGE”, and press MENU .6Press + or – to selectpress MENU .7Press + or – to select“B RETURN”, and press MENU twice. The Menu Screen closes.The date/time is recorded onto the tape at all times, but its display can be turned on or off during playback. (੬pg.31,36)1Perform steps 1–4 in “Language Settings”on the left column.2Press + or – to select “CLOCK ADJ.”, andpress MENU . The parameter for “Day” is highlighted.3Press + or – to inputthe day, and press MENU . Repeat to input the month, year, hour and minute.4Press + or – to select“B RETURN”, and press MENU twice. The Menu Screen closes.1Adjust the velcro strip.2Pass your right handthrough the loop and grasp the grip.3Adjust your thumb andfingers through the grip to easily operate the Recording Start/StopButton, Power Switch and Power Zoom Lever. Besure to fasten the velcro strip to your preference.Language SettingsDate/Time SettingsGrip AdjustmentGETTING STARTED16 EN1Set the Power Switch to “A” or “M” while pressing down the Lock Button located on theswitch.2Make sure the LCD monitor is closed and locked. Pull out the viewfinder fully and adjust it manually for best viewability.3T urn the Dioptre Adjustment Control until the indications in the viewfinder are clearly focused.1to “Mswitch.2fully. (੬pg.18)●(੬pg.31,34).3Press MENU4Press + or – to select “n”, and press MENU. The CAMERA DISPLAY Menu appears.5Press + or – to select “BRIGHT”, and press MENU. The Menu Screen closes and the brightness control indicator appears.6Press + or – until the appropriate brightness is reached.7Press MENU to clear the brightness control indicator from the display.T o attach the camcorderto a tripod, align thedirection stud and screwto the mounting socketand stud hole on thecamcorder. Then tightenthe screw clockwise.●Some tripods are notequipped with studs.The camcorder needs to be powered up to load or eject a cassette.OPEN/EJECT in the direction●Once the cassette holder is closed, it recedes automatically. Wait until it recedes completely before closing the cassette holder cover.Viewfinder AdjustmentTripod MountingLoading/Unloading A CassetteEN17GETTING STARTEDG E T T I N●When the battery pack’s charge is low, you may not be able to close the cassette holder cover. Do not apply force. Replace the battery pack with a fully charged one or use AC power before continuing.3Close the cassette holder cover firmly until itlocks into place.To protect valuable recordingsSlide the erase protection tab on the back of the tape in the direction of “SAVE”. This prevents the tape from being recorded over. T o record on this tape, slide the tab back to “REC” before loading it.NOTES:●If you wait a few seconds and the cassette holder does not open, close the cassette holder cover and try again. If the cassette holder still does not open, turn the camcorder off then on again.●If the tape does not load properly, open the cassette holder cover fully and remove the cassette. A few minutes later, insert it again.●When the camcorder is suddenly moved from a cold place to a warm environment, wait a short time before opening the cassette holder cover.The provided memory card is already inserted in the camcorder at the time of purchase. (GR-D290 only)1Make sure the camcorder’s power is off.2Open the card cover (MEMORY CARD).3To load a memory card , firmly insert it withits clipped edge first.To unload a memory card , push it once. After the memory card comes out of the camcorder, pull it out.●Do not touch the terminal on the reverse side of the label.4Close the card cover.To protect valuable files (available only for SD Memory Card)Slide the write/erase protection tab on the side of the memory card in the direction of “LOCK”. This prevents the memory card from being recorded over. T o record on this memory card, slide the tab back to the position opposite to “LOCK” before loading it.NOTES:●Some brands of memory cards are not compatible with this camcorder. Before purchasing a memory card, consult its manufacturer or dealer.●Before using a new memory card, it is necessary to format the card. (੬pg.30)ATTENTION:Do not insert or remove the memory card while the camcorder is turned on, as this may cause the memory card to be corrupted or cause thecamcorder to become unable to recognise whether or not the card is installed.Loading/Unloading A Memory CardClipped edge18 EN VIDEO RECORDINGNOTE:Before continuing, perform the procedures listed below:●Power (੬pg.13)●Loading A Cassette (੬pg.16)੬pg.11)2Open the LCD monitor fully.3Set the VIDEO/MEMORY Switch to “VIDEO”. 4Set the Power Switch to “A” or “M” whilepressing down the Lock Button located on theswitch.●The POWER/CHARGE lamp lights and the camcorder enters the Record-Standby mode. “P AUSE” is displayed.●To record in LP (Long Play) mode, ੬pg.32.5T o start recording, press the Recording Start/ Stop Button. “T REC” appears on the display while recording is in progress.6T o stop recording, press the Recording Start/ Stop Button again. The camcorder re-enters the Record-Standby mode.Approximate recording timeNOTES:●If the Record-Standby mode continues for5minutes, the camcorder’s power shuts off automatically. To turn the camcorder on again, push back and pull out the viewfinder again or close and re-open the LCD monitor.●When a blank portion is left between recorded scenes on the tape, the time code is interrupted and errors may occur when editing the tape. To avoid this, refer to “Recording From The Middle OfA T ape” (੬pg.20).●To turn the beep sounds off, ੬pg.31,33.starts blinking.●The time required to calculate and display the remaining tape length, and the accuracy of the calculation, may vary according to the type of tape used.LCD Monitor And ViewfinderWhile using the LCD monitor:downward, 180° upward).While using the viewfinder:Make sure the LCD monitor is closed andLCD monitor and the viewfinder. When the viewfinder is pulled out while the LCD monitor is opened, you can select which one to use. Set “PRIORITY” to the desired mode in SYSTEM Menu. (੬pg.31,34)●Coloured bright spots may appear all over the LCD monitor or the viewfinder. However, this is not a malfunction. (੬pg.48)Basic RecordingTapeRecording mode SP LP30min.30min.45min. 60min.60min.90min. 80min.80min.120min.。
premiere制作动画效果案例黑板文字出现效果
premiere制作动画效果案例黑板文字出现效果
今天讲的这个案例效果是让黑板上的文字逐渐出现的效果,需要用到的效果就是线性擦除还有关键帧的使用,下面2张图,是我们今天要用到素材,需要注意的是,第二张图片是png格式的图片,没有黑色背景的,上传的时候,png 的显示不出来,所以我给加上了黑色背景。
做出来的效果将是黑板中的文字,有规律的显现出来,如下图:
好了我们现在开始一步步的来做,下面就是操作的具体步骤。
第一步:打开pr,把素材01,素材02两张图片导入进去,然后把素材01直接拖到时间线上,建立一个序列01,然后把素材02拖到视频轨道V2上,如下图:第二步:在时间线上,鼠标点击选中素材02,在效果控件里,调整素材02大小,使它匹配素材01黑板的大小,如图:
第三步:给素材02添加“线性擦除”的特效,在效果搜索那里搜索,就可以找到这个效果:
设置一下,线性擦除效果的参数,擦出角度为45°,羽化数值为150.
第四步:这一步就是打关键帧了,是最重要的一步,现在时间线上把标尺移动到第0秒,也就是起始帧。
然后点击过渡完成前面的关键帧按钮(就是那个秒表形状的
按钮),调整数值为100%,此时你会发现预览窗口中素材01黑板上的文字消失了,如下图:
第五步:继续打关键帧,不过此时要在时间线上个,把标尺移动到第3秒位置,然后调整过度完成的数值为0%。
此时你会发现右侧预览窗口中的黑板上的文字又出现了,如下图:
整个过程我们已经做完了,在时间线上拖动,既可以预览整个动画效果,如:
今天的案例就讲到这里,要点就是关键帧的设置,以及线性擦除效果的运用,喜欢的朋友们可以动手试一试啦。
注:本文为作者原创,转载请注明出处,谢谢。
剪映视频剪辑中的面霓虹灯效果技巧制作出炫酷的霓虹灯效果

剪映视频剪辑中的面霓虹灯效果技巧制作出炫酷的霓虹灯效果霓虹灯效果是一种常见而受欢迎的视觉效果,它给视频带来了独特的美感和时尚感。
在剪映视频剪辑软件中,通过一些简单而有效的技巧,我们可以制作出炫酷的霓虹灯效果。
本文将介绍一些关键技巧,帮助您在剪映中运用面霓虹灯效果,让您的视频更加生动有趣。
1. 准备素材在开始创建霓虹灯效果之前,我们需要准备一些素材。
这包括:- 一个想要添加霓虹灯效果的视频剪辑- 一段适合用作霓虹灯效果的文本内容或图形素材- 一个RGB彩色值表,用于选择霓虹灯效果中的颜色2. 创建面将您的视频剪辑拖入剪映编辑器的时间轴中。
在右侧的“效果”面板中,选择“重叠”选项,并将其拖动到视频剪辑上方的轨道上。
3. 添加文本内容或图形素材点击右侧工具栏中的“文字”或“图形”按钮,选择一个适合的文本样式或图形来作为霓虹灯效果的基础。
将其拖动到时间轴的顶部轨道上,并调整其位置和持续时间,以便与视频剪辑重叠。
4. 设置颜色点击选中的文本或图形,进入右侧的“属性”面板。
在“颜色”选项中,选择“填充颜色”并点击旁边的颜色预览框。
根据您事先准备的RGB彩色值表,选择一个想要的颜色。
5. 调整亮度和透明度点击选中的文本或图形,再次进入右侧的“属性”面板。
在“效果”选项中,调整“亮度”和“透明度”滑块,以使霓虹灯效果看起来更加明亮和透明。
6. 添加动画效果如果您想要为霓虹灯效果增加一些动态效果,可以使用剪映中提供的过渡和动画特效。
点击选中的文本或图形,再次进入右侧的“属性”面板。
在“过渡”选项中,选择一个适合的过渡效果,并调整过渡的时间和延迟。
7. 调整模糊度为了使霓虹灯效果看起来更加真实,可以给文本或图形添加一些模糊效果。
点击选中的文本或图形,再次进入右侧的“属性”面板。
在“模糊度”选项中,增加一些模糊度值,使得周围的光线更加柔和,如同真正的霓虹灯效果。
8. 导出与调整完成霓虹灯效果的制作后,您可以点击剪映编辑器右上角的“导出”按钮,将视频剪辑导出为一个新的视频文件。
宝宝生日满月宴开场快闪PPT

操作简单·易于驾驭·生日快闪片场
祝XXXX小朋友永远健康,快乐成长!
各位
来宾
亲朋友好
中午好
抽空参加
孩子的成长
车速
很快
注意
注意
发车啦
开始
抓紧我
抱紧我
盯住我
首先
有请
今日的 小主角
今天
农历6月20日
国历
7月29号
是
我
们
的
小公主
满月的
健康成 长
欢声笑语
更多了
当然
啼哭声
也增多了
带来热闹 带来欢乐
今日
满月宴
感谢大家
见证孩子 的成长
最后
让我们一起
祝福
XXX宝贝
以后
每一天
每一刻
都要
健康
快乐
最后
满月宴
正式开始
XXX宝宝满月宴正式开始
感谢大家的到来!
日子
他
可爱无邪
粉雕玉琢
聪明伶俐
天生丽质
可爱无邪
萌
可爱 迷人
接下来41
小天使
降临人 间
肉嘟嘟 的小脸
粉嫩的 小手
迷人
可爱
在我们
大家庭的
精心呵护下
茁壮成长
历程
心酸中带 有甜蜜
充满了 酸甜苦辣
我们的
宝宝
摄影经典打光(白色背景灯光布置)

三角光+双造型光
黑光培训
三角光+双造型光+8000色温+降饱和度
黑光培训
单灯蝴蝶光
• 光源位于被摄人物正面0°角 中高位,这种打光方式是 拍摄中经常用到的一种方 式,因为鼻子的投影形似 蝴蝶所以被称为蝴蝶光。
黑光培训
单灯蝴蝶光
黑光培训
双灯蝴蝶光
黑光培训
三灯蝴蝶光
黑光培训
双灯蝴蝶光+双背景光
布光方式是在工作中不断总结得来的
黑光培训
黑光培训
感谢您的聆听!
黑光培训
白色背景灯光布置
三角光、蝴蝶光、鳄鱼光在白色背景中的应用与演变
黑光培训
三角光
黑光培训
• 把灯光移到中等高度篇偏 一侧45°左右处,使之位于 侧光跟偏中央光之间时, 因为光的照射范围的亮部 呈现三角形,所有被称为 三角光43;造型光
黑光培训
三角光+双背景光
黑光培训
鳄鱼光
黑光培训
• 高、(地)低光平光(主 光加底光) 也称为“鳄鱼” 光 低光可以消除或者减弱 被摄者的笑沟及眼袋以及 由主光造成的下巴阴影等 通常情况下 拍摄“由”字 型脸型的人 低光可以适当 拉远或减弱
鳄鱼光
黑光培训
鳄鱼光+轮廓光
黑光培训
鳄鱼光+双轮廓光
黑光培训
所以不断创新是用光的根本!
爆火全网的快闪PPT怎么做

第四步:插入音乐!
插音乐,调整“切换”时间
1. 提前准备好音乐,点击“插入” 2. 第一页选择“闪光”,时间设置2秒 3. 后面选择“无”,时间设置0.4秒 4. 其他切换效果均可尝试,把握节奏即可
第五步:添加动画!
插动画,调整“动画”时间
1. 点击文本框后,点击“动画” 2. 可添加“擦除、缩放、路径”等动画 3. 点击“动画窗格”调整控制动画时间 4. 右击相应动画弹出选项,路径建议平滑
“动画” 时间
第 六 步
耐心 调整
把握 节奏点
打 完 收 工
CTRL +
SHIFT + S
另存为 视频格式
源 文 件
免费 分享
更 多 作 品
请在 “稻壳儿”
搜索 “SAYOU”
直接下载!
第二步:创建主体!
插入文字,加粗加大
1. 创建多页幻灯片,依次添加文字 2. 文字一定要加大加粗(全屏居中) 3. 背景可改喜欢的颜色,但要注意统一
第三步:插入元素!
插入合适的图片、视频元素
1. 提前准备好素材,点击“插入” 2. 点击图片或视频,插入元素 3. 按住CTRL+SHIFT等比拉大全屏展示
第六步:整体检查!
耐心调整与节奏点相扣
1. 快闪PPT关键在于音乐节奏点 2. 你需要不断调试播放更改,把握节奏点 3. 你已经学会这个快闪PPT,祝你好运! 4. 最后CTRL+SHIFT+S 另存为视频格式
就可以去秀一波真正的技术了!
你好 !
这里是
做了个P!
曾 经 做 过
排版教程
歌手:Cheli
Booty Shorts (Drums)
Vegas特效系列教程(上)
mk:@MSITStore:C:\Documents%20and%20Settings\zt\桌面\Vegas特效系列教程.... 2010-12-24
02.夕阳的辉煌
第二步:将图片调入素材上层,并将图片层的叠加模式改为“叠加”模式。
Page 2 of 5
tered 由于素材的剪影前景也被云图覆盖了一些,所以我们要将剪影大致取出来。 is 第三步:把素材复制一层,加入“对比度与亮度”特效之后再加入“chroma keyer‘色键抠像特效,将玩需要透云图的地方 UnReg 大致抠去。
UnRegistered 第五步:因天空太暗,我们需要给云图层添加一个“color curves”色彩曲线特效,将天空调整致我们满意的色调。
第六步:因感觉前景与云层的国缘有点生硬,于是我们将挎贝素材层的透明略降一些。到此,这个辉煌夕阳的画面就基本 调好了。
mk:@MSITStore:C:\Documents%20and%20Settings\zt\桌面\Vegas特效系列教程.... 2010-12-24
UnRegistered
mk:@MSITStore:C:\Documents%20and%20Settings\zt\桌面\Vegas特效系列教程.... 2010-12-24
04.流淌的水墨
Page 1 of 8
04.流淌的水墨
水墨效果是作后期常用到的效果,在AE、CB、DF中都有较为成熟的解决方式,但在VEGAS里如何呢?我们一起来试 一试。 以下是我在VEGAS里调出的水墨效果,感觉比目前网上的大多数制作水墨程的效果都要好。真是不试不知道,以后 调水墨再也不用AE了。
01.天之蓝草之绿
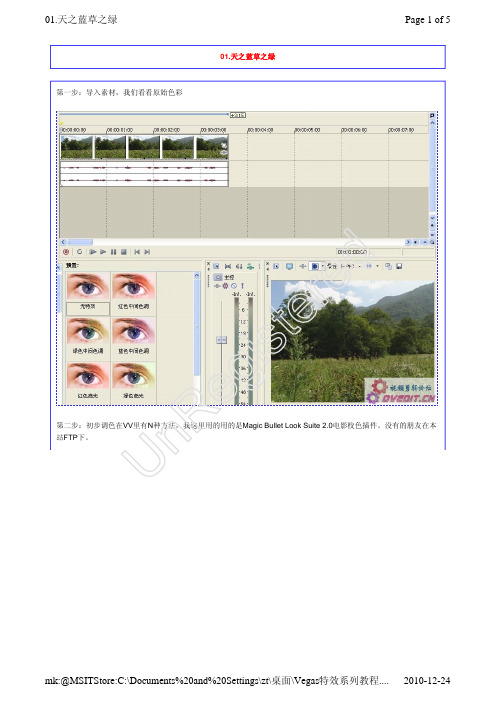
第一步:导入素材,我们看看原始色彩
白增黑减的具体使用方法

白增黑减的具体使用方法
嘿,朋友们!今天咱就来讲讲白增黑减这个神奇的玩意儿到底咋用!
你看啊,白增黑减就像是一个魔法口诀,能让你的照片变得超级精彩!当你面对一个很亮很亮的场景,比如雪地里,那可就是白色的天下啦!这时候你就得记住“白增”,增加曝光补偿,让雪看起来更白更纯净,就像给它披上了一层闪闪发光的纱衣。
这就好比你在黑暗中找到了一盏明灯,一下子就把整个场景都照亮了,多神奇呀!
反过来,要是遇到了一个黑乎乎的场景,比如夜晚的小巷子,那就是黑色的地盘咯!这时候就得用“黑减”啦,减少曝光补偿,让那些黑暗中的细节都能显现出来,就像给黑暗施了魔法,让隐藏的东西都跑出来了。
你想想,原本黑乎乎啥也看不清的地方,突然就变得清晰可见,是不是特别有意思?
这可不是随便说说的哦!你得用心去感受每个场景,就像画家对待自己的作品一样。
要根据实际情况灵活运用白增黑减,不能死板地套公式。
比如说,同样是白色的场景,云朵和雪地可就不一样,你得根据它们的特点来调整。
这就好像每个人都有自己独特的性格,你得用不同的方式去对待他们一样。
而且哦,这白增黑减还得结合其他的参数一起用,才能发挥出最大的效果。
就像做菜一样,光有盐可不行,还得有各种调料搭配起来,才能做出美味佳肴。
你得不断尝试,不断摸索,才能找到最适合的那个平衡点。
总之啊,白增黑减的使用方法可真是一门大学问,需要我们不断地去学习、去实践。
不要害怕犯错,因为每一次错误都是成长的机会。
只要你用心去体会,去尝试,你一定能掌握这个神奇的技巧,让你的照片变得美轮美奂!相信我,你绝对能做到!。