NanoStation 2设置说明书
Furrion 2-zone Soundbar Speaker 操作手册说明书

Thank you for purchasing this Furrion® 2-zone Soundbar Speaker. Before operating your new product, please read these instructions carefully. This instruction manual contains information for safe use, installation and maintenance of the product. Please keep this instruction manual in a safe place for future reference. This will ensure safe use and reduce the risk of injury. Be sure to pass on this manual to new owners of this product.The manufacturer does not accept responsibility for any damages due to not observing these instructions.If you have any further questions regarding our products, please contact us at*******************Welcome (2)Contents (3)Important Safety Instructions (4)FCC Statement (4)IC Statement (4)Product Features (5)Control Panel (5)Remote Control (5)Installation (6)Operation (7)Basic Operation (7)Audio Operation (8)USB Operation (9)BT Audio Playback Operation (10)Electrical Connection (11)Wiring Diagram (11)Speaker and Power Wire Socket View (11)Specification (12)Warranty (13)FCC StatementThis device complies with part 15 of the FCC Rules. Operation is subject to the following two conditions:(1) This device may not cause harmful interference, and(2) this device must accept any interference received, including interference thatmay cause undesired operation.NOTE: This equipment has been tested and found to comply with the limits for a Class B digital device, pursuant to Part 15 of the FCC Rules. These limits are designed to provide reasonable protection against harmful interference in a residentialinstallation. This equipment generates, uses and can radiate radio frequency energy and, if not installed and used in accordance with the instructions, may cause harmful interference to radio communications.However, there is no guarantee that interference will not occur in a particularinstallation. If this equipment does cause harmful interference to radio or television reception, which can be determined by turning the equipment off and on, the user is encouraged to try to correct the interference by one or more of the following measures:• Reorient or relocate the receiving antenna.• Increase the separation between the equipment and receiver.• Connect the equipment into an outlet on a circuit different from that to which thereceiver is connected.•Consult the dealer or an experienced radio/TV technician for help.CAUTION: TO REDUCE THE RISK OF ELECTRIC SHOCK, DO NOT REMOVE COVER (OR BACK). NO USER-SERVICEABLE PARTS INSIDE. REFER SERVICING TO QUALIFIED SERVICE PERSONNEL.WARNING: TO REDUCE THE RISK OF ELECTRIC SHOCK, DO NOT EXPOSE THIS APPLIANCE TO RAIN OR MOISTURE.The lightning flash with arrowhead symbol, within an equilateral triangle, is intended to alert the user to the presence of uninsulated dangerous voltage within the products enclosure that may be of sufficient magnitude to constitute a risk of electric shock to persons.The exclamation point within an equilateral triangle is intended to alert user to the presence of important operating and maintenance (servicing) instructions in the literature accompanying the appliance.IC StatementThis device complies with Canada Industry licence-exempt RSS standard(s).Operation is subject to the following two conditions: (1) this device may not cause interference. and (2) this device must accept any interference. Including interference that may cause undesired operation of the device.Le présent appareil est conforme aux CNR d’Industrie Canada applicables auxappareils radio exempts de licence. L’exploitation est autorisée aux deux conditions suivantes :(1) l’appareil ne doit pas produire de brouillage; (2) l’utilisateur de l’appareil doit accepter tout brouillage radioélectrique subi, même si le brouillage est susceptible d’en compromettre le fonctionnement.WARNING: Changes or modifications to this unit not expressly approved by the part responsible for compliance could void the user’s authority to operate the equipment.FCC Radiation Exposure StatementThe device has been evaluated to meet general RF exposure requirement. The device can be used in portable exposure condition without restriction.Control PanelRemote ControlSEL BUTTONPREVIOUS BUTTONNEXT BUTTON ZONE 1/2 BUTTONMUTE BUTTONMODE BUTTON NUMBER BUTTONSPLAY/PAUSE BUTTON POWER BUTTON● Before finally installing the unit, connect the wiring temporarily and make surethe unit and the system work properly.● Fix the unit with screws according to following diagram.1. Remove the Net Cover from the main unit.2. Fix the unit with 8 pieces (#8) pan-head self-tapping screws.3.Put the Net Cover back on the main unit.Basic Operation1. Turn the unit On/OffWhen the unit is Off, press POWER button to switch the unit On. When the unit is On, short press POWER button to switch the unit Off.2. Select function modePressMODE button repeatedly to select RADIO, USB (only available when a USB storage is inserted), AUX IN, TV, DVD or BT mode.3. Adjust the volumeDuring playback, press VOLUME +/VOLUME - button to increase/decrease the volume.4. Mute or resume soundDuring playback, press MUTE button to silence the unit, press again to resume the sound immediately.5. Select and adjust the mode of the sound and menuPressSEL button repeatedly to select the mode of VOL, BAS, TRE(treble), BAL (balance), LOUD OFF/LOUD ON, EQ OFF/FLAT/ROCK/POP/CLASSIC, RPTOFF/RPT ONE/RPT DIR (in USB mode), RDM OFF/RDM ON (in USB mode), DEVOL, DX/LOCAL (in RADIO mode), STEREO/MONO (in RADIO mode) in the sequence and circulation.VOLUME +/VOLUME - button to select your desired mode.Press6. Select a preset EQ modeEQ button repeatedly on the remote control to select the preset musicPressequalizer curves: EQ OFF, CLASSIC, POP, ROCK, FLAT. The sound effect will be changed accordingly.7. Select the speaker ZONE 1/2ZONE1/2 button to turn on or off the audio source in each of speakers. The Presscorresponding icon “ZONE 1 ”or “ZONE 2”will be displayed on LCD once it isselected.8. Reset the unitIf the display is incorrect, or the function buttons are not effective or the sound is distorted, switch the unit to AUX IN mode, press and hold MODE button for more than 6 seconds to make the unit return to factory default settings and re-instate the correct functions.Audio Operation1. FREQUENCY SELECTIn RADIO mode: Press and hold SEL button for about 2 seconds to switch to radioregion selection mode, then press VOLUME + or VOLUME - to select AREA USA /AREA EUR for model FSB2N25MC-BL (or select AREA AUS / AREA EUR for modelFSB2N25MCM-BL).2. TUNE/SEARCH UP/DOWNIn RADIO mode:1) Press and hold or button on the front panel or press and hold orbutton on the remote control to automatically search up or down for anavailable station from the current frequency.2) Press or button on the front panel or press or button on theremote control to manually search up or down step by step for your desiredstation from the current frequency.3. AS & PS FUNCTIONIn RADIO mode:1) Press and hold ZONE 1 button on the front panel to automatically search theradio frequency from the lowest frequency till the search cycle is finished.Then 10 of the strongest stations are automatically stored in the correspond-ing preset memory band (FM0~FM9).When the AS (Automatic Storage) operation is complete, the radio station willresume to the previous played station.2) Press and hold ZONE 2 button on the front panel to automatically searcheach preset stations from FM0 to FM9.When the search cycle of PS (Preset Scan) is complete, the radio station willresume to the previous played station.4. PRESET STATION AND PRESET NUMBER [ 0-9 ] BUTTONSIn RADIO mode:1) To memorize the current frequency station:a) Press and hold one of the 10 number buttons (0-9) on the remote control tostore the current station.b) Press and hold the PLAY/PAUSE button until the preset number flashes,then press PLAY/PAUSE button repeatedly to select the preset numbersfrom 0 to 9. Press and hold PLAY/PAUSE to confirm the selection.2) To recall the preset memory on the current band, press one of the 10 numberbuttons (0-9) on the remote control to broadcast the corresponding presetstation.USB Operation1. Pause PlaybackDuring playback, press PLAY/PAUSE button on the front panel or remote control to pause the playback, press PLAY/PAUSE button again to resume normalplayback.2. Select Chapter with the or buttonPress or button on the front panel or on the remote control duringplayback to select the previous or next chapter to playback.3. Select ChapterPress and hold Zone1 or Zone2 button on the front panel to select the previous or next DIR.4. Repeat track(s)●During playback, press SEL button repeatedly and select the RPT ONE modeto play the current track repeatedly.●During playback, press SEL button repeatedly and select the RPT DIR mode toplay the tracks in the album repeatedly.●During playback, press SEL button repeatedly and select the RPT OFF mode tocancel RPT function.5. Play tracks randomly●During playback, press SEL button repeatedly and select the RDM ON mode toplay all tracks randomly.●During playback, press SEL button repeatedly and select the RPT OFF mode tocancel RDM function.BT Audio Playback Operation1. Pairing and connectiona) Turn on the Bluetooth mode of your external Bluetooth device.b) Select the item from Finding the Bluetooth Device and enter it. After the devicesearch is complete, it will show the name of the Bluetooth DeviceFSB2N25MC-BL-XXXXX (where X can be any character A-Z or number 0-9).Select it and enter it, a window will pop up and ask you to input a password,input 0000 and enter it. The device will now begin paring.c) Once paired successfully, the LCD will display LINK OK. If pairing failed, theLCD will display NO LINK.2. Play audio file from an external Bluetooth device to the unitIf your mobile device supports A2DP then you will be able to stream music from your Bluetooth device so it can be played by stereo speaker. Select your Bluetooth device to play the audio through Bluetooth. If your mobile device supports AVRCP then you will be able to control the basic audio output functions by theWall-mount Stereo controls. Eg. Play/Pause.Wiring DiagramSpeaker and Power Wire Socket ViewFurrion warrants for a period of 1 year from date of retail purchase by the original end-use purchaser, that this product, when delivered to you in new condition, in original packaging, from a Furrion authorized reseller and used in normal conditions, is free from any defects in manufacturing, materials, and workmanship. In case of such defect, Furrion shall replace or repair the product at no charge to you. This warranty does not cover: products where the original serial numbers have been removed, altered or cannot readily be determined; damage or loss caused by accident, misuse, abuse, neglect, product modification, failure to follow instructions in instruction manual, commercial or industrial use; damage or loss caused to the decorative surface of product; to any data, software or information; and normal wear and tear. This warranty only protects the original end-user (“you”) and is not trans-ferable; any attempt to transfer this warranty shall make it immediately void. This warranty is only valid in the country of purchase.THIS WARRANTY AND REMEDIES SET FORTH ABOVE ARE EXCLUSIVE AND IN LIEU OF ALL OTHER WARRANTIES, REMEDIES AND CONDITIONS, WHETHER ORAL OR WRITTEN, EXPRESS OR IMPLIED. FURRION SPECIFICALLY DISCLAIMS ANY AND ALL IMPLIED WARRANTIES, INCLUDING, WITHOUT LIMITATION, WARRANTIES OF MERCHANTABILITY AND FITNESS FOR A PARTICULAR PURPOSE. IF FURRION CANNOT LAWFULLY DISCLAIM IMPLIED WARRANTIES UNDER THIS LIMITED WARRANTY, ALL SUCH WARRANTIES, INCLUDING WARRANTIES OF MERCHANT-ABILITY AND FITNESS FOR A PARTICULAR PURPOSE ARE LIMITED IN DURATION TO THE DURATION OF THIS WARRANTY.No Furrion reseller, agent, or employee is authorized to make any modification, extension, or addition to this warranty.FURRION IS NOT RESPONSIBLE FOR DIRECT, INDIRECT, SPECIAL, INCIDENTAL OR CONSEQUENTIAL DAMAGES RESULTING FROM ANY BREACH OF WARRANTY OR CONDITION, OR UNDER ANY OTHER LEGAL THEORY, INCLUDING BUT NOT LIMITED TO LOST PROFITS, DOWNTIME, GOODWILL, DAMAGE TO OR REPLACEMENT OF ANY EQUIPMENT OR PROPERTY, ANY COSTS OF RECOVERING, REPROGRAMMING, OR REPRODUCING ANY PROGRAM OR DATA STORED IN OR USED WITH FURRION PRODUCTS. FURRION’S TOTAL LIABILITY IS LIMITED TO THE REPAIR OR REPLACE-MENT OF THIS PRODUCT PURSUANT TO THE TERMS OF THIS WARRANTY.SOME STATES DO NOT ALLOW THE EXCLUSION OR LIMITATION OF INCIDENTAL OR CONSEQUENTIAL DAMAGES OR EXCLUSIONS OR LIMITATIONS ON THE DURATION OF IMPLIED WARRANTIES OR CONDITIONS, SO THE ABOVE LIMITATIONS OR EXCLUSIONS MAY NOT APPLY TO YOU. THIS WARRANTY GIVES YOU SPECIFIC LEGAL RIGHTS, AND YOU MAY ALSO HAVE OTHER RIGHTS THAT VARY BY STATE OR (WHERE APPLICABLE IN THE COUNTRIES WHERE FURRION HAS NON-US/CANADI-AN AUTHORIZED DEALERS) COUNTRY. NO ACTION OR CLAIM TO ENFORCE THIS WARRANTY SHALL BE COMMENCED AFTER THE EXPIRATION OF THE WARRANTY PERIOD.Keep your receipt, delivery slip, or other appropriate payment record to establish the warranty period. Service under this warranty must be obtained by contacting Furrion at ********************Product features or specifications as described or illustrated are subject to change without notice.。
NanoStationM2-M5配置使用指南

�作操示图按
�
议 协
”)PI/PCT( tenretnI“ 击 双
�
� � � � �
。”享共机印打和 件文的络网“和”端户客络 网“�选勾消取�用禁该应 你�机印打或件文享共中 络网地本在要需不你果如 ”性属 “ 择选 �”接连地本“击单键右 。 �”用禁“择选并”接连络网线无“击右�卡网线无用禁该应�卡网线无了置配果如 。 �了变改做再用不 � ” 用 禁 “示 显 只则 � 态 状 用 启 是 经 已 果如 � ” 用 启 “ 择选并 ”击点 键 右 上 ” 接 连 地 本 “ 在 。 �PX swodniW 于用适�接连有所示显�到接连�始开�开打
�部顶口窗在现出经已钮按示图�到意注会您
�
”egnahC“击点
网与�如例�址地 SND �关网 NA L�关网 址地 PI 的 5/2MSN 置配络网 5/2MSN 码掩网子
�同相关
。用应 接桥的点多对点者或 点对点现实 �桥网线无 个一为作将 5/2MSN 该
�下如改更并卡项选”krowteN“择选 置设址地.1
置配桥网端远
钮按”egnahC“击点 址地 CAM 的桥网端远加添�证认 相互桥网端远与址地 CAM 式方等 suidaR/x1.208 /2APW/APW/PEW�如 式方密加种多择选以可 置设宽带高 提再后通调�宽带低最置 设先议建�宽带路链择选 节调可率功射发 道信择选 宽频”zHM02“择选 式模 ”dexim N/A“择选 ”SU“家国认默 DISS 个一置设 桥网主式模接 连点多为即”SDW PA“择选 �下如改更并卡项选”SSELERIW“择选
�
式模桥网 、1 置配式模接桥 1.3
击点
定绑 击点ห้องสมุดไป่ตู้
Nano Q-Tron 产品说明书

Congratulations on your purchase of the Nano Q-Tron envelope-controlled filter! An envelope-controlled filter modulates an instrument’s tone based on the musician’s dynamics and playing style. The loudness of your instru -ment’s signal forms a volume envelope that directly sweeps the cutoff or center frequency of the filter. In the Nano Q-Tron, three different filter types are available: Lowpass, Bandpass and Highpass, all controllable withvariable Q and sensitivity knobs; yielding a wide range of tonal options. Nano Envelope FilterOperating InstructionsConnect your guitar to the INPUT jack on the Nano Q-Tron and the AMP jack to your amp’s input. Apply power if needed; your Nano Q-Tron might already have a 9V battery installed. Press the footswitch to ensure the STATUS LED is lit, now your Nano Q-Tron is ready to go.The Nano Q-Tron’s effect is controlled by the musician’s playing dynamics. A stronger attack or louder note will yield a more dramatic effect, while softer playing will produce more subtle effects. Use the full range of control settings in combination with different playing techniques to obtain several different and unique effects combinations.TIP: You might find that the DRIVE and Q controls work best when they are in the middle of their range rather than maximized.TIP: When you play a note into the Nano Q-Tron, its filter jumps up to a high frequency and then the frequency slowly descends according to the volume envelope of the notes you play. The louder your note, the higherin frequency the filter jumps.Controls and Connections1. DRIVE Knob Sets the envelope sensitivity gain, which in turn controls how wide the filter sweeps. The higher the DRIVE setting, the more the filter reacts to your playing and the higher in frequency the filter will jump when you play a note. Turn DRIVE clockwise for a wider filter sweep or counterclockwise to reduce the sweep range. If you turn DRIVE up too far, the filter sweep will max out at its highest frequency (approximately 3.5kHz) and remain at the highest frequency until the note has fully decayed. Louder instruments will typically use lower DRIVE settings while quieter instruments require higher settings. When learning the Nano Q-Tron, start with DRIVE at 12 o’clock.2. MODE Rotary Switch (LP / BP / HP) Determines the frequency range that the filter allows to pass through. LP (Lowpass) mode emphasizes low frequencies, BP (Bandpass) middle frequencies and HP (Highpass) high frequencies.3. Q Knob Sets the bandwidth of the filter. As Q is turned clockwise, the filter sounds more resonant or peakier, making the envelope effect more dramatic. Low settings of Q yield a less intense filter curve. Start with Q set to about 2 o’clock for a middle-of-the-road filter intensity.4. VOL Knob Adjusts the overall volume at the OUTPUT jack. As VOL is turned clockwise, the output level increases. Use VOL to match the effect volume to your bypass volume or give the effect a volume boost.5. FOOTSWITCH and STATUS LED The footswitch engages or bypasses the effect. The Status LED lights when the effect is engaged. The LED is off in bypass mode. The Nano Q-Tron employs True Bypass.6. INPUT Jack Audio input to the Nano Q-Tron.7. AMP Jack Audio output from the Nano Q-Tron. In bypass mode, the AMP jack is directly connected to the INPUT jack.8. 9V Power Jack An optional 9VDC, center-negative power supply can be connected to the power jack to provide power without a battery. The Nano Q-Tron requires 10mA at 9VDC on a center-negative plug. Do not exceed 12VDC at the power jack.When using a 9V battery, plugging into the INPUT jack activates power. The input cable should be removed when the unit is not in use to avoid running down the battery.To change the 9-volt battery, you must remove the 4 screws on the bottom of the Nano Q-Tron. Once the screws are removed, you can take off the bottom plate and change the battery. Please do not touch the circuit board or adjust the trim pot while the bottom plate is off or you may damage a component or set the filter sweep range to a non-ideal setting.Notes and Specificationst Audio input impedance at INPUT jack: 330kΩt Audio output impedance at OUTPUT jack: 300Ωt Current draw: 10mAt Maximum input signal level: +5.2dBuWARRANTY INFORMATIONPlease register online at /product-registration or complete and return the enclosed warranty card within 10 days of purchase. Electro-Harmonix will repair or replace, at its discretion, a product that fails to operate due to defects in materials or workmanship for a period of one year from date of pur-chase. This applies only to original purchasers who have bought their product from an authorized Electro-Harmonix retailer. Repaired or replaced units will then be warranted for the unexpired portion of the original warranty term.If you should need to return your unit for service within the warranty period, please contact the appropriate office listed below. Customers outside the re-gions listed below, please contact EHX Customer Service for information on *******************************+AandCanadiancus-tomers: please obtain a Return Authorization Number(RA#) from EHX Cus-tomer Service before returning your product. With your returned unit, include a written description of the problem as well as your name, address, telephone number, e-mail address, RA# and a copy of your receipt clearly showing the purchase date.United States & Canada EHX Customer Service Electro-Harmonixco New Sensor Corp. 47-50 33rd StreetLong Island City, NY 11101 Tel: 718-937-8300 Email:************EuropeJohn WilliamsElectro-Harmonix UK13 Cwmdonkin TerraceSwansea SA2 0RQUnited KingdomTel: +44 179 247 3258Email:*********************************This warranty gives a purchaser specific legal rights. A purchaser may have even greater rights depending upon the laws of the jurisdiction within which the product was purchased.The CE logo indicates that this product has been tested and shown to conform with all applicable European Conformity directives.The WEEE or “trashcan” logo indicates that this product is made up of electronic components that should notbe trashed alongside household waste but instead should be recycled by a proper electrical waste facility.。
UBNT_无线路由器_M2_M5配置教程
本教程适合ORIENT2414SN/ROCKET M2/NanoStation M5/ NanoStation M2/AG5G/NB5G等UBNT 150Mbps产品的配置.本教程只介绍接入点模式及客户端模式.也就是 Access Point及 Station。
名词解释:Airmax:这是由美国ubnt公司一项用于提升无线传输速率的无线技术.此技术仅限ubnt M2系列产品才能与之兼容.它的存在使无线带宽能得到最大限度的提升.网络承载能力也大幅提升.它无法与其他品牌无线AP兼容.甚至和ubnt 11g的产品也无法兼容。
(可以简单的理解为动态的控制客户端连接的速率)Access Point:即ap模式.无线接入点.可以理解为无线交换机.特点:通过RJ45(网线)输入.向外发射无线信号Station:站模式.也叫做客户端模式.这个模式和Client是一样的意思.特点接收无线信号.以RJ45(网线)输出组成一个桥接的无线网络.我们需要一个发射端.一个接收端.即AP模式《=====》客户端模式如果我们只是需要用设备完成接收的作用.那麽使用Station客户端模式即可。
如果我们只是需要网桥做无线AP向外发射无线信号做覆盖.那麽用Access Point模式即可为了实现真正意义上是透明网桥.以下配置教程我们讲述的是wds桥接.我们的网桥也是根据wds所配置。
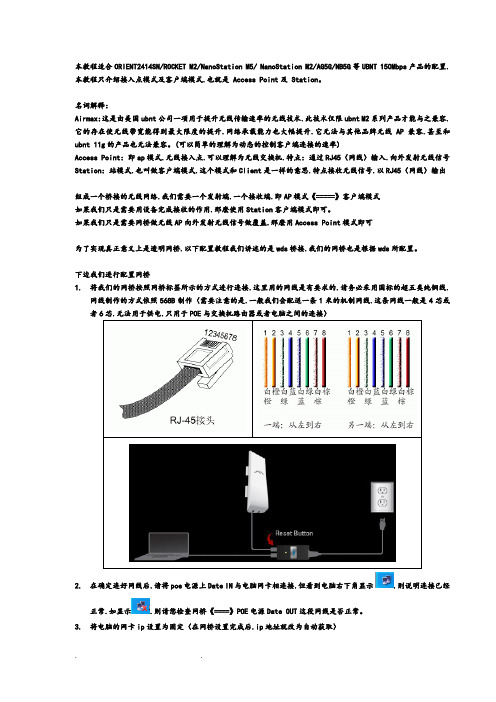
下边我们进行配置网桥1.将我们的网桥按照网桥标签所示的方式进行连接.这里用的网线是有要求的.请务必采用国标的超五类纯铜线.网线制作的方式依照568B制作(需要注意的是.一般我们会配送一条1米的机制网线.这条网线一般是4芯或者6芯.无法用于供电.只用于POE与交换机路由器或者电脑之间的连接)2.在确定连好网线后.请将poe电源上Date IN与电脑网卡相连接.但看到电脑右下角显示.则说明连接已经正常.如显示.则请您检查网桥《====》POE电源Date OUT这段网线是否正常。
JBC Nano Station 纳米工作站说明书

NA NANO STATION2NA / NANO STATIONNT105-A NANO SOLDERINGIRON *NP105-A NANO TWEEZERS *0012755 x2 TOOL HOLDER0011568CARTRIDGE SET Nº1 *0009848ALLEN KEY 1,5mmCL6230METALLIC BRUSHCL6210BRASS WOOLN1738SLEEVES0011806 x2CARTRIDGE EXTRACTORMANUALPOWER CORD * These accessories are not supplied with NA-2B / NA-1B / NA-9B control unitsCONTAINS: C105101 x1C105103 x1C105105 x2C105107 x1C105112 x1C105113 x2NA-2B / NA-1B / NA-9BCONTROL UNITThese accessories are already assembled in the control unit and nano tweezersScrews already assembled3INSTALLATIONA1205TOOLS EXTENSION CORD (1m.)P-105 PEDALSold separatelyPART NAMESACCESSORIESCable collectorIntelligentprocess control Cartridge extractorand tip aligner Brass woolMetallic brushHeatManagementNA-2B / NA-1B / NA-9BCONTROL UNITNP105-ANANO TWEEZERSNT105-ANANO SOLDERING IRON214TOOL HOLDER ASSEMBLYCABLES ASSEMBLYFAST CARTRIDGE CHANGENA / NANO STATIONMETALLIC BRUSH REPLACEMENTTIP ALIGNMENTCARTRIDGE EXTRACTOR REPLACEMENTT workT ambTime6JBC stations intelligently manage the tool temperature and it helps to extend the tip life: Work mode: Lift tool from the stand and the tool tip heats up to the selected temperature.Hibernation mode: When you place the tool in the stand, the power cuts off and the tool cools down to room temperature.*The tips of this station have such a small mass that temperature recovery is almost instantaneous. So the station goes into hibernation mode automatically when the tool is placed in the stand, without going into sleep mode.Heat management increase tip life which reduces cost of ownership.HEAT MANAGEMENTC105 CARTRIDGE RANGEAll the cartridges shown are actual size. All dimensions are in milimiters (mm).Contact JBC if other shapes are needed.Stainless steel tipNA / NANO STATION7Decrease & move down Increase & move upAccess Menu&Confirm SelectionCONTROL SCREENTip temperatureWARRANTYJBC’s 2 years warranty guarantees this equipment against all manufacturing defects, covering the replacement of defective parts and all necessary labour.Warranty does not cover product wear due to use or mis-use.In order for the warranty to be valid, equipment must be returned, postage paid, to the dealer where it was purchased enclosing this fully filled in, sheet.SERIAL NºSTAMP OF DEALERDATE OF PURCHASE0011844-0513。
NETGEAR CPL 500 Nano 2 端口适配器包设置指南说明书

réservés.
Conditions NETGEAR se réserve le droit d'apporter des modifications aux produits décrits dans ce document sans préavis afin d'en améliorer la conception, les fonctions opérationnelles et/ou la fiabilité. NETGEAR décline toute responsabilité quant aux conséquences de l'utilisation des produits ou des configurations de circuits décrits dans le présent document.
Contenu de la boîte
Câbles Ethernet (3)
Adaptateurs CPL (3) Dans certains pays, un CD est fourni avec les produits.
3
Caractéristiques matérielles
Prise filtrée
3. Vous disposez de 2 minutes pour appuyer pendant 2 secondes sur le bouton de sécurité du deuxième adaptateur CPL.
Une fois la sécurité configurée, le voyant d'alimentation devient vert continu. Les adaptateurs peuvent communiquer sur le réseau. Les voyants CPL clignotent ou sont allumés en continu.
艾肯2nano说明书

艾肯2nano说明书
1、使用艾肯2nano声卡中的音频连接线分别连接手机的手机的耳机孔,或者是手机的数据口,根据不同声卡设计决定,另一端连接在艾肯2nano声卡的【直播】插孔;
2、连接伴奏设备,使用标配中另一根音频线连接伴奏设备和艾肯2nano声卡。
音频线的一端连接在伴奏设备的耳机孔或者数据口,另一端连接在艾肯
2nano声卡的【伴奏】插孔;
3、将耳机连接在艾肯2nano声卡的【耳麦】插孔;
4、连接好后,打开直播手机,进入直播软件,伴奏设备找到要播放的歌曲,准备播放,在声卡上选择合适的模式,就可以开始直播了。
安奈特中文操作指南
目录初始登录设置: (2)预备操作知识: (2)三层交换机vlan基本配置: (3)IP基本配置: (6)IP Helper设置(广播转发): (7)DHCP(动态主机配置协议)服务器设置: (7)IP Filter的配置(访问控制列表,ACL): (8)Hardware Filter的设置(硬件包过滤,HWF): (10)IP NAT的配置(网络地址转换,标准IP NAT只适用于路由器): (13)SNMP(简单网络管理协议)设置: (13)Ping Polling的设置: (16)Trigger(触发器)的设置: (17)Test工具之Virtual Cable Test Facility: (18)OSPF(开放式最短路径优先)的设置: (19)VRRP(虚拟路由器冗余协议)的设置: (23)QoS(服务质量)的设置: (24)物理端口速率限制: (25)各种二层隧道协议及IPSec VPN设置: (25)配置文件的保存及设置: (31)上传下载文件至路由器/三层交换机: (31)####################################################################### 初始登录设置:####################################################################### 使用超级终端通过串口登录进入路由器/三层交换机。
超级终端设置:9600波特率,8数据位,1停止位,No奇偶校验,硬件流控制。
在login:状态输入用户名:manager密码:friend如果有相应权限,也可通过telnet路由器/三层交换机的任意活跃接口的IP地址访问设备。
安奈特路由器/三层交换机的配置环境是不区分层次化的,不存在类似Cisco的“全局配置模式”、“接口配置模式”、“路由协议配置模式”……,所有的配置命令均在同一模式/界面下执行,其提示符为:登录用户级别设备名称>例如,使用Manager权限用户登录名称为Test的设备,则显示为:Manager Test>使用SecurityOfficer权限用户登录名称为CoreSwitch的设备,则显示为:SecOff CoreSwitch>然后即可配置所有内容。
- 1、下载文档前请自行甄别文档内容的完整性,平台不提供额外的编辑、内容补充、找答案等附加服务。
- 2、"仅部分预览"的文档,不可在线预览部分如存在完整性等问题,可反馈申请退款(可完整预览的文档不适用该条件!)。
- 3、如文档侵犯您的权益,请联系客服反馈,我们会尽快为您处理(人工客服工作时间:9:00-18:30)。
NanoStation 2说明书目录第1章、登陆系统 (1)第2章、状态(设备运行状态) (2)第3章、无线(无线设置) (4)第4章、网络(网络参数设置) (6)第5章、高级(高级选项设置) (7)第6章、服务(系统服务) (9)第7章、系统 (11)第一章登陆系统1.1 默认登陆IP:192.168.1.20,用户名:ubnt,密码:ubnt1.2 正确连接NanoStation 2与电脑网卡后,设置本地连接的IP为192.168.1.209。
1.3 在ie地址栏中输入NanoStation 2默认IP,根据提示输入默认用户名,密码,登陆NanoStation 2查看、设置、更改参数。
1.4 NanoStation 2默认的语言为中文,可以通过界面里“系统”(system)选项,更改适合您的语言。
1.5 在设置参数的过程中,每次设置完参数一定要点击页面底部的“更改(change)”,接着点击弹出的“应用(apply)”,设置才能生效。
第二章状态(设备运行状态)注意:图示模式为“站”,“接入点”模式下没有“信号强度”、“传出CCQ”、“QOS状态”显示,其他内容与“接入点”模式相同。
2.1 基站SSID 显示当前“站”模式下连接的无线AP(接入点)的ESSID名称,默认为“XTHUIW”。
2.2 AP MAC 显示当前连接AP的MAC地址,如果没有连接上则显示“未连接”,否则显示为AP的MAC地址。
2.3 信号强度显示“站”模式下连接AP的信号强度,通过色彩和具体的数据表示当前的连接强度,连接后会显示,否则没有显示,根据当前的信号强度大概确定此信号强度下最快的连接速度。
例如显示-68dBm,表示信号较好,连接速度大约为36-48Mbps,此信号强度也是LED灯显示信号强度的参照,具体内容参看LED灯的信号强度表示,安装过程中,要求信号强度在-75dBm左右。
不能低于-80dBm。
2.4 TX 速率表示当前的发送速率,显示1、6、9、12、18、24、36、48Mbps,高的信号强度可以提高速率,例如要达到54Mbps的速率,至少需要-70dBm的信号强度。
该参数也是上传速度的最大值。
2.5 RX速率表示当前的接受速率,该参数也是下载速度的最大值。
2.6 频率当前使用的信道频率。
2.7 信道当前使用的信道。
2.8 天线天线的方向2.9 Noise Floor 当前的噪声强度。
2.10 安全当前使用的加密模式,没有加密则显示“无”,加密支持WEP,WPA,WPA-TKIP,WPA-AES,WPA2,WPA2-TKIP,WPA2-AES。
2.11 ACK超时当前超时的ACK帧数,可以自动和手动设置。
ACK超时是传输中很重要的参数,尤其是室外的长距离传输,ACK表示传输中两个无线设备在传送数据前的应答数据内容的等待时间,此参数可以在高级设置中设置。
2.12 传输CCQ 用来评估网络质量的参数,表示错误发送和重新发送计数对成功发送计数的比率,100%表示当前网络传输比较稳定。
2.13 QOS状态表示对特定的数据流提供更高质量的传输,在高级设置中可以设置,状态为自动优先级、视频优先和音频优先。
2.14 正常运行时间设备正常运行的时长。
2.15 日期当前设备的时间。
2.16 LAN电缆以太网线的检测开启表示以太网已经连接。
2.17 主机名NanoStation 2的名称。
2.18 LAN MAC 以太网的MAC地址。
2.19 LAN IP地址当前设备的IP地址。
2.20 WAN MAC 无线接口的MAC地址。
2.21 WAN IP地址无线接口的IP地址。
2.22 附加信息提供了一些选项工具,仅供查看。
2.23 工具常用的工具,如:ping工具。
2.24 LAN统计、W AN统计、W AN错误显示各个接口的状态信息。
第三章无线(无线设置)3.1 无线模式NanoStation 2的工作模式,支持接入点、wds接入点、站、wds站。
如果做发射的话需要用接入点模式,如果做接收的话需要用站模式。
3.2 ESSID 当前设备的SSID,可以通过后边的扫描来选择连接信号较强的接入点,提高网络质量及传输速率。
3.3 锁定到AP MAC 将此设备的连接锁定到某个接入点。
3.4 国家代码根据实际情况进行选择,选择测试,可以使用2.3G频段。
3.5 IEEE802.11模式设备的工作模式,支持的协议。
3.6 信道频谱宽度可以调节此项来增加带机量或提高网络连接速率。
3.7 信道转换一般选择禁用3.8 信道扫描列表一般关闭此项功能3.9 输出功率更改此项来调节NanoStation 2的功率,功率越大,信号强度越强,整个网络中给其他设备带来的干扰也随之增大。
3.10 数据速率Mbps 调节设备的最大连接速率。
3.11 无线安全可以选择相应的安全协议,增加网络的安全性。
第四章、网络(网络参数设置)4.1 网络模式可以选择使用网桥或者路由模式。
4.2 Disable Network 可以选择禁用的网卡。
4.3 网络IP地址可以选择DHCP动态获得或静态,NanoStation 2的IP地址,应该按照IP划分库进行静态IP设置。
4.4 子网掩码根据子网掩码来确定网络中主机个数。
4.5 网关IP 设置网关IP。
4.6 主DNS IP 设置本地ISP的dns解析服务器IP地址。
4.7 备用DNS IP 设置本地ISP备用的dns解析服务器IP地址。
4.8 DHCP Fallbak IP 如果设置了DHCP获得IP,因DHCP服务器故障无法获得IP,自动将此IP设置为NanoStation 2IP。
4.9 Spanning Tree Protocol 树协议,开启此功能,可以避免因本地连接环路对整个网络造成更大的冲击。
4.10 FIREWALL SETTINGS 防火墙设置,根据自己的需求来进行设置。
第5章、高级(高级选项设置)5.1 EWMA算法通过连续检测数据包的失败次数,决定速率并尝试使用较高的速率。
Exponential Weighted Moving Average是一种介于保留和开放之间的一种算法,应用于多种无线系统中的方案。
5.2 抗干扰开启此功能可以减少其他同频率无线设备干扰,增强网络信号强度及网络传输质量。
5.3 RTS阀值确定数据包大小,用来控制冲突的流量,范围是0-2347bytes,默认为2347,RTS方式关闭。
5.4 分段阀值制定最大的分段数据包的大小,范围是256-2346bytes,太低的值会导致网络性能低下。
设置分段阀值可以提高传输的稳定性,因为发送小数据包的冲突会很少。
默认2346的分段长度是优化过的参数,适用于绝大部分的网络应用中。
5.5 距离制定传输的距离,单位为英里/km (miles/km),在室外长距离应用中尤其重要,它会直接影响传输性能,室外应需要正确设置传输的距离。
5.6 ACK超时设备通讯之间的应答信息超时时间的设置,在室外长距离应用中,ACK的时间会比较长,因此要正确设置传输距离的情况下可以调整ACK的值,ACK值太小太大都会造成网络性能下降,默认为自动调整方式。
5.7 多播数据允许多播数据通过,默认关闭。
5.8 多播速率允许多播数据设置高达54Mbps的速率(普通无线设备802.11b 1Mbps,802.11g/a 6Mbps),改善多播的性能,默认关闭。
5.9 Enable Extra Reporting 允许在802.11管理信息帧中加入附加信息(如主机名等),用来使其他查找工具盒路由器等设备获取认证信息和状态信息,默认开启。
5.10 天线天线方向设置5.11 信号LED阀值当信号达到阀值时,对应的LED灯亮。
5.12 无线流量整形对NanoStation 2,数据的流入、流出做限制,提高整个网络的稳定性,默认关闭。
5.13 802.11E QOS (WMM)设置表明哪种数据具有优先级,可以设置为自动优先级,视频优先级和音频优先级,默认为无优先级。
第6章、服务(系统服务)6.1 PING监视狗开启此功能可以在使用NanoStation 2时ping某个ip的设备,当无法ping 通,失败如干次后,NanoStation 2认为异常自动重启,默认关闭。
这里可以设置要ping的ip地址,ping间隔(多长时间启动一次ping功能),启动延迟(设备重新启动后,第一次启动ping功能的时间间隔),重启失败次数(多少次ping失败后系统重新启动)。
6.2 web服务器开启或关闭NanoStation 2web服务,可以通过网页网页对NanoStation 2进行管理,也可以设置管理端口。
6.3 TELNET 开启或关闭NanoStation 2TELNET服务,可以通过telnet方式对NanoStation 2进行管理,也可以设置管理端口。
6.4 SSH SERVER开启或关闭NanoStation 2SSH服务,可以通过ssh方式对NanoStation 2进行管理,也可以设置管理端口。
第七章、系统7.1 固件显示当前固件文件名,固件版本,固件生成日期等信息。
可以在/寻找最新版本。
7.2 主机名设置更改NanoStation 2的名称,在“状态”栏目中显示。
7.3 管理账户修改管理登陆用户名及密码。
7.4 READ-ONL Y ACCOUNT 只读账号,设置只读账号与密码,该账号只有查看权限,无法更改设置。
7.5 配置管理可以配置当前设备的配置信息到本地电脑,配置文件也可用于同版本下别的NanoStation 2。
7.6 设备管理对设备进行相应的操作。
说明:此说明基于ubnt3.5.1版本,ubnt3.6.1升级固件下载地址:/forum.php?mod=viewthread&tid=207&extra=page%3D1。