AIX5.3 SDK和weblogic安装配置
WebLogic安装配置说明

WebLogic安装及配置说明1.weblogic安装1.双击安装图标,需要一段准备时间,选择“Next”2.若是首次安装,勾选“Create a new BEA Home”,若以前安装过,可以选择“Usean exiting BEA Home”。
这里勾选“Create a new BEA Home”,选择“Next”继续安装3.勾选“complete”,选择“Next”继续安装4.选择“Next”,继续安装5.勾选“All Users start Menu folder”,选择“Next”继续安装6.选择“Next”,开始安装,需要等待一段时间7.选择“Done”,完成安装2.weblogic配置1.配置域:1)依次选择“开始”——>“程序”——>“Oracle Weblogic”——>“Webogic Server 10gR3”——>“Tools”——>“Configuration Wizard”,出现如下界面:2)选择“Next”,进入如下界面:3)继续选择“Next”,进入如下界面:User name :weblogicUser password:weblogicConfirm user password:weblogic4)选择“Next”,显示界面如下:其中“Available JDKs”选择上面的一项。
5)选择“Next”,进入如下界面:6)每个域对应一个端口号,多个域共用一个端口号会导致冲突,当存在多个域时,我们勾选“Y es”进行进一步的设置,否则勾选“No”,这里我们勾选“No”,选择“Next”,显示界面如下:7)修改Domain name为sale_domain,选择“Create”,当出现下图且progress 条为“100%”时,选择“Done”,完成域的创建。
2.启动服务器:依次选择“开始”——>“程序”——>“Oracle Weblogic”——>“user projece”——>“sale_domain”——>“start Admin server for weblogic server domain”来启动服务器,当命令行界面下出现“Running”和“Running Mode”时表示服务器启动成功。
AIX上安装WEBLOGIC

作者:border88(姚) 2007-5-10邮箱:border1982@硬件要求:空间:不小于1G内存:不小于1G 最好2-4G之间CPU:不低于1.5GHz1.先确认安装的环境是不是AIX 5。
3[root@yaoxj ~]# oslevel5.3.0.02.创建组weblogicgroupadd weblogic --增加组cat /etc/group --查看是否增加这个组命令:adduser -g weblogic -p weblogic weblogic --增加用户3.从4./developerworks/java/jdk/aix/service.html可以从网上下载,但最好用192.168.5.188下的/data/weblogic/sdk目录和/data/weblogic/license目录因为网上要下好几个包,且要使用smit installp安装(我是从oracle里面把oracle 安装的java考过来用的,只需要bin和lib这两个文件夹就可以了)5.使用tar -xvf ibmjdk5.0.tar解开包6.配置weblogic 的JAVA 环境变在.profile 文件中增加如下几行PATH=$PATH:/data/weblogic/sdk/bin:/data/weblogic/sdk/jre/bin--注意和自己的JDK目录相同export PATHJAVA_HOME=/data/weblogic/sdk/ --注意和自己的JDK目录相同export JAVA_HOME保存退出7.退出使用weblogic 用户登陆执行java –versionjava version "1.5.0"Java(TM) 2 Runtime Environment, Standard Edition (build pap64dev-20070201(SR4))IBM J9 VM (build 2.3, J2RE 1.5.0 IBM J9 2.3 AIX ppc64-64 j9vmap6423-20070201 (JIT enabled)J9VM - 20070131_11312_BHdSMrJIT - 20070109_1805ifx1_r8GC - 200701_09)JCL - 20070126放入BEA-ESB AIX光盘(或将相应安装文件传到AIX上) 使用MOUNT命令挂上光驱进入光盘相应目录如:/media/cdrom8.执行java -jar alsb250_wls920_generic.jar -mode=console -Xmx=1024m-Djava.io.tmpdir=/data/weblogic/tmp –log=/data/weblogic/log64.log出现下面字符:Extracting 0%....................................................................................................100% ################################################################之后,出现下面字符:输入Next################################################################ <------------------------ BEA Installer - BEA Products ----------------------->Welcome:--------This installer will guide you through the installation of BEA Products. Type"Next" or enter to proceed to the next prompt. If you want to change dataentered previously, type "Previous". You may quit the installer at any time by typing "Exit".Enter [Exit][Next]>Next################################################################之后,出现下面字符:输入1################################################################ <------------------------ BEA Installer - BEA Products ----------------------->BEA Systems License Agreement:------------------------------BEA SYSTEMS, INC. SOFTWARE LICENSE AGREEMENTUSE OF SOFTWARE ORDERED FROM BEA SYSTEMS, INC. ("BEA") IS PROVIDED ONLY UNDERLICENSE FROM BEA. PLEASE READ THE FOLLOWING LICENSE CAREFULLY AND INDICATE YOUR ACCEPTANCE BY CLICKING THE ACCEPTANCE BOX. CERTAIN CAPITALIZED TERMS AREDEFINED IN SECTION 11.1. LICENSE TERMSa. WebLogic SDK Use. The terms of this Section 1(a) are applicable to you ifyou have registered as a WebLogic SDK customer. Subject to the terms of thisAgreement, BEA grants to you a non-exclusive, non-transferable, royalty-freelicense to use WebLogic SDK solely for Development Use and Scale-Limited Personal Use for the number of users and/or developers and the number of CPU's, Servers and/or at the Sites, as specified at the time of registration. Third party software products or modules supplied by BEA, if any, may be used solely with the Software. All rights not specifically granted to you herein areretained by BEA.b. WebLogic SDK Pro Use. The terms of this Section 1(b) are applicable to youif you have registered as a WebLogic SDK Pro customer. Subject to the terms of this Agreement, BEA grants to you a non-exclusive, non-transferable,Use above value or select another option:1 - Yes, I agree with the terms of the license2 - No, I do not agree with the terms of the licenseEnter option number to select OR [Down][Exit][Previous]>1################################################################之后,出现下面字符:输入Next [输入安装路径,这里使用默认的所以输入Next]################################################################ <------------------------ BEA Installer - BEA Products ----------------------->Choose BEA Home Directory:--------------------------"BEA Home" = [Enter new value or use default "/data/weblogic/bea"] ################################################################之后,出现下面字符:输入1 [完全安装Complete]################################################################ <------------------------ BEA Installer - BEA Products ----------------------->Choose Install Type:--------------------Select the type of installation you wish to perform.->1|Complete| Install the following software components and examples:| - WebLogic Server| - Workshop for WebLogic Platform| - AquaLogic Service Bus2|Custom| Choose software components to install and perform optional configuration.Enter index number to select OR [Exit][Previous][Next]> 1################################################################之后,出现下面字符:输入1 [完全默认的产品]################################################################ <------------------------ BEA Installer - BEA Products ----------------------->Choose Product Installation Directories:----------------------------------------BEA Home Directory: [/data/weblogic/bea]Product Installation Directories:1|Default Product Home: [/data/weblogic/bea/weblogic92]2|Workshop for WebLogic Platform: [/data/weblogic/bea/workshop92]Enter index number to select OR [Exit][Previous][Next]> 1################################################################之后,出现下面字符:输入Next [完全默认的产品路径]################################################################ <------------------------ BEA Installer - BEA Products ----------------------->Choose Product Installation Directories:----------------------------------------"Default Product Home" = [Enter new value or use default "/data/weblogic/bea/weblogic92"]Enter new Default Product Home OR [Exit][Previous][Next]>Next################################################################开始安装,如下图################################################################<------------------------ BEA Installer - BEA Products ----------------------->Installing files..0% 25% 50% 75% 100%[------------|------------|------------|------------][**********************************]Performing String Substitutions...Creating Domains...################################################################执行:/data/weblogic/bea/weblogic92/common/bin/config.sh[和你的weblogic安装路径一样]################################################################ Unable to instantiate GUI, defaulting to console mode.<--------------------- BEA WebLogic Configuration Wizard ---------------------> Welcome:--------Choose between creating and extending a domain. Based on your selection,the Configuration Wizard guides you through the steps to generate a new orextend an existing domain.->1|Create a new WebLogic domain| Create a WebLogic domain in your projects directory.2|Extend an existing WebLogic domain| Extend an existing WebLogic domain. Use this option to add|applications and services, or to override existing database access (JDBC)|and messaging (JMS) settings. You can also incorporate additional|functionality in your domain, for example, by including AquaLogic Service|Bus.################################################################之后,出现下面字符:输入1################################################################ Enter index number to select OR [Exit][Next]> 1<--------------------- BEA WebLogic Configuration Wizard ---------------------> Select Domain Source:---------------------Select the source from which the domain will be created. You can create thedomain by selecting from the required components or by selecting from alist of existing domain templates.->1|Choose Weblogic Platform components| You can choose the Weblogic component(s) that you want supported in|your domain.2|Choose custom template| Choose this option if you want to use an existing template. This|could be a custom created template using the Template Builder.Enter index number to select OR [Exit][Next]> 1################################################################之后,出现下面字符:输入1################################################################ <--------------------- BEA WebLogic Configuration Wizard ---------------------> Select Domain Source:---------------------Select the source from which the domain will be created. You can create the domain by selecting from the required components or by selecting from alist of existing domain templates.->1|Choose Weblogic Platform components| You can choose the Weblogic component(s) that you want supported in|your domain.2|Choose custom template| Choose this option if you want to use an existing template. This|could be a custom created template using the Template Builder.Enter index number to select OR [Exit][Previous][Next]> 1################################################################之后,出现下面字符:输入Next################################################################<--------------------- BEA WebLogic Configuration Wizard ---------------------> Application Template Selection:-------------------------------Available Templates|_____WebLogic Server (Required)x|_____Workshop for WebLogic Platform [2]|_____AquaLogic Service Bus [3]Enter number exactly as it appears in brackets to toggle selection OR [Exit][Previous][Next]>3################################################################之后,出现下面字符:输入Next################################################################<--------------------- BEA WebLogic Configuration Wizard ---------------------> Application Template Selection:-------------------------------Available Templates|_____WebLogic Server (Required)x|_____Workshop for WebLogic Platform [2]|_____AquaLogic Service Bus [x]Enter number exactly as it appears in brackets to toggle selection OR [Exit][Previous][Next]>Next################################################################之后,出现下面字符:输入2################################################################ <--------------------- BEA WebLogic Configuration Wizard ---------------------> Configure Administrator Username and Password:----------------------------------------------Create a user to be assigned to the Administrator role. This user is thedefault administrator used to start development mode servers.| Name | Value|_|_________________________|_________________________________________| 1| *User name: | weblogic|2| *User password: ||3| *Confirm user password: ||4| Description: | This user is the default administrator. | Use above value or select another option:1 - Modify "User name"2 - Modify "User password"3 - Modify "Confirm user password"4 - Modify "Description"Enter option number to select OR [Exit][Previous][Next]> 2################################################################之后,出现下面字符:输入用户的密码weblogic################################################################<--------------------- BEA WebLogic Configuration Wizard ---------------------> Configure Administrator Username and Password:----------------------------------------------Create a user to be assigned to the Administrator role. This user is thedefault administrator used to start development mode servers."*User password:" = []Enter new *User password: OR [Exit][Reset][Accept]> weblogic################################################################之后,出现下面字符:输入3 [确认用户密码]################################################################<--------------------- BEA WebLogic Configuration Wizard ---------------------> Configure Administrator Username and Password:----------------------------------------------Create a user to be assigned to the Administrator role. This user is thedefault administrator used to start development mode servers.| Name | Value|_|_________________________|_________________________________________| 1| *User name: | weblogic|2| *User password: | ********|3| *Confirm user password: ||4| Description: | This user is the default administrator. | Use above value or select another option:1 - Modify "User name"2 - Modify "User password"3 - Modify "Confirm user password"4 - Modify "Description"5 - Discard ChangesEnter option number to select OR [Exit][Previous][Next]> 3################################################################之后,出现下面字符:输入用户的确认密码weblogic################################################################<--------------------- BEA WebLogic Configuration Wizard ---------------------> Configure Administrator Username and Password:----------------------------------------------Create a user to be assigned to the Administrator role. This user is thedefault administrator used to start development mode servers."*Confirm user password:" = []Enter new *Confirm user password: OR [Exit][Reset][Accept]> weblogic<--------------------- BEA WebLogic Configuration Wizard ---------------------> Configure Administrator Username and Password:----------------------------------------------Create a user to be assigned to the Administrator role. This user is thedefault administrator used to start development mode servers.| Name | Value|_|_________________________|_________________________________________| 1| *User name: | weblogic|2| *User password: | ********|3| *Confirm user password: | ********|4| Description: | This user is the default administrator. | Use above value or select another option:1 - Modify "User name"2 - Modify "User password"3 - Modify "Confirm user password"4 - Modify "Description"5 - Discard Changes################################################################之后,出现下面字符:输入Next################################################################ Enter option number to select OR [Exit][Previous][Next]> Next################################################################之后,出现下面字符:输入1 [开发模式,如果是现场则输入2 产品模式################################################################ <--------------------- BEA WebLogic Configuration Wizard ---------------------> Domain Mode Configuration:--------------------------Enable Development or Production Mode for this domain.->1|Development Mode2|Production ModeEnter index number to select OR [Exit][Previous][Next]> 1################################################################之后,出现下面字符:输入1 [选择JDK]################################################################ <--------------------- BEA WebLogic Configuration Wizard ---------------------> Java SDK Selection:-------------------->1|Unknown SDK 6.0 @ /data/weblogic/sdk2|Other Java SDKEnter index number to select OR [Exit][Previous][Next]>1################################################################之后,出现下面字符:输入Yes################################################################<--------------------- BEA WebLogic Configuration Wizard ---------------------> Choose Configuration Option:----------------------------*Do you want to modify any of the preconfigured settings or defaults in*your template?**To keep the default or template settings, and proceed directly to name and *create your domain, leave No selected.1|Yes->2|NoEnter index number to select OR [Exit][Previous][Next]> Yes################################################################之后,出现下面字符:输入Next################################################################<--------------------- BEA WebLogic Configuration Wizard ---------------------> Choose Configuration Option:----------------------------*Do you want to modify any of the preconfigured settings or defaults in*your template?**To keep the default or template settings, and proceed directly to name and *create your domain, leave No selected.1|Yes->2|No** Invalid input, only integer selection or page movement command are** accepted: YesEnter index number to select OR [Exit][Previous][Next]>1<--------------------- BEA WebLogic Configuration Wizard ---------------------> Configure the Administration Server:------------------------------------Enter adminstration server configurations. Each WebLogic Server domain must have one Administration Server. The Administration Server hosts theAdministration Console which is used to perform administrative tasks.| Name | Value |_|__________________|_____________________|1| *Name: | AdminServer |2| Listen address: | All Local Addresses |3| Listen port: | 7001 |4| SSL listen port: | N/A |5| SSL enabled: | false |Use above value or select another option:1 - Modify "Name"2 - Modify "Listen address"3 - Modify "Listen port"4 - Modify "SSL enabled"Enter option number to select OR [Exit][Previous][Next]> Next################################################################之后,出现下面字符:输入Next################################################################ <--------------------- BEA WebLogic Configuration Wizard --------------------->Configure Managed Servers:--------------------------Add or delete configuration information for Managed Servers. A typicalproduction environment has one or more Managed Servers. Each Managed Server is an instance of WebLogic Server used to host enterprise applications.| Name* | Listen address | Listen port | SSL listen port | SSL enabled |_|_______|________________|_____________|_________________|_____________ |Enter name for a new OR [Exit][Previous][Next]> Next################################################################之后,出现下面字符:输入Next################################################################ <--------------------- BEA WebLogic Configuration Wizard --------------------->Configure Clusters:-------------------Add or delete configuration information for clusters. A cluster containsmultiple WebLogic Server instances that run simultaneously and worktogether to provide increased scalability and reliability. A clusterappears to be a single WebLogic Server instance to clients.| Name* | Multicast address | Multicast port | Cluster address |_|_______|___________________|________________|_________________| Enter name for a new Cluster OR [Exit][Previous][Next]>Next################################################################之后,出现下面字符:输入Next################################################################ <--------------------- BEA WebLogic Configuration Wizard ---------------------> Configure Unix Machines:------------------------Add or delete configuration information for machines. A machine is thelogical representation of the system that hosts one or more WebLogic Server instances. The Administration Server and Node Manager application use themachine definition to start remote servers.| Name |_|______|Enter name for a new Cluster OR [Exit][Previous][Next]>Next################################################################之后,出现下面字符:输入Next################################################################<--------------------- BEA WebLogic Configuration Wizard ---------------------> Configure Clusters:-------------------Add or delete configuration information for clusters. A cluster containsmultiple WebLogic Server instances that run simultaneously and worktogether to provide increased scalability and reliability. A clusterappears to be a single WebLogic Server instance to clients.| Name* | Multicast address | Multicast port | Cluster address |_|_______|___________________|________________|_________________| Enter name for a new Cluster OR [Exit][Previous][Next]> Next################################################################之后,出现下面字符:输入Next################################################################<--------------------- BEA WebLogic Configuration Wizard ---------------------> Configure Machines:-------------------Add or delete configuration information for machines. A machine is thelogical representation of the system that hosts one or more WebLogic Server instances. The Administration Server and Node Manager application use themachine definition to start remote servers.| Name* | Node manager listen address | Node manager listen port |_|_______|_____________________________|__________________________| Enter name for a new Machine OR [Exit][Previous][Next]> Next################################################################之后,出现下面字符:输入Next################################################################ <--------------------- BEA WebLogic Configuration Wizard ---------------------> Select the target domain directory for this domain:---------------------------------------------------"Target Location" = [Enter new value or use default"/data/weblogic/bea/user_projects/domains"]Enter new Target Location OR [Exit][Previous][Next]> Next<--------------------- BEA WebLogic Configuration Wizard --------------------->Edit Domain Information:------------------------| Name | Value |_|________|_____________|1| *Name: | base_domain |Enter value for "Name" OR [Exit][Previous][Next]> ^C$################################################################之后,出现下面字符:输入Next################################################################ <--------------------- BEA WebLogic Configuration Wizard --------------------->Edit Domain Information:------------------------| Name | Value |_|________|_____________|1| *Name: | base_domain |Enter value for "Name" OR [Exit][Previous][Next]><--------------------- BEA WebLogic Configuration Wizard ---------------------> Creating Domain...0% 25% 50% 75% 100%[------------|------------|------------|------------][***************************************************]**** Domain Created Successfully! ****################################################################/data/weblogic/bea/user_projects/domains/base_domain/startWebLogic.sh 启动服务器################################################################使用IE或Mozilla 游览weblogicServer控制台:http://192.168.5.188:7001/consoleESB控制台http://192.168.5.188:7001/sbconsole。
AIX 5.3 安装 weblogic 9.2 中文版本 Oracle10g R2中文版本安装记录

以下图形化,略。记得修改安装路径:/opt/bea
附注:如果以字符模式安装,加上参数 -mode=console
下面的就不多说了。跟普通安装weblogic没有什么区别。
安装后,无需执行quickstart.sh,
/technology/software/products/database/oracle10g/htdocs/10201aixsoft.html
4:oracle的参考文档
/pls/db102/homepage
安装思路:依照英文文档,首先检查安装前的硬件要求,软件要求,添加Oracle用户组,执行相关Oracle命令。
1:扩展SWAP,并将物理卷PV加入卷组rootvg中
# extendlv hd6 5
# extendlv paging00 5
# lsps -a
Page Space Physical Volume Volume Group Size %Used Active Auto Type
# lspv
hdisk0 000108bea5cd4a82 rootvg active
hdisk1 00c05860ab525174 rootvg active
/tmp 5000M
安装说明:
安装系统后,通过程管理AIX主机,图形化安装weblogic和oracle,安装过程时可以另外开1个root的文本终端.下个版本提供完全文本类型的安装方法。
AIX的安装选择全新安装。其它选择默认即可。
所需软件及文档:
1:jdk的下载,如果Oracle中使用EM,请下载64位的JDK版本
Weblogic安装配置手册

Weblogic安装配置手册一、Weblogic的安装与配置工作域1:双击weblogic安装文件,出现这边安装的画面:2:点击下一步进行安装3:勾选同意许可,点击下一步:4:选择BEA的主目录,点击下一步:5:点击下一步:6:选择产品目录,点击下一步:7:点击下一步:8:点击下一步:9:正在安装的画面10:安装完成后,点击完成:10:选择“开始——程序”中BEA目录下的Configuration Wizard,新建一个用户域:11:出现安装界面,选择新建,点击下一步:12:点击下一步:13:配置管理员的用户和密码,输入完成后点击下一步:14:配置JDK环境,点击下一步:15:选择“否”,点击下一步:16:输入用户域的名称和位置,点击下一步:17:正在安装中:18:安装完成后,点击完成:19:修改服务器端环境变量,添加BEA_HOME和JAVA_HOME20:启动用户域的服务器:“开始——所有程序——BEA Products—User Projects —TSOC—Start Admin Server for Weblogic Server Domain”,完成二、发布web应用程序1.启动Start Adimn Server forWeblogic Server Domain2.然后再启动Admin Server Console或者再IE地址中输入http://localhost/7001/console3.登陆,再左侧单击Deployment(部署),如图4.单击Install注:发布web应用程序必须在某个合法路径下建立一个工作域。
完全符合J2EE标准的WEB目录WEB-INF其中的web.xml(jsp2.0或Servlet2.4版本的)本例:在C:\下建立个testbea的文件夹,把Tomcat6.0\webapps\root下的WEB-INF文件夹copy到testbea中把C:\testbea\WEB_INF\classes和lib目录下东西删掉。
weblogic配置(AIX和windows)
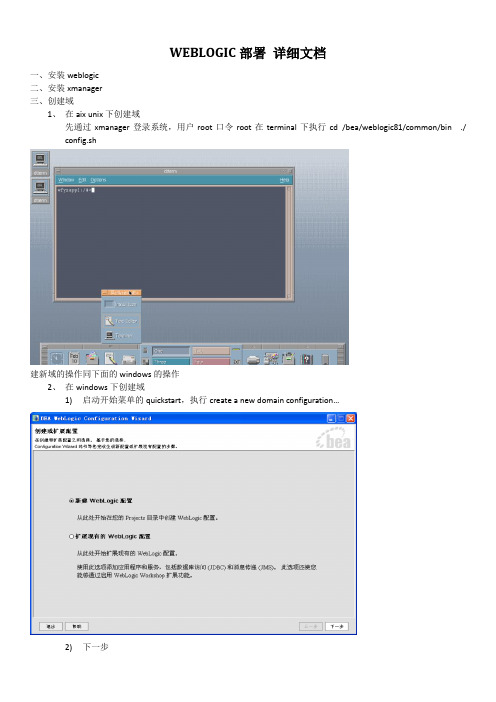
WEBLOGIC部署详细文档一、安装weblogic二、安装xmanager三、创建域1、在aixunix下创建域先通过xmanager登录系统,用户root口令root在terminal下执行cd /bea/weblogic81/common/bin./ config.sh建新域的操作同下面的windows的操作2、在windows下创建域1)启动开始菜单的quickstart,执行create a new domain configuration…2)下一步3)下一步,选自定义4)下一步,name=myserver,listen port:60015)下一步6)下一步,user=weblogic password=weblogic7)下一步8)下一步,选择生产模式aix机器要选用ibm提供的jdk,路径:/usr/java149)下一步10)创建,完成四、配置服务(省了)五、weblogic配置:1、启动服务:1)aixunix操作系统:通过xmanager登录系统,在terminal下执行cd/bea/user_projects/domains/mydomain/ ./startWebLogic.sh2、windows的操作,在开始菜单启动服务1)打开控制台http://地址:端口/console如:http://10.158.212.45:7001/consoleUsername:weblogic Password: weblogic2)Listen Address配置:配置如图所示页面中Listen Address:为应用服务器地址3)SSL Listen Port配置:4)数据库连接配置:a)连接池配置:b)配置连接池1.第一步,Configure a new JDBC Connection Pool...2.第二步,按图所示选择oracle,按continue3.第三步,按下面配置要求配置数据库4.第四步,可根据数据库实际配置修改url配置5.第五步,创建部署完成二、数据源配置:配置数据源1.第一步,Configure a new JDBC Data Source2. 第二步,按下面配置配置name 、JNDI name。
weblogic安装与配置

Weblogic安装与配置(windows)astonmarting一、安装1.下载weblogic安装包,一般下载通用安装包,下载地址:2.下载完成之后使用java -jar wls_121200.jar命令进行安装。
(注意:安装前确保你的电脑安装了jdk;下载下来的.jar的文件需要将它考进C:\Program Files\Java\jdk1.7.0_45\bin ,然后执行安装,不然将会报错)3.然后根据提示,点击“下一步”进行安装。
二、配置1.安装完成之,勾选“配置weblogic实例”,进入配置界面。
2.配置管理员的用户名和密码。
(密码至少必须为8个字母数字字符,并且至少包含一个数字或一个特殊字符)3.启动域,配置完成之后,勾选“启动域”,点击完成。
或者找到C:\Oracle\Middleware\Oracle_Home\user_projects\domains\base_domai n目录下的startWebLogic,点击启动,在命令框按提示输入用户名密码。
当启动域后命令提升符显示如下的界面时,表示域已经启动成功。
4.打开浏览器,输入http://127.0.0.1:7001/console,进入Weblogic后台管理控制台。
三、部署方法一:控制台部署1.启动weblogic服务,登录到weblogic控制台页面,点击左侧的“部署”——>”安装”。
2.选择文件路径,点击“下一步”。
方法二:autodeploy自动部署自动部署时不需要登录控制台,在domain域的主目录下面有个autodeploy目录,直接将项目包拷贝到autodeploy目录下面就可以了。
开发模式下面,当weblogic启动时,会自动部署autodeploy目录下面的项目。
补充:1.开发模式和生产模式的区别开发模式:可以使用 WebLogic Server 安全服务提供的示范数字证书和示范密钥库。
利用这些证书,可设计出在由 SSL 担保的环境中工作的应用程序。
AIX5。3下用weblogic10。3+jdk1。6搭建WEB应用程序

<context-root>/</context-root>
</weblogic-web-app>
好了,如果以上步骤都完成了,并且没有报错,那么恭喜你,你的WEB服务应该已经部署成功了。^_^
安装完对应版本的JDK和weblogic,下面就是用Configuration Wizard新建一个DOMAIN,这个比较简单,我就不赘述了,E文稍微好一点的都应该能搞定,Configuration Wizardch程序:${WL_HOME}/wlserver_10.3/common/bin/.目录下的config.sh。
最近项目需要升级应用服务器,并且要将系统迁移到AIX上,终于可以不用JDK1.4了,低版本的JDK用久了,感觉自己都快与世界脱节了,SO马上动手自己搞一下。在这个过程中也遇到了一些问题,特此记录,希望对以后遇到此类问题的兄弟一点帮助。
先说welogic10.3,这个版本好象是不支持1.5以下的JDK的,而且如果你装的JDK1.6是SR3版的,也不行,需要降到SR2版。这个问题的出现让我对10.3的稳定性有很大的怀疑。网上有帖子说这个版本的WEBLOGIC必须装JDK1.6的64位版本,经过我的实践,32位的也是可以的,但是一定要是SR2版,否则会报Exception in thread "Thread-17" java.util.NoSuchElementException错。
<?xml version="1.0" encoding="UTF-8"?>
<!DOCTYPE weblogic-web-app PUBLIC "-//BEA Sysቤተ መጻሕፍቲ ባይዱems, Inc.//DTD Web Application 6.1//EN" "/servers/wls610/dtd/weblogic-web-jar.dtd">
aix_hacmp_oracle9i_weblogic安装

AIX5.3+HACMP+Oracle9I+Weblogic8.1安装实施报告作者:肖艳华(CNOUG ID:brotherxiao)郭岳(CNOUG ID:David.Guo)Blog: 原文来自,如需转载,请勿更改文档任何部分第一章软硬件清单开始安装前请仔细检查以下内容是否齐全硬件设备IBM P510两台DS4300 阵列柜一台,含4块300G光纤硬盘盘柜相关附件(串口线2根,光纤线2根)HP DL380 两台HP KVM模块及液晶显示器IBM,HP标准42U机柜各一个,IBM机柜含PDU模块其他随机附件软件AIX5.3系统安装光盘AIX5.3 update补丁光盘AIX5.3 HACMP安装光盘Oracle9i for AIX 安装光盘Weblogic for AIX5L安装光盘Unzip解压工具包Windows 2003 server杀毒软件工具一字螺丝刀一把十字螺丝刀一把剪刀等其他第二章硬件安装1.机柜安装旋转IBM机柜底部四个支脚螺丝升起IBM机柜,将机柜移动至合适位置。
确定好机柜位置后(请考虑电源和网线介入方便)2.按照组装图拼装HP机柜。
3.将所有机器安装到机柜上,并接好UPS电源。
第三章盘柜配置1.接上盘柜电源,打开电源开关2.盘柜启动完成后,接通网线到交换机3.在本机上安装ibm存储管理软件storage manager 9,并确定能ping 192.168.128.101(默认配置I P:192.168.128.101/102 255.255.255.0)4.使用storage manager 9连接到盘柜进行配置5.划分逻辑驱动器大小为50G每个,共11个第四章操作系统安装基本操作系统安装¾打开主机电源。
¾连接好系统终端,把第一张安装介质(磁带、光碟)插入驱动器。
¾在开机后按<F5>(图形终端)进入系统安装画面。
¾当终端显示如下信息时:☆☆☆☆☆☆Please define the system console☆☆☆☆☆☆Type a 1 and press enter to use this terminal as the system console.Type een 1 en druk op enter om deze terminal als de systeemconsole to gebruiken.Skrive tallet 1 og trykk paa enter for aa bruke denne terminalen som systemkonsoll.Pour definir ce terminal comme console systeme, appuyez sur 1puis sur entree. Taste 1 and ansch1iessend die eingabetaste druecken,umdiese datenstation als systemkonsole zu verwenden.Prenier I1 tasto 1 ed invio per usare questo terminal como consolo.Escriba 1 y pulse intro para utilizer esta terminal como consola del sistema.Tryck paa 1 och sedan paa enter om dy vill att haer terminalen ska vara systemkonsol 键入“1”并回车(注意:键入的“1”不回显)选择主控台¾屏幕上将不断显示一些信息,几分钟后出现:>>> 1 Type 1 and press enter to have English during install.2 Type 2 en druk op enter om tijdens het installeren het Nederlands tekrijgen.3 Entrez 3 pour effectuer 1 installation en francais.4 Fr Installation in deutscher sprache 4 eingeben und die eingabetaste drcken.5 Immettere 5 e premereinvio per 1 installazione initaliona.6 Escriba 6 ypulse intro para usar el idioma espa ol durante la instalaci n.7 Skriv 7 och tryck ned enter=svenska vid installationen.88 Help?>>>Choice【1】:键入“1”后回车,选择语言环境为English¾此后屏幕出现:这是系统安装和维护的主菜单。
- 1、下载文档前请自行甄别文档内容的完整性,平台不提供额外的编辑、内容补充、找答案等附加服务。
- 2、"仅部分预览"的文档,不可在线预览部分如存在完整性等问题,可反馈申请退款(可完整预览的文档不适用该条件!)。
- 3、如文档侵犯您的权益,请联系客服反馈,我们会尽快为您处理(人工客服工作时间:9:00-18:30)。
AIX5.3双机安装SDK5和Weblogic101.前期准备预安装环境▪服务器:IBM p550▪操作系统:AIX 5.3▪WebLogic Server版本:10.0▪JDK版本:Java1.51.1 版本确认首先请确认您要安装的WebLogic版本所在的平台已通过了BEA的认证,完整的认证平台列表请参考/wls/certifications/c..._810/index.html1.2 检查系统配置(双机)#uname –a查看操作系统、版本、主机名AIX p550 3 5 004A070C4C00#bootinfo –K查看操作系统位数32#bootinfo –y cpu的位数64#lsps –a检查交换空间Page Space Physical Volume Volume Group Size %Used Active Auto Type hd6 hdisk0 rootvg 2048MB 3 yes yes lv#oslevel –r检查操作系统系统5300-00#lsattr –El sys0 –a –realmem检查内存realmem 1048576 Amount of usable physical memory in Kbytes False2.下载IBM Java SDK 5.0 for AIX(双机)登陆https:///developerworks/java/jdk/aix/service.html在"Where to get SDK base image and JRE"一行,选择你需要下载的JDK版本和位数,我这里选择的是"Java 5 32-bit",如图:注意:在"Where to get SDK base image and JRE"一行选,不要选错了!~点进去之后,接着出现一个IBM账户,输入你的IBM ID和密码,登陆成功后,勾选"I agree"选项,然后点击"I confirm",进入下载页面,勾选"32-bit Java 5 SDK user guide(sdkguide.aix64. htm)[向导网页,可以不下载]"和"Base SDK (required)Java5.sdk.tar或者OR Java5.sdk.tar.gz"(真正的安装文件),接着用IBM的Java Applet下载这2个文件。
注:以下操作请在root用户下操作,若要想使用普通用户,可以选择"smitty installp"命令来安装JDK1.5,不过操作过程中可能还需要root用户来改变某些文件的权限,所以推荐使用root用户,安装完成后,仍可用root用户来改变JDK的权限。
3.下载WebLogic10.0 for AIX 32 bit的安装介质注:去/ 下载WebLogic Server10.0 for AIX5.3 (server100_generic.ja r), 想下载其他版本的WebLogic Server,请登陆MetaLink, 搜索"BEA Release Archive"即可找到。
例如:WebLogic Server 10.0的:4.上传文件并安装SDK(双机)下载完后,先阅读sdkguide.aix64.htm中的说明,接下来使用root用户 server100_generic.jar、J ava5.sdk.tar或者Java5.sdk.tar.gz上传到AIX上介绍三种安装方法,具体如下:(1)tar -xvf Java5.sdk.tar或者gunzip -c Java5.sdk.tar.gz | tar -xvf(根据你下载的文件压缩后缀),解压后得到Java5.sdkInstall the SDK:#installp -a -Y –R -d /<Install Path>/ Java5.sdk(2)或者使用smitty installp来安装也可以.smitty install 选择安装路径,此处不赘述了,"ACCEPT new license agreements? "修改为yes,我当时浪费了许多时间在这里。
vi /etc/environment 修改PATH变量,添加JAVA_HOME变量如下:PATH=/usr/bin:/etc:/usr/sbin:/usr/ucb:/usr/bin/X11:/sbin:/usr/java5/jre/bin:/usr/java5/binJAVA_HOME=/usr/java5搞定!导入变量source /etc/environment(3)SMIT安装JDK使用smit安装# smit install_latest在INPUT device / directory for software 后面的[ ] 内输入Java5.sdk两个文件所在目录的位置如/tmp/javajdk(只输入目录即可),将ACCEPT new license agre ements? 选为yes将光标移动到SOFTWARE to install 选项按F4 列出目录下的文件,找到Java5.sdk ,J ava5.license两个文件按esc 7选择文件。
确定回车开始安装安装成功后,编辑:environment修改环境变量配置# vi /etc/environment找到以下一行,修改java安装路径,默认为java14,改成现在的版本路径PATH=/usr/bin:/etc:/usr/sbin:/usr/ucb:/usr/bin/X11:/sbin:/usr/java5/jre/bin:/usr/java5/bin添加以下一行JAVA_HOME=/usr/java5 ;与实际安装路径一致保存退出注:如果安装失败后再次安装,安装目录下会产生一个.toc文件。
它记录了安装信息,必须把.toc文件删除掉(4)查看Java版本#java –version安装过程如下图:输入Java5.Sdk所在的目录。
Ok单击”*SOFTWARE to install”边的按钮List选中要安装的JDK,单击OK注意:ACCEPT new license agreements 改为yes,单击ok注:遇到的问题所要求的安装集,要进行更新安装。
安装命令如下# installp -a -Y –R -d /<Install Path>/ X11.base.rte 5.3.0.10 # installp -a -Y –R -d /<Install Path>/ X11.motif.lib 5.3.0.10 # installp -a -Y –R -d /<Install Path>/ bos.mp 5.3.0.30# installp -a -Y –R -d /<Install Path>/ bos.mp64 5.3.0.305.安装weblogic(双机)安装思路:创建weblogic的用户,以此用户安装相应的程序,未来的使用中此用户管理we blogic相应的服务。
步骤如下。
5.1 创建用户和用户组#mkgroup bea#useradd –g bea –m weblogic#passwd weblogic5.2 建立weblogic server的安装目录并授权目录#mkdir /oradata/weblogic //用户指定的目录#chown weblogic.bea /oradata/weblogic5.3 修改环境变量#su – weblogic$vi .profile修改PATH为PATH=/usr/bin:/etc:/usr/sbin:/usr/ucb:$HOME/bin:/usr/bin/X11:/sbin:/usr/java5/jr e/bin:/usr/java5/bin保存,退出。
$source .profile使之生效或者直接导入环境变量$Export PATH=$PATH: /usr/java5/jre/bin:/usr/java5/bin5.4开始安装$java –jar server100_generic.jar单击Next,创建BEA HOME,单击Browse本例选择我们已经建好的目录/oradata/weblogic //用户指定的目录选择完全安装,Next确认安装目录,单击Next开始安装安装完成,不选“快速启动”,单击Done。
至此,安装完成6.创建新的weblogic域6.1 把资源切换到A机上#cd /oradata/weblogic/wlserver_10.0/common/bin/ //用户指定的目录#./config.sh创建一个新域,单击Next生成自动配置的域来支持BEA产品,单击Next输入配置管理员的用户和密码,单击Next选择生产模式和默认的JDK,单击Next选择yes ,更改配置,单击Next修改Name 、Listen address 、Listen port 、SSL listen port 、SSL enabled (按照用户要求),单击Next注:Listen address 为本机的漂移ip这里可以指定一个或者多个Manager servers实例(本例不配置),本例单击Next配置Machines(本例不配置),单击Next输入域的名称和位置,单击Create开始创建。
至此,A机新域创建完成,单击Done在启动Weblogic之前,可将服务用户名和密码写入启动脚本。
进入刚刚配置完成的域目录(例如:/wls/user_projects/mydomain),编辑startWebLogic.sh 启动脚本,执行$ vi startWebLogic.shexport WLS_USER= 输入用户名export WLS_PW=输入密码在最后一行结尾处添加&字符,保存退出最后执行$ ./startWebLogic.sh,启动Weblogic..本例操作如下:$ cd /oradata/weblogic/user_projects/domains_test/base_domain_test/$./startWebLogic.sh注:启动服务遇到的错误,如下图错误原因:在用root用户启动weblogic的时候会在base_domain里产生root权限的文件,或者用root权限的文件覆盖了部分原来存在的weblogic用户所属文件,当再次切换到weblogic用户后,启动的时候就会出现权限问题,所以报告上面的错误。