2016最新版孕期万能表
2014年最新准妈妈孕产妇待产包清单+孕产妇生活指南+万能表+育儿知识
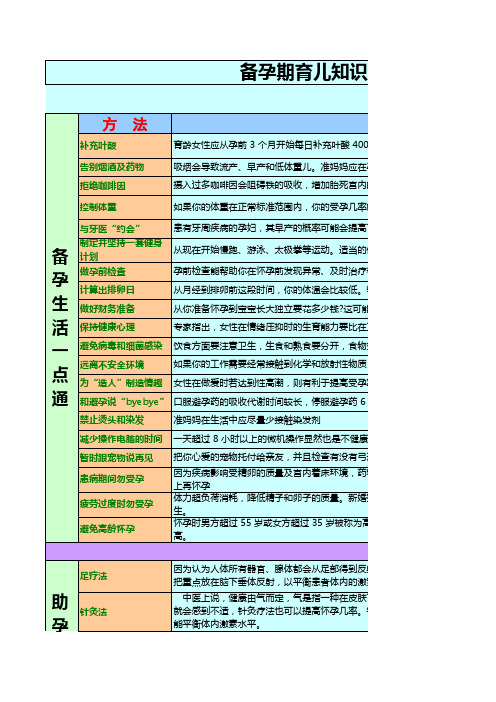
五养忌期饮精明妈咪帮:邮件订阅:康的弓形体等感染药物可能会对精子和卵子产生不利影响,故夫妇双方患病时,要停药半年以婚蜜月时性生活频繁,也会影响精子和卵子在子宫内着床的环境,不利于优为高龄怀孕,怀孕期间要加强监护,因为高龄孕产妇胎儿畸形的发生率相对较在正常状况时低一半物变质后不要再吃质,你最好能改变或离开这个环境孕率6 个月后怀孕才好率就会更高些高7倍。
应在怀孕前6个月内到口腔科做一次彻底的口腔检查和必要的治疗。
等开始排卵时,你的体温会迅速升高0.3~0.5℃左右可能是一个让你不敢面对的数字具 体 做 法00 微克,持续整个孕期在孕前就减少饮酒量,孕期避免饮酒内的风险。
最好戒掉咖啡、茶、可乐等含咖啡因的饮料的体育锻炼还可以帮助丈夫提高身体素质,确保精子的质量疗和避免潜在问题。
将身体和心理都调试到最佳状态。
夫妻双方都要进行反射,足疗可以帮助女性放松心情,缓解压力,一些手法能刺激生殖系统,者体内的激素。
肤下活动的能量,包括同量的阴气和阳气。
当这些气处于混乱状态时,人们怀孕几率。
针灸疗法能增加子宫血液流动,帮助卵子更好地与精子结合。
针刺疗法还识响备孕辅助物品推荐福施福 孕妇营养素软胶囊叶酸60粒 国家计生委推荐!每天服用一粒!易星新款V10最有效的戒烟器备孕期可适量饮用淡绿茶提神亿健8008A 跑步机多功能折叠健身器材超静音要对牙齿护理引起重视哦在此推荐《太极八段锦》百度视频推荐观看纪录片: 寰宇地理之子宫内日记 女性测排卵期基础体温计////助孕情趣用品//抗疲劳防辐射电脑护目镜////按摩加热泡脚冠军足浴盆全自动加热按摩洗脚盆家用多功能数码经络理疗仪。
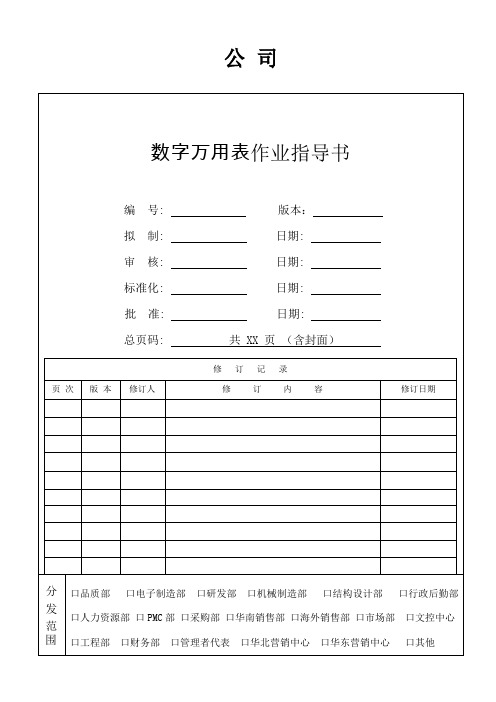
数字万用表作业指导书WI-QTD-TY万用-001√
1.目的:
指导操作者正确的有效的使用数字万用表,从而确保测试的有效性.
2.适用范围
适用于数字万用表的使用及维护.
3.职责
品质部:负责设备的保养及维护,作业员的培训及测试作业的执行.
4.规范
4.1电源开关(POWER)
当电源开关按下,此时电源开关按钮被锁住无弹起或将电源开关置于“ON”位置。此时电源接通LCM应有数字符号显示。若长时间不使用时必须再次按下电源开关,此时电源开关按钮全部弹起或将电源开关置于“OFF”位置,此时LCM无显示。
(2) 测Ac电压:量程开关拔到“Acv”位置,接黑色表笔在“COM”端口,红色表笔插在“V/Ω”端口,电源开关打开测试笔接到测量点,读数即现。
(3)测Dc电流:量程开关打在要求的“DcA”位置,接黑色表笔在“COM”端口,被测电流在200mA之内,接红色表笔在“mA”端口,电流在200mA和10A之间,红表笔接在“10A/20A”端口,电
公司
数字万用表作业指导书
编 号:版本:
拟 制:日期:
审 核:日期:
标准化:日期:
批 准:日期:
总页码:共 XX 页 (含封面)
修 订 记 录
页 次
版 本
修订人
修 订 内 容
修订日期
分
发
范
围
口品质部口电子制造部 口研发部 口机械制造部口结构设计部口行政后勤部 口人力资源部 口PMC部口采购部 口华南销售部 口海外销售部口市场部口文控中心
4.3注意事项
4.3.1低电压显电池。
4.3.2超量程显示:当最高位显示“1”或“-1”时,实测值超出预设量程范围,需更换符合要求的量程。
高精度万用表使用说明(3篇)

第1篇一、前言高精度万用表是一种集电流、电压、电阻、电容、频率等多种测量功能于一体的电子测量仪器。
它具有测量精度高、功能全面、操作简便等特点,广泛应用于电子、电气、通信、科研等领域。
本说明旨在为您提供高精度万用表的使用指南,帮助您正确、高效地进行各项测量。
二、产品概述1. 产品名称:高精度万用表2. 产品型号:[具体型号]3. 测量范围:电压(DC/AC)、电流(DC/AC)、电阻、电容、频率等4. 测量精度:根据具体型号而定,一般精度为0.05%或更高5. 功能特点:- 数字显示,读数直观- 自动量程,测量方便- 大容量可充电电池,续航时间长- 具有交直流电压、电流测量功能- 具有电阻、电容、频率测量功能- 具有二极管测试、通断测试等功能三、使用前的准备1. 熟悉仪器:在开始使用前,请仔细阅读本说明书,了解仪器的性能、功能和使用方法。
2. 检查仪器:检查仪器外观是否完好,电池电量是否充足,确保仪器处于正常工作状态。
3. 准备测量对象:根据测量需求,准备好待测对象,确保其安全可靠。
四、基本操作步骤1. 开启仪器:将万用表置于合适的位置,打开电源开关。
2. 选择测量模式:- 按下“功能选择”按键,选择所需的测量模式(如电压、电流、电阻等)。
- 按下“量程选择”按键,选择合适的量程。
3. 连接测试线:- 将红色测试线插入“VΩmA”插孔,用于测量电压、电阻、电流等。
- 将黑色测试线插入“COM”插孔,用于测量公共接地。
4. 进行测量:- 将测试线正确连接到待测对象上。
- 检查仪器显示,读取测量结果。
五、详细测量说明1. 电压测量:- 将万用表置于“V~”挡,选择合适的量程。
- 将红色测试线连接到待测电路的正极,黑色测试线连接到负极。
- 读取显示的电压值。
2. 电流测量:- 将万用表置于“A~”挡,选择合适的量程。
- 将万用表串联接入待测电路。
- 读取显示的电流值。
3. 电阻测量:- 将万用表置于“Ω”挡,选择合适的量程。
OW16 系列数字万用表 用户手册说明书

OW16系列数字万用表用户手册⏹OW16A⏹OW16B官方微信,一扫即得2018.12版本V1.0.2©福建利利普光电科技有限公司版权所有,保留所有权利。
产品受专利权的保护,包括已取得的和正在申请的专利。
本文中的信息将取代所有以前出版资料中的信息。
本手册信息在印刷时是正确的。
然而,福建利利普光电科技有限公司将继续改进产品并且保留在任何时候不经通知的情况下变动规格的权利。
是福建利利普光电科技有限公司的注册商标。
福建利利普光电科技有限公司福建漳州市蓝田工业开发区鹤鸣路(原横三路)19号利利普光电科技楼Tel: 4006-909-365 Fax:************Web: E-mail:*************.cn保修概要OWON 保证,本产品从OWON 公司最初购买之日起一年期间,不会出现材料和工艺缺陷。
本有限保修仅适于原购买者且不得转让第三方。
如果产品在保修期内确有缺陷,则OWON 将按照完整的保修声明所述,提供维修或更换服务。
但此保修不包括保险丝、一次性电池或者由于意外事故、疏忽、滥用、改造、污染及操作环境的反常而造成的损害。
如果在适用的保修期内证明产品有缺陷,OWON 可自行决定是修复有缺陷的产品且不收部件和人工费用,还是用同等产品(由OWON 决定)更换有缺陷的产品。
OWON 作保修用途的部件、模块和更换产品可能是全新的,或者经维修具有相当于新产品的性能。
所有更换的部件、模块和产品将成为OWON 的财产。
为获得本保证承诺的服务,客户必须在适用的保修期内向OWON 通报缺陷,并为服务的履行做适当安排。
客户应负责将有缺陷的产品装箱并运送到OWON 指定的维修中心,同时提供原购买者的购买证明副本。
本保证不适用于由于意外、机器部件的正常磨损、在产品规定的范围之外使用、使用不当或者维护保养不当或不足而造成的任何缺陷、故障或损坏。
OWON 根据本保证的规定无义务提供以下服务:a) 维修由非OWON 服务代表人员对产品进行安装、维修或维护所导致的损坏;b) 维修由于使用不当或与不兼容的设备连接造成的损坏;c) 维修由于使用非OWON 提供的电源而造成的任何损坏或故障;d) 维修已改动或者与其他产品集成的产品(如果这种改动或集成会增加产品维修的时间或难度)。
数字万用表的使用方法及图解

数字万用表的使用方法及图解
万能表使用方法(图解)如下:
1、以下图的数字万用表为例,万用表主要分为两部分:分别是表身和表笔,表笔很简单,就两根表笔,一根红色的表笔和一根黑色的表笔;表身包括表头即屏幕、转换旋钮、表笔插口。
2、表身最上面的就是显示屏,可以显示出我们测量出来的所有数值。
3、显示屏下面是两个按钮,分别是数字保留按钮和手动自动量程按钮。
4、万用表中间部分就是转换旋钮,用了转换各种档位,上面各个字符代表的意思分别是:从OFF档开始,依次是交流电压、直流电压、直流电压毫伏、
Ω档(电阻)和二极管测试、电容、交流/直流安培、交流/直流毫安、交流/直流微安。
5、万用表表身最下面部分是表笔插口,从左到右共计四个插口,分别是电流安培(注意有电流通过时间要求)、电流毫安微安(也要注意电流通过时间的要求)、COM也叫公共端、电压电阻二极管;其中COM孔插黑色的表笔,其余三个孔均插红色的表笔。
6、每款万用表上面的标注方式都不相同,但是字符代表的意思都是一致的。
数字万用表资料整理

1、概念万用表又叫万用计、多用表、多用计、三用表、复用表,万用表分为指针式万用表和数字万用表引。
是一种多功能、多量程的测量仪表,一般万用表可测量直流电流、直流电压、交流电流、交流电压、电阻和音频电平等,有的还可以测交流电流、电容量、电感量及半导体的一些参数,其中数字万用表又可分为便携式手持万用表与台式万用表,由于便携式手持万用表兼顾了方便与实用,故其占有较大的市场。
一般包含安培计、电压表、欧姆计等功能数字万用表有用于基本故障诊断的便携式装置,也有放置在工作台的装置,有的分辨率可以达到七、八位数;这样的设备,在实验室很常见,一般被用作电压或电阻的基准,或用来调校多功能标准器的性能。
2、分类数字万用表按照量程转换方式来分类,可划分成三种类型:手动量程,自动量程,自动/手动量程根据功能、用途及价格的不同,数字万用表大致可分为9大类:低档数字万用表(亦称普及型数字万用)、中档数字万用表、中/高档数字万用表、数字/模拟混合式仪表,数字/模拟图双显示的仪表、万用示波表(将数字万用表、数字存储示波器等动能集于一身)。
数字万用表的分类:有效值万用表、真有效值万用表、产业普及型万用表、高档精确型万用表。
万用表有模拟和数字两种。
类比万用表,使用磁场偏转指针的表盘,此表头与经典的檢流計相同;数位万用表的显示则采用LCD、VFD (真空荧光显示器,Vacuum fluorescent display)、LED、OLED等,此外,早期也有用数码管的。
现代万用表以数字化电表为主,并被专称为数字万用表(DMM,Digital MultiMeter)。
在这种设备中,被测量信号被转换成数字电压并被数字的前置放大器放大,然后由数字显示屏直接显示该值;这样就避免了在读数时视差带来的偏差。
同样,更好的电路系统和电子技术,也提高了测量精度。
一般模拟仪表的基本精度(直流电压档)在2%到5%之间,常见的基本精度在3~4%。
现代便携数字万用表常見的可攜型基本精度在0.5%~1%,高级机型则可以达到±0.025%,而工作台设备更高达百万分之一的精度。
汽车专用万用表的类型

汽车专用万用表的类型
汽车专用万用表是用车电路测试和故障诊断的万用表。
下面是一些常见的汽车专用万用表类型:
1. 数字万用表(Digital Multimeter):数字万用表是最常见的一种汽车专用万用表。
它可以测量直流电压、交流电压、电流、电阻等各种电气参数,并具有自动量程、数据保持、相对测量等功能。
2. 高级数字万用表(Advanced Digital Multimeter):高级数字万用表除了具备数字万用表的基本功能外,还配备了更多的特殊功能,如温度测量、频率测量、电容测量、发动机转速测试等。
3. 汽车电路专用万用表(Automotive Multimeter):这种万用表专门设计用于汽车电路测试。
它们通常具有特殊的功能和测量范围,例如测量车载电池电压、探测传感器信号、测试点火系统等。
4. 示波器万用表(Scope Multimeter):示波器万用表结合了示波器和万用表的功能。
它可以用于分析和电信号的波形,适用于复杂的电路障诊断和故障定位。
以上是一些常见的汽车专用万表类型,每种类型的万用表都有不同的功能和适用范围,适用于不同的汽车电路测试和维修需求。
381626 便携式数字万用表 使用手册说明书

Pen MultimeterModel 381626CAUTION: Read, understand and follow allSafety Rules and Operating Instructions in thismanual before using this product.This instrument is a 3200 count pen style digital multimeter. It can be used for measuring AC or DC voltage, AC or DC current, resistance, diodes and continuity. It can also be used as a logic test pen. The measuring ranges are changed automatically or can be manually set. All measurements are displayed with 0.6 inch high characters with full parameter symbols. This meter is easily operated and all ranges have overload protection. It is an ideal instrument for use in the home, factory, school and laboratory. The DMM is for indoor use only. It is UL 1244 listed.WARNING:USE EXTREME CAUTION IN THE USE OF THIS DEVICE. Improper use of this device can result in injury or death. Follow all safeguards suggested in this manual in addition to the normal safety precautions used in working with electrical circuits. DO NOT service this device if you are not qualified to do so. EXTECH INSTRUMENTS CORPORATION warrants this instrument to be free of defects in parts and workmanship for one year from date of shipment. If it should become necessary to return the instrument for service during or beyond the warranty period, contact the Customer Service Department at (781) 890-7440 for authorization. A Return Authorization (RA) number must be issued before any product is returned to Extech. The sender is responsible for shipping charges, freight, insurance and proper packaging to prevent damage in transit.This warranty does not apply to defects resulting from action of the user such as misuse, improper wiring, operation outside of specification, improper maintenance or repair, or unauthorized modification. Extech specifically disclaims any implied warranties or merchantability or fitness for a specific purpose and will not be liable for any direct, indirect, incidental or consequential damages. Extech's total liability is limited to repair or replacement of the product.The warranty set forth above is inclusive and no other warranty, whether written or oral, is expressed or implied.Version 1.2 5/02SPECIFICATIONSRanges ResolutionAccuracyDC Voltage 300mV, 3V30,300, 500V 100µV +(1.5% reading + 5 digits)+(1.0% reading + 2 digitsInput Impedance 10MΩMax Input 500V AC/DCAC Voltage 3, 30, 300, 500V 1mV +(1.5% reading + 8 digits) AC Freq. Response:DC Current 30, 300mA 10µA +(1.5% reading + 3 digits) 40Hz to 400HzAC Current 30, 300mA 10µA +(2.0% reading + 5 digits) AveragerespondingResistance 300,3k,30k,300kΩ3MΩ30MΩ0.1 ohms +(1.5% reading + 5 digits)+(2.0% reading + 8 digits)+(3.0% reading + 10 digits)Overload Protection:250VAC rmsOpen ckt. V: 0.6V - 1.2VContinuity Buzzer sounds for resistance less than 20 ohms (approximately)Logic <1V Logic low, 1V to 2V Indeterminate, >2V Logic High, 3V reference, 220kΩ input impedance Operating Temp. 32o F to 122o F (0o C to 50o C)Storage Temp. -4o F to 140o F (-20o C to 60o C)Relative Humidity <70% operating, <80% storageOperating Altitude 2000 meters (7000ft.) maximumSafety For indoor use and in accordance with Overvoltage Category II, Pollution Degree 2. Category II includes local level, appliance, portable equipment, etc., with transient overvoltages less thanOvervoltage Category III.Power supply Two 1.5V AAA batteriesDimmensions/Wt. 1x7.5x1.9” (26x191x40mm) / 3.9oz (120gm)SAFETY INSTRUCTIONSCaution ! Refer to the explanation in this ManualWarning ! Risk of electric shock(Ground)Double Insulation or Reinforced insulationThis meter has been designed to be safe in use, but the rules listed below should be carefully followed for safe operation.1) NEVER apply voltage or current to the meter thatexceeds the specifications.2) USE EXTREME CAUTION when working with highvoltages.3) DO NOT measure voltage above 500V DC or ACrms.4) ALWAYS turn off the power and disconnect the testleads before replacing the fuse or battery.5) Voltage checks on electrical outlets can be difficultand misleading because of the uncertainty ofconnection to the electrical contacts. Other meansshould be used to ensure that the terminals are not"live".6) The product is intended only for indoor use7) If the equipment is used in a manner not specified bythe manufacturer, the protection provided by theequipment may be impaired.8) Pollution degree: 21. Data Hold Button 8. Positive Test Probe2. 9. Battery & Fuse Door3. 10 LCD Display & Bargraph4.5. Green LED6. Red LED7 Common TerminalFunction Switch SettingsRange Hold ButtonThe Resistance, AC or DC voltage or current ranges can be selected manually or automatically. The Range Hold button is used to select the range hold mode as follows.1. Press to change from automatic to manual ranging.“RH” is displayed in the manual range mode2. Press to change range in the manual range mode.Observe the decimal point position to determine the range set.3. Press and HOLD for 2 seconds to change back toautomatic ranging.Data Hold Button1. The display will hold the reading when the Data Holdbutton is pressed. The “DH” symbol will be displayed.2. Data Hold will be canceled when the “D-H” button ispressed again or it will be canceled automatically if the Function switch is changed to another position. OPERATIONCAUTION: This meter is a precision electronic instrument. To avoid damaging the unit, observe all safety statements contained in this manual.DC or AC Voltage Measurement1. Connect the black test lead to the COM jack.2. Set the Function Switch to the V position and select ACor DC.3. Connect the positive test probe and the black test leadacross the source or load under measurement.For DC voltage, the polarity of the measurement will be indicated.DC or AC Current Measurement1. Connect the black test lead to the COM jack.2. Set the Function Switch to the mA position and selectDC or AC.3. Connect the positive test probe and the black test leadin series with load under measurement.For DC current, the polarity of the measurement will be indicated.Resistance Measurement1. Connect the black test lead to the COM jack.2. Set the Function Switch to the Ω position.3. Connect the positive test probe and the black test probe across the resistance to be measured.Note: 1) The polarity of the positive test probe is “+”.2) When checking in-circuit resistance, be sure all power is removed from the circuit under test and all capacitors are fully discharged. Continuity Testto the circuit. If the resistance is less than approximately 20Ω the buzzer will sound.Note: The polarity of the positive test probe is “+”Diode Test3. Connect the positive test probe and the black test lead across the diode under test. If the positive test probe isplaced on the anode of the diode, the display will indicate the approximate forward voltage drop of the diode. Logic Test1. Connect the black test lead to the COM jack.2. Set the Function Switch to the L position3. Connect the black test lead to the common terminal of the circuit to be tested Connect the test probe to the point to be tested.a) If the measured voltage is below the low reference threshold the GREEN LED will light, indicating a logic “0”.b) If the measured voltage is above the high reference threshold the RED LED will light, indicating a logic “1”.c) If the measured voltage is between the reference limits, neither LED will light.4. In the logic testing mode, the measured voltage is displayed in the LCD. Auto Power OffPower will automatically turn off after 30 minutes of inactivity.UL ListedThe UL mark does not indicate that this product has been evaluated for the accuracy of its readings.Battery and Fuse ReplacementNOTE: Do not operate the instrument or connect the test lead or probe to any circuit with the rear cover open.1. Remove the screw and open the battery door. Replacethe old batteries or the blown fuse with the same type.Fuse: 800mA/250V fast blow typeBattery: Two 1.5V AAA or UM-4 typeSupport Hotline (781) 890-7440Techsupport:Ext.200;Email:****************** Repair/Returns:Ext.210;Email:*****************Website: 。
- 1、下载文档前请自行甄别文档内容的完整性,平台不提供额外的编辑、内容补充、找答案等附加服务。
- 2、"仅部分预览"的文档,不可在线预览部分如存在完整性等问题,可反馈申请退款(可完整预览的文档不适用该条件!)。
- 3、如文档侵犯您的权益,请联系客服反馈,我们会尽快为您处理(人工客服工作时间:9:00-18:30)。
2014/12/17 2014/12/24 2014/12/31 2015/01/07 2015/01/14 2015/01/21 2015/01/28
2014/12/18 2014/12/25 2015/01/01 2015/01/08 2015/01/15 2015/01/22 2015/01/29
产检 25夜首次胎动 唐筛 产检
产检
产检
产检 产检
产检 产检 产检 产检 预产期
的信息.非常详细!
宝宝周历
66 4224 4290 44.6875 0.6875
66
114 4176 4290 29.79167 0.791667
114
0
星期二 2014/04/15 2014/04/22 2014/04/29 2014/05/06 2014/05/13 2014/05/20 2014/05/27 2014/06/03 2014/06/10 2014/06/17 2014/06/24 2014/07/01 2014/07/08 2014/07/15 2014/07/22 2014/07/29 2014/08/05 2014/08/12 2014/08/19 2014/08/26 2014/09/02 2014/09/09 2014/09/16 2014/09/23 2014/09/30 2014/10/07 2014/10/14 2014/10/21 2014/10/28 2014/11/04 2014/11/11 2014/11/18 2014/11/25 2014/12/02 2014/12/09
星期三 2014/04/16 2014/04/23 2014/04/30 2014/05/07 2014/05/14 2014/05/21 2014/05/28 2014/06/04 2014/06/11 2014/06/18 2014/06/25 2014/07/02 2014/07/09 2014/07/16 2014/07/23 2014/07/30 2014/08/06 2014/08/13 2014/08/20 2014/08/27 2014/09/03 2014/09/10 2014/09/17 2014/09/24 2014/10/01 2014/10/08 2014/10/15 2014/10/22 2014/10/29 2014/11/05 2014/11/12 2014/11/19 2014/11/26 2014/12/03 2014/12/10
星期一 2014/04/14 2014/04/21 2014/04/28 2014/05/05 2014/05/12 2014/05/19 2014/05/26 2014/06/02 2014/06/09 2014/06/16 2014/06/23 2014/06/30 2014/07/07 2014/07/14 2014/07/21 2014/07/28 2014/08/04 2014/08/11 2014/08/18 2014/08/25 2014/09/01 2014/09/08 2014/09/15 2014/09/22 2014/09/29 2014/10/06 2014/10/13 2014/10/20 2014/10/27 2014/11/03 2014/11/10 2014/11/17 2014/11/24 2014/12/01 2014/12/08
今天 2022.0 2.23 孕2874 天(第 410周 +5天) 距离预 产期 (2594) 天
孕月 周 孕1月 00
01
02
03 孕2月 04
05
06
07 孕3月 08
09
10
11 孕4月 12
13
14
15 孕5月 16
17
18
19 孕6月 20
21
22
23 孕7月 24
25
26
27 孕8月 28
2014/12/19 2014/12/26 2015/01/02 2015/01/09 2015/01/16 2015/01/23 2015/01/30
在第一栏输入你末次月经第一天的时间,然后将鼠标点在当前时间对应的红色小三角上,就可以出现你的宝宝应有的信息.非常详细!
宝宝周历
备注
状态图
唐氏筛查1项 产检
29
30
31 孕9月 32
33
34
宝宝周历
星期六 2014/04/12 2014/04/19 2014/04/26 2014/05/03 2014/05/10 2014/05/17 2014/05/24 2014/05/31 2014/06/07 2014/06/14 2014/06/21 2014/06/28 2014/07/05 2014/07/12 2014/07/19 2014/07/26 2014/08/02 2014/08/09 2014/08/16 2014/08/23 2014/08/30 2014/09/06 2014/09/13 2014/09/20 2014/09/27 2014/10/04 2014/10/11 2014/10/18 2014/10/25 2014/11/01 2014/11/08 2014/11/15 2014/11/22 2014/11/29 2014/12/06
星期四 2014/04/17 2014/04/24 2014/05/01 2014/05/08 2014/05/15 2014/05/22 2014/05/29 2014/06/05 2014/06/12 2014/06/19 2014/06/26 2014/07/03 2014/07/10 2014/07/17 2014/07/24 2014/07/31 2014/08/07 2014/08/14 2014/08/21 2014/08/28 2014/09/04 2014/09/11 2014/09/18 2014/09/25 2014/10/02 2014/10/09 2014/10/16 2014/10/23 2014/10/30 2014/11/06 2014/11/13 2014/11/20 2014/11/27 2014/12/04 2014/12/11
2014/12/15 2014/12/22 2014/12/29 2015/01/05 2015/01/12 2015/01/19 2015/01/26
2014/12/16 2014/12/23 2014/12/30 2015/01/06 2015/01/13 2015/01/20 2015/01/27
星期五 2014/04/18 2014/04/25 2014/05/02 2014/05/09 2014/05/16 2014/05/23 2014/05/30 2014/06/06 2014/06/13 2014/06/20 2014/06/27 2014/07/04 2014/07/11 2014/07/18 2014/07/25 2014/08/01 2014/08/08 2014/08/15 2014/08/22 2014/08/29 2014/09/05 2014/09/12 2014/09/19 2014/09/26 2014/10/03 2014/10/10 2014/10/17 2014/10/24 2014/10/31 2014/11/07 2014/11/14 2014/11/21 2014/11/28 2014/12/05 2014/12/12
星期日 2014/04/13 2014/04/20 2014/04/27 2014/05/04 2014/05/11 2014/05/18 2014/05/25 2014/06/01 2014/06/08 2014/06/15 2014/06/22 2014/06/29 2014/07/06 2014/07/13 2014/07/20 2014/07/27 2014/08/03 2014/08/10 2014/08/17 2014/08/24 2014/08/31 2014/09/07 2014/09/14 2014/09/21 2014/09/28 2014/10/05 2014/10/12 2014/10/19 2014/10/26 2014/11/02 2014/11/09 2014/11/16 2014/11/23 2014/11/30 2014/12/07
孕9月
宝宝周历
35 孕10月 36
37 38 39 孕11月 40 41
2014/12/13 2014/12/20 2014/12/27 2015/01/03 2015/01/10 2015/01/17 2015/01/24
2014/12/14 2014/12/21 2014/12/28 2015/01/04 2015/01/11 2015/01/18 2015/01/25