(商业照明12)-HDB-E26-603W作业指示
欧姆朗·Bussmann NH型高压照明用电流保护器系列说明书

Fuse size
NH1
NH2 NH3
Current rating (amps) 63 80 100 125 160 200 250 315 355 400
Energy integrals I2t (A2S)
Pre-arcing
Total at 1000V
470
4300
640
5760
1300
11,700
Energy integrals I2t (源自2S)Pre-arcing
Total at 1000V
PV-32ANH1
32
80
720
PV-40ANH1
40
185
1670
PV-50ANH1
50
400
3600
PV-63ANH1
63
470
4300
PV-80ANH1 NH1
80
640
5760
PV-100ANH1
a fuse block, reducing
The traditional blade version
installation time and
is for use with a fuse block
components.
and provides quick, tool-less replacement for easier maintenance. The bolt-on version with common hole centers easily integrates into standardized
© 2016 Eaton All Rights Reserved Printed in USA Publication No. 10365 January 2016
10KVA照明标准
Q/PDK 浙江浦东矿用设备有限公司企业标准Q/PDKxx—20xx 矿用隔爆型照明信号综合装置20xx-02-01发布20xx-03-01实施浙江浦东矿用设备有限公司发布Q/PDKxxx—20xxx前言本标准结构执行GB/T1.1-2000《标准化工作导则第1部分,标准的结构和编写规则》。
本标准依据GB3836.1—2000《爆炸性气体环境用电气设备第1部分:通用要求》、GB3836.2——2000《爆炸性气体环境用电气设备第2部分:隔爆型“d”》、JB6312—1992《矿用隔爆型煤电钻变压器综合装置》。
本标准由浙江浦东矿用设备有限公司提出。
本标准由浙江浦东矿用设备有限公司起草。
本标准由浙江浦东矿用设备有限公司归口。
本标准由浙江浦东矿用设备有限公司负责解释。
本标准主要起草人:xxxx。
本标准批准人:xxxx。
IQ/PDKxxx—20xxx矿用隔爆型照明信号综合装置1.范围本标准规定了矿用隔爆型照明信号综合装置、矿用隔爆型无触点照明信号综合装置(以下简称装置)的技术要求、试验方法、检验规则、标志、包装、运输和贮存。
本标准适用于矿用隔爆型照明信号综合装置、矿用隔爆型无触点照明信号综合装置,该装置适用于含有煤尘及爆炸性气体(甲烷)的场合,作为127V照明及信号的供电控制之用。
2.规范性引用文件下列文件中的条款通过本标准的引用而成为本标准的条款。
凡是注日期的引用文件,其随后所有的修改单(不包括勘误的内容)或修订版均不适用于本标准,然而,鼓励根据本标准达成协议的各方研究是否可使用这些文件的最新版本。
凡是不注日期的引用文件,其最新版本适用于本标准。
GB/T2423.4-2008 电工电子产品环境试验第2部分:试验Db:交变湿热(12h+12h循环)GB3836.1-2000爆炸性气体环境用电气设备第1部分:通用要求GB3836.2-2000爆炸性气体环境用电气设备第2部分:隔爆型“d”GB3836.3-2000爆炸性气体环境用电气设备第3部分:增安型“e”GB 14048.1-2006低压开关设备和控制设备第一部分:总则JB6312—1992 矿用隔爆型煤电钻变压器综合装置MT/T661-1997 煤矿井下用电器设备通用技术条件AQ1043-2007 矿用产品安全标志标识GB4208-2008 外壳防护等级(IP代码)3.产品分类3.1型号含义:Z B Z - □/ □M -照明信号额定工作电压V容量kV A综合隔爆型装置3.2基本参数见表11Q/JM07—20092 表1型 号 名 称额定功率 电源额定频率 ZBZ-10.0/1140(660)M矿用隔爆型照明信号综合装置 10.0KV A 50Hz3.2.1 主变压器参数见表2 表2额定容量(kV A )输入电压V 输出电压V 输入电流V 输出电流V 接线方式 10.01140(660) 133V 5.0(8.7) 43.4 Y 、△/△ 3.2.2防爆型式:矿用隔爆型 3.2.3防爆标志:ExdI 4 技术要求4.1 装置应符合本标准要求,并按规定程序批准的图样及文件制造。
6036 系列直管型 LED 灯具 - 使用说明书

CN CN CN CN CN CN CN CN CN CN CN CN CN CN CN CN CN CN CN CN CN CN CN CNCN使用说明书附加语种 直管型 LED 灯具6036 系列内容目录1总体信息 (3)1.1制造商 (3)1.2本使用说明书信息 (3)1.3其他文件 (3)1.4标准和规定的符合性声明 (3)2图标说明 (4)2.1操作指南中的图标 (4)2.2警告提示 (4)2.3设备上的图标 (5)3安全说明 (5)3.1操作指南的保管 (5)3.2安全使用 (5)3.3按规定使用 (6)3.4改装和改动 (6)4功能与设备结构 (6)4.1功能 (6)4.2设备结构 (7)5技术数据 (8)6仓储和运输 (17)7装配和安装 (18)7.1尺寸信息/固定尺寸 (18)7.2安装/拆卸、使用位置 (18)7.3安装 (20)8调试 (20)9保养、维护、修理 (21)9.1保养和维护 (21)9.2修理 (21)9.3退回 (22)10清洁 (22)11弃置处理 (22)12配件和备件 (22)2直管型 LED 灯具6036 系列268491 / 6036603001302021-02-03·BA00·III·zh·12总体信息3直管型 LED 灯具6036 系列1总体信息1.1制造商1.2本使用说明书信息ID 编号:268491 / 603660300130出版代码:2021-02-03·BA00·III·zh·12原版操作指南是英文版。
这在所有法律情况下均具有法律约束力。
1.3其他文件•数据页其他语种文件,参见 。
1.4标准和规定的符合性声明证书和 EC 符合性声明参见 。
设备拥有 IECEx 许可。
证书参见 IECEx-主页:http://iecex.iec.ch/如下链接提供其他国家证书的下载:https:///en/global/support/downloads/。
GB 16806—20XX说明书

6.5.6 检查功能 .................................................................. 19
6.5.1 通用要求 .................................................................. 16
6.5.2 控制功能 .................................................................. 16
6.6.1.1 通用要求 ............................................................... 21
6.6.1.2 火灾报警功能 ........................................................... 21
6.2 一般要求 ....................................................................... 6
6.2.1 外观要求 ................................................................... 6
6.6.1.11 机械环境耐受性 ........................................................ 25
6.6.2 气体释放警报器 ............................................................. 25
360Q系列灯具安全指示和操作手册说明书

360Q SERIES SAFETY INSTRUCTIONS AND OPERATING PROCEDURE-SA VE THESE INSTRUCTIONS!A. Lamp InstallationLoosen the captive knurled brass screw and remove socket cap from rear of unit. In-sert lamp fully into socket. Be sure lamp is properly seated by holding the socketcap in both hands and pressing down on both sides of the lamp base with yourthumbs.CAUTION: Do not touch glass portion of lamp with your hands. Agents such assodium, grease, or oil from your fingers may be transferred to the glass wall. Thesecontaminants can cause the lamp to rupture or can greatly reduce the performanceand life of the lamp. If accidentally soiled, immediately clean the lamp with a soft,clean, lint-free cloth soaked in methylated spirits (denatured alcohol), and thenpolish with a dry, soft, clean, lint-free cloth.B. Beam Adjustment and Lamp CenteringThe beam may be altered in appearance utilizing the three flat head machine screws in conjunction with the round head machine screw. The “hot spot” may be increased (peak field) or decreased (flat field) by moving the socket plate towards the front or rear of the fixture respectively. This is accomplished by loosening the round head machine screw a few turns, then by alternately adjusting the three flat head screws, the field can be adjusted to the desired look. The lamp should also be centered during this procedure, again using the three flat head screws to “fine tune” the field until the hot spot is centered in the beam. Once the desired field has been achieved, tighten the round head machine screw to lock the socket mounting plate into position, then tighten the two nuts on the round head screw onto the socket cap to prevent the screw from vibrating loose.CAUTION: Always insure that the lamp in centered when using an iris. A lamp imaged onto an iris will cause premature iris failure.C. FocusingA hard or soft edge beam pattern is accomplished by loosening the lens adjusting knob then sliding the lens holderin or out until desired focus is attained. Tighten the lens adjusting knob to lock the lens holder into position.D. Beam ShapingThe four shutters are used to shape the beam pattern. By moving these shutters in and out or side to side, a wide variety of shapes and angles are made possible. Remember, the left-hand shutter as you stand at the rear of the fixture will shape the right-hand side of the beam, and the top shutter affects the bottom of the beam, and so on. CAUTION: When using an iris, always close down the shutters as close to the edge of the iris as possible. This will minimize the detrimental heating effect of the lamp upon the iris.E. Lens CleaningTo gain access to the lenses for cleaning, or other purposes, remove the lens adjusting knob and slide the lens holder out of the unit. Remove the lens retaining ring and carefully remove the front lens. If necessary, remove the lens spacer and remove the rear lens. Reverse this process to install the lens holder back into unit.NOTE: Be sure to note the position and orientation of the lenses before removing them to assure correct reassembly and optical correctness of the fixture.Clean the lenses with a mild soap and water or a commercial glass cleaning solution and a soft, clean, lint-free cloth. Insure that the cleaning process does not leave film on the lens, since the heat from the beam will bond onto the surface.57 Alexander Street, Yonkers, NY 10701Tel: 914.476.7987, 212.569.7777; 800.4.ALTMAN Fax:914.963.7304Visit our website at © 2008 Altman Stage lighting Company, Inc.。
590直流调速器中文操作说明书

590 直流调速器中文操作说明书590+直流调速器中文操作说明书欧陆传动系统有限公司590+系列直流数字式调速器产品手册HA466461U002,第一版与5.x版本软件兼容欧陆传动系统有限公司,2001年版权版权所有。
本文件的任何部分均不得存储在可恢复系统中,或者,未经欧陆传动系统有限公司的书面许可而以任何形式或以任何方式传输给任何非欧陆传动系统有限公司的雇员。
尽管已竭尽所能来确保本文件的精确性,但是,仍然有可能在不予通知的情况下对本文件进行修正或者补充,因此而产生的损坏,伤害及费用,欧陆传动系统有限公司将不予承担任何责任。
590+系列直流数字式调速器保修欧陆传动系统有限公司担保,按照欧陆传动系统有限公司IA058393C标准销售条款,自交货之日起12个月内,本产品在设计、材料与工艺方面无任何瑕疵。
欧陆传动系统有限公司保留在不予通知的情况下对本文件内容以及产品规格进行更改的权利。
590+系列直流数字式调速器安全信息要求重要事项:在安装本设备以前,请仔细研读该安全信息。
目标用户本手册是提供给需要对手册中讲述的设备进行安装、配置或维修,或者进行其它任何相关操作的所有人员使用。
本信息的目的在于强调安全事项,并使用户能够最大限度地从该设备中受益。
下表是关于设备如何安装和使用的详细情况,请填写完整,以备将来参考之用。
应用领域本设备用于通过使用直流电压用做工业电机的速度控制。
人员要求本设备的安装、操作与维护工作应该由有资格的人员来完成。
有资格的人员指具有相应技能,并熟悉所有安全要求及确定的安全操作实践,熟悉本设备的安装过程、操作与维护以及全部相关危险性的人员。
590+系列直流数字式调速器安全信息危及生命安全。
如不遵守下面的规定,则有可能导致触电危险。
根据国际电工委员会(IEC)61800,3的要求,本产品属于限制销售级别的设备。
在局部环境下使用时,本产品可能产生无线电干扰,在此情况下,用户可能需要采取适当的措施。
电气照明标准及参数

电气照明标准及参数引言电气照明是现代社会不可或缺的一部分,无论是家庭、商业还是工业场所,都需要合适的照明系统来提供良好的光照条件。
为了确保照明系统的安全性、高效性和持久性,各国都有自己的电气照明标准和参数。
本文将介绍一些常见的电气照明标准和参数。
1. 照明标准1.1 国际电工委员会(IEC)标准国际电工委员会是一个制定国际标准的组织,对于电气照明来说,IEC发布了一系列标准,以确保各种类型的照明设备和安装都能满足特定的要求。
•IEC 60598:通用照明设备的安全要求标准,涵盖了各种室内和室外照明设备的安全性能要求。
•IEC 61000:涵盖电磁兼容性(EMC)方面的标准,确保照明设备不会对其他电子设备产生干扰。
•IEC 62471:针对照明产品的人眼安全性进行评估的标准,以确保照明设备不会给人眼带来损害。
1.2 国家标准不同国家对于电气照明的标准也有所不同,在中国,国家质量监督检验检疫总局和中国标准化研究院制定了一系列电气照明标准,包括:•GB 7000.1:室外照明设备的安全要求标准。
•GB 7000.5:LED灯具的安全要求标准。
•GB 24906:卤素灯的安全要求标准。
2. 照明参数照明参数是衡量照明设备性能的指标,包括照明亮度、色温、色彩还原性和能效等。
2.1 照明亮度照明亮度是指照明设备所提供的光照强度,一般以流明(lm)为单位。
亮度较低的照明设备适合用于舒适的环境,而亮度较高的照明设备适合用于需要更强光照的场所,如手术室和工业车间。
2.2 色温色温是用来描述照明设备发出的光线中所包含的色彩的特性。
色温以开尔文(K)为单位表示,一般分为暖白色、自然白色和冷白色三个范围。
不同的照明环境需要不同的色温来达到最佳的效果,比如居家环境一般使用暖白色(2700K-3000K)。
2.3 色彩还原性色彩还原性是指照明设备对物体真实色彩的还原能力。
色彩还原性以色彩还原指数(CRI)来衡量,范围从0到100。
海尔大区域照明产品说明书
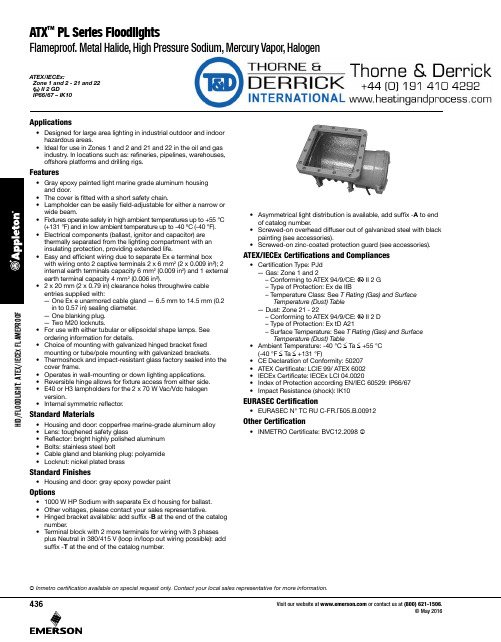
• Gray epoxy painted light marine grade aluminum housing and door.
• The cover is fitted with a short safety chain. • Lampholder can be easily field-adjustable for either a narrow or
(Magnetic Ballast)
Options: T - Extra Terminals A - Asymmetrical
Optic C -25 °C (-13 °F) Ambient Temperature
T Rating (Gas) and Surface Temperature (Dust) Table
Bracket: B - Hinged Bracket Included
Lamp Type: H - Metal Halide L - High Pressure Sodium M - Mercury Vapor Z - Halogen
Voltage: XJ - 230/240 Vac, 50 Hz
number. • Terminal block with 2 more terminals for wiring with 3 phases
plus Neutral in 380/415 V (loop in/loop out wiring possible): add suffix -T at the end of the catalog number.
in to 0.57 in) sealing diameter. — One blanking plug. — Two M20 locknuts. • For use with either tubular or ellipsoidal shape lamps. See ordering information for details. • Choice of mounting with galvanized hinged bracket fixed mounting or tube/pole mounting with galvanized brackets. • Thermoshock and impact-resistant glass factory sealed into the cover frame. • Operates in wall-mounting or down lighting applications. • Reversible hinge allows for fixture access from either side. • E40 or H3 lampholders for the 2 x 70 W Vac/Vdc halogen version. • Internal symmetric reflector.
- 1、下载文档前请自行甄别文档内容的完整性,平台不提供额外的编辑、内容补充、找答案等附加服务。
- 2、"仅部分预览"的文档,不可在线预览部分如存在完整性等问题,可反馈申请退款(可完整预览的文档不适用该条件!)。
- 3、如文档侵犯您的权益,请联系客服反馈,我们会尽快为您处理(人工客服工作时间:9:00-18:30)。
漏出PCB板现象,见右图
4.5将焊好的遥控接收板放进灯体,将电源线从灯体内穿上焊接在
灯板上,正负极勿反,见下图
??????????
4.6将恒流电源的输入线(N)剥线5mm,放在灯体连接处的卡糟内,L线焊到灯头接触点,注意焊点要光滑,见下图
4.7将灯头顺着灯体连接座顺时针拧紧,注意拧紧后裸铜线不能露出灯头外,最后用压灯头机将灯头与灯体连接座固定.装上灯罩,见下图
3.0作业目的:
本工序是将大功率LED及配件进行组装。
4.0作业步骤:
4.1用镊子夹住LED,先将LED的正、负极对准
接收板上所标示的正、负极,RGB的焊盘,
.如右图所示。
4.2将灯体连接器与灯体组装在一起如下图:
4.3将绝缘纸垫放在灯体内对准孔位并电热吹风机
WL-HDB-E26-603W作业指示
1.0作业设备及工具:
防静电烙铁(60W)、剥线钳、剪刀、防静电手腕、刀片、电热吹风
(1500W)、物料盒、小号十字螺丝刀。
2.0作业材料:
灯罩、铝基板座盘、灯头、灯头、灯体连接座、灯体散热器、大功率LED、铝基板、恒流电源、热缩套管、环保导热胶、螺丝、环保焊锡丝。
5.0注意事项:接线分清正负极,各焊接点要牢固,运输周转注意静电灰尘、振动等防护
6.0包装