DKVM-22U产品手册
VS222HD4K 2x2 HDMI 矩阵开关-4K 快速切换和自动感知产品说明书

2x2 HDMI Matrix Switch - 4K with Fast Switching and Auto-SensingProduct ID: VS222HD4KSave time and hassle by automatically switching between your HDMI audio/video sources. This 2x2 HDMI® matrix switcher provides the ultimate viewing experience, with support for Ultra HD 4K. It lets you connect two HDMI sources to two HDMI displays, with exceptional 4K resolution, while switching seamlessly between your video sources.Impressive image quality with 4K supportThe matrix switch supports Ultra HD 4K picture quality on two monitors while switching between content from HDMI source devices - including Blu-ray™ players or DVD players, computer systems, video game consoles, digital cable or satellite boxes, and A/V receivers.4K support ensures a higher level of image clarity and visibility, delivering four times the resolution of 1080p - 8.29 million pixels versus 2.07 million pixels. It provides a more engaging visual experience for audiences in a wide range of venues including conference centers, boardrooms, educational facilities, and commercial settings. With its exceptional image quality, 4K resolution is also ideal for bringing your digital signage to life.Fast and versatile switching optionsEnjoy hassle-free operation with four different switching modes:•Matrix switching: lets you route either HDMI source (Input 1 or Input 2) to either monitor (Output 1 and/or Output 2) - and independently switch two displays between two video sources.•Fast auto-switching: ensures minimal time for switching between HDMI sources. The switch provides effortless operation with advanced auto-sensing - it detects the latest connected HDMI source andautomatically switches both outputs to that device. It also ensures no downtime in a digital signageapplication if a source signal is accidentally powered off or fails.•Priority switching: identifies the first port to have first priority for HDMI sources, which will be output on both displays.•Manual switching: enables you to manually select your HDMI source with front-panel buttons that are easy to use.An IR remote control is included in the box, enabling you to select your desired input source remotely. The RS-232 serial control interface ensures easy remote operation with serial control enabled devices.Hassle-free setup with plug-and-play installationThe matrix switch is easy to install. EDID emulation saves you time during setup by ensuring all of your display settings, such as native resolution and refresh rate, are communicated between your display and video source devices. The built-in EDID copy feature maximizes compatibility with your 4K display, to ensure a convenient plug-and-play installation and the sharpest image quality.The VS222HD4K is TAA compliant and backed by a 2-year warranty with free lifetime technical support.Certifications, Reports and Compatibility Applications•Run Ultra HD 4K multimedia presentations on two monitors inconference rooms, commercial settings or at trade shows•Switch between different video sources on your digital signage displays in hospitals, shopping centers, or schools•Connect and switch between two video sources and two displays on a test bench, for troubleshooting computers•Automatically switch between your Blu-ray player, set-top box, or gaming console in a home theatre environmentFeatures•Impressive image quality with support for Ultra HD 4K•Easy operation with automatic, priority and manual switching between HDMI sources•Access two HDMI source devices on two independent HDMI displays,with 2 x 2 matrix switching•IR remote control included•RS-232 serial control interface•EDID copy support ensures accurate display output•Backward compatible with high-definition 1080p•Mounting hardware includedWarranty 2 YearsHardware Audio YesAV Input HDMIAV Output HDMIIndustry Standards HDMI 1.4Ports2Performance Audio Specifications7.1 Surround soundMax Distance10 m / 33 ftMaximum Cable Length393.7 in [10000 mm]Maximum Digital Resolutions4K @ 30 HzSupported Resolutions3840x2160 (4K)2560x16001920x12001920x1080 (1080p)1280x720 (720p)Wide Screen Supported YesConnector(s)Connector A 2 - HDMI (19 pin) FemaleConnector B 2 - HDMI (19 pin) Female1 - RJ-11 FemaleIndicators LED Indicators 2 - Active port LED1 - Power LEDPower Input Voltage100 - 240 ACOutput Current 1.5Output Voltage12 DCPower Consumption (In Watts)18Power Source AC Adapter Included Environmental Humidity0% ~ 80%Operating Temperature0°C to 50°C (32°F to 122°F)Storage Temperature-20°C to 70°C (-4°F to 158°F)Color BlackPhysicalCharacteristicsProduct Height0.8 in [2 cm]Product Length 6.1 in [15.6 cm]Product Width 2.6 in [65 mm]Weight of Product10.4 oz [296 g]Package Height 2.6 in [65 mm]PackagingInformationPackage Length 6.1 in [15.6 cm]Package Width9.3 in [23.5 cm]Shipping (Package) Weight29.7 oz [841 g]What's in the Box Included in Package 1 - 2x2 HDMI matrix switch1 - remote control1 - universal power adapter (NA/EU/UK/AU)1 - RJ11 cable (1200mm)1 - RJ11 to DB-9 serial adapter1 - mounting kit1 - quick start guideProduct appearance and specifications are subject to change without notice.。
道尔金安全门锁操作手册说明书
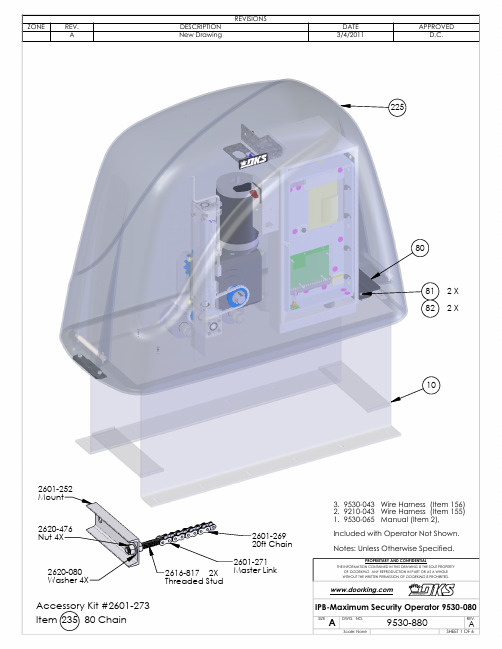
IPB 9530-880 Rev A (Model and Movex Number 9530-080) March 4, 20111 9530-880 1 EA Illustrated Parts Breakdown2 9530-065 1 EA Manual10 9550-150 1 EA Base Slider21 2615-153 4 EA Bolt Hex Head 5/16-18 x 3/422 2620-411 4 EA Nut Hex Flange Lock 5/16-1825 2601-260 1 EA Gearbox 40:1 9530's26 2615-167 8 EA Bolt Hex Head 7/16-14x1 1/4Gr827 2620-048 8 EA Lockwasher 7/16"30 2601-324 1 EA Sprocket 35 Chain 30 Tooth31 2601-322 1 EA Sprocket Hub 1 1/2" Bore32 2600-436 1 FT Chain #3533 2600-479 1 EA Chain Master Link #3535 2600-367 1 EA Sprocket 15 tooth 80 Chain36 2601-334 1 EA Sprocket Hub 1 1/2" Bore40 2601-264 1 EA Motor 3HP Emerson J63WZBKC-19241 2615-052 4 EA Bolt Hex Head 3/8-16 x 142 2620-047 4 EA Lockwasher 3/8"50 1603-032 1 EA Manual Safety Interlock Assy51 9550-244 1 EA Interlock Mounting Bracket60 9550-135 2 EA Idler Wheel UHMW61 2615-220 2 EA Bolt Hex Head 1-14 x 7 Gr562 2620-084 2 EA Washer 1" USS Galv63 2620-225 2 EA Washer SS 1.5"ODx1.00"IDx.050"T64 2620-056 2 EA Lockwasher 1"65 2620-480 4 EA Nut Hex 1-14 Thread Gr580 9550-228 1 EA Bracket Offset Catch81 2615-154 2 EA Bolt Hex Head 5/16-18 x 182 2620-411 2 EA Nut Hex Flange Lock 5/16-1890 9550-100 1 EA Control Box Slide Gate91 2615-052 5 EA Bolt Hex Head 3/8-16 x 192 2620-019 10 EA Washer 3/8" SAE93 2620-047 5 EA Lockwasher 3/8"94 2620-405 5 EA Nut Hex 3/8-1695 1506-071 1 EA Tone Generator Loud96 1812-005 2 EA Switch Push Button N.O.97 2600-403 1 EA Switch 3 Phase 25 AMP98 1804-029 2 EA Mount Wire Tie99 2600-619 2 EA Wire Clp-5/8" Concord 770-1209100 2902-006 2 EA Nut Nylon Lock 10-32101 2600-820 1 EA Bushing 1/2110 9210-416 1 EA AC Motor Drve Assy 208V3P 10HP111 2620-009 4 EA Washer Split Lock 1/4"112 2905-065 4 EA Screw Phillips Head 1/4-20x1/2115 9210-425 1 EA AC Tech Brake 845-215116 2616-001 4 EA Screw Phillips Head 6-32 x 3/8120 9200-900 1 EA Mount Plate PCB Hinged 9200121 2620-409 6 EA Nut Hex Flange Lock 1/4-20125 9200-913 1 EA Mount Panel PCB 9200126 2600-945 1 EA Cover Plastic Insulator127 2616-000 6 EA Screw Phillips Head 6-32 x 1/4128 1200-028 2 EA Outlet Snap-In Leviton 1306129 2616-002 6 EA Screw Phillips Head 6-32 x 1/2130 2599-014 1 EA Decal Copper Wire Only131 2600-434 1 EA Marker Strip 208V 3Phase132 3130-008 1 EA Terminal Block 5 pin134 3129-005 1 EA Terminal Block Cover 5 Position135 2616-007 6 EA Screw Phillips Head 6-32x5/8"IPB-Maximum Security Operator 9530-0809530-880136 2599-006 1 EA Decal SUPPLY GND137 2600-439 1 EA Washer Cup - Brass138 2902-010 1 EA Nut Nylon Lock 8-32 Green139 2600-810 15 EA Bushing 7/8 Poke Thru Flaps140 2600-619 13 EA Wire Clp-5/8" Concord 770-1209 141 2902-003 14 EA Nut Nylon Lock 6-32143 3140-040 1 EA Label 9210 Speed144 4001-125 1 EA Pot 5k Linear Taper Chassis Mt 145 9210-255 1 EA Knob for 1/4" Shaft Set Screw146 2600-410 1 EA Marker Strip Silkscn Both Side147 2600-414 1 EA Terminal Block-2 Position148 3129-002 1 EA Terminal Block Cover 2 Position 149 2343-010 1 EA PCB Current Sensor150 4001-095 1 EA Trans Small 460/230/208-115151 2616-051 2 EA Screw Phillips 10-32x3/8152 9200-932 1 EA Solid Ste Rely 1P SGDH2544RD3 153 4001-020 1 EA Terminal 20 Pin154 9200-234 1 EA Bracket High/Low Volt Seporator 155 9210-043 1 EA Wire Harness 9210 Subassy VS 156 9530-043 1 EA Wire Harness 9530 Subassy VS 160 4404-010 1 EA PCB Gate Operator161 9210-006 1 EA Cover Plastic170 9550-110 1 EA Control Box Door Slide Gate171 4001-035 1 EA Lock N16058BDxSFx2K Key 16120 172 1702-501 1 EA Cam 7/8"180 2600-529 1 EA Bracket Limit Enclosure 9200181 2600-909 1 EA Shaft Limit Threaded 9200182 2600-454 4 EA Bearing Holder Plastic Front183 2600-440 4 EA Bearing Used in Slide Oper184 2615-153 16 EA Bolt Hex Head 5/16-18 x 3/4185 2620-411 16 EA Nut Hex Flange Lock 5/16-18186 2600-258 2 EA Limit Nut 1" Bronze187 2600-254 1 EA Limit Nut w/Magnet Assy Bronze 188 2600-309 2 EA Gear Bevel 15 tooth Bored 3/4" 189 2600-199 1 EA Shaft Limit Cross 9200190 2630-018 1 EA Snap Ring 3/4" 01121191 2600-096 2 EA Washer SS 1.125"ODx.75"IDx.03" 192 2600-032 2 EA Spirol Pin - 3/16" D x 1" L SS193 2600-522 1 EA Bracket Limit Hold 9200194 2600-857 3 EA Spring-Compression Limits195 2616-108 3 EA Screw Smooth Shoulder 6-32x3/4 197 1804-024 4 EA Switch Micro No NC C198 2904-004 8 EA Screw Round Head 4-40 x 5/8" 199 9210-301 1 EA Bracket Upper Slow Down Limit 200 9210-302 1 EA Bracket Lower Slow Down Limit 201 2902-002 4 EA Nut Nylon Lock 4-40202 2902-003 2 EA Nut Nylon Lock 6-32203 9210-303 1 EA Bracket Partial Open Limit204 2616-031 2 EA Screw Flat Head #0-90x1/4 Slot 205 2620-399 2 EA Nut Hex 00-90 Brass Zinc Plt206 1601-256 1 EA Switch Magnetic Sensor207 9530-193 1 EA Crank Handle Model 9530208 2600-214 2 EA Spring Clip For Crank Handle209 2902-006 2 EA Nut Nylon Lock 10-32210 2601-310 1 EA Sprocket220 9200-005 1 EA Cover Plastic Limits221 2616-052 2 EA Screw Phillips Head 10-32 x1/2225 9550-400 1 EA Cover Assembly230 2600-767 2 EA Lock Padlock Brass B745C 235 2601-273 1 EA Accessory Chain Kit IPB-Maximum Security Operator 9530-0809530-880。
D-LINK-DKVM-4K说明书
D-LINK-DKVM-4K电脑切换器说明书一、性能介绍DKVM-4K 4端口KVM切换器是一种适用于办公室和商业用户的经济型KVM解决方案。
用户通过这种切换器,可以用一套键盘、鼠标和VGA显示器轻松控制4台电脑。
DKVM-4K允许用户管理端口流量和启动连接的电脑。
设备顶端的控制按钮可以一键进入所选择的电脑。
该设备还具有热插拔、自动扫描、键盘热键和反馈音等特性,便于管理所有的电脑。
DKVM-4K支持分辨率高达2048*1536的VGA、SVGA和MultiSync显示器。
还提供Microsoft IntelliMouse支持。
二、特点介绍1、特性⏹总线电源支持(无需外接电源适配器)⏹1套键盘、鼠标和显示器控制4台PS/2式电脑⏹键盘和鼠标仿真无差错启动⏹VGA、SVGA和MultiSync显示器支持分辨率2048*1536⏹支持Microsoft IntelliMouse和Microsoft IntelliMouse Explorer⏹支持PS/2式键盘和鼠标⏹用“选择”按钮和热键命令在4台PC间切换⏹自动扫描模式,便捷的自动切换(扫描启动PC)⏹切换时可听见反馈音⏹4个LED指示4台PC⏹自动取消每台电脑的大写键(CAPS LOCK)、数字锁定(NUM LOCK)和滚动键(SCROLL)⏹使用普通线缆2、技术规格3、物理与环境参数三、安装及操作说明1、安装说明⏹将显示器、键盘和鼠标与DKVM-4K连接将6pin PS/2键盘接头连接到DKVM-4K的Console键盘接口将6pin PS/2鼠标接头连接到DKVM-4K的Console鼠标接口将显示器的HDDB 15 VGA接头连接到DKVM-4K的显示屏控制接口⏹将PC与DKVM-4K连接将KVM连接线(键盘接头)连接到DKVM-4K的PS/2键盘接口将KVM连接线(鼠标接头)连接到DKVM-4K的PS/2鼠标接口将KVM连接线(VGA接头)连接到DKVM-4K的VGA接口将KVM连接线(VGA接头)连接到电脑机箱后的VGA接口将KVM连接线(键盘接头)连接到电脑机箱后的PS/2键盘接口将KVM连接线(鼠标接头)连接到电脑机箱后的PS/2鼠标接口⏹重复上述2的步骤,连接其他电脑⏹DKVM-4K的安装完成后,启动所有连接的电脑2、操作说明使用DKVM-4K机器上部有一个Select按钮或键盘的热键,可以方便的在各主机之间进行切换。
otis3000 mcs220 中文调试手册
5
OTIS3000 调试说明 MCS220
P8
1
2
3
4
5
6
信号
HLI 不使用 24VAC 24VAC 24VDC
GND
类型
输入 -
输入 输入 输出 输出
电压测量
P8/3 – P8/4 24VAC +/-10%
P8/5 – P8/6 24VDC +/-10%
可以找到原因
在确定了停机原因的情况下 将电源开关关上并打开 可以把这一情况清除
3 磁条的调整
可以使用长度为 170 至 250mm 的磁条 在较短的层站 你必须考虑到两门区之间
的距离至少是 180mm 否则 门区便不能由正常的速度来分离开
(1)单轨结构
假定
磁 条 在 每 一 层 站 为 相 同 的 长 度
按 下 UIB 或 DIB 按 钮 电 机 应 起 动
如果电机的运行方向与所期望的运行方向不同 那么 必须将电机电缆的两相进
行交换
必须检查一下 当轿厢到达开关 1LS 或 2LS 时 驱动是否将速度降低至爬行速度
如果轿厢不移动 状态显示便可以显示错误
如果显示出停机 SHT DWN 通过错误记录 ErrLog (<M><2><2><1><GO ON>)
LED
说明
状态
MP BC VLC GRP/J NOR/d INS ES DW DFC DOL DOB LV RSL
电 机 保 护 装 置 MPD 阀门/制动器电流控制装置
电压检测 5VDC 三相主电源故障 正常操作检验 检修操作 急停 厅门信号 门完全关闭 开门限位 开门按钮
TM系列集成电路产品手册第二版

TM 系列集成电路产 品 手 册(第二版)深圳市天微电子有限公司Shenzhen Titan Micro Electronics Co., Ltd.http://www.titanmec.om/前言天微产品涵盖电源管理产品线、检测与计量产品线、照明及显示驱动产品线等系列产品,产品众多,每个产品都有详细的产品规格书。
随着公司的蓬勃发展,产品越来越多。
编写本手册目的是把公司自2003年以来的所有产品进行归类,便于公司各部门以及客户全面地系统地了解天微的芯片。
由于产品规格书不是同一个人,也不是同一时期编写的,里面的引脚图,采用了不同的格式,特别的图片格式的,放大或缩小容易失真,打印不清晰。
在这里,编者用AutoCAD 2010重画了所有的芯片引脚图,这样的图是矢量图,任意放大或缩小不会失真,双击图形可直接进入AutoCAD 中进行修改。
建议大家用AutoCAD 2010绘图软件。
本手册的产品分类是根据服务器上的规格书重新分类的。
相比较2012年8月30日编写的《TM 系列集成电路产品手册》第一版,分类方法略有不同,。
目前的集成电路主要包括:1. LCD驱动2. LED看板驱动3. LED面板驱动4. LED照明及装饰驱动5. 通用器件6. 电机驱动7. 电能计量8. 红外控制9. 音频及视频处理10.模数转换器11.数模转换器12.电源管理13.其它。
在产品简介中注明了产品的型号、封装形式、名称、主要特点、应用领域、引脚图、典型应用电路图等。
本手册中没有录入某些很老的产品或还未正式规格书的新产品。
本手册未录入的产品有:TM74HC74,TM7758,TM7760,TM7762、TA1669、TA1672、TA1673、TM1670、TM1623C、TM1669、TA9909、TA9909B、TA9912、TA9912B、TM1933、TM1836、TM1904、TM1909、TM1912、TM1913、TM1925、TM2101、TM2104、TM2202、TM9105等等。
UM系列低压伺服一体机使用手册说明书

UM系列低压伺服一体机使用手册版权声明安全有关的符号说明版权声明SYNTRON森创®是北京和利时电机公司(以下简称和利时电机)于2005年推出的产品品牌。
这个品牌浓缩了公司的核心技术和影响力,是公司始终注重自主创新,保持技术优势的体现。
说明书的内容参照了相关法律基准和行业基准。
如对本说明书提供的内容有疑问,请向销售人员咨询,致电客服热线,联系官网客服或致信本公司。
和利时电机保留在不事先通知的情况下,修改本手册中的产品和产品规格参数等权力。
手册请联系销售人员,或在和利时电机的官方网站下载相关手册。
和利时电机具有本产品及其软件的专利权、版权和其它知识产权。
未经授权,不得直接或者间接地复制、制造、加工、使用本产品及其相关部分。
和利时电机具有本使用说明书的著作权,未经许可,不得修改、复制使用说明书的全部或部分内容。
安全有关的符号说明本说明书中与安全有关的内容,使用了下述符号。
标注了安全符号的都为重要内容,请务必遵守。
安全注意事项注意事项⏹版权声明安全有关的符号说明目录第一章产品概况 .......................................................................................... - 1 -1.1产品概况 .................................................................................................................. - 1 -1.2型号命名规则 .......................................................................................................... - 1 -1.3安装尺寸图 .............................................................................................................. - 2 -1.4重量 .......................................................................................................................... - 2 -1.5性能参数 .................................................................................................................. - 2 -1.6规格型号说明 .......................................................................................................... - 3 -1.7配件组成 .................................................................................................................. - 3 -第二章配线 ................................................................................................. - 4 -2.1供电端子的接线 ...................................................................................................... - 4 -2.2输入输出接口定义 .................................................................................................. - 4 -2.3保险 .......................................................................................................................... - 5 -2.4指示灯 ...................................................................................................................... - 5 -第三章运行 ................................................................................................. - 6 -3.1试运行基本流程 ...................................................................................................... - 6 -3.2内部速度模式运行 .................................................................................................. - 7 -3.3位置模式运行 .......................................................................................................... - 7 -3.4通讯模式运行 .......................................................................................................... - 7 -3.5恢复出厂默认参数 .................................................................................................. - 8 -3.6驱动器使用教程 ...................................................................................................... - 8 -3.7在线升级步骤 .......................................................................................................... - 8 -3.8电机编码器自学习步骤 .......................................................................................... - 8 -第四章参数与功能..................................................................................... - 10 -4.1Fn参数清单 .......................................................................................................... - 10 -4.1.1Fn参数位说明................................................................................................... - 10 -4.1.2Fn参数功能....................................................................................................... - 10 -4.2Dn参数清单 .......................................................................................................... - 15 -4.2.1Dn参数位说明 .................................................................................................. - 15 -4.2.2Dn参数功能 ...................................................................................................... - 15 -4.3Pn参数清单 .......................................................................................................... - 16 -4.3.1Pn参数位说明 .................................................................................................. - 16 -4.3.2Pn参数功能 ...................................................................................................... - 16 -第五章故障报警及处理.............................................................................. - 18 -5.1驱动器故障代码及解决方法 ................................................................................ - 18 -5.2驱动器异常现象及解决办法 ................................................................................ - 19 -产品概况第一章产品概况1.1 产品概况UM系列伺服是北京和利时电机公司推出的新一代高性能、高可靠性的低压伺服电机驱动一体机,采用了先进的全数字电机控制算法,可对伺服电机的位置、速度和转矩进行精确控制。
Daikin ER22Y 远程水冷机安装、维护、使用手册说明书

1000003021 (Rev. B - 10/15)PAGE 1B230V Refrigeration PackageInstallation / Care / Use ManualModel : ER22YOriginal Instructions Description Remote Water Chillers are designed to reduce the temperature of potable water that is routed through the water chiller. Remote Water Chillers are designed to be installed in properly ventilated, non-visible locations.Ratings• Electrical: 230Vac, 50Hz, ___A (see nameplate), 1 phase. • Ambient Air Temperature: 50-100.4 °F (10-38 °C). • Water Pressure: 20-100 psig (0.14-0.69 MPa). • Maximum Water Temperature: 90 °F (32 °C).• Refrigerant: HFC-R134a • Ingress Protection: IP2x• For Indoor Commercial Use only.DANGER – Indicates death or serious injury will result if proper precautions are not taken.WARNING – Indicates death, serious injury or property damage can result if proper precautions are not taken.CAUTION – Indicates some injury or property damage may result if proper precautions are not taken.DefinitionsAuthorized Service Personnel – Factory trained personnel or personnel having working knowledge of electrical, plumbing and machine (appliance) maintenance procedures.SafetyDANGER• Please read these instructions completely before starting the installation or performing any service. Failure to follow the instructions and safety precautions in this manual can result in serious injury or death.• After installation, keep these instructions in a safe location for future reference.• Electric supply must be identical in voltage, cycle, and phase to that specified on nameplate.• A means for disconnecting electrical supply to the unit must be incorporated in the fixed wiring in accordance with wiring rules. This is to allow electrical disconnection of the unit from electrical supply after installation.WARNING• For use with clean, clear potable drinking water only. Do not use with water that is microbiologically unsafe or of unknown quality without adequate disinfection before the system.• Installation and connection to water and electrical mains must be in compliance with local and national laws. • All Installation and Service work must be performed by an authorized service personnel.CAUTION• This appliance can be used by children aged from 8 years and above and persons with reduced physical, sensory, or mental capabilities or lack of experience and knowledge if they have been given supervision or instructions concerning use of the appliance in a safe way and understand the hazards involved. Children shall not play with the appliance. Cleaning and user maintenance shall not be made by children without supervision.• To prevent a metallic taste or increased metal content in the water due to an electrolysis process caused by electrical feedback from the grounding of electrical equipment to water mains, connect to the water mains using a dielectric coupling.LEGENDA= 1/4" (6mm) O.D. TUBE WATER OUT B = 1/4" (6mm) O.D. TUBE WATER INLET C = TEMPERATURE ADJUSTMENT D = ELECTRICAL1000003021 (Rev. B - 10/15)PAGE 2InstallationFor correct and safe installation, please read these instructions completely.• All Installation work must be performed by an authorized service personnel.• Disconnect electrical supply serving the Installation area to reduce risk of electrocution. • Unit not suitable for installations where water jets could be used.DANGERWARNING• Shut off water supply serving the Installation area to reduce risk of water damage.• Installation area must have minimum required clearances and ventilation for safe operation. • Never wire compressor directly to electrical supply. CAUTION• Hose-sets are not to be used for connecting to water mains. • Tools/Items required but not provided. o Safety Glasses o Protective Gloves o Hex drives.o Water Shut-off Valve o Fasteners for wall type.Installation Steps1. It is important to insure proper ventilation. For remote installation a minimum clearance of 6 inches (152 mm) to the front must be maintained, 1 inch (25 mm) each side, 3 inches (76 mm) to the rear above the unit. Wall grille EG-1 or EG-2 to be used when unit is inserted into an enclosure. Install unit as close as possible to wall grille. A 6 inch (152 mm) clearance beyond the front of the wall grille is required for adequate air circulation.2. This chiller has been designed for use with potable water and includes an o-ring seal on the drain plug. This fitting should be replaced if the unit is to be used with more aggressive fluids.3. Connecting lines to be made of copper. Thoroughly flush all lines to remove all foreign matter before connecting to cooler. If flushing does not remove all particles, a water strainer should be installed in the supply line.4. Connect cooler to building supply with a shut-off valve and install a union connection between the valve and the cooler.5. For use with photo processing applications, adjust thermostat to warmer settings.Wiring Instructions1. Turn off electrical supply to chiller circuit2. Remove top cover to gain access to electrical box3. Join electrical wire to unit using 3/8” cable clamp connector or appropriate conduit connector4. Connect ground wire to ground screw (provided)5. Connect black wire to 230VAC6. Connect white wire to Neutral line7. Replace top cover and turn on electrical supplyStart-Up1. Open water shut-off valve.2. Purge air from all water lines by operating bubbler valve of fountain to which cooler is connected. Steady water stream assures all air is removed.3. Rotate fan to insure proper clearance and free fan action.4. Connect to electrical supply.Water Mains ConnectionA) 1/4” (6mm) O.D. Tube. Water Inlet to ChillerB) Building Water MainsC) Water Shut-off Valve (not provided)1000003021 (Rev. B - 10/15)PAGE 3BFor Replacement Parts, contact your local distributor or visit our website 2222 Camden Court – Oak Brook, IL 60523 U.S.A – 630.574.3500ServiceFor proper and safe servicing, please read these instructions completely.• All Service and Maintenance must be performed by an authorized service personnel.• Disconnect electrical supply to the unit before any service work to reduce risk of electrocution. • Shut off water supply serving the unit before any service work to reduce risk of water damage.DANGERCAUTION• Tools/Items required but not provided, for Servicing: o Safety Glasses o Protective Gloves o Hex drives.1. Temperature Control: Factory set for 50ºF ± 5º (10ºC ± 5º) water under normal conditions. To adjust water temperature, turn screw on Item No. 7 clockwise for colder, counter clockwise for warmer.Service: AdjustmentsService: Inspection/Cleaning• Inspect Water Chiller twice each year for proper operation and performance.• Inspection of the unit will require disconnecting electrical supply, removal of panels, etc. and reassembly and return to service practices.2. Condenser Fan Motor : Confirm condenser fan turns freely. If the condenser fan does not spin freely, have an authorized service personnel replace.3. Ventilation : Cabinet louvers and condenser fins should be periodically cleaned with a brush, air hose or vacuum cleaner. Cleaning should be done twice each year or more frequently if needed due to environment. Excess dirt or poor ventilation can cause no cold water and compressor cycling on the compressor overload protector.4. Water Flow : Confirm proper water flow. If water flow is slow, inspect filter or inline strainer for restriction. Replace filter cartridge if required. Disassemble inline strainer and clean if required.5. Lubrication: Motors are lifetime lubricated.6. Actuation of Quick Connect Water Fittings: Chiller is provided with lead-free plug which utilizes an o-ring seal. To remove plug from Chiller, relieve water pressure, pull the collar towards the fitting and pull the fitting off the tube. To install plug, push fitting straight ontotubing until it reaches a positive stop, approximately 3/4”(19mm).Replacement Parts: Parts ListITEM NO. PART NO. 1 2 3 4 5 6 7 8 *91011121314151617181920NS NS30040C 30039C 98773C 31341C 30824C 4267700011154304389066266C 000000119498747C 98181C 98777C 66201C 66810C 50930C 23105C 27304C 23107C 23108C 23109C 56092C 75583CDESCRIPTIONCover - Electrical Box Box - ElectricalKit - Cold Control/Screws Motor - Fan Fan - Blade Fan - Bracket Nut - Hex #6-32CondenserCompressor Service PakKit - Electrical (Relay/Cvr/O/L)Kit - Heat Exchanger/DrierKit - Compr. Mounting Hardware DrierEvaporator Assy Bumper Cabinet BaseplatePanel - Rear (Not Shown)Panel - FrontPanel - Condenser Mounting Poly Tubing (Cut To Length)Elbow - 5/16" x 1/4"DESCRIPTIONMotor - FanCompr. Service PakKit - Electrical (Relay/Cvr/O/L)Kit - Heat Exchanger/Drier DrierITEM NO. 31395C 35967C 98746C 000000101466200C220/240V 50HZPART NO. 4*910111319131116320104, 5,6, 79141517121, 28。
三菱 XD221U多媒体投影机 使用者手册

多媒體投影機
機型
使用者手冊
此使用者手冊對您很重要。 在使用投影機前請您仔細閱讀。
小心
謹防觸電 請勿打開機蓋
小心:為減少觸電危險, 請勿拆卸機蓋(或背面); 機內零件非用戶可自行維修, 請洽有資格的專業人員進行維修。
等邊三角形內帶箭頭符號的閃電旨在提醒用戶注意本產品內有未經絕緣的“危險壓"存在, 它足以構成觸電危險。
警告
為了將干擾控制在 EN55022 B 級設備的限值內,請使用本 設備附帶的 RGB 訊號線和屏蔽區域網路電纜。 請按照 “警告” 的說明進行操作。
CH-2
目錄
安全注意事項........................................................................................................................................ 4 概覽 ...................................................................................................................................................... 6 遙控器 .................................................................................................................................................. 8 安裝 ...................................................................................................................................................... 9 基本連接............................................................................................................................................. 10 準備工作............................................................................................................................................. 12 基本操作............................................................................................................................................. 13 選單操作............................................................................................................................................. 16 影像調整............................................................................................................................................. 23 進階功能............................................................................................................................................. 25 更換燈泡............................................................................................................................................. 27 故障排除............................................................................................................................................. 29 指示燈 ................................................................................................................................................ 32 規格 .................................................................................................................................................... 33
- 1、下载文档前请自行甄别文档内容的完整性,平台不提供额外的编辑、内容补充、找答案等附加服务。
- 2、"仅部分预览"的文档,不可在线预览部分如存在完整性等问题,可反馈申请退款(可完整预览的文档不适用该条件!)。
- 3、如文档侵犯您的权益,请联系客服反馈,我们会尽快为您处理(人工客服工作时间:9:00-18:30)。
DKVM-22U 产品手册
Ҧ术˕ܵ
办公地址:北京市东城区北三环东路 36 号环球贸易中心 B 座 26F02-05 室 邮编:100013
技术支持中心电话:800 829 6688/(028)66052968 技术支持中心传真:(028)85176948 KVM 技术支持专线:400 668 3330 各地维修中心地址请登录 D-Link 官方网站查询 网址: 办公时间:周一到周五,早 9:00 到晚 18:00
DKVM-22U 产品手册
反之, 若想再回到热键「Scroll Lock」模式:按「Caps Lock」 or 「Number Lock」兩 次 +「Scroll Lock」, 即可回到热键「Scroll Lock」.
DKVM-22U 产品手册
Troubleshooting
2 当切换到正在开机的计算机上,无法侦测到键盘,或者会显示键盘/鼠标没有被侦 测到的错误信息.
关闭. 意思就是, 当您切换到一台关闭的计算机上时,监视器上将没有任何显示. 3. 如果您不希望使用热键¨Scroll Lock㛤, 您可以有下列热键更改模式:
第一種: 按「Scroll Lock」两次 +「Number Lock」, 使热键更改为「Number Lock」. 第二種: 按「Scroll Lock」两次 +「Caps Lock」, 使热键更改为「Caps Lock」.
或者是 USB Hub.
Q3: 键盘能动,但是鼠标不能. A: 在使用該设备時, 我們建议用戶先插上鼠标再接键盘到指定位置上的 USB KVM 切换
器
Q4: 当设备空闲了一会儿后,鼠标变的无法用 A: 如果发生这样的事情,请按「Scroll Lock」+「Scroll Lock」+「M」来重启设备.
Y)%# 凹形类型 蓝Ѝ
H YYNN
DKVM-22U 产品手册
证书
$& '$$
㠠ᇌ单
z YQPSU64#,7. ࠪ频切换ኜ z Y ͜䔚˓册 z Y 米连ટ线 产品连接示意图:
DKVM-22U 产品手册
Q5: 当切换到 PC2 时,计算机仍然显示为 PC1 A: USB KVM 切换器无法用计算机来切换,用户必须用热键或者是按钮来切换.
Q6: 为什么我的电脑不能显示正确的分辨率 A: 请选择控制面板点击外观和主题,点击“改变屏幕分辨率” 和“设置”来调整正确
的屏幕分辨率
如果有任何故障请联系厂家,保存纸箱,包括包装原料
%%$# z 支持音频功能、可以独立切换 ,7. 和声音 z 兼容 8JOEPXT 91 7JTUB .BDY 以上 BOE-JOVY04 z 键盘讯号全模拟,确保开机零失误 z 支持市场上主流无线及多功能键鼠 z 支持市场上主流宽屏幕分辨率 z 造型精巧,内嵌 组 ,7. 线缆 z 支持固件升级
DKVM-22U 产品手册
D-Link SOHO 级桌面型 KVM 切换器
DKVM-22U
用户手册
产品介绍:
DKVM-22U 产品手册
使用者通过DKVM-22U KVM切换器允许用一套键盘、视频显示器和鼠标来访问2台计
算机,KVM转换器提供更多的桌面空间,并且可以省下多个键盘、鼠标和显示器的开
销。
Y)%# 绿Ѝ
Y)%# 插入型配件 ලЍ
Y)%# 凹形接口 ලЍ
YNN 迷你型立体耳声接口 绿Ѝ
Y64#" 凹形类型 Y64#" 凹形类型 YNN 迷你型立体耳声接口 绿Ѝ
A: 如果计算机的 BIOS 不支持 USB boot-up,在计算机启动时,系统无法侦测到鼠标和 键盘
Q2: 为什么计算机 BIOS 的设置是正确的,但是仍然无法侦测到鼠标和键盘? A: 建议用 KVM 切换器上的 USB 直接连接到 PC 上的 USB 口,而不是透过 PCI 卡、Card Bus
DKVM-22U 产品手册
基本配置:
安装后,您可选择“SELECT”按钮或者使用键盘热键功能来指导您在多台计算机 间切换。
键盘热键菜单:
按「Scroll Lock」两次, 您会听到¨滴㛤的一声, 以确定已经进入热键模式。(LED 闪烁)
DKVM-22U 产品手册
在自动扫描模式 ,7. 切换器会在进入下一个端口前停留 秒钟在自动扫描模式鼠标 和键盘控制器有 秒的时间限制. ءจ 1. 在您没有按任何键的情况下,在 4-5 秒之后会自动离开热键模式. 2. 如果是在 BIOS 内设置¨Power On㛤功能, KVM 切换器无法识别计算机是开启或者是
基本功能:
z 通过一套键盘、鼠标、显示器和一个音频来访问多台计算机 z 通过 4&-&$5 按钮或者热键命令来选择计算机、前面板 -&% 指示所选择的计算机 z 自动扫描模式是按照计算机的排序来的 z 支持 47(" 7(" 和多显示器同步,最大分辨率 、支援 %%$ %%$ BOE
产品规格:
̌ঐ ۨ㠈 1$ ၌ɹ 64# ၌ɹ 线䔉 ၌ɹ选择 1$ ၌ɹ -&% 切换
连ટ线
1$ ,7.
છՓ̨
,7.
键盘
连ટ
ཽ标
䕉ࠪ
监䕦ኜ
ࠠ量
ˉʂ -Y8Y)
规ࣸ %,7.6 一个键盘一个鼠标
Ϸ 4FMFDU 按钮或者热键命令 Y 绿Ѝ -&% Y64#" 插入型配件 YNN 迷你型立体耳声接口 绿Ѝ