使用VS2015调试罗云彬的32位汇编语言源代码
在VisualStudio中开发汇编程序

在VisualStudio中开发汇编程序创建⼀个控制台清除默认⽂件选择项⽬属性设置⼊⼝函数设置⽣成依赖项选择在添加源⽂件 .asm.586.MODEL flat, stdcallincludelib user32.libincludelib kernel32.libExitProcess PROTO, dwExitCode:DWORDMessageBoxA PROTO hwnd : DWORD,lptxt: BYTE, lpCaption:BYTE,uType:DWORD .dataNumber DWORD 0text db "shellcode",0.codemain procpush 0push offset textpush offset textpush 0call MessageBoxAadd esp,16call ExitProcessmain ENDPEND main没有关键字变⾊可以装⼀个扩展asmdude解读⼀下上⾯代码的意思.586;指令集 .386-.686 都可以看你需要哪个指令集.MODEL flat, stdcall;模式选择 flat 代表win32程序执⾏stdcall 调⽤约定includelib user32.libincludelib kernel32.lib;导⼊程序包⽤户程序和系统核⼼都是32位ExitProcess PROTO, dwExitCode:DWORDMessageBoxA PROTO hwnd : DWORD,lptxt: BYTE, lpCaption:BYTE,uType:DWORD; 导出windows sdk 函数api 可以直接看 sdk 有那些函数有⼏个参数定义函数声明后⾯调⽤.dataNumber DWORD 0text db "shellcode",0;数据段.code;代码段⼊⼝ main 函数要在项⽬⾥⾯设置⼊⼝位置main proc;MessageBoxA 打印字符 A代表 ascii 输出函数需要4个参数 push4个进去push 0push offset textpush offset textpush 0call MessageBoxAadd esp,16;堆栈平衡;结束进程call ExitProcessmain ENDPEND main。
C++采用visual studio2015或2017编程入门
前言:
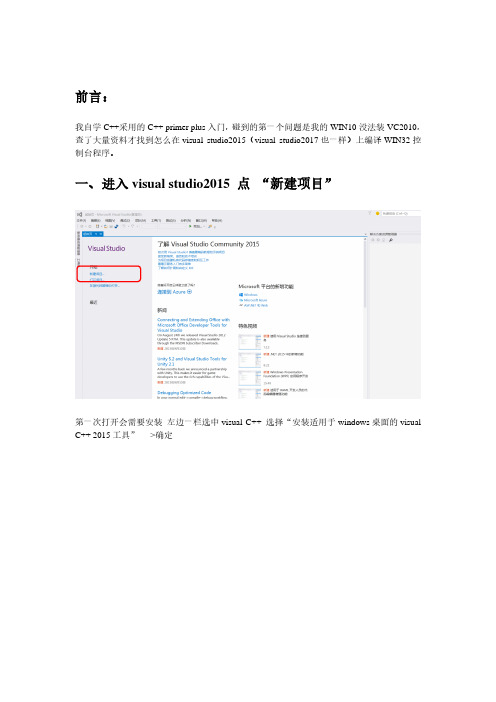
我自学C++采用的C++ primer plus入门,碰到的第一个问题是我的WIN10没法装VC2010,查了大量资料才找到怎么在visual studio2015(visual studio2017也一样)上编译WIN32控制台程序。
一、进入visual studio2015 点“新建项目”
第一次打开会需要安装左边一栏选中visual C++ 选择“安装适用于windows桌面的visual C++ 2015工具”---->确定
安装过程就是全选-->下一步……下一步,需要比较长的时间,完成后再点新建项目
左边一栏选visual C++ 中间选win32控制台应用程序,下方修改名称,位置,解决方案名称和的visual C++ 6.0 的workspace 一样。
下一步
!!!!!!此处注意!!!!!
不勾选“预编译头”
不勾选“安全开发生命周期检查”
勾选:空项目
最后如图所示
完成后即可看到自己新建的项目在红框中
接下来向工程中添加文件:
右击“源文件”——>添加——>新建项
选择C++文件(.cpp)
编写C语言代码,需要把红框中的文件名后缀“hello.cpp”改为“hello.c”,点添加
接下来可以看到“hello.c”文件已经添加进来,双击打开,就可以编辑了,我写了个hello world
的小程序
保存后,将写的程序编译,链接,生成可执行的二进制代码:找到“生成”——>生成解决方案
程序正确的话,下方会显示成功1 失败0
然后执行程序,找到“调试”——>开始执行不调试,
大功告成!。
32位汇编语言07

汇编语言的优点:开发的程序占用存储空间小、运行速度 快等 汇编语言的缺点:与机器密切相关、移植性差,编程烦琐、 对汇编语言程序员要求较高
• 混合编程:汇编语言与高级语言、或高级语言间,
通过相互调用、参数传递、共享数据结构和数据信 息而形成程序的过程 • 汇编语言与C和C++语言的混合编程
3
; mean
堆栈帧
21
第7章 与Visual C++的混合编程
3. 高级语言的发布版本
• 采用调试(Debug)版本时,默认不进行优化 • 采用发布(Release)版本时
参数“/O2”,按照最快运行速度的原则进行优化 (Maximize Speed) 参数“/O1”,按照最小空间的原则优化 (Minimize Size)
堆栈帧
19
第7章 与Visual C++的混合编程
〔例7-4〕计算数组平均值的C++函数-3
; 12 long i,temp=0; mov DWORD PTR _temp$[ebp], 0 ; 13 : for(i=0;i<num;i++) temp=temp+d[i]; mov DWORD PTR _i$[ebp], 0 _d$ = 8 jmp SHORT $L1298 _num$ = 12 $L1299: mov eax, DWORD PTR _i$[ebp] _i$ = -4 add eax, 1 _temp$ = -8 mov DWORD PTR _i$[ebp], eax $L1298: mov ecx, DWORD PTR _i$[ebp] cmp ecx, DWORD PTR _num$[ebp] jge SHORT $L1300 „„
如何使用Visual Studio编程调试ASM汇编语言程序 masm 9

Updated 8/30/2008, for Visual Studio 2008If you've recently purchased Assembly Language for Intel-Based Computers, 5th edition, you probably want to get the software set up so you can start working. This tutorial should make the process easier. If you're in a hurry to get started, you only need to read Item 1.1. Required setup for 32-bit applications2. Building 16-bit applications (Chapters 12-16)3. Project properties settings4. Creating a project from scratch5. Generating a source listing file6. Using the Visual Studio 2005 debugger7. MASM syntax highlighting8. Assembling, linking, and debugging with a batch fileFound an error in this document? Please email me immediately. Except where noted, all instructions in this document apply equally to Visual Studio 2008 and Visual C++ 2008 Express.Required Setup for 32-bit ApplicationsIf you are using Visual Studio 2008 Professional or Team Suite, these products already contain the Microsoft Assembler 9.0. You can skip Steps 1 and 2 and go directly to Step 3.Also, Visual C++ 2008 Express edition Service Pack 1 includes the Visual C++ 2008 Feature Pack, which includes MASM 9.0. (The initial edition of VC++ 2008 express did not.)Step 1: Install Visual C++ 2005 Express Edition, Service Pack 1Click here to download Visual C++ 2005 Express from Microsoft. When you run the Visual C++ setup program, make a note of the location where the C++ compiler is installed. This information will be useful to you later.Step 2: Download and Install the Microsoft AssemblerVisit Microsoft's MASM 8.0 download site. Follow the download and installation instructions on the Microsoft page. If the link is broken, please let us know by email. Note that this MASM download only works with Visual C++ 2005 Express. MASM 8.0, by the way, is functionally identical to MASM 9.0.Step 3: Install the Book's Example ProgramsClick this linkis link to get the latest copy of the book's link libraries and example programs. The examples are stored in a self-extracting archive file that automatically extracts to the c:\Irvine folder. Unless you have some objection to using that location, do not alter the path. (Lab managers: you can designate c:\Irvine directory as read-only.) If you plan to change the installation location, read our instructions relating to changing project propertie s.The folllowing files will be copied into the c:\Irvine directory:Filename DescriptionGraphWin.inc Include file for writing Windows applicationsIrvine16.inc Include file used with the Irvine16 link library (16-bit applications)Irvine16.lib16-bit link function library used with this bookIrvine32.inc Include file used with the Irvine32 link library (32-bit applications)Link16.exe16-bit linkerIrvine32.lib32-bit link function library used with this bookMacros.inc Include file containing macros (explained in Chapter 10)SmallWin.inc Small-sized include file, used by Irvine32.incmake16.bat Batch file for building 16-bit applicationsVirtualKeys.inc Keyboard code definitions file, used by Irvine32.incA subdirectory named Examples will contain all the example programs shown in the book.Step 4: Building a Sample Assembly Language ProgramPreliminary Step: Set Tab Size to 5Start Visual C++ Express, and select Options from the Tools menu. Select Text Editor, Select All Languages, and select Tabs:Set the Tab Size and Indent Size to 5.Opening a ProjectVisual Studio and Visual C++ Express require assembly language source files to belong to a project, which is a kind of container. A project holds configuration information such as the locations of the assembler, linker, and required libraries. A project has its own folder, and it holds the names and locations of all files belonging to it. We have created a sample project folder in the c:\Irvine\Examples directory, and its name is Project_Sample.Do the following steps, in order:1. Start Visual Studio or Visual C++ Express.2. If you're using Visual Studio, select Open Project from the File menu. Or, if you're using Visual C++ Express, select Open, and select Project/Solution.3. Navigate to the c:\Irvine\Examples\Project_Sample folder and open the file named Project.sln.4. In the Solution Explorer window, click the + symbol next to the item named Project to expand it.Double-click the file named main.asm to open it in the editing window. (Visual Studio users may see a popup dialog asking for the encoding method used in the asm file. just click the OK button to continue.)Tip: If the Solution Explorer window is not visible, select Solution Explorer from the View menu. Also, if you do not see main.asm in the Solution Explorer window, look at the tabs along thebottom of the window. Click the Solution Explorer tab.You should see the following program in the editor window:TITLE MASM Template (main.asm); Description:;; Revision date:INCLUDE Irvine32.inc.datamyMessage BYTE "MASM program example",0dh,0ah,0.codemain PROCcall Clrscrmov edx,OFFSET myMessagecall WriteStringexitmain ENDPEND mainLater, we'll show you how to copy this program and use it as a starting point to write your own programs.Build the ProgramNext, you will build (assemble and link) the sample program:●If you're using Visual C++ Express, select Build Solution from the Build menu.●If you're using Visual Studio, select Build Project from the Build menu.In the output window at the bottom of the screen, you should see messages similar to the following, indicating the build progress:1>------ Build started: Project: Project, Configuration: Debug Win32------1>Assembling...1>Assembling: .\main.asm1>Linking...1>Embedding manifest...1>Build log was saved at "file://g:\masm\Project_sample\Debug\BuildLog. htm"1>Project - 0 error(s), 0 warning(s)========== Build: 1 succeeded, 0 failed, 0 up-to-date, 0 skipped==========If you do not see these messages, the project has probably not been modified since it was last built. No problem--just add a space somewhere in the document, save it, and try the Build command again.Run the ProgramSelect Start without Debugging from the Debug menu. The following console window should appear, although your window will be larger than the one shown here:The "Press any key to continue..." message is automatically generated by Visual C++ Express.Congratulations, you have just run your first Assembly Language program.Press any key to close the Console window.When you assembled and linked the project, a file named Project.exe was created inside theproject's \Debug folder. This is the file that executes when you run the project. You can execute Project.exe by double-clicking its name inside Windows Explorer, but it will just flash on the screenand disappear. That is because Windows Explorer does not pause the display before closing the command window.Creating New Projects of Your OwnBefore long, you will want to create your own projects. The easiest way to do this is to copy the entire c:\Irvine\Examples\Project_Sample folder to a new location. Copy it to a folder in which you have read/write permissions. (If you're working in a college computer lab, a useful location is a portable USB drive. Then you can modify the program, build, and run it again.Step 5: Running the Sample Program in Debug ModeIn this step, you will set a breakpoint inside the sample program. Then you will use the Visual C++ debugger to step through the program's execution one statement at a time.1. To begin stepping through your program in Debug mode, press the F10 key.2. A yellow arrow will appear next to the first program statement (call Clrscr).The arrow indicates thatthe statement is next to be executed.3. Press the F10 key (called Step Over) to execute the current statement. Continue pressing F10 untilthe program is about to execute the exit statement.4. A small black window icon should appear on your Windows status bar. Open it and look at thecontents of the Command window. You should see the words "MASM program example" in thewindow.5. Press F10 one more time to end the program.RegistersIf you want to display the CPU registers, do the following: Start debugging the program, then select Windows from the Debug menu. Select Registers from the drop-down list. The bottom window will display the register contents. Right click this window and check the item Flags to enable the display of conditional flags.You can interrupt a debugging session at any time by selecting Stop Debugging from the Debug menu. You can do the same by clicking the blue square button on the toolbar. To remove a breakpoint from the program, click on the red dot so that it disappears.Setting a BreakPointIf you set a breakpoint in a program, you can use the debugger to execute the program a full speed (more or less) until it reaches the breakpoint. At that point, the debugger drops into single-step mode.1. Click the mouse along the border to the left of the call WriteString statement. A large red dotshould appear in the margin.2. Select Start Debugging from the Debug menu. The program should run, and pause on the line withthe breakpoint, showing the same Yellow arrow as before.3. Press F10 until the program finishes.You can remove a breakpoint by clicking its red dot with the mouse. Take a few minutes to experiment with the Debug menu commands. Set more breakpoints and run the program again. For the time being, you can use the F11 key to step through the program in the same way the F10 key did.Building and Running Other ProgramsSuppose you want to run another example program, or possibly create your own program. You can either edit and modify main.asm, or you can remove main.asm from the project and insert some other . asm file into the project.●To remove a program from a project without deleting the file, right-click its name in the SolutionExplorer window. In the context menu, select Exclude from Project. If you change your mind and decide to add it back to the project, right-click in the same window, select Add, select Existing item, and select the file you want to add.●To remove a program from a project and delete the source code file, select the file with the mouseand press the Del key. Or, you can right-click the file name and select Remove.Adding a File to a ProjectThe easiest way to add an assembly language source file to an open project is to drag its filename with the mouse from a Windows Explorer window onto the name of your project in the Solution Explorer window. A reference to the file (not a copy) will be inserted in your project's directory. Try this now:1. Remove the main.asm file from your project.2. Add a reference to the file c:\Irvine\Examples\ch03\AddSub.asm to the project.3. Build and run the project.Here is what you should see in the Console window, except that only your EAX register will have thesame value as ours:When you press a key, the console window will close.Copying a source fileIf you want to make a copy of an existing file, use Windows Explorer to copy the file into your project directory. Then, right-click the project name in Solution Explorer, select Add, select Existing Item, and select the filename.Return to top or read about Project Properties settings.Building 16-bit Applications (Chapters 12-16)Only Chapters 12 through 16 require the building of 16-bit applications. Except for a few exceptions, which are noted in the book, your 16-bit applications will run under Windows XP and Windows Vista.If you plan to build 16-bit applications, you need to add two new commands to the Tools menu in Visual C ++ Express (or Visual Studio). To add a command, select External Tools from the Tools menu. The following dialog will appear, although many of the items in your list on the left side will be missing:Step 1: Create the Build 16-bit ASM CommandClick the Add button and fill in the Title, Command, Arguments, and Initial directory fields as shown in the screen snapshot. If you click the buttons with arrows on the right side of the Arguments and Initial directory fields, a convenient list appears. You can select an item without having to worry about spelling:Click the Apply button to save the command.Step 2: Create the Run 16-bit ASM CommandClick the Add button again, and create a new command named Run 16-bit ASM:Click the OK button to save the command and close the External Tools dialog.Testing Your new 16-Bit CommandsTo test your new 16-bit commands, open the file named 16-bit.asm from the ch03 folder in the book's example programs. Select Build 16-bit ASM from the Tools menu. The following command window should appear, showing the successful execution of the assembler and linker, followed by a listing of all files related to this program:Press a key to close the window. Next, you will run the program. Select Run 16-bit ASM from the Tools menu. The following window will appear, although the contents of all registers except EAX will be different:Press a key to close the window.You have completed the setup for building and running 16-bit assembly language programs.Return to topProject Properties Settings (Optional Topic)We thought you might like to know more about how Visual C++ projects are set up for assembly language programs. If so, we will walk you through the important parts of the project configuration.Assuming that our sample project is still open, select Project Properties from the Project menu. Expand the entry under Configuration Properties. Then expand the entry named Microsoft Macro Assembler 8.0. This is what you should see:Click the entry named General under Microsoft Macro Assembler 8.0. Notice that the Include Paths option has been set to the c:\Irvine directory. This tells the assembler where to find files having a filename extension of ".inc". Here is a sample:Find the Linker entry under Configuration Properties. Select the Input entry, and notice that two filenames have been added to the Additional Dependencies entry. The user32.lib file is a standard MS-Windows file. The irvine32.lib file is the link library file supplied with this book. There must be at least one space separating the file names:Next, select Linker under Configuration Properties, and then select General. The Additional Library Directories option equals c:\Irvine, so the linker can find the Irvine32.lib library file:Select Linker under the Configuration Properties and select Debugging. Notice that the Generate Debug Info option is set to Yes:Select System under the Linker entry. Notice that the SubSystem option has been set to Console:We use the Console setting because it's easy for assembly language programs write output to a text console (Command) window. This is the window you see when running cmd.exe from the Start > Run menu in Windows.Click the OK button to close the Project Property Pages window.Return to topGenerating a Source Listing FilePrior to 7/26/06, the sample Visual Express projects in the book's download file do not generate source listing files. Here's how to change that behavior in a single project:Open the project. From the menu, select Project, select Project Properties. In the list box, select Microsoft Macro Assembler, then select Listing File. Set the Assembled Code Listing file option to$(InputName).lst .Return to topCreating a Project from ScratchYou do not have to create your own projects completely by yourself. Quite frankly, it's a lot of work.We've placed a copy of the Project_sample project in each folder of the book's example programs. You can just add your own program to one of these projects. But here's how to create your own:You can name a project anything you want, of course, but we will assume your project is named MyProject in the following examples, and that you will save it in the c:\temp directory. The commands are a little different, depending on which software you use:Visual C++ Express1. Select New from the File menu, and select Project.2. In the New Project window, select General, and select Empty Project as the project type:You probably will want to leave the Create directory for solution option unchecked.3. Click the OK button to create the empty project.Visual Studio1. Select New Project from the File menu.2. In the New Project dialog (shown in the image below), select Other Languages, select Visual C++, select General, and select Empty Project.3. Give a name to the project and select the location. Do not change any other options.4. Click the OK button.You probably will want to leave the Create directory for solution option unchecked.Both Visual Studio and Visual C++ Express1. Use Windows Explorer or My Computer to copy the file main.asm from the \examples\Project_sample folder into the project folder you must created. (In our example, the folder is named MyProject).2. Back in Visual Studio or Visual C++ Express, right click your project name in the Solution Explorerwindow. Select Add, select Existing Item, and select main.asm. (The file may not show up until you input *.asm in the filename box.) Click the Add button to add it to your project.3. Select Custom Build Rules from the Project menu. You will see a list of Rule files, which will varydepending on which software you are using. Place a check next to Microsoft Macro Assembler:Click the OK button to close this window.7. Next, you need to add some customizations. We will assume you installed the book's files in the c:\Irvine directory. Make all changes shown in the Project Properties Settings section of this document. If you installed the book's sample programs in some other location than c:\Irvine, you'll need to make appropriate changes to the project properties.9. Select Build Solution. If your Output window is similar to the following message, you did everything right:1>------ Build started: Project: MyProject, Configuration: Debug Win321>Linking...1>Embedding manifest...1>Build log was saved at "file://c:\temp\MyProject\Debug\BuildLog.htm"1>MyProject - 0 error(s), 0 warning(s)========== Build: 1 succeeded, 0 failed, 0 up-to-date, 0 skippedReturn to topMASM syntax highlightingWhen a text editor uses syntax highlighting, language keywords, strings, and other elements appear in different colors. Visual Studio and Visual C++ Express can highlight MASM reserved words and strings, as shown in the following example:This won't happen automatically, but you can create a syntax definition file named Usertype.dat that contains MASM keywords. Then when Visual Studio (or Visual C++ Express) starts, it reads the syntax file and highlights MASM keywords.Here are the required steps to set up MASM syntax highlighting in Visual Studio or Visual C++ Express:1) Download the Usertype.dat file given here to a folder in which you have read/write permissions. If you are using Windows Vista, download to My Documents, or C:\temp, or any folder that doesn't have security restrictions.2) Copy Usertype.dat to the C:\Program Files\Microsoft Visual Studio 9.0\Common7\IDE folder. If you are using Windows Vista, it will display a verification window before copying the file.3) Open Visual Studio or Visual C++ Express, select Options from the Tools menu, select Text Editor, and select File Extension. On the right side of the dialog (shown below), enter asm as the extension, select Microsoft Visual C++ from the Editor list, and click the Add button. Click the OK button to save your changes.Close Visual Studio and restart it. Open your project and display an ASM file. You should see syntax highlighting in the editor.Return to topAssembling, Linking, and Debugging with a Batch FileMany people like to use a Windows batch file to assemble and link programs. A batch file is a text file containing a sequence of commands that execute as if they had been typed at the command prompt. In fact, they are powerful enough to contain variables, loops, IF statements, and so on.The easiest way to run a batch file is to first open a Command window and then type the name of the batch file (along with arguments) at the command prompt. To open a Command window, you must execute a program named cmd.exe. We will make that easy for you.Step 1:Download a ZIP file containing the following items:● A shortcut to cmd.exe, which opens a Command window in the current directory●asm32.bat, a batch file for assembling and linking programs●main.asm, a sample assembly language programThere are two different versions of the ZIP file:●If you're using Visual Studio 2008 or Visual C++ 2008 Express (SP1), click here.●If you're using Visual Studio 2005 or Visual C++ 2005 Express, click here.Step 2: Extract the ZIP file into the c:\Irvine\Examples directory on your computer.Step 3: Do the following:●Copy asm32.bat to any directory on your system path. If you're using Windows XP, you can save itin the asm32.bat on your system path permits asm32 to be a valid command whenever you type its name at the command prompt.●Double-click the cmd.exe shortcut. A Command window should appear.●At the command prompt in this window, execute the asm32 batch file and display its helpinformation by typing the following command and pressing Enter:asm32This file assembles, links, and debugs a single assembly languagesource file. Before using it, install Visual Studio 2008 in thefollowingdirectory:C:\Program Files\Microsoft Visual Studio 9.0Next, install the Irvine 5th edition link libraires and includefiles in the following directory: C:\IrvineFinally, copy this batch file to a location on your system path.We recommend the following directory:C:\Program Files\Microsoft Visual Studio 9.0\VC\binCommand-line syntax:asm32 [/H | /h | -H | -h] -- display this help informationasm32 filelist -- assemble and link all filesasm32 /D filelist -- assemble, link, and debugasm32 /C filelist -- assemble only<filelist> is a list of up to 5 filenames (without extensions),separated by spaces. The filenames are assumed to refer to fileshaving .asm extensions. Command-line switches are case-sensitive.Type the following command to assemble and link a source file named main.asm:asm32 mainYou should see the following messages:Assembling: main.asmThe file main.obj was produced. ..................................Linking main.obj to the Irvine32, Kernel32, and User32 libraries.The file main.exe was produced. ..................................In fact, several files were produced.●main.obj - the object file●main.ilk - incremental link status file●main.pdb - debug symbol fileIf there were errors in the program, you would see error messages generated by the assembler. Here is an example:Assembling: main.asmmain.asm(9) : error A2008: syntax error : myMessagemain.asm(15) : error A2006: undefined symbol : myMessageYou would then open the main.asm file with a text editor (such as Notepad), fix the errors, and run the asm32 batch file again.Although we used a file named main.asm in this example, the asm32.bat batch file willwork for any assembly language file, regardless of the name. The only requirement isthat your assembly language source file have a .asm filename extension.Assembling Programs in Other DirectoriesNo doubt, you will want to assemble programs in various different disk folders, not just thebatch_sample folder used in the foregoing example. All you need to do is copy the cmd.exe shortcut we gave you to your working directory, where your assembly language source files are located. When you double-click to run the shortcut, it will open a Command window in the current folder.Assembling, Linking, and DebuggingIn addition to assembling and linking, you can use the asm32.bat file to launch your program in the Visual Studio debugger. Try the following command:asm32 /D mainIf the program assembles and links with no errors, your program should load in Visual Studio. The first time you do this with a new program, the source code will not appear. All you have to do is press theF10 key to begin debugging, and your program should appear with a yellow band across the first executable line:(Depending on how Visual Studio is configured, you might have to press F8 to do the same thing.)From here, you can step through the program. When you get to the call to WriteString, you can even trace into its code by pressing the F11 key (trace to). When you finish, close Visual Studio.From this time on, when you load the same program in the Visual Studio debugger, your source code will appear right away.Assembling without LinkingOccasionally, you may want to assemble programs but not link them. This happens, for example, when you are creating a multimodule project and you want to assemble each asm file into an obj file separately before linking them into the final exe program. Or, you might be assembling a module to be inserted into a link library (like Irvine32.lib).To assemble a source file only, inser the /C option before the name of the file being assembled:asm32 /C mainYou should see the following output:Assembling: main.asmThe file main.obj was produced. ..................................If you are interested in learning more about how batch file commands work, here are some reference links we found:●: Batch file tutorial●Microsoft TechNet article: Creating Truly Powerful Batch Files, by Brien Posey●Microsoft TechNet article: Using Batch Files in Windows NT, by Troy ThompsonLinks go out of date quickly, but you can google for Windows batch files and get plenty of hits. Return to top。
Win32汇编程序源码级调试

Win32汇编程序源码级调试Win.32汇编程序源码级调试win32汇编语言ff;l沽,-陕速功能强夫的优点都魁被广泛使用的豫闻.无论足在系统编程舒i域.进是在加密解密领域,使用n:编语吉来编写程J_罕丰¨使川汇编诳占硐酞程序都已经成为丁?个程序必矧蛩熟练掌握的技能以前.汇编语言}_{是在DOSF编程的^,员才会偶尔使甩;如令,借助Hutcl-的Masm32软件包和Iczeliim柏~qn32系列救程.汇编语占WindowsF重I{9获得f发展和牡:夫越来越多的程序员尝试II:蛤使用Win32:编束编写裎.Nasrn,Fasm等汇编编译器的发布也给了大宋更多的选拌甚至,也有r方便好州的粜成"发f:境(II)E)RadASM,WinAsm,Eas)Code等,大夫提高了n一编程序睫的做牢奉l空盟给大家介绍的就姓Win32汇编程序的源代码级刖嗣j式M题,.尉为.不像vc++.Delphi等开发工具提供丁方便的潭代码凋试功能.使用Win32汇编晤苦编程没行一个々门的谰试器虽然说RadASM也提供丁简单的调j_jj=功能,但和我们需要的滁代码调试功能还是相差太远,就连最基车的单步跟踪都没有.当然.没有调试器我们也能够想到剐的办法.比如兑刹月{MessageBox米撮示需搿观察的变龄等等;采用汇编代码级别的调试等等.力.法多多,血都可行.却不实际.现fE的Windows程序和原来的DOS程序夫不一样.各种符样的结构和API参数在n:编代码级别将变成雅以|只别的一申地址或者常数.很难眼看出代码的功能.t'L~W:IllUVleft.p~gtX显然蜚比IltOVfXXXXXXXXJ,e好理解得多至,采厢MessageBox来显示变篮更是会使得代码和可执行文件的大小产生无端的膨胀.即使可以采用条件编译来控制最终文件的大小,但代码的大小一点不会减少.而且电没有单步跟踪等等功能所源代码级别的调试绝对足有必要的下面就米分别给大家介绍常用的几种源代码调斌方法及其优缺点.方使大家选用一,SoftlCE调试使用SoftlCE担5{码涮试Win32汇编程序町能是现在夫家使用的最多的办法.原因有几点:同上可以拽到~)ftlCE'阚试的资料.可以凋试系统程序(比如驱动).对源代码谢试提供了很好的支持.使用簖单等等,l盘f是具体的步骤:一块三毛钱(1)更改编译链接选硕.给?1r执f文件傣加渊试信息这一点在本文提到的所有捌玳方式,l,郝垃衙要的.卜的IL~I'式我就不再强调这一点.MI/c/t:uff/ZixxamLINK/dt~bug/de1)uglyf:v.x.obj(2)使用,'%fIICE提供的flillbylll具把pdb格式的嗣试信息转换成SoflICE自己的lllll~州试信息格式.然后加裁进行源码调试.nmsym/translate:d【Ju"'.package.always/8?L-rcP:./load: execute.br~,ak.xe这里有几点衙要说明,山了他用ml/link/,unsym等工具.需要把相关的路径先设置好..本文捉供的删f代码中嗣试用的批处理文件debug.bat坦面的州pmh_--就是J=l=】米r'这个的另外.为r使用lnICE进行删.你当然需先把SoftlCE装好,关1这个女裟口j题可以去1.找资料一上i『I『姐是源码调试的准备[作.至)'具体的渊试命令,快捷键等等大家看看SoltlCE的帮助资料向已解决其实,使用TRW也可以进行源弼阃战.f【=l婀.rHWH能够在Windows95/98/Me下曲使用.现在已羟没自多少程序员还会紧守着这个已经被淘汰的系统.所以这里作升绍有需要的可以参考TRW的帮助文件使用~ftlCE或者I'RW等内梭调试器米进竹调试除错工作是大家在编稷中经常会邋到的事情.在没有源代{玛的情况下,SofilCE调试器是我们手中的核武器,能够帮助我们快速的找出代码出错的地方.不但在用rt级别的调试是个合适的选择.在系统级别的谰试更足我们必备的工其为汇编使川的场合大部分还是和系统_}日关的底层编程或莆对性能要求比较尚的模块所以.熟练掌握SoftlCE凋试器对_r编件员是一个基本要求.不过,对于我们这次讨沦的源代码级别的渊淤而吉.SoftlCE却不是一个豫佳的选择,原凼有}LZ:(1)调试前需要把pdb格式的'阋试信息转换成nlll'~格式的调试信息,步骤繁琐;(2)儒璎采用键盘输入命令操作删试过程.不方便;(3)安装麻烦.配置电麻烦,学习周期长.初学者下容易掌握;(4)不支持代码商亮,支持中文显示.支持宁符蹙撼的撮示等所以.在没有特蛛要求的悄F.需要动不动就搬ⅡjSofiICE调试器当有些M题5;lJ的渊试器解决r的叫候.戕们才需璎用到它了二,OIIyDBG调试OIIyDBG是个32lfit用户级凋试软件,集静态分析代码和动态捌试代码r一身.更是提供了J字符串.显示晒数参数.支持代码岛兜.町姒调j=】=cDI.1,强人的俩什功能等等.他浔OIIyDBG战州:『=}{】热fJ酬试器:管是逆I分析代码,谢解晰,还是脱先等郝是一个强有力的丁.¨,它电提供丁源码缎鹕试的功能.扪对jSuffiCE米潍H有以F优点:町以在问试纳同时舟阅史档资料,以在谰试的M时听rap3,做调试程睁Hlr惜不会影响删的程序的正常逛行等等.所以,采刚OI[yDBG来{16i码调试Win32编程序也是?个不错的选择.刚OIIyDBG打7i成的【1J执行文件.OllyDBG会自动读取谰试信息.匣汇编完r后.通过菜单View/Sourcefiles可以看到和可执行文件相芫的源代码文件.在Soun2efiles窗口中双出肄体的源代码文件就能打开柑应的文件¨歼r源f℃砌文件后.你单步调试的时候窗II中的源代码史件当前行也会跟着移动.如果源代码文什tIr的inbi随着你的涮试1f『j移动.11j以往DebuggingOptions对|舌框1"的cI'u进项负巾选巾Sy]~ehronizePd)Brt~ewithCI'U|殳髓另外,如果你觉得窗门太多.cI'L窗口和Source街¨平铺排州很占屏幕空间的话,你也可以荧掉u,e窗口在c窗门的层上角的Disassemhler子窗口中会发现上而商?排标题头区域.艟示着Addreas,flexDump,Disassembly,Comment字样f如果没币『找到这个.单击鼠标右键.在弹出菜单巾选择Appearance/ Showbar就可以显示)单击Cotnmetlt区域会发现可以fE Commen[,~mrce,Profile背之间切换,当切换纠SoureeHl』就会自动显示源代码文件,每一个ji《【代码行都和相应的反汇编行对应l往一起.在捌试的过程中,正在调试的反:编衍对应着邢一q源代码就清二楚了.相对于SofilCE调武器,OllyDBG身材/J'~5,方便携带;电容易学习一f:手更快,适合初学莆使用各种各样的插件给脉奉就根方便的OIIyDBG添加了更多的功能.用级别的调试功能也丝毫;比SdtICE逊色而且,作为一个rmg3程序.可以在调试的过程中随时把发现的问题在电脑上记录下米(比如通过记事率程序),不需嬖像SoftlCE一样.在调试的时候同时准备好纸和笔.边调试一边在纸L做记录.过,O|1yDBG的激码级j周斌功能本来就足一个辅助功能.所以有很多不方便的地方:f11反编代码支持岛兜.似{l5【代码1,盘持高亮;【2)能自动识别局部变椭.4:能舔加表达式监视局部变量.支持结构体变量的识别;(不芷椅局部变量可能是和in]b这种捌信息宵天采,因为p,lb格泄仃公开,OIIyDB(;址利用散被提供的dbg1.dpdll芷仆束i棼取pdl,丰}}的捌斌佾息.佩足dbghelp.dll小点持局部尘蚺的姒别)世的来说,Olly1)BGljI;c码蒯试是朴4力矩,虽然呵以通过编写插件米加强功能(比如,可以编写一个捕件束分离谰歧;}{} 和敲嗣试程序).似是太麻烦,人寐迁是把它作为一个通用的fill绂蝴试器使用吧!三,VC+十调试采川VC++来进行糠码圾蜊试能够提供比I面两个软件多的功能.你就好像是调试C++程睁一样.可以查看伞膈变蚺和局部变量的值.可以添加雌视表达式.可以设置高缎端点,吖以便的肖香变蛩的结构等等使用VC++进行源码宝醍调试足找人词太家推荐的?种调试方式侧试的步骤很简单.先成渊试信息.然后把可执行文件拖到VC十+的界面j一打开,接着再把你需要设置断点的源文件拖到VC++的界丽¨J开(然也J叮以通过菜单的打开史件等命令米扣歼可执行文件和源文件,似我认为拖动更方便一一些).现在就可以湎过设置断点.添加雌视变量等开始.阏试渊试的过程中可以在V ariab|e~,面板L{J的l~xuds页面墼而行到当前所处幽数的局部变量.仝局变量你可姒在Watch 面板照呵添加查看VC++会自动识别变由I=结构,并W以艘开查看结构的成员.非常方便当需查看字符串瘦世时.可以通过在变量名字前添加&字符来掘示符串的内容.并R,在Watch画板中町以输入表达式监视魅个表达式的值的变化,迁支持一些调试变量.比如.输入@eft就可随时查看函数的调用情况,相当于嗣用Gef1astErrur晒敬另外,Vc++j丕支持高级断点.鼠标悬浮查看变量值.多线程谪试等等总之,源码级调试Win32汇编程序应该有的功能Vc++都有,除丁不能埘斌马Ⅸ动程序外所以.建汉人家在嗣酞的时候选择它.通过本文提供的例子代码大家可以谰试一下,体会到VC++源码级调试的强大功能和使用的方便当结束调敞关闭Vc++的时候.Vc++会提示是否把作区信息保存到一个扩展名为opt的文件当qi,这时选择保存可以在下次钉开{周试的时候保留断点,监视变量表达式等信息,方便调试推荐大家采用VC++柬源码调试,使用方便,功能强大.在源码级调试的时僻具有很多优点:鲤IlJ完美支持lll格式的删佰息:(2)住rirlg3程序的优点,可以刚鼠怀操作.简单易学:【3)n『【动刚局郎变,可以自动识别变量的结构类型:(4】强火的变量监视功能.可以添加变摄表达式来监视,可以用格式化力式显示变世的值;l5)强大的断点功能,备种备样的高级断点使得你的调试工作事半功倍;[6)可以随时在源码调试和反汇编代码调试之问田换;(7)可以直接把鼠标指向某个耍查看的变量或者寄存器来观察它们的当前值还有一些其它优点大家在阚试的过程中慢慢体会.不过.Vc++也有自己的缺点,不能够硎试系统内核程序.不能够高亮显示代码等等.四,RadASM简单断点调试RadASM是一个专门为Win32汇编程I竿员准备的集成开发环境.提供了代码编辑资源编辑等功能.湎过工程文件很方便的把所有的源文件组织在一起.编译连接等鼠标点几下就可以完成,不再需要自己手动输入命令行编译代码和链接代码.另外,RadASM还有代码高亮,参数提示,变量自动完成等等方便的代码编辑功能,极太地加快了我们开发的速度.做为一个集成开发环境.RadASM自带了一个简单的|阍试功能.通过在源代码中包岔'd;tadASM\masm\inc\radbg.inc文件.我们可以在源代码中需要的地方垃景断点(通过菜单"编辑/断点/开关端点"来没置),在断点处徭加{《;娶观察的变_睦名字(通过菜单"编辑/断点/添加变量"来殴暨)然后从RadASM中运行程序.当运行到断点处,程序会被中断下来.显示所有寄存器的值和所观察的变量的值.使用很简单.但是功能太弱,莲一个调试器最基本的单步jJ笥试功能都没有,基本上不能称之为调斌器.如果大家手头没有别的调试器可以考虑试试,能够发现一些简单的错误.而目是RadASM自带的一个功瞻.完全免费使甩五,VkDebug调试VkDebug是Maim32软件包自带的调试器.说是涌试器.其实只是一个宏攮合.提供了一些宏插入源代码中可以在程序运行的时候显示变蕾的值使用时储要在源代码中添加下面两行包音语句岛然后就町以在源代码的陋盘位置捕^¨IIJu提供的者使得在程序运行的时候打印出你想观察的变世的涵越澧置DBGw【Nj)EBUG_uN0r,J以移去霞,置DBGWIN-FXTJNFO勾l可以在输出变射值的同时输出文件名和韶}【代码行信息.比如,在j8;【代码中添加如下行;口vgOg.OFFFFABcDh一剐mHex:eex,exvaluePrhtLineimS";n.szMessage会在运行的时候佩示如r的输出M哺辨-M酩Idbdemo.詹48l具体的宏使用可以参考Mo~sm32软件包中的dbgwinhip帮助文件和vkdebug于目录中的源代码和例f代码.如果你不想打断程序的运行,只是恕看看程序运行中间的过程有没有出错什么的.町以用到这个VkDebug宏集合使用起来比MessageBox或者OutputDebugstring还是方便一些.不过少r步调试功能,很多ffq错误发现不丁.发现了错误也不能够定位代码行.所以.年¨RadASM的调试器一样也是一千辅助舯工具.没有别的选择帕削候可以考虑使刷它六,INT3调试当编写一个插人近程线程的程序时,如粜远程线程咀面的代码出错r,你想单步跟踪一下代码看看到底是哪句代码导致了崩溃.这时,采用上面介绍的的办法都起作用.你当然可以在调试器里面插入断点到想观察的代码处.但是不行,根本就不会中断朦因就是因为远程线程的代码是插八目标进程中运行的,栅足你正在渊试fI{f这个进程,所以断点无效而且,远程线程的错洪往往会引起目标进程的崩溃所以,如何在这种情况下调试代码也是我们需要关注的.这里,给大家介绍一种调试的办法就魁在代码中想开始单步跟踪的地方插^im3指令当执行到这条指令的时候,代码会产生异常,然后操作系统显示一个出错信息框,你选择嗣试就可以调用即时澜试器米调斌代码了.如果程序有调试信息.jJl0试器还会自动加裁调试估息.显示源代码产生的异常也会被忽略,习:会影响程序的运行.也不会导致程序的崩溃.但是.如果你没有关联的即时调试器,操作系统就会自动终止--曩薹妒85Xh,㈣州PPP窑用曩一譬曩密●计算椴全与维护(『1M¨i—f{"j(.1AⅥM恻蟊cⅢj0r.程序运行VC++,OlIyDBG,SohlCE都町以作为即时嗣试器捕捉产生的件常.用米'闹试这种情况]的代码运行So[rICE还可以捕捉内核级别的异常使得你可,仃这种方式米l阋试驱动等等内核程序.例f代码中足个在explorer?Ii插人远程线程然后撞乐个消息框的程序..代码中插入丁两条int3指令,会在开始运行的时候产}一个异常.如果有调试器来接管这个异常则会继续运行,然后在远程线程中产生第二个异常,调试器照样能哆接管这个异常.接着开始调试,调试完毕后explorer可以继续正常运行,本例子程序电会正常结柬.不过,这里有一个问题,就是当调斌完毕关闭VC++或者别的用来接管异常的调试器的时候.explorer也会被结束掉.单步调试的功能是实现了.但把excreter结束掉显然不是我们想看到的.其实,这不怪我们,如果调试器提供了分离被谰试进程的功能就可以避免这个问题.但是很遗憾.VC++6.0没有这个功能,OllyDl~C,现在也没有这个功能.VCtrot提拱了这个功能(在调试完毕之后从蠲试菜单选择DetachDebug:gee分离被调试进程).SofiICE则不存在这个问题(要让SofllCE接管异常需要输人命令i3hereOil).所以.推荐大家采用SoftlCE米调试或者来调试.另外.如果采用SofilCE来调试这种代码,为了看到源代码,记得把pdh格式的调试信息先转换成SofllCE能够识别的hills谰试信息,然后通过SymbolLoader把调试信息加载进SofllCE再开始婀试【Nr3澜试的方法只是在有特萋采需要的情况下才使用比如.休需要调试的代码不在非e可执行文件里面.而是在du文件里面或者别的格式的模块琨面.无法通过调试器直接加载凋试,这时候你就需要用到INT3斓试方法.还有Ij面介绍的远程线程的情况,叉或者是动代码的调试等等,这种调试方法都町很好地解决问尉.另外.因为要有调试器来接管这个异常,所以调试前娶保证调试器已经准备好,甭则程序就会崩溃.内{奢程序还会导致Widnows崩溃例子演示为了能靠个匹加清晰形象的r解.下而讲解一个综合使朋V【:++嗣ISofllCE源码调试的例子例予代码是一个简的端【1址滤胁火墙.具体实现细节不必深究代码中有两个带误.嚣先.运行程序,会提示安装驱动失败但是系统信息耐能够娃示驱动已始宦装r通过单步跟踪,我们发.I!l!原来是打开驱动的时候评葑写r一个反斜杠',',导致打开驱动失l股.从而提示安装驱动失败从【摹fI百T以看到,当跟踪剁打开驱jilJ这一句代码的时候. 会发现j医回错误信息"乐统找到指定的文件"驱动寰黻好86巧与-r找不到文件,怎幺回事?通过f原来是指虚的驰动文件名珊rf次跟踪.驱动已经可被Ⅱ『以体会到使甩VC十+'闹试:细检查这一句代码.发现个反斜杠','改正代带的打".通过这个小错℃码的方便了排除了个错,次运行程序发现还是不能按照预期的目的IE确地最示被过滤掉的端口信息使用vc++再次单步调试毪序.找到错代码处,发现从驱动r11读取信息的代码总是退回等,代表没有数据被凄墩movdwByteReturned.0invokeDevIceIOCont_oI.g_hDevice.IOCTL_GETjPjNFO.0.0.\sddrstlplnfO.sizeofstIplnfo,addrdwByteReturned.0._fdwByteReturnedinvoke/nsertlplnfo,addrstlplnfoendifviceh)Control就是币¨驱动程序通信的函数,在参数f1w一圈2SofllCE调试界面ByteReturned返回读取的数据长度现每次返同零,通过匕.1调试动很快的昶f『J记找到了出错代码的位置后记从闭2中我Inf以看H1,原来足凄取r端口信息后_本米城f颤运M凑取成功的怀忠.然后呕心滨取的大小|II丁疏忽.返㈨j-必帔的标志.接荐逗l挺取丁零,所以!=n错丁mOVstatus.STATUS8UFFER"TO0-8MALLxoreaxeaxifStatUS==STATUS-sUCCESSmoveax.fedilPerametsmDeviceloContro1. OutputBufferLength.endifmOv【esi】.IoStatusInform日tion.eax由于status被设置成了错误的值,导致最后返回零字节从这个错误我们可以发现SoflICE调试功能的强大.不但可以调试用户程序,也可以-闹试驱动程守,对源代码级别的调试支持也很好.在编程学当中.很多人大郭分的11~I'.I『叮能都魁花在蒯斌齑锵L面原因很多,其巾有点就是【!I为4;愿意花时闸学调试的技巧,而把时问全部花在调试代码的L而其实.如果能够多学j』一些调试的知识和技巧,住实际调试的时僻能啦节省很多的时间,效率更高,正所谓:磨不误砍柴工!提到了这么多源码级调试Win32汇编程序的办法.推荐大家采用Vc++做源码调试,如果有特殊需要则采用INT3方式来调试,如果调试驱动则采用SoflICE.如果简单的调试几句代码,不想安装VC++和SoftICE等.可以考虑使用OllyDBG.另外.除了上面介绍的这些方法,还有采用WinD—BG或者别的支持源码级调试的调试器的方法都行,步骤方法也是大同小异.大家自己摸索吧!(收稿日期:2005年8月27日)●■'■■■■■■■■■■P■-■tjk-■t-■■■t?■t?■}'k■■—■t■●■t■t ■■●k■■,■●.■.■■.●k●■■}●■●■■■'■■■e■■■'■■■t'●k (上接第82酉)byte【lbTripleDesKey=Convert.FrOmBase64StringfeneryptTripleDesKey)returnrsa.Decrypt(bTripleDesKeyfalse):)2利用rripIeDES算法解密EMIF报文当解密TfipleDES的打¨密密钥之后.我们_J利用该加密密钥解密前面清单7所示的程序中读人的EMIF报文加密结果,而款得原来的EMIF报文.清单9显示的程序说明l『解辔EMIF报文的过程.它与加崭过稚类似,唯一的区另4是使用加密密钥刨建的是解衡器对象.此处再赘述清单9解密EMIF'撤文publicstringDecryptMessage(stringenc忡EmffMessege.byte【】mj:6y)//解密报文,encryEmifMessage表示报文加密后的//Base84格式表示的结果,m_key是对称加密密钥fbvteI1bytEnc=ConveR.FromBase64S1ring(encrypEmifMessage):byte【】bytOut;newbytelencrypEmifMessage.Lengthl:MemoryStreamstmOut=newMemoryStreamIbytOut)://定义输出流.对应bytOutWrite)://定义解赍转换流stmbecrypt.Write{bytEnc.0.bytEncLength)五,结束语本文详细地介绍了EMIF报文的加密解衍的有美技术.文中所有程序在2003中调试完全通过EMIF报文加密解密是EMIF报文安全方面一个重要的组成部分.与EMIF报文数字签名一起构成EMIF框架的安全基础.目前有关XML的加密和数字签名的技术标准仍在不断的完善中.随着技术的成熟.EMIF将广泛地应用于教育系统,实现教育信息资源的共享参考文献I.XMLEncryptionSyntaxandProcessing.http:///TR/xmlenc—core/.20022.CELTS一40—2004EMIF胡范(CD11).http://WWW.'-el№.20043.【黄]JohnPguIMueller着..NEr开发安全解决方寨应用辅程.电子工业出版社.20044.AshishBan,AravindComra等着.c群Web服务高毂辅程一使用.NETRemoting和ASP.NEfF创建Web服务.清华大学版牡.2002(收犒日{9I:2005年9月6日)。
32位汇编语言程序设计上机指导

《32位汇编语言程序设计》上机指导《32位汇编语言程序设计》上机指导 (1)实验一建立windows环境下32位汇编语言开发环境 (2)实验2 指令格式与寻址方式 (4)实验3 数据操作编程 (5)实验4 分支和循环程序设计 (6)实验5 子程序设计 (8)实验6 输入输出程序设计 (9)实验7:字符串操作 (10)实验8:宏结构设计 (11)实验9:混合编程 (12)Windows环境下32位汇编语言开发环境的建立 (13)调试程序Windbg (19)宏汇编命令ML和连接命令LINK常用参数速查 (22)输入输出宏命令 (23)实验1 建立windows环境下32位汇编语言开发环境实验目的:建立windows环境下32位汇编语言开发环境,并熟悉它的使用方法。
实验要求:(1)建立windows环境下32位汇编语言开发环境;(2)熟悉自己建立的开发环境的使用方法;(3)熟悉调试工具的使用实验内容:(1)定制masm32集成开发环境,使之符合教学要求。
(2)分别建立汇编,连接,和汇编&连接批处理命令,能够生成包含调试信息的目标文件,列表文件,以及能够进行调试的可执行WIN32控制台程序。
(3)建立16位和32位汇编语言框架程序。
(4)在自己建立的开发环境下汇编,连接,运行教材中的例3-1和例3-2。
实验步骤:1、安装开发环境运行《32位汇编语言程序设计》教材配套开发环境软件“开发工具.exe”,将MASM32安装在根目录下(例如:c:\masm32)。
接着运行Exmasm32.exe,将其它软件安装在masm32的目录下(例如:c:\masm32)。
建立masm32文件夹中的qEditor.exe和Windbg.exe桌面快捷方式。
2、定制开发环境修改文件msm32\bin\buildc.bat中的内容,使得执行Project\Console Assemble & Link后能够汇编连接可调试的32位控制台应用程序,同时生成列表文件。
VS2015编译原版tightvnc2.8.27源码

注意事项
若VS提示:无法打开包括文件: “TimeAPI.h”,双击错误提示,定位到所有引用该头文件的CPP,注释掉 #include "TimeAPI.h",大概有两处; 若修改了编译模式,例如改为 Release X64,同样要按照第2步添加SDK到包含目录。
请求出错错误代码503请尝试刷新页面重试
准备环境
安装VS20vnc2.8.27源码
开始编译
1)、 修 改 编 译 模 式 打开工程 tightvnc2015.sln,等工程就绪,生成模式改为 Release Win32 ,等工程就绪;
2)、添加 SDK到包含目录 找到工程 desktop 和 tvnserver-app 右击属性,C/C++,常规,附加包含目录,添加(第一行是两个点不能去掉): C:\Program Files (x86)\Windows Kits\8.1\Include\shared C:\Program Files (x86)\Windows Kits\8.1\Include\um
cmake+vs2015的使用方法

cmake+vs2015的使用方法本文介绍了cmake和vs2015的简单使用方法,包括如何创建项目、配置cmake和编译生成可执行文件等内容。
CMake 是一个流行的开源项目,用于生成 IDE 特定的 Makefile 或构建系统。
它可以帮助开发人员更轻松地管理项目的依赖项和构建过程。
Visual Studio 2015 是一个流行的集成开发环境(IDE),用于开发 Windows 应用程序。
下面介绍如何使用 CMake 和 Visual Studio 2015 创建项目。
1. 安装 CMake首先,您需要安装 CMake。
可以从 CMake 官方网站下载适用于您的操作系统的 CMake 版本。
然后,按照提示进行安装。
2. 创建项目打开 Visual Studio 2015,选择“新建项目”。
在“新建项目”对话框中,选择“Visual C++”类别,然后选择“空项目”模板。
输入项目名称并选择保存位置。
3. 配置 CMake在“解决方案资源管理器”中,右键单击项目名称,然后选择“添加” u003e “CMake 目录”。
在“添加 CMake 目录”对话框中,选择“CMakeLists.txt”文件,然后单击“添加”按钮。
4. 构建项目在“解决方案资源管理器”中,右键单击项目名称,然后选择“生成”。
这将使用 CMake 生成项目构建系统。
5. 编译生成可执行文件在“解决方案资源管理器”中,右键单击生成目录,然后选择“添加” u003e “新项”。
在“添加新项”对话框中,选择“可执行文件”,输入名称并选择生成目录。
单击“添加”按钮。
- 1、下载文档前请自行甄别文档内容的完整性,平台不提供额外的编辑、内容补充、找答案等附加服务。
- 2、"仅部分预览"的文档,不可在线预览部分如存在完整性等问题,可反馈申请退款(可完整预览的文档不适用该条件!)。
- 3、如文档侵犯您的权益,请联系客服反馈,我们会尽快为您处理(人工客服工作时间:9:00-18:30)。
第 1 页 共 10 页
使用VisualStudio2015
调试罗云彬的32位汇编语言附属光盘中的汇编源代码
(第三版琢石成器版)
整理:太虚野老
第 2 页 共 10 页
本文介绍使用Visual Studio 2015 调试汇编源代码。以罗云彬的《Windows环境下32
位汇编语言程序设计(最新琢石成器版)》附属光盘中的汇编源代码为例。
1.创建ASM项目
打开Visual Studio 2015,选择新建一个VC++项目。选择“空项目”,输入项目名称,
点确定。
在工程中的“源文件”文件夹新建“.asm”类型的源文件:
在这里会发现不能新建“.asm”类型的文件,选择“C++文件(.cpp)”,然后在文件结尾
加上扩展名.asm。
第 3 页 共 10 页
现在项目和源文件都有了,但是这毕竟是个VC++的空项目,VC++项目在默认情况下是
不会编译.asm类型的源文件的。所以你点击“生成解决方案”发现根本什么都没有生成,
Debug文件夹是空的,就会出现这样的现象。
事实上在创建源文件时,可以使用任意格式的源文件。例如使用文本文件:
第 4 页 共 10 页
要经过下面两步设置。
第一步,右击解决方案选择“生成依赖项”→“生成自定义”:
把“MASM”那项勾上,确定。
第 5 页 共 10 页
第二步,右击你创建的.asm源文件,选择属性,在配置属性->常规->项类型下拉菜单
中选择“Microsoft Macro Assembler”。这样就指定了你源文件的类型是.asm格式的,如
果不指定默认就是按照.cpp也就是c++语法去编译自然是行不通的。
设置这些之后还要去修改项目配置,这样程序才能得以运行。这包括是否连接其他的库
文件(.lib)、是否调试、子系统的原型环境。这些全部都在项目属性中设置。打开项目属性
的方法:你可以在刚才右键点 “生成自定义”那里选择最下面的属性,也可以在项目选项
卡里找到“属性”一项然后选择。
选择 配置属性->连接器。
把调试->生成调试信息改为“是(/Debug)”。在Visual Studio 2015中默认是“true”;
把系统->子系统改为“控制台(/SUBSYSTEM:CONSOLE)”:
第 6 页 共 10 页
罗云彬的win32汇编程序设计中,汇编文件中包含了一些后缀名为inc的头文件,这种
头文件在vs的include中是没有的,需要从masm32中引用过来,所以需要添加如下目录:
masm32中的inc的头文件包含在include目录中。为了获得masm32的include目录,
需要单独下载、安装masm32。include目录在 masm32安装目录的根目录下。
有人说为什么lib文件不用添加过来,因为masm中的lib和vs中的lib本来就是一样
的,直接用vs的就可以了,至此就可以编译调试。
罗云彬的win32汇编程序设计中,有一些汇编源代码在Visual Studio 2015中不能识
别断点。例如:附属光盘\Chapter02\Test\Test.asm。
2.调试运行
写好汇编代码之后,“生成”→“生成解决方案”。
生成的可执行文件名为“工程名.exe”,而不是以汇编源代码文件的名字命名。
这里以附属光盘\Chapter04\FirstWindow\FirstWindow.asm为例。
第 7 页 共 10 页
设置断点后,按F5调试。
调试开始后,点击“调试”→“窗口”,可以打开“反汇编窗口”、“寄存器窗口”等:
源代码窗口如下:
第 8 页 共 10 页
反汇编窗口如下:
反汇编窗口必须在调试状态下才能打开。
寄存器窗口如下:
可以看到寄存器窗口打开之后,能看到各个寄存器当前的状态。寄存器窗口必须在调试
状态下才能打开。
如果还要连接其他的系统.lib库文件,在配置属性->连接器->输入->附加依赖项选择
“编辑”,把要链接的库文件名添加进去。
第 9 页 共 10 页
如果需要
系统以外的 .inc文件和.lib库文件,则在配置属性->VC++目录中添加。
添加.inc文件:
添加.lib库文件:
这里以masm32的“include”、“lib”为例。
也可以在配置属性->链接器->常规->附加库目录中把你的系统以外的附加库所在的目
录填上去,这样链接器搜索的时候才能找到附加库在哪。如果已经在配置属性->VC++目录中
添加了系统以外的附加库,则在这里可以不必添加。
第 10 页 共 10 页