ASG5300系列上网行为管理产品详版彩页
华为ASG5000上网行为管理产品解决方案

目录
1
项目挑战&需求
2
ASG产品解决方案
3
场景&案例分享
刚性需求:依法合规
大数据时代,网络安全和信息安全已成为“达摩克利斯之剑” ,国家出台诸多法规,用于保护个人与国家的网络安全和信息安全。
• 数字生活真方便! • 收集信息真全面! • 发表言论真自由! • 盗取数据真简单!
传统类身份认证 营销类身份认证 增强类身份认证 共享网络管理 网络安全防护
审计合规
精准行为审计 网络安全法 151号令 GA/WA3011.1 多方式日志留存
行为管理
细致应用管理 访问权限最小化 动态流量管理 多出口选路 用户行为画像
营销增值
应用缓存 快速IPSec VPN 广告推送 上网数据分析
• 《网络安全法》 • 《GA/WA3011.1-2015(无线非经)》 • 《151号令》 • 《等级保护2.0》 • ··· ···
安全需求:权限最小化
上网过程是一个“黑盒子”,不可见,不可管
用户思维
不禁止即允许
管理者思维
不出事即安全
网页浏览
VPN
游戏
贷款
P2P下载 视频APP 越权访问
股票 黄色网站
• 同时提供多种身份认证方式, 用户自行选择任意一种认证方 式
共享接入管理
共享接入管理,针对私接路由器、使用Wi-FI共享软件和使用随身Wi-Fi等行为进行识别和管理,有效管理NAT场景
共享接入处理机制
放行
时间戳
白名单
UA识别
流量接入
应用特征
终端总数
阻断
Flash Cookie
H3C智能管理中心宣传彩页V2[1].00
![H3C智能管理中心宣传彩页V2[1].00](https://img.taocdn.com/s3/m/1157f7ec856a561252d36f70.png)
H3C智能管理中心宣传彩页随着网络的发展,其作用已经不仅是简单的互连互通,通信、计算、应用、存储、监控等各类业务应用和网络的融合,促使网络成为承载企业核心业务的平台,网络运行的安全、稳定、高效直接决定企业核心业务能否顺利开展。
同时,网络的运营和管理也从“网络资源运营”向“信息服务和流程服务”转变,从“粗放的规模运营和管理”向“精确管理和精益运营”转变。
这些都对网络管理和运营提出了新的挑战。
为了能够系统的解决目前网络运营、管理中存在的问题,凭借对网络管理的深刻理解,杭州华三通信技术有限公司推出了新一代的管理系统:H3C智能管理中心(H3C Intelligent Management Center,以下简称:H3C iMC)。
H3C iMC以业务应用流程模型为核心,采用面向服务(SOA)的设计思想,按需装配的组件化结构,为客户提供业务、资源和用户的融合管理解决方案,帮助客户实现业务的端到端管理。
通过H3C iMC能够灵活组织功能组件,可以形成直接面向客户需求的业务流解决方案,从根本上解决管理的复杂性问题。
1 产品特点H3C iMC从根本上颠覆了传统网络管理软件的设计思想,以开放的技术路线和融合管理用户、资源和业务三大网络要素的理念为基础,最终向客户提供了一个个面向具体需求的业务管理流程,从而把客户从繁杂、无序、割裂的管理工作中解脱出来。
H3C iMC系统的主要特点有:•业务流程(Business Process)传统网络管理产品往往提供给客户的是面向故障、性能、安全、配置等一个个割裂内容的工具软件,但如何利用这些工具和满足客户实际管理需求之间存在着巨大的“鸿沟”,正因为如此导致了业界“有工具,无管理”的现状。
H3C iMC的核心理念在于融合、贯穿各类工具软件,提供给客户的不再是独立的功能工具,而是直接面向客户需求的业务流程(Business Process),由流程来指导管理工作的开展。
•用户、资源和业务的融合管理用户、资源和业务是构成客户IT环境的三个要素,管理系统不应该割裂的仅仅管理其中一部分,否则无法真正落实IT管理的规章制度。
广州博德科技(Broadcom)SA-S500设备安装和配置指南说明书
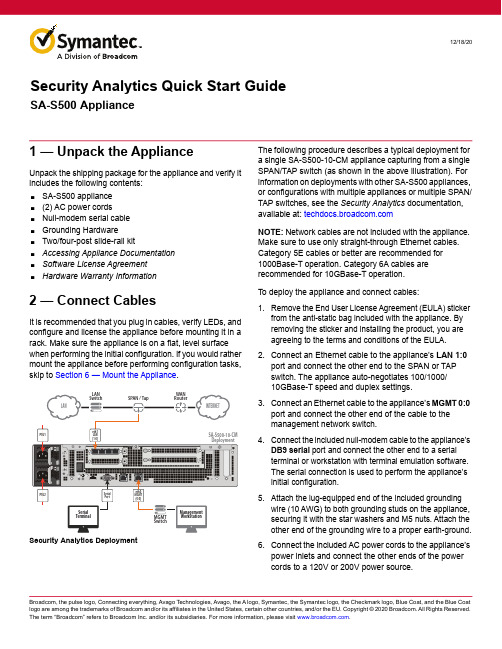
12/18/201 — Unpack the ApplianceU npack the shipping package for the appliance and verify it includes the following contents:⏹SA-S500 appliance ⏹(2) AC power cords⏹Null-modem serial cable ⏹Grounding Hardware⏹Two/four-post slide-rail kit⏹Accessing Appliance Documentation ⏹Software License Agreement ⏹Hardware Warranty Information2 — Connect CablesIt is recommended that you plug in cables, verify LEDs, and configure and license the appliance before mounting it in a rack. Make sure the appliance is on a flat, level surface when performing the initial configuration. If you would rather mount the appliance before performing configuration tasks, skip to Section 6 — Mount the Appliance .The following procedure describes a typical deployment for a single SA-S500-10-CM appliance capturing from a single SPAN/TAP switch (as shown in the above illustration). For information on deployments with other SA-S500 appliances, or configurations with multiple appliances or multiple SPAN/TAP switches, see the Security Analytics documentation, available at: NOTE: Network cables are not included with the appliance. Make sure to use only straight-through Ethernet cables. Category 5E cables or better are recommended for 1000Base-T operation. Category 6A cables are recommended for 10GBase-T operation.To deploy the appliance and connect cables:1.Remove the End User License Agreement (EULA) stickerfrom the anti-static bag included with the appliance. By removing the sticker and installing the product, you are agreeing to the terms and conditions of the EULA.2.Connect an Ethernet cable to the appliance’s LAN 1:0port and connect the other end to the SPAN or TAP switch. The appliance auto-negotiates 100/1000/10GBase-T speed and duplex settings.3.Connect an Ethernet cable to the appliance’s MGMT 0:0port and connect the other end of the cable to the management network switch.4.Connect the included null-modem cable to the appliance’sDB9 serial port and connect the other end to a serial terminal or workstation with terminal emulation software. The serial connection is used to perform the appliance’s initial configuration.5.Attach the lug-equipped end of the included groundingwire (10 AWG) to both grounding studs on the appliance, securing it with the star washers and M5 nuts. Attach the other end of the grounding wire to a proper earth-ground.6.Connect the included AC power cords to the appliance’spower inlets and connect the other ends of the power cords to a 120V or 200V power source.Security Analytics DeploymentSecurity Analytics Quick Start GuideSA-S500 ApplianceSA-S500 Appliance ConfigurationsThe SA-S500 is available in the following appliance configurations with the indicated port enumerations.3 — Power On the Appliance and Verify LEDsTo verify the appliance is operational:1.Confirm the appliance’s power cords are securelyconnected to a power source.2.If the appliance does not automatically power on, pressthe rear soft power switch.NOTE: The state of the appliance’s soft power switch (on or off) is retained when power is removed. This may necessitate pressing the power switch when reapplying power to the appliance.3.As the appliance boots, verify the following:⏹The power LED turns amber.⏹Near the end of the boot cycle, the Power LED alternates between amber and green, indicating an unconfigured state.⏹After the boot cycle has completed, the LCD panel displays information about the appliance, such as model, serial number, and IP address, which can be scrolled with the front-panel arrows.⏹Following the initial configuration and licensing, the Power LED turns green.During operation, the front-panel status LEDs indicate the following states:4 — Perform the Initial ConfigurationYou must have the following network information to initialize the appliance:To perform the initial configuration for the appliance:1.Confirm the appliance’s DB9 serial port is connected toa serial terminal or workstation with terminal software.2.Open a terminal emulation program, such as MicrosoftHyperTerminal®, PuTTY, Tera Term, or ProComm™,and configure it to use the following settings:LED Color DescriptionPower StatusOff Powered off or no power present Amber BootingAmber/green alternating Not yet initializedGreenPowered on and configured System StatusOff Powered off or no power present Green NormalAmber System fault or not yet licensed Amber blinkingCritical fault⏹Appliance IP address ⏹Subnet mask⏹Primary DNS server IP address⏹Link settings (speed and duplex)⏹Default Gateway IP address⏹Admin ID and password⏹Baud rate: 9600 bps ⏹Data bits: 8⏹Parity: none ⏹Stop bits: 1⏹Flow control: none3.Power on the appliance (if it is not already powered on)and log in to the command-line interface (CLI) withdefault credentials: admin | Solera4.Configure the management IP address, netmask, andgateway with the following CLI command, specifying the netmask in dotted-decimal format (255.255.255.0): sudo cfg _ bond _ interface.py -i eth0 -n<IP>/<netmask> -g <gateway>5.When prompted, enter the sudo password: Solera6.Open a browser, navigate to the address just specified,and log in with default credentials: admin | Solera7.When prompted, accept the EULA.8.On the Initial Configuration page, configure the following:hostname; IP address, mask, and default gateway; up to three DNS servers; date, time, and time zone; interface language; and root and admin passwords.NOTE: For more information, see the Initial Settings topic in the Security Analytics documentation, available at: 9.Click Save. If there are no errors, you are prompted tolicense the appliance.5 — License the ApplianceTo license the appliance:1.After completing the initial configuration, you areprompted with the License Details dialog.NOTE: You can also update or change an existinglicense. To do so, select Menu > Settings > About and then click License Details.2.Retrieve your license key from the Broadcom SupportPortal (/security), as instructed in the eFulfillment message from Broadcom.3.If your appliance has Internet access, do the following:⏹Under Retrieve License, enter the License Key andclick Send Request.⏹If applicable, select the license type.⏹The appliance sends the license key and license seedfile to the Symantec license server, which generates the license file (license.tgz) and returns it to the appliance, which automatically reboots.4.If your appliance does not have Internet access, do thefollowing:⏹Click Download DS Seed to download the seed file(dsseed.tgz) to your workstation.⏹On a workstation with Internet access, go to:⏹Type the appliance’s license key, upload dsseed.tgz,and click Submit.⏹If applicable, select the license type and click Submit.⏹Save the license file (license.tgz) to the workstation.⏹Return to the License Details dialog, click Browse, andselect license.tgz. The license is uploaded and theappliance automatically reboots.5.Once the appliance has rebooted, select About>License Details to verify the license.6.Click Download to save an archive copy of the licensefile (license.tgz). Store this file in a secure location that is not on the appliance.6 — Mount the ApplianceThe slide-rail kit included with the appliance allows it to be mounted in a 2- or 4-post equipment rack. The slide-rail kit includes the following parts:NOTE: Installation of the slide rails requires an M4 nut driver or adjustable wrench and a #2 Phillips head screwdriver. If you are working alone, a mechanical lift is also required. NOTE: The following procedure documents how to install the appliance in a 4-post equipment rack. For comprehensive information on rack-mounting the appliance, including other configurations, see the S-Series WebGuide, available at .Rack Warnings and Precautions CAUTION! Before mounting the appliance:⏹Power off the appliance and disconnect all cables.⏹Verify that the weight of the system does not exceed therack’s fully populated weight limit. For more information, refer to the manufacturer’s instructions included withthe rack.⏹For weight stability, load the rack from the bottom up.⏹Read the “Rack Mount Warnings” section of the Safety and Compliance Guide .⏹Take adequate safety and grounding measures to avoid creating an electrical shock hazard and to prevent bodily injury.⏹The appliance is heavy. A two-person lift or mechanical aid is recommended to lift the appliance from the carton and install it in the rack.⏹Do not place objects on the appliance or use it as a work surface. Its mounting hardware does not support additional weight.Attach the Chassis Rails to the ApplianceThe slide-rail assemblies come pre-assembled with the inner chassis rails inside the slide rails. The chassis rails attach to the appliance chassis. The slide rails are installed⏹Fully extend each slide rail by sliding out the chassis rails until they reach the stop.⏹Press the release tab on the chassis rails and slide them all the way out.⏹The chassis rails are symmetrical and can be attached to either side of the chassis.2.Attach the two chassis rails to the appliance:⏹Align each rail to the mounting posts on each side of thechassis.⏹Slide the rail toward the rear of the chassis until the mounting posts snap into place.⏹Secure each inner rail to the appliance with one M4x4L screw.3.Test the slide-rail release latches. They should movesmoothly in both directions with minimal effort.4.Set the appliance aside in a safe location.Install the Slide Rails in a 4-Post RackFor installation in 4-post equipment racks, the slide rails use the Bracket_A and Bracket_C assemblies.To install the slide rails in a 4-post equipment rack:1.Assemble the two slide rails:⏹Loosely attach Bracket_C to the Bracket_A assembly.⏹Secure the brackets with three M4x5L screws, insertedthrough the slot in Bracket_C and screwed into three holes in Bracket_A.⏹Make sure the screws are equidistant from each other so the load will be evenly distributed on the rail. Do notyet fully tighten the screws.⏹The precise attachment location of the side-mounting screws will depend on how far Bracket_C will extend or retract to fit the rack. It may be necessary to removeBracket_C from Bracket_A to determine the proper installation length.2.Install the assembled slide rails in the 4-post rack:⏹Secure Bracket_A to the outside front of the rack with two M6 rack screws. Do not yet fully tighten the screws. You will do so after the appliance is installed in the rack.⏹Extend or retract Bracket_C to align with the outside rear of the rack. Secure the bracket with two M6 rack screws. Do not yet fully tighten the screws. You will do so after the appliance is installed in the rack.⏹Tighten the three side-mounting M4x5L screws, securing Bracket_C to Bracket_A, for each slide rail.Bracket_CBracket_A3.Inspect the installed slide rails:⏹Verify the slide rails are even and installed at the same level in the equipment rack.⏹Make sure the slide rails are free of defect and damage. Make sure there is no debris in the slide rails.⏹Extend and retract the slide rails to verify smooth operation and slide-stop operation.Install the Appliance into the Equipment RackTo install the appliance in the equipment rack and verify slide-rail operation:1.Align the chassis rails attached to the appliance with theslide rails in the rack and slide the appliance half-way into the rack.2.Press the release tabs on the chassis rails to slide theappliance all the way into the rack.3.Slide the appliance out of the rack, far enough to accessthe rack screws. Fully tighten the M6 rack screws securing the slide rails to the rack.4.Verify the slide-rail operation:⏹Press the release tabs on the chassis rails to lock and unlock the appliance in place.⏹Push and pull the appliance to verify smooth movement across the entire slide range.⏹Carefully pull out the appliance all the way to verify the slide-stop functionality.5.Gently push the appliance all the way into the rack andtighten the captive thumbscrews on the rack ears to prevent the appliance from sliding out of the rack.6.Verify the appliance is securely installed in theequipment rack.7.Reconnect the cables as documented in Section 2 —Connect Cables and verify the appliance is functioning as in Section 3 — Power On the Appliance and Verify LEDs .7 — Next Steps⏹If your Security Analytics system includes externalstorage, install the storage arrays per the instructions in the SA-J5300 Quick Start Guide or SA-SM-48T Quick Start Guide , available at: ⏹For additional configuration instructions for SA-S500 appliances—including cabling to storage arrays, and RAID array settings for Capture and Indexing—see the SA-S500 Configuration Guide , available at:Symantec Technical Support⏹For Symantec technical support, case management,licenses, and product downloads, go to /security Security Analytics Help and Documentation⏹For Security Analytics help, in the web UI selectSettings > Help > [language].⏹For Security Analytics software documentation, go to and type “Security” in the search field, then click Security Analytics .Appliance Documentation⏹For Symantec appliance documentation, go to and type “Appliances” in the search field, then click Hardware Appliances .。
ODN系列产品彩页(中国市场专用)
华为ODN系列产品目录
EasyODN
作为FTTH数据传输的承载通道,ODN直接左右着FTTH的系统性能、可靠性和升级潜力。华为可提供全 系列的ODN 产品,并根据运营商的需求,提供快速定制服务,全面满足运营商ODN网络建设需求。
FTTH系统由局端机房设备(OLT)、用户终端设备(ONT)和光配线网(ODN)三个部分组成。作为FTTH系 统的重要组成部分,ODN是OLT和ONT之间的光传输物理通道,覆盖了从OLT机房到用户ONT的20公里甚至更 远的范围,通常由光纤光缆、光连接器、光分路器以及安装连接这些器件的配套设备组成。
光缆接头盒产品......................................... 39
帽式光缆接头盒 ........................................................ 40
附件 ........................................................... 41
在产品方面,华为可提供全系列的ODN产品,满足运营商针对不同场景的建网需求,轻松实现最优组 网方案。
1
华为ODN系列产品目录
EASYODN
z 快速部署
基于长期的工程施工经验累积,华为致力于从产品设计及工程技术等方面提高施工效率,从而帮助运 营商实现FTTH网络快速部署。如外径最小的气吹光缆实现最高管道利用率以及业界首创工程界面设计分纤箱 等人性化的入楼、入户产品设计等。
电话: (0755) 28780808 邮编: 518129
版本号: M3-308130205-20110610-C-1.0
华为技术有限公司华为ODN源自列产品目录华为ODN系列产品目录
ASG5000系列上网行为管理产品白皮书
华为ASG5000 系列上网行为管理产品技术白皮书华为ASG5000 上网行为管理产品技术白皮书目录目录1概述 (1)1.1行为管理产品产生 (1)1.2行为管理产品简介 (1)1.3行为管理设备的使用指南 (2)2行为管理设备的技术原则 (3)2.1行为管理的可靠性设计 (3)2.2行为管理的性能模型 (3)2.3行为管理组网能力 (4)2.4行为管理路由特性 (5)2.5链路负载均衡 (5)2.6服务器负载均衡 (5)2.7地址转换 (6)2.8动态域名服务 (6)2.9VRF 路由 (7)2.10入侵防御 (7)2.11病毒防护 (8)2.12SSL 网站解密 (8)2.13无线非经 (9)2.14双因子设备管理 (9)2.15三权管理 (9)2.16行为管理系统管理方式 (9)2.17身份认证 (10)2.18应用识别 (10)2.19IPv4 一体化策略 (10)2.20流量、时长限额 (11)2.21防私接路由 (11)3ASG5000 系列行为管理技术特点 (11)3.1高可靠性设计 (11)3.2丰富的用户认证 (14)华为ASG5000 上网行为管理产品技术白皮书目录3.3高精度的用户审计 (14)3.4精细化的用户流控 (16)3.5领先的合规维护 (17)3.6丰富的攻击防御手段 (18)3.7优秀的组网能力 (19)3.8完善的日志系统 (21)4典型部署 (23)4.1网桥部署 (23)4.2路由部署 (24)4.3旁路部署 (24)华为ASG5000 系列上网行为管理产品技术白皮书关键词:ASG、SSO摘要:本文详细介绍了华为ASG5000上网行为管理产品的特点、技术特性和部署模式。
1 概述ASG5000 系列产品,是业界应用识别最丰富,威胁防护最全面的上网行为管理产品。
该系列产品提供URL 过滤、应用行为控制、流量管理、数据防泄漏、恶意软件防护、互联网行为记录等多项功能,为企业机构提升员工工作效率、营造安全办公环境、以及法规遵从提供了一体化的解决方案。
网御上网行为管理LeadsecC5000完整版标底V5.0

★支持密码问题方式恢复设备管理平台登陆口令功能,且不会丢失原有配置,以便于忘记密码后重新设置密码
要求提供界面截图
支持对设备进行恢复出厂配置操作
提供ping、tracert等网络诊断工具和手段进行网络诊断工作
支持存储介质到达自定义百分比时,自动邮件告警功能
注:其中“★”部分为必须满足项。请根据投标方应答要求详细应答。
技术指标
指标要求
投标方应答
硬件指标
2U机箱,冗余双电源
吞吐量≥1.5Gbps
并发会话数≥1,000,000
每秒新建连接数≥30,000
转发时延≤0.1ms
至少支持8*10/100/1000M自适应电口,4个SFP
部署能力
支持路由、透明(需支持多桥组)、旁路三种部署方式
要求提供界面截图
支持对每用户、每用户组的会话连接数限制
支持基于5元组及基于时间的ACL应用
支持二层及跨三层IP+MAC绑定
★支持对ARP病毒攻击的实时检测,提高网络稳定性
支持检测内网中IP冲突行为,并能给予告警提示,快速定位冲突PC
支持检测内网用户私接DHCP服务器,规范网络使用
要求提供界面截图
支持基于用户身份的黑名单
支持SYN Flood、UPD Flood、ICMP Flood、ARP Flood等攻击防护
★支持IPsec VPN功能
要求提供界面截图
★支持L2TP VPN功能
要求提供界面截图
★支持对特权用户提供免审计Usb-key功能,以解决过度审计的问题
要求提供界面截图
高级网络应用
支持静态路由协议
支持基于源地址和基于接口的策略路由
UAG3000-CE上网行为管理彩页

全面识别、准确控制
协议识别业界最全,可识别超过1000种协 议,可 对 各 类 P2P/IM、流 媒 体、炒 股 软 件、网络游戏等多种应用识别和分析。创 新性的将深度流检测技术(DFI)与深度 包检测技术(DPI)完美结合,可精确识别 各种P2P应用与未知、加密的P2P应用,带 宽控制粒度达到十几K。在URL过滤方面拥 有业界最大的、持续更新的URL分类库, 方便有效的实现对WEB访问的灵活控制。
产品订购信息
项目 主机 主机特征库 主机特征库 管理平台
描述
备注
DPtech UAG3000-CE 交流主机,自带协议库 必配
升级-3年、病毒库升级-1年
UAG3000-CE,病毒库升级-1年
选配
UAG3000-CE,协议库升级-1年
选配
DPtech UMC 统一管理中心(UAG3000-CE专 用版)管理软件。
网关模式、网桥模式、透明模式和旁路模式
支持对近千种网络、应用协议的识别 支持基于流量走势、应用排名、用户排名、连接数排名等多维度的报表
支持对各种P2P协议进行基于用户的细粒度管理和控制,如迅雷、BT、eMule、 PPLive、QQLive等
支持对网站访问、论坛、网络游戏、Web访问、炒股、在线影视等各种行为和应 用进行识别、记录、审计、管理 支持对P2P/IM、邮件等行为的识别、记录、审计、管理
网吧,工作效率直线下降。UAG3000-CE通过应用控制、网址过滤、内容过滤等方法,对与工 作无关的上网行为进行控制,并且可以区分不同的用户/用户组、时间段等条件,从大幅提升 工作效率。
5 华为ASG2000上网行为管理产品技术培训胶片
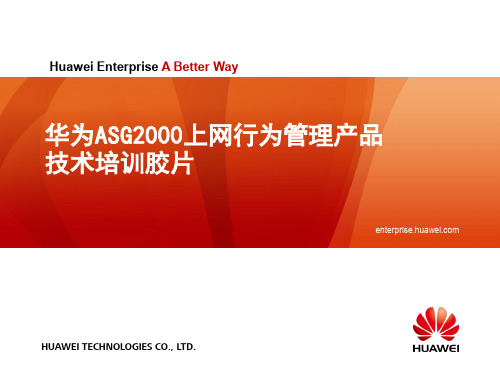
Huawei Enterprise A Better Way
ASG2100/ASG2150/ASG2200
正面图
背面图
HUAWEI TECHNOLOGIES CO., LTD. Huawei Confidential Page 5
Huawei Enterprise A Better Way
ASG2600/ASG2800
数据中心
Radius服务器 ASG设备 ASG设备 LDAP服务器 TSM服务器 AD服务器 AD插件
ASG设备
ASG Manager
日志服务器
SWG SWG SWG
SWEB SWEB SWEB
日志采集器 日志采集器
(X86卡/PC服务器)
升级服务器
企业内部网络
终端机器 终端机器 终端代理 终端代理 此种对象为外部服务器 终端机器 终端机器 AD脚本 AD脚本 终端机器 终端机器
正面图
背面图
HUAWEI TECHNOLOGIES CO., LTD.
Huawei Confidential
Page 6
Huawei Enterprise A Better Way
目录
ASG架构说明
部署模式/组网方案
基本功能 审计原理介绍
License控制
性能/可靠性
HUAWEI TECHNOLOGIES CO., LTD.
条直接的策略对应起来的,而是由里面的策略项对应起来的,
所以创建一条策略时,内部实现会生成同名不同类型的多条策 略
实现上,策略分配给用户的关系是保存在用户数据库里面的, 配置文件里面没有这个分配关系
HUAWEI TECHNOLOGIES CO., LTD.
- 1、下载文档前请自行甄别文档内容的完整性,平台不提供额外的编辑、内容补充、找答案等附加服务。
- 2、"仅部分预览"的文档,不可在线预览部分如存在完整性等问题,可反馈申请退款(可完整预览的文档不适用该条件!)。
- 3、如文档侵犯您的权益,请联系客服反馈,我们会尽快为您处理(人工客服工作时间:9:00-18:30)。
ASG5300系列上网行为管理产品
ASG5300系列上网行为管理产品(以下简称“ASG5300”)是华为面向中小企业发布的业界应用识别丰富,威胁防护全面的上网行为管理产品。
该系列产品提供URL过滤、应用行为控制、流量管理、数据防泄漏、恶意软件防护、互联网行为记录等多项功能,为企业机构提升员工工作效率、营造安全办公环境、以及法规遵从提供了一体化的解决方案。
产品图
ASG5305
ASG5310
ASG5320
产品特点
全面的网络安全接入
• 支持本地认证、第三方认证服务器认证、IP/MAC认证、单点登录、U-Key认证、微信认证、短信认证、Portal认证、APP认证和混合认证等多种用户识别手段,将各类用户上网行为定位到“人”。
• 支持主流入侵攻击和病毒的检测和防御并保证每周更新特征库。
• 支持网络私接行为识别和管理,可自定义设置PC终端和移动终端的接入数量阀值,有效保障网络安全接入。
精准的上网行为管理
• 采用先进多核架构,精准高效识别主流网络应用和网址;同时,支持对应用的使用动作进行审计和控制,让网络管理者可对各类网络应用进行更精细的管控。
• 具备详细、清晰、易用的审计日志,全面记录用户上网行为、使用流量、访问网站、所用终端系统及设备类型平台等信息;支持快速查询和导出日志,让事后审计省时省力。
• 具备高应用识别能力、多样的日志上报手段、灵活的组网方式,以及与主流网监后台进行对接,为各类客户的上网业务安全合规提供保障。
精细的流量控制
• 基于地址、用户、服务、应用、时间等新五元组提供多级流量通道管理特性,形成差异化流量控制机制。
• 支持流量动态调配技术,智能租借空闲流量,动态调整网络拥堵通道的最大带宽值,避免带宽资源浪费,保障业务价值最大化。
• 支持个性化流量管理,可基于上网时长和上网流量额度为用户定制上网套餐并支持定期提醒套餐余额,实现业务差异化管理。
多种营销增值服务
• 通过主动缓存、被动缓存和模糊匹配等技术,将应用缓存在设备本地,配合APP身份认证,实现应用快速下发。
在提升出口带宽利用率的同时为低成本营销推广开辟了新方向。
• 依靠精准识别电商、搜索引擎、网页浏览等访问内容,动态对用户进行标记并构建用户画像,反映用户上网偏好,例如小额理财、数码玩家等,便于企业结合营销系统实现对客户的精准营销。
• 支持基于浏览器四个位置向用户推送广告弹窗,可根据业务需求自定义广告内容,具备极高灵活性,可快速向用户推送营销资讯。
精准营销
简化的运维管理
• 支持将设备配置文件批量保存到U盘,设备从U盘自动匹配并读取配置文件,实现业务快速上线。
• 支持通过ASG Manager软件实现全网ASG设备集中监控,策略统一下发和日志收集。
• 通过IPSec VPN协议栈动态化技术,将静态协商变为动态学习,实现全网业务变更自动收敛,无需所有节点执行配置变更,将运维工作量降到最低。
01020304
ASG Manager集中运维管理
应用场景
路由部署模式
• 适用于SMB、连锁行业网络场景;
• 部署在网络出口,总部和分支通过IPSec VPN通信,为内网提供连接互联网和上网行为控制等功能。
办公网络/运营网络办公网络/运营网络
透明部署模式
• 适用于金融、政府、企业等网络场景;
• 串行部署在网络关键节点,为内网提供用户准入和上网行为控制和带宽控制等功能。
访客区办公网络/运营网络
旁路部署模式
• 适用于普教、职教等审计流量较大的网络场景;
• 部署于核心交换机旁,为内网提供上网行为审计和日志留存等功能。
访客区办公网络/运营网络
性能指标
硬件规格
订购信息
ASG5300
系列产品报价项介绍
功能特性关于本文档
本文档仅供参考,不构成任何承诺或保证。
本文档中的商标、图片、标识均归华为技术有限公司或拥有合法权利的第三方所有。
版权所有 ©华为技术有限公司 2018。
保留一切权利。