PageLeft() Or PageRight() 方法使用
官方AE快捷键大全

Ctrl+G
将选中形状取消群组
Ctrl+Shift+G
进入自由变换路径的编辑模式
在时间线面板选中路径属性按Ctrl+T
17.Shortcuts: markers(标记)
在当前时间设置标记(包括在内存预览和仅音频预演期间)
* (乘以号)数字小键盘上
在当前时间设置标记并打开标记对话框
Alt+* (乘以号)数字小键盘上
新建固态层
Ctrl+Y
使用图层序号的数字选择图层(1-999),(两位或三位数字需要连续迅速地输入)
数字小键盘上的0-9
在时间线中选中下一个层
Ctrl+Down Arrow
在时间线中选中上一个层
Ctrl+Up Arrow
取消全部层的选中状态
Ctrl+Shift+A
将选中层滑动到时间线面板顶部(时间线中图层较多,只显示部分图层时有用)
仅显示轴心点属性(灯光和摄像机为目标点)
A
仅显示音量属性
L
仅显示遮罩羽化属性
F
仅显示遮罩路径属性
M
仅显示遮罩的不透明度属性
TT
仅显示不透明属性(灯光为强度)
T
仅显示位置属性
P
仅显示旋转和方向属性
R
仅显示比例属性
S
仅显示时间映像属性
RR
仅显示缺失的特效
FF
仅显示特效属性组
E
仅显示遮罩属性组
MM
仅显示材质选项属性组
End or Ctrl+Alt+Right Arrow
向前移动1帧
Page Down or Ctrl+Right Arrow
PlantUML文档说明
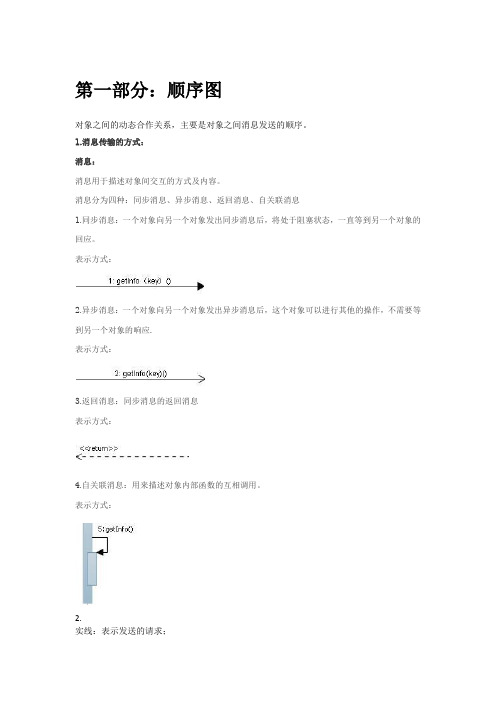
第一部分:顺序图对象之间的动态合作关系,主要是对象之间消息发送的顺序。
1.消息传输的方式:消息:消息用于描述对象间交互的方式及内容。
消息分为四种:同步消息、异步消息、返回消息、自关联消息1.同步消息:一个对象向另一个对象发出同步消息后,将处于阻塞状态,一直等到另一个对象的回应。
表示方式:2.异步消息:一个对象向另一个对象发出异步消息后,这个对象可以进行其他的操作,不需要等到另一个对象的响应.表示方式:3.返回消息:同步消息的返回消息表示方式:4.自关联消息:用来描述对象内部函数的互相调用。
表示方式:2.实线:表示发送的请求;虚线:表示请求响应,一般与请求方向相反。
3.创建参与者的方式有两种:(1)直接写名字;(2)“名字”;4.关键字autonumber可以用来自动的添加消息的数量Autonumber n:消息从第N个数开始Autonumber n ,m:消息从第n个数开始,增量为m.Antonumber “”:可以再双引号里设置字体的格式<b>黑体[000]显示数字的方式;()将数字括起来<u>表示下划线<font color=red><b>Message 0设置显示的字体,颜色,消息等等5.title 后直接加题名6.newpage 表示将一个图划分成多个小图Newpage 后可直接加图名7. (不懂)•alt/else•opt•loop•par•break•critical•group, followed by a text to be displayed8.note left or note right 表明在左侧添加一个note或在右侧添加一个notenote left of,note right of ornote over p1(p2 or p1,p2) #color 可以同时添加两个参与者,中间用逗号隔开表示将note添加在参与者的左边,右边还是中间9.•<b>: 黑体字</b>设置结束的范围,后边一样•<u>:下划线•<i>:斜体•<s>, <del>, <strike>:字体•<font color="#AAAAAA"> or <font color="colorName">•<color:#AAAAAA> or <color:colorName> 设置字体的颜色•<size:nn> to change font size•<img src="file"> or <img:file> : the file must be accessible by the filesystem插入文件或者是图片这些属性均可用在title的设置上10.==将图按逻辑分层11.activate A #COLOR激活参与者A的生命期,可以在其后添加属性设置deactivate A 结束参与者A的生命期destroy C 参与者C的生命线结束12.Create 创建参与者13.“[”用来表示图的左边“]”放在图的右边14. box "Internal Service" #LightBlue 开始一个画一个盒子,引号里是盒子的名字,后边是盒子的颜色participant Bobparticipant Alice 盒子里的两个参与者end box 结束盒子15.hide footbox 移除图的脚15.<< (C,#ADD1B2) Testable >> #EEEEEE《》给参与添加状态或者添加一些标志的属性(C,#ADD1B2)表示圆Testable为属性名16.Skinparam 设置颜色一些主要的参数:backgroundColor 背景颜色sequenceArrowColor 序列箭头的颜色sequenceParticipantBorderColor 序列参与者的边框颜色sequenceActorBorderColor User者的线条颜色sequenceLifeLineBorderColor 生命线的线条颜色sequenceParticipantBackgroundColor 参与者的背景颜色sequenceParticipantFontName 参与者名字的字体sequenceParticipantFontSize 参与者名字字体的大小sequenceParticipantFontColor 参与者字体的颜色skinparam sequenceActorBackgroundColor aqua Actor的背景颜色sequenceActorFontColor “User”字的颜色sequenceActorFontSize “User”字体大小sequenceActorFontName “User”字体sequenceLifeLineBackgroundColor 生命线的背景颜色17.Skin BlueModern Rose(默认)可以理解为两种皮肤模式第二部分:用例图从用户的角度描述系统的功能,是用户所能观察到的系统功能的模型图。
IrfanView4.28快捷键说明(翻译)
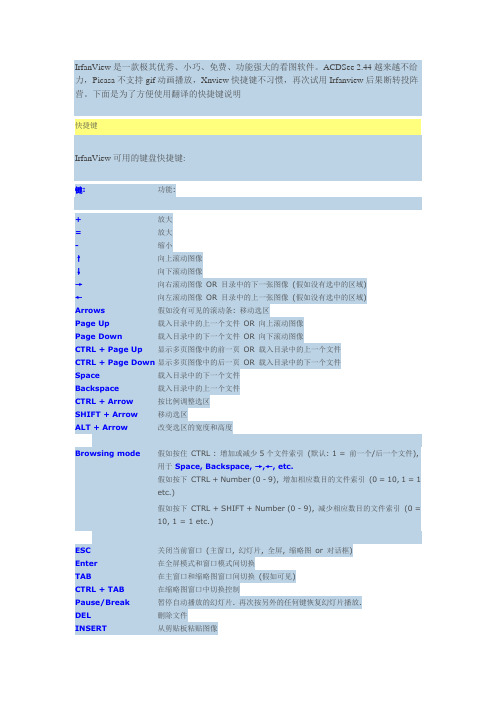
IrfanView是一款极其优秀、小巧、免费、功能强大的看图软件。
ACDSee 2.44越来越不给力,Picasa不支持gif动画播放,Xnview快捷键不习惯,再次试用Irfanview后果断转投阵营。
下面是为了方便使用翻译的快捷键说明快捷键IrfanView可用的键盘快捷键:键:功能:+放大=放大-缩小↑向上滚动图像↓向下滚动图像→向右滚动图像OR 目录中的下一张图像(假如没有选中的区域)←向左滚动图像OR 目录中的上一张图像(假如没有选中的区域)Arrows假如没有可见的滚动条: 移动选区Page Up载入目录中的上一个文件OR 向上滚动图像Page Down载入目录中的下一个文件OR 向下滚动图像CTRL + Page Up显示多页图像中的前一页OR 载入目录中的上一个文件CTRL + Page Down显示多页图像中的后一页OR 载入目录中的下一个文件Space载入目录中的下一个文件Backspace载入目录中的上一个文件CTRL + Arrow按比例调整选区SHIFT + Arrow移动选区ALT + Arrow改变选区的宽度和高度Browsing mode假如按住CTRL : 增加或减少5个文件索引(默认: 1 = 前一个/后一个文件), 用于Space, Backspace, →,←, etc.假如按下CTRL + Number (0 - 9), 增加相应数目的文件索引(0 = 10, 1 = 1etc.)假如按下CTRL + SHIFT + Number (0 - 9), 减少相应数目的文件索引(0 =10, 1 = 1 etc.)ESC关闭当前窗口(主窗口, 幻灯片, 全屏, 缩略图or 对话框)Enter在全屏模式和窗口模式间切换TAB在主窗口和缩略图窗口间切换(假如可见)CTRL + TAB在缩略图窗口中切换控制Pause/Break暂停自动播放的幻灯片. 再次按另外的任何键恢复幻灯片播放.DEL删除文件INSERT从剪贴板粘贴图像Home滚动至起始(水平滚动) OR 载入目录中第一个文件CTRL + Home载入目录中第一个文件SHIFT + Home载入多页图像的第一张图End滚动至末尾(水平滚动) OR 载入目录中最后一个文件CTRL + End载入目录中最后一个文件SHIFT + End载入多页图像的最后一张图F1帮助F2 or F6重命名文件F3十六进制显示图像F4当前文件添加到当前幻灯片F5 or U刷新(显示and 文件列表)SHIFT + F5刷新+ 高质量重采样(假如重采样在查看->显示选项中已激活)F7移动文件F8复制文件F9启用OCR 插件(对于全尺寸图像or 选区)F10打开多页文件预览对话框F11在全屏/幻灯片模式中显示/隐藏鼠标F12显示绘制对话框A"About IrfanView" 对话框B批量转换/重命名C捕获对话框D编辑-> 删除E当EXIF 信息可用时为JPGs 显示EXIF 对话框F在"窗口/图像适应桌面" 和"窗口适应图像" 之间切换G停止GIF or ANI 动画H水平翻转I显示图像信息K"滤镜工厂" 对话框L向左旋转图像M最小化IrfanView 窗口- 老板键;-)N切换全屏/幻灯片文本显示O打开对话框P程序设置对话框R向右旋转图像S"另存为" 对话框T缩略图模式(浏览器模式)V垂直翻转W幻灯片对话框X浏览(窗口or 全屏模式): 标记当前文件CTRL + A选中/取消选中所有图像or 选中所有缩略图(假如当前窗口为缩略图窗口) CTRL + B打开"浏览子文件夹" 对话框CTRL + C复制图像到剪贴板CTRL + D图像-> 添加边框CTRL + E特效设置CTRL + F搜索文件CTRL + G创建灰度图像CTRL + H原始尺寸(无缩放)CTRL + I为JPGs 显示IPTC 对话框CTRL + J编辑-> 重做CTRL + K Adobe 8BF 滤镜对话框CTRL + M打开目录中的随机图像CTRL + N在另一个IrfanView 窗口中打开当前图像CTRL + P打印对话框CTRL + Q编辑多页TIFCTRL + R调整尺寸/重载样对话框CTRL + S保存对话框CTRL + T编辑-> 在选区中插入文字CTRL + U图像-> 自定义/精确旋转CTRL + V从剪贴板粘贴图像CTRL + W幻灯片播放当前目录中的文件CTRL + X剪切选区CTRL + Y裁剪选区CTRL + Z编辑-> 撤销CTRL + number浏览(窗口or 全屏)模式:通过数字键(0-9)增加文件索引CTRL + Print以自定义矩形/区域模式开始捕捉/截图SHIFT + A开始/停止自动播放(幻灯片窗口)SHIFT + C编辑-> 创建自定义选区SHIFT + E用外部浏览器/编辑器打开SHIFT + F仅大图像适应桌面SHIFT + G增强色彩SHIFT + J JPG 无损操作SHIFT + L锁定/取消锁定缩放(全屏幕模式同时生效)SHIFT + M通过email 发送图像SHIFT + N创建新图像SHIFT + OSHIFT + P复制当前文件名到剪贴板SHIFT + Q浏览(窗口or 全屏模式): 在缩略图窗口中显示被标记的文件SHIFT + R重新打开文件SHIFT + S锐化SHIFT + T跳转到工具栏编辑区域SHIFT + U自动色彩校正SHIFT + V增加画布(改变画布大小)SHIFT + W图像适应窗口SHIFT + X浏览(窗口or 全屏模式): 取消当前文件的标记SHIFT + Y消除红眼Alt + SHIFT + S显示/隐藏状态栏Alt + SHIFT + T显示/隐藏工具栏Alt + SHIFT + M显示/隐藏菜单栏Alt + SHIFT + C显示/隐藏标题CTRL + SHIFT + A捕获/批量扫描设置CTRL + SHIFT + J无损JPG 裁剪CTRL + SHIFT + M显示JPGs 评论对话CTRL + SHIFT + L无线JPG 旋转- 向左CTRL + SHIFT + R无线JPG 旋转- 向右CTRL + SHIFT + C设为墙纸- 居中CTRL + SHIFT + T设为墙纸- 平铺CTRL + SHIFT + S设为墙纸- 拉伸CTRL + SHIFT + P设为墙纸- 前一张墙纸CTRL + SHIFT + W在所有显示器上拉伸图像(切换)CTRL + SHIFT + X设为墙纸- 拉伸- 比例CTRL + SHIFT + Y自动裁剪边界CTRL + SHIFT +浏览(窗口or 全屏)模式:通过数字键(0-9)减少文件索引numberCTRL + ALT + P打印图像, 隐藏打印对话框(直接打印)1全屏模式: 显示图像/视频原始尺寸(1:1)2全屏模式: 适合屏幕: 仅适用于大图片3全屏模式: 适合屏幕: 所有图像/视频4全屏模式: 按屏幕拉伸所有图像/视频5全屏模式: 图像宽度适应屏幕宽度6全屏模式: 图像高度适应屏幕高度Numpad 5滚动图像到中央IrfanView 可用的选区快捷方式:Left button click/hold/move 绘制选区CTRL + Left button click/hold/move 按"创建自定义选区" 对话框中设置的比例绘制选区Left button click 放大选区Right button click/hold/move 移动选区Arrows移动选区(假如没有可见的滚动条)SHIFT +arrows移动选区CTRL +arrows按比例调整选区ALT +arrows改变选区高度/宽度IrfanView 可用的鼠标快捷方式:普通模式:Left button click/hold 在标题栏显示鼠标坐标and 像素颜色(or 放大选区) SHIFT + Left button click/hold 显示坐标and 像素颜色+ 拷贝十六进制颜色值到剪贴板Left button click + drag 形成一个选区CTRL + Left button click + drag 使用实际的长宽比调整选区Right button click 滚动图片or 显示上下文菜单(假如是活动的).CTRL + Right button click + drag 按拖动方向滚动图像,即使上下文菜单被激活.Right button click + drag 按拖动方向滚动图像. 假如在选区内,移动选区.Left button double click 切换到全屏模式Wheel up 载入目录中的上一个文件OR 向上滚动图像Wheel down 载入目录中的下一个文件OR 向下滚动图像CTRL + Wheel up 放大CTRL + Wheel down 缩小SHIFT + Wheel 水平滚动图像全屏or 幻灯片模式:Left button click 载入目录中的上一个图像Right button click 载入目录中的下一个图像Left button click ...在屏幕的左上角or 右上角= 退出全屏模式F更改/循环全屏幕显示/适应选项↓载入目录中的下一个图像↑载入目录中的上一个图像F11显示/隐藏鼠标全屏/幻灯片模式下视频播放控制条(DirectShow 模式) 快捷键:B隐藏/显示播放控制条Y隐藏/显示播放控制条中的文件名Left/right arrow跳转10% 视频进度CTRL +Left/right arrow跳转5% 视频进度SHIFT +Left/right跳转1% 视频进度arrowMouse move视频底部: 隐藏/显示播放控制条EXE 幻灯片:E从EXE 幻灯片中释放所有文件T or N显示/隐藏图像中的文本F改变/循环全屏显示/适应选项F1显示帮助信息F11显示/隐藏鼠标rfanView 是一款小巧、快速、强大、免费、有中文版的图像查看器/浏览器/转换器,适用于Win9x - Vista版本。
Dreamweaver中命名规则整理及常用技巧

主要命名介绍“container“就是将页面中的所有元素包在一起的部分,这部分还可以命名为: “wrapper“, “wrap“, “page“.“header”是网站页面的头部区域,一般来讲,它包含网站的logo 和一些其他元素。
这部分还可以命名为:“page-header” (或pageHeader).“navbar“等同于横向的导航栏,是最典型的网页元素。
这部分还可以命名为:“nav”, “navigation”, “nav-wrapper”.“Menu”区域包含一般的链接和菜单,这部分还可以命名为: “subNav “, “links“,“sidebar-main”.5. Main“Main”是网站的主要区域,如果是博客的话它将包含的日志。
这部分还可以命名为: “content“, “main-content”(或“mainContent”)。
“Sidebar”部分可以包含网站的次要内容,比如最近更新内容列表、关于网站的介绍或广告元素等…这部分还可以命名为: “subNav “, “side-panel“, “secondary-content“.“Footer”包含网站的一些附加信息,这部分还可以命名为: “copyright“.ID命名(1)页面结构容器: container页头:header内容:content页面主体:main页尾:footer导航:nav侧栏:sidebar栏目:column左右中:left right center页面外围控制整体布局宽度:wrapper(2)导航导航:nav主导航:mainbav子导航:subnav顶导航:topnav边导航:sidebar左导航:leftsidebar 右导航:rightsidebar 菜单:menu子菜单:submenu标题: title摘要: summary(3)功能标志:logo广告:banner登陆:login登录条:loginbar注册:regsiter搜索:search功能区:shop标题:title加入:joinus状态:status按钮:btn滚动:scroll标签页:tab文章列表:list提示信息:msg当前的: current小技巧:tips图标: icon注释:note指南:guild服务:service热点:hot新闻:news下载:download投票:vote合作伙伴:partner友情链接:link版权:copyright网站公用相关Container div #container 容器Header or banner div #header 页头部分Main or global navigation div #main-nav 主导航Menu #menu 菜单Sub Menu #submenu 子菜单Left or right side columns #sidebar-a, #sidebar-b 左边栏或右边栏Main div #main 页面主体Content div #content 内容部分The main content area #content-main 主要内容区域Footer div #footer 页脚部分Tag #tag 标签Message #msg #message 提示信息Tips #tips 小技巧Vote #vote 投票Friend Link #friendlink 友情连接Title #title 标题Summary #summary 摘要Sub-navigation list #sub-nav 二级导航Search input #search-input 搜索输入框Search output #search-output 搜索输出和搜索结果相似Search #search 搜索Search results #search-results 搜索结果Copyright information #copyright 版权信息brand #branding 商标branding-logo #branding-logo LOGOSite information #siteinfo 网站信息Copyright information etc. #siteinfo-legal 法律声明Designer or other credits #siteinfo-credits 信誉Join us #joinus 加入我们Partnership opportunities #partner 合作伙伴Services #service 服务Regsiter #regsiter 注册Status #status 状态电子贸易相关Products .products 产品Products prices .products-prices 产品价格Products description .products-description 产品描述Products review .products-review 产品评论Editor's review .editor-review 编辑评论New release .news-release 最新产品Publisher .publisher 生产商Screen shot .screenshot 缩略图FAQ .faqs 常见问题Keyword .keyword 关键词Blog .blog 博客Forum .forum 论坛注意事项-使用技巧元素居中{margin:0 auto; text-align:center;}text-align:center;这句是为了适应IE6以下版本的浏览器而加的,IE6以下对margin:0 auto;不能解析为居中,所以用这种方式来补救,所以在写代码时把两句都写上。
快捷键大全(MacWindows)

快捷键⼤全(MacWindows)常⽤快捷键基本的快捷键描述Windows Mac OS编辑菜单Alt + E Ctrl + F2 + F⽂件菜单Alt + F Ctrl + F2 + E视图菜单Alt + V Ctrl + F2 + V全选⽂本Ctrl + A Cmd + A复制⽂本Ctrl + C Cmd + C查找⽂本Ctrl + F Cmd + F查找替换⽂本Ctrl + H Cmd + F新建⽂档Ctrl + N Cmd + N打开⽂件Ctrl + O Cmd + O打印选项Ctrl + P Cmd + P保存⽂件Ctrl + S Cmd + S粘贴⽂本Ctrl + V Cmd + V剪切⽂本Ctrl + X Cmd + X重做⽂本Ctrl + Y Shift + Cmd + Z撤销⽂本Ctrl + Z Cmd + Z⽂本编辑描述Windows Mac OS 光标移动将⽂本插⼊光标向右移动或者移动到下⼀⾏⾏⾸Right Arrow Right Arrow将⽂本插⼊光标向左移动或者移动到上⼀⾏⾏尾Left Arrow Left Arrow将⽂本插⼊光标向上移动⼀⾏Up Arrow Up Arrow将⽂本插⼊光标向下移动⼀⾏Down Arrow Down Arrow将⽂本插⼊光标移动到当前⾏的⾏⾸Home Cmd + Left Arrow将⽂本插⼊光标移动到当前⾏的⾏尾End Cmd + Right Arrow将⽂本插⼊光标移动到⽂档的开头Ctrl + Home Cmd + Up Arrow将⽂本插⼊光标移动到⽂档的结尾Ctrl + End Cmd + Down Arrow将⽂本插⼊光标移动到上⼀个⽂本框Page Up Fn + Up Arrow将⽂本插⼊光标移动到下⼀个⽂本框Page Down Fn + Down Arrow将⽂本插⼊光标向左移动到前⼀个词的开头Ctrl + Left Arrow Option + Left Arrow将⽂本插⼊光标向右移动到后⼀个词的开头Ctrl + Right Arrow Option + Right Arrow将⽂本插⼊光标移动到⾏⾸Ctrl + Up Arrow Cmd + Left Arrow将⽂本插⼊光标移动到⾏尾Ctrl + Down Arrow Cmd + Right Arrow⽂本选择选择⽂本插⼊光标左边的字符Shift + Left Arrow Shift + Left Arrow选择⽂本插⼊光标右边的字符Shift + Right Arrow Shift + Right Arrow向上选择⼀⾏⽂本Shift + Up Arrow Shift + Up Arrow向下选择⼀⾏⽂本Shift + Down Arrow Shift + Down Arrow选择⽂本插⼊光标左边的字Shift + Ctrl + Left Shift + Opt + Left选择⽂本插⼊光标右边的字Shift + Ctrl + Right Shift + Opt + Right向左选择⼀段⽂本Shift + Ctrl + Up Shift + Opt + Up向右选择⼀段⽂本Shift + Ctrl + Down Shift + Opt + Down选择⽂本插⼊光标与当前⾏⾏⾸之间的⽂本Shift + Home Cmd + Shift + Left Arrow选择⽂本插⼊光标与当前⾏⾏尾之间的⽂本Shift + End Cmd + Shift + Right Arrow选择⽂本插⼊光标与⽂档开头之间的⽂本Shift + Ctrl + Home Cmd + Shift + Up Arrow or Cmd + Shift + Fn + Left Arrow选择⽂本插⼊光标与⽂档结尾之间的⽂本Shift + Ctrl + End Cmd + Shift + Down Arrow or Cmd + Shift + Fn + Right Arrow向上选择⼀个⽂本框Shift + Page Up Shift + Fn + Up Arrow向下选择⼀个⽂本框Shift + Page Down Shift + Fn + Down Arrow全选⽂本Ctrl + A Cmd + A查找⽂本Ctrl + F Cmd + F⽂本排版将所选⽂本设置为粗体Ctrl + B Cmd + B将所选⽂本设置为斜体Ctrl + I Cmd + I将所选⽂本加下划线Ctrl + U Cmd + U将所选⽂本设置为上标Ctrl + Shift + =Cmd + Shift + =将所选⽂本设置为下标Ctrl + =Cmd + =⽂本编辑删除⽂本插⼊光标左边的字符Backspace Backspace删除⽂本插⼊光标右边的字符Delete Fn + Backspace删除⽂本插⼊光标右边的字Ctrl + Del Cmd + Backspace删除⽂本插⼊光标左边的字Ctrl + Backspace Cmd + Fn + Backspace增加缩进量Tab Tab减少缩进量Shift + Tab Shift + Tab复制⽂本Ctrl + C Cmd + C查找替换⽂本Ctrl + H Cmd + F粘贴⽂本Ctrl + V Cmd + V剪切⽂本Ctrl + X Cmd + X重做⽂本Ctrl + Y Shift + Cmd + Z撤销⽂本Ctrl + Z Cmd + Z描述Windows Mac OSWeb 浏览器描述Windows Mac OS Navigation向下滚动框Space or Page Down Space or Fn + Down Arrow向上滚动框Shift + Space or PageUpShift + Space or Fn + Up Arrow定位到页⾯底部End Cmd + Down Arrow 定位到页⾯头部Home Cmd + Up Arrow回退Alt + Left Arrow orBackspaceCmd + Left Arrow前进Alt + Right Arrow orShift + Backspace Cmd + Right Arrow刷新⽹页F5Cmd + R刷新⽹页(⽆缓存)Ctrl + F5Cmd + Shift + R 停⽌Esc Esc全屏切换F11Cmd + Shift + F 放⼤Ctrl + +Cmd + +缩⼩Ctrl + -Cmd + -重置 100% (默认)Ctrl + 0Cmd + 0打开主页Alt + Home Option + Home or Option + Fn + Left Arrow查找⽂本Ctrl + F Cmd + F标签/窗⼝管理打开⼀个新的标签页Ctrl + T Cmd + T关闭当前标签页Ctrl + W Cmd + W关闭所有标签页Ctrl + Shift + W Cmd + Q关闭除当前标签页以外的其它标签页Ctrl + Alt + F4Cmd + Opt + W定位到下⼀个标签页Ctrl + Tab Control + Tab or Cmd + Shift + Right Arrow定位到上⼀个标签页Ctrl + Shift + Tab Shift + Control + Tab or Cmd + Shift + Left Arrow定位到指定编号的标签页Ctrl + 1-8Cmd + 1-8定位到最后⼀个标签页Ctrl + 9Cmd + 9重新打开最后⼀个关闭的标签页Ctrl + Shift + T Cmd + Shift + T打开⼀个新窗⼝Ctrl + N Cmd + N关闭当前窗⼝Alt + F4Cmd + W定位到下⼀个窗⼝Alt + Tab Cmd + Tab定位到上⼀个窗⼝Alt + Shift + Tab Cmd + Shift + Tab重新打开最后⼀个关闭的窗⼝Ctrl + Shift + N在背景的标签页中打开链接Ctrl + Click Cmd + Click在前景的标签页中打开链接Ctrl + Shift + Click Cmd + Shift + Click打印当前⽹页Ctrl + P Cmd + P保存当前⽹页Ctrl + S Cmd + S地址栏在⼯具栏、搜索栏和页⾯元素间进⾏循环定位Tab Tab定位到浏览器的地址栏Ctrl + L or Alt + D Cmd + L聚焦并选中浏览器的搜索栏Ctrl + E Cmd + E / Cmd + K在新的标签页打开地址栏位置Alt + Enter Cmd + Enter显⽰⼀系列之前访问过的地址F4在地址栏输⼊⽂本的开头增加"www.",结尾增加".com"。
AD9 DXP 快捷键

1.1Common Schematic / PCB Editor ShortcutsSHIFT While autopanning to pan at higher speed 自动平移时加速平移Y While placing an object to flip it along the Y-axis 放置物体时沿Y轴翻转X While placing an object to flip it along the X-axis 放置物体时沿X轴翻转CTRL + SHIFT + ↑ ↓ ← →Move selection ten grid increments in direction of arrow key 将被选择的物体向箭头的方向移动十个网格的增量SHIFT + ↑ ↓ ← →Move cursor ten grid increments in direction of arrow key 将光标向箭头的方向移动十个网格的增量CTRL + ↑ ↓ ← →Move selection one grid increment in direction of arrow key 将被选择的物体向箭头的方向移动一个网格的增量↑ ↓ ← →Move cursor one grid increment in direction of arrow key 将光标向箭头的方向移动一个网格的增量ESC Escape from current process 退出当前项目END Redraw the screen 刷新屏幕HOME Redraw screen with center at the cursor point 以光标点为中心刷新屏幕CTRL + HOME Jump to absolute origin (lower left corner of workspace) 跳到绝对原点(工作区左下角)CTRL + Mouse-wheel down (orPAGE DOWN)Zoom out 缩小CTRL + Mouse-wheel up (or PAGE UP) Zoom in around cursor (zooms around cursor, position the cursor first) 围绕光标放大(先定位光标,再进行缩放)Mouse-wheel Pan up/down 向上或下平移SHIFT + Mouse-wheel Pan left/right 向左或右平移A Display Align sub-menu 显示排列子菜单B Display Toolbars sub-menu 显示工具栏子菜单J Display Jump sub-menu 显示跳转子菜单K Display Workspace Panels sub-menu 显示工作区面板子菜单M Display Move sub-menu 显示移动子菜单O Pop-up right-click Options menu 弹出右键单击的选项菜单S Display Select sub-menu 显示选择子菜单X Display DeSelect sub-menu 显示取消子菜单Z Pop-up menu with zoom commands 弹出缩放命令菜单CTRL + Z Undo 复原CTRL + Y Redo 重做CTRL + A Select all 全选CTRL + C (or CTRL + INSERT) Copy 复制CTRL + X (or SHIFT + DELETE) Cut 剪切CTRL + V (or SHIFT + INSERT) Paste 粘贴CTRL + R Copy to clipboard and repeat paste selected objects (RubberStamp) 复制到剪贴板和重复粘贴选定对象(橡皮图章)CTRL + R then ESC Re-enters Rubber Stamp mode using the current clipboardcontent 使用当前剪贴板的内容重新进入橡皮图章模式CTRL + Q Access the Selection Memory dialog 进入选择性存储对话框ALT Constrain object movement horizontally or vertically 水平或垂直约束物体移动DELETE Delete selection 删除物体V, D View document 查看文档V, F View fit placed objects 查看适合放置物体X, A De-select all 取消全选Right-click & hold Display slider hand & slide view 显示滑动手型&滑动显示Left-click Select/deselect object under cursor 选择或取消光标下的物体Right-click Pop-up floating menu, or escape from current operation 弹出浮动菜单,或者退出当前操作Right-click on object, select Find Similar Load object under cursor into Find Similar Objects dialog 选择光标下的物体进到查找相似对象对话框Left-click, hold & drag Select inside area 选择内部区域Left-click & hold Move object/selection under cursor 移动光标下物体或对象Left Double-click Edit object 编辑对象SHIFT + Left-click Add/remove object from selection set 从选择设置里添加或删除对象TAB Edit attributes while placing 放置对象时编辑属性SHIFT + C Clear current Filter 清除当前过滤器SHIFT + F Click on object to display Find Similar Objects dialog 单击对象显示查找相似对象对话框Y Pop-up Quick Queries menu 弹出快速查询菜单F11 Toggle Inspector panel on/off 切换检查面板开启或关闭F12 Toggle Filter panel on/off 切换过滤器面板开启或关闭SHIFT + F12 Toggle List panel on/off 切换列表面板开启或关闭ALT + F5 Toggle full screen mode 切换全屏模式, Left-click Cross probe to matching object on target document, stay remaining in source document 在目标文件交叉探测匹配对象,其余的留在源文件, CTRL + Left-click Cross probe and jump to matching object on target, jumping to target document 交叉探测并跳转到匹配的目标对象,跳转到目标文件SHIFT + CTRL + T Align selected objects by top edges 沿上边缘排列选择对象SHIFT + CTRL + L Align selected objects by left edges 沿左边缘排列选择对象SHIFT + CTRL + R Align selected objects by right edges 沿右边缘排列选择对象SHIFT + CTRL + B Align selected objects by bottom edges 沿底边缘排列选择对象SHIFT + CTRL + H Distribute selected objects equally in horizontal plane 在水平面上均匀分布SHIFT + CTRL + V Distribute selected objects equally in vertical plane 在垂直面上均匀分布SHIFT + CTRL + D Align selected objects to grid 选择的对象与网格对齐CTRL + n (n=1 to 8) Store current selection in memory location n 在n位置内存中存储当前选择ALT + n (n=1 to 8) Recall selection from memory location n 从n位置内存中调用选择SHIFT + n (n=1 to 8) Add current selection to selection already stored in memorylocation n 添加当前选择到已存储的n位置内存中SHIFT + ALT + n (n=1 to 8) Recall selection from memory location n and add it to currentselection in workspace 从n位置内存中调用选择并且添加到工作区中当前的选择上SHIFT + CTRL + n (n=1 to 8) Apply filtering based on selection set in memory location n. 基于n位置内存中的选择应用过滤1.2Schematic Editor Only ShortcutsG Cycle through snap grid settings 通过单元格设置循环F2 Edit in-place 在适当的位置编辑CTRL + PAGE DOWN Fit all objects into view 查看所有对象SPACEBAR Rotate counterclockwise by 90 degrees while moving an object移动物体时逆时针旋转90度SPACEBAR Toggle start/end mode while placing a wire/bus/line 放置线/总线/线条时切换开始或结束模式, SPACEBAR Toggle pen color while using highlighting pens 使用高亮笔时切换笔的颜色SHIFT + SPACEBAR Rotate clockwise by 90 degrees while moving an object 移动物体时顺时针旋转90度SHIFT + SPACEBAR Cycle Step through placement modes while placing awire/bus/line 放置线/总线/线条时通过放置模式循环步骤CTRL + SPACEBAR Rotate counterclockwise by 90 degrees while dragging an object拖动对象时逆时针旋转90度SHIFT + CTRL + SPACEBAR Rotate clockwise by 90 degrees while dragging an object 拖动对象时顺时针旋转90度, CTRL + Left-click on port or sheet entry Highlight connection/net on target sheet while using highlighting pens 使用高亮笔时在目标表格上高亮连接或网络SHIFT + CTRL + C Clear all highlighting applied by highlighting pens 使用高亮笔清除所有高亮应用BACKSPACE Remove the last vertex when placing a wire/bus/line/polygon 放置线/总线/线条/铜皮时移除上一个顶点Left-click, hold + DELETE When a wire is selected to delete a vertex 选中线时删除顶点Left-click, hold + INSERT When a wire is selected to add a vertex 选中线时添加顶点CTRL + Left-click & drag Drag object 拖动对象Left-click in Navigator panel Cross probe to object on schematic document 在原理图上交叉探测对象ALT + Left-click in Navigator panel Cross probe to object on both schematic document and PCB 在原理图和PCB上同时交叉探测对象ALT + Left-click on net object Highlight all elements in net on sheet 把网络上所有元素高亮CTRL + Double Left-click On sheet symbol to descend hierarchy 在图表符号上降低层次CTRL + Double Left-click On port to ascend hierarchy 在端口上上升层次+ (numeric keypad) Enlarge IEEE symbol size during placement or movement 放置或移动时增大IEEE符号大小- (numeric keypad) Reduce IEEE symbol size during placement or movement 放置或移动时减小IEEE符号大小CTRL + F Find text 查找文本CTRL + H Find and replace text 查找和重新放置文本F3 Find next occurrence of searched text 查找下一个出现的搜索文本INSERT Copy attributes of object under the cursor while placing an objectof the same type 放置相同类型的对象时复制光标下对象的属性S Swap sheet entry side while moving one or more selected sheetentries 移动一个或多个选择图表入口时交换图表入口V Reverse sheet entry order while moving two or more selectedsheet entries 选择两个或者多个选择图表入口时翻转图表入口命令T Toggle sheet entry IO type while moving one or more selectedsheet entries 移动一个或多个选择图表入口时切换图表入口IO类型T Toggle all sheet entry IO types while resizing selected sheetsymbol 调整选择图表符号时切换所有图表入口IO类型T, P Access Schematic - General page of Preferences dialog 进入原理图一般页面的选项对话框1.3PCB Editor Only ShortcutsSHIFT + R Cycle through three routing modes (ignore, avoid or pushobstacle) 通过三个路径模式循环(忽略,避免或者推挤)SHIFT + E Toggle electrical grid on/off 切换电子网格开启或关闭SHIFT + B Build Query 建立查询SHIFT + PAGE UP Zoom-in in small increments 小增量放大SHIFT + PAGE DOWN Zoom-out in small increments 小增量缩小CTRL + PAGE UP Zoom-in to 400% 放大到400%CTRL + PAGE DOWN Fit document into view 适应查看文件CTRL + END Jump to defined relative origin for the workspace 在工作区跳到已定义的相对原点ALT + END Redraw current layer only 只刷新当前板层ALT + INSERT Paste on current layer 粘贴到当前板层CTRL + G Pop up Snap Grid dialog 弹出对齐网格对话框G Pop up Snap Grid menu 弹出对齐网格菜单N Hide the ratsnest while moving a component 移动元件时隐藏激光L Flip component being moved to other side of board 把移到电路板的另一侧的元件翻转SHIFT + F1 Pressed while routing, displays the appropriate interactive routingshortcut keys 布线时按下,显示相对应的交互式布线快捷键TAB Pressed while routing, length tuning, component or stringplacement displays appropriate interactive editing dialog 布线,等长,放置元件或线时按下,显示相对应的交互式编辑对话框F2 Display Board Insight and Heads Up display options 显示板的洞察和显示选项CTRL + Left-click Highlight routed net under cursor (repeat in free space to clear)高亮光标下的网络(在自由空间里重复清除)CTRL + SPACEBAR Cycle through connection lines modes during interactive routing在交互式布线时通过连接线模式循环BACKSPACE Remove last track corner during interactive routing 交互式布线时移除上一个轨道角SHIFT + S Toggle single layer mode on/off 切换单层模式开启或关闭O, D, D, O, ENTER Set all primitives to display in draft mode 将所有图元显示在草稿模式O, D, F, O, ENTER Set all primitives to display in final mode 将所有图元显示在最终模式O, D (or CTRL + D) Access Show/Hide page of View Configurations dialog 进入显示/隐藏页面的查看配置对话框。
Web自动化测试之playwright:Web元素定位
Web⾃动化测试之playwright:Web元素定位要对web页⾯进⾏控制,⾸先需要定位到页⾯对应的元素,和Selenium⼀样,playwright也⽀持多种元素定位⽅法,下⾯来介绍它⽀持的元素选择器。
⽬录playwright主要的选择器:Locator Descriptiontext⽂本值css selector CSS 选择器xpath xpath表达式React selector React选择器Vue selector Vue 选择器id, data-testid, data-test-id, data-test属性值,只⽀持这4种属性。
其它属性需要通过css⽅式可以和Selenium对⽐来看:。
其中Vue selector和React selector⽬前还是实验性的功能,这⾥不做更多介绍。
Text 定位通过⽂本值定位点击【学术】:page.click('text="学术"')# 或者page.click('"学术"')属性值定位只⽀持id, data-testid, data-test-id, data-test这4种属性值,其它属性需要使⽤css表达式。
page.fill("id=kw", "test")page.click("id=su")其它属性值定位:page.fill('css=[id="kw"]', "test")page.fill('css=[class="s_ipt"]', "test")page.fill('css=[name="wd"]', "test")# 也可以简化为page.fill('[id="kw"]', "test")page.fill('[class="s_ipt"]', "test")page.fill('[name="wd"]', "test")xpath定位xpath 定位语法介绍可参考:。
logic使用快捷键使用方法
l o g i c使用快捷键使用方法本页仅作为文档封面,使用时可以删除This document is for reference only-rar21year.March以前用过NUENDO等软件,Logic Pro 9的快捷键适应不了,怎么设置快捷键?启动Logic Pro 9,点击桌面左上角Logic Pro菜单,找到Preferences,找到key commands,在这里设置。
这里有一个我已经改好的快捷键预设,仿NUENDO的,可下载导入。
方法:在key commands窗口左上角,找到Option下拉菜单。
选择Import....,完成即可。
Logic Pro 9录音以后再录音,怎么会“顿”一下?在Logic Pro 9底部,transport (传送条)上,在录音按钮上单击鼠标右键,勾选“punch on the fly",好了,整个世界清净了。
我想对单个音频/MIDI事件进行非破坏性的移调处理怎么做?选择你要处理的音频/MIDI事件,在界面最左边Inspctor区域找到Transposition,输入数值:移高半音输入1,降低半音输入-1,以此类推。
在Logic Pro 9中怎样精细制作渐快、渐慢速度a 首先在刻度尺上选择你要变速的范围。
b将播放光标定位到范围的最右边c按键盘上的“T”键,打开LIST窗口d点击Create,程序将在播放光标位置,创建新的速度标记e在TEMPO栏下,输入你想要的新速度f在这个窗口上方,找到Options下来菜单,找到Tempo operations,在curve type出选择适合的渐变模式,如果从此以后就用新的速度,那么勾选“Continue with New Tempo",如果变速后还想马上回到原有速度则不要勾选,注意density这个下拉菜单,它可以让你的变速曲线像楼梯一样有棱有角,也可让曲线像丝绸一般顺滑。
g调整完了,点”Apply”,试听。
MFC设置滚动条C++代码
滚动条控件简介滚动条大家也很熟悉了,Windows窗口中很多都有滚动条。
前面讲的列表框和组合框设置了相应属性后,如果列表项显示不下也会出现滚动条。
滚动条分为水平滚动条(Horizontal Scroll Bar)和垂直滚动条(Vertical Scroll Bar)两种。
滚动条中有一个滚动块,用于标识滚动条当前滚动的位置。
我们可以拖动滚动块,也可以用鼠标点击滚动条某一位置使滚动块移动。
从滚动条的创建形式来分,有标准滚动条和滚动条控件两种。
像列表框和组合框设置了WS_HSCROLL 或WS _VSCROLL风格以后出现的滚动条,不是一个独立的窗口,而是这些窗口的一部分,这就是标准滚动条。
而滚动条控件是一个独立的窗口,它可以获得焦点,响应某些操作。
滚动条控件的创建MFC也为滚动条控件的操作提供了类,即为CScrollBar类。
滚动条控件的创建依然有两种方式,一种是直接在Toolbox中将滚动条控件拖入对话框模板,然后添加控件变量使用,另一种就是用CScrollBar类的Create成员函数动态创建。
这两种方式适用于不同的场合。
CScrollBar类的成员函数Create的函数原型如下:virtual BOOL Create(DWORD dwStyle,const RECT& rect,CWnd* pParentWnd,UINT nID);此函数与其他控件类的Create函数原型基本相同。
参数dwStyle指定滚动条控件的风格,rect指定滚动条控件的位置和尺寸,pParentWnd为指向滚动条控件父窗口的指针,nID指定滚动条控件的ID。
下面鸡啄米简单介绍几个主要的滚动条控件风格,更加具体的可以查阅MSDN。
SBS_HORZ:指定滚动条为水平滚动条。
如果没有指定SBS_BOTTOMALIGN或SBS_TOPALIGN风格,则滚动条的高度、宽度和位置由Create函数的rect参数给出。
SBS_VERT:指定滚动条为垂直滚动条。
FEI Quanta 200扫描电子显微镜操作标准操作规程说明书
Standard Operating ProcedureFEI Quanta 200 Scanning Electron Microscope This document is intended as a guide to the operation of the FEI Quanta 200ESEM by certified users. It provides details on sample loading, bringing the microscope up to operating conditions, normal operation procedures, sample removal, and returning the microscope to a powered down state. This guide is not intended for novice users.*Please fill out the log sheet before beginning using the microscope.1. Specimen Preparation and HandlingThe Quanta 200 has three operating vacuum modes to deal with different types of samples. High Vacuum (HiVac) is the conventional operating mode associated with all scanning electron microscopes. High Vacuum mode typically requires that the sample be conductive or properly mounted and coated for conduction. Coating reduces beam penetration and allows for a sharper image; however, it may mask elements of interest forX-ray analysis. The two other operating modes are Low Vacuum (LowVac) and ESEM.In these modes the column is under high vacuum and the specimen chamber is at higher pressures of 0.1 to 30 Torr. Observation of outgassing or highly charging materials can be made using one of these modes without the need to coat the sample with a conductive material. In some cases, a PLA (Pressure Limiting Aperture) cone placed on the conical objective maybe useful in LowVac mode because the gas in the chamber may cause “skirting” of the incident beam. ESEM mode is used primarily for any specimens that are considered “wet” and contain volatile components such as water or oil.The microscope is currently used in High Vacuum (HiVac) mode. If you want to use Low Vacuum please contact before Claudia Ojeda-Aristizabal or Rick Behl.Specimens should be clean, fixed, and properly mounted before loading them onto the specimen stage. The specimen must be electrically grounded to the sample holder with conductive tape or paint to minimize specimen charging.2. Computer User Interface (UI)The SEM is controlled by means of a Windows-based user interface (UI) program, calledxT Microscope Control.The primary SEM controls are accessed via the consoles on the right hand side of the screen. There are various tabs at the upper right hand side corresponding to different“pages”. The Work Page(Figure 1) contains the “Vacuum”console, the “Electron Column”console, the “Detectors”console, and the “Stage”console, with maps, coordinates, and tilt correction tabs, and finally, the “Status” console. The Options Page (Figure 2) contains the “Imaging” console. The various pages are accessed by selecting the desired tab from the top of the console.Images are displayed in the main window on the computer screen. The main windowis divided in to 4 quadrants (quads). The bottom right quadrant, quad 4, shows an infrared camera view of the inside of the SEM chamber. The upper right quadrant, quad 2, is typically used to display the secondary electron image. Quadrant 1 (upper left) may be used for the backscatter detector, and quadrant 3 (lower left) may be used to mix images from quad 1 and2.The SEM can be controlled by making selections from the Menu, clicking icons onthe Toolbar (Figure 3), or with keyboard commands (Figure 4). The mouse is also used tocontrol various functions on the SEM. The controls are discussed in detail in the following sections.Figure 1. The Work Page, located on the right side of the xT Microscope Control window.Figure 2. The Options Page, located on the right side of the xT Microscope Control window.Figure 3. The Toolbar, located on the top of the xT Microscope Control window.Figure 4. Keyboard shortcuts.3. Start up Procedure*Users must wear latex gloves when handling detectors or loading specimens.1.Fill out the Logsheet. Fill out the Date, User, Supervisor, Sample material,Acceleration Voltage, Time In, Time Out and any comments regarding the SEM (for ebeam lithography include spot sizes used and measured currents). Refer to the previous entry on the Logsheet to confirm the SEM status.2.From the xT microscope control user interface (UI), enter your Username andPassword. The general username is “supervisor”, and the password is “supervisor”.3.The column and specimen chamber are kept under vacuum when not in use to preventcontamination therefore first the system must be brought to atmospheric pressure to open the specimen chamber. First bring the stage to “Home stage” while watching the camera image, checking that the stage will not hit anything. In case of doubt, click “Stop”. Vent via the computer interface by clicking the “Vent” button on the “Vacuum” console. The program will display a prompt asking “Really vent the chamber?”. Click yes to vent the chamber.4.As the system vents, the Vacuum Status Indicator on the “Status” console willchange from green, to yellow while venting, and finally to red when vented. At this point, as you watch the camera image, open the chamber door by pulling the door carefully straight out. Check in the camera image that the stage is far from the eyepiece.5.After mounting your specimen to a specimen stub, insert the pin on the underside ofthe specimen mount into the opening in the top of the stage (see Figure 5). Use gauge to test the height of the sample before closing the door of the chamber.6.Close the chamber door as you watch the camera image and click the “Pump” buttonon the Vacuum console in the computer interface.7.Wait for 15min.During this time a green light will appear next to the vacuumpressure on the “Status” console. After 15min pumping, the accelerating voltage may be turned on by clicking on the “HV” button on the “Electron Column” console.(Even if the software allows to click “HV” before the 15min have passed, please wait.We suspect that the pressure gauge is not reading an accurate pressure in the chamber)Figure 5. Inserting the specimen stub into the stage.4. Adjusting Working Distance, Accelerating Voltage and Spot Size1.Set the highest point on the specimen to a working distance of approximately 10 mmby adjusting the z-axis on the stage. The z-axis can be changed by clicking on the camera view window or in quad 4, then clicking and holding the middle scroll button up or down over the yellow bar which will appear on the screen. It can also be changed by changing the relative coordinates in the stage menu. Approach to the 10mm mark on the screen little by little. Be prepared to stop the stage in case it gets too close to the eyepiece. Do a rough focusing on the highest point of the specimen.Once on focus, click on the icon . This couples the specimen height to the working distance.2.The accelerating voltage can be set between 0-30 kV via the “Electron column”console however, 10 kV will be adequate for most materials. For polymer and glass samples 2-6kV works well and for metals or highly conductive surfaces 30kV will provide high resolution.3.To obtain an image, click on the desired quadrant, 1, 2 or 3, and then click the rabbiticon on the toolbar for fastest render.4.Demagnify as far out as possible when setting up an image by pressing the “-“ key5.Adjust the magnification, focus, stigmator, contrast and brightness to desiredlevels as described below.6.Adjust the contrast and brightness, located on the “Detectors” console, to thedesired levels, or press F9 for the auto contrast brightness (ACB) function.7.Once the brightness and contrast have been adjusted, increase the magnificationusing the “+” key on the keyboard. Other magnification adjustments are• Higher/Lower = (+/-on num pad)• Coarse control = (Crtl key + mouse wheel up/down)• Fine control = (Shift key + mouse wheel up/down)• Round value = (*on num pad)• Select preset value from Magnification menu on the Option page8.Focus the image by holding the right mouse button and moving the mouse left orright.9.The “Spot size” on the “Electron column” console should be adjusted to improvethe image quality; however, in turn the brightness and contrast will need to be readjusted. In general, smaller spot sizes are used for high magnification/resolution while larger spot sizes are more suitable for low magnification and X-ray analysis.10.An area of interest can be moved to the center by locating the mouse pointer over itand double-clicking. To move the sample, the arrow keys, the center scroll button, the stage console, or the x, y and z knobs on the SEM chamber door can also be used.11.To optimize very high magnification imaging, the stigmator can be adjusted byholding the “Shift” key and the right mouse button simultaneously.5. Image Capture1.To capture an image, click on the desired quadrant, 1, 2 or 3.2.By clicking the “-“ button in between the “turtle” and “rabbit” buttons on the toolbarthe render speed can be decreased, thereby increasing the image quality shown on the screen and allowing for a better idea of how the final image will actually look. It is good technique to adjust the brightness and contrast a few times while switching back and forth between fast and slow raster speeds until the extremely bright regions are minimized and muddy looking regions show detailed contrast.3.To have good resolution in your saved image, the image size, located to the rightof the rabbit button, should be 1024x884. This results in an image of around 900kB.4.Now click the “camera” button on the toolbar to initiate a slow scan and capture afinal image.5.File – Save As… to save the image to the “Data” folder.All pictures should besaved under a subfolder with your Supervisor’s name.6.Transfer your images through the internet using the DELL black computer on theground (at the far left). Never insert a USB memory to the SEM computer8. Shut-down Procedure1.Reduce the magnification to its lowest value and turn off the accelerating voltage byclicking the “HV” button on the “Column” console.2.Bring the stage to home while you watch the camera image, checking that the stagewon’t hit anything inside the chamber. In cause of doubt, click “Stop”3.Once the accelerating voltage has been turned off, click the “Vent” button on the“Vacuum” console to bring the system back to ambient pressure.4.Once the system is fully vented, the “Vacuum Status” on the “Vacuum” consolewill display a red box.5.The specimen chamber can now be opened and the sample can be removed. Open thedoor carefully as you watch the camera image to check that the stage won’t hit anything, in particular the eyepiece. Remember user must wear latex gloves when unloading specimens or handling detectors.6. Remove the specimen stub from the socket.7.Now that the sample has been unloaded shut the specimen chamber door. The systemis kept under high vacuum when not in use, so click the “Pump” button on the “Vacuum” console as the door is hold closed. (If the system is in LowVac or ESEM mode, the environmental backing valve(EBV) should be shut when prompted by the computer)8.Wait until the vacuum indicator on the “Vacuum” console has turned green, a fewminutes after pump down has commenced, and record the pressure on the log sheet.9.Under File, log off from the system.1.Close the XT Microscope Control Program and click STOP UI. Shut down thecomputer by clicking the Windows Start button, then selecting Shut Down.puter. Don’t turn off the monitor, as it has a delicate switch.11.Make sure that the door is left locked when you leave9. Troubleshooting9.1 Shut Down Procedure for the SEMIf the program becomes unstable (for example the xT Microscope Control program windowis not updating, or the program crashes), you may need to shut down and restart the computerand/or the SEM. If you are unsure about any of these procedures, contact the Tom Douglass before proceeding.2.Close the xT Microscope Control program, click File, and select Exit. Stop UI.3.Shut down the computer by clicking the Windows Start button, then selecting ShutDown.4.Turn on the computer by pressing the power button.5.Log on. The user name is “supervisor” and the password is “supervisor”6.Double click the shortcut “xT microscope Server”7.Press Start on the xT microscope Server8.Press Start UI9.Again enter “supervisor” as both the user name and password9.2 Blown FilamentIf these is no picture with the HV on, check the Status console. If the filament or emission current reads zero, then the filament may be blown. Contact SEM manager (Tom Douglass)for replacement.9.3 Venting (currently the system is vented with air. A nitrogen dewar will be hooked up in the close future)The system is hooked up to a nitrogen dewar, which provides a clean, dry gas which is letinto the SEM chamber during venting. The gas pressure should be not more than 1-2 psi, to prevent damage to the EDS system. If the dewar is empty, then the vacuum may not be released completely after the system has been vented. In this case, the nitrogen tank pressurewill read zero (or close to zero), and the tank level may show empty (or close to empty).In this case, take an adjustable wrench and remove the plastic hose from the gas regulator fitting. This will allow a path for room air to enter the chamber. Click “pump” and wait untilthe system begins pumping. Then, click “vent” to vent the system. The chamber door should open easily when the vent cycle is completed.Do not force the door. Should you continue to have problems, contact the SEM Manager.9.4 Help FileFurther information is available in the help file. Press F1 to access the online help file, or open the pdf file shortcut on the desktop.10. References10.1 Print referencesScanning Electron Microscopy and X-ray Microanalysis, Goldstein, J., Springer (2003). Scanning Electron Microscopy: A Student's Handbook, Postek, Michael T., et al., Ladd Research Industries (1980).Scanning Electron Microscopy, X-Ray Microanalysis, and Analytical Electron Microscopy: A Laboratory Workbook, Lyman, C., et al, Springer (1990).Electron Optics, Grivet, P., Pergamon Press (1972)10.2 Electronic references for Electron Microscopy/Resources/StudentLearning/tabid/91/language/en-US/Default.aspx/wiki/Scanning_electron_microscope/microscopy/home.html/CMRAcfem/em.htm/CMRAcfem/em.htm/microscopy/guide.aspxPlease contact Prof. Rick Behl (**********************) for Low Vacuum mode or ESEM modeAppendix A – Low Vacuum ModeLow vacuum mode allows a non-conductive or “wet” sample to be imaged by creating a water-vapor-containing atmosphere in the SEM chamber. The pressureallowed range from 0.8 to 1 torr. To operate in LowVac mode the Large Field Detector(LFD), shown in Figure A1, must be installed. The LFD is inserted into the blackconnecter in the rear of the specimen chamber, as shown in Figure A2. The LFD isnormally left in the microscope to enable the user to switch between low and high vacuummode without venting the chamber. When using LowVac mode a PLA cone can be used,if desired. The PLA is installed onto the conical objective (Figure A3).After installing the LFD and PLA and closing the chamber, select “Low Vacuum”on the Vacuum console area of the computer interface. Set the desired starting pressure(0.8 to 1.0 torr), and click “Pump”. Before pumping down, the computer will ask if anycone accessories are being used. Click beside the picture of the accessory being used sothat the system is aware of it presence.The environmental backing valve (EBV), located on the left side of the SEM column, must also be opened (see figure A4). The computer interface will display aprompt when it is time to open this valve.Figure A1. Underside of the Large Field Detector (LFD).Figure A2. Installing the LFD or GSED into the connector in the rear of the chamber can be awkward; be sure to match up the slots in the card with the connector properly.Figure A3. Inserting the GSED or PLA aperture into the conical objective opening where the beam is emitted.Figure A4. Open the environmental backing valve (EBV) only when prompted by the computer system.Appendix B – ESEM ModeESEM mode is used when a higher water vapor pressure than is allowed in low vacuum mode is needed. The pressure in this case can go up to 30 torr. When using ESEM mode the Gaseous Secondary Electron Detector (GSED)must be installed.The GSED has an integrated flexible pc board that must be inserted into the signal connector behind the conical lens (Figures B1 and B2) and an aperture that must be plugged into the conical objective opening were the beam is emitted. This aperture is inserted over the conical objective in the same way a PLA is in Low Vac mode (see figure A3 in the previous section).When using ESEM mode, select “ESEM” on the “Vacuum”console area of the computer interface. The environmental backing valve (EBV) located on the left side of the column must also be opened (see Figure A4 in the previous section). The computer interface will display a prompt when it is time to open this valve.Installing the Gaseous Secondary Electron Detector (GSED)Figure B1. Gaseous Secondary Electron Detector (GSED).Figure B2. Inserting the GSED card into the connector slot.。
- 1、下载文档前请自行甄别文档内容的完整性,平台不提供额外的编辑、内容补充、找答案等附加服务。
- 2、"仅部分预览"的文档,不可在线预览部分如存在完整性等问题,可反馈申请退款(可完整预览的文档不适用该条件!)。
- 3、如文档侵犯您的权益,请联系客服反馈,我们会尽快为您处理(人工客服工作时间:9:00-18:30)。
由于很多时候我们需要把数据进行格式化,方便各个系统之间通信和数据交互,因此难免会经常让人位数不够而进行位数相应数据填充。
比如,你希望获取的是7位的2进制数据格式,而2进制数据格式,都是以0,1都为数据信号的,只有1,0两数据格式,刚我说的是7位,相当于如下:1000101格式,如果,我的数据是101三个长度的2进制数据,但我想返回一个新的并且具有固定长度,位数不够填充0的做法。
string SourceStr="101";
string DestinationStr;
DestinationStr=String.PadLeft(7,"0");
Console.Write(DestinationStr);
以上代码就会输出:0000101
现在解析此函数,此函数有2个重载版本。
重载1:public string PadLeft(int totalWidth);
重载2public string PadLeft(int totalWidth, char paddingChar);
关于重载1的解释,微软的注释为:(这个默认是以空格进行左边填充,保持右边对齐。
)
String.PadLeft (Int32)
右对齐此实例中的字符,在左边用空格填充以达到指定的总长度。
String.PadRight (Int32)
右对齐此实例中的字符,在左边用指定的Unicode 字符填充以达到指定的总长度。
String.PadRight (Int32, Char)
左对齐此字符串中的字符,在右边用指定的Unicode 字符填充以达到指定的总长度。