改变ListCtrl字体和颜色
自己写一个ListCtrl控件(实现栅格属性表的编辑)

栅格数据有属性表和颜色表,属性表描述了像素值和该值代表的内容,同时对应颜色表,表示某一个值对应的颜色(如下图1)。
ArcGIS中提供了对属性表和对应颜色编辑的功能(如下图2)。
我们软件用MFC开发的,发现ListCtrl控件实在不好用,网上有很多重写的demo,没有找到合适的,于是按照功能自己重新写了一个。
之前没自己写过控件,觉得很复杂。
主要是实现某一列单元格可编辑,网上看了一下,思路是双击那一列的时候,出现一个EditCtrl控件,输入值,按了enter键后,把EditCtrl控件的值保存到listctrl那一列中。
下面就是双击后,生成edit控件,然后再双击的地方出现,感觉就好像单元格可编辑一样。
[cpp]view plainc opyprint?1.void CEditListCtrl::OnLButtonDblClk(UINT nFlags, CPoint point)2.{3. LVHITTESTINFO hi;4. hi.pt = point;5.int n = SubItemHitTest(&hi);6.if(n != -1)7. {8.// 不编辑1/2/3列9.if(hi.iSubItem == 1 || hi.iSubItem == 2 || hi.iSubItem == 0)10. {11. CListCtrl::OnLButtonDblClk(nFlags, point);12.return;13. }14. m_nRow = hi.iItem; //行15. m_nCol = hi.iSubItem; //列16.if(m_EditItem.m_hWnd == NULL)17. {18. RECT rect; //edit控件大小19. CRect cRect; //单元格的区域20. rect.left = rect.top = 0;21. rect.bottom = 20;22. rect.right = 100;23. m_EditItem.Create(WS_CHILD | ES_LEFT| ES_AUTOHSCROLL | ES_WANTRETURN | ES_MULTILINE, rect, this, 0x01);24. m_EditItem.SetFont(this->GetFont(), FALSE);25. GetSubItemRect(hi.iItem, hi.iSubItem, LVIR_BOUNDS, cRect);26. m_EditItem.SetWindowText(this->GetItemText(hi.iItem, hi.iSubItem));27. m_EditItem.MoveWindow(&cRect, TRUE);28. m_EditItem.SetFocus();29. m_EditItem.ShowWindow(SW_SHOW);30. }31. }32.}相响应一下enter事件,重写PreTranslateMessage(MSG* pMsg)函数,然后保存edit 框中的数据,[cpp]view plainc opyprint?1.void CEditListCtrl::SetColumnText()2.{3. m_EditItem.ShowWindow(SW_HIDE);4.if(m_nRow != -1)5. {6. CString ItemText;7. m_EditItem.GetWindowText(ItemText);8.this->SetItemText(m_nRow, m_nCol, ItemText);9. }10. m_nCol = m_nRow = -1;11.12.}上面就实现了可编辑的操作;下面是属性对应颜色,把颜色显示在单元格中,本来想修改颜色的,觉得太复杂了,改颜色就用了原来的按钮功能。
改变CListCtrl、CHeaderCtrl高度、字体、颜色和背景
改变CListCtrl、CHeaderCtrl⾼度、字体、颜⾊和背景改变 CListCtrl、CHeaderCtrl ⾼度、字体、颜⾊和背景作者:摘要 ⽤CListCtrl来显⽰数据⽐较⽅便,有时候我们需要标注某⼀列或某⼀个单元格的背景和字体颜⾊,或者需要改变⼀下⾏⾼和字体⼤⼩,CListCtrl要改变这些并不是很⽅便。
本⽂将介绍如何派⽣⼀个类来改变CListCtrl及其表头的⾼度、字体⼤⼩、列背景颜⾊、单元格背景颜⾊、列字体颜⾊、单元格字体颜⾊。
关键字: ⾃绘 ⼦类化 颜⾊ CListCtrl CHeaderCtrl⼀、 实现过程1.表头修改 新建⼀个MFC类CHeaderCtrlCl,其基类为CHeaderCtrl,响应OnPaint消息实现⾃绘,实现代码请看源代码(由于代码较占篇幅,所以就不贴上来了,抱歉),在头⽂件中定义函数LRESULT OnLayout( WPARAM wParam, LPARAM lParam ),之后⼿动添加消息响应ON_MESSAGE(HDM_LAYOUT, OnLayout),在消息响应中改变⾼度,实现代码如下:LRESULT CHeaderCtrlCl::OnLayout( WPARAM wParam, LPARAM lParam ){LRESULT lResult = CHeaderCtrl::DefWindowProc(HDM_LAYOUT, 0, lParam);HD_LAYOUT &hdl = *( HD_LAYOUT * ) lParam;RECT *prc = hdl.prc;WINDOWPOS *pwpos = hdl.pwpos;int nHeight = (int)(pwpos->cy * m_Height); //改变⾼度,m_Height为倍数pwpos->cy = nHeight;prc->top = nHeight;return lResult;}2. 表的修改 新建⼀个MFC类CListCtrlCl,其基类为CListCtrl,定义⼀个CHeaderCtrlCl的成员变量m_Header,重载PreSubclassWindow(),在函数中修改控件类型为⾃绘模式,然后⼦类化表头,代码如下:void CListCtrlCl::PreSubclassWindow(){// TODO: 在此添加专⽤代码和/或调⽤基类ModifyStyle(0,LVS_OWNERDRAWFIXED);CListCtrl::PreSubclassWindow();CHeaderCtrl *pHeader = GetHeaderCtrl();m_Header.SubclassWindow(pHeader->GetSafeHwnd());}添加成员变量,保存⼀些基本信息。
ListControl控件技巧总汇

ListControl控件技巧总汇一、基本使用1. 创建List Control控件:使用CListCtrl类的Create函数来创建List Control控件,并指定样式。
2. 设置List Control控件的样式:使用SetExtendedStyle函数来设置List Control控件的扩展样式,例如设置带有网格线、可以选择多行等等。
3. 添加列表项:使用InsertItem函数来添加列表项,可以指定列表项的文本和图标等属性。
4. 设置列标题:使用InsertColumn函数来设置列标题,可以指定列的索引、宽度、文本等属性。
二、列表项操作1. 删除列表项:使用DeleteItem函数来删除指定索引的列表项。
2. 修改列表项:使用SetItemText函数来修改指定索引的列表项的文本。
3. 获取列表项:使用GetItemText函数来获取指定索引的列表项的文本。
4. 设置列表项属性:使用SetItemData函数来设置列表项的用户数据,可以将数据与列表项关联起来。
三、列操作1. 删除列:使用DeleteColumn函数来删除指定索引的列。
2. 移动列:使用SetColumnOrderArray函数来移动列的顺序。
3. 调整列宽:使用SetColumnWidth函数来调整列的宽度。
四、列表样式修改1. 修改行高:使用SetItemHeight函数来修改列表项的行高。
2. 修改列宽:使用SetColumnWidth函数来修改列的宽度。
3.绘制单元格背景:使用NM_CUSTOMDRAW消息来绘制列表项的背景,可以自定义背景色或者绘制图标。
五、排序功能1. 启用排序:使用EnableHeaderSorting函数来启用列表项的排序功能。
2.排序回调:使用排序回调函数来自定义排序的规则。
3. 刷新列表:使用SortItems函数来刷新列表,使得排序生效。
六、自定义绘制1.自定义绘制列表项:使用NM_CUSTOMDRAW消息来自定义绘制列表项的外观,例如修改字体、颜色等。
改变ListCtrl字体和颜色
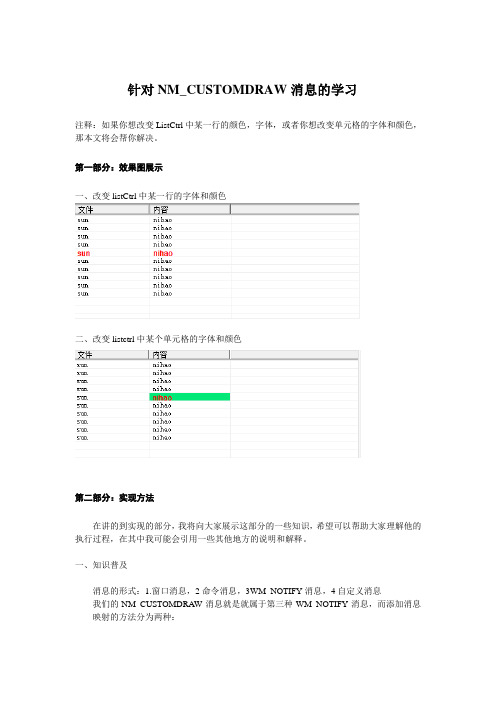
针对NM_CUSTOMDRAW消息的学习注释:如果你想改变ListCtrl中某一行的颜色,字体,或者你想改变单元格的字体和颜色,那本文将会帮你解决。
第一部分:效果图展示一、改变listCtrl中某一行的字体和颜色二、改变listctrl中某个单元格的字体和颜色第二部分:实现方法在讲的到实现的部分,我将向大家展示这部分的一些知识,希望可以帮助大家理解他的执行过程,在其中我可能会引用一些其他地方的说明和解释。
一、知识普及消息的形式:1.窗口消息,2命令消息,3WM_NOTIFY消息,4自定义消息我们的NM_CUSTOMDRAW消息就是就属于第三种WM_NOTIFY消息,而添加消息映射的方法分为两种:1. BEGIN_MESSAGE_MAP(CListCtrlColor, CListCtrl)ON_NOTIFY_REFLECT(NM_CUSTOMDRAW,OnCustomMyList)END_MESSAGE_MAP()2.BEGIN_MESSAGE_MAP(CListCtrlColor,CListCtrl)ON_NOTIFY(NM_CUSTOMDRAW,IDC_LIST,OnCustomMyLIst)END_MESSAGE_MAP()第一种用到的是消息反射机制:在Windows的消息处理中,控制子窗口的发给其父窗口的通知消息只能由其父窗口进行处理,这使得控制子窗口的自身能动性大大降低(你想,它连改变自己的背景色,处理一个自身滚动问题都要其父窗口来完成),为了解决这个问题,在MFC中引入了反射消息“Reflect Message”的概念,进行消息反射,可以使得控制子窗口能够自行处理与自身相关的一些消息,增强了封装性,从而提高了控制子窗口的可重用性。
通常在封装一些类是就用这个,比如本文中用的封装类,就是以CListCtrl控件作为基类,第二种则常用在父窗口中不用反射,直接由父窗口处理该消息。
例如:创建基于对话框的窗口,在其上加入CListCtrl控件,则用第二种对该控件发生的变化做出处理。
mfc listctrl单元格颜色

mfc listctrl单元格颜色mfc listctrl是一种用于显示列表和图标的控件,常用于Windows应用程序开发中。
其中一个常见的需求是根据数据的值为列表的单元格设置不同的颜色。
在本文中,我们将一步一步地讲解如何使用mfc listctrl控件来设置单元格的颜色。
首先,我们需要创建一个MFC窗口应用程序。
接下来,在资源视图中,找到并双击“Dialog”文件夹中的“Dialog”文件,来创建一个对话框。
在对话框设计器中,右键单击对话框并选择“添加类”,然后在“类名”字段中输入“CMyDlg”,点击“确定”按钮创建一个对话框类。
接下来,打开CMyDlg类的头文件,在其中添加以下成员变量和函数声明:cppclass CMyDlg : public CDialog{...CListCtrl m_listCtrl;void SetCellColor(int row, int col, COLORREF color);};在CMyDlg类的实现文件中,添加下面的代码来创建mfc listctrl控件和设置单元格的默认背景颜色:cppBOOL CMyDlg::OnInitDialog(){CDialog::OnInitDialog();创建mfc listctrl控件m_listCtrl.Create(WS_VISIBLE WS_CHILD LVS_REPORT, CRect(10, 10, 400, 300), this, IDC_LISTCTRL);设置表头m_listCtrl.InsertColumn(0, _T("序号"), LVCFMT_LEFT, 100);m_listCtrl.InsertColumn(1, _T("姓名"), LVCFMT_LEFT, 100);m_listCtrl.InsertColumn(2, _T("成绩"), LVCFMT_LEFT, 100);插入数据m_listCtrl.InsertItem(0, _T("1"));m_listCtrl.SetItemText(0, 1, _T("张三"));m_listCtrl.SetItemText(0, 2, _T("90"));m_listCtrl.InsertItem(1, _T("2"));m_listCtrl.SetItemText(1, 1, _T("李四"));m_listCtrl.SetItemText(1, 2, _T("80"));设置单元格默认背景颜色for (int row = 0; row < m_listCtrl.GetItemCount(); row++) {for (int col = 0; col <m_listCtrl.GetHeaderCtrl()->GetItemCount(); col++){SetCellColor(row, col, RGB(255, 255, 255));}}return TRUE;}void CMyDlg::SetCellColor(int row, int col, COLORREF color) {LVITEM lvItem;lvItem.mask = LVIF_BACKGROUND LVIF_STATE;lvItem.iItem = row;lvItem.iSubItem = col;lvItem.state = 0;lvItem.stateMask = LVIS_SELECTED LVIS_FOCUSED;lvItem.pszText = nullptr;hTextMax = 0;lvItem.iImage = 0;lvItem.lParam = 0;lvItem.crBkCol = color;m_listCtrl.SetItem(&lvItem);}以上代码中,OnInitDialog()函数用于初始化对话框,在其中创建listctrl 控件、设置表头和插入数据。
ListCtrl控件使用方法和经验大全
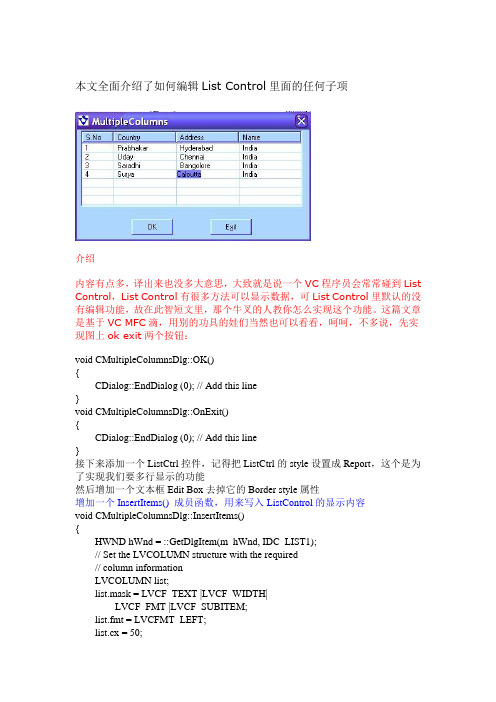
本文全面介绍了如何编辑List Control里面的任何子项介绍内容有点多,译出来也没多大意思,大致就是说一个VC程序员会常常碰到List Control,List Control有很多方法可以显示数据,可List Control里默认的没有编辑功能,故在此智短文里,那个牛叉的人教你怎么实现这个功能。
这篇文章是基于VC MFC滴,用别的功具的娃们当然也可以看看,呵呵,不多说,先实现图上ok exit两个按钮:void CMultipleColumnsDlg::OK(){CDialog::EndDialog (0); // Add this line}void CMultipleColumnsDlg::OnExit(){CDialog::EndDialog (0); // Add this line}接下来添加一个ListCtrl控件,记得把ListCtrl的style设置成Report,这个是为了实现我们要多行显示的功能然后增加一个文本框Edit Box去掉它的Border style属性增加一个InsertItems() 成员函数,用来写入ListControl的显示内容void CMultipleColumnsDlg::InsertItems(){HWND hWnd = ::GetDlgItem(m_hWnd, IDC_LIST1);// Set the LVCOLUMN structure with the required// column informationLVCOLUMN list;list.mask = LVCF_TEXT |LVCF_WIDTH|LVCF_FMT |LVCF_SUBITEM;list.fmt = LVCFMT_LEFT;list.cx = 50;list.pszText = "S.No";list.iSubItem = 0;//Inserts the column::SendMessage(hWnd,LVM_INSERTCOLUMN, (WPARAM)0,(WPARAM)&list);list.cx = 100;list.pszText = "Name";list.iSubItem = 1;::SendMessage(hWnd ,LVM_INSERTCOLUMN, (WPARAM)1,(WPARAM)&list);list.cx = 100;list.pszText = "Address";list.iSubItem = 2;::SendMessage(hWnd ,LVM_INSERTCOLUMN, (WPARAM)1,(WPARAM)&list);list.cx = 100;list.pszText = "Country";list.iSubItem = 2;::SendMessage(hWnd ,LVM_INSERTCOLUMN, (WPARAM)1,(WPARAM)&list);// Inserts first Row with four columns .SetCell(hWnd,"1",0,0);SetCell(hWnd,"Prabhakar",0,1);SetCell(hWnd,"Hyderabad",0,2);SetCell(hWnd,"India",0,3);// Inserts second Row with four columns .SetCell(hWnd,"2",1,0);SetCell(hWnd,"Uday",1,1);SetCell(hWnd,"Chennai",1,2);SetCell(hWnd,"India",1,3);}自定义的SetCell( ) 函数,用来实现插入数据用的void CMultipleColumnsDlg::SetCell(HWND hWnd1, CString value, int nRow, int nCol){TCHAR szString [256];wsprintf(szString,value ,0);//Fill the LVITEM structure with the//values given as parameters.LVITEM lvItem;lvItem.mask = LVIF_TEXT;lvItem.iItem = nRow;lvItem.pszText = szString;lvItem.iSubItem = nCol;if(nCol >0)//set the value of listItem::SendMessage(hWnd1,LVM_SETITEM,(WPARAM)0,(WPARAM)&lvItem);else//Insert the value into ListListView_InsertItem(hWnd1,&lvItem);}//通过行和列得到项目里面的数据CString CMultipleColumnsDlg::GetItemText(HWND hWnd, int nItem, int nSubItem) const{LVITEM lvi;memset(&lvi, 0, sizeof(LVITEM));lvi.iSubItem = nSubItem;CString str;int nLen = 128;int nRes;do{nLen *= 2;hTextMax = nLen;lvi.pszText = str.GetBufferSetLength(nLen);nRes = (int)::SendMessage(hWnd,LVM_GETITEMTEXT, (WPARAM)nItem,(LPARAM)&lvi);str.ReleaseBuffer();return str;}//为窗口类添加两个成员变量:int nItem, nSubItem;用Class wizard 添加NM_CLICK 响应,当用户点击任何位置时,就会对应出现一个Edit Box,并可以修改数据void CMultipleColumnsDlg::OnClickList(NMHDR* pNMHDR, LRESULT* pResult){Invalidate();HWND hWnd1 = ::GetDlgItem (m_hWnd,IDC_LIST1);LPNMITEMACTIVATE temp = (LPNMITEMACTIVATE) pNMHDR;RECT rect;//get the row numbernItem = temp->iItem;//get the column numbernSubItem = temp->iSubItem;if(nSubItem == 0 || nSubItem == -1 || nItem == -1)return ;//Retrieve the text of the selected subItem//from the listCString str = GetItemText(hWnd1,nItem ,nSubItem);RECT rect1,rect2;// this macro is used to retrieve the Rectanle// of the selected SubItemListView_GetSubItemRect(hWnd1,temp->iItem,temp->iSubItem,LVIR_BOUNDS,&rect);//Get the Rectange of the listControl::GetWindowRect(temp->hdr.hwndFrom,&rect1);//Get the Rectange of the Dialog::GetWindowRect(m_hWnd,&rect2);int x=rect1.left-rect2.left;int y=rect1.top-rect2.top;if(nItem != -1)::SetWindowPos(::GetDlgItem(m_hWnd,IDC_EDIT1),HWND_TOP,rect.left+x,rect.top+4,rect.right-rect.left - 3,rect.bottom-rect.top -1,NULL);::ShowWindow(::GetDlgItem(m_hWnd,IDC_EDIT1),SW_SHOW);::SetFocus(::GetDlgItem(m_hWnd,IDC_EDIT1));//Draw a Rectangle around the SubItem::Rectangle(::GetDC(temp->hdr.hwndFrom),rect.left,rect.top-1,rect.right,rect.bottom);//Set the listItem text in the EditBox::SetWindowText(::GetDlgItem(m_hWnd,IDC_EDIT1),str);*pResult = 0;}To handle the ENTER key we need to write the virtual function OnOk(响应ENTER 键)afx_msg void OnOK();In MultipleColumnsDlg.cpp write the following code.// This function handles the ENTER keyvoid CMultipleColumnsDlg::OnOK(){CWnd* pwndCtrl = GetFocus();// get the control ID which is// presently having the focusint ctrl_ID = pwndCtrl->GetDlgCtrlID();CString str;switch (ctrl_ID){ //if the control is the EditBoxcase IDC_EDIT1://get the text from the EditBoxGetDlgItemText(IDC_EDIT1,str);//set the value in the listContorl with the//specified Item & SubItem valuesSetCell(::GetDlgItem (m_hWnd,IDC_LIST1),str,nItem,nSubItem);::SendDlgItemMessage(m_hWnd,IDC_EDIT1,WM_KILLFOCUS,0,0);::ShowWindow(::GetDlgItem(m_hWnd,IDC_EDIT1),SW_HIDE);break;default:break;}}最后一步在OnInitDialog 中设置List Control的样式ListView_SetExtendedListViewStyle(::GetDlgItem(m_hWnd,IDC_LIST1),LVS_EX_FULLROWSELECT |LVS_EX_GRIDLINES);InsertItems();::ShowWindow(::GetDlgItem(m_hWnd,IDC_EDIT1),SW_HIDE);IntroductionAlmost every one of us who are programming in VC++ , will come across the List control. There are many cases where there is a need to represent data in List Control in multiple columns. By default it is not possible to modify the data in the List control itself. In this small article I am putting a simple way to edit any value in any column in a Report style List control. The logic here is simple, whenever user clicks on an sub-item which he wants to modify at that place I am displaying a edit box and allowing to modify the value. Once modified and by clicking the ENTER key, the updated value is set in the List control. Here I am assuming the user is familiar with VC++ and using Class WizardImplementation steps:ing MFC AppWizard, create a Dialog Based application. Give theapplication nam e as MultipleColumns. By default the wizard adds OK andCancel buttons to the Dialog, Remove these two butt ons.2.Now Add a List-Control and in properties change the style to Report, thisstyle is necessary if we want m ultiple columns3.Add two buttons to the Dialog and name them as OK and Exit4.Add one Edit box and in the properties remove the Border styleing the Class Wizard add the m essage handlers for the OK and ExitButtons. Add the following code to those functionsCollapse Copy Codevoid CMultipleColumnsDlg::OK(){CDialog::EndDialog (0); // Add this line}Collapse Copy Codevoid CMultipleColumnsDlg::OnExit(){CDialog::EndDialog (0); // Add this line}6.Add a function called InsertItems() to the CMulipleColumnsDlg class.Collapse Copy Codevoid InsertItems();In the function handler add the following codeCollapse Copy Code// This function inserts the default values// into the listControlvoid CMultipleColumnsDlg::InsertItems(){HWND hWnd = ::GetDlgItem(m_hWnd, IDC_LIST1);// Set the LVCOLUMN structure with the required// column informationLVCOLUMN list;list.mask = LVCF_TEXT |LVCF_WIDTH|LVCF_FMT |LVCF_SUBITEM;list.fmt = LVCFMT_LEFT;list.cx = 50;list.pszText = "S.No";list.iSubItem = 0;//Inserts the column::SendMessage(hWnd,LVM_INSERTCOLUMN,(WPARAM)0,(WPARAM)&list);list.cx = 100;list.pszText = "Name";list.iSubItem = 1;::SendMessage(hWnd ,LVM_INSERTCOLUMN,(WPARAM)1,(WPARAM)&list);list.cx = 100;list.pszText = "Address";list.iSubItem = 2;::SendMessage(hWnd ,LVM_INSERTCOLUMN,(WPARAM)1,(WPARAM)&list);list.cx = 100;list.pszText = "Country";list.iSubItem = 2;::SendMessage(hWnd ,LVM_INSERTCOLUMN,(WPARAM)1,(WPARAM)&list);// Inserts first Row with four columns .SetCell(hWnd,"1",0,0);SetCell(hWnd,"Prabhakar",0,1);SetCell(hWnd,"Hyderabad",0,2);SetCell(hWnd,"India",0,3);// Inserts second Row with four columns .SetCell(hWnd,"2",1,0);SetCell(hWnd,"Uday",1,1);SetCell(hWnd,"Chennai",1,2);SetCell(hWnd,"India",1,3);// Inserts third Row with four columns .SetCell(hWnd,"3",2,0);SetCell(hWnd,"Saradhi",2,1);SetCell(hWnd,"Bangolore",2,2);SetCell(hWnd,"India",2,3);// Inserts fourth Row with four columns .SetCell(hWnd,"4",3,0);SetCell(hWnd,"Surya",3,1);SetCell(hWnd,"Calcutta",3,2);SetCell(hWnd,"India",3,3);}7.Add another function called SetCell( ) to the CMultipleColumnsDlgclassCollapse Copy Codevoid SetCell(HWND hWnd1, CString value, int nRow, int nCol);In the function handler add the following codeCollapse Copy Code// This function set the text in the specified// SubItem depending on the Row and Column valuesvoid CMultipleColumnsDlg::SetCell(HWND hWnd1,CString value, int nRow, int nCol){TCHAR szString [256];wsprintf(szString,value ,0);//Fill the LVITEM structure with the//values given as parameters.LVITEM lvItem;lvItem.mask = LVIF_TEXT;lvItem.iItem = nRow;lvItem.pszText = szString;lvItem.iSubItem = nCol;if(nCol >0)//set the value of listItem::SendMessage(hWnd1,LVM_SETITEM,(WPARAM)0,(WPARAM)&lvItem);else//Insert the value into ListListView_InsertItem(hWnd1,&lvItem);}8.Add one more function called GetItemText() to the sam e ClassCollapse Copy CodeCString GetItemText(HWND hWnd, int nItem, int nSubItem) const;Inside the function add the following codeCollapse Copy Code//this function will returns the item//text depending on the item and SubItem IndexCString CMultipleColumnsDlg::GetItemText(HWND hWnd, int nItem, int nSubItem) const{LVITEM lvi;memset(&lvi, 0, sizeof(LVITEM));lvi.iSubItem = nSubItem;CString str;int nLen = 128;int nRes;do{nLen *= 2;hTextMax = nLen;lvi.pszText = str.GetBufferSetLength(nLen);nRes = (int)::SendMessage(hWnd,LVM_GETITEMTEXT, (WPARAM)nItem,(LPARAM)&lvi);str.ReleaseBuffer();return str;}9.Also add two m ember variables to the CMultipleColumnsDlg class whichare of type intCollapse Copy Codeint nItem, nSubItem;10.From the Class wizard add NM_CLICK notification to the List control. Insidethe function handler write the following codeCollapse Copy Code//This function Displays an EditBox at the position//where user clicks on a particular SubItem with//Rectangle are equal to the SubItem, thus allows to//modify the valuevoid CMultipleColumnsDlg::OnClickList(NMHDR* pNMHDR, LRESULT* pResult){Invalidate();HWND hWnd1 = ::GetDlgItem (m_hWnd,IDC_LIST1);LPNMITEMACTIVATE temp = (LPNMITEMACTIVATE) pNMHDR;RECT rect;//get the row numbernItem = temp->iItem;//get the column numbernSubItem = temp->iSubItem;if(nSubItem == 0 || nSubItem == -1 || nItem == -1)return ;//Retrieve the text of the selected subItem//from the listCString str = GetItemText(hWnd1,nItem ,nSubItem);RECT rect1,rect2;// this macro is used to retrieve the Rectanle// of the selected SubItemListView_GetSubItemRect(hWnd1,temp->iItem,temp->iSubItem,LVIR_BOUNDS,&rect);//Get the Rectange of the listControl::GetWindowRect(temp->hdr.hwndFrom,&rect1);//Get the Rectange of the Dialog::GetWindowRect(m_hWnd,&rect2);int x=rect1.left-rect2.left;int y=rect1.top-rect2.top;if(nItem != -1)::SetWindowPos(::GetDlgItem(m_hWnd,IDC_EDIT1),HWND_TOP,rect.left+x,rect.top+4,rect.right-rect.left - 3,rect.bottom-rect.top -1,NULL);::ShowWindow(::GetDlgItem(m_hWnd,IDC_EDIT1),SW_SHOW);::SetFocus(::GetDlgItem(m_hWnd,IDC_EDIT1));//Draw a Rectangle around the SubItem::Rectangle(::GetDC(temp->hdr.hwndFrom),rect.left,rect.top-1,rect.right,rect.bottom);//Set the listItem text in the EditBox::SetWindowText(::GetDlgItem(m_hWnd,IDC_EDIT1),str);*pResult = 0;}11.To handle the ENTER key we need to write the virtual function OnOk in theMultipleColumnsDlg.h, so add the following as protected m emberCollapse Copy Codeafx_msg void OnOK();In MultipleColumnsDlg.cpp write the following code.Collapse Copy Code// This function handles the ENTER keyvoid CMultipleColumnsDlg::OnOK(){CWnd* pwndCtrl = GetFocus();// get the control ID which is// presently having the focusint ctrl_ID = pwndCtrl->GetDlgCtrlID();CString str;switch (ctrl_ID){ //if the control is the EditBoxcase IDC_EDIT1://get the text from the EditBoxGetDlgItemText(IDC_EDIT1,str);//set the value in the listContorl with the//specified Item & SubItem valuesSetCell(::GetDlgItem (m_hWnd,IDC_LIST1),str,nItem,nSubItem);::SendDlgItemMessage(m_hWnd,IDC_EDIT1,WM_KILLFOCUS,0,0);::ShowWindow(::GetDlgItem(m_hWnd,IDC_EDIT1),SW_HIDE);break;default:break;}}12.The last step in the im plementation is add the following code in side theOnInitDialog functionCollapse Copy Code//Set the style to listControlListView_SetExtendedListViewStyle(::GetDlgItem(m_hWnd,IDC_LIST1),LVS_EX_FULLROWSELECT |LVS_EX_GRIDLINES);InsertItems();::ShowWindow(::GetDlgItem(m_hWnd,IDC_EDIT1),SW_HIDE);VC/MFC之ListCtrl控件使用经验总结以下未经说明,listctrl默认view 风格为report相关类及处理函数MFC:CListCtrl类SDK:以“ListView_”开头的一些宏。
ListControl控件的使用方法
ListControl控件的使用方法列表控件可以看作是功能增强的ListBox,它提供了四种风格,而且可以同时显示一列的多中属性值。
MFC中使用CListCtrl类来封装列表控件的各种操作。
通过调用BOOL Create( DWORD dwStyle, const RECT& rect, CWnd* pParentWnd, UINT nID );创建一个窗口,dwStyle中可以使用以下一些列表控件的专用风格:LVS_ICON ,LVS_SMALLICON ,LVS_LIST, LVS_REPORT 这四种风格决定控件的外观,同时只可以选择其中一种,分别对应:大图标显示,小图标显示,列表显示,详细报表显示LVS_EDITLABELS 结点的显示字符可以被编辑,对于报表风格来讲可编辑的只为第一列。
LVS_SHOWSELALWAYS 在失去焦点时也显示当前选中的结点LVS_SINGLESEL 同时只能选中列表中一项首先你需要设置列表控件所使用的ImageList,如果你使用大图标显示风格,你就需要以如下形式调用:CImageList* SetImageList( CImageList* pImageList, LVSIL_NORMAL);如果使用其它三种风格显示而不想显示图标你可以不进行任何设置,否则需要以如下形式调用:CImageList* SetImageList( CImageList* pImageList, LVSIL_SMALL);int InsertItem( int nItem, LPCTSTR lpszItem ); 插入行nItem:指明插入位置lpszItem:为显示字符。
除LVS_REPORT风格外其他三种风格都只需要直接调用InsertItem就可以了,但如果使用报表风格就必须先设置列表控件中的列信息。
int InsertColumn( int nCol, LPCTSTR lpszColumnHeading, int nFormat , int nWidth, int nSubItem); 插入列iCol:为列的位置,从零开始lpszColumnHeading:为显示的列名nFormat:为显示对齐方式nWidth:为显示宽度nSubItem:为分配给该列的列索引。
设置LISTControl控件某一行的背景和文字颜色
设置LISTControl控件某⼀⾏的背景和⽂字颜⾊定义宏⽤listcontrol的SetItemData设置某⼀⾏的属性,通过⾃定义属性标识实现。
⾃定义某⾏内容颜⾊属性:#define COLOR_DEFAULT 0 //默认颜⾊#define COLOR_RED 1 //红⾊#define COLOR_BLUE 2 //蓝⾊定义消息调⽤BOOL SetItemData(In int nItem, In DWORD_PTR dwData);其中nItem为某⾏位置,下标以0开始,dwData可为⾃定义颜⾊属性。
然后在LISTControl控件中的NM_CUSTOMDRAW事件中处理。
void CListControlExampleDlg::OnNMCustomdrawList1(NMHDR *pNMHDR, LRESULT *pResult){LPNMTVCUSTOMDRAW pNMCD = reinterpret_cast<LPNMTVCUSTOMDRAW>(pNMHDR);// TODO: 在此添加控件通知处理程序代码NMCUSTOMDRAW nmCustomDraw = pNMCD->nmcd;switch(nmCustomDraw.dwDrawStage){case CDDS_ITEMPREPAINT:{if (COLOR_BLUE == nmCustomDraw.lItemlParam){pNMCD->clrTextBk = RGB(51, 153, 255);pNMCD->clrText = RGB(255, 255, 255);}else if (COLOR_RED == nmCustomDraw.lItemlParam){pNMCD->clrTextBk = RGB(255, 0, 0); //背景颜⾊pNMCD->clrText = RGB(255, 255, 255); //⽂字颜⾊}else if (COLOR_DEFAULT == nmCustomDraw.lItemlParam){pNMCD->clrTextBk = RGB(255, 255, 255);pNMCD->clrText = RGB(0, 0, 0);}else{//}break;}default:{break;}}*pResult = 0;*pResult |= CDRF_NOTIFYPOSTPAINT; //必须有,不然就没有效果*pResult |= CDRF_NOTIFYITEMDRAW; //必须有,不然就没有效果return;}调⽤⽅法void CListControlExampleDlg::OnBnClickedButton1() {// TODO: 在此添加控件通知处理程序代码m_lstControl.SetItemData(0, COLOR_BLUE);m_lstControl.SetItemData(1, COLOR_DEFAULT);return;}void CListControlExampleDlg::OnBnClickedButton2() {// TODO: 在此添加控件通知处理程序代码m_lstControl.SetItemData(0, COLOR_DEFAULT);m_lstControl.SetItemData(1, COLOR_RED);return;}参考mfc中设置listcontrol某⼀⾏的背景和⽂字颜⾊。
ListCtrl控件的风格设置
1. ListCtrl 风格LVS_ICON: 为每个item显示大图标LVS_SMALLICON: 为每个item显示小图标LVS_LIST: 显示一列带有小图标的itemLVS_REPORT: 显示item详细资料直观的理解:windows资源管理器,“查看”标签下的“大图标,小图标,列表,详细资料”--------------------------------------------------------------------------------2. 设置listctrl 风格及扩展风格LONG lStyle;lStyle = GetWindowLong(m_list.m_hWnd, GWL_STYLE);//获取当前窗口stylelStyle &= ~LVS_TYPEMASK; //清除显示方式位lStyle |= LVS_REPORT; //设置styleSetWindowLong(m_list.m_hWnd, GWL_STYLE, lStyle);//设置styleDWORD dwStyle = m_list.GetExtendedStyle();dwStyle |= LVS_EX_FULLROWSELECT;//选中某行使整行高亮(只适用与report风格的listctrl)dwStyle |= LVS_EX_GRIDLINES;//网格线(只适用与report风格的listctrl)dwStyle |= LVS_EX_CHECKBOXES;//item前生成checkbox控件m_list.SetExtendedStyle(dwStyle); //设置扩展风格--------------------------------------------------------------------------------3. 插入数据m_list.InsertColumn( 0, "ID", LVCFMT_LEFT, 40 );//插入列m_list.InsertColumn( 1, "NAME", LVCFMT_LEFT, 50 );int nRow = m_list.InsertItem(0, “11”);//插入行m_list.SetItemText(nRow, 1, “jacky”);//设置数据--------------------------------------------------------------------------------4. 一直选中item选中style中的Show selection always,或者在上面第2点中设置LVS_SHOWSELALWAYS--------------------------------------------------------------------------------5. 选中和取消选中一行int nIndex = 0;//选中m_list.SetItemState(nIndex, LVIS_SELECTED|LVIS_FOCUSED, LVIS_SELECTED|LVIS_FOCUSED);//取消选中m_list.SetItemState(nIndex, 0, LVIS_SELECTED|LVIS_FOCUSED);--------------------------------------------------------------------------------6. 得到listctrl中所有行的checkbox的状态m_list.SetExtendedStyle(LVS_EX_CHECKBOXES);CString str;for(int i=0; i<m_list.GetItemCount(); i ){if( m_list.GetItemState(i, LVIS_SELECTED) == LVIS_SELECTED || m_list.GetCheck(i)){str.Format(_T("第%d行的checkbox为选中状态"), i);AfxMessageBox(str);}}CString strIns;strIns="delete from tmpStatByGround";m_pRs.CreateInstance(__uuidof(Recordset));m_pRs->CursorLocation = adUseClient;m_pRs->Open((LPCTSTR)strIns, vDispatch, adOpenKeyset,adLockOptimistic, adCmdUnknown);--------------------------------------------------------------------------------7. 得到listctrl中所有选中行的序号方法一:CString str;for(int i=0; i<m_list.GetItemCount(); i ){if( m_list.GetItemState(i, LVIS_SELECTED) == LVIS_SELECTED ){str.Format(_T("选中了第%d行"), i);AfxMessageBox(str);}}方法二:POSITION pos = m_list.GetFirstSelectedItemPosition();if (pos == NULL)TRACE0("No items were selected!\n");else{while (pos){int nItem = m_list.GetNextSelectedItem(pos);TRACE1("Item %d was selected!\n", nItem);// you could do your own processing on nItem here}}--------------------------------------------------------------------------------8. 得到item的信息TCHAR szBuf[1024];LVITEM lvi;lvi.iItem = nItemIndex;lvi.iSubItem = 0;lvi.mask = LVIF_TEXT;lvi.pszText = szBuf;hTextMax = 1024;m_list.GetItem(&lvi);--------------------------------------------------------------------------------9. 得到listctrl的所有列的header字符串内容LVCOLUMN lvcol;char str[256];int nColNum;CString strColumnName[4];//假如有4列nColNum = 0;lvcol.mask = LVCF_TEXT;lvcol.pszText = str;hTextMax = 256;while(m_list.GetColumn(nColNum, &lvcol)){strColumnName[nColNum] = lvcol.pszText;nColNum ;}--------------------------------------------------------------------------------10. 使listctrl中一项可见,即滚动滚动条m_list.EnsureVisible(i, FALSE);--------------------------------------------------------------------------------11. 得到listctrl列数int nHeadNum = m_list.GetHeaderCtrl()->GetItemCount();--------------------------------------------------------------------------------12. 删除所有列方法一:while ( m_list.DeleteColumn (0))因为你删除了第一列后,后面的列会依次向上移动。
如何改变控件的字体和字体颜色
如何改变控件的字体和字体颜色如何改变控件的字体和字体颜色问题详述很多时候,对话框上各种子控件需要不同的的字体以达到某种效果,该如何实现呢?专家解答由于控件也是窗口,用户可以调用CWnd::SetFont指定新字体。
该函数用了一个CFont指针,要保证在控件撤销之前不能撤销该字体对象。
下面介绍一下该函数:CWnd::SetFontThis method sets the current font of the window to the specified font.void SetFont(CFont* pFont,BOOL bRedraw = TRUE );ParameterspFontSpecifies the new font.bRedrawIf TRUE, redraw the CWnd object.RequirementsWindows CE versions: 1.0 and laterHeader file: Declared in Afxwin.hPlatform: H/PC Pro, Palm-size PC, Pocket PC与此函数对应的还有CFont::GetFontCWnd::GetFontThis method retrieves the current font for this window.CFont* GetFont( )const;Return ValueReturns a pointer to a CFont that contains the current font.The pointer may be temporary and should not be stored for later use.RequirementsWindows CE versions: 1.0 and laterHeader file: Declared in Afxwin.hPlatform: H/PC Pro, Palm-size PC, Pocket PC本问题的对应工程为CtrlFont,相关代码如下://在对话框头文件中声明两个字体变量,分别对应两个按钮的字体Protected:CFont m_fntOk;//ok按钮对应的字体CFont m_fntCancel;//cancel按钮对应的字体//设置字体BOOL CCtrlFontDlg::OnInitDialog(){CDialog::OnInitDialog();//创建字体m_fntOk.CreateFont(MulDiv(8,GetDC()->GetDeviceCaps(LO GPIXELSY),72),0,0,0,FW_NORMAL,0,0,0,ANSI_CHARSET,OUT_STR OKE_PRECIS,CLIP_STROKE_PRECIS,DRAFT_QUALITY,VARIABLE_PI TCH|FF_SWISS,_T(“Arial”));//设置ok按钮的字体CWnd *pWnd=GetDlgItem(IDOK);pWnd-.SetFont(&m_fntOk);//创建字体m_fntCancel.CreateFont(12,10,10,10,FW_NORMAL,FALSE,FALSE,0,ANSI_CHARSET,OUT_DEFAULT_PRECIS,CLIP_DEFAULT_PRE CIS,DEFAULT_QUALITY,DEFAULT_PITCH|SWISS,””);//设置cancel按钮的字体pWnd=GetDlgItem(IDCANCEL);pWnd->SetFont(&m_fntCancel);//IDM_ABOUTBOX must be in the system command range.ASSERT((IDM_ABOUTBOX&0xFFF0)==IDM_ABOUTBOX);ASSERT(IDM_ABOUTBOX<0xF000);CMenu* pSysMenu=GetSystemMenu(FALSE);If(pSysMenu!=NULL){CString strAboutMenu;strAboutMenu.LoadString(IDS_ABOUTBOX);if(!strAboutMenu.IsEmpty()){pSysMenu->AppendMenu(MF_AEPARATOR);pSysMenu->AppendMenu(MF_STRING,IDM_ABOUTBOX,str AboutMenu);}}//Set the icon for this dialog. The framework does this automatically//when the application’s main window is not a dialogSetIcon(m_hIcon,TRUE);SetIcon(m_hIcon,FALSE);Return TRUE;}//设置字体颜色在MFC类库中提供了CWnd::OnCtlColor函数在工作框架的窗口被重画时将调用该成员函数,因此可以重载WM_CTLCOLOR消息的响应函数,此函数的原型:CWnd::OnCtlColorThis method is called by the framework when a child control is about to be drawn. Most controls send this message to their parent, usually a dialog box, to prepare the pDC for drawing the control using the correct colors.afx_msg HBRUSH OnCtlColor(CDC* pDC,CWnd* pWnd,UINT nCtlColor);ParameterspDCContains a pointer to the display context for the child window. May be temporary.pWndContains a pointer to the control asking for the color. May be temporary.nCtlColorContains one of the following values, specifying the type of control: (指定控件的类型)· CTLCOLOR_BTN Button control (按钮控件)· CTLCOLOR_DLG Dialog box (对话框)· CTLCOLOR_EDIT Edit control (编辑控件)· CTLCOLOR_LISTBOX List-box control (列表控件)· CTLCOLOR_MSGBOX Message box (消息框)· CTLCOLOR_SCROLLBAR Scroll-bar control (滚动条控件)· CTLCOLOR_STATIC Static control (静态控件)Return ValueOnCtlColor must return a handle to the brush that is to be used for painting the control background.RemarksTo change the text color, call the SetTextColor method with the desired red, green, and blue (RGB) values.To change the background color of a single-line edit control, set the brush handle in both the CTLCOLOR_EDIT and CTLCOLOR_MSGBOX message codes, and call the CDC::SetBkColor method in response to the CTLCOLOR_EDIT code.OnCtlColor will not be called for the list box of a drop-down combo box because the drop-down list box is actually a child of the combo box and not a child of the window. To change the color of the drop-down list box, create a CComboBox with an override of OnCtlColor that checks for CTLCOLOR_LISTBOX in the nCtlColor parameter. In this handler, the SetBkColor method must be used to set the background color for the text.This method is called by the framework to allow your application to handle a Windows CE message. The parameters passed to your method reflect the parameters received by the framework when the message was received. If you call the base-class implementation of this method, that implementation will use the parameters originally passed with the message and not the parameters you supply to the method.Example// This OnCtlColor handler will change the color of a static control// with the ID of IDC_MYSTATIC. The code assumes that the CMyDialog// class has an initialized and created CBrush member named m_brush.// The control will be painted with red text and a background // color of m_brush.HBRUSH CZilchDlg::OnCtlColor(CDC* pDC, CWnd* pWnd, UINT nCtlColor){// Call the base class implementation first! Otherwise, it may // undo what we are trying to accomplish here.HBRUSH hbr = CDialog::OnCtlColor(pDC, pWnd, nCtlColor);// Are we painting the IDC_MYSTATIC control? We can use // CWnd::GetDlgCtrlID() to perform the most efficient test.if (pWnd->GetDlgCtrlID() == IDC_MYSTATIC){// Set the text color to red.pDC->SetT extColor(RGB(255, 0, 0));// Set the background mode for text to transparent// so background will show thru.pDC->SetBkMode(TRANSPARENT);// Return handle to our CBrush object.hbr = m_brush;}return hbr;}假设你已有了名为My的对话框工程,你有了一个STATIC的控件,IDC_STATIC1HBRUSH CMyDlg::OnCtlColor(CDC* pDC, CWnd* pWnd, UINT nCtlColor){HBRUSH hbr = CDialog::OnCtlColor(pDC, pWnd, nCtlColor);// TODO: Change any attributes of the DC hereif(nCtlColor==CTLCOLOR_STATIC){pDC->SetT extColor(RGB(255,0,0));//字体颜色pDC->SetBkColor(RGB(0,0,255));//字体背景颜色}// TODO: Return a different brush if the default is not desired return hbr;}如果要指定某个特定控件可以这样写:ID为IDC_STATIC1if(pWnd->GetDlgCtlID()==IDC_STATIC1){pDC->SetT extColor(RGB(255,0,0));//pDC->SetBkMode(TRANSPARENT);//设置字体背景为透明return (HBRUSH)::GetStockObject(BLACK_BRUSH);//设置背景色}Return hbr;。
- 1、下载文档前请自行甄别文档内容的完整性,平台不提供额外的编辑、内容补充、找答案等附加服务。
- 2、"仅部分预览"的文档,不可在线预览部分如存在完整性等问题,可反馈申请退款(可完整预览的文档不适用该条件!)。
- 3、如文档侵犯您的权益,请联系客服反馈,我们会尽快为您处理(人工客服工作时间:9:00-18:30)。
针对NM_CUSTOMDRAW消息的学习注释:如果你想改变ListCtrl中某一行的颜色,字体,或者你想改变单元格的字体和颜色,那本文将会帮你解决。
第一部分:效果图展示一、改变listCtrl中某一行的字体和颜色二、改变listctrl中某个单元格的字体和颜色第二部分:实现方法在讲的到实现的部分,我将向大家展示这部分的一些知识,希望可以帮助大家理解他的执行过程,在其中我可能会引用一些其他地方的说明和解释。
一、知识普及消息的形式:1.窗口消息,2命令消息,3WM_NOTIFY消息,4自定义消息我们的NM_CUSTOMDRAW消息就是就属于第三种WM_NOTIFY消息,而添加消息映射的方法分为两种:1. BEGIN_MESSAGE_MAP(CListCtrlColor, CListCtrl)ON_NOTIFY_REFLECT(NM_CUSTOMDRAW,OnCustomMyList)END_MESSAGE_MAP()2.BEGIN_MESSAGE_MAP(CListCtrlColor,CListCtrl)ON_NOTIFY(NM_CUSTOMDRAW,IDC_LIST,OnCustomMyLIst)END_MESSAGE_MAP()第一种用到的是消息反射机制:在Windows的消息处理中,控制子窗口的发给其父窗口的通知消息只能由其父窗口进行处理,这使得控制子窗口的自身能动性大大降低(你想,它连改变自己的背景色,处理一个自身滚动问题都要其父窗口来完成),为了解决这个问题,在MFC中引入了反射消息“Reflect Message”的概念,进行消息反射,可以使得控制子窗口能够自行处理与自身相关的一些消息,增强了封装性,从而提高了控制子窗口的可重用性。
通常在封装一些类是就用这个,比如本文中用的封装类,就是以CListCtrl控件作为基类,第二种则常用在父窗口中不用反射,直接由父窗口处理该消息。
例如:创建基于对话框的窗口,在其上加入CListCtrl控件,则用第二种对该控件发生的变化做出处理。
添加消息处理函数:afx_msg void OnCustomMyList(NMHDR* pNMHDR,LRESULT* pResult);函数参数:NMHDR参数:查看NM_CUSTOMDRAW的MSDN文档可以了解到pNMHDR存储的是一些结构体的地址,这些结构体会根据该消息的发出者决定是什么类型的结构体,如图:这些结构体都存储了控件的一些基本信息,我们该文用到的是NMLVCUSTOMDRAWLRESULT参数:该参数相当于函数的返回值函数执行以后系统可以根据该结果作出相应的操作。
函数执行原理:该函数处理NM_CUSTOMDRAW消息的,只要触发该消息就会执行该函数,在本文中ListCtrl控件的重绘都会出发该消息。
函数执行过程:该处理函数将控件的绘制分为两部分:擦除和绘画。
Windows在每部分的开始和结束都会发送NM_CUSTOMDRAW消息。
所以总共就有4个消息。
但是实际上你的程序所收到消息可能就只有1个或者多于四个,这取决于你想要让WINDOWS怎么做。
每次发送消息的时段被称作为一个“绘画段”。
你必须紧紧抓住这个概念,因为它贯穿于整个“重绘”的过程。
所以,你将会在以下的时间点收到通知:l 一个item被画之前——“绘画前”段l 一个item被画之后——“绘画后”段l 一个item被擦除之前——“擦除前”段l 一个item被擦除之后——“擦除后”段并不是所有的消息都是一样有用的,实际上,我不需要处理所有的消息,直到这篇文章完成之前,我还没使用过擦除前和擦除后的消息。
所以,不要被这些消息吓到你。
NM_CUSTOMDRAW消息将会给你提供以下的信息:1.lListCtrl的句柄2.ListCtrl的ID3.当前的“绘画段”4.绘画的DC,让你可以用它来画画5.正在被绘制的控件、item、subitem的RECT值6.正在被绘制的Item的Index值7.正在被绘制的SubItem的Index值8.正被绘制的Item的状态值(selected, grayed, 等等)9.lItem的LPARAM值,就是你使用CListCtrl::SetItemData所设的那个值其中4的获得方法:CDC *pDC=CDC::FromHandle(pLVCD->nmcd.hdc);其中5的获得方法:item=(int)pLVCD->nmcd.dwItemSpec;subitem= pLVCD->iSubItem;第三部分:代码实现一、改变listCtrl中某一行的字体和颜色void CListCtrlColor::OnCustomMyList(NMHDR* pNMHDR,LRESULT* pResult){ NMLVCUSTOMDRAW *pLVCD=(NMLVCUSTOMDRAW*)pNMHDR;//绘画周期开始前if(pLVCD->nmcd.dwDrawStage==CDDS_PREPAINT){*pResult=CDRF_NOTIFYITEMDRAW;}//指定绘画项绘画前if(pLVCD->nmcd.dwDrawStage==CDDS_ITEMPREPAINT){int nCout=(int)pLVCD->nmcd.dwItemSpec;if(pLVCD->iSubItem==1&&nCout==4){CDC *pDC=CDC::FromHandle(pLVCD->nmcd.hdc);CFont* cFont=new CFont;cFont->CreateFont(15,0,0,0,FW_BOLD,FALSE,FALSE,0,ANSI_CHARSET,OUT_DEFAUL T_PRECIS,CLIP_DEFAULT_PRECIS,DEFAULT_QUALITY,DEFAULT_PITCH | FF_SWISS,"Arial");pDC->SelectObject(cFont);pLVCD->clrText=RGB(255,0,0);}*pResult=CDRF_NOTIFYITEMDRAW;}}在其中我们可以看到pLVCD->nmcd.dwDrawStage的值和pResult的值图1图2这两个图分别是刚才那两个值的对应值,图一中返回值解释如下从图一中我们可以看到返回值分为两个部分:1.当pLVCD->nmcd.dwDrawStage= CDDS_PREPAINT时即绘画周期开始前:CDRF_DODEFAULT:返回该值之后该控件自己绘制,整个绘画周期内他不会发送任何其他的NM_CUSTOMDRAW消息,CDRF_NOTIFYITEMDRAW:该返回值返回以后会通知父窗口相关项的绘画操作,并且在项的绘画开始前和开始后都会发送NM_CUSTOMDRAW;2.当pLVCD->nmcd.dwDrawStage=CDDS_ITEMPREPAINT时即在该项绘画开始前CDRF_NOTIFYSUBITEMDRAW:在视图项被绘制之前,你的应用程序会收到一个NM_CUSTOMDRAW消息,该消息中的dwDrawStage为CDDS_ITEMPREPAINT | CDDS_SUBITEM,这时你可以指定画笔和颜色对每个子项进行修改,否则返回CDRF_DODEFAULT默认处理。
CDRF_NEWFONT:你的应用程序使用指定的画笔,然后控件将会调用。
CDRF_SKIPDEFAULT:应用程序绘制这个项,控件不绘制。
上面是我们用到的其他自己研究吧!看了上面的解释也许你还是一头雾水,那这里我就给你解答:首先你要明白函数的过程是一个简单的绘画操作,绘画周期开始前,绘画前,绘画中,绘画后,你第一次触发NM_CUSTOMDRAW消息肯定是绘画开始前的所以第一个if语句肯定是成立的,这样就执行了第一个if语句,而接下来绘画前,绘画中,绘画后都不会触发,都不执行,这样一个关键点就是返回值了LRESULT了,其返回值就决定了在绘画过程中会不会触发NM_CUSTOMDRAW,这样你也就明白了第一个if中的返回值了吧。
而第二个if是绘画前和第一个的道理是一样的,从上面的解释中我们可以看到其返回值有三个,这三个中我尤其有说明的是CDRF_NOTIFYSUBITEMDRAW,因为该返回值决定是否触发消息进入绘画中,后面的代码中我们会看到在绘画中修改代码……….。
二、改变listCtrl中某个单元格的字体和颜色void CListCtrlColor::OnCustomMyList(NMHDR* pNMHDR,LRESULT* pResult){ NMLVCUSTOMDRAW *pLVCD=(NMLVCUSTOMDRAW*)pNMHDR;//绘画周期开始前if(pLVCD->nmcd.dwDrawStage==CDDS_PREPAINT){*pResult=CDRF_NOTIFYITEMDRAW;}//指定绘画项绘画前if(pLVCD->nmcd.dwDrawStage==CDDS_ITEMPREPAINT){int nCout=(int)pLVCD->nmcd.dwItemSpec;if(pLVCD->iSubItem==1&&nCout==4){CDC *pDC=CDC::FromHandle(pLVCD->nmcd.hdc);CFont* cFont=new CFont;cFont->CreateFont(15,0,0,0,FW_BOLD,FALSE,FALSE,0,ANSI_CHARSET,OUT_DEFAUL T_PRECIS,CLIP_DEFAULT_PRECIS,DEFAULT_QUALITY,DEFAULT_PITCH | FF_SWISS,"Arial");pDC->SelectObject(cFont);pLVCD->clrText=RGB(255,0,0);}*pResult=CDRF_NOTIFYSUBITEMDRAW;}//指定绘画项绘画中if(pLVCD->nmcd.dwDrawStage==(CDDS_ITEMPREPAINT | CDDS_SUBITEM)){ int nCout=(int)pLVCD->nmcd.dwItemSpec;if(pLVCD->iSubItem==1&&nCout==4){CDC *pDC=CDC::FromHandle(pLVCD->nmcd.hdc);CFont* cFont=new CFont;cFont->CreateFont(15,0,0,0,FW_BOLD,FALSE,FALSE,0,ANSI_CHARSET,OUT_DEFAUL T_PRECIS,CLIP_DEFAULT_PRECIS,DEFAULT_QUALITY,DEFAULT_PITCH | FF_SWISS,"Arial");pDC->SelectObject(cFont);pLVCD->clrText=RGB(255,0,0);pLVCD->clrTextBk=RGB(0,233,120);*pResult=CDRF_DODEFAULT;}}}。