NETGEAR WNR2000v3 快速安装指南
NETGEAR 无线宽带路由器快速安装手册
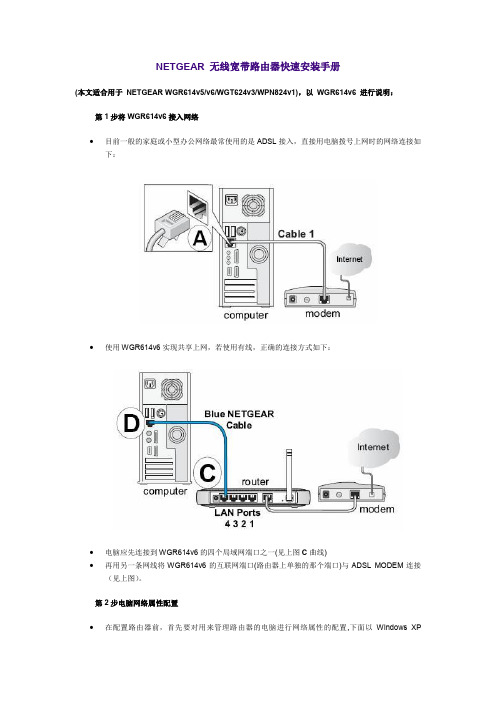
NETGEAR 无线宽带路由器快速安装手册(本文适合用于NETGEAR WGR614v5/v6/WGT624v3/WPN824v1),以WGR614v6 进行说明:第1步将WGR614v6接入网络∙目前一般的家庭或小型办公网络最常使用的是ADSL接入,直接用电脑拨号上网时的网络连接如下:∙使用WGR614v6实现共享上网,若使用有线,正确的连接方式如下:∙电脑应先连接到WGR614v6的四个局域网端口之一(见上图C曲线)∙再用另一条网线将WGR614v6的互联网端口(路由器上单独的那个端口)与ADSL MODEM连接(见上图)。
第2步电脑网络属性配置∙在配置路由器前,首先要对用来管理路由器的电脑进行网络属性的配置,下面以Windows XPHome Edition Service Pack 2为例来说明电脑的配置过程:2.1. 启动电脑,右键单击桌面或“开始”中的“网上邻居”选“属性”,右键单击“本地连接”选“属性”,选中“Internet协议(TCP/IP)”,点击“属性”:2.2. 将电脑设为“自动获得IP地址”,“自动获得DNS服务器地址”点击“确定”:第3步登录路由器3.1. 确保电脑已按照第一步所述通过有线连接到路由器的四个LAN口之一,启动路由器。
3.2. 打开电脑的Internet Explorer或者Netscape Navigator等其他浏览器,在浏览器的地址栏键入http://192.168.1.1/basicsetting.htm后回车:『注』初次设置路由器须按以上步骤,以后管理路由器或者更改配置,只需要在IE浏览器中输入192.168.1.1,此时路由器会要求提供用户名和密码。
登录路由器用户名:admin,密码:password,都是小写:默认进入的页面是”基本设置”页面,如图:『注意』无论您的宽带采用何种接入方式,都须先通过有线方式连接到路由器,在基本设置页面中进行相应的设置,完成后无线收发功能才会开启,才可使用无线连接。
NETGEAR Trek N300 旅行路由器和扩展器 PR2000 快速启动指南说明书
NETGEAR Trek N300 Travel Router and Range Extender WiFi US BU S B L A NGE AR PowerGetting StartedThank you for purchasing the NETGEAR Trek N300 Travel Router and Range Extender PR2000. You can connect your Trek to the Internet by using the Trek in hotspot mode, extender mode, or router mode. Note: You can also use the Trek in bridge mode or AP mode. For more information, see the user manual. You can get the user manual online at or through a link in the Trek’s user interface. For more information about how to access the Trek’s user interface, see View or Change the Trek’s Settings on page 17.Hotspot mode Extender modeRouter modeport.Internet Mode SwitchPut the• Wired. Set the switch to Wired if you want to connect the Trek to the Internet with an Ethernet cable. For example, set the switch to Wired if you want to use the Trek in router mode or AP mode.• Power off. Set the switch to Power off to turn off the Trek. Make sure the switch is set to Power off before plugging the Trek into anelectrical outlet.• Wireless. Set the switch to Wireless to connect the Trek to the Internet with a WiFi connection. For example, set the switch toWireless if you want to use the Trek in hotspot mode, extender mode, or bridge mode.Connection Ports and Reset ButtonThe Trek has the following connection ports and reset button:• Reset button . To reset the Trek to its factory default settings, insert a paper clip into the Reset hole and hold it until the Internet LEDblinks.• Internet/LAN port . When the Internet Mode switch is set to Wired, this port becomes an Internet port. When the switch is set to Wireless, this port becomes a LAN port.• LAN port . A LAN port for any Ethernet-enabled device.•USB port . A USB port for USB storage or USB printer. If the Trek is plugged into an AC wall outlet, the USB port can also be used as a charger.Indicator LEDsMonitor the status of your Trek using the following LEDs:Power LED• Green. The Trek is powered on.• Off. The Trek is powered off.Internet LED• Green. The Trek is connected to the Internet.• Blinking green. One of the following occurred:• The Reset button was pressed longer than fiveseconds.• A firmware upgrade is in progress.• The bandwidth limit was exceeded.• Off. The Trek is not connected to the Internet.WiFi LED• Green. The WiFi radio is operating.• Off. The WiFi radio is off.USB LED• Green. A USB device is connected and ready.• Off. No USB device is connected.Set Up Your Trek¾To set up your Trek:1. Record your Trek’s WiFi network name (SSID) and WiFi password.The SSID and WiFi password are on the sticker near the Internetmode switch. You can write the WiFi settings from the sticker in this space for easy reference.SSID:WiFi password:2. Connect the Trek to a power source.Use one of these options:• AC power connection. Plug the Trek into an AC wall outlet.• Micro USB connection. Connect a micro USB cable to the Trek and to a USB port on another device.AC power connection Micro USB connection3. Rotate the Trek’s cover clockwise to orient the antenna.The WiFi antenna is inside the cover. For best performance, keep the cover vertical when you use your Trek.Use one of these options:• Use the Trek in Hotspot Mode on page 8• Use the Trek in Extender Mode on page 11• Use the Trek in Router Mode on page 14Use the Trek in Hotspot Mode Use the Trek in hotspot mode to connect to a public hotspot. The Trek’s firewall protects your devices from known DoS attacks and port scans from the Internet.CAUTION : Most public WiFi hotspots offer no security. NETGEARrecommends that you do not send personal information over the Internetwhen using a public WiFi hotspot.¾To use the Trek in hotspot mode:1. Connect your Trek to a power source and rotate the antenna.For more information, see Set Up Your Trek on page 62. Set the Internet Mode switch to Wireless.3. Connect your computer or WiFi device to the Trek.You can use an Ethernet cable or connect with WiFi:• For a wired connection, use an Ethernet cable (not included) to connect your computer to the LAN port on the Trek.• To connect with WiFi, use the Trek’s network name (SSID) and WiFi password, which are on the sticker near the Internet Modeswitch. For more information, see Connect Devices to Your Trekwith WiFi on page 16.4. Launch a web browser.5. Enter in the address field of the browser.The Wireless as WAN screen displays, which shows the available WiFi networks.6. If a login screen displays, do the following:a. Enter admin for your user name and password for yourpassword.The BASIC Home screen displays.b. Select Internet.The Wireless as WAN screen displays, which shows the availableWiFi networks.7. Clear the Extend my current wireless router’s range check box.8. Select a radio button next to the WiFi network to which you want toconnect.9. From the Security list, select the WiFi network’s security option.10. In the Password (Network Key) field, type the WiFi network’spassword.11. For the Internet IP Address setting, select one of the following radiobuttons:• Get Dynamically. The Internet service provider (ISP) uses DHCP to assign your IP address. Your ISP automatically assigns theseaddresses.• Use Static IP Address. Enter the IP address, IP subnet mask, and the gateway IP address that your ISP assigned. The gateway isthe ISP’s gateway to which your Trek connects.12. To be able to use these settings again without having to reenter them,select the To save a name for profile check box and in the fieldprovided, type a name for the profile.Create a descriptive name for the profile to help you remember thesettings. For example, if you visit a hotel frequently, you might use the hotel name as the profile name.13. Click the Apply button.It might take up to two minutes before the Trek connects to the WiFi network.14. If your computer or WiFi device disconnects from the Trek, reconnect your computer or WiFi device to the Trek.Use the Trek in Extender ModeUse the Trek in extender mode to boosting an existing WiFi signal and enhancing the overall signal quality over long distances. NETGEAR recommends that you use the Trek in extender mode when a wireless device is in a dead zone where the connection to your existing WiFi routeris poor or nonexistent.¾1. Place your Trek in the same room as your WiFi router.Note: Proximity to the WiFi router is required only during the initial setup process.2. Connect your Trek to a power source and rotate the antenna.For more information, see Set Up Your Trek on page 6.3. Set the Internet Mode switch to Wireless.4. Connect your computer or WiFi device to the Trek.You can use an Ethernet cable or connect with WiFi:• For a wired connection, use an Ethernet cable (not included) to connect your computer to the LAN port on the Trek.• To connect with WiFi, use the Trek’s, network name (SSID) and WiFi password, which are on the sticker near the Internet Modeswitch. For more information, see Connect Devices to Your Trekwith WiFi on page 16.5. Launch a web browser.6. Enter in the address field of the browser.The Wireless as WAN screen displays, which shows the available WiFi networks.7. If a login screen displays, do the following:a. Enter admin for your user name and password for yourpassword.The BASIC Home screen displays.b. Select Internet.The Wireless as WAN screen displays, which shows the availableWiFi networks.8. Select the Extend my current wireless router’s range check box.9. Select a radio button next to a WiFi network you want to connect to.10. From the Security list, select the WiFi network’s security option.11. In the Password (Network Key) field, type the WiFi network’spassword.12. To be able to use these settings again without having to reenter them,select the To save a name for profile check box and in the fieldprovided, type a name for the profile.Create a descriptive name for the profile to help you remember the settings. For example, if you might use Extender Mode as the name for your extender profile settings.13. Click the Apply button.It might take up to two minutes before the Trek connects to the WiFi network.14. Unplug the Trek and move it to a new location closer to the area witha poor WiFi signal.The location that you choose must be within the range of yourexisting WiFi router network.15. Connect your Trek to a power source and rotate the antenna.For more information, see Set Up Your Trek on page 616. If your computer or WiFi device disconnects from the Trek, reconnect your computer or WiFi device to the Trek.Use the Trek in Router ModeYou can connect the Trek to a DSL or cable modem and use the Trek as arouter.¾To use the Trek in router mode:1. Connect you Trek to a power source and rotate the antenna.For more information, see Set Up Your Trek on page 62. Connect your DSL or cable modem to the Internet/LAN port on theTrek with an Ethernet cable.3. Set the Internet Mode switch to Wired.4. Connect your computer or WiFi device to the Trek.You can use an Ethernet cable or connect with WiFi:• For a wired connection, use an Ethernet cable (not included) to connect your computer to the LAN port on the Trek.• To connect with WiFi, use the Trek’s network name (SSID) and WiFi password, which are on the sticker near the Internet Modeswitch. For more information, see Connect Devices to Your Trekwith WiFi on page 16.5. Launch a web browser.6. Enter in the address field of the browser.NETGEAR genie displays.7. If a login screen displays, do the following:a. Enter admin for your user name and password for yourpassword.The BASIC Home screen displays.b. Select ADVANCED > Setup Wizard.The Setup Wizard screen displays.8. Follow the onscreen instructions.NETGEAR genie guides you through connecting the Trek to theInternet.Connect Devices to Your Trek with WiFiTo use WiFi to connect your computer or WiFi device (such as a smartphone or gaming device) to your Trek’s WiFi network, use the Trek’s network name (SSID) and WiFi password on the sticker near the Internet Mode switch.Note: You can also use WPS to connect WiFi devices to your Trek. For more information, see the user manual. You can get the user manual online at or through a link in the Trek’s user interface. For more information about how to access the Trek’s user interface, see View or Change the Trek’s Settings on page 17¾To connect devices to your Trek with WiFi:1. Open the software utility that manages your WiFi connections on thecomputer or WiFi device that you want to connect to your Trek.This utility scans for all wireless networks in your area.2. Find and select your Trek’s SSID.The SSID is on the sticker near the Internet Mode switch.3. Enter the Trek’s WiFi password (or your custom password if youchanged it) and click the Connect button.The WiFi password is on the sticker near the Internet Mode switch.4. Repeat Step 1 through Step 3 to add other computers or WiFi devices.View or Change the Trek’s SettingsAfter you use genie to set up the Trek, you can log in to the Trek to view or change its settings.¾To log in to the Trek:1. Connect your computer or WiFi device to the Trek.You can use an Ethernet cable or connect with WiFi:• For a wired connection, use an Ethernet cable (not included) to connect your computer to the LAN port on the Trek.• To connect with WiFi, use the Trek’s network name (SSID) and WiFi password, which are on the sticker near the Internet Modeswitch. For more information, see Connect Devices to Your Trekwith WiFi on page 16.2. Launch a web browser.3. Enter in the address field of the browser.A login screen displays.4. Enter admin for your user name and password for your password.The BASIC Home screen displays.NETGEAR, Inc.350 East Plumeria DriveSan Jose, CA 95134, USA Technical SupportThank you for purchasing this NETGEAR product.After installing your device, locate the serial number on the label of your product and use it to register your product at https:// .You must register your product before you can use NETGEAR telephone support. NETGEAR recommends registering your product through the NETGEAR website.For product updates and web support, visit .NETGEAR recommends that you use only the official NETGEAR support resources. You can get the user manual online at or through a link in the product’s user interface.TrademarksNETGEAR, the NETGEAR logo, and Connect with Innovation are trademarks and/or registered trademarks of NETGEAR, Inc. and/or its subsidiaries in the United States and/or other countries. Information is subject to change without notice. © NETGEAR, Inc. All rights reserved.ComplianceFor the current EU Declaration of Conformity, visit /app/answers/detail/a_id/11621/.For regulatory compliance information, visit: /about/regulatory/.See the regulatory compliance document before connecting the power supply.。
路由器R2000设置步骤 图文详解R2000安装全过程
路由器R2000设置步骤图文详解R2000安装全过程本文主要介绍的是关于R2000的安装设置步骤,希望本文能对你有所帮助。
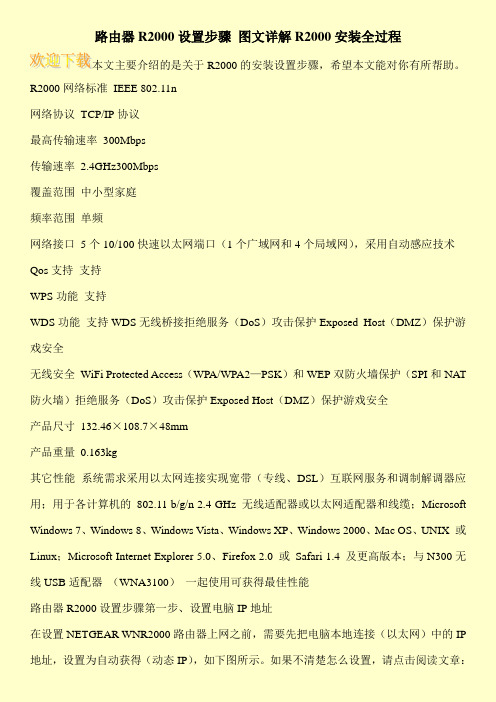
R2000网络标准IEEE 802.11n网络协议TCP/IP协议最高传输速率300Mbps传输速率2.4GHz300Mbps覆盖范围中小型家庭频率范围单频网络接口5个10/100快速以太网端口(1个广域网和4个局域网),采用自动感应技术Qos支持支持WPS功能支持WDS功能支持WDS无线桥接拒绝服务(DoS)攻击保护Exposed Host(DMZ)保护游戏安全无线安全WiFi Protected Access(WPA/WPA2—PSK)和WEP双防火墙保护(SPI和NAT 防火墙)拒绝服务(DoS)攻击保护Exposed Host(DMZ)保护游戏安全产品尺寸132.46×108.7×48mm产品重量0.163kg其它性能系统需求采用以太网连接实现宽带(专线、DSL)互联网服务和调制解调器应用;用于各计算机的802.11 b/g/n 2.4 GHz 无线适配器或以太网适配器和线缆;Microsoft Windows 7、Windows 8、Windows Vista、Windows XP、Windows 2000、Mac OS、UNIX 或Linux;Microsoft Internet Explorer 5.0、Firefox 2.0 或Safari 1.4 及更高版本;与N300无线USB适配器(WNA3100)一起使用可获得最佳性能路由器R2000设置步骤第一步、设置电脑IP地址在设置NETGEAR WNR2000路由器上网之前,需要先把电脑本地连接(以太网)中的IP 地址,设置为自动获得(动态IP),如下图所示。
如果不清楚怎么设置,请点击阅读文章:电脑动态IP地址的设置方法。
第二步、连接NETGEAR WNR2000路由器1、电话线上网:用户需要准备2根网线,一根网线用来连接ADSL Modem(宽带猫)与NETGEAR WNR2000路由器的WAN接口;另一根网线用来连接计算机与路由器的LAN 接口(1/2/3/4中的任意一个都可以)。
路由器无线N300 WNR2000v4 安装指南说明书
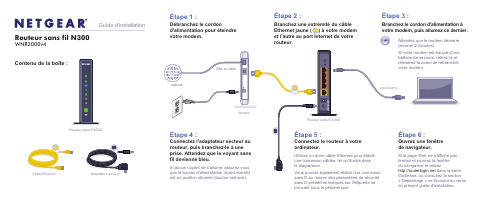
votre modem, puis allumez ce dernier.Contenu de la boîte :Routeur sans fil N300WNR2000v4Guide d'installationCâble EthernetRouteur sans fil N300(non fourni)est en position allumée (bouton enfoncé).sans fil au moyen des paramètres de sécurité sans fil prédéfinis indiqués sur l'étiquette se trouvant sous le périphérique.d'adresse, ou consultez la section « Dépannage » se trouvant au verso du présent guide d'installation.Attendez que le modem démarre (environ 2 minutes).Si votre modem est équipé d'une batterie de secours, retirez-la et réinsérez-la avant de rebrancher votre modem.NETGEAR, le logo NETGEAR et Connect with Innovation sont des marques de commerce ou des marques déposées de NETGEAR, Inc. ou de ses sociétés affiliées aux États-Unis et dans d'autres pays. Ces informations sont susceptibles d'être modifiées sans préavis. Les autres marques ou noms de produits sont des marques déposées de leurs détenteurs respectifs. © NETGEAR, Inc. Tous droits réservés.Uniquement pour utilisation intérieure dans les pays membres de l'UE, les pays membres de l'AELE et en Suisse.Novembre 2012Pour la déclaration de conformité complète pour l'UE, consultez le /app/answers/detail/a_id/11621/Repérez les paramètres sans fil prédéfinis sur votre routeur et Connexion des périphériques sans fil à votre routeurChoisissez la méthode manuelle ou WPS (Wi-Fi Protected Setup) pour ajouter des ordinateurs ou autres périphériques à votre réseau sans fil.Méthode manuellencez l'utilitaire qui gère vos connexions sans fil sur le périphérique sans fil(iPhone, ordinateur portatif ou de bureau, console de jeux) que vous voulez connecter à votre routeur. Cet utilitaire recherche tous les réseaux sans fil de votre secteur.2.Recherchez le nom du réseau sans fil NETGEAR prédéfini (SSID) etsélectionnez-le. Ce nom est indiqué sur l'étiquette du produit, située sous le routeur.Remarque : Si vous avez modifié le nom de votre réseau pendant le processus de configuration, recherchez-le.3.Entrez le mot de passe prédéfini (ou votre mot de passe personnalisé si vousl'avez modifié), puis cliquez sur Connect (Connexion).4.Répétez les étapes 1 à 3 pour ajouter d'autres périphériques sans fil.Méthode WPSSi votre périphérique sans fil prend en charge la fonctionnalité WPS (Wi-Fi Protected Setup), que NETGEAR appelle la méthode « Appuyez : vous êtesconnecté », il vous sera peut-être demandé d'appuyer sur le bouton WPS situé sur le routeur au lieu d'entrer un mot de passe. Le cas échéant :1.Appuyez sur le bouton WPSdu routeur.2.Dans un délai de deux minutes, appuyez sur le bouton WPS sur lepériphérique client ou suivez les instructions de l'utilitaire WPS incluses avec votre appareil sans fil. Le périphérique sera alors connecté à votre routeur. 3.Répétez cette procédure pour ajouter d'autres périphériques sans fil WPS.Remarque : La fonction WPS ne prend pas en charge la sécurité WEP. Si vous essayez de connecter un client WEP à votre réseau au moyen de la fonction WPS, la connexion échouera.DépannageLe navigateur ne peut afficher la page Web.• Assurez-vous que votre ordinateur est connecté en réseau local à l'un desquatre ports Ethernet ou qu'il est connecté via connexion sans fil au routeur.• Assurez-vous que le routeur est correctement alimenté en électricité et que levoyant de réseau sans fil est devienne bleu.• Fermez et rouvrez la fenêtre pour vous assurer que le navigateur n'a pas misen cache la page précédente.• Allez à l'adresse .• Si l'ordinateur est configuré de manière à utiliser une adresse IP statique ou fixe(ce qui est rare), modifiez le paramètre pour obtenir automatiquement une adresse IP du routeur.Après l'installation de votre appareil, notez le numéro de série inscrit sur l'étiquette située sous votre produit. Il vous sera nécessaire pour enregistrer votre produit à l'adresse https:// . Vous devez enregistrer votre produit avant de pouvoir bénéficier des services de soutien par téléphone NETGEAR. NETGEAR vous recommande d'enregistrer votre produit via le site Web NETGEAR. Pour obtenir des mises à jour de produits et consulter le support Web, visitez le site .Si vous désirez obtenir le logiciel gratuit de filtrage centralisé de sites Web Live Parental Controls pour votre routeur, vous pouvez le télécharger à l'adresse /lpc .Pour toute autre fonctionnalité, y compris le compteur de trafic et l'accès réservé aux invités, ouvrez une session sur votre routeur à l'adresse .Vous pouvez obtenir le manuel de l'utilisateur en ligne au ou via un lien dans l'interface utilisateur du produit.NETGEAR vous recommande d'utiliser uniquement les ressources d'assistance officielles NETGEAR.Téléchargez gratuitement NETGEAR Genie Corrigez automatiquement les problèmes de réseau les plus courants et gérez facilement vos connexions de réseautage à domicile./genie。
NETGEAR 适配器快速安装指南说明书
Guide d'installationNETGEAR, le logo NETGEAR et Connect with Innovation sont des marques commerciales et/ou des marques déposées de NETGEAR, Inc. et/ou des iliales de NETGEAR aux Etats-Unis et/ou dans d'autres pays. Ces informations sont susceptibles d'être modifiées sans préavis. © NETGEAR, Inc. Tous droits réservés.Pour une utilisation en intérieur seulement. Destiné à être vendu dans tous les États membres de l'UE, les états de l'AELE et la Suisse.Mars 2013NETGEAR, Inc.350 East Plumeria DriveSan Jose, CA 95134 USADescription des voyants et des boutonsElémentDescriptionVoyant d'ali-mentation •Vert continu . L'adaptateur est sous tension.•Orange continu . L'adaptateur est en mode veille.•Vert clignotant . Le processus d'appairage/de sécurisation de l'adaptateur est en cours.•Eteint . L'adaptateur est hors tension.Voyant Ethernet•Continu . L'adaptateur est connecté par l'intermédiaire du port Ethernet à un dispositif Ethernet alimenté. •Eteint . Aucune connexion Ethernet disponible.Bouton de réinitialisationBouton de sécuritéVoyant CPLVoyant Ethernet Voyant d'alimentation CPL 200 Mini (pack de 2) XAVB1301Assistance techniqueNous vous remercions d'avoir choisi les produits NETGEAR. Après l'installation de votre périphérique, notez le numéro de série inscrit sur l'étiquette située sous votre produit. Il vous sera nécessaire pour enregistrer votre produit à l'adresse https:// .Vous devez être enregistré pour utiliser notre serviced'assistance téléphonique. Nous vous recommandons vivement de procéder à l'enregistrement sur notre site Web.Pour obtenir des mises à jour de produits et consulter le support Web, rendez-vous à l'adresse gear.fr/support. NETGEAR vous recommande d'utiliser uniquement les ressources d'assistance officielles NETGEAR.Vous pouvez obtenir le manuel de l'utilisateur en ligne àl'adresse ou via un lien dans l'interface utilisateur du produit.Pour consulter la déclaration de conformité complète pour l'UE rendez-vous sur le site/app/answers/detail/a_id/11621/.Avertissement : avant d'appuyer sur le bouton de sécurité, attendez que l'installation de l'adaptateur CPL soit terminée et que les adaptateurs communiquent entre eux (voyant CPL clignotant). En appuyant trop tôt sur ce bouton, vous risquez de désactiver temporairement lacommunication CPL. Le cas échéant, appuyez sur le bouton de réinitialisation pour rétablir les paramètres par défaut de l'adaptateur CPL.Voyant CPL•Continu . L'adaptateur est connecté à un réseau CPL.•Eteint . L'adaptateur n'a pas trouvé d'autres périphériques CPL compatibles utilisant la même clé de fonctionnalité Pick A Plug vous permet de choisir la prise électrique comportant le plus fort débit de connexion, indiqué par la couleur du voyant :Vert : débit de connexion > à 80 Mbit/s (Rapide)Orange : débit de connexion > à 50 et < à 80 Mbit/s (Moyen)Rouge : débit de connexion < à 50 Mbit/s(Lent)Bouton de réinitialisa-tion Appuyez sur le bouton de réinitialisation pendant 1 seconde pour rétablir les paramètres par défaut de l'adaptateur CPL.Bouton de sécuritéAprès avoir branché votre nouvel adaptateur, appuyez sur le bouton de sécurité pendant 2 secondes, puis appuyez sur le bouton de sécurité de l'un des autres adaptateurs du réseau existant pendant 2 secondes. Vous devez appuyer sur les deux boutons dans un délai de 2 minutes.Pour activer le mode d'économie d'énergie, appuyez et maintenez le bouton sécurité pendant au moins 10 secondes, puis relâchez-le. Le fait d’appuyer à nouveau sur le bouton sécurité remet l'adaptateur sous tension.Elément DescriptionCâbles EthernetXAV2101, XAV2602, XAV1401, XAV1601, et XAVN2001 NETGEAR. Pour consulter la liste complète des périphériques certifiés HomePlug AV, rendez-vous à l'adresse /certified_rmations de sécurité•Prise secteur CA : 100-240 V~, 60 mA (max.).•Température de fonctionnement : 0 °C~35 °C.•La prise de courant doit être facilement accessible et se trouver à proximité de l'équipement.DépannageLe voyantd'alimentation estéteintAssurez-vous que la prise électrique est bien sous tensionet que les périphériques CPL ne sont pas branchés à unerallonge électrique, un bloc multiprise ou un dispositif deprotection contre les surtensions.Le voyantd'alimentation estorangeL'adaptateur CPL est en mode d'économie d'énergie. Pourrétablir l'adaptateur en mode normal, appuyez sur lebouton sécurité.Le voyant CPL estéteint•Si vous avez configuré la sécurité du réseau, assurezvous que tous les périphériques CPL utilisent la même cléde chiffrement. Pour plus d’informations, reportez-vous auManuel de l’utilisateur.•Appuyez sur le bouton de réinitialisation pendant1 seconde pour rétablir les paramètres par défaut del'adaptateur CPL.Le voyant CPL estorange ou rougeRapprochez le périphérique CPL.Le voyantEthernet est éteint•Assurez-vous que les câbles Ethernet sont branchés auxpériphériques et fonctionnent correctement.•Appuyez sur le bouton de réinitialisation pendant1 seconde pour rétablir les paramètres par défaut del'adaptateur CPL.。
NETGEAR Trek N300 旅行路由器和扩展器 PR2000 安装指南说明书
NETGEAR TrekN300 Travel Router and Range Extender PR2000Wi Fi US BU S B L A NI n t e r n e t /L A N R e s e t G E A R Power InternetContentsGet Started . . . . . . . . . . . . . . . . . . . . . . . . . . . . . . . . . . . . . . . . . . . 3 Connect on the Go . . . . . . . . . . . . . . . . . . . . . . . . . . . . . . . . . . 3 Connect in the Home. . . . . . . . . . . . . . . . . . . . . . . . . . . . . . . . . 3 Meet Your NETGEAR Trek . . . . . . . . . . . . . . . . . . . . . . . . . . . . . . . 5 Internet Mode Switch. . . . . . . . . . . . . . . . . . . . . . . . . . . . . . . . . 5 Power Inputs. . . . . . . . . . . . . . . . . . . . . . . . . . . . . . . . . . . . . . . 5 Indicator LEDs. . . . . . . . . . . . . . . . . . . . . . . . . . . . . . . . . . . . . . 6 Connection Ports and Reset Button . . . . . . . . . . . . . . . . . . . . . 7 Antenna Orientation . . . . . . . . . . . . . . . . . . . . . . . . . . . . . . . . . 7 WiFi Connection at a Public Hotspot Setup. . . . . . . . . . . . . . . . . . . 8 WiFi Range Extender Setup . . . . . . . . . . . . . . . . . . . . . . . . . . . . . 10 Internet Connection at Home Setup . . . . . . . . . . . . . . . . . . . . . . . 12 WiFi Bridge Setup . . . . . . . . . . . . . . . . . . . . . . . . . . . . . . . . . . . . . 14 Connect WiFi Devices to Your Trek. . . . . . . . . . . . . . . . . . . . . . . . 16Get StartedThank you for your purchase of the NETGEAR Trek N300 Travel Router and Range Extender PR2000.Whether you use the Internet in the home or on the go (or both), the Trek is your solution to a better Internet experience.Connect on the GoThe Trek gives you the means to connect to the Internet while away from home.Do you want to connect your devices to the Internet at a WiFi hotspot? Connect your Trek to the WiFi hotspot and then connect your devices to your Trek. The Trek’s firewall protects your personal devices from known DoS attacks and port scans from the Internet. For more information, see WiFi Connection at a Public Hotspot Setup on page8.Connect in the HomeThe Trek provides you with the means to extend and expand the home network that you already have with your existing Internet connection. Use the Trek for any of the following situations:•Add a WiFi router to your home network.Do you want to connect your wireless devices to your network?Convert your home network into a home WiFi network. For more information, see Internet Connection at Home Setup on page12.•Extend the range of your home WiFi network.Do you want to use your wireless devices at a greater distance from your WiFi router? Extend the range of your WiFi router witha WiFi range extender. For more information, see WiFi RangeExtender Setup on page10.•Bridge the distance to your Internet-ready TV.Is your Internet-ready TV or other Ethernet-enabled device too far from your router for an Ethernet cable connection? Bridge thedistance with a WiFi bridge. Examples of Ethernet-enableddevices include an Internet-ready TV, Blu-ray player, gamingconsole, and desktop or laptop computer. For more information, see WiFi Bridge Setup on page14.Meet Your NETGEAR TrekLocate the hardware features on your Trek.Internet Mode SwitchSelect your Internet mode.. Connect to the Internet with ancable.off. Turn off the Trek.. Connect to the Internet with alink.a microport on anotherIndicator LEDsMonitor the status of your Trek using the following LEDs:Green. The Trek is powered on.Off. The Trek is powered off.Green. Either the Internet/LAN port isconnected physically or a wirelesschannel is associated successfully.Blinking green. One of the followingoccurred:Off. The Trek is not connected in eitherwired or wireless mode.Green. Either the LAN port or a wirelessdevice is connected to the Trek.•Off. No device is connected.•Green. The USB drive is properlymounted.•Off. No USB drive is detected.-The Reset button was pressed longerthan five seconds.- A firmware upgrade is in progress.-The bandwidth limit was exceeded. USBportsblinks.Modeantoport.•USB port. A USB port for USB storage or USB printer. When plugged into the wall, the USB port can also be used as a cell phone charger.Antenna OrientationWiFi Connection at a Public Hotspot SetupUse the Trek as a WiFi connection to a wireless network in a WiFi hotspot zone. The Trek’s firewall protects your devices from known DoS attacks and port scans from the Internet.CAUTION: Most public WiFi hotspots offer no GEAR recommends that you do not send personal information over the Internet from your connected devices.(Optional) Connecta USB device tothe USB portTo connect to a public WiFi hotspot:1.Connect the Trek to a power source.For more information, see Power Inputs on page5.2.Turn on power to the Trek by moving the Internet Mode switchfrom the Power Off position to the Wireless position.3.Rotate the Trek’s cover clockwise to orient the antenna.For more information, see Antenna Orientation on page7.4.Connect your computer or wireless device to the Trek's SSID, orconnect your computer or wireless device to the Trek’s LAN port with an Ethernet cable.5.Open a web browser on your computer or wireless device, type in the address field, and press the Enter key.If a login screen displays, enter admin for your user name and password for your password. Then click the OK button.The Wireless as WAN screen displays, which shows the available wireless networks.6.Make sure that the Extend my current wireless router's rangecheck box is not selected.7.Select the wireless network that you want to connect to and enterthe related security information for that wireless network.8.T o be able to use these settings again without having to reenterthem, select the To save a name for profile check box.9.In the field provided, enter a name for the profile.10.Click the Apply button.The Trek connects to the WiFi hotspot after a couple of minutes.11.Connect your other wireless devices to the Trek.For more information, see Connect WiFi Devices to Your Trek on page16.WiFi Range Extender SetupUse the Trek as a WiFi extender to connect your wireless devices that are outside the range of your existing WiFi router. NETGEAR recommends that you connect to the WiFi network of the Trek when a wireless device is in a dead zone where the connection to your existing WiFi router is poor or nonexistent.To use the Trek as a WiFi range extender:1.Place the Trek at an equal distance between your existing WiFirouter and the wireless device that is located in the dead zone of your router.2.Connect the Trek to a power source.For more information, see Power Inputs on page5.3.Turn on power to the Trek by moving the Internet Mode switchfrom the Power Off position to the Wireless position.4.Rotate the Trek’s cover clockwise to orient the antenna.For more information, see Antenna Orientation on page7.5.Connect your computer or wireless device to the Trek's SSID, orconnect your computer or wireless device to the Trek’s LAN port with an Ethernet cable.6.Open a web browser on your computer or wireless device, type in the address field, and press the Enter key.If a login screen displays, enter admin for your user name and password for your password. Then click the OK button.The Wireless as WAN screen displays, which shows the available wireless networks.7.Make sure that the Extend my current wireless router's rangecheck box is selected.8.Select the wireless network that you want to connect to and enterthe related security information for that wireless network.9.T o be able to use these settings again without having to reenterthem, select the To save a name for profile check box.10.In the field provided, enter a name for the profile.11.Click the Apply button.The Trek connects to the WiFi hotspot after a couple of minutes.12.Connect your other wireless devices to the Trek.For more information, see Connect WiFi Devices to Your Trek on page16.Internet Connection at Home Setup Connect to the Internet with an Ethernet cable.DSL orTo connect to the Internet with an Ethernet cable:1.Connect an Ethernet cable between the Internet port of the Trekand the Ethernet port of your DSL or cable modem.2.Connect the Trek to a power source.For more information, see Power Inputs on page5.3.Turn on power to the Trek by moving the Internet Mode switchfrom the Power Off position to the Wired position.4.Connect your computer or wireless device to the Trek's SSID, orconnect your computer or wireless device to the Trek’s LAN port with an Ethernet cable.5.Open a web browser on your computer or wireless device, type in the address field, and press the Enter key.If a login screen displays, enter admin for your user name and password for your password. Then click the OK button.The Setup Wizard screen displays.6.Click the Next button and follow the prompts of the Setup Wizard.When you are done, the Congratulations screen displays.The Trek is connected to the Internet.7.(Optional) Connect your other wireless devices to the Trek.For more information, see Connect WiFi Devices to Your Trek on page16.8.(Optional) Connect a USB device to the USB port of the Trek.A USB device can be a USB storage drive or a USB printer.When plugged into the wall, the USB port can also be used as a cell phone charger. See the user manual.WiFi Bridge SetupUse the Ethernet ports on your Trek to connect up to two Ethernet-enabled devices wirelessly to your existing WiFi network.(Optional) Connect a USB device to the USB portTo use the Trek as a WiFi bridge:1.Connect the Trek to a power source.For more information, see Power Inputs on page5.2.Turn on power to the Trek by moving the Internet Mode switchfrom the Power Off position to the Wireless position.3.Rotate the Trek’s cover clockwise to orient the antenna.For more information, see Antenna Orientation on page7.4.Connect your computer or wireless device to the Trek's SSID, orconnect your computer or wireless device to the Trek’s LAN port with an Ethernet cable.5.(Optional) Connect an Ethernet cable between the LAN port of theTrek and the Ethernet port of another device.6.Open a web browser on your computer or wireless device, type in the address field, and press the Enter key.If a login screen displays, enter admin for your user name and password for your password. Then click the OK button.The Wireless as WAN screen displays, which shows the available wireless networks.7.Make sure that the Extend my current wireless router's rangecheck box is selected.8.Select the wireless network that you want to connect to and enterthe related security information for that wireless network.9.T o be able to use these settings again without having to reenterthem, select the To save a name for profile check box.10.In the field provided, enter a name for the profile.11.Click the Apply button.The Trek is configured as a WiFi bridge after a two-minute setup process.12.(Optional) Connect your other wireless devices to the Trek.For more information, see Connect WiFi Devices to Your Trek on page16.Connect WiFi Devices to Your Trek Connect wireless devices such as desktops, laptops, smartphones, and tablets to your Trek. You can connect these WiFi devices either manually or using the WPS (Wi-Fi Protected Setup) method. For best wireless connection performance, rotate the Trek’s cover clockwise to position its antenna properly. For more information, see Antenna Orientation on page7.To connect WiFi devices manually to your Trek:1.From your wireless device, view the available wireless networks.For more information, see the manual that came with your device.2.From the list of available wireless networks, select the wirelessnetwork name (SSID) of the Trek.The SSID is printed on the Trek’s product label.3.From your wireless device, initiate a wireless connection.For more information, see the manual that came with your device.4.When prompted by your wireless device, enter the wireless networkkey (password) of the Trek.The password is printed on the Trek’s product label.5.From the screen of your wireless device, click the appropriatebutton to continue the connection procedure.You are connected wirelessly to the Trek.6.Repeat Step1 through Step5 for each wireless device that youwant to connect to the Trek.Use WPS to connect a WiFi device to the Trek without entering the wireless network name or network key. Instead, you log in to the Trek and either click a button or enter a PIN to connect. WPS supports WPA and WPA2 wireless security.To connect WiFi devices to your Trek with WPS:1.Log in to the Trek and select ADVANCED > WPS Wizard > Next.For more information, see the user manual.2.Select one of the following radio buttons:•Push Button (recommended). Click the button.•PIN Number. Select the PIN number radio button and enter the client PIN in the field that displays.e the WPS software on your wireless device to connect to theTrek.For more information, see the manual that came with your device.NETGEAR, Inc.350 East Plumeria Drive San Jose, CA 95134 USADecember 2013SupportThank you for selecting NETGEAR products. After installing your device, locate the serial number on the label of your product and use it to register your product at https:// .You must register your product before you can use NETGEAR telephone support. NETGEAR recommends registering your product through the NETGEAR website.For product updates and web support, visit .NETGEAR recommends that you use only the official NETGEAR support resources. You can get the user manual online at or through a link in the product’s user interface.TrademarksNETGEAR, the NETGEAR logo, and Connect with Innovation are trademarks and/or registered trademarks of NETGEAR, Inc. and/or its subsidiaries in the United States and/or other countries. Information is subject to change without notice. © NETGEAR, Inc. All rights reserved.ComplianceFor regulatory compliance information, visit /about/regulatory/.For the current EU Declaration of Conformity, visit: /app/answers/detail/a_id/11621/.。
美国网件n300便携式无线路由器-pr2000安装指南说明书
美国网件N300便携式无线路由器PR2000WiFi US BU S B L A NI n t e r n e t /L A N R e s e t T G EARPower Inter net目录由此开始 . . . . . . . . . . . . . . . . . . . . . . . . . . . . . . . . . . . . . . . . . . . . . 3外出使用 . . . . . . . . . . . . . . . . . . . . . . . . . . . . . . . . . . . . . . . . . . 3家庭使用 . . . . . . . . . . . . . . . . . . . . . . . . . . . . . . . . . . . . . . . . . . 4了解NETGEAR便携式无线路由器 . . . . . . . . . . . . . . . . . . . . . . . . . 5因特网模式切换开关 . . . . . . . . . . . . . . . . . . . . . . . . . . . . . . . . . 5电源输入 . . . . . . . . . . . . . . . . . . . . . . . . . . . . . . . . . . . . . . . . . . 5 LED指示灯 . . . . . . . . . . . . . . . . . . . . . . . . . . . . . . . . . . . . . . . . 6端口及按钮介绍. . . . . . . . . . . . . . . . . . . . . . . . . . . . . . . . . . . . . 7天线的方向 . . . . . . . . . . . . . . . . . . . . . . . . . . . . . . . . . . . . . . . . 7公共WiFi热点连接设置. . . . . . . . . . . . . . . . . . . . . . . . . . . . . . . . . . 8无线扩展器模式设置 . . . . . . . . . . . . . . . . . . . . . . . . . . . . . . . . . . . 10家庭宽带的因特网连接设置 . . . . . . . . . . . . . . . . . . . . . . . . . . . . . . 12无线桥接模式设置 . . . . . . . . . . . . . . . . . . . . . . . . . . . . . . . . . . . . . 14 3G/4G连接设置. . . . . . . . . . . . . . . . . . . . . . . . . . . . . . . . . . . . . . . 16无线设备接入网络 . . . . . . . . . . . . . . . . . . . . . . . . . . . . . . . . . . . . . 18由此开始感谢您购买NETGEAR N300便携式家用无线路由器PR2000。
NETGEAR N300 WiFi Range Extender 模型WN3000RPv3 安装指南
N300 WiFi Range Extender Model WN3000RPv3You can also connect the extender to your router or gateway with an Ethernet cable and use the extender as an access point. See Install the Extender as an Access Pointon page 14.Existing WiFi Sometimes your routerdoes not provide the WiFicoverage you need.WiFi Range Extender Boosts the range of yourexisting WiFi and createsa stronger signal inhard-to-reach areas.Meet Your ExtenderBefore you install your extender, familiarize yourself with its LEDs, buttons, and port.Front PanelRouter Arrow LEDClient Arrow LED Power LEDWPS LED Router Link LED Client Link LEDSide and Bottom PanelsFactory Resetbutton Ethernet portWPS buttonPower On/Off buttonLED DescriptionsRouter Link LED This LED indicates the connection between the extender and the router or access point.Solid green. Best connection.Solid ambe r. Good connection.Solid red. Poor connection.Off. No connection.Client Link LED This LED indicates the connection between the extender anda computer or WiFi device.Solid green. Best connection.Solid amber. Good connection.Solid red. Poor connection.Off. No connection.Power LED Solid amber. The extender is booting.Solid green. The extender is powered on.Off. The extender is powered off.WPS LED Solid green. WiFi security is enabled (WPA or WPA2).Blinking green. A WPS connection is in progress.Off. WiFi security is not enabled.Note: If the Router Arrow LED or Client Arrow LED blinks, see Find the Best Location on page 12. If no arrow LEDs light, the extender is in a good location.Install the WiFi ExtenderPlace the extender, apply power, and connect it to your WiFi network. Place the Extender and Apply Power1. Place your extender in the same room as your WiFi router.Proximity to the WiFi router is required only during the initial setupprocess.2. Plug the extender into an electrical outlet.The Power LED lights green within one minute. If the Power LED does not light, press the Power button.Connect to an Existing WiFi NetworkTo extend the range of your WiFi network, you must connect the extender to your existing WiFi network. You can do this in one of two ways:• Connect with WPS. For more information, see Connect with WPS on page 7.• Connect with web browser setup. For more information, see Connect with Web Browser Setup on page 8.Connect with WPSWi-Fi Protected Setup (WPS) lets you join a secure WiFi network without typing the network name and password.Note: WPS does not support WEP network security. If you are using WEP security, follow the instructions in Connect with Web Browser Setup on page 8.1. Press the WPS button on the side panel of the extender.The WPS LED blinks.2. Within two minutes, press the WPS button on your router or accesspoint.The WPS LED on the extender lights solid green, the Router Link LED lights, and the extender connects to your existing WiFi network.If the Router Link LED does not light, try again. If it still does not light, see Connect with Web Browser Setup on page 8.3. Find the new extender network name.The extender’s wireless network name (SSID) changes to your existing WiFi network name, with _EXT at the end of the name, for example:• Existing WiFi network name. MyNetworkName• New extended network name. MyNetworkName_EXT4. Connect your WiFi devices to the new extender network.Use the same WiFi password that you use for your WiFi router.5. Unplug the extender and move it to a new location closer to the areawith a poor WiFi signal.The location that you choose must be within the range of yourexisting WiFi router network.6. Plug the extender into an electrical outlet.The Power LED lights green within one minute. If the Power LED does not light, press the Power button.7. Use the Router Link LED to help you choose a spot where theextender-to-router connection is optimal.Connect with Web Browser Setup1. Use a WiFi network manager on a computer or WiFi device to find andconnect to the NETGEAR_EXT (SSID) WiFi network.After the connection with the computer or WiFi device is established, the Client Link LED lights.2. Open a web browser window from the same computer or WiFi device.The browser takes you directly to the NETGEAR genie Smart Setup.If you are not automatically directed to NETGEAR genie, launch a web browser and type in the address field.The NETGEAR genie screen displays.3. Select the WiFi Range Extender (Wireless) radio button and clickthe Continue button.The extender finds WiFi networks in your area and displays a list.4. Select a WiFi network to extend and click the Continue button.5. When prompted, type the network password (also called passphraseor security key) in the Password field and click the Continue button.6. In the Name field, type the name (SSID) for your new extender WiFinetwork and click the Continue button.You can use the same security settings as the settings for yourexisting network by selecting the check box.The settings are applied and the following screen displays.On iPads, iPhones, and MacBook computers, this screen automatically closes.7. Use a WiFi network manager on the computer or WiFi device toconnect to the extender’s newly created WiFi network.Repeat this step for all of your computers and WiFi devices.8. If the screen is still displayed on your computer or device, select thefollowing check box and click the Continue button.A message displays confirming that the extender connected to theWiFi network.9. Click the Finish button.10. Unplug the extender and move it to a new location closer to the areawith a poor WiFi signal.The location that you choose must be within the range of yourexisting WiFi router network.11. Plug the extender into an electrical outlet.The Power LED lights green within one minute. If the Power LED does not light, press the Power button.12. Use the Router Link LED to help you choose a spot where theextender-to-router connection is optimal.Find the Best LocationIf the WiFi signal is weak, the first time you join the extender network, an arrow LED blinks for two minutes. If this happens, adjust the position of the extender.• If the Router arrow blinks, move the extender closer to the router.• If the Client arrow blinks, move the computer or WiFi device closer to the extender.If no arrow LEDs are lit, the extender is in a good location.Connect an Ethernet-Enabled DeviceAfter the extender is connected to your existing WiFi network, you can connect a wired device to the extender using an Ethernet cable. Thatdevice can then access your existing network through the WiFi connection.1. Set up the extender.For more information about initial setup, see Install the WiFi Extender on page 6.WiFi router2. Connect the extender to an existing WiFi network.3. Plug the Ethernet cable from an Ethernet-enabled device in to theEthernet port on the extender.Install the Extender as an Access PointYou can use the extender as a WiFi access point, which creates a new WiFi hotspot by using a wired Ethernet connection.1. Place your extender in the same room as your WiFi router.Proximity to the WiFi router is required only during the initial setupprocess.2. Plug the extender into an electrical outlet.The Power LED lights green within one minute. If the Power LED does not light, press the Power button.3. Use a WiFi network manager on a computer or WiFi device to find andconnect to the NETGEAR_EXT (SSID) WiFi network.After the connection with the computer or WiFi device is established, the Client Link LED lights.4. Open a web browser window from the same computer or WiFi device.The browser takes you directly to the NETGEAR genie Smart Setup.If you are not automatically directed to NETGEAR genie, launch a web browser and type in the address field.The NETGEAR genie screen displays.5. Select the Access Point (Wired) radio button.6. Use an Ethernet cable to connect the extender to a router Ethernetport or a remote Ethernet jack with network access.The extender joins the network and creates a WiFi hotspot.7. Follow the genie steps to set up WiFi security for the new WiFinetwork.Log In to Access Extender SettingsAfter installation, you can log in to the extender to view or change the extender’s settings.1. Connect a computer or WiFi device to the extender’s network.2. Launch a web browser and in the address field, enter or .A login screen displays.3. Enter admin for the user name and password for the password. Frequently Asked QuestionsYou can find more information about your product in the user manual, which is available at .The web browser setup guide keeps asking me for my network password (passphrase) or security key, and I am sure I entered the correct password. What can I do?The extender is probably placed at the borderline of the range covered by the router or access point. For more information, see Find the Best Location on page 12. If you are using WEP security, make sure that you are typing the network password in the correct field.I am connected to NETGEAR_EXT and launched a browser. Why can’t I see the web browser setup guide?Try these troubleshooting steps:• Make sure that your computer is set up to use DHCP (most are).• Make sure that the Client Link LED is green and that you are using a valid IP address.• Relaunch the web browser and type or in the address field. Enter admin for the user name and password for the password.How do I restore the extender to its factory default settings?1. Use a sharp object such as a pen or paper clip to press and hold theFactory Reset button on the bottom of the extender for at least five seconds until the Power LED blinks amber.2. Release the Factory Reset button and wait for the extender toreboot.The extender resets and returns to the factory default settings.You can now access the extender from your web browser using the factory default settings.I enabled a wireless MAC filter, wireless access control, or access control list (ACL) on my router. What should I do when installing the extender?When the WiFi device connects through the extender to your router, the MAC address of the WiFi device shown on the router is translated to another MAC address. If your router’s MAC filter, wireless access control, or ACL is enabled, the WiFi device connects to the extender but cannot get an IP address from the extender and cannot access the Internet.To allow the WiFi device to receive an IP address from the extender and access the Internet, you must provide the translated MAC address to the router.1. Log in to your router and disable the MAC filter, wireless accesscontrol, or ACL.For more information on how to disable your router’s MAC filter,wireless access control, or ACL, see your router’s documentation. 2. Power on the extender and connect all of your WiFi devices to theextender network.3. Make sure that the Client Link LED remains lit.4. Log in to your extender.a. Launch a web browser and in the address field, enter or .A login screen displays.b. Enter admin for the user name and password for thepassword.5. Select Maintenance > Network Devices.The Network Devices screen displays the MAC addresses and virtual MAC addresses for computers and devices that are connected to the extender network.6. On the router, add all of the virtual addresses from your extender toyour router’s MAC filter table.7. Enable the router’s MAC filter, wireless access control, or ACL.July 2014Netgear, Inc.350 East Plumeria DriveSan Jose, CA 95134, USA Technical SupportThank you for purchasing this NETGEAR product. After installing your device, locate the serial number on the label of your product and use it to register your product at https:// . You must register your product before you can use NETGEAR telephone support. NETGEAR recommends registering your product through the NETGEAR website.For product updates and web support, visit .NETGEAR recommends that you use only the official NETGEAR support resources. You can get the user manual online at or through a link in the product’s user interface.TrademarksNETGEAR, the NETGEAR logo, and Connect with Innovation are trademarks and/or registered trademarks of NETGEAR, Inc. and/or its subsidiaries in the United States and/or other countries. Information is subject to change without notice. © NETGEAR, Inc. All rights reserved.ComplianceFor the current EU Declaration of Conformity, visit /app/answers/detail/a_id/11621/.For regulatory compliance information, visit /about/regulatory/.See the regulatory compliance document before connecting the power supply.。
- 1、下载文档前请自行甄别文档内容的完整性,平台不提供额外的编辑、内容补充、找答案等附加服务。
- 2、"仅部分预览"的文档,不可在线预览部分如存在完整性等问题,可反馈申请退款(可完整预览的文档不适用该条件!)。
- 3、如文档侵犯您的权益,请联系客服反馈,我们会尽快为您处理(人工客服工作时间:9:00-18:30)。
NETGEAR WNR2000v3 快速安装指南
感谢您选择NETGEAR公司的N300系列无线路由器WNR2000v3,以下将介绍该路由器的安装使用方法。
只需5步即可完成全部设置,让您享受上网冲浪的乐趣。
包装内容
第一步将WNR2000v3接入网络
1. ADSL/ Cable Modem接入,连接方式如下:
使用一条网线将Modem连接到路由器的因特网端口(黄色标识),使用另一条网线将一台计算机连接到路由器的局域网端口。
2. 若宽带网线到户,没有Modem,连接方式如下:
使用一条网线将计算机连接到路由器的局域网端口;运营商提供的宽带线或宽带接口,直接连接到路由器的因特网端口(黄色标识)。
注意:路由器指示灯说明,详见本文附录一。
第二步登录路由器管理界面
启动Internet Explorer或者其他浏览器,打
开一个网页,在网页的地址栏中输入
或
然后回车:
通常情况下,浏览器会弹出如下登录框,要求输
入用户名和密码,,默认如下:
用户名:admin
密码:password
(字母均为小写)
注意:初次设置时,会出现精灵设置向导,询问“需要NETGEAR精灵为您提供帮助吗?”请选择“不需要,我想自己配置因特网连接”,点击“下一步”,再点击“确定”。
有的用户或许会看到写有“重要的更新”的提示,请点击继续。
第三步将路由器连上因特网
最常见的宽带类型有三种:PPPoE、固定IP或动态IP。
设置方法分别如下(如果您不确定自己所用的宽带属于哪种类型,请首先向宽带运营商进行咨询):
1. 采用PPPoE拨号上网的配置方式
每次连接因特网时都需要用户名和密码进行登录,或者ISP提供给您的是PPPoE帐户,均在此列。
例如:中国电信和中国联通ADSL 宽带业务通常采用此连接类型,部分小区宽带也会采用这种方式。
【例】某电信ADSL用户,电信提供的相关信息如右:
a) 选择菜单基本→因特网设置
b) 请按照如下示意图进行设置,并在登录名和密码后面的空白栏中分别输入宽带帐号和宽带密码
(注意区分字母大小写)。
注意:宽带无限时上网的用户,请将“连接模式”设置为”一直连接”;宽带限时的用户,请选择”按需连接”、闲置超时5分钟,则不使用宽带5分钟后,路由器自动断开因特网连接;
c) 设置完成后,点击画面上方的应用保留您的设置。
如要确定是否成功连上因特网,请按如下操作:
a) 选择菜单高级
b) 查看路由器与因特网的连接情况,如下图,
因特网端口 中显示IP 地址和域名服务器 均已成功获取,说明路由器与Internet 连接成功,请进入第四步“设置无线密码”。
如若获取不成功,则IP 地址是0.0.0.0,请检查 基本->因特网设置 中输入的宽带账号名、密码信息是否正确,或与您的宽带运营商进行联系。
注意:路由器设置成功后,不必再运行下图所示的宽带连接进行认证。
直接打开网页即可上网冲浪!
2. 采用固定IP 地址上网的配置方式
商务光纤等专线接入通常会采用此种连接类型。
宽带服务商会向用户提供 IP 地址,子网掩码,网关和 DNS 等详细参数。
【例】某运营商的固定IP 地址用户,运营商提供的相关信息如右:
注意:IP 地址等信息必须由宽带运营商提供,表格中的地址仅为举例所用,用户设置时不可照此填写!
a) 选择菜单 基本→因特网设置
b) 请按照如下示意图进行设置,并将运营商提供的IP 地址、子网掩码等信息输入,如下图。
c) 设置完成后,点击画面上方的应用保留您的设置。
若可以成功上网,请进行第四步“设置无线密码”。
若设置完毕,仍旧无法上网,请再次确认所填信息是否准确无误。
3. 采用动态IP地址上网的配置方式
如果您直接使用电脑上网时,电脑TCP/IP设置为自动获得IP和DNS,且无需运行任何拨号或连接程序,那么您就属于这种接入方式了。
有线电视(Cable)和部分小区宽带采用此种连接方式,如:上海有线通、广州珠江宽频、深圳天威视讯等。
a) 选择菜单基本→因特网设置:
b) 保持默认设置,无需做任何改动,如下图,直接点击画面上方的应用。
如要确定是否成功连上因特网,请按如下操作:
a)选择菜单高级
b) 查看路由器与因特网的连接情况,如下图,
因特网端口中显示IP地址和域名服务器均已成功获取,说明路由器与Internet连接成功,请进入第四步“设置无线密码”。
如若获取不成功,则IP地址是0.0.0.0,请与您的宽带提供商或网络管理员进行联系。
第四步预设无线密码
为了进一步确保无线网络的安全性,WNR2000v3在出厂时已随机预设了无线网络名称(SSID)及无线密码,每台设备各不相同,具有唯一性。
您可以不做任何改动、直接使用预设密码进行无线连接,该信息请查看路由器背部的标签处,如下图所示:
请查看设备背部标签中的预设信息,填写在这里:
无线网络名称(SSID):
无线密码:
如果修改了无线网络名称及无线密码,请将修改后的信息填写在这里:
无线网络名称(SSID):
无线密码:
如需修改预设信息,请登录路由器管理界面(参考第二步),选择菜单基本→无线设置,可以设置无线网络的名称和无线密码。
第五步计算机成功连接无线网络
1.Windows XP 系统下,连接无线网络(以Windows XP Service Pack 3为例):
a) 鼠标右键单击“网上邻居”,选“属性”;
b) 鼠标右键单击“无线网络连接”,选“查看可用的无线连接”,弹出“无线网络连接”的对话框,显示您周围
存在的无线网络,包括无线网络标识及安全认证;
c) 找到您的无线网络标识(为该路由器预设的无线网络标识,若已做修改,则显示您更改后的标识),点
击“连接”。
d) 输入您的无线密码(即您在安全选项设置的无线密码)。
稍等片刻,当右上角显示“已连接”时,表明无线网络连接成功。
2.Windows 7系统下,连接无线网络:
a) 打开“控制面板”;
b) 点击“网络和共享中心”;
c) 点击“连接到网络”,即可弹出对话框,显示周围环境中所有无线网络;
d) 找到您的无线网络标识(默认为NETGEAR,若已做修改,则显示您更改后的标识),点击“连接”;
e) 输入您的无线密码(即您在安全选项设置的无线密码)。
成功连接后,如下图所示:
注意:如果右侧显示“区域中找不到无线网络”,请联系您的笔记本厂家咨询如何开启笔记本无线开关;
如果右侧显示“Windows无法配置此无线连接”,请联系您的笔记本厂家咨询无线网卡的配置与使用。
附录一:WNR2000v3的指示灯及端口介绍
1. 电源指示灯,通电启动时呈橘色,稳定运行时呈绿色
2. 因特网端口(WAN口)指示灯,正常连接时,呈绿色
3. 无线指示灯,启用无线模式时,呈蓝色
4. 局域网端口(LAN口)指示灯,正常连接到100Mbps设备时,呈绿色;正常连接到10Mbps设
备时,呈橘色
5. WPS一键加密按钮/指示灯,按下按钮,路由器即进入WPS搜索模式,闪烁;路由器无线设置
加密时,常亮;路由器无线未设置加密时,熄灭
1. 电源开关
2. 电源接口,用于连接电源,为路由器供电
3. 因特网端口(WAN口),用于连接ADSL/ Cable Modem或以太网线缆,黄色标识
4. 局域网端口(LAN口),4个10/100M自适应以太网口,用于连接4台有线设备,橘色标识
5. 复位按钮
6. 无线开关,用于手动开启/关闭路由器无线功能
附录二:将WNR2000v3恢复出厂设置的操作方法
首先找到复位按钮(见附录一),然后将路由器接上电源并打开电源开关,保持路由器在通电状态,用曲别针或其他尖状物按住复位按钮,持续10秒钟后松手,待路由器面板的电源灯由橘红色变为绿色即可。
注意:该操作会将路由器现有的配置清空,完全恢复到出厂状态。
请谨慎操作!
技术支持
感谢您选择NETGEAR!
美国网件公司中文网址
技术支持热线 400-830-3815
技术支持邮箱 tech@。