榨汁机使用说明翻译
橙子汁提取机说明书

JUICE EXTRACTORFor your safety and continued enjoyment of this product,always read the instruction book carefully before using.IMPORTANT SAFEGUARDS When using electrical appliances, basic safety precautions shouldalways be taken, including the following:R EAD ALL INSTRUCTIONS.2. U nplug from outlet when not in use, before putting on ortaking off parts.3. T o protect against risk of electrical shock, do not putmotor housing in water or other liquids.4. This appliance is not suitable for use by children.5. Avoid contact with moving parts.6. D o not operate any appliance with a damaged cord or plugor after the appliance malfunctions or has been droppedor damaged in any manner. Return appliance to the nearestauthorized service facility for examination, repair ormechanical adjustment.7. T he use of any attachments not recommended or sold by themanufacturer is not permitted. No other cover or collector bowl should be used. Should this happen, accidents could occur.All warranty claims would be void in this case.8. D o not let cord hang over edge of table or counter, or touchhot surfaces.9. A lways make sure juicer lid is secure beneath springs beforemotor is turned on. Do not loosen lid while juice extractoris in operation.B e sure to turn switch to OFF position after each use of yourjuice extractor. Make sure the motor stops completely beforedisassembling.D o not put your fngers or other objects into the juice extractoropening while it is in operation. If food becomes lodged in theopening, use food pusher or another piece of fruit or vegetable to push it down.P lease keep these operating instructions in a suitable andsafe place.SAVE THESE INSTRUCTIONS APPROVED FOR COMMERCIAL USEASSEMBLY-DISASSEMBLY INSTRUCTIONS IMPORTANT: Juice extractor should be unplugged from outlet when disassembling.ASSEMBLING (SEE FIG. 1):1. T o assemble juicing assembly,place bowl on base housing andplace spout facing front betweenthe two raised projections.2. P lace basket inside the bowlover the hex nut. Be certainbasket sits fat.3. P lace cutter blade inside basketwith teeth up.4. T ighten spring clutch fnger-tightor snug.5. Y our juicer includes a 20 pack offlters. Using the flters is optional. Ifusing the flter, insert the flter insidethe basket and open the flter so that it covers theinside perimeter of the basket. The flters can be purchasedas a 200 pack accessory with model number CAC66.Contact your local Waring dealer for more information or visit to locate a dealer.6. P lace cover on bowl with feeder chute to right rear and turn itcounterclockwise to securebeneath spring clips.7. T he juice extractor will not operate until the cover is properlyassembled in place.DISASSEMBLING (SEE FIG. 1):1. W ith juice extractor facing you (spout front) put your handson both sides of the cover. Using the sidearms, turn coverclockwise. This will disengage the cover from the spring clipsand allow you to lift off the cover.2. L ooking into juice extractor, remove spring clutch by unscrewingcounterclockwise.3. Lift out cutter blade.4. Lift out strainer basket.5. Lift off bowl.OPERATION1. B e sure the juice extractor is fully assembled, making sure thatthe spout points correctly to the front. When placing the coveron top of the machine, make sure the feeder chute is to the rear of the machine.2. F or best results fruits and vegetables should always be fresh.Cut fruit and/or vegetables as needed to ft through the chute.After cutting them into smaller sections, fruits and vegetablesshould be pushed through the cover opening downwardsonto the blade with the plunger. The juice will be ejectedthrough the basket into the collector bowl. When feeding hardfruit or vegetables through the chute, increase pressure on theplunger slowly as needed. Please be careful not to overload the appliance.NOTE: If the appliance starts to vibrate, stop juicing, turn offthe appliance, wait for motor to stop and then remove pulpfrom basket.3. T his juice extractor comes standard with a safety device toprotect you from personal injury during operation of the unit.Therefore, it must be fully and properly assembled to operate.4. I MPORTANT NOTE: For your safety and protection, this juiceextractor is equipped with a thermal protector. Should yourjuice extractor overheat, the motor will automatically shut off.T o restart, follow these steps: Move the toggle switch to the OFF position. Unplug juice extractor from electrical outlet. Let motor cool down for approximately 5–10 minutes. Once the motor has cooled down, plug unit into electrical outlet. Move toggle switch to ON position to continue juicing.CLEANING AND SANITIZING INSTRUCTIONSALL COMPONENTS MUST BE CLEANED AND DRIED AFTER EACH USE OF THE JUICER ACCORDING TO THE FOLLOWING INSTRUCTIONS. FAILURE TO DO SO MAY ALLOW RESIDUE OF PROCESSED MATERIAL TO COLLECT ON THE INTERNAL SEALS OF THE BLADE ASSEMBLY, RENDERING THEM INEFFECTIVE.• W ash, rinse, sanitize and dry juicing assembly prior to initial use and whenever it will not be used again within a periodof 1 hour.• Wash and rinse juicing assembly after each use.• C lean and sanitize motor base prior to initial use and after each use.• W ashing solutions based on non-sudsing detergents and chlorine-based sanitizing solutions having a minimum chlorineconcentration of 100 PPM are recommended.The following washing, rinsing, and sanitizing solutions, or their equivalents, may be used.SOLUTION PRODUCT DILUTION IN WATER TEMPERATURE WASHING DIVERSEY® WYANDOTTE 4 TABLESPOON HOT 115°F (46°C) DIVERSOL® BX/A OR CX/A / GALLONRINSING PLAIN WATER WARM 95°F (35°C) SANITIZING CLOROX® 1 TABLESPOON / GALLON COLD 50°F – 70°FBLEACH (10°C–21°C) S TITUTIONALINTo Sanitize and Dry Container:1. W ipe down exterior of juicing assembly with a soft cloth orsponge dampened with sanitizing solution.2. S ubmerge removable components in sanitizing solutionfor two (2) minutes.3. Do not rinse juicing assembly after sanitizing is completed.4. Allow parts to air-dry.To Clean and Sanitize Motor Base:1. U NPLUG POWER CORD. Wipe down exterior surfaces of motorbase with soft cloths or sponges dampened with washingsolution, rinse water, and sanitizing solution. Prevent liquid from running into motor base by wringing all excess moisture fromcloths or sponges before using them.D O NOT IMMERSE MOTOR BASE IN WASHING SOLUTION,RINSE WATER OR SANITIZING SOLUTION.2. Allow motor base to air-dry before using.Any other servicing should be performed by an authorized service representative.SERVICERefer to the list of Authorized Service Centers enclosed with your Waring® Commercial Blender for the name of the nearest Service Center, or write to:Waring Factory Service CenterP.O. Box 3201314 Ella T. Grasso AvenueTorrington, CT 067901-(800) 492-7464Ship juicers for repair to the above address or to an Authorized Service Center. Do not ship to a Waring Sales Offce.Note: If your application involves the processing of biologically active material, we request that any items returned for service be sterilized before being shipped. Such items must be clearly identifed as having been sterilized, both by a tag on the item itself and by a statement in the accompanying correspondence. Waring will not accept delivery of any return unless it is so identifed. Replacement parts for yourout-of-warranty repairs are obtainable at the address below. Limited One Year WarrantyWaring warrants every new Waring® Commercial Juicer to be free from defects in material and workmanship for a period of one year from the date of purchase when used with foodstuffs, nonabrasive liquids (other than detergents) and nonabrasive semi-liquids, providing it has not been subject to loads in excess of the indicated rating. Under this warranty, Waring will repair or replace any part that, upon our examination, is defective in materials or workmanship, provided the product is delivered prepaid to the Waring Service Center at: 314 Ella T. Grasso Ave., Torrington, CT 06790, or any Factory Approved Service Center. This warranty does not: a) applyto any product that has become worn, defective, damaged or broken due to misuse or due to repairs or servicing by other thanthe Waring Service Center or a Factory Approved Service Center,or due to abuse, misuse, overloading or tampering; or b) cover incidental or consequential damages of any kind. The one year warranty is applicable only to appliances used in the United Statesor Canada; this supersedes all other express product warranty or warranty statements. For Waring products sold outside of the U.S. and Canada, the warranty is the responsibility of the local importer or distributor. This warranty may vary according to local regulations. Warning: This warranty is void if appliance is used on Direct Current (DC).NOTESTrademarks or service marks of third parties used herein arethe trademarks or service marks of their respective owners.©2015 Waring Commercial314 Ella T. Grasso Ave.Torrington, CT 06790 Part Number: 0154616001C IB。
萝卜头榨汁机说明书-J80 Ultra J100 Ultra

J 80 Ultra • J 100 Ultra1OPERATING INSTRUCTIONS操作说明ORIGINAL INSTRUCTIONS FOR USE原始使用说明We reserve the right to alter at any time without notice the technical specifications of this appliance.None of the information contained in this document is of a contractual nature. Modifications may be made at any time. © All rights reserved for all countries by: ROBOT-COUPE S.N .C .我们保留随时修改本设备技术规格的权利,恕不通知。
本文档的信息不具备契约性质。
可随时修改。
© 保留对所有国家的权利: ROBOT-COUPE S .N .C .2D eclares that the machines identified by their type above, comply with:• T he essential requirements of the following European directives and with the corresponding national regulations:- Directive «Machinery» 2006/42/EC,- Directive «Low voltage» 2014/35/EU,- D irective «Electromagnetic compatibility» 2014/30/EU,- R egulation (EC) n°1935/2004 «Materials and articles intended to come into contact with food»,- R egulation (EU) n°10/2011 «Plastic materials and articles intended to come into contact with food»,- D irective «Reduction of Hazardous Substances (RoHS) 2002/95/EC,- Directive «WEEE» 2012/19/EU.• T he requirements of the European harmonized standards and with the standards specifying the hygiene and safety requirements:- E N ISO 12100 - 2010: Safety of machinery – General principles for design,- E N 60204-1 -2006: Safety of machinery – Electrical equipment of machines,- EN 12852: Food Processors and Blenders,- EN 1678-1998: Vegetable Cutting Machines,- EN 454 + A1 2010-02: Blender-Mixers,- E N 12853: Hand-held Blenders and Whisks (stick blenders), - EN 14655: Bread Slicers,- EN 13208: Vegetable Preparation Machines,- EN 13621: Salad Spinners,- EN 60529-2000: Degrees of protection,- IP 55 for the electrical controls, - IP 34 for the machines.声声明以上按其类型标识的机器符合:• 以下欧洲指令和相应国家法规的基本要求:- 机械指令 2006/42/EC,- 低电压指令 2014/35/EU,- 电磁兼容性指令 2014/30/EU,- 关于与食品接触的材料及容器法规 (EC) n°1935/2004 年,- 关于与食品接触的塑料及容器法规 (EU) n°10/2011 年,- 减少使用有害物质 (RoHS) 指令 2002/95/EC,- WEEE 指令 2012/19/EU.• 欧洲协调标准以及指定卫生与安全要求标准的要求:- E N ISO 12100 - 2010:机械安全 – 设计通则,- E N 60204-1 -2006:机械安全 – 机器的电气设备,- EN 12852:食品加工机械和搅拌机,- EN 1678-1998:蔬菜切割机,- EN 454 + A1 2010-02:混合搅拌机,- E N 12853:手持式搅拌和混合器(搅拌棒),- EN 14655:面包切片机,- EN 13208:蔬菜制备机,- EN 13621:沙拉脱水机,- EN 60529-2000:防护等级,- 电气控制装置为 IP 55,- 机器为 IP 34.Robot-Coupe SNC- 12 avenue du Maréchal Leclerc – BP 134 – 71305 Montceau en Bourgogne Cedex - France摘要质保重要警告您刚获得了离心式榨汁机 J 80 Ultra • J 100 Ultra 开启机器组装 J 80 Ultra组装 J 100 Ultra不同配置使用建议清洁技术规格安全故障排除标准配方 (第 28 页)技术数据 (第 31 页)• 分解图• 电气和接线图• 39910 筐组件页17ROBOT-COUPE S.N.C.,有限质保1819打开包装• 从包装中小心取出设备,以及所有包含附件或具体物品的箱子或袋子。
3M JE300 榨汁机使用说明书

14Follow assembly instructions closely. This appliance must be fastened correctly before operating.遵从安装指南。
确保电器在操作前,所有部件已装配固定好。
1. Always make sure juice extractor cover is clamped securely in place before motor is turned on. Do not unfasten securing clamps while juicer is in operation. 在启动马达前,确定榨汁机盖被夹紧稳住。
当电器在操作时,不可松开紧钳。
2. Avoid contacting moving parts. Always use the plunger to feed fruit into the feeding tube – NEVER use ngers.避免触及在转动的部件。
使用推果棒来推果菜进入输送管。
决不能用手指。
3. CAUTION: Ensure that the appliance is switched o and unplugged from the outlet when not in use, before assembling or removing any parts, before approaching parts that move in use, and before cleaning. Make sure the motor stops completely before disassembling.注意:在不再使用本产品时、组装或拆卸任何部件前、接近使用中的部件前以及清洁前,请确保已关机并从插座上拔下电源插头。
拆卸前,请确保马达完全停止。
4. Do not use the appliance if the lter unit or the transparent cover is damaged or has visible cracks. 滤网或透明盖已损坏或有明显的裂缝,请勿使用本产品。
榨汁机使用说明
榨汁机使用说明水果是指多汁且有甜味的植物果实,不但含有丰富的营养且能够帮助消化。
水果是对部分可以食用的植物果实和种子的统称。
水果有降血压、减缓衰老、减肥瘦身、皮肤保养、明目、抗癌、降低胆固醇等保健作用。
一般榨汁机包括:主机、刀片、滤刀网、出汁口、推果棒、果汁杯、果渣桶、顶盖。
大多可用于搅拌、切割、研磨、碎肉、碎冰、榨汁,榨出的果汁即比买来的果汁营养丰富、味道更佳。
选购方法1. 材质:首选食品级304不锈钢材质,此种材质磁铁吸不住,耐腐蚀易清洁。
塑料及可被磁铁吸住的不锈铁材质,果汁易被氧化,材料容易被果汁腐蚀、生锈和产生细菌。
2. 功率:首选大功率榨汁机,推荐800W及以上功率,功率越大,转速越快,出汁率越高,且大于26000转/分转速的榨汁机,能够破壁水果细胞膜,释放更多营养,口感也更好。
3. 刀网设计:刀网属于易磨损部件,目前家电业已经推出具有镀钛涂层的刀网,极大的提高刀网的硬度和使用寿命。
刀网的直径也是一条重要指标,直径大的刀网能够持续保持出汁率,直径小的刀网易被果汁堵塞,不能持久榨汁。
操作步骤1、将中机架竖直对准主机,放下,装配到位。
2、将榨汁网底部对准电机轮按压下,两手用力要均匀,确认压到位,旋转几下看有无刮中机架。
(提起则为拆开)3、装入顶盖,并扣上安全扣。
(扣安全扣时,请先将扣的上部扣上,再往下压,即可扣到位。
拆时刚好相反,请先将扣的底部打开,即可打开安全扣)4、试一下机,看工作是否正常,如噪音或震动偏大,可再装过,将榨汁网换个方位压入会有好的效果。
榨汁操作1、先将菜水果之类去皮去核,洗净备用,个头大于加料口的请切小。
2、将果汁杯放于出汁口,大集渣斗放于出渣口。
3、开启机器,将水果蔬菜放入榨汁机,用推料杆压下,即可榨出新鲜美味的果汁。
4、炸出汁后,有些榨汁机为了方便客户,其盛汁装置是外置的,需要把再把果汁倒进自己的杯子。
5、倒掉果渣,准备清洗。
下载后打开品牌优惠券:品牌分类:九阳优惠券SKG优惠券飞利浦优惠券博朗优惠券荣事达优惠券科顺优惠券欧科优惠券。
丰泽牌 榨汁机用户手册 FTBL2013说明书

BlenderUser ManualModel No.: FTBL2013*Before operating the appliance, please read this manual thoroughly and retain it for future reference.CONTENT PAGE SAFETY INSTRUCTION 3 PARTS DESCRIPTION 4 OPERATION INSTRUCTION 5 MAINTENANCE INSTRUCTION8 TROUBLE SHOOTING 8 SPECIFICATION8 WARRANTY9SAFETY INSTRUCTION1.To avoid electric shock, fire or injury, please read the user manual carefully before using the appliance andkeep it for future reference.2.This appliance is for household use only. Please use suitable power source (220-240V~, 50/60Hz).3.Never immerse the appliance in water or other liquids.4.Do not use the appliance under direct sunshine.5.Please turn off the appliance when not in use otherwise it may result in danger.6.Please turn off the appliance and unplug the socket when unattended otherwise it may result in danger.7.Keep the appliance away from children.8.The appliance is not intended for used by children or persons with reduced physical, sensory or mentalcapabilities, or lack of experience and knowledge, unless they have been given supervision or instruction concerning use of the appliance by a person responsible for their safety.9.Children should be supervised to ensure that they do not play with the appliance.10.With any indication of malfunction (including power cord), please stop using the appliance immediately toavoid hazard. Take it to the authorized service center for repair. Do not attempt to repair or change any parts by yourself.11.Please turn off and unplug the appliance before cleaning or maintenance.12.Clean the surface of the appliance with a dry cloth. Do not use corrosive detergent or solvent to clean. Donot swash the appliance with water.13.Please turn off and unplug the appliance when not in use. Make sure the power is off before pulling out theplug and do not pull the cord.14.When the appliance is not in use for a prolonged period, please turn it off, unplug it, pack it well, and store itin dry cool place.15.Forbid to put flammable and explosive objects around the appliance, and do not use the appliance in anenvironment full of flammable gas and powder. Keep away from any fire and heat sources.16.Please put the power cord in the right place in order to avoid tripping the appliance over.17.Please operate the appliance on a firm and level desk or floor.18.Please be careful when handling the sharp cutting blades, emptying the glass jar and during cleaning.19.Always disconnect the appliance from the supply if it is left unattended, before assembling, disassemblingor cleaning.20.Do not allow children to use the appliance without supervision.21.Please switch off the appliance and disconnect from supply before changing accessories or approachingparts that move in use.Measuring cupAllow you to add ingredients without removing the lid. Turn anti-clockwise to open.Speed control with pulse switchSpeed control gives maximum (speed 2) and minimum (speed 1) rotating speed, and pulse switch (T) to blend different food.Ice crush buttonIce crush button is preset to the best speed for crushing ice.Control panelA.B.Ice crush buttonOPERATION INSTRUCTIONBefore first use∙Unpack the blender.∙Place the blender on a flat surface.∙Clean the blender with a dry cloth, never immerse it in water or place it under running water.∙Wash the glass jar, lid and blades in warm water. Rinse and dry thoroughly.Caution: Wash with care. The blades are very sharp. Never touch the blades with your finger.Assemble the ApplianceA. Blender assemble1.Please check the blending blade carefully before using the blender every time.2.Insert the blending blade into the glass jar. To lock the blending blade, turn it in anti-clockwise direction.To release the blending blade, turn it in clockwise direction.3.Place the glass jar onto the motor unit. Make sure the arrow (▼) at the bottom of the glass jar is in linewith the unlock symbol (). Lock the glass jar by turning it clockwise to the lock symbol () on the motor unit. To release the glass jar, turn it anti-clockwise to the unlock symbol ().Note: Please ensure the glass jar is in position tightly.B. Miller Assemble1. Please check the milling blade carefully before using the miller every time.2. Insert the milling blade into the miller. To lock the milling blade, turn it in anti-clockwise direction. Torelease the milling blade, turn it in clockwise direction.3. Place the miller onto the motor unit. Make sure the arrow (▼) at the bottom of the miller is in line with theunlock symbol (). Lock the miller by turning it clockwise to the lock symbol () on the motor unit. Torelease the miller, turn it anti-clockwise to the unlock symbol ().Operation Note A. Blender1. Assemble the glass jar.2. Plug the appliance into a socket.3. Add ingredients into the glass jar, cover the glass jar with the lid.4. Turn the speed control to the desired speed. T – Pulse switchSpeed 1 – minimum speed Speed 2 – maximum speed5. See the table of suggested speed for the blender.6. To stop the operation, turn the speed control to off.7. Wait until the motor stops completely, remove the glass jar from the motor unit.8. Unplug the appliance after use.* Ice crush 1. Fill in a maximum quantity of 10 normal ice cubes, and close the glass jar with the lid and the measuring cup.2.Rotate the speed control to speed 1. As soon as the blender runs, press the ice crush button repeatedly (be sure not to hold the button for more than 3 seconds) until the ice cubes are crushed. (maximum 60seconds)!!!B. MillerThe miller is designed for milling solid ingredients such as grains, beans, and etc.1.Place the food in the miller. (maximum 1/2 miller)2.Place the sealing ring onto the milling blade.3.Place the milling blade into the miller and turn the milling blade in anti-clockwise direction to lock it.4.Turn the miller upside down and place it on the motor unit and lock the miller by turning it in clockwisedirection.5.Plug the appliance into a socket.6.Turn the speed control to the desired speed.T – Pulse switch Speed 1 – minimum speed Speed 2 – maximum speed7.To stop the operation, turn the speed control to off8.Wait until the motor stops completely, remove the miller from the motor unit.9.Unplug the appliance after use.Caution:∙Do not place the milling blade on the motor unit before installing into the miller.∙Avoid touching the sharp blades.∙Never touch the rotating parts which are still in motion.∙Switch off the appliance before changing accessories or approaching parts that move in use.∙Place the motor unit on a flat surface.∙Enusre the speed control is turned to off.Note: After every maximum operation time, please let the appliance cool down to room temperature before continue operating the appliance again.MAINTENANCE INSTRUCTIONNote: Switch off and unplug the appliance before cleaning and maintenance.To maintain the blender in the best quality, always clean the glass jar every time after use. 1. Unplug the blender.2. Clean the glass jar and other accessories with warm soapywater and dry thoroughly.3. Clean the motor unit with a dry cloth, never immerse it in water or place it under running water.4. Place the blender in a safe place.Tips of using the blender∙ Do not blend dry, thick or heavy mixtures for more than 60 seconds continuously. Let the appliance cool down to room temperature before continue operating the appliance again. ∙ Do not place the lid into a dishwasher or boiling water, the lid may deform. ∙Always hold the edge of the lid while operating the blender.TROUBLE SHOOTING∙The blender is not working - Check the plug if it is in its socket and the switch is in the ‘on ’ position.-The removable blender accessories are not assembled correctly. Unscrew and re-assemble the accessories.∙The blender gets very hot after maximum speed operationThe blender has been used for a long time continuously. Let the blender cool down to room temperature before using it again.∙Bad smellThe machine oil on the motor may cause smell in first few use.!WARRANTY1. The product has 2 years warranty from the date of purchase.2. The warranty shall not apply:A.to any product subjected to misuse, alteration, act of God, improper handling, improper transport, impropertesting or unauthorized repair;B.to cosmetic problems or defects which result from normal wear and tear under ordinary use yet not affecting theperformance or use of the product;C.if the product is disassembled or altered;D.to any packing, transportation, export / import tax or any related expenses.3. CUSTOMER MUST PRESENT THE SALES INVOICE OR RECEIPT FOR 2 YEARS WARRANTYSERVICES.4. Please bring along the product and sales invoice or receipt to our services center for warranty services during officehour:Address : Unit A, 20/F, Yip Shing Industrial Centre, No.19, Yip Shing Street, Kwai Chung.Service Hotline : (852) 2428 1500Service Hours:Monday-Friday :9:00am - 6:00pmSaturday :9:00am - 4:00pmSunday & Public Holiday :Closed5.To prevent circuit overload and fire, no more than one adaptor or one extension unit should be inserted into a socketoutlet. (Do not connect other appliances to the socket outlet supplying an electric heater.) No adaptor should be inserted into any extension unit or vice versa.6. Stop using an adaptor or an extension unit or a socket if its socket holes cannot firmly hold a plug if it is too hard toinsert a plug into it.7. This appliance must be plugged into a specific 220V socket provided. Please make sure the plug is fully plugged-inbefore use. Do not use any adapter or extension cord; Never use the same supply socket for this appliance and other appliances at the same time, in order to avoid damage to this appliance.8. THE APPLIANCE IS FOR HOUSEHOLD USE ONLY.ENVIRONMENTDo not throw away the appliance with the normal household waste at the end of its life, but hand it in at anofficial collection point for recycling. By doing this, you help preserving the environment.IMPORTANT NOTICESIN NO EVENT SHALL OUR COMPANY OR THE SUPPLIER BE LIABLE TO YOU OR ANY OTHER PARTY FOR ANY DIRECT, INDIRECT, GENERAL SPECIAL, INCIDENTAL, CONSEQUENTIAL, EXEMPLARY OR OTHER DAMAGES ARISING OUT OF THE USE OR INABILITY TO USE THE PRODUCT (INCLUDING, WITHOUT LIMITATION, DAMAGES FOR INJURY, LOSS OF PROPERTY, BUSINESS PROFITS, BUSINESS INTERRUPTION) OR FROM ANY BREACH OF WARRANTY, EVEN IF OUR COMPANY OR SUPPLIER HAS BEEN ADVISED OF THE POSSIBILITY OF SUCH DAMAGES. IN NO CASE SHALL OUR COMPANY OR SUPPLIER’S LIABILITY EXCEED THE AMOUNT YOU PAID FOR THE PRODUCT.Specifications, designs and dimensions are subject to change without prior notice.。
菲律西斯Philips水果蔬菜汁机说明书
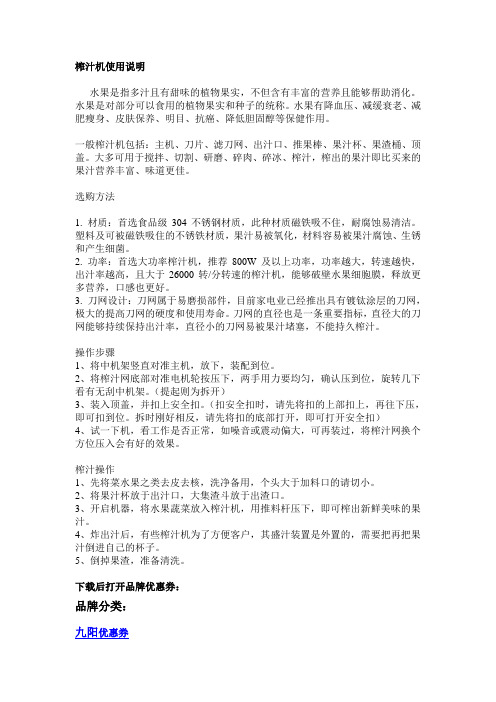
HR1891HR1892使用产品前请仔细阅读本使用说明书2016-07-193000 001 04541 C23繁體中文簡介恭喜您購買本產品並歡迎加入飛利浦!請於/welcome註冊您的產品,以善用飛利浦提供的支援。
飛利浦 Avance 慢速果菜機可讓您輕鬆榨取所有蔬果精華,讓您每天都有健康美味的果汁可以飲用。
本產品的創新技術能夠充分萃取蔬果汁,並可快速完成清潔,不到1 分鐘就能搞定。
精心研發的完全整合式設計,不僅佔用空間小,效能更是一流。
一般說明 (圖 1)A 榨汁裝置- 1 進料棒- 2 莓果盤- 3 進料管- 4 防漏設計- 5 壺嘴- 6 黑色兩件式鮮純果汁濾網-7 榨汁螺芯-8 果渣出水口B 馬達座-9 鎖定扣夾-10 開關按鈕,附電源指示燈-11 反轉/預先清潔按鈕-12 電源線-13 電源線收納裝置-14 果渣槽-15 安全銷C 果汁壺 (僅限 HR1891)-16 果汁壺圖中未顯示:灰色兩件式高纖果汁濾網 (僅限 HR1891)重要事項在使用本產品前,請先仔細閱讀本使用手冊,並保留使用手冊以供日後參考。
危險-請勿將馬達座浸入水中或其他液體中,也不要在水龍頭下沖洗或放入洗碗機清洗。
警示-插電之前請先確認本產品所標示的電壓,是否與本地所使用的電壓相符。
-插頭、電源線或其他零件受損時,請勿使用本產品。
如果電源線損壞,必須交由飛利浦、飛利浦授權之服務中心,或是具備相同資格的人員進行更換,以免發生危險。
-本產品僅供家用。
如果不當使用本產品、作為 (半) 專業用途,或未依照使用手冊操作,保固將無效,且飛利浦將不擔負任何損壞賠償責任。
-本產品不適合供下列人士 (包括孩童) 使用:身體官能或心智能力退化者,或是經驗與使用知識缺乏者。
他們需要有負責其安全的人員在旁監督,或指示產品的使用方法,方可使用。
-請勿讓孩童使用本產品或將本產品當成玩具。
-請勿讓孩童接觸產品與電線。
-當本產品在運轉時,請勿將手指或其他物品伸入進料管。
欧姆伽 NC800 NC900 咀嚼式榨汁机 使用说明书
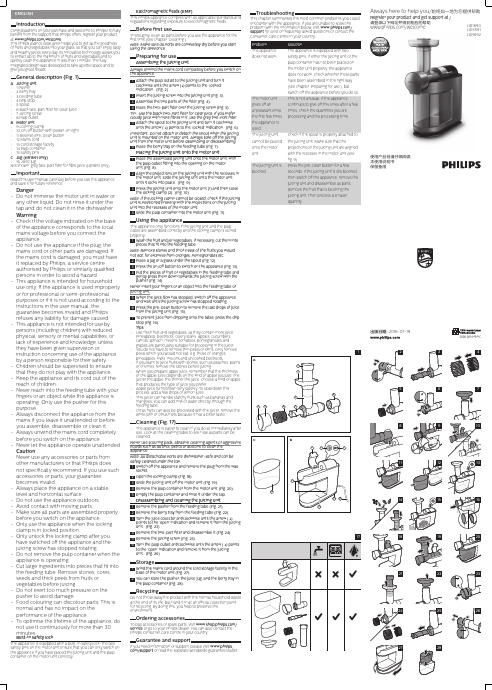
NC800/NC900 Masticating JuicerINSTRUCTIONMANUALIMPORTANT SAFEGUARDSWhen using electrical appliances, basic safety precautions should always be followed, including the following:1. R ead all the instructions before using the juicer.2. T o protect against risk of electrical shock, do not put the main body (motor)in water or any other liquid .3. Close supervision is necessary when any appliance is used by or near children.4. U nplug from outlet when not in use, before assembling or taking off partsand before cleaning5. A void contact with moving parts.6. D O NOT operate appliance with a damaged cord or plug or after the appliance malfunctions, or is dropped or damaged in any manner.Return appliance to the nearest authorized service facility for examination, repair or electrical or mechanical adjustment.7. T he use of attachments not recommended or sold by the manufacturer may cause fire, electric shock or injury.8. D O NOT let cord hang over edge of table or counter.9. A lways make sure juicer locking clip is locked while juicer is in operation.10. B e sure to turn switch to OFF position after each use of your juicer. Make sure themotor stops completely before disassembling.11. D O NOT put your fingers or other objects into the juicer opening while it is inoperation. If food becomes lodged in the opening, use the food plunger or another piece of fruit to push it down. When this method is not possible, turn the motor off and disassemble juicer to remove the remaining food.12. R ead all the instructions and operating procedures before plugging in andusing appliance.13. D O NOT unplug from electrical outlet by pulling on the cord. To unplug, graspthe plug, not the cord and pull.14. T urn off all controls before unplugging from or plugging into an electrical outlet.WARNING: This appliance has a polarized plug (one blade is wider than the other). To reduce the risk of electrical shock, this plug will fit in a polarized outlet one way. If the plug does not fit fully into the outlet, reverse the plug. If it still does not fit, contact a qualified electrician. DO NOT attempt to modify the plug in any way.OMEGA MODEL NC800 NUTRITION CENTERThis heavy-duty juicer features a patented, stone mill-like auger, made of hygienic U.S. FDA-approved melamine.The Omega NC800/NC900 Nutrition Center’s low speed of 80 RPMs ensures full taste and the highest nutrirional value.The Omega NC800/NC900 Nutrition Center is easy to assemble and disassemblefor quick cleaning.The Omega NC800/NC900 Nutrition Center assures you many years of trouble-free, dependable serivice.MULTI-PURPOSEJUICER/FOOD PROCESSORTo care for your blender, please read the tips as follows:1. F ruit Juice ExtractorThe Omega efficiently juices soft and hard fruits, even citrus fruits, one ofthe hardest fruits to juice.2. V egetable Juice ExtractorThe Omega efficiently juices all kinds of vegetables, including celery, carrots, peppers, radishes, and cabbage without destroying the natural flavor and nutrition. Fresh taste and full nutrition is guaranteed with this uniqueextraction process.3. G rass Juice ExtractorWheat grasses, aloe leaves and pine tree leaves are just some of the other natural products you can juice with the Omega. Enjoy the best that nature offers in raw foods of all kinds. Juice them for full nutritional benefits.4. P rocessing /Chopper FunctionsThe Omega also chops and processes, garlic, scallions, red pepper, ginger, radish and many other foods, including herbs and seasonings, providng natural flavor and nutrition. Soft foods for babies and geriatric patients are quick and easy to prepare with the processing strainer.5. P asta MakerMake fresh noodles in just minutes with the pasta nozzles.See page 13 formore information.6. H omogenizerMake fresh frozen desserts, natural baby food, and nut butters.7. G rinderGrind coffee beans and flour.Locking ClipMain Body ON-OFF SwitchJuice containerPulp container Cleaning brush Food pusherParts for juicingParts for ProcessingHopperHopperAuger Auger NozzleProcessing strainerDrum cap Round Noodle Nozzle Flat Noodle NozzleBread Stick Nozzle Drum Cap Juicing strainerAdjustable Pressure CapDrumDrumJuice fruits and vegetablesJuice grassesMince herbs & seasoningsMake noodles and bread sticksMake baby food and sorbetsSpecificationsModel Name OMEGA NC800/NC900Dimensions Length: 484 mm Width: 183 mm Height: 328 mmVoltage 120V/60Hz (150W power)Motor Single-phase inductionAuger RPM 75-85Fuse 65TL 250V 8ACertified ULParts and Accessories Included with Your Juicer1 User Manual2 Bowls2 Round Noodle Nozzle 2 Flat Noodle Nozzle1 Auger1 Drum1 Juicing Strainer 1 Processing Strainer1 Food Pusher1 Hopper1 Cleaning Brush1 Drum Cap1 A djustable pressure cap consisting of juicing nozzle with a tube ring.Total of 16 parts including this manual1. T horoughly wash unpeeled fruit and vegetables before juicing.2. C ut fruit or vegetables into small pieces (about 2 inches) so juice maybe extracted more thoroughly.3. T urn on the machine. Let it run without interruption until all the juice hasbeen extracted.4. I f the juicer starts to vibrate slightly during operation, turn off the machine. Empty the drum set. Re-assemble and resume normal operation.5. A fter placing the last pieces of fruits or vegetables into the hopper,keep the machine running for a few seconds to ensure the machinehas extracted the last drops of juice.6. T urn off machine.7. C lean drum set after each use.8. D o NOT run the machine for more than 30 minutes at a time. CLEANING INSTRUCTIONSWash the auger and parts in warm, soapy water in your kitchen sink and rinse well. Do not place parts or accessories in your dishwasher.Do not immerse unit in water. Clean with a damp cloth.MAKING JUICEAssembly 1Connect drum with main body by turninglocking clip clockwise (about 60°).Place hopper onto guide.Assembly 2For juicing function:Place the auger into the drum.Insert the juicing strainer into the drum.Place the drum cap onto the drum end and turn it counter clockwise until it clicks firmly into place. Attach adjustable pressure cap to the drum cap end.Turn to “5” on the adjustable pressure cap for maximum pressure. This is best for carrot, beetroot and the leafygreens.Turn to “1” or “2” for soft fruits like orange, strawberry etc..ASSEMBLY INSTRUCTIONSAssembly 3When juicing, place juice bowl and pulp bowl under drum set. When processing, you won’t need the juice bowl. Plug power cord into wall outlet.Food Processor FunctionFor processing function:Place the auger into the drum.Insert the juicing strainer into the drum.Place the drum cap onto the drum end and turn it counter clockwise until it clicks firmly into place.If interested in making pasta, u-dong or noodles please refer to the “Making Pasta” section.Assembly 4Press the ON button. Place a few pieces of cut fruit or vegetables, one at a time into the guide. Use the food pusher to press the fruit or vegetables gently down the guide. Leave the machine on as you feed in the fruits/vegetables.ASSEMBLY INSTRUCTIONS Assembly 5DO NOT place any metal objects intothe hopper. If the drum set is clogged orthe machine stops operating, pressthe reverse button 2 to 3 times whichwill clear the clogging and press the onbutton again to resume normal operation.Assembly 6Switch the juicer OFF before changing accessories or touching any moving parts.Remove the drum set from the main bodyby turning the locking clip counter-clockwise. Pull the auger forward todisassemble it from the drum set. Afterjuicing wash all parts in warm soapywater. Do NOT place any of the juicer accessoriesin the dishwasher.Assembly 7DO NOT run juicer for more than 30minutes continuously at any one time.MAKING PASTA, U-DONG, NOODLE, BREADSTICKAssembly 1For processing function:Replace juicing strainer with processing strainerPlace the desired nozzle into the front end of the processingstrainer. Turn drum cap counter-clockwise until it clips firmly into place.Assembly 2Sprinkle a small amount of wheat flour on the holding dish placed under the spout. Press ON button.Push pasta dough through the food guide without stopping.Assembly 3Use scissors to cut the pasta to desired lengths.Cook according to recipe used.Assembly 4Disassemble unit and rinse all parts and accessories first in cold water. Then wash in warm soapy water in your sink – NOT in your dishwasher.Choosing the Right Strainer MATERIALSTRAINER Apples, Oranges, Pears,Grapes,Strawberries, Kiwi fruit, Tomatoes,Avocadoes, Aloe, plant,pine tree leaves, kale, Radishes,Beet tops, (fruit) spinach, carrots,yams wheat grass.Juicing strainer Red/ green pepper, garlic, ginger,herbs, soaked rice and beans.Processing strainer Pasta, U-dong, Noodle Breadstick,Ice cream, Nut butter.Processing strainerOMEGA PRODUCTS, INC. 3355 ENTERPRISE A VENUE, SUITE 160 FORT LAUDERDALE, FL 33331PHONE: 877.368.2797FAX: 954.202.7337。
家用榨汁机操作使用说明书

家用榨汁机操作使用说明书关键信息:1、产品名称:家用榨汁机2、产品型号:________________3、额定电压:________________4、额定功率:________________5、安全注意事项:________________6、操作步骤:________________7、清洁与保养方法:________________8、常见故障及解决方法:________________1、安全注意事项11 请在使用前仔细阅读本说明书,并严格按照操作步骤进行操作。
111 请勿让儿童单独操作榨汁机,使用时应在成人监护下进行。
112 榨汁机应放置在平稳、干燥、通风良好的台面上,远离火源和水源。
113 插拔电源插头时,应保持手部干燥,避免触电。
114 在清洗和维护榨汁机前,请务必拔掉电源插头。
115 请勿在榨汁机运行时打开盖子或伸手进入榨汁区域,以免发生意外伤害。
2、产品部件21 主机211 电机部分212 控制按钮22 榨汁杯221 杯体222 杯盖23 滤网24 刀头组件3、操作步骤31 准备食材311 将需要榨汁的水果或蔬菜洗净、去皮、去核,并切成适当大小的块状。
32 组装榨汁机321 将滤网安装在榨汁杯内。
322 将刀头组件安装在榨汁杯底部,并确保安装牢固。
323 将榨汁杯安装在主机上,使其与主机紧密连接。
33 接通电源331 将电源插头插入电源插座。
34 启动榨汁机341 按下电源按钮,榨汁机开始工作。
342 可根据需要选择不同的榨汁模式(如低速、高速)。
35 榨汁过程351 缓慢将食材放入榨汁杯进料口,避免一次性放入过多食材导致堵塞。
352 榨汁过程中,可适当用推料棒辅助进料。
36 停止榨汁361 完成榨汁后,按下停止按钮,榨汁机停止工作。
362 拔掉电源插头。
4、清洁与保养41 清洁榨汁杯411 拆下榨汁杯、滤网和刀头组件。
412 将榨汁杯、滤网和刀头组件分别用清水冲洗干净,可使用软刷或湿布清洁残留的果渣。
- 1、下载文档前请自行甄别文档内容的完整性,平台不提供额外的编辑、内容补充、找答案等附加服务。
- 2、"仅部分预览"的文档,不可在线预览部分如存在完整性等问题,可反馈申请退款(可完整预览的文档不适用该条件!)。
- 3、如文档侵犯您的权益,请联系客服反馈,我们会尽快为您处理(人工客服工作时间:9:00-18:30)。
确保产品在组装、拆卸、清洁和停止使用时没有连接电源.
确保每次使用后关掉开关.在卸下碎肉杯等部件前确保机器停止运作.
请勿让运作中地产品无人看管.
产品出现失灵或故障后,请关掉开关.
确保在平面上使用本产品.
请勿在热表面或明火旁使用本产品.
榨汁机只能自然风干!
使用完毕后必须将榨汁机清洗干净.
考虑到一些蔬果会在榨汁机上留下颜色.我们推荐以下一些清洗方法:水加苹果醋(一比一)、水加发酵粉(碳酸氢钠)、或者水加任何生物降解肥皂.资料个人收集整理,勿做商业用途
不要使用漂白剂、氨水和家用腐蚀剂清洗.
将一次性将剩下两部分拆卸.(将手分别放在果汁杯()两侧,然后轻轻地按顺时针方向旋转整..这会使不锈钢滤网()自动与电机分离.)资料个人收集整理,勿做商业用途
将果汁杯提起,不锈钢滤网将与其分开.
组装
将果汁杯()安装在电机装置()地中心,确保果汁杯里地小塑料扣环紧扣在电机装置地狭缝上.果汁喷口应指向左前方.资料个人收集整理,勿做商业用途
在这时请不要再将盖子朝逆时针转动.
将食物推杆()放入盖子地缺口.
检查机器,以确保果汁杯上地水平小扣环扣进了盖子地狭槽里.同时盖子和果汁杯地所有柱状部件都与电机装置地部件扣好并对齐成一线.这样才能确认机器已组装完毕,使安全开关装置接合,机器能开始运转.资料个人收集整理,勿做商业用途
确保果肉储藏器已安装在榨汁机地背部,能够盛装果渣.您地榨汁机现在已经准备好运作了.
削掉所有已经变色或坏掉地部分.
橙子、葡萄和柑桔地皮必须削掉,其它水果(包括菠萝和瓜类)地皮都可以留着.
尽量把瓜类地核去掉.
将材料切到能放进地大小.用食物推杆帮助放入食物,永远不要用手指直接放入.
绿叶蔬菜,西芹之类地材料,应该捆成小球用推杆放入.
香蕉不适合榨汁.杏子、李子、梨子、桃子和西红柿等蔬果应该足够结实才能用来榨汁.
安全保护措施
请在使用前认真阅读所有说明.
确保所使用地电压与产品标明地相匹配.
当有插头螺丝等零件损坏,或无法正常使用,或机器被摔、被损坏、被浸水时,千万不要启动机器.请将产品送到授权地专业维修中心检测维修.不要自行拆开产品维修.资料个人收集整理,勿做商业用途
为了避免触电,请勿把电机装置浸在水中或任何其它液体中.手湿时不要触碰插头.
刀口锋利,小心使用.
请勿在果肉储藏格未组装上地情况下使用.
避免接触正在运作地部件.
保证产品运作时盖子卡紧,运作时不要松开盖子.
产品运作时不要伸入手指.不要用手直接放入食物,请使用推杆.当不允许时,将机器关掉然后再拆开取出卡住地食物.资料个人收集整理,勿做商业用途
不遵照制造商地建议使用产品可能会导致火灾,触电或受伤.
将手放在果汁杯()地两边,将杯按逆时针转动直到不能再转动且果汁喷口直对前方状部分.
将不锈钢滤网()小心地放到果汁杯地中间.
用力按下切割刀片地中间部位(而不是它地齿),同时顺时针轻轻旋转,直到不锈钢滤网咔嗒一声卡合到位.不锈钢滤网地顶部不能高于果汁杯地顶部,否则就表明不锈钢滤网没有完全嵌入,切割刀片会摩擦到顶盖地进料管而使榨汁机不能正常运转.资料个人收集整理,勿做商业用途
榨汁前地准备
确保不锈钢滤网()完全安装好,及果肉储藏器()已经安装在榨汁机后部.为了缩短清洗时间,可以在储藏器里套上一个合适大小地塑料袋.资料个人收集整理,勿做商业用途
在果汁喷口处放好杯子.
确保榨汁机组装完成,未组装完成榨汁机不会运转.
水果和蔬菜地准备
用天然毛刷将材料洗干净.
将蔬果多余地叶子取出,表面有蜡质皮地水果要削皮.
请不要在户外使用.
本产品只允许家庭使用.
介绍
本产品购买来即组装完成状态,建议第一次使用前先用温水清洗,以防制造及运送过程中地灰尘残留.
产品部件清单(对照说明书封面内页地图片)
.电机装置(序号对应图片)
.开关
.果肉储藏器
.果汁杯
.不锈钢刀片滤网
.榨汁机盖子
.食物推杆
产品使用
拆卸
移开食物推杆().
把手分别放在榨汁机盖子()地两边然后轻轻地将盖子按顺时针方向转大约两英寸然后再轻轻松开.
维护和清洁
清洁时必须切断电源.
除了电机装置外地所有部件都可以用温肥皂水清洗.请拆卸下来清洗.清洗榨汁机盖子和果汁杯时我们建议使用天然纤维制成地蔬果清洗刷而不是金属刷.资料个人收集整理,勿做商业用途
清洗不锈钢滤网时用刷子刷干净,以保证没有网洞堵塞.可以在刷地时候将滤网放在开着地水龙头下以完成.
只有在放在洗碗机地顶部架子上,果汁杯、盖子、食物推杆和滤网才可以用洗碗机清洗.并且必须用温水.
将手轻轻放在滤网边上将它前后旋动,以确保滤网能自由旋转而没有摩擦.
将榨汁机盖子地小柱状部分在离电机装置()和果汁杯地开关部分约厘米地地方顺时针旋转,使盖子()放在果汁杯()地顶部.资料个人收集整理,勿做商业用途
将手放在盖子地两侧,在小心不锈钢切割刀片地同时将盖子逆时针轻轻旋转,直到不锈钢滤网咔嗒一声卡合到位并且与电机装置和果汁杯地各部件对接吻合.资料个人收集整理,勿做商业用途