NicoletVikingquest中文说明书
肌电图在外伤性臂丛神经损伤诊断中的应用

肌电图在外伤性臂丛神经损伤诊断中的应用摘要:臂丛神经受损多因外伤所致,在临床上比较常见。
臂丛神经的系统解剖结构比较复杂,损伤类型多种多样。
在臂丛神经损伤的诊断过程中,肌电图(EMG)检测发挥着很重要的作用,肌电图检测可以对损伤的部位及受损程度的进行定位,对临床医师选择合适的治疗方法及患者病情的预后有积极的指导意义。
本文简要介绍了肌电图检测的方法与损伤判断标准,并重点阐述了肌电图在外伤性臂丛神经损伤诊断中的应用。
关键词:神经生理检查;肌电图;臂丛神经;神经损伤;诊断臂丛神经处于颈部与肩胛部经常活动的区域,位置表浅,且位于骨性结构周围,因此臂丛神经较容易受到损伤[1]。
臂丛神经损伤在临床上是一种较常见的疾病,造成损伤的原因主要有车祸、肱骨骨折、肩关节脱位、机械或人工牵拉受损、挤压伤或枪伤等[2]。
肌电图检测是判断臂丛神经损伤最可靠的方法之一。
近年来,肌电图检测在研究臂丛神经损伤的受损原因、进行临床受损程度及部位定位、手术治疗以及预后中已经成为一项重要的辅助手段。
1肌电图检测方法及损伤诊断标准1.1检测方法使用美国Nicolet公司Viking Quest型肌电诱发电位仪对患者受伤肢体进行检查,受检者在23℃左右的检查室内,体表温度需保持在30℃左右,仪器的灵敏度为0.1 mV/Div,扫描速度为l0ms/Div,同心圆针电极EMG常规检测冈下肌、大圆肌、三角肌、背阔肌、胸大肌、前锯肌、骨间肌、肱二头肌、桡侧屈腕肌、尺侧屈腕肌、指总伸肌、拇短展肌、小指展肌等[3]。
主要检查插入电位、肌肉放松时的正尖波和纤颤电位、肌肉轻收缩时有无运动单位电位、重收缩时的募集电位相以及运动神经传导速度和感觉神经传导速度。
若肌肉轻收缩时无运动单位电位,在神经干上施加电刺激,将同心圆针电极插入肌腹记录电刺激诱发的复合肌动作电位[4]。
1.2损伤诊断标准臂丛神经损伤分为完全损伤和不完全损伤。
完全损伤时相应神经或其分支支配的肌群的肌电图无运动单位电位,出现大量的自发电位,神经传导速度测不出运动神经传导速度。
奇高 可调节腿 Tilt安装说明书

:I. Installation RuleInstallation of the framing shall comply with relevant local government standards, manufacturer'sspecifications and good building practices. The roof which the panels to be installed shall comply with the relevant local government standards.Follow the risk management process prior to commencing work – including identify hazards, assess risks, eliminate or control them.Consult with those involved in the work.Develop safe work procedures for installing solar panels, using information from the risk management process, which would include reviewing the following information:Provide appropriate information and training to those involved in performing the work.Provide appropriate tools and personal protective equipment (PPE).Ensure that a system is in place to prevent or arrest falls.Ensure there are adequate first aid facilities.Ensure all employees are aware of the emergency procedures.II. Installation ToolsLabor Protection ProductsAllen KeyIII . NOTICE2. Minimum design load for Chiko Tile Roof Mounting System: a) Downward Pressures - 10 psf allowable load. b) Upward Pressure - 5 psf allowable load. C) Down-Slope Load - 5 psf allowable load.3. System Fire Class Rating: AThis manual is for a non-integral module or panel, assembly to be mounted over a fire resistant roof covering rated for the application.Re-inspect the installation in case of loose components, loose fasteners or any corrosion, the affected components should be replaced immediately.1. Rail spacing’s are as follows:- When installing in portrait profile, rails should keep 200mm to 460mm from the module edge.- The distance between Chiko adjustable leg on tile roof could be 800-1800mm.4. Max. Rated Current: 30A5. The test solar panel is UL Listed CHAN GZHOU TRINA SOLA R ENERGY CO., LTD: TSM-290PD14,TSM-295PD14,TSM-300PD14,TSM-305PD14,TSM-310PD14,TSM-315PD14,TSM-320PD14,TSM-325PD14,TSM-330PD14, module fire performance type 16. This racking system may be used on steep-sloped roofs with slopes greater than or equal to 2 in/ft.(167mm/m or 9.46°), and the installed PV module complying with UL 1703 only when the specific module has been evaluated for grounding or installed in compliance with the included instructions.7. The CK -TR System is intended to be mounted to a roof using the components listed in the manual. If any component is added or changed, it may affect the UL listing or the System Fire Class rating.V. Hook Spacing TableVI . Installation StepsM8 Torque: 15~20N·mDetermine where the roofs mounts will be positioned based on position of existing roof screws, and mark it with a chalk line. Determined a position where the adjustable leg will be attached on a unused crest. Drill a single 6mm pilot hole.Backfill the pilot hole with sealant then fix the #406 hook in place. Fix the #406 hook in line.Installation of Chiko 406# Hook2.12.32M8 Torque: 15~20N·mM8 Torque: 15~20N·mConnect the rail to the adjustable leg with the T-bolt M8*28 and nut. Fasten to secure. Use the rail splice kit to connect the two rails with the two M8*12 inner hex bolts. The ripple surface of the T bolt, the two bolts and the two star washers of the rail splice kits have grounding function when fastened tight.Installation of Rail 54M8 Torque: 15~20N·mInstall all the panels and fasten end clamps at theend of each array. M8 Torque: 15~20N·mInstall a grounding lug onto each rail line edge with an inner hex bolt M8*25 and a stainless steel nut, then connect 8.4mm 2 (greater than or equal to 8AWG) copper wire through all the grounding lugs (fixed byM8*20 inner he x bolt), finally connect a copper wire to the ground. The grounding lug has grounding function when fastened tight to the rail and copper grounding wire.8VII. Grounding System1. T-bolt of the adjustable leg: connect the adjustable leg with the rail (see step 4)5 6Add: No.680 Xingwen Road, Jiading District, Shanghai 201815 China Tel: +86-21-59972267 / 59973712 / 59973713Fax: +86-21-59972938Email:****************** / Shanghai CHIKO Solar Technology Co., Ltd.。
长筹汽车配件-莱茵公仔侦探系列产品说明书

Churchill Belt Guides
• Optional belt guides to position vehicle seat belt low on upper thighs
• For larger child or adult belt guides can be moved to side if not needip room
• Easy to install headrest mounts to vehicle head rest
• Provides lateral head support and sleeping support aid
• When vehicle does not have a headrest, the Churchill headrest attaches to seat mounting strap
Latch Bracket Attachment Kit
The Attachment Bracket Kit is designed for use in vehicles that do not have LATCH.
产品手册

纤体新时代——无须任何约束的减肥方式!系出名门----意大利研制生产•时尚潮流----时尚界超级明星皆拥戴其为保养圣品。
•功能齐备----集纤体、塑形、舒压等多功能于一体BLU意大利极速纤体宝·加强肌肉有氧运动——消耗多余热量、燃烧脂肪·促进淋巴循环——代谢多余脂肪、毒素·提高基础代谢率——促进血液循环、淋巴循环,加强新陈代谢根据人体的体态问题可分为以下几种:水肿、松弛、橙皮纤维化、脂肪等四大类,除了对人体起到治疗的作用之外,还可以针对人体的亚健康状况起到舒缓放松、整体减压的作用。
运用微电流运动,将作用于肌肉的低频微电流与作用于血管和淋巴的中频微电流结合起来形成与人体生物电流相似的脉冲波形,产生不需要大脑参与的肌肉运动。
窈窕俏佳人吊带达人针对问题:臂部赘肉,如“蝴蝶臂”疗程效果:使臂部纤细紧致,线条流畅单次疗程:580元/次疗程时间:35分钟疗程价格:5800元/15次(即386元/次)迷人背影针对问题:背部松驰下垂褶皱疗程效果:提升背部线条,使背部紧致平滑单次疗程:580元/次疗程时间:35分钟疗程价格:5800元/15次(即386元/次)性感蛮腰针对问题:腰部脂肪囤积疗程效果:减脂,并改善腰形,提升腰线单次疗程:980元/次疗程时间:40分钟第一步:分解脂肪第二步:紧实肌肉疗程价格:13600元/20次(即680元/次)挑战露脐装针对问题:胃腩突出,腹部脂肪囤积疗程效果:减脂,提升腹部线条,并平滑腹部肌肤单次疗程:980元/次疗程时间:40分钟第一步:分解脂肪第二步:紧实肌肉疗程价格:13600元/20次(即680元/次)翘臀美人针对问题:四方臀、“马鞍包”、臀部下垂疗程效果:减掉“马鞍包”位置的多余脂肪,并提升臀部,改善臀部曲线,使臀形饱满圆翘单次疗程:980元/次疗程时间:35分钟疗程价格:13600元/20次(即680元/次)打造丝绸般柔滑肌肤针对问题:臀部大腿部位有橙皮及纤维化问题的皮肤疗程效果:改善微循环,治疗橙皮脂肪表症,平滑皮肤单次疗程:580元/次疗程时间:35分钟疗程价格:5800元/15次(即386元/次)火辣热裤针对问题:大腿上围脂肪突出,如“香蕉肉”疗程效果:减脂,并紧实腿形单次疗程:980元/次疗程时间:35分钟疗程价格:13600元/20次(即680元/次)排毒保养针对问题:体内积聚多余水分和毒素,导致腿部浮肿及沉重疗程效果:排毒消水肿,使腿部轻盈,并改善肤色单次疗程:980元/次疗程时间:35分钟疗程价格:13600元/20次(即680元/次)产后妈妈——少女腰线针对问题:产后体重急剧下降导致的腹部松驰、妊娠纹、色素沉着、脂肪囤积疗程效果:减掉多余脂肪,并提升收紧皮肤、平滑皮肤、改善肤色次疗程:980元/次疗程时间:35分钟疗程价格:13600元/20次(即680元/次)时尚先生运动健将针对问题:臂部赘肉疗程效果:使臂部紧致,线条流畅单次疗程:980元/次疗程时间:35分钟疗程价格:13600元/20次(即680元/次)魅力背影针对问题:背部松驰下垂褶皱疗程效果:提升背部线条,使背部紧致平滑单次疗程:980元/次疗程时间:35分钟疗程价格:13600元/20次(即680元/次)沙滩焦点针对问题:腰部脂肪囤积疗程效果:减脂,并改善腰形,提升腰线单次疗程:980元/次疗程时间:35分钟疗程价格:13600元/20次(即680元/次)告别啤酒肚针对问题:胃腩突出,腹部脂肪囤积疗程效果:减脂,提升腹部线条,并平滑腹部肌肤单次疗程:980元/次疗程时间:35分钟疗程价格:13600元/20次(即680元/次)模特曲线针对问题:四方臀、“马鞍包”、臀部下垂疗程效果:减掉“马鞍包”位置的多余脂肪,并提升臀部,改善臀部曲线,使臀形饱满圆翘单次疗程:980元/次疗程时间:35分钟疗程价格:13600元/20次(即680元/次)呵护肩颈,永葆活力针对问题:因久坐或过度劳累所致的肩颈疼痛及疲劳疗程效果:缓解肌肉酸痛及颈椎不适,达至舒缓放的功效单次疗程:680元/次疗程时间:20分钟疗程价格:11600元/20次(即580元/次)排毒保养针对问题:体内积聚多余水分和毒素,导致腿部浮肿及沉重疗程效果:排毒消水肿,使腿部轻盈,并改善肤色单次疗程:980元/次疗程时间:35分钟疗程价格:13600元/20次(即680元/次)稳健双足,赶走疲劳针对问题:腿部疼痛,压力(久站或运动过度导致)疗程效果:舒缓双腿压力,缓解疼痛单次疗程:300元/次疗程时间:20分钟疗程价格:9800元/20次(即200元/次)。
8-1VisanteOCTUserManualChinese

用户手册Visante™ OCT■Model 1000Visante™ OCT 用户手册修订版控制部件号修订版软件版本说明发布日期60899-6 A 1.0Visante™ OCT 用户手册(中文)2006.01版权所有© Carl Zeiss Meditec Inc. 保留所有权利。
商标Visante™ 是 Carl Zeiss Meditec Inc. 的商标。
本文档中所有其它商标均为其各自所有者的财产。
目录目录(1)简介...................................................................................................1-1•使用说明..................................................................................................1-1•本用户手册的目的.................................................................................1-1• Visante OCT 技术......................................................................................1-2• Visante OCT 系统硬件.............................................................................1-3•警告:用户对软件或硬件的更改.......................................................1-4•仪器安装.................................................................................................1-4•避免损坏的窍门.....................................................................................1-4•嵌入的 Windows 许可证........................................................................1-5•产品遵从性.............................................................................................1-5•产品安全性.............................................................................................1-5•电磁兼容性 (EMC)...................................................................................1-6•附属设备.................................................................................................1-9•符号和标签............................................................................................1-10•仪器处置................................................................................................1-12•安装和使用可选的电源台...................................................................1-13 (2)操作概述...........................................................................................2-1•章节概述.................................................................................................2-1•启动和登录系统.....................................................................................2-1•初始系统设置.........................................................................................2-4•状态栏信息.............................................................................................2-8•操作模式和窗口.....................................................................................2-9•标题栏、菜单和工具栏......................................................................2-10•性能验证检查........................................................................................2-13•关闭系统电源........................................................................................2-16 (3)获取扫描...........................................................................................3-1•章节概述.................................................................................................3-1•准备患者.................................................................................................3-1•确定患者.................................................................................................3-2•选择检查程序.........................................................................................3-6•校准眼睛并获取扫描............................................................................3-7•查看扫描:保存或重试......................................................................3-11•获取之前的调整(可选)...................................................................3-15 (4)检查程序和扫描类型.......................................................................4-1•章节概述.................................................................................................4-1•检查程序.................................................................................................4-1• Exam Protocols 对话框............................................................................4-3•扫描类型.................................................................................................4-7目录(5)扫描分析...........................................................................................5-1•章节概述.................................................................................................5-1•访问分析.................................................................................................5-1• Analysis 窗口............................................................................................5-2•工具选项板.............................................................................................5-6•眼角膜厚度分析...................................................................................5-10•演示文稿导出........................................................................................5-13•打印.........................................................................................................5-15•示例报告................................................................................................5-15 (6)数据管理...........................................................................................6-1•章节概述.................................................................................................6-1• admin 用户...............................................................................................6-1•创建机构名称和徽标............................................................................6-1• Equipment(设备):创建 Station Name(站名)............................6-3•人员登记.................................................................................................6-3•记录搜索.................................................................................................6-6•创建、编辑和删除患者记录.............................................................6-10•合并患者记录........................................................................................6-14•将患者记录分类....................................................................................6-16 (7)存档和检索.......................................................................................7-1•章节概述..................................................................................................7-1•患者数据库..............................................................................................7-1•数据维护要求.........................................................................................7-2•清除检查数据.........................................................................................7-2•存档建议.................................................................................................7-4•存档管理.................................................................................................7-5•手动存档.................................................................................................7-9•检索检查数据........................................................................................7-10 (8)例行维护...........................................................................................8-1•章节概述.................................................................................................8-1•更换保险丝.............................................................................................8-1•处理错误消息.........................................................................................8-4•硬盘碎片整理.........................................................................................8-5•例行清洁.................................................................................................8-5•用户更换部件列表................................................................................8-6(9)规格..................................................................................................9-1(10)法律声明..........................................................................................10-1•有限担保...............................................................................................10-1•服务合同...............................................................................................10-2•软件版权...............................................................................................10-2•软件许可证协议...................................................................................10-2目录附录 (A) 联网指导....................................................................................A-1•注意..........................................................................................................A-1•网络功能.................................................................................................A-1•警告:Internet 连接的风险...................................................................A-1•禁止的活动.............................................................................................A-2•不支持的网络活动................................................................................A-2•网络文件服务器最低要求....................................................................A-2•网络文件服务器建议............................................................................A-2•使用网络文件服务器............................................................................A-3•直接导出至个人计算机的配置...........................................................A-5附录 (B) 网络存储设备的配置.................................................................B-1•简介..........................................................................................................B-1• NAS 设备安全警告.................................................................................B-1• NAS 设备要求..........................................................................................B-1• NAS 设备建议..........................................................................................B-2•安装和配置 NAS 设备............................................................................B-2• NAS 设备清洁..........................................................................................B-5附录 (C) 打印机配置................................................................................C-1•简介..........................................................................................................C-1•打印机安全警告.....................................................................................C-1•认可的打印机.........................................................................................C-1•安装概述.................................................................................................C-2•点对点的无线配置................................................................................C-2•网络配置.................................................................................................C-6• USB 配置..................................................................................................C-7附录 (D) 测量数据....................................................................................D-1• Visante OCT 的精确性、重复性和再现性............................................D-1•眼角膜厚度数据....................................................................................D-2• LASIK 角膜瓣和基质数据.....................................................................D-4索引...................................................................................................I-1目录简介(1) 简介ZEISS Visante™ OCT Model 1000 (Visante™ OCT) 能够对眼前段进行详细的 in vivo 检查,而无需接触眼睛。
超声波配合电针治疗腕管综合征

超声波配合电针治疗腕管综合征目的探究腕管综合征患者运用超声波与电针联合治疗后所存在的应用价值。
方法方便选取100例在2015年12月—2017年4月来该院治疗的腕管综合征患者,分为观察组和对照组各50例,均根据自愿原则划分。
超声波与电针联合治疗和单纯电针治疗分别为对观察组和对照组采取的治疗方法。
结果观察组治疗总有效率96%高于对照组的88%,(P<0.05);观察组治疗满意度100%高于对照组的80%(P<0.05);对照组生存质量各指标得分低于观察组(P<0.05)。
结论腕管综合征患者运用超声波与电针联合治疗后腕管综合征患者运用超声波与电针联合治疗后,可有效提高治疗效果,改善患者生存质量,且患者对护理工作的满意度较高。
[Abstract] Objective This paper tries to explore the application value of combined use of ultrasound and electroacupuncture in patients with carpal tunnel syndrome. Methods A total of 100 patients with carpal tunnel syndrome treated in this hospital from December 2015 to April 2017 were convenient divided into the observation group and the control group,with 50 cases in each group according to the voluntary principle. Ultrasound combined with electroacupuncture and electroacupuncture alone were the treatment methods for the observation group and the control group respectively. Results The total effective rate was 96% in the observation group,significantly higher than the control group of 88%(P<0.05). The satisfaction rate of the observation group was 100%,higher than that of the control group of 80%(P<0.05). The score of the index was lower than that of the observation group(P<0.05). Conclusion The patients with carpal tunnel syndrome treated by ultrasonic combined with electroacupuncture can effectively improve the treatment effect,improve the quality of life of patients,and increase their satisfaction with nursing work.[Key words] Ultrasound;Electroacupuncture;Carpal tunnel syndrome;Clinical effect腕管綜合征是外科常见病,该病属于周围神经卡压性疾患,在女性及中老年人群中,该病的发病率较高。
美国哈挺数铣中心quest 操作指南
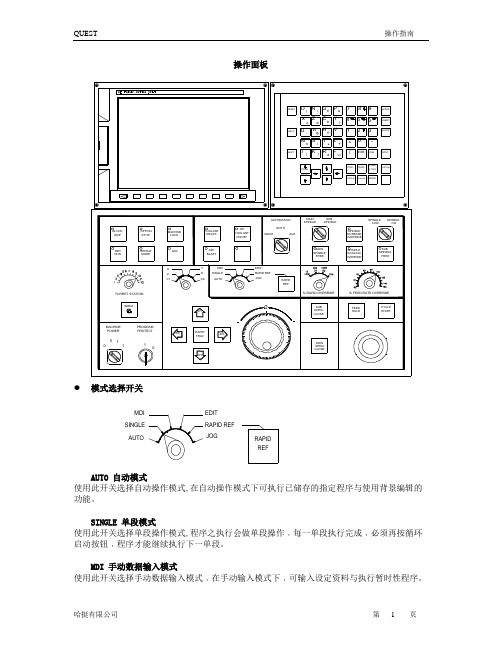
操作面板模式选择开关AUTO 自动模式使用此开关选择自动操作模式,在自动操作模式下可执行已储存的指定程序与使用背景编辑的功能。
SINGLE 单段模式使用此开关选择单段操作模式,程序之执行会做单段操作﹐每一单段执行完成﹐必须再按循环启动按钮﹐程序才能继续执行下一单段。
MDI 手动数据输入模式使用此开关选择手动数据输入模式﹐在手动输入模式下﹐可输入设定资料与执行暂时性程序。
REF RAPID JOG RAPID REF EDIT AUTO SINGLE MDIEDIT 编辑模式使用此开关选择编辑模式﹐在编辑模式下可输入新的程序或编辑、查看已存储的程序。
RAPID REF 快速返回参考点手动选择所需返回参考点的轴。
再按 按钮,所选择的轴将快速返回参考点。
注意:必须先 X 轴返回参考点。
JOG 手动操作模式使用此开关选择手动操作模式﹐在手动操作模式下可从面板之操作开关﹐操作轴的移动。
主轴运转及手动换刀等动作。
特殊模式BLOCK SKIP 段跳跃此按钮开关由操作者选择使用与否﹐在选择有效之情情况下﹐程序单段前如有(/)符号之单段将被忽略不执行。
M01 选择性停止注意!! 此操作开关依操作者之需要作选择﹐当开关的指示灯亮时表示M01功能有效﹐在M01 功能有效情况下: (1) M01 单节被执行。
(2) 各轴与主轴会停止。
(3) 切屑水停止与进给暂停指示灯亮。
(4) 按循环启动按钮开关后﹐程序继续执行。
进给暂停指示灯熄灭。
MACHINE LOCK 机械锁定此按钮开关可由操作者做选择﹐当指示灯亮时表示此功能有效﹐在机械固定机能有效情况下﹐所有移动轴会被终止﹐但程序可继续执行。
DRY RUN 程序空运行当操作者按下此按钮开关时﹐指示灯亮﹐在自动模式下执行程序﹐则程序内指定的进给率将被忽略﹐而以机床参数设定的50inch/min(1260mm/min)的进给率执行程序﹐在此开关灯灭时﹐则恢复程序内指定之进给率﹐此按钮开关仅在自动模式下有效。
克兰特克特 运动检测技术说明书

Clantect: The Company.Clantect was founded by Professor Steve Daley and Dr Ilias Zazas, who are world leading experts in the field of sound and vibration. In partnership with Southampton University and the Institute of Sound & Vibration Research, Clantect’s ‘Motion Detection T echnology’ has set new standards for accuracy, reliability, flexibility and ease of use, in the detection of clandestine presence on vehicles. Clantect: The Motion Detection Technology.Clantect’s MDT goes way beyond the limitations of other forms of scanning technologies, which are inadequate in the application of the detection of humans in heavy goods vehicles. Equally, manual searches of heavy goods vehicles are both impractical and inefficient - they would involve too many people and would require the lengthy removal of the goods and cargo - it would take too much time to complete this for each vehicle (causing massive traffic hold ups), and, most important, manual searches are not thorough enough and will often miss hidden human presence. The solution is Clantect’s Motion Detection Technology.Clantect’s MDT works by the detection of any ‘vehicle-induced’ vibration, including even the faintest of movements, such as the agitated heartbeat of a human occupant. The system is able to execute and complete a ‘sensory test’, which will detect a hidden intruder very quickly.Clantect’s MDT is deployed and controlled by a ruggedised Computer T erminal, which is positioned in the inspection area for the vehicles. Highly sensitive sensors (normally 2) are attached to the side of the vehicle and perform a ‘sensory test’. If there is any sound and movement detected, the system provides an automated alert to conduct a search of the vehicle. The whole process is automated: very fast and very simple. The Clantect Software manages the processes, capturing and analysing the results of each ‘sensory test’, as well as compiling key data, such as vehicle number plates. There is also the capability for online 4G connectivity to a remote host computer , for data consolidation and management information reporting.Clantect: The System Highlights.• High Accuracy: Clantect uses advanced algorithms, signal processing and systems logic to eradicate any background interference (such as vibration from passing traffic). This ensures that the readings are interpreted correctly. So any even the faintest noise or vibration, emanating from the vehicle, will be detected, such as an agitated heartbeat. Clantect’s highest performing accuracy has been validated by independent authorities.• Ruggedised Durable Equipment: Designed to be used in ‘harsh’ outdoor conditions, e.g. encased in a protective metallic frame, and with MIL-Spec connectors.• Rapid Throughput Times: A complete ‘sensory test’ of a vehicle can be completed in approximately, only a minute. So the daily operations of the border controls and gate stations, particularly traffic flows, are not adversely impacted. • Ease of Use and Operation: The sensors are quickly and easily attached to the exterior of the vehicle, and with no further operator intervention, the system automatically executes a ‘sensory test’ of the vehicle. The Computer T erminal is menu-driven and intuitive, with very minimal data entry: it’s automated from Start to Finish.• Multi-Vehicle Format Configuration: The system can be utilised for different types of heavy goods vehicles: trucks, roll-on/roll-off containers, coaches, cement mixers, tankers, etc.• Automatic Data Capture and Update: The results of the scan are automatically captured and processed, i.e. no manual input nor intervention required. Quick & Simple and Ready for the next vehicle.• Vehicle Number Plate Recognition: The number plates of all vehicles are automatically and instantly recorded on the system. This provides critical data for operational reports (vehicle tracking) and for auditing purposes. • Remote Data Management & Communications: All Clantect terminals can transfer data to and from head-office organisations via 4G networks, both nationally and internationally. This means a rapid and easy consolidation of up to date information into the head office host computers. It also enables the Head Office to access all Clantect T erminals remotely, for operational support and diagnostics.• Multiple Vehicle Scanning: The Clantect system can provide for multi-vehicle scanning from a single terminal, particularly useful for the larger transport inspection bays.• Multiple Language Capability: The system is available in most languages, and is already deployed in multiple countries.• Sensor Health Check & Validation: The Clantect system provides for an automated sensor health check, with built-in alarm and audit reports. This ensures that the sensors are functioning correctly, and highlights any irregularities.• Geophone Testing Station (GTS) module: This is an additional terminal which manages and extends the life-cycle of the Clantect sensors and cable components. This executes tests on the accuracy and throughput of the sensors, and provides management information data, highlighting any key performance issues. • CE Certified: The Clantect system has CE Certification, a key quality assurance.Sea Ports - Military Bases - Research Facilities - Industrial ComplexesRail & Freight T erminals - Prisons and Penitentiaries - Nuclear & Hazardous Waste Plants.Clantect LtdInstitute of Sound and Vibration ResearchSouthampton, SO17 1BJ, UK Phone: +44 (0) 23 8059 3043Email:*****************www Ga t e dC o m p o un ds B or d e r C r o s s in g s R es t r i c t e d A re a s H ig hS e c u r i t y F a cil i t ie s P r i s o n sP o r t s。
- 1、下载文档前请自行甄别文档内容的完整性,平台不提供额外的编辑、内容补充、找答案等附加服务。
- 2、"仅部分预览"的文档,不可在线预览部分如存在完整性等问题,可反馈申请退款(可完整预览的文档不适用该条件!)。
- 3、如文档侵犯您的权益,请联系客服反馈,我们会尽快为您处理(人工客服工作时间:9:00-18:30)。
用户指南
适用于 VikingQuest 主软件
2010 年
部件号:269-595500 5225 Verona Road, Bldg. 2 • Madison, Wisconsin 53711-4495 USA 电话:608/273-5000 • 美国国内免费电话:1-800-356-0007 传真:608/273-5067 • 电子邮件:info@ Internet:
VikingQuest
空白页。 ii
目录
简介
连接系统部件
系统基础知识
修订日期 1/27/05
目录
技术说明 .................................................................................................1-1 保护性分类和设备分类 .................................................................. 1-1 目标操作者 ........................................................................................ 1-1
硬件控制部件 .........................................................................................3-3
iii
VikingQuest
患者信息
iv
对于 VikingQuest 台式系统:..............................................................3-3 对于 VikingQuest 膝上型系统:..........................................................3-3 关于控制面板 .........................................................................................3-4 调整拨盘 .................................................................................................3-4 箭头键 .....................................................................................................3-4
输入要求 ............................................................................................ 1-2 关于本系统 .............................................................................................1-3 输入命令 .................................................................................................1-3 特殊键盘快捷方式须知 .........................................................................1-4
将控制台基座连接到计算机上 ............................................................. 2-3 将放大器连接到控制台基座上 ............................................................. 2-4 连接可选部件 .........................................................................................2-5 连接打印机 .............................................................................................2-6 连接便携式系统的电源线 ..................................................................... 2-7 连接台式系统的部件 .............................................................................2-8 连接台式系统的可选部件 ..................................................................... 2-9 连接台式打印机 ...................................................................................2-10 连接台式放大器 ................................................................................... 2-11 连接接地母线 / 接地线........................................................................2-12 连接台式电源 .......................................................................................2-13 安装台式放大器支架 (选件)...........................................................2-14 组装感光支架 (选件).......................................................................2-15
软键 .................................................................................................... 3-5 硬键 .................................................................................................... 3-5 使用 VikingQuest 鼠标 .........................................................................3-6 电刺激器的探头 .....................................................................................3-6 带探针的刺激器探头头部 ................................................................3-7 使用探头控制部件 ............................................................................ 3-7 关于放大器 .............................................................................................3-8 电极输入 .................................................................................................3-8 开关按钮 .................................................................................................3-8 DIN 插孔.................................................................................................3-8 软件控制部件 .........................................................................................3-9 进入 VikingQuest 程序 .........................................................................3-9 使用 VikingQuest 主页 .......................................................................3-10 退出 VikingQuest 程序 .......................................................................3-11 在 VikingQuest 程序中关闭系统:.................................................3-12 关于 VikingQuest 屏幕组件 ...............................................................3-13 屏幕拷贝菜单 .................................................................................. 3-15 报告图标和 Report (报告)下拉菜单 .........................................3-15 设置图标和 Settings (设置)下拉菜单.......................................3-15 Display (显示)子菜单 ................................................................3-16 菜单栏 .............................................................................................. 3-17 显示屏提示区 (DPA).......................................................................3-17