远程管理卡使用说明书1.0 for lenovo
Lenovo XClarity 管理员产品指南说明书

Lenovo XClarity AdministratorProduct GuideLenovo XClarity™ Administrator (LXCA) is a centralized resource management solution that is aimed at reducing complexity, speeding response, and enhancing the availability of Lenovo® server systems and solutions.Lenovo XClarity Administrator runs as a virtual appliance and provides agent-free hardware management that automates discovery, inventory, tracking, updates, monitoring, and provisioning for Lenovo® server systems, storage, network switches, hyperconverged and ThinkAgile solutions. A single XClarity Administrator instance supports managing a maximum of 1,000 devices.Figure 1. Lenovo XClarity Administrator dashboardDid you know?Lenovo XClarity offers a mobile app for Android and iOS devices. The app enables you to securely monitor physical systems, get real-time status alerts and notifications, and take action on common system level tasks. The app can also connect directly via an enabled USB port to a ThinkSystem server and provide virtual LCD capability.Click here to check for updatesFigure 2. Lenovo XClarity mobile appFigure 3. User management interfaceHardware monitoringLenovo XClarity Administrator provides a centralized view of events and alerts that are generated from managedendpoints, such as chassis components, servers, storage devices and network switches. When an issue is detected an event is passed to the Lenovo XClarity Administrator. That event is displayed in the alerts list that is available within the user interface. A status bar also is available that provides overall status information on the main XClarity Administrator interface. An example list of alerts is shown in the following figure. This view can be filtered to show specific alert severity.Additionally, the view can also be filtered by dates and alert sources or via the search filter.Figure 4. Alerts and actionsHardware managementThere are various management tasks for each supported endpoint, including viewing status and properties, configuring system information and network settings, starting the CMM/BMC/IMM/XCC web interfaces, and remote control for the severs and Flex nodes. Note, the Feature on Demand (FoD) key for remote presence is required on ThinkSystem,ThinkAgile Solutions, NeXtScale, and System x servers if not included as standard. The options available for PowerActions on a selected ThinkSystem server is shown in the following figure.Figure 5. Hardware ManagementConfiguration managementConfiguration patterns provide a way to ensure that you have consistent configurations applied to managed servers.Server patterns are used to provision or pre-provision a managed server by configuring local storage, I/O adapters, boot setting, firmware, ports, IMM, and UEFI settings. Server patterns also integrate support for virtualizing I/O addresses so you can virtualize Flex System fabric connections or re-purpose servers without disruption to the fabric.You can also determine whether the settings on a server are in compliance with the server profile assigned. The settings on a server can become out of compliance with its server profile if settings are changed without using Configuration Patterns or if an issue occurred during deployment, such a firmware issue or an invalid setting.Operating system deploymentFigure 6. Firmware updatesTask automation using scriptsLenovo XClarity Administrator provides REST APIs and a PowerShell Toolkit, Python Toolkit and Ruby toolkit, which can be used to generate scripts to automate management functions.Lenovo XClarity Administrator set of easy-to-use APIs can be used to access XClarity Administrator data and services from applications running outside of the XClarity Administrator framework. This allows for integration of XClarity Administrator capabilities into other software. These APIs are based on the REST architecture and are accessed via the HTTPS protocol. More information on the XClarity Administrator REST API is available at the following link:https:///help/topic/com.lenovo.lxca_restapis.doc/rest_apis.htmlLenovo XClarity Administrator PowerShell (LXCAPSTool) toolkit provides a library of cmdlets to automate provisioning and resource management from a Microsoft PowerShell session. The cmdlets use Lenovo XClarity REST APIs and can automate the following functions:Logging in to XClarity AdministratorManaging and unmanaging chassis, servers, storage devices, and top-of-rack switches (devices)Collecting inventory data for devices and componentsDeploying an operating-system image to one or more serversConfiguring servers through the use of Configuration PatternsApplying firmware updates to devicesManaging user accountsMonitoring eventsXClarity Administrator offers a PyLXCA toolkit which provides a Python-based library of commands and APIs to automate provisioning and resource management from an OpenStack environment, such as Ansible or Puppet.The PyLXCA toolkit provides an interface to Lenovo XClarity Administrator REST APIs to automate functions such as: Logging in to Lenovo XClarity AdministratorLenovo XClarity Pro editions are available with a 1-year, 3-year, or 5-year software subscription and support. Lenovo XClarity Pro is available on a per-managed-endpoint basis or per-managed-chassis basis. The per-chassis licenses offer a more cost-effective way of purchasing licenses for the Flex System environment.The part numbers are listed in the following tables.Table 2. Lenovo XClarity Pro part numbers: Per managed endpointDescription Part numberLenovo XClarity Pro, per Managed Endpoint w/1 Yr SW S&S00MT201Lenovo XClarity Pro, per Managed Endpoint w/3 Yr SW S&S00MT202Lenovo XClarity Pro, per Managed Endpoint w/5 Yr SW S&S00MT203Table 3. Lenovo XClarity Pro part numbers: Per managed chassisDescription Part numberLenovo XClarity Pro, per Managed Chassis w/1 Yr SW S&S00MT198Lenovo XClarity Pro, per Managed Chassis w/3 Yr SW S&S00MT199Lenovo XClarity Pro, per Managed Chassis w/5 Yr SW S&S00MT200When you purchase XClarity Pro, the order is fulfilled via electronic software delivery (ESD) using the Lenovo Key Management System (LKMS). The order is placed onto LKMS using an email address for the end user who has ordered the code. This email address is where the Activation Code is sent in PDF format (the email will come from******************).TherecipientemailaddressisthelogintotheLKMSsystemforadministrationandtomanagethe LKMS inventory.The Activation code is redeemed via LKMS and the information about the end customer should be entered during the redemption process.For more information on how to redeem the Authorization Code, downloading the XClarity Administrator License key, and importing the license key into the XClarity Administrator appliance, refer to Installing the full-function enablement license in the online help.Licenses are installed using a license activation key file, in .KEY format or as a .zip file (which consists of multiple .key files). After you redeem licenses, you can create an activation key for all or a subset of your available licenses (Note this can only be done at the time of redemption), and then download and install the activation key in XClarity Administrator per instructions as described in Installing the full-function enablement license in the online help.Note: The number of managed devices must not exceed the total number of licenses in all active license keys. If XClarity Administrator is not in compliance with the installed licenses (for example, if licenses expire or if managing additional devices exceeds the total number of active licenses), you have a grace period of 90 days to install appropriate licenses. Each time XClarity Administrator becomes non-compliant, the grace period resets to 90 days. If the grace period (including the free trial) ends before licenses are compliant, advanced functions are disabled for all devices.For example, if you manage an additional 100 ThinkSystem servers and 20 rack switches in an existing XClarity Administrator instance, you have 90 days to purchase and install 100 additional licenses before advanced functions are disabled in the user interface (for all devices). Licenses for the 20 rack switches are not needed to use the advanced functions; however, they are needed if you want service and support. If advanced functions are disabled, the advanced functions are re-enabled after you install enough licenses to be back in compliance. If you are using a free trial license or you have a grace period to become compliant, and you upgrade to a later version of XClarity Administrator, the trial license or grace period resets to 90 days.The following table shows details on what happens to each of the premium functions on different versions of XClarity Administrator after the 90 day grace/evaluation period has expired. For more information, see the Installing the full-function enablement license in the online help.4. Lenovo XClarity Integrator for Windows Admin Center - HCI Disk Management2022-11-25 | 15 minutes | Employees and PartnersThis course introduces the Lenovo XClarity Integrator (LXCI) for Windows Admin Center (WAC) HCI diskmanagement functions. After completing this course, you will be able to describe the available HCI diskmanagement functions, and list the steps to add, replace or remove a disk drive in a storage pool.Published: 2022-11-25Length: 15 minutesEmployee link: Grow@LenovoPartner link: Lenovo Partner LearningCourse code: DLXCIO2065. Lenovo XClarity Integrator for Windows Admin Center - Systems Update Overview2022-10-21 | 20 minutes | Employees and PartnersThis course will provide an overview of the Lenovo XClarity Integrator for Windows Admin Center - Systems Update.After attending this overview course, you will be able to:1. Describe the available update package types2. Explain the difference between the two update methods3. List the recommended steps to update a server or cluster.Published: 2022-10-21Length: 20 minutesEmployee link: Grow@LenovoPartner link: Lenovo Partner LearningCourse code: DLXCIO2056. Lenovo XClarity Integrator for Windows Admin Center - Cluster Management Basics2022-08-30 | 15 minutes | Employees and PartnersThis course introduces how to manage Lenovo clusters in Lenovo XClarity Integrator for Windows Admin Center.After completing this course, you will be able to manage Lenovo clusters in Lenovo XClarity Integrator for WAC via Lenovo XClarity Administrator, or via Native OS. You will be able to describe the cluster management functions provided by LXCI.Published: 2022-08-30Length: 15 minutesEmployee link: Grow@LenovoPartner link: Lenovo Partner LearningCourse code: DLXCIO2047. Lenovo XClarity Integrator for Windows Admin Center - Server Management Basics2022-08-29 | 15 minutes | Employees and PartnersThis course introduces how to manage Lenovo servers in Lenovo XClarity Integrator for Windows Admin Center.After completing this course, you will be able to:• Manage Lenovo servers in Lenovo XClarity Integrator for WAC via Lenovo XClarity Administrator, or via Native OS.• Describe the server management functions provided by LXCI.Published: 2022-08-29Length: 15 minutesEmployee link: Grow@LenovoPartner link: Lenovo Partner LearningCourse code: DLXCIO2038. Partner Technical Webinar - XClarity Workshop Lite2022-08-10 | 60 minutes | Partners OnlyIn this 60-minute replay, Marilee Smith, NA Technical Trainer and XClarity SME showed an abridged version of the XClarity Workshop for Partners. She gave an overview of the XClarity family and then gave a bit more depth and short demo of XClarity Controller, Essentials, Provisioning Manager, Administrator, Orchestrator and Integrator.Published: 2022-08-10Length: 60 minutesPartner link: Lenovo Partner LearningCourse code: 0805229. Lenovo XClarity Integrator for Windows Admin Center - Install and Configure2022-07-13 | 25 minutes | Employees and PartnersThis course will guide you to install and configure the Lenovo XClarity Integrator for Windows Admin Center. After attending the Lenovo XClarity Integrator for Windows Admin Center: Install and Configure course you will be able to: explain the steps to install Lenovo XClarity Integrator for WAC, describe the available settings that can be configured in LXCI for WAC, and demonstrate how to use the system updates repository.Published: 2022-07-13Length: 25 minutesEmployee link: Grow@LenovoPartner link: Lenovo Partner LearningCourse code: DLXCIO20210. Lenovo XClarity Integrator for Windows Admin Center - Overview2022-06-23 | 15 minutes | Employees and PartnersThis course will provide an overview of the Lenovo XClarity Integrator for Windows Admin Center. After attending this overview course, you will be able to: describe Lenovo XClarity Integrator for Windows Admin Center, discuss when to use Lenovo XClarity Integrator for Windows Admin Center, and explain the key features and functions of Lenovo XClarity Integrator for Windows Admin Center.Published: 2022-06-23Length: 15 minutesEmployee link: Grow@LenovoPartner link: Lenovo Partner LearningCourse code: DLXCIO20111. Understanding Lenovo XClarity2021-11-05 | 8 minutes | Employees and PartnersThis course is designed to give Lenovo sales and partner representatives an understanding of Lenovo XClarity.Learning Objectives:- Identify the different components of XClarity- Describe the primary benefits to customers- Define its core featuresPublished: 2021-11-05Length: 8 minutesEmployee link: Grow@LenovoPartner link: Lenovo Partner LearningCourse code: SXXW2118TrademarksLenovo and the Lenovo logo are trademarks or registered trademarks of Lenovo in the United States, other countries, or both. A current list of Lenovo trademarks is available on the Web at https:///us/en/legal/copytrade/. The following terms are trademarks of Lenovo in the United States, other countries, or both:Lenovo®Flex SystemNeXtScaleRackSwitchSystem x®ThinkAgile®ThinkEdge®ThinkServer®ThinkSystem®UpdateXpress System PacksXClarity®The following terms are trademarks of other companies:Intel® and Xeon® are trademarks of Intel Corporation or its subsidiaries.Linux® is the trademark of Linus Torvalds in the U.S. and other countries.Microsoft®, Azure®, Hyper-V®, PowerShell, Windows Server®, and Windows® are trademarks of Microsoft Corporation in the United States, other countries, or both.Other company, product, or service names may be trademarks or service marks of others.。
ThinkServer RD 远程管理用户手册 V
ThinkServerManagement Module User Guide远程管理用户手册V1.1目录第一章简介 (4)1.1 术语 (4)1.2 安全信息 (4)第二章联想远程管理模块概述 (5)2.1联想远程管理模块特性 (5)第三章配置联想远程管理模块 (6)第四章联想远程管理模块操作快速入门 (7)4.1开始之前 (7)4.2登录 (7)4.3导航 (8)4.4注销 (9)第五章远程控制台(KVM)操作 (10)5.1启动重定向控制台 (10)5.2主窗口 (10)5.3远程控制台菜单栏 (10)5.3.1远程控制台视图菜单 (10)5.3.2远程控制台宏菜单 (10)5.3.3远程控制台工具菜单 (11)5.3.4远程控制台电源菜单 (11)第六章联想远程管理模块Web控制台选项 (12)6.1属性 (12)6.2配置 (12)6.2.1网络 (12)6.2.2网络安全 (12)6.2.3安全 (12)6.2.4用户 (13)6.2.5服务 (13)6.2.6 IPMI (13)6.3会话 (14)6.4 LDAP (14)6.5更新 (14)6.6实用程序 (14)6.7服务器信息 (14)6.7.1电源 (15)6.7.2热量 (15)6.8系统事件日志 (15)6.9事件管理 (15)6.9.1平台事件 (15)6.9.2陷阱设置 (16)6.9.3电子邮件设置 (16)6.10 LAN串行 (16)6.11远程控制 (16)6.11.1远程管理 (16)6.11.2配置 (17)第七章语言 (18)附录A-常见问题 (19)第一章简介感谢你购买并使用联想远程管理模块,以下简称远程管理模块。
本用户指南讲述了如何使用远程管理模块,并简要概述了模块特性以及如何设置和操作。
本用户指南专供那些负责安装、故障排除、升级以及维修远程管理模块的系统技术人员使用。
作为系统管理员,您在熟读本指南后即可利用远程管理模块从任意位置远程访问,以便对紧急的关键事件做出即时响应。
联想服务器远程管理用户指南
ThinkServerManagement Module User Guide目录第一章简介 (3)1.1 术语 (3)1.2 安全信息 (3)第二章联想远程管理模块概述 (4)2.1联想远程管理模块特性 (4)第三章配置联想远程管理模块 (5)第四章联想远程管理模块操作快速入门 (6)4.1开始之前 (6)4.2登录 (6)4.3导航 (7)4.4注销 (8)第五章远程控制台(KVM)操作 (9)5.1启动重定向控制台 (9)5.2主窗口 (9)5.3远程控制台菜单栏 (9)5.3.1远程控制台视图菜单 (9)5.3.2远程控制台宏菜单 (9)5.3.3远程控制台工具菜单 (10)5.3.4远程控制台电源菜单 (10)第六章联想远程管理模块Web控制台选项 (11)6.1属性 (11)6.2配置 (11)6.2.1网络 (11)6.2.2网络安全 (11)6.2.3安全 (11)6.2.4用户 (12)6.2.5服务 (12)6.2.6 IPMI (12)6.3会话 (13)6.4 LDAP (13)6.5更新 (13)6.6实用程序 (13)6.7服务器信息 (13)6.7.1电源 (14)6.7.2热量 (14)6.8系统事件日志 (14)6.9事件管理 (14)6.9.1平台事件 (14)6.9.2陷阱设置 (15)6.9.3电子邮件设置 (15)6.10 LAN串行 (15)6.11远程控制 (15)6.11.1远程管理 (15)6.11.2配置 (16)第七章语言 (17)附录A-常见问题 (18)2第一章简介感谢你购买并使用联想进程管理模块,以下简称进程管理模块。
本用户指南讱述了如何使用进程管理模块,并简要概述了模块特性以及如何设置和操作。
本用户指南专供那些负责安装、故障排除、升级以及维修进程管理模块的系统技术人员使用。
作为系统管理员,您在熟读本指南后即可利用进程管理模块从任意位置进程访问,以便对紧急的关键事件做出即时响应。
网络人远程开机卡使用说明
网络人远程开机卡使用说明
很多人使用了网络人远程开机卡,但是刚刚接触的时候却不是很会使用网络人远程开机卡,接下来小编将详细为大家介绍怎么使用网络人远程开机卡
①拨打连接有网络人电脑远程开机卡的固定电话或手机号码。
②若无人接听电话,在默认等待时间(15秒)过后,电脑远程开机卡会自动挂机进入启动平台。
语音提示信息如下:欢迎登录网络人电脑启动平台,请输入密码,按#号结束。
③在语音提示下输入登录密码,初始密码:123456,按#号结束。
④当密码正确时,语音提示如下:开机请按1#关机请按2#,修改响铃时间请按3#(默认为15秒),修改登录密码请按4#,强行关机请按5#,退出请挂机。
⑤当按下3#时,可以修改响铃时间(单位:秒),请输入两位的数字,如30 或者09(请注意,不要超过50,一般电话响铃时间超过50秒即自动挂机了)。
⑥当按下4#时,可以修改登录密码,必须输入一个6位的新密码,默认的登录密码是123456 。
⑦当按下5#时,电脑远程开机卡发出长时间的关机指令,相当于手工持续按下电脑面板上的开机按键6秒钟,这样可以保
证电脑被强行关闭(如果按下2#进行关机,则电脑远程开机卡只发出1秒左右的关机指令,当电脑处于死机状态时有可能不能关机)。
如果此时电脑已经处于关机状态,则会提示指令无效。
⑧若忘记了登录密码,可以持续按下电脑远程开机卡上的复位键5秒左右(指示灯旁的黑色小圆按扭),即可恢复到出厂设置,密码会还原为默认的123456 (注意:必须将电话线插在电脑远程开机卡上,方可进行还原操作)。
ThinkServer TSM 用户手册 V1.0
目录
第 1 章:简介 ................................................................................ 3 术语....................................................................................... 3 Safety Information(安全信息) ..................................... 4
第 5 章:TSM Web 控制台选项 ................................................. 9 登录和访问控制 ................................................................ 9 忘记密码.............................................................................. 9 仪表板 ................................................................................ 10 编辑概要文件 ................................................................... 11 更改密码............................................................................ 12 电子邮件地址 ........................................................ 12 用户管理............................................................................ 12 本地用户 ................................................................. 12 LDAP......................................................................... 14 FRU 资产 ............................................................................ 17 电源管理............................................................................ 18 控件.......................................................................... 18 服务器电源按钮.................................................... 18 网络..................................................................................... 19 NIC ............................................................................ 19 DNS ........................................................................... 19 链路.......................................................................... 20 虚拟控制台 ....................................................................... 21 控制台启动器 ........................................................ 21 设置.......................................................................... 21
远程控制操作说明书
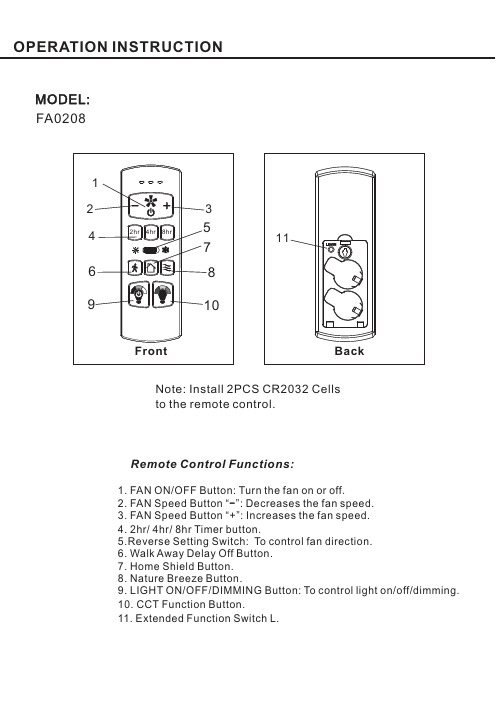
Remote Control Functions:MODEL:1.FAN ON/OFF Button:Turn the fan on or off 3.7.9.LIGHT ON/OFF/DIMMING Button:To control light on/off/dimming.10.11..Extended Function Switch L.2.FAN Speed Button “”:Decreases the fan speed.FAN Speed Button “+”:Increases the fan speed.Timer 5.6.Walk Away Delay Off Button.Home Shield Button.8.Nature Breeze Button.CCT Function .-248hr/hr/hr button Button .4.Reverse Setting Switch:To control fan direction.FA 0208Back11Note:Install 2PCS CR2032Cellsto the remote control.●Products shall be subject to any changes without additional notices due to DawnSun will keep innovation and optimization on the products.FCC STATEMENT1.This device complies with Part 15of the FCC Rules.Operation is subject to the following two conditions:(1)This device may not cause harmful interference This device must accept any interference received including interference that may cause undesired operation.2.Changes or modifications not expressly approved by the party responsible for compliance could void the user's authority to operate the equipment.(2),NOTE:This equipment has been tested and found to comply with the limits for a Class B digital device,pursuant to Part15of the FCC Rules.These limits are designed to provide reasonable protection against harmful interference in a residential installation.This equipment generates,uses and can radiate radio frequency energy and,if not installed and use in accordance with the instructions,may cause harmful interference to radio communications.However there is no guarantee that interference will not occur in a particular installation.If this equipment does cause harmful interference to radio or television reception,which can be determined by turning the equipment off and on,the user is encouraged to try to correct the interference by one or more of the following measures:1.Reorient or relocate the receiving antenna.2.Increase the separation between the equipment and receiver.3.Connect the equipment into an outlet on a circuit different from that to which the receiver is connected.4.Consult the dealer or an experienced radio/TV technician for help..,IC STATEMENTThis device complies with Industry Canada license-exempt RSS standard(s).Operation is subject to the following two conditions:this device may not cause harmful interference andthis device must accept any interference received,including interference that may cause undesired operation.Avis d'Industrie Canada (IC):Cet appareil est conforme avec Industrie Canada exempts de licence standard RSS (s).Son fonctionnement est soumisaux deux conditions suivantes cet appareil ne doit pas provoquer d interférences etcet appareil doit accepter toute interférence,y compris celles pouvant causer un mauvais fonctionnement de l'appareil.Votre appareil est conçu et fabriquépour ne pas dépasser les limites d'émission pour l'exposition àl énergie RF établie par le gouvernement du Canada (IC).Les informations sur votre appareil sont en fichier avec l'IC et peuvent être trouvées sous la section Affichage Grant de https://sms-sgs.ic.gc.ca/equipmentRechercher après la recherche sur l'IC pour votre appareil,qui se trouve sur le Àl arrière de l'appareil.(1),(2):(1)'(2)''Information concernant l'exposition àl énergie radiofréquence '。
远程卡使用方法
松下TDA远程维护卡使用
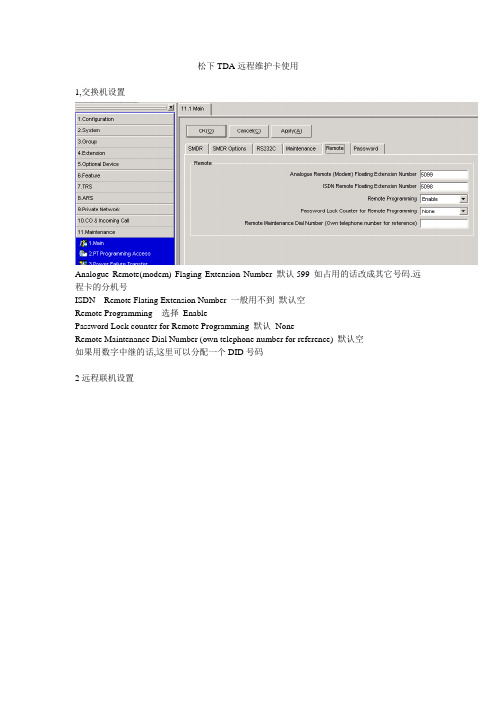
1,交换机设置
Analogue Remote(modem) Flaging Extension Number 默认599 如占用的话改成其它号码.远程卡的分机号
ISDN Remote Flating Extension Number 一般用不到默认空
Remote Programming 选择Enable
Password Lock counter for Remote Programming 默认None
Remote Maintenance Dial Number (own telephone number for reference) 默认空
如果用数字中继的话,这里可以分配一个DID号码
2远程联机设置
1.选择用Modem 连接
2.Dial Number 如果是内部连接直接输入远程卡的号码, 默认599 .
如果是通过外线连接,这里输入交换机的外线号码
3.Dial Type Auto(Tone)
ment 这里输入连接Modem的号码外线添外线号,内线填内线号码
mand 默认AT&F
5.Port 这个是你自己电脑上Modem 占用的COM
6.Baud Rate (bps) 默认38400
7.点击Inistalise 弹出正常点Connet 连接
8.注:如果是用外线连接远程卡的话, 交机换又没有自动话务员的需用人工转接到远程卡,连接过去是传真类似的音,直接转接到远程卡号码大约1分钟后连接成功.。
安装和配置dell远程管理卡详细过程
本地服务器的设置
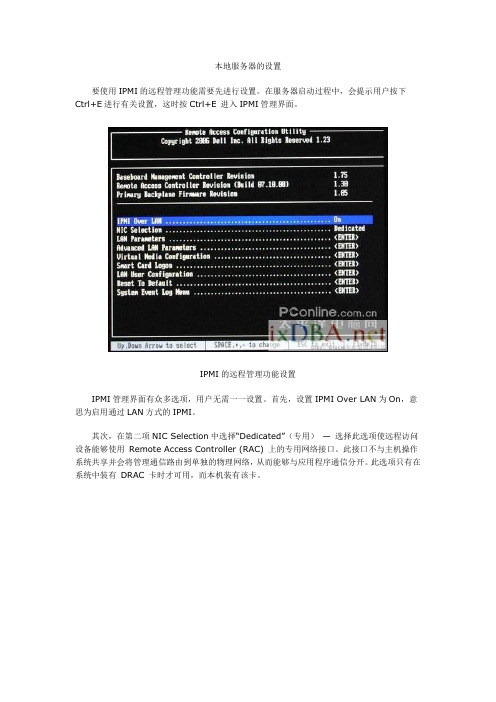
要使用IPMI的远程管理功能需要先进行设置。
在服务器启动过程中,会提示用户按下Ctrl+E进行有关设置,这时按Ctrl+E 进入IPMI管理界面。
IPMI的远程管理功能设置
IPMI管理界面有众多选项,用户无需一一设置。
首先,设置IPMI Over LAN为On,意思为启用通过LAN方式的IPMI。
其次,在第二项NIC Selection中选择“Dedicated”(专用)—选择此选项使远程访问设备能够使用Remote Access Controller (RAC) 上的专用网络接口。
此接口不与主机操作系统共享并会将管理通信路由到单独的物理网络,从而能够与应用程序通信分开。
此选项只有在系统中装有DRAC 卡时才可用,而本机装有该卡。
网络设置
在第三项中设置IPMI接口的IP地址等信息,注意,这里的IP地址可以和服务器网卡的IP 地址不同,而如果用户是通过局域网来进行IPMI控制,该IP地址须和控制端处于同一个网段之内。
此外,用户还需要在“Lan User Configeration”中设置用户名与口令。
设置完毕这些,用户按ESC建推出,系统会提示保存推出,选择之后带待系统重新启动用户就可以通过远程访问IPMI了。
用户设置
保存退出
服务器远程管理
在控制端安装ipmiutil工具包之后,我们就可以通过一系列的命令来获取远端服务器相关信息并对其进行设置了。
- 1、下载文档前请自行甄别文档内容的完整性,平台不提供额外的编辑、内容补充、找答案等附加服务。
- 2、"仅部分预览"的文档,不可在线预览部分如存在完整性等问题,可反馈申请退款(可完整预览的文档不适用该条件!)。
- 3、如文档侵犯您的权益,请联系客服反馈,我们会尽快为您处理(人工客服工作时间:9:00-18:30)。
目录1 产品介绍 (3)1.1 产品原理 (3)1.2 产品规格 (4)1.3 产品功能说明 (4)1.3.1 KVM功能 (4)1.3.2 电源管理 (5)1.3.3 虚拟储存 (5)1.3.4 IPMI功能 (5)1.3.5 网络安全 (5)2 安装前准备 (6)2.1 安全提示 (6)2.2 产品检查 (6)3 硬件安装向导 (7)3.1 连接VGA线 (7)3.2 连接USB线 (8)3.3 连接网络 (8)3.4 安装电源适配器 (8)3.5 安装完成 (9)4 客户端登录向导 (10)4.1 IP地址登录 (10)4.2 常规信息 (10)4.3 服务器健康管理 (11)4.4 配置 (12)4.4.1 配置 (12)4.4.2 SSL证书 (17)4.5 远程控制和虚拟存储 (18)4.5.1 提前设置 (18)4.5.2 启动重定向 (21)4.5.3 服务器电源控制 (27)4.5.4 重启远程管理卡 (27)4.6 维护 (28)4.6.1 进入更新模式 (28)4.6.2 更新提示 (28)4.6.3 上传文件 (28)4.6.4 开始升级文件 (29)4.6.5 上传文件提示 (29)4.6.6 升级文件进度 (30)4.6.7 更新完成 (30)4.7 语言 (30)5 网络配置 (32)5.1 IP设置 (32)5.2 网页开启慢的原因 (32)5.3 外网访问 (32)5.4 优化设置 (33)6常见问题解答 (34)1产品介绍远程管理卡是软硬一体的远程管理设备,为服务器提供远程管理功能。
在服务器上安装远程管理卡后,你就能在任何地方远程管理该服务器,像管理自己眼前的服务器一样,不仅可以看到远程服务器的桌面,用本地的鼠标和键盘对远程服务器进行正常的操作,还可以虚拟本地的光驱、软驱、USB设备给远程服务器使用,甚至还可以随时启动尚未开机的远程服务器。
远程管理卡采用了世界领先的SOC(system on a chip)技术,一个芯片中集成了三个系统:BMC、KVM-over-IP、虚拟存储。
主要具备四大功能:远程KVM功能、电源管理、虚拟存储、IPMI功能。
远程管理卡把远程管理技术提高到了一个新的阶段,通过网络实现了更为全面和底层的BIOS级管理。
此卡对服务器输出的画面信息进行专业压缩后发送到客户端,同时把客户端键盘和鼠标给出的信号反馈给远端的服务器。
所有这些操作都由管理卡上内嵌的处理系统完成,不占用远端服务器的资源,不会对被管理端的性能造成任何影响。
远程管理卡基于硬件底层设计,与被管理端操作系统无关,所以可以支持所有操作系统。
1.1 产品原理远程管理卡是安装在服务器PCI槽上的远程管理设备,通过系统总线获得服务器图像信息和执行远程指令。
连接主板的IPMB接口,可以获取到标准的IPMI信息。
下图是远程管理卡在服务器主板上的工作原理图:1.2 产品规格1.3 产品功能说明远程管理卡功能:KVM功能、电源管理、虚拟存储、IPMI功能。
1.3.1KVM功能1.3.2电源管理1.3.3虚拟储存1.3.4IPMI功能1.3.5网络安全2安装前准备2.1 安全提示远程管理卡为专业产品,使用前请先阅读《远程管理卡使用说明书》。
所有硬件安装操作都要在服务器和管理卡断电的状态下进行。
2.2 产品检查打开远程管理卡包装,请先检查产品的配件是否齐套。
3硬件安装向导3.1 连接VGA线VGA线约40cm,是一个一分二的VGA接头,一个接头连接主机的VGA接口(同时,预留一个接显示器的),另一端连接板卡的VGA接口,分别拧紧两侧螺丝。
VGA线连接示意图VGA线接口说明标识为“1”的VGA头:连接KVM卡的VGA输入端标识为“2”的VGA头:连接服务器主板上的VGA输出端标识为“3”的VGA头:连接本地显示器的VGA线(不用显示器时,建议不要连接)3.2 连接USB线用外置USB线把管理卡USB接口和被管理服务器USB中一个接口连接起来。
外置USB连接示意图用于连接的外置USB线3.3 连接网络用网线连接板卡网口。
网线连接示意图3.4 安装电源适配器电源适配器,一端连接插线板,一端连接板卡的电源插孔。
电源适配器连接示意图3.5 安装完成整个硬件安装过程结束。
安装完成的状态如图所示:安装完成示意图4客户端登录向导4.1 IP地址登录KVM-over-IP技术,顾名思义,即为透过Internet环境,以TCP/IP网络为接口,来传递视频信息,并远程操控散布在各地机房中服务器的解决方案。
相对于模拟式KVM,KVM over IP技术提供了非常有弹性的管理方案,网管人员甚至可以通过TCP/IP网络来管理部署在异地机房中的机器。
在客户端IE浏览器中输入IP地址,出现用户登录画面。
▼注意:root 用户名是管理专用,日常使用不建议使用。
而且root用户名不能删除,建议初次使用后更改密码。
日常使用,请自行添加用户名和密码。
4.2 常规信息登录后首页为常规信息,显示软件的版本信息和更新日期。
4.3 服务器健康管理打开“服务器健康管理”栏位,在传感器读数菜单下将显示所有的传感器值。
传感器读数主要有:温度、电压值、风扇转速,可以进行刷新和显示系统门槛。
门槛状态有三对:●NC(警告)上限和NC(警告)下限;●CT(严重错误警告)上限和CT(严重错误警告)下限;●NR(不可恢复错误警告)上限和NR(不可恢复错误警告)下限。
根据IPMI规范定义每一个传感器值的范围,系统根据当前传感器读取的数值与门槛进行对比,根据对比的结果,显示服务器相关部件的健康状态。
以+5VSB为例:5V为设计的工作电压;当前读到的值为5.068V,处于警告上限和警告下限之间,显示为正常。
当5VSB电压≤4.828V以后,就会发出警告下限;当5VSB电压≤4.732V以后,就会发出严重错误警告下限;当5VSB电压≤4.564V以后,就会发出不可恢复错误警告下限;反之,当5VSB电压≥5.332V以后,就会发出警告上限;当5VSB电压≥5.428V以后,就会发出严重错误警告上限;当5VSB电压≥5.572V以后,就会发出不可恢复错误下限警告上限。
如果说当前读到+5VSB为0V,那么,系统会进行门限值对比判断,首先0V≤4.828V,所以先发出警告下限,接着,再判断0V≤4.732V,所以就会发出严重错误警告下限,最后,判断0V≤4.564V,所以就会发出不可恢复错误警告下限。
▼注意:系统设定本页面会不断的显示传感器数据,长时间停留在此页面会增大管理卡负荷,超过3小时停留在此页面,可能导致管理卡运行缓慢,如果出现以上现象,请重启远程管理卡。
长时间离开客户端时,请点击断开连接,退出管理界面。
4.4 配置4.4.1配置配置网络、用户、报警、鼠标模式、日期和时间、动态DNS设置、SSL证书。
4.4.1.1 网络设置对网络进行配置。
默认IP地址为:192.168.0.200;默认子网掩码为:255.255.255.0;默认网关为:192.168.0.1。
根据需要更改IP地址或者选择DHCP。
▼注意:更改IP地址后,请在板卡的背面的白色标签空白处,标注更改后的IP地址,以方便查询。
请牢记IP地址。
使用DHCP时,可以在路由器端对应MAC地址定位管理卡IP,在网络设置页面有每个卡唯一的MAC地址,管理卡背面也标注有相应的MAC 地址。
对用户进行设置。
root用户为不可删除用户,root的权限为管理员,请登录后及时更改密码。
变更和删除用户名的时候,需要点击“断开连接”后才能生效。
重新登录即可使用。
root用户名为非日常使用的用户名,请自行增加日常使用的用户名,并设置密码和权限。
增加日常登录使用的用户名,并设置密码和权限。
请牢记用户名和密码,忘记将无法登录。
远程管理卡最多可以建立9个用户名,分为三种权限:Administrator(管理员)、Operator(操作员)、NO Access (禁止) 。
管理员:可以进行所有操作。
操作者:只可以进行一般应用操作,不能改变配置及升级Firmware。
禁止:不允许登录远程管理界面。
针对不同的使用者合理分配管理权限,安全方便的管理服务器。
▼注意:root 用户名是管理专用,日常使用不建议使用。
而且root用户名不能删除,建议初次使用后更改密码。
日常使用,请自行添加用户名和密码。
在设置报警功能的时候,首先要在SMTP中,把您的邮件服务器的IP保存完成。
请参考4.5.1.6节。
然后进入报警选项中,在告警类型中选择E-mail报警,在事件层级中选择报警的类型。
输入您的邮箱地址等相关信息,即可完成。
点击修改,设定报警邮箱和事件层级。
4.4.1.4 鼠标模式设置绝对模式鼠标可以在远程画面和本地画面间进行自由切换,实现鼠标在两个画面之间的游离;相对模式下鼠标在远端画面和本地画面切换需要选择快捷键“Alt+M”进行切换,否则不能实现鼠标游离。
相比较:绝对模式实现鼠标游离给操作带来便捷,但相对模式时,鼠标同步的效果更好。
所以在进入使用之前,请先选择好想要使用的模式。
4.4.1.5 日期/时间对日期和时间进行设定,可以与时间服务器同步,也可以自行设定时间。
报警发出时的日期和时间,以卡上当时的时间为准。
请根据需要设置板卡的时间和日期。
●用户指定时间:如果要手动设置时间,可以在用户指定时间中输入年、月、日以及时间。
这时KVM卡上的时间就会自动调整到所指定的时间。
只要卡不重启,系统会自动计时,但如果远程管理卡被重启,卡上的时间会恢复到系统的初始值。
●与NTP服务器同步:如果远程管理需要选择时间同步,请输入时间同步服务器的地址,并提交,卡上的时间就会与时间服务器同步。
例如:选择GMT+8时区,并在同步服务器中输入或其它时间同步服务器地址,提交以后就会显示当前的时间。
当重启远程管理卡时,系统会自动与时间服务器校正时间,并在系统中显示当前的日期与时间。
4.4.1.6 SMTP服务器IP设置SMTP服务器的IP地址。
在选择E-mail报警时,需要输入SMTP服务器的IP地址。
请根据实际情况设置需要登录的SMTP服务器的IP,账号,密码。
存储完成后密码将隐藏。
4.4.1.7 服务器BMC传感器外部BMC监控。
外部BMC是相对于卡而言,实际是指服务器的BMC。
服务器BMC I2C address,一般都是0X20. 如有不同需要可以更改地址,此更改涉及底层参数,请参照BMC 芯片提供商的建议更改。
4.4.1.8 动态DNS设置动态DNS为非固定IP地址提供固定的访问地址。
在动态DNS设置中:首先,要在网络配置中输入DNS server的IP地址;其次,再打开DNS配置界面,输入动态DNS的主机名,账号和密码,实现IP和域名绑定在一起。