AXE OPERATION-01
石油钻井工程英语词汇
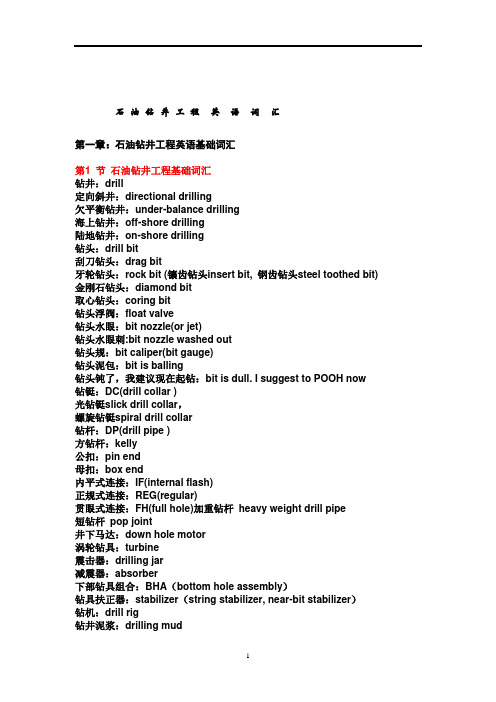
石油钻井工程英语词汇第一章:石油钻井工程英语基础词汇第1 节石油钻井工程基础词汇钻井:drill定向斜井:directional drilling欠平衡钻井:under-balance drilling海上钻井:off-shore drilling陆地钻井:on-shore drilling钻头:drill bit刮刀钻头:drag bit牙轮钻头:rock bit (镶齿钻头insert bit, 钢齿钻头steel toothed bit) 金刚石钻头:diamond bit取心钻头:coring bit钻头浮阀:float valve钻头水眼:bit nozzle(or jet)钻头水眼刺:bit nozzle washed out钻头规:bit caliper(bit gauge)钻头泥包:bit is balling钻头钝了,我建议现在起钻:bit is dull. I suggest to POOH now钻铤:DC(drill collar )光钻铤slick drill collar,螺旋钻铤spiral drill collar钻杆:DP(drill pipe )方钻杆:kelly公扣:pin end母扣:box end内平式连接:IF(internal flash)正规式连接:REG(regular)贯眼式连接:FH(full hole)加重钻杆heavy weight drill pipe短钻杆pop joint井下马达:down hole motor涡轮钻具:turbine震击器:drilling jar减震器:absorber下部钻具组合:BHA(bottom hole assembly)钻具扶正器:stabilizer(string stabilizer, near-bit stabilizer)钻机:drill rig钻井泥浆:drilling mud钻井液:drilling fluid钻井设备:drilling equipment油:oil原油:crude oil天然气:nature gas煤层气:coal-bed gas石油:petroleum中国石油(简称):CNPC(China National Petroleum Corporation )长城钻井(简称):GWDC(Great Wall Drilling Company)采油:oil production产油层(目的层):reservoir( or pay zone)钻进:drilling调整钻井参数以得到理想的机械钻速:play the drilling parameters to get fast ROP起钻:POOH(pull out of hole)下钻:RIH(run in hole)下套管:run casing(or RIH with casing)短起下钻:wiper trip循环泥浆:circulate泥浆:reverse circulate中途循环泥浆:break circulation分段下钻:RIH in stages通井:control trip划眼:reaming倒划眼:back reaming接单根:make connection滑、割大绳:slip and cut drilling line by ton-mile保养设备:maintain the equipment修理设备: repair (or fix) the equipment保养顶驱:service TDS保养冲管:lubricate wash pipe待工日费:standby rate今天零日费:there is no day rate today(zero day rate today)我可以为您做,但必须收费,请理解I can do for you and I have to charge(back charge) you. Please give me full understanding.不在我的职责范围之内,我要汇报领导,一有消息会马上告诉你It is out of my power and I have to report to my boss. I will let you know as soon as I get news.大鼠洞:rat hole小鼠洞:mouse hole钻具错扣:the connections are crossed钻具粘扣:thread is galled丝扣坏了:the thread is damaged起钻错扣:alternate the connections新钻具或接头磨扣:break in the new tool joint新钻头磨合:break in the new bitPDC 钻头井底造型:shape the PDC bit跳钻:rough drilling( vibrated drilling, bit is bouncing)蹩钻:rough drilling(drilling torque is abnormally high)缩径:tight hole起钻遇卡:get overpull下钻遇阻:set weight部分漏失:partially lost circulation全部漏失:totally lost circulation盲钻:blind drilling堵水眼:bit jets are blocked掉水眼:bit jets are lost憋压:the pressure is built up卸压:release pressure试压:pressure test功能测试:function test双方独自检查:double check地质:geology地质专业人员:geologist物理:physics地球物理勘探:geo-physical exploration.测井:logging电测井作业:wireline logging operation泥浆测井:mud logging井(副词“好”含意):well拓展记忆:井眼:bore hole油气井:oil&gas well试井:well test井下:down-hole井下作业:down-hole operation第2 节石油钻井方法基础词汇钻井原理:the principles of drilling顿钻钻井:percussion drilling,cable-tool drilling旋转钻井:rotary drilling大位移井:big distance( or extended ) well侧钻井:sidetracking drilling水平井:horizontal well探井:wildcat,wildcat drilling深井:deep well浅井:shallow well老井:maturing well丛式钻井:cluster well drilling煤层气井:coal-bed gas well生产井:production well报废井:abandoned well停产井:none-production well井下情况:downhole condition第3 节石油钻井技术基础词汇技术规范,技术指标,技术性能:specification 拉伸:tension拉伸强度:tensile strength弯曲强度:bending srength最小屈服强度:minimum torsional strength 应力:stress压力:pressure应力点:stress point压力降:pressure drop压力梯度:pressure gradient回压:back pressure大气压:atmosphere压差:pressure difference静液柱压力:static fluid cloumn pressure地层压力:formation pressure坍塌压力:collapse pressure破裂压力:fractured pressure液体:liquid固体:solid气体:gas,air正的:positive负的:negative水平的:horizontal垂直的:vertical第4 节石油钻井参数基础词汇钻压:WOB(weight on bit)转盘转速:RPM(rotation per minute)泵压:SPP(slurry pump pressure)泵冲:SPM(stroke per minute)排量:FR(flow rate)大钩负荷:hook load扭矩:torque反扭矩:reactive torque钻速:ROP(rate of penetration)顶驱:TDS(top drive system)钻井周期:drilling period钻井成本:drilling costs井眼尺寸:hole size垂深:TVD(total vertical depth)井深:MD(measured depth)水平位移:horizontal displacement井斜角:angle( or hole inclination)方位角:azimuth井眼环空:annulus第5 节石油钻井作业现场工作人员名称甲方:oil company(operator)钻井承包商:drilling contractor第三方(分包商)the third party(sub-contractor)钻井经理:drilling manager监督:supervisor钻井监督:DSV(drilling supervisor) or Companyman 地质监督:geologist泥浆工程师:mud engineer固井工程师:cementing engineer泥浆录井工:mud logger钻井队:drilling crew,drilling team钻井1 班:drilling shift one总经理:general manager总工程师:chief engineer项目经理:project manager(country manager)作业经理:operation manager财务经理:financial manger会计:accountant平台经理:rig manager带班队长:tool pusherHSE 监督:HSE officer司钻:driller副司钻:assistant driller井架工:derrick man钻工:roughneck(or floorman)场地工:roustabout泥浆工:mudman发动机工:motorman机械师:mechanic电工:electrician电焊工:welder司机:driver吊车司机:crane operator铲车司机:forklift operator营房经理:camp boss医生:doctor材料员:material man(storekeeper)炊事员:cook翻译:interpreter洗衣工:laundry man厨房服务生:waiter保安:watchman(or security)机械工程师:mechanic engineer第6 节石油作业现场常用工具扳手:wrench螺丝起子:screwdriver多角螺丝起子:Phlilips screwdriver (cross-headed screwdriver)撬杠:bar加长撬杠:cheater bar活动板手:monkey wrench,adjustable wrench钳子:pliers钩子:hook台钳:bench vice钢挫:file榔头:hammer锤击扳手:hammer wrench搬手:spanner内六角扳手:Allen key钢锯:hacksaw砂纸:sandpaper管钳:pipe tongs(pipe wrench)链钳:chain tong千斤顶:jack黄油枪:grease gun吊车:crane牵引绳:tag line电焊条:welding rod拖拉机:tractor推土机:bulldozer硬尺:ruler游标卡尺:Vernier slide油漆:paint铅油:dope油漆刷:paint brush铅油刷:dope brush绝缘胶布:electrical tape电线:wire插头:plug电插座:outlet(receptacle or switchboard)开关:switch螺栓:bolt螺帽:nut垫片:washer钉子:nail手电钻:hand drill钻头:bit工作台:workbench工具箱:toolbox胶水:glue胶棒:glue bar护丝:thread protector手轮:hand wheel脚轰油门:throttle联接法兰:coupling flange(or adaptor flange) 安全带:safety belt安全帽:helmet工作靴:safety boot工衣:coverall棉袄:coat防护眼镜:safety goggle手套:gloves口罩:mouth mask围裙:apron洗眼台:eye washing station灭火机:fire extinguisher消防栓:fire -hydrant水龙头:water tap消防斧:fire fighting axe铲子:shovel手砂轮:emery wheel左转:turn left右转:turn right手势:gesture信号:signal垃圾:waste garbage拖把:mop接头:sub配合接头:X-over ,cross-over提升短节:lifting sub卡瓦:slips放卡瓦:set slips母锥:box tap公锥:taper tap打捞矛:fishing spear安全接头:safety sub柔性短节:flexible joint井口盖子:wellhead cover防喷盒:mud boxBOP 吊装:BOP trolley( BOP hoist)吊卡:elevator吊环:elevator links安全卡瓦:safety clamp(dog collar)钻杆架:pipe rack水龙头提环:swivel bail材料房:warehouse绳卡:bullnose clamp(guy anchor)绳套:sling吊带:soft sling(belt)卸扣:shackle吊装工具:lifting gear维护保养:maintenance内钳:make-up tong外钳:break-out tong液压大钳:power tong液压猫头:E-zy tong兜绳:mule line四通阀:four-way valve三通:Tee软管:hose球阀:ball valve闸板阀:gate valve单流阀:back valve灌注泵:supercharge pump第二章:石油工程常用设备及专业术语第1 节钻井设备部分井架:Derrick(or mast)起(放)井架:erect(lay down) Derrick 底座大梁:sill钢木基础:mat铅锤:plumb水平仪:level架,台:rack立根盒:setback area坡道:V door(or ramp)猫道:catwalk二层台:monkey-board圆井盖:cellar cover天车:crown block防碰天车:crown-o-matic天车梁:crown block beam天车台:water table游动滑车:traveling block钻井大绳:drilling line引绳:guide line穿大绳:string-in drilling line金属线,电线:wire,cable钢丝绳股:strand截断:cutoff滑车,滑轮,皮带轮:pulley(hoist)手拉葫芦:hand pulley吊耳:lifting eye顶驱:top drive大钩:hook大钩弹簧:hook spring大钩销子:hook pin大钩锁紧装置:hook locking device大钩悬挂高度:hook height水龙头:swivel鹅颈管:gooseneck冲管:wash pipe水龙头盘根:swivel packing钻井水龙带: rotary hose( kelly hose)立管:stand pipe立管管汇:stand pipe manifold高压管线:high pressure line由壬:union低压管线:low pressure line传感器:sensor放压管线:relief line转盘:Rotary Table转盘方瓦:master bushing方补心取出装置:bushing handling tool 方补心:kelly drive bushing方孔:square opening小鼠洞:mouse hole大鼠洞:rat hole绞车:Drawworks挂合(摘开)绞车:engage(disengage) drawworks液压绞车:hydraulic winch气动绞车:air tugger(air hoist)滚筒:drum( reel)滚筒高速气离合器:high speed clutch滚筒低速气离合器:low speed clutch锚头:cathead液压猫头:E-zy tong上扣猫头:make up cathead卸扣猫头:make out cathead牙嵌离合器:jaw clutch涡磁刹车:eddy current brake(electromagnetic brake) 猫头轴:cathead shaft猫头绳:cathead line死绳:dead line死绳固定器:dead line anchor间隙:gap死绳固定器膜片:dead line diaphragm上扣:make up上扭矩:torque sth卸扣,卸开:break out上紧,固定:tighten(fasten)松开,松扣:loosen加载:load卸载:unload盘式刹车:disc brake刹车总成:brake assembly刹车轴:brake shaft刹车带:brake band刹车片:brake block液压油箱:hydraulic power unit液动试压泵:hydraulic test pump液压大钳:hydraulic (power)tong倒档齿轮:reverse gear动力扳手:power wrench吊钳钳头:hinged jaw钳牙:die大钳锁销:latch大钳悬臂:suspension bar平衡重:counterbalance weight吊钳钳臂:tong arm第2 节钻井泵类及相关设备泥浆泵:mud pump活塞:piston活塞杆:piston rod活塞皮碗:piston cup缸套:liner凡尔体:valve body凡尔座:valve seat凡尔箱:pump module阀弹簧:valve spring阀杆:valve lever阀面:valve face阀帽:valve bonnet空气包:pulsation damper充氮气:refill with nitrogen泥浆泵安全阀:pop-off valve卸压管线:release line排出阀:discharge valve吸入阀:suction valve上水滤子:screen油尺:oil-level dipstick灌注泵:supercharge pump冷却水泵:cooling pump潜水泵:submersible pump盘根盒:stuffing box叶轮:impeller单向阀:check valve(single-pass valve)安全阀:safety valve手动阀:manual valve液动阀:hydraulic valve拉杆:tie rod,tension bar压力表:pressure gauge冲数:strokes排量:flow rate80 冲(次)/分:eighty strokes per minute 泥浆罐:mud tank倒泥浆:transfer mud循环罐:active tank储备罐:reserve tank起下钻罐:trip tank溢流检查:flow check沉砂罐:satteling tank锥形罐:sand trap震动筛:sahle shaker筛布:screen目数:mash除砂器: desander除泥器: desilter离心机:centrifuge泥浆分配槽:spider box缓冲罐buffer tank第3 节与泵操作有关的实用短语没有压力:No pressure压力过高:The pressure is too high返回太少:Mud return is too few水太少:Water is not adequate.抢修:Rush to repair请看记录:Please check the record没作记录:No record available加化学药品:add chemicals测定比重:measure mud weight(specific gravity) 测定失水:measure water loss泥饼:mud cake测定切力:measure gel strength停泵:stop pump请打手势:Please make a gesture转动一周:turn round a circle垫高一些:put something under it to raise抓紧:firmly grasp抬高:lift it up拿稳:hold firm打一下:hit once往外拉:pull outward站稳:stand firm小端:small end大端:large end光滑:smooth粗糙:coarse,rough平面:flat弯曲:bending放松:loosen绷直:stretch tight,draw tight冷却:cooling润滑:lubricate过载:overload功率不足:power is not enough.第4 节钻台与底座钻台:drilling floor钻井班组记录:drilling tour record司钻监视器:driller's monitor司钻控制台:driller's console指重表:weight indicator底座:substructure井队活动房:trailer钻台上值班房:doghouse梯子:ladder第5 节井控操作与防喷器溢流: kick溢流征兆: kick sign气侵:gas cut井喷:blow-out1 次井控the primary well control2 次井控the secondary well control3 次井控the tertiary well control平衡balance超平衡over-balance欠平衡under balance漏失试验leak-off test破裂压力fracture pressure额定压力rated pressure工作压力working pressure防喷器组BOP stack安装(甩下)防喷器组:nipple up(nipple down) BOP stack 分流器diverter万能防喷器:annular preventer,bag preventer单闸板防喷器:single ram preventer双闸板防喷器:double ram preventer(防喷器)闸板:pipe ram变芯闸板防喷器variable bore ram全封式防喷器:blind ram剪切防喷器:shear ram内防喷器Inside BOP投入式单流阀DIBPV(Drop in blowout preventer valve)分流关线diverter line节流管汇choke manifold节流阀choke valve旁通阀standby valve调压阀: Pressure regulator手动节流阀manual choke远程节流阀remote choke井口四通drilling spool变径法兰:adapter flange液压控制阀HCR(hydraulic controller)远程控制系统:koomey unit蓄能器:accmulator压井管线:kill line入口:inlet出口:outlet简易除气器:poor-boy degasser真空除气器:vaccum degasser泥浆池液面纪录仪Pit volume recorder(totallizer) 泥浆流动传感仪mud flow sensor泥浆增量Pit gains硫化氢侵入H2S influx加重材料Weighted material氮气Nitrogen乙炔:acetylene氧气:oxygen预冲氮气压力Pre-charge nitrogen pressure地脚螺栓连接Studded connection法兰连接Flange connection箍盘连接Hub connection演习:drill急救演习:first aid drill消防演习:fire drill防喷演习:kick drill泄压: bleed off pressure带刻度压力表: calibrated pressure gauge带刻度容(体)积表: calibrated volume gauge 套管鞋: casing shoe上部井眼段top hole section快速钻进地层fast drilling formation压实地层:consolidated formation风化地层:weathered formation钻屑携带能力cuttings carrying capacity浅层气藏shallow gas地层破裂formation to break down压力梯度pressure gradient地层压力formation pressure井口压力wellhead pressure漏失压力leak-off pressure破裂压力fractured pressure井底压力BHP( bottom hole pressure)正常压力normal pressure异常压力abnormal pressure静液压力hydrostatic pressure动态压力dynamic pressure环空压力annular pressure关井钻杆压力SIDPP (shut in drill pipe pressure)关井套管压力SICP( shut in casing pressure)最大关井套管压力maximum allowable surface pressure, MAASP 最初循环压力ICP( Initial circulating pressure)循环结束压力FCP(Final circulating pressure)U 形管原理U-tube principle压井操作killing operation补救措施remedial actions关井后循环circulation under well closed in conditioncl 离子含量chloride contentDc 指数Dc exponent软关井soft shut in硬关井hard shut in第1 次循环first circulation第2 次循环second circulation压井泥浆比重kill mud weight抽吸swab激动surge含气地层gas bearing formation含气页岩gas bearing shale安全增量safety margin记录卡片trip sheet低循环泵速SCR(slow circulation rate)当量泥浆密度EQD(equivalent mud density)当量循环密度ECD(equivalent circulating density)司钻压井法driller’s method等待压井法wait & weight method体(容)积法volumetric method下推压井法bull-heading method不压井下钻:snub in第三章:钻井工程作业部分第1 节钻井事故井喷:blow out井涌:kick井漏:lost circulation坍塌,井壁坍塌:cave in(collapse)出砂:sand production砂桥:sand bridge台阶:ledge键槽:keyseat椭圆井眼:oval shaped hole卡钻:sticking填井:pack-hole封井:packed drilling井下落物:fish大幅度活动钻具试图解卡:work the string and try to free it活动钻具以避免卡钻:move(reciprocate ) the string to avoid being stuck. 打捞:fishing鱼头:top of fish打捞工作:fishing job侧钻:side-tracking侧钻井眼:sidetracking hole水泥窜槽:cement channeling固井失败:cement failure防砂:sand control缓慢开泵并仔细观察返浆情况:slowly start pumping and closely watch the return on the shale shaker第2 节钻头牙轮钻头:rock bit刮刀钻头:drag bit金钢石钻头:diamond bit镶齿钻头:insert bit铣齿钻头:milled tooth bit喷射钻头:jet bit牙轮:cone钻头装卸器:bit breaker钻头直径:bit diameter钻头寿命:bit life钻头磨损:bit wear钻头型号:bit type水眼尺寸:nozzle size水眼效率:nozzle efficiency钻头接头:bit sub第3 节钻具方钻杆:kelly方钻杆旋扣器:kelly spinner方钻杆旋塞:kelly cock钻具:drilling string钻杆:drill pipe油管:tube钻具组合:drilling assembly扶正器:stabilizer扩眼器:reamer(hole opener)钻铤:drill collar无磁钻铤:NMDC(non-magnetic drill collar) 加重钻杆:HWDP(heavy weight drill pipe) 近钻头扶正器:near-bit stabilizer震击器:jar减震器:shock absorber螺旋钻铤:spiral drill collar键槽破坏器:key seat reamer安全接头:safety joint钻杆刮泥器:drill pipe wiper泥浆动力钻具:mud motor钻柱:drill string涡轮:turbine涡轮钻具:turbo-drill stem立根:stand加厚:upset内加厚:IU(internal upset)外加厚:EU(external upset)内外加厚:internal-external upset丝扣:thread打捞颈:fishing neck母扣:box公扣:pin左旋螺纹:left-hand thread右旋螺纹:right-hand thread正规接头:regular joint贯眼接头:full hole joint内平接头:internal flush joint护丝:thread protector快速护丝:easy protector打捞工具:fishing tool打捞作业:fishing operation打捞篮:junk basket卡瓦打捞筒:overshot打捞杯:junk sub牙轮打捞器:cone fisher套管打捞矛:casing spear打捞矛:fishing spear打捞公锥:male tap(fishing nipple)打捞母锥:female tap(fishing socket)倒扣工具:reversing tool(backing-up tool) 铣鞋:milling shoe铣具:milling tool平底铣鞋:flat bottom mill磁力打捞工具:magnetic fishing tool打捞钩:fish hook气动工具:pneumatic tool减摩短节:friction reduction sub下套管漂浮接箍:casing floating coupling轴向加压器:hydraulic axial thruster第4 节钻井工程地面作业实用词汇与短语方入:kelly-in方余:kelly-up开钻:spud in作业指令:instruction钻井设计:drilling program井身结构:well schematic岩性:lithology迟到时间:lag time(bottom up)换钻头:change bit甩钻具:laydown drill pipe发生故障:break down安装(拆卸):rig up(rig down)接头:sub adapter机械手:mechanical arm铁钻工:iron roughneck有故障:It fucked up( something is wrong with it)已修好:it has been fixed马上去:Go there at once请下去:Please go down请上来:Please come up躲开,危险:keep away,danger.请翻译来:Ask interpretor come here,冲洗:wash down井口:well-head一根钻杆(单根):single三根钻杆组合(立根):thribble吊蓝:cage(basket)换班:shift change第5 节钻井工程井口作业实用词汇与短语喇叭口:bell nipple出水管:mud return line(flow line)试压杯:cup tester小心滑倒:wet floor, be careful不要往井眼内掉东西:never fall down anything inside hole我来做:Let me do it带把板手来:Bring a spanner,please带点密封剂:Bring a little sealant(Teflon),please 很快就好了:lt will be finshed right away抬一下:Let's lift it把绳子给我:Give me the rope,please不漏:no leakage电焊:welding气焊:gas welding气割:gas cut栏杆:handrail,gangway rail,railing蒸汽:vapour压缩空气:pressurized (compressed) air注意安全:pay attention to safety别动:Don't move,Don't touch.对准:point out exactly.校正:align裸眼:open hole第四章:钻井液及相关设备第1节钻井液名称泥浆:mud钻井液:drilling fluid完井液:completion fluid修井液:work-over fluid压井液:killing fluid射孔液:perforating fluid隔离液:spacer fluid泥浆处理:mud treatment泥浆处理设备:mud treating equipment饱和盐水泥浆:saturated salt-water mud油基泥浆:oil-base mud高粘度泥浆:heavy viscous mud重泥浆:weighted mud重泥浆压钻杆:slug drill pipe起钻倒返泥浆:we have wet pipeduring POOH重晶石:barite纯碱:soda ash高岭土粉:koaline powder云母片:mica sheet增粘剂:viscosifier稀释剂:diluent (thinner)稳定剂:stabilizer (stabilizing agent)烧碱:caustic soda稀释dilution, thinning水泥凝固cement setting第2 节钻井液设备离心泵:centrifugal pump振动筛跑泥浆:mud overflow shale shaker 筛出:shake out混合泵:mixing pump混合漏斗:mixing hopper搅拌器:mud agitator泥浆抢:mud gun岩屑:cuttings沉淀:settle沉积物:deposit吸入:suction吸入罐:suction pit泥浆天平:mud balance游码:slide weight支点:fulcrum刀口:edge调整,校正:adjust粘度计:viscometer第3 节钻井液处理剂包,袋:sack粘土:clay膨润土,般土:bentonite钠:sodium钙:calcium氯:chloride氯化钙:calcium chloride石棉:asbestos分散:dispersal表面活性剂:surface-active material铁络盐:lignite单宁:tannin羧甲基纤维素:carboxymethyl celluose CMC 木纤维:xylogen石灰:lime二氧化钙:calcium oxide粉末:powder薄片:flake溶解:dissolve延迟,妨碍:retard处理剂,添加剂:additives缓凝剂:retarder支撑剂:proppant乳化剂:emulsifier润湿剂:wetting agent稳定剂:stabilizing agent除钙剂:calcium remover降失水剂:filtration-reducing agentPH 值控制剂:PH control additive润滑剂:lubricant消泡剂:defoamer agent破乳剂:emulsion breaker洗涤剂:detergent防膨胀剂:anti-swelling agent粘土稳定剂:clay stable agent稀释剂:thinner封堵剂:plugging agent抑制剂:inhibition agent暂堵剂:temporary plugging agent解堵剂:plugging removal堵漏剂:LCM (lost circulation material)水敏地层:water-sensitive formation分散:dispersal水泥浆:cement slurry流变性:rheological characteristics稳定性:stability稠化时间:thickening-time低密度水泥浆:low-density slurry油气层保护:reservoir protection高渗透性:high-permeability砾石:gravity悬浮:suspension固化:solidification.防膨胀:anti-swelling高凝高粘度:high condensation and viscosity 无毒的:non-poisonous无荧光:non-fluorescence钻井液性能参数Specificaitons of Drilling Fluid 含水:water content密度:density厚度:thickness粘度:viscosity塑性粘度:plastic viscosity含砂量:sand content屈服:yield屈服点:yield point屈服强度:yield strength剪切速率:shear rate剪切强度:shear strength剪切应力:shear stress稀释:dilute适用温度:safe temperature初始切力:initial gel strength终切力:ten-min gel strength触变性:thixotropy剪切稀释:shear thining液体浓度:concentration泥浆柱:mud column层流:laminar flow涡流:turbulent flow气泡:bubble第五章:钻井相关作业第1节取芯部分岩心:core取心钻头:core bit取心筒:core barrel内岩心筒:inner barrel外岩心筒:outer barrel岩心爪:core catcher取心工具:corehandling tools取心收获率:core recovery rate 取样器:sample blob取样盒:sample box样品筒:sample chamber取样工:sample catcher取样间隔:sample interval井壁取心:side-wall coring井壁取心枪:side-wall coring gun 取芯失败:coring failure第2 节固井部分固井:cementing完井:well completion水泥:cement井口:wellhead井口压力:well head pressure井口回压:back pressure on the well head套压:casing pressure导管:conductor表层套管:surface casing技术套管:protective casing(intermediatecasing) 油层套管:production casing尾管:liner尾管悬挂器:liner hanger通径轨:rabbit封隔器:packer联顶节:landing joint套管柱casing string套管下部结构(含套管鞋、浮箍):casing track(including casing shoe, float collar) 套管扶正器:centralizer止退环:stop collar口袋:pocket( rat hole)环空注水泥作业:top cement job碰压:bump plug隔离液:spacer分级箍:stage collar水泥粘结强度strength of cement bond套管钳:casing tongs套管接箍:casing coupling套管头:casing head散装水泥:bulk-cement水泥浆:cement slurry插管注水泥:stab in cementing插入密封接头:stab in adapter分级注水泥:stage cementing先行水泥浆:lead cement slurry末端水泥浆:tail cement slurry促凝剂:accelerator替浆:displace with mud水泥面:top of cement固井管线:chicksan line(cementing line)灰罐:silo(bulk tank)候凝:WOC(wait-on-cement)挤水泥:squeeze cement水泥塞:plug第3 节固井水泥浆名称和参数超细水泥浆:ultrafine slurry普通水泥浆:normal slurry纤维水泥浆:fiber-reinforced cement slurry膨胀水泥浆:expanding cement slurry低密度水泥浆:low-density slurry水泥体积收缩:cement volume contraction水泥浆水化期间:cement slurry hydrating period水泥胶结质量:cement sheath bonding quantity失水率:the rate of water loss析水:liberate water稠化时间:thickening time凝固强度:cementation strength渗透性:permeability,膨胀率:expansion rate压缩强度:compression strength流动性:mobility第4 节测井部分电测:wireline logging测井解释:logging interpretation随钻测井:LWD(logging while drilling)测井电缆:logging cable测井工具:logging tool自然电位测井:spontaneous potential log感应电测井:induction electrical survey双感应测井:dual induction-laerolog中感应测井:medium induction log数字记录:digital record照相记录:photographic recording放射性测井:radioactivity log声波技术:acoustic wave technology仪器耐温:the temperature resistance of the instrument 仪器耐压:pressure resistance of instrument油气比:GOR (gas oil ratio)第六章:井下作业常用短语修井:work-over修井工具:work-over tool井下操作:down-hole operations.产层污染:pollution of pay zone增产措施:stimulations压裂和酸化:fracturing or acidizing酸化处理:acid treatment人工压裂:artificial fracturing重复压裂过程:repetition presses for fracturing,压裂车:fracturing truck sets压裂后反映:post-fracture response固体和液体添加泵:solid and liquid additive pump泵交联:pumping cross link交联剂:cross-linking agent排量:discharging三维压裂:three-dimension fracturing对压裂参数的监控、分析和解释:real time monitoring,analyzing and interpreting for fracturing operation parameters压裂操作:fracturing operation压裂规模:fracturing scale化学吞吐:chemical disposal乳化降粘:emulsification declining viscosity增注:augmented injection.注水:water-injection裸眼砾石填充完井:bore hole gravel packer completion.开窗铣锥:open-window mill prick,开窗斜向器:open-window inclined implement碳酸盐岩:carbonate reservoir第七章:海上钻井作业¨海上钻井:offshore drilling陆地钻井:on-land drilling海滩:sea beach浅海:shallow sea海底管线:sea-bottom pipe海底电缆铺设:setting cable under sea-bottom平台安装:platform installation钻井平台:drilling platform顺风:tail wind逆风:against the wind摄氏零下…度:below…degree centigrade启锚:weigh anchor抛锚:drop anchor拖航:drag对讲机:intercom,walkie-talkie上吊茏:Please get on the liftbasket救生衣:life jacket晕船:sea sick控制速度:Control the speed货已送抵:The goods has arrived货物验收:Please check and accept the goods在不远处:Not far from here不方便:lt's not convenient有危险:lt's dangerous防污染:prevent pollution没情况:Nothing happened.第八章:定向井部分定向井:directional well造斜点:KOP(kick off point)最大井斜角:maximum hole inclination增斜段:building up section稳斜段:holding section降斜段:drop off section井眼尺寸:hole size长、中、段半径:long,medium and short radius 裸井段:the open hole section水平段:horizontal section固井段:cementing section井斜角测量点:angle point水平位移:horizontal departure(displacement)井眼轨迹:wellbore trajectory优化控制:optimum control筛管:screen pipe长封固段固井:long intervals cementing丛式井:cluster well斜向器:whipstock第九章:石油现场机械传动与机械设备第1 节:动力与传动柴油机:diesel发电机:generator直流(交流)电动机:DC(AC)motor交流电:A.C (alternating current)直流电:D.C (direct current)变压器:transformer传动轴:driving shaft从动轴:driven shaft空调机:air conditioner空气压缩机:air compressor应急发电机组:emergency generator消防水泵:fire pump配电间:distrubution room电动潜水泵:ESP(electrical submersible pump) 锅炉:boiler蒸汽:vapour气压不足:The airpressure is poor操作有问题:Operation is not good电压正常:Voltage is all right绝缘不好:The insulation is bad触电:electric shock温度太高:The tempreture is too high 接地:ground短路:short circuit按红色钮:Please push the red button 打开:open,turn on,switch on关闭:close,turn off,switch off风扇:fan爬上去:climd up跳下来:jump down接住:catch it拿稳:hold tight平方米:square meter立方米:cubic meter加工:process三项交流电:three-phase AC气罐:air tank偶合器,联轴节:coupling链轮:sprocket链条:chain皮带:belt链条驱动:chain drive皮带驱动:belt drive第2 节机械加工与设备对准,使…成一线:align周围的,环境的:ambient模糊,含糊,不明确:ambiguity退火的:annealed淬火:quench回火:temper阳极:anode阴极:cathode含水的,水的:aqueous装配:assembly增大,增加,增益:augment侧向间隙:back-lash电木,(绝缘)胶木:Bakelite批量生产:bulk production轴承:bearing锥齿轮,伞齿轮:bevel gear(刮刀,刃,叶片:blade坯料:blank吹风,爆炸,喷砂机:blast滑轮组:block and tackle浮子,摆锤:bob镗床,镗孔刀具:borer内孔加工,镗孔:boring瓶颈,薄弱环节:bottleneck平衡点,盈亏临界点:breakeven point 型坯:briquette拉床,铰孔机:broacher拉削,扩孔:broaching大齿轮:bull gear碰撞,曲折,拐点:bump缓冲器,减震器:bumper擦亮,光亮:burnish去毛刺:burring凸轮,偏心轮:cam凸轮轴:camshaft铸造:cast触媒,催化剂:catalyst空化作用:cavitation内腔,空穴,(铸造)型腔:cavity陶瓷的,陶器的,陶瓷制品:ceramic铁屑,金属屑:chip凿子,扁铲:chisel钳:clamp障碍(物),阻塞(物):clog离合器:clutch罗盘,指南针:compass凸型的:convex凹型的:concave外形,轮廓;结构,构造:configuration 锥形的,锥状的,锥体:conical传送装置,运输机,传送带:conveyor 波纹;使成波状:corrugation曲柄,曲拐:crank曲轴:crankshaft蠕动,蠕变:creep圆筒,圆柱体;液缸:cylinder仪表盘,控制板:dashboard静载:dead load碎片:debris模具,钢型,冲模:die模锻:die forge压铸的,模铸的:die-cast不导电的,电解质(的):dielectric差动齿轮,差速齿轮:differential gear扩散,弥漫:diffusion修饰,打磨,使表面光洁:dress钻床:drill press染色,着色;染料:dye电解质:electrolyte椭圆,椭圆体:ellipse金刚砂:emery侵蚀,冲蚀:erosion蚀刻:etch排出,排气;废气:exhaust消音器:muffler爆炸物,炸药;爆炸(性)的:explosive挤压(成形);挤出,压出:extrude平面加工:facing测隙规:feeler gauge膜:film精加工:finish柔性的,能变形的,灵活的,适应性强的:flexible软盘:floppy disc硬盘:hard disk车床:lathe流程图:flow chart起伏,波动:fluctuation开槽,切槽:fluting飞轮:flywheel锻造:forge支点,支轴:fulcrum(龙门)起重机:gantry几何学:geometry花岗岩,花岗石:granite石墨:graphite润滑脂:grease磨碎,研磨,磨削加工:grinding槽,沟,企口:groove陀螺仪,回转仪:gyroscope主轴箱:headstock螺旋形的,螺线:helical螺旋齿轮,斜齿轮:helical gear六角形(的):hex万向接头,万向联轴节:hooke (cardan) joint,flexible joint 削弱,损害:impair冲击,脉冲:impulse。
AXE10概述ppt课件

BA
Switching functions
Time switch
PRA
ETB
To GSS
To GSS JTC
Figure 8.5
Functions of SCS
Supplementary services and coordination
BA and PRA access
PABX Interface functions
Hardware structure for PRA
4 x PRA 4 x PRA PRA PRA
LSM LSM
ETC ETC
RPG RPG
Figure 8.14
V5.1 and V5.2 interface implementations in AXE
V5.1 or V5.2
ISDN BA Access node
CHAP
Acknowledgement reception
SSS
LIC
LI2
SCS
CJ
Figure 8. 28
TSW
KRC JTC
TS JT
KR2
TCS
SC
GSS
GS
CCS
ST-7
TSS
ETC
GS
RE
DA
RA
C7ST C7DR
BT
C7LABT
CHS
CHPULSE
CLCOF
CHAP
Completion of call set-up
Calling Line Identification Presentation(CLIP)
FSK/DTMF
ISUP, TUP/MFC
A
E21 数控操作手册说明书

E21Operation Manual(Version:V1.07)Contents Preface (1)Chapter1Product Overview (2)1.1Product introduction (2)1.2Operation panel (2)1.3Displayer (4)Chapter2Operation Instruction (5)2.1Basic operation procedure (5)2.2Programming (6)2.2.1Single-step programming (6)2.2.2Multi-step programming (8)2.3Parameter setting (12)2.4Manual adjustment (14)Chapter3Alarm (16)Appendix Common fault and troubleshooting (18)PrefaceThis manual describes operation of E21numerical control device and is meant for operators who are instructed for operation of the device.Operator shall read through this manual and know operation requirements before using this device.Copy right is preserved by ESTUN.It is not allowed to add or delete part or all of the manual content without ESTUN’s consent.Do not use part or all of manual content for the third party’s design.E21device provides complete software control and has no mechanical protection device for operator or the tool machine.Therefore,in case of malfunction,machine tool must provide protection device for operator and external part of the machine tool.ESTUN is not responsible for any direct or indirect losses caused by normal or abnormal operation of the device.ESTUN preserves the right to modifying this manual in the event of function adding or print error.Chapter1Product Overview1.1Product introductionThis product is equipped with press brake machine dedicated numerical control device which is applicable to various users.On the basis of ensuring work precision,the cost of numerical control bending machine is reduced significantly.Features of this product are listed below:●Positioning control of back gauge.●Intelligent positioning control.●Unilateral and bidirectional positioning which eliminates spindle clearance effectively.●Retract functions.●Automatic reference searching.●One-key parameter backup and restore.●Fast position indexing.●40programs storage space,each program has25steps.●Power-off protection.1.2Operation panelOperation panel is shown in Figure1-1.Figure1-1Operation panelFunctions of panel keys are described in Table1-1.Table1-1Description of key functionsKey Function descriptionDelete key:delete all data in input area on left bottom of displayer.Enter key:confirm the input content.If no content is input,the key has the similarfunction to direction key.Start key:automatic start-up,top left corner of the key is operation indicatorLED.When operation is started,this indicator LED is on.Stop key:stop operation,top left corner of the key is Stop indicator LED.Wheninitialize normal start-up and no operation,this indicator LED is on.Left direction key:page forward,cursor removeRight direction key:page backward,cursor removeDown direction key:select parameter downwardFunction switch:switch over different function pagesSymbolic key:user input symbol,or start diagnosis.~Numeric key:when setting parameter,input value.Decimal point key:when set up parameter,input decimal point.Manual movement key:in case of manual adjustment,make adjustment objectmove in forward direction at low speed.Manual movement key:in case of manual adjustment,make adjustment objectmove in backward direction at low speed.High speed selection key:in case of manual adjustment,press this key andpress simultaneously,make adjustment object move in increasingdirection at high speed,then press,make adjustment object move indecreasing direction at high speed.1.3DisplayerE21numerical control device adopts160*160dot matrix LCD displayer.The display area is shown in Figure1-2.Figure1-2Display area●Title bar:display relevant information of current page,such as its name,etc.●Parameter display area:display parameter name,parameter value and systeminformation.●Status bar:display area of input information and prompt message,etc.The paraphrases of shortening on this page are as shown in Table1-2.Table1-2The paraphrases of shorteningShortening DescriptionX The current backgauge positionY The current slider positionXP The desired backgauge positionYP The desired slider positionDX Backgauge retract distanceHT Holding delayDLY Retracting delayPP Preset workpieceCP Current workpieceChapter2Operation Instruction2.1Basic operation procedureBasic switch over and operation procedure of the device is shown in Figure2-1.Figure2-1Basic Operational Flow2.2ProgrammingThe device has two programming methods,which are single-step programming and multi-step er can set up programming according to actual demand.2.2.1Single-step programmingWhen the parameter X or Y displays********on the page,please do notenter the RUN page or Manual page,unless you have reset the teachfunction of X-axis or Y-axis.Single-step programming is generally used for processing single step to finish work piece processing.When controller is power on,it will automatically enter single-step program page. Operation stepsStep1After starting up,the device will enter setting up page of single-step program automatically,as shown in Figure2-2.Figure2-2Single-step program setting pageStep2Press,select parameter which needs to be set up,press numerical key to inputprogram value,press to complete input.[Note]Parameter can only be set when Stop indicator is on.Setting range of singe step parameter is shown in Table2-1.Table2-1Set up range of singe step parameterParameter name Unit Set up range RemarksX mm/inch-Current position of X axis,unable to bemodified.Parameter name Unit Set up range RemarksY mm/inch-Current position of Y axis,unable to bemodified.XP mm/inch0~9999.999Program position of X axis.YP mm/inch0~9999.999Target position of Y axis.DX mm/inch0~9999.999Retract distance of X axis.HT s0~99.99The time between concession signal validand end hold time output.DLY s0~99.99In case of single step,delay time for X axisconcession.PP-0~9999Number of preset work piece.CP-0~9999Number of current work piece.Step3Press,system will execute according to this program,as shown in Figure2-3.Figure2-3Single step operation pageOperation exampleOn single-step program page,program bending depth to100.0mm,back gauge position to 80.00mm,retract distance to50mm,concession waiting time to2s,holding time to3s,work piece to10.Operation steps are shown in Table2-2.Table2-2Operation steps of single step exampleOperation steps OperationStep1Press,select“XP”parameter.Step2Input80.00by numerical key.Step3Press,confirm setting of this parameter.Operation steps OperationStep4Press,select“YP”parameter.Step5Input100.0by numerical key.Step6Press,confirm set up of this parameter.Step9Press,select“DX”parameter,“DLY”parameter,“HT”parameter,“PP”parameter respectively.Step10Set up parameter to50mm,2s,3s,10,0by numerical key.Step11Press,system execute according to this program.2.2.2Multi-step programmingWhen the parameter X or Y displays********on the page,please do notenter the RUN page,unless you have reset the teach function of X-axis orY-axis.Multi-step program is used for processing single work piece of different processing steps, realize consecutive implementation of multi-steps,and improve processing efficiency. Operation stepStep1Power on,the device displays the single-step parameter page automatically.Step2Press,switch to program manage page,as shown in Figure2-4.Figure2-4Program management pageStep3Press,select program serial number,or input program number directly, such as input“1”.Step4Press,enter multi-step program setting page,as shown in Figure2-5.Figure2-5Multi-step program setting pageStep5Press,select multi-step programming parameter which requires set up,inputsetting up value,press,and the set up takes effect.Step6In completion of set up,press,enter step parameter set page,as shown in Figure 2-6.Figure2-6Step parameter set pageStep7Press,select step parameter that needs to be set up,input program value, press,and the setup takes effect.Step8Press to switch over between steps.If the current step is the first step,press to enter the last page of step parameter setting;if the current step is thelast one,press to enter the first page of step parameter setting.Multi-step parameter setting range is shown in Table2-3.Table2-3Multi-step parameter setting rangeParameter name Unit Setting range Remarks Step number of program-0~25Set up total processingstep number of thisprogramParameter name Unit Setting range Remarks Preset work piece number-0~9999Number of work piece tobe processed,decreasing piece whenmore than zero;negativeincreasing count.Current work piece number-0~9999Number of finished workpiece Concession delay s0~99.99Time between retractsignal and concessionexecution.Holding time delay s0~99.99Time betweenconcession signal andend pressurize output X mm/inch-Current position of Xaxis,can’t be modified;Y mm/inch-Current position of Yaxis,can’t be modified;X target position mm/inch0~9999.999Program position of Xaxis;Y target position mm/inch0~9999.999Target position of Y axis;concession distance mm/inch0~9999.999Distance of X axisconcession;Repeat times-1~99Repeat times required bythis step.Step9Press,system will operate according to this program,as shown in Figure2-7.Figure2-7Multi-step programming operation pageOperation example[Background]One work piece requires processing50as shown below;●First bend:50mm;●Second bend:100mm;●Third bend:the other direction300mm;[Analysis]according to work piece and technological conditions of machine tool:●First bend:X axis position is50.0mm;Y axis position is85.00mm,concession50mm;●The second bend:X axis position is100.0mm;Y axis position is85.00mm,concession50mm;●The third bend:X axis position is300.0mm;Y axis position is85.00mm,concession50mm;Edit processing program of this work piece on No.2program.Operation procedure is shown in Table2-4.Table2-4Operation steps of multi-step programming exampleNO.OperationStep1On single step parameter setting page,press to enter programselection page.Step2Input“2”,press,enter multi-step general parameter setting page of program2.Step3Select“Program step”,input“3”,press,the setting takes effect.Step4Select“number of preset work piece”,input“50”,press,the setup takes effect.Step5Similar to step3and step4,set“current work piece number”,“concession delay”and“pressurize time”to0,400,200respectively.Step6Press to enter first step setup page of step parameter.Step7Select“X target position”,input50,press,the setup takes effect.Step8Select“Y target position”,input85,press,and the setup take effect.NO.OperationStep9Similar to step7,8,set up“concession distance”and“repeat times”to50,1 respectively.Step10Press to enter second step setup page of step parameter,the setup method is similar to that of step one.Step11Press again,to enter third step setup page of step parameter,the setup method is similar to that of step one and step two.<Note>■In completion of multi-step programming,return to start stepbefore launching the system;otherwise,the program will startposition processing at current step.■Press left and right direction key to circulate page turning andbrowsing among all step parameters.■Program can be called and revised again.■In completion of processing all work pieces(50in the example),system stops automatically.Restart directly will start another roundof processing50work pieces.2.3Parameter settingUser can setup all parameters required for normal operation of the system,including system parameter,X axis parameter and Y axis parameter.Step1On program management page,press to enter programming constant page,as shown in Figure2-8.On this page,programming constant can be set.Figure2-8Programming constant pageRange of programming constant setup is shown in Table2-5.Table2-5Range of programming constant setupParameter name Unit Range Default Remarksmm/inch-0or100:mm,1:inch中文/English-0or100:Chinese,1:EnglishRelease Time s0to99.990.3Continue time of unloading outputafter starting the system.Pulse Time s0.000to1.0000.200The duration of the pulse signal. Version---Software version information,Vrefers to version.1:indicates version number.0:indicates version level.Step2Input password“1212”,press to enter the Teach Page,as shown in Figure 2-9.Figure2-9System parameter setting pageStep up parameter,parameter setup range is shown in Table2-6.Table2-6System parameter setup rangeParameter Name Unit Range Default RemarksX-tea.in mm0~9999.9910In teach enable,input currentposition of X axisY-tea.in mm0~9999.9910In teach enable,input currentposition of Y axis<How to Teach>:You can directly measure the positions of slider and back gauge.Ifthe measurement is difficult,you can program and operate any oneprocess,and then measure the accomplished workpiece.Step 3Press ,return to programming constant page.----End2.4Manual adjustmentIn single-step mode,axis movement can be controlled by pressing key manually.This method helps user to adjust machine tool and work piece.Step 1On single step parameter setup page,press orto enter manual page,asshown in Figure 2-10.Figure 2-10Manual pageStep 2According to your actual requirement,following the above table to adjust the position of the axis.-If the drive mode of the corresponding axis is common motor :Press KeyStatus Direction Running Time Speed Stop increasing Press timeSlow Run increasing ●Press time (if it is less than “Pulse Time”)●Pulse Time (If it is less than Press time)Slow Stop decreasing Press timeSlow Run decreasing ●Press time (if it is less than “Pulse Time”)●Pulse Time (If it is less than Press time)Slow +Stopincreasing Press time Slow Run increasing Press time Slow +Stopdecreasing Press time Slow RundecreasingPress timeSlow<Note>:When the system is on run status,the operation of manual adjustment is just valid for the X-axis.-If the drive mode of the corresponding axis is frequency :Press Key Status Direction Running Time Speed Stop increasing Press time SlowRun Cannot do itStop decreasing Press time SlowRun Cannot do it+Stop increasing Press time Fast Run Cannot do it+Stop decreasing Press time Fast Run Cannot do itStep3Press return to single step parameter setting page.----EndChapter 3AlarmThe device can detect internal or external abnormity automatically and send out alarm prompt.Alarm message is available on alarm list.Step 1On programming management page,press to enter programming constantpage.Step 2On programming constant page,press to enter “Alarm history”page to view allalarm history.As shown in Figure 3-1,the latest 6alarms,alarm number and causes can be viewed on thispage.Figure 3-1Alarm history pageAlarm history and message is shown in Table 3-1.Table 3-1Alarm number and alarm messageAlarm number Alarm nameAlarm descriptionA.02XPos <minimum Move X-axis forwards in Manual Movement.A.03XPos >maximum Move X-axis backwards in Manual Movement.A.04YPos <minimum Move Y-axis forwards in Manual Movement.A.05YPos >maximum Move Y-axis backwards in Manual Movement.A.06X out of lmt.Re-teach the position of X-axis.A.11Count reached shut-down Rerun,the alarm is cleared automatically.A.12Beam is not on upperdead point Step on the Foot Up Switch,moving the slider to the TDC,and the alarm will be cleared automatically.A.13X Un-teachIn Re-teach the position of X-axis.A.14Y Un-teachInRe-teach the position of Y-axis.Alarm number Alarm name Alarm descriptionA.21Oil pump not startedCheck whether the pump signal is connected,and check whether the pump switch is on. A.22Encoder failure Check whether the encoder wiring is normal.A.25Drive mode err Reprogram the Drive Mode for X-axis and Y-axis.A.26X Stop Err Check whether the back gauge motor is run normally.A.27Y Stop Err Check whether the slider motor is run normally.A.28X V2ErrCheck whether the back gauge motor is runnormally.A.29X V3Err Check whether the back gauge motor is run normally.A.30Y V2Err Check whether the slider motor is run normally.A.31Y V3Err Check whether the slider motor is run normally.A.32XPos<0Move X-axis forwards to the setting range in Manual Movement.A.33YPos<0Move Y-axis forwards to the setting range inManual Movement.A.41Parameter storage error Back to factory for repairing----EndAppendix Common fault and troubleshooting Fault phenomena Trouble shootingThe screen don’t display when power on.●The terminal of power supply wiring is error.Followthe nameplate to rewire.●The source voltage is too low.●The connector is not connected well.The back gauge motor doesn’t run when X-axis is operated,but the slider motor runs.The wires of these two motor are in reverse,please rewire.The motor doesn’t run when operating.●Check whether the machine is impeded,or whetherthe slider is back to TDC●Check whether the motor wire is connected well.The motor can’t mutually convert from high to low ●Check whether the signal is in effect,or whetherfrequency converter is normal.●Check whether parameter Mute Dis.is programmedcorrectly.The step can’t be changed in Multi-Step mode.Check the START terminal is connected to+24V when the slider is on TDC.The counter doesn’t work in Multi-Step mode.Check the START terminal is connected to+24V when the slider is on TDC.Lose control of the system●Check whether the encoder cable is connected well.●Check whether the motor direction wiring(X+,X-,Y+,Y-)is correct.The actual position of X-axis or Y-axis is unchanged or unshown.Check whether the encoder cable is connected well or correctly.。
Schneider Electric ATS01N212RT软启动器数据手册说明书

T h e i n f o r m a t i o n p r o v i d e d i n t h i s d o c u m e n t a t i o n c o n t a i n s g e n e r a l d e s c r i p t i o n s a n d /o r t e c h n i c a l c h a r a c t e r i s t i c s o f t h e p e r f o r m a n c e o f t h e p r o d u c t s c o n t a i n e d h e r e i n .T h i s d o c u m e n t a t i o n i s n o t i n t e n d e d a s a s u b s t i t u t e f o r a n d i s n o t t o b e u s e d f o r d e t e r m i n i n g s u i t a b i l i t y o r r e l i a b i l i t y o f t h e s e p r o d u c t s f o r s p e c i f i c u s e r a p p l i c a t i o n s .I t i s t h e d u t y o f a n y s u c h u s e r o r i n t e g r a t o r t o p e r f o r m t h e a p p r o p r i a t e a n d c o m p l e t e r i s k a n a l y s i s , e v a l u a t i o n a n d t e s t i n g o f t h e p r o d u c t s w i t h r e s p e c t t o t h e r e l e v a n t s p e c i f i c a p p l i c a t i o n o r u s e t h e r e o f .N e i t h e r S c h n e i d e r E l e c t r i c I n d u s t r i e s S A S n o r a n y o f i t s a f f i l i a t e s o r s u b s i d i a r i e s s h a l l b e r e s p o n s i b l e o r l i a b l e f o r m i s u s e o f t h e i n f o r m a t i o n c o n t a i n e d h e r e i n .Product data sheetCharacteristicsATS01N212RTsoft starter for asynchronous motor - ATS01 -12 A - 460..480 VProduct availability: Stock - Normally stocked in distribution facilityMainRange of product Altistart 01Product or component typeSoft starterProduct destination Asynchronous motors Product specific applica-tionSimple machine Device short name ATS01Phase3 phase[Us] rated supply volt-age460...480 V - 10...10 %Maximum Horse Power Rating7.5 hp, 3 phase 460...480 V IcL starter rating 12 AUtilisation category AC-53B EN/IEC 60947-4-2Current consumption 60 A at nominal load Type of startStart with voltage rampPower dissipation in W4 W at full load and at end of starting 124 W in transient stateComplementaryAssembly style With heat sink Function available Integrated bypass Supply voltage limits 414…528 V Supply frequency 50...60 Hz - 5...5 %Network frequency 47.5...63 HzOutput voltage<= power supply voltage [Uc] control circuit voltage Built into the starter Starting timeAdjustable from 1 to 10 s Deceleration time symb Adjustable from 1 to 10 sStarting torque 30...80 % of starting torque of motor connected directly on the line supply Discrete input type Logic LI1, LI2, BOOST) stop, run and boost on start-up functions <= 8 mA 27kOhm Discrete input voltage 24...40 VDiscrete input logic Positive LI1, LI2, BOOST < 5 V <= 0.2 mA > 13 V, >= 0.5 mA Discrete output current 2 A DC-133 A AC-15Discrete output type Open collector logic LO1 end of starting signal Relay outputs R1A, R1C NO Discrete output voltage 24 V 6...30 V) open collector logic Minimum switching current 10 mA 6 V DC relay outputsMaximum switching current Relay outputs 2 A 250 V AC cos phi = 0.5 20 ms inductive Relay outputs 2 A 30 V DC cos phi = 0.5 20 ms inductive Display type 1 LED green)starter powered up1 LED yellow)nominal voltage reached Tightening torque16.82…22.13 Lbf.In (1.9…2.5 N.m)4.43 lbf.in (0.5 N.m)Electrical connection 4 mm screw clamp terminal - rigid 1 1...10 mm² AWG 8 power circuitScrew connector - rigid 1 0.5...2.5 mm² AWG 14 control circuit4 mm screw clamp terminal - rigid 2 1...6 mm² AWG 10 power circuitScrew connector - rigid 2 0.5...1 mm² AWG 17 control circuitScrew connector - flexible with cable end 1 0.5...1.5 mm² AWG 16 control circuit4 mm screw clamp terminal - flexible without cable end 1 1.5...10 mm² AWG 8power circuitScrew connector - flexible without cable end 1 0.5...2.5 mm² AWG 14 control cir-cuit4 mm screw clamp terminal - flexible with cable end 2 1...6 mm² AWG 10 powercircuit4 mm screw clamp terminal - flexible without cable end 2 1.5...6 mm² AWG 10power circuitScrew connector - flexible without cable end 2 0.5...1.5 mm² AWG 16 control cir-cuitMarking CEOperating position Vertical +/- 10 degreeHeight 4.88 in (124 mm)Width 1.77 in (45 mm)Depth 5.16 in (131 mm)Net weight0.93 lb(US) (0.42 kg)Compatibility code ATS01N2EnvironmentElectromagnetic compatibility Conducted and radiated emissions level B CISPR 11Conducted and radiated emissions level B IEC 60947-4-2Damped oscillating waves level 3 IEC 61000-4-12Electrostatic discharge level 3 IEC 61000-4-2EMC immunity EN 50082-1EMC immunity EN 50082-2Harmonics IEC 1000-3-2Harmonics IEC 1000-3-4Immunity to conducted interference caused by radio-electrical fields level 3 IEC61000-4-6Immunity to electrical transients level 4 IEC 61000-4-4Immunity to radiated radio-electrical interference level 3 IEC 61000-4-3Micro-cuts and voltage fluctuation IEC 61000-4-11Voltage/current impulse level 3 IEC 61000-4-5Standards EN/IEC 60947-4-2Product certifications ULB44.1-96/ASME A17.5 for starter wired to the motor delta terminalCSACCCC-TickGOSTIP degree of protection IP20Pollution degree 2 EN/IEC 60947-4-2Vibration resistance 1 gn 13…150 Hz)EN/IEC 60068-2-61.5 mm peak to peak 3…13 Hz)EN/IEC 60068-2-6Shock resistance15 gn 11 ms EN/IEC 60068-2-27Relative humidity5…95 % without condensation or dripping water EN/IEC 60068-2-3Ambient air temperature for operation14…104 °F (-10…40 °C) without)104…122 °F (40…50 °C) with current derating of 2 % per °C)Ambient air temperature for storage-13…158 °F (-25…70 °C) EN/IEC 60947-4-2Operating altitude<= 3280.84 ft (1000 m) without> 3280.84 ft (1000 m) with current derating of 2.2 % per additional 100 m Ordering and shipping detailsCategory22392 - ATSU01/ATS01 LOW HP SOFT STARTERSDiscount Schedule I11GTIN00785901588337Package weight(Lbs)0.50 kg (1.11 lb(US))Returnability YesCountry of origin DEOffer SustainabilityREACh Regulation REACh DeclarationREACh free of SVHC YesEU RoHS Directive Pro-active compliance (Product out of EU RoHS legal scope)EU RoHS Decla-rationToxic heavy metal free YesMercury free YesRoHS exemption information YesChina RoHS Regulation China RoHS DeclarationCircularity Profile End Of Life InformationWEEE The product must be disposed on European Union markets following specificwaste collection and never end up in rubbish bins.Contractual warrantyWarranty18 monthsDimensions DrawingsDimensionsMounting on Symetrical (35 mm) RailScrew Fixing(1)Retractable fixingsConnections and Schema Example of Manual ControlA1 :Soft start/soft stop unit(1)For type 2 coordinationQ1 :Motor circuit-breakerF3 : 3 fast-acting fusesTechnical DescriptionFunction Diagram2-wire Control with DecelerationUs :Power supply voltageGreen LEDLED1 :LI2 :Logic inputR1 :Relay outputLO1 :Logic outputLEDYellow LED2 :3-wire Control with DecelerationUs :Power supply voltageGreen LEDLED1 :Logic inputsLI2,LI1 :R1 :Relay outputLO1 :Logic outputUm :Motor voltageLEDYellow LED2 :。
2010-26-EU-欧盟新排放指令

DIRECTIVESCOMMISSION DIRECTIVE 2010/26/EUof 31 March 2010amending Directive 97/68/EC of the European Parliament and of the Council on the approximation of the laws of the Member States relating to measures against the emission of gaseous and particulate pollutants from internal combustion engines to be installed in non-road mobile machinery(Text with EEA relevance)THE EUROPEAN COMMISSION, Having regard to the Treaty on the Functioning of the European Union,Having regard to Directive 97/68/EC of 16 December 1997 of the European Parliament and of the Council on the approxi mation of the laws of the Member States relating to measures against the emission of gaseous and particulate pollutants from internal combustion engines to be installed in non-road mobile machinery ( 1 ), and in particular Articles 14 and 14a thereof, Whereas:(1) Article 14a of Directive 97/68/EC sets out the criteria and the procedure for extending the period referred to in Article 9a(7) of that Directive. Studies carried out in accordance with Article 14a of Directive 97/68/EC show that there are substantial technical difficulties to comply with stage II requirements for professional use, multi- positional, hand-held mobile machinery in which engines of classes SH:2 and SH:3 are installed. It is therefore necessary to extend the period referred to in Article 9a(7) until 31 July 2013. (2) Since the amendment of Directive 97/68/EC in 2004, technical progress has been made in the design of diesel engines with a view to make them compliant with the exhaust emission limits for stages IIIB and IV. Electronically controlled engines, largely replacing me- chanically controlled fuel injection and control systems, have been developed. Therefore, the current general type- approval requirements in Annex I to Directive 97/68/EC should be adapted accordingly and general type-approval requirements for stages IIIB and IV should be introduced. (3) Annex II to Directive 97/68/EC specifies the technical details of the information documents that need to be submitted by the manufacturer to the type-approval authority with the application for engine type-approval. The details specified regarding the additional anti- pollution devices are generic and should be adapted to the specific after-treatment systems that need to be used to ensure that engines comply with exhaust emission limit stages IIIB and IV. More detailed information on the after-treatment devices installed on the engines should be submitted to enable type-approval authorities to assess the engine’s capability to comply with stages IIIB and IV.(4) Annex III to Directive 97/68/EC sets out the methodtesting the engines and determining their level of emissions of gaseous and particulate pollutants. The type-approval testing procedure of engines to demon strate compliance with the exhaust emission limits of stage IIIB and IV should ensure that the simultaneous compliance with the gaseous (carbon monoxide, hydro carbons, oxides of nitrogen) and the particulate emission limits is demonstrated. The non-road steady cycle (NRSC) and non-road transient cycle (NRTC) should be adapted accordingly. (5) Point 1.3.2 of Annex III to Directive 97/68/EC foreseesthe modification of the symbols (section 2.18 of Annex I), the test sequence (Annex III) and calculation equations (Appendix III to Annex III), prior to the introduction of the cold/hot composite test sequence. The type approval procedure to demonstrate compliance with the exhaust emission limits of stage IIIB and IV requires the intro duction of a detailed description of the cold start cycle. (6) Section 3.7.1 of Annex III to Directive 97/68/EC sets out the test cycle for the different equipment specifications. The test cycle under point 3.7.1.1 (specification A) needs to be adapted to clarify which engine speed needs to be used in the type approval calculation method. It is also necessary to adapt the reference to the updated version of the international testing standard ISO 8178-4:2007.( 1 ) OJ L 59, 27.2.1998, p. 1.(7) Section 4.5 of Annex III to Directive 97/68/EC outlines the emissions test run. This section needs to be adapted to take account of the cold start cycle. (8) Appendix 3 of Annex III to Directive 97/68/EC sets out the criteria for the data evaluation and calculation of the gaseous emissions and the particulate emissions, for both the NRSC test and the NRTC test set out in Annex III. The type approval of engines in accordance with stage IIIB and IV requires the adaptation of the calculation method for the NRTC test. (9) Annex XIII to Directive 97/68/EC sets out the provisions for engines placed on the market under a ‘flexible scheme’. To ensure a smooth implementation of stage IIIB, an increased use of this flexibility scheme may be needed. Therefore, the adaptation to technical progress to enable the introduction of stage IIIB compliant engines needs to be accompanied by measures to avoid that the use of the flexibility scheme may be hampered by notifi cation requirements which are no longer adapted to the introduction of such engines. The measures should aim at simplifying the notification requirements and the reporting obligations, and at making them more focused and tailored to the need for market surveillance authorities to respond to the increased use of the flexi bility scheme that will result from the introduction of stage IIIB. (10) Since Directive 97/68/EC provides for the type-approval of stage IIIB engines (category L) as from 1 January 2010 it is necessary to provide for the possibility to grant type approval from that date. (11) For reasons of legal certainty this Directive should enter into force as a matter of urgency. (12) The measures provided for in this Directive are in accordance with the opinion of the Committee estab lished in Article 15(1) of Directive 97/68/EC, HAS ADOPTED THIS DIRECTIVE: Article 1 Amendments to Directive 97/68/EC Directive 97/68/EC is amended as follows: 1. in Article 9a(7), the following subparagraph is added: ‘Notwithstanding the first subparagraph, an extension of the derogation period is granted until 31 July 2013, within the category of top handle machines, for professional use, multi- positional, hand-held hedge trimmers and top handle tree service chainsaws in which engines of classes SH:2 and SH:3 are installed.’;2. Annex I is amended in accordance with Annex I to this Directive;3. Annex II is amended in accordance with Annex II to this Directive;4. Annex III is amended in accordance with Annex III to this Directive;5. Annex V is amended in accordance to Annex IV to this Directive;6. Annex XIII is amended in accordance with Annex V to this Directive.Article 2Transitional provisionWith effect from the day following the publication of this Directive in the Official Journal, Member States may grant type-approval in respect of electronically controlled engines which comply with the requirements laid down in Annexes I, II, III, V and XIII to Directive 97/68/EC, as amended by this Directive.Article 3Transposition1. Member States shall bring into force the laws, regulations and administrative provisions necessary to comply with the Directive within 12 months after the publication of the Directive. They shall forthwith communicate to the Commission the text of those provisions.They shall apply those provisions from 31 March 2011.When Member States adopt those provisions, they shall contain a reference to this Directive or be accompanied by such a reference on the occasion of their official publication. Member States shall determine how such reference is to be made.2. Member States shall communicate to the Commission the text of the main provisions of national law which they adopt in the field covered by this Directive.Article 4Entry into forceThis Directive shall enter into force on the day following its publication in the Official Journal of the European Union .Article 5AddresseesThis Directive is addressed to the Member States. Done at Brussels, 31 March 2010. For the Commission The President José Manuel BARROSOANNEX IThe following section 8 is added to Annex I to Directive 97/68/EC:IIIBIVSTAGESANDFOR‘8. TYPEAPPROVALREQUIREMENTS8.1. This section shall apply to the type-approval of electronically controlled engines, which uses electronic control todetermine both the quantity and timing of injecting fuel (hereafter “engine”). This section shall apply irrespective of the technology applied to such engines to comply with the emission limit values set out in sections 4.1.2.5 and 4.1.2.6 of this Annex.8.2. DefinitionsFor the purpose of this section, the following definitions shall apply:8.2.1. “emission control strategy” means a combination of an emission control system with one base emission controlstrategy and with one set of auxiliary emission control strategies, incorporated into the overall design of an engine or non-road mobile machinery into which the engine is installed.8.2.2. “reagent” means any consumable or non-recoverable medium required and used for the effective operation of theexhaust after-treatment system.8.3. Generalrequirements8.3.1. Requirements for base emission control strategy8.3.1.1. The base emission control strategy, activated throughout the speed and torque operating range of the engine,shall be designed as to enable the engine to comply with the provisions of this Directive8.3.1.2. Any base emission control strategy that can distinguish engine operation between a standardised type approvaltest and other operating conditions and subsequently reduce the level of emission control when not operating under conditions substantially included in the type approval procedure is prohibited.8.3.2. Requirements for auxiliary emission control strategy8.3.2.1. An auxiliary emission control strategy may be used by an engine or a non-road mobile machine, provided thatthe auxiliary emission control strategy, when activated, modifies the base emission control strategy in response toa specific set of ambient and/or operating conditions but does not permanently reduce the effectiveness of theemission control system:(a) where the auxiliary emission control strategy is activated during the type approval test, sections 8.3.2.2 and8.3.2.3 shall not apply;(b) where the auxiliary emission control strategy is not activated during the type approval test, it must bedemonstrated that the auxiliary emission control strategy is active only for as long as required for thepurposes identified in section 8.3.2.3.8.3.2.2. The control conditions applicable to this section are all of the following:(a) an altitude not exceeding 1 000 metres (or equivalent atmospheric pressure of 90 kPa);(b) an ambient temperature within the range 275 K to 303 K (2 °C to 30 °C);(c) the engine coolant temperature above 343 K (70 °C).Where the auxiliary emission control strategy is activated when the engine is operating within the control conditions set out in points (a), (b) and (c), the strategy shall only be activated exceptionally.8.3.2.3. An auxiliary emission control strategy may be activated in particular for the following purposes:(a) by onboard signals, for protecting the engine (including air-handling device protection) and/or non-roadmobile machine into which the engine is installed from damage;(b) for operational safety and strategies;(c) for prevention of excessive emissions, during cold start or warming-up, during shut-down;(d) if used to trade-off the control of one regulated pollutant under specific ambient or operating conditions, formaintaining control of all other regulated pollutants, within the emission limit values that are appropriate forthe engine concerned. The purpose is to compensate for naturally occurring phenomena in a manner thatprovides acceptable control of all emission constituents.8.3.2.4. The manufacturer shall demonstrate to the technical service at the time of the type-approval test that theoperation of any auxiliary emission strategy complies with the provisions of section 8.3.2. The demonstration shall consist of an evaluation of the documentation referred to in section 8.3.3.8.3.2.5. Any operation of an auxiliary emission control strategy not compliant with section 8.3.2 is prohibited.8.3.3. Documentation requirements8.3.3.1. The manufacturer shall provide an information folder accompanying the application for type-approval at thetime of submission to the technical service, which ensures access to any element of design and emission control strategy and the means by which the auxiliary strategy directly or indirectly controls the output variables. The information folder shall be made available in two parts:(a) the documentation package, annexed to the application for type-approval, shall include a full overview of theemission control strategy. Evidence shall be provided that all outputs permitted by a matrix, obtained fromthe range of control of the individual unit inputs, have been identified. This evidence shall be attached to theinformation folder as referred to in Annex II;(b) the additional material, presented to the technical service but not annexed to the application for type-approval, shall include all the modified parameters by any auxiliary emission control strategy and theboundary conditions under which this strategy operates and in particular:(i) a description of the control logic and of timing strategies and switch points, during all modes ofoperation for the fuel and other essential systems, resulting in effective emissions control (such asexhaust gas recirculation system (EGR) or reagent dosing);(ii) a justification for the use of any auxiliary emission control strategy applied to the engine, accompanied by material and test data, demonstrating the effect on exhaust emissions. This justification may be basedon test data, sound engineering analysis, or a combination of both;(iii) a detailed description of algorithms or sensors (where applicable) used for identifying, analysing, or diagnosing incorrect operation of the NO x control system;(iv) the tolerance used to satisfy the requirements in section 8.4.7.2, regardless of the used means.8.3.3.2. The additional material referred to in point (b) of section 8.3.3.1 shall be treated as strictly confidential. It shallbe made available to the type-approval authority on request. The type-approval authority shall treat this material as confidential.ofoperationNO x control measures8.4. Requirementstoensurecorrect8.4.1. The manufacturer shall provide information that fully describes the functional operational characteristics of theNO x control measures using the documents set out in section 2 of Appendix 1 to Annex II and in section 2 of Appendix 3 to Annex II.8.4.2. If the emission control system requires a reagent, the characteristics of that reagent, including the type of reagent,information on concentration when the reagent is in solution, operational temperature conditions and reference to international standards for composition and quality must be specified by the manufacturer, in section 2.2.1.13 of Appendix 1 and in section 2.2.1.13 of Appendix 3 to Annex II.8.4.3. The engine emission control strategy shall be operational under all environmental conditions regularly pertainingin the territory of the Community, especially at low ambient temperatures.8.4.4. The manufacturer shall demonstrate that the emission of ammonia during the applicable emission test cycle ofthe type approval procedure, when a reagent is used, does not exceed a mean value of 25 ppm.8.4.5. If separate reagent containers are installed on or connected to a non-road mobile machine, means for taking asample of the reagent inside the containers must be included. The sampling point must be easily accessible without requiring the use of any specialised tool or device.8.4.6. Use and maintenance requirements8.4.6.1. The type approval shall be made conditional, in accordance with Article 4(3), upon providing to each operator ofnon-road mobile machinery written instructions comprising the following:(a) detailed warnings, explaining possible malfunctions generated by incorrect operation, use or maintenance ofthe installed engine, accompanied by respective rectification measures;(b) detailed warnings on the incorrect use of the machine resulting in possible malfunctions of the engine,accompanied by respective rectification measures;(c) information on the correct use of the reagent, accompanied by an instruction on refilling the reagentbetween normal maintenance intervals;(d) a clear warning, that the type-approval certificate, issued for the type of engine concerned, is valid only whenall of the following conditions are met:(i) the engine is operated, used and maintained in accordance with the instructions provided;(ii) prompt action has been taken for rectifying incorrect operation, use or maintenance in accordance with the rectification measures indicated by the warnings referred to in point (a) and (b);(iii) no deliberate misuse of the engine has taken place, in particular deactivating or not maintaining an EGR or reagent dosing system.The instructions shall be written in a clear and non-technical manner using the same language as is used in the operator’s manual on non-road mobile machinery or engine.8.4.7. Reagent control (where applicable)8.4.7.1. The type approval shall be made conditional, in accordance with the provisions of section 3 of Article 4, uponproviding indicators or other appropriate means, according to the configuration of the non-road mobile machinery, informing the operator on:(a) the amount of reagent remaining in the reagent storage container and by an additional specific signal, whenthe remaining reagent is less than 10 % of the full container’s capacity;(b) when the reagent container becomes empty, or almost empty;(c) when the reagent in the storage tank does not comply with the characteristics declared and recorded insection 2.2.1.13 of Appendix 1 and section 2.2.1.13 of Appendix 3 to Annex II, according to the installedmeans of assessment.(d) when the dosing activity of the reagent is interrupted, in cases other than those executed by the engine ECUor the dosing controller, reacting to engine operating conditions where the dosing is not required, providedthat these operating conditions are made available to the type approval authority.8.4.7.2. By the choice of the manufacturer the requirements of reagent compliance with the declared characteristics andthe associated NO x emission tolerance shall be satisfied by one of the following means:(a) direct means, such as the use of a reagent quality sensor.(b) indirect means, such as the use of a NO x sensor in the exhaust to evaluate reagent effectiveness.(c) any other means, provided that its efficacy is at least equal to the one resulting by the use of the means ofpoints (a) or (b) and the main requirements of this section are maintained.’ANNEX IIAnnex II to Directive 97/68/EC is amended as follows:1. Section 2 of Appendix 1 is replaced by the following:POLLUTIONAIRAGAINSTTAKEN‘2. MEASURESyes/no(*)............................................................................................................gases:recyclingcrankcase2.1. Deviceforcoverednotbyheading)ifanother(ifanti-pollutiondevices2.2. Additionalandany,(*)yes/noconverter:2.2.1. Catalytic.......................................................................................................................................................................................2.2.1.1. Make(s):........................................................................................................................................................................................2.2.1.2. Type(s):converterselements................................................................................................................andcatalytic2.2.1.3. Numberofconverter(s):...............................................................................................thecatalyticofandvolume2.2.1.4. Dimensions-........................................................................................................................................................action:ofcatalytic2.2.1.5. Typeprecious........................................................................................................................................metals:of2.2.1.6. Totalchargeconcentration:...........................................................................................................................................................2.2.1.7. Relative.....................................................................................................................................material):and2.2.1.8. Substrate(structure...............................................................................................................................................................................2.2.1.9. Celldensity:2.2.1.10. Type of casing for the catalytic converter(s): .................................................................................................................2.2.1.11. Location of the catalytic converter(s) (place(s) and maximum/minimum distance(s) from engine): ............2.2.1.12. Normal operating range (K): ................................................................................................................................................2.2.1.13. Consumable reagent (where appropriate): .......................................................................................................................2.2.1.13.1. Type and concentration of reagent needed for catalytic action: .............................................................................2.2.1.13.2. Normal operational temperature range of reagent: ......................................................................................................2.2.1.13.3. International standard (where appropriate): ....................................................................................................................2.2.1.14. NO x sensor: yes/no (*)(*)yes/nosensor:2.2.2. Oxygen.......................................................................................................................................................................................2.2.2.1. Make(s):............................................................................................................................................................................................2.2.2.2. Type:.....................................................................................................................................................................................2.2.2.3. Location:(*)yes/noinjection:2.2.3. Airetc.):.........................................................................................................................................pump,2.2.3.1. Type(pulseair,air(*)yes/no2.2.4. EGR:etc.):pressure,........................................................................2.2.4.1. Characteristicspressure/low(cooled/uncooled,high(*)yes/no2.2.5. Particulatetrap:particulate.........................................................................................................thetrap:capacityof2.2.5.1. Dimensionsandparticulatetrap:.........................................................................................................................theandof2.2.5.2. Typedesignengine):..................................................................fromdistance(s)2.2.5.3. Locationand(place(s)maximum/minimumdescriptionand/ordrawing:regeneration,............................................................................ofor2.2.5.4. Methodsystempressure(kPa)and..................................................................................range:2.2.5.5. Normal(K)operatingtemperature(*)yes/nosystems:2.2.6. Otheroperation:...................................................................................................................................................and2.2.6.1. Description___________(*) Strike out what does not apply.’2. Section 2 of Appendix 3 is replaced by the following:POLLUTIONAGAINSTAIRTAKEN‘2. MEASURESyes/no(*)............................................................................................................gases:crankcase2.1. Deviceforrecyclingcoverednotbyheading)ifanotherany,anti-pollutiondevices(ifand2.2. Additional(*)yes/noconverter:2.2.1. Catalytic.......................................................................................................................................................................................2.2.1.1. Make(s):........................................................................................................................................................................................2.2.1.2. Type(s):and................................................................................................................converterselementscatalyticof2.2.1.3. Numberconverter(s):...............................................................................................thecatalyticofandvolume2.2.1.4. Dimensions-........................................................................................................................................................action:ofcatalytic2.2.1.5. Typeprecious........................................................................................................................................metals:of2.2.1.6. Totalchargeconcentration:...........................................................................................................................................................2.2.1.7. Relative.....................................................................................................................................material):and2.2.1.8. Substrate(structure...............................................................................................................................................................................2.2.1.9. Celldensity:2.2.1.10. Type of casing for the catalytic converter(s): .................................................................................................................2.2.1.11. Location of the catalytic converter(s) (place(s) and maximum/minimum distance(s) from engine): ............2.2.1.12. Normal operating range (K) .................................................................................................................................................2.2.1.13. Consumable reagent (where appropriate): .......................................................................................................................2.2.1.13.1. Type and concentration of reagent needed for catalytic action: .............................................................................2.2.1.13.2. Normal operational temperature range of reagent: ......................................................................................................2.2.1.13.3. International standard (where appropriate): ....................................................................................................................2.2.1.14. NO x sensor: yes/no (*)yes/no(*)sensor:2.2.2. Oxygen.......................................................................................................................................................................................2.2.2.1. Make(s):............................................................................................................................................................................................2.2.2.2. Type:.....................................................................................................................................................................................2.2.2.3. Location:(*)yes/noinjection:2.2.3. Airetc.):.........................................................................................................................................pump,2.2.3.1. Type(pulseair,air(*)yes/no2.2.4. EGR:etc.):pressure,........................................................................2.2.4.1. Characteristicspressure/low(cooled/uncooled,high(*)yes/no2.2.5. Particulatetrap:particulate.........................................................................................................thetrap:capacityof2.2.5.1. Dimensionsandparticulatetrap:.........................................................................................................................theandof2.2.5.2. Typedesignengine):..................................................................fromdistance(s)2.2.5.3. Locationand(place(s)maximum/minimumdescriptionand/ordrawing:regeneration,............................................................................ofor2.2.5.4. Methodsystempressure(kPa)and..................................................................................range:2.2.5.5. Normal(K)operatingtemperature(*)yes/nosystems:2.2.6. Otheroperation:...................................................................................................................................................and2.2.6.1. Description___________(*) Strike out what does not apply.’。
AXE OPERATION-06

APT
APZ-SW = CPS, MAS, RPS, DBS etc
APZ-SW
APZ-VM = APZ Virtual Machine APZ-VM ASA compiler
OS = Commercial Operating System
OS
HW = Commercial µ-Pro
HW (µ -Pro)
TEST MIA CPSB
CP-B
EX
NRM UP HA SE
RPH
BA
Numerical display
New boards: IPNX and IPNA In RPH subrack
11
IPN与重新装载速度
APZ 10
CP RPH
APZ 11 (APZ 212 30/33)
CP RPH
APZ 11 APZ 212 30/33
CP RPH
STOC
10Mb/s Ethernet
Reload Speed Kbytes/s
主要内容
•AXE 810 介绍 •RP和EM •选组集 •路由和设备数据 •信令系统 •APZ 212 •MSC操作
APZ 212
目标
APZ212产品结构和功能 CP基本操作 系统备份与恢复
3
典型APZ212的积木式功能块
4
基于APZ 212 30的APZ 212 33
APZ 212 30
17
CPU模块
Equipment practice BYB 501 2 CP sides/shelf External RPH-magazine must be
used (same RP bus interface boards as in APZ 212 30/33) Footprint: 600 x 400 mm Height: 1800 mm
维宏四轴雕刻机运动控制系统Ncstudio V10用户手册(适用于PCIMC-75A控制卡)说明书
machine must be grounded. 4) When machine is not in use, please shut off the power. 5) Please pull out the BNC connector plugs, when the machine is not used for a period of
DA51中文操作手册
DA-51 / DM-51Operation Manualof version V4 GBManual version V0604, IPREFACEThis manual describes the operation of the Delem controller types DA-51 and DM-51 and is meant for operators who are instructed for operation of the total machine.Only authorised people should be able to create new or edit existing programs, as well as programming or editing of the tooldata.Therefore the controller has a keyswitch to prevent uncontrolled programming. With the keyswitch in the off position the operator can execute a selected program. The operator can not change the parameters to wrong, unwanted values.IITABLE OF CONTENTSPAGE1.Operation overview and general introduction...........................................1.1modes..........................................................................................................1.1 1.1. Operationmodes....................................................................................................1.2 1.2. Programming1.3. Frontpanel....................................................................................................................1.3versions.........................................................................................................1.4 1.4. Softwarenumber....................................................................................................1.41.4.1. Versionchange...................................................................................................1.41.4.2. EPROMwarranty..........................................................................................................1.51.5. Limited2.Automatic production mode........................................................................2.1selection.........................................................................................................2.1 2.1. Programcreation..........................................................................................................2.3 2.2. Programlibrary................................................................................................................2.10 2.3. Tool2.4. General parameter constants......................................................................................2.143.Manual mode.................................................................................................3.1screen..........................................................................................................3.1 3.1. Parameter3.2. Manual operation of the axes.......................................................................................3.44.Testbending mode.........................................................................................4.1 4.1. Testbending in the automatic mode or in the manual mode........................................4.1Manual version V0604, IIIINTENTIONALLYLEFTBLANKIV1. Operation overview and general introduction1.1. Operation modesThe control has the 3 following modes:Manual modeIn this mode it is possible to program all parameters of just one bend. Afterpushing the start button all parameters are active and the backgauge axis as wellas any auxiliary axis go into position. It is also possible to move the axesmanually.Automatic production modeIn this mode it is possible to program all parameters of a complete bend program.Each program can contain maximal 25 bends. This mode executes the selectedprogram automatically after pushing the 'start' button.Testbending modeIn this mode you make testbendings of the product (bend by bend) by moving theaxes manually with the '+' and '-'-keys of the frontpanel. It is possible to move thepressbeam even under full pressure. You select the testbending mode only incombination with the manual- or the automatic mode. The backgauge axes go intoposition as with the manual mode, but in this mode you must move the Y-axesmanually. In the testbending mode it is not possible to program the parameters forthe material type and the tools. This mode is only meant for testing the parametersby performing a bend manuallyYou select these modes by pushing the frontpanel pushbuttons. The LED-indication in the push-button indicates the selected mode.V0604, 1.11.2. Programming modesThe control has the following programming modes:General parameter constantsIn this mode you program the general parameters for the material constants,force factor, clamp correction, inch or mm selection etcetera (see also paragraph2.4)Tool libraryIn this mode you program and edit the tools. There are 3 three different punch-shapes and 7 different die-shapes to program in the program memory. You onlyhave to program the basic parameters of the tools you want to use for theprogramming of the products.Program parametersIn this mode you enter the required values of the product. The specificparameters are angle values, used tools, backgauge position etcetera.You select one of the three programming modes in the manual- or automatic operation mode while the controller is in the 'stop'-status. The mode-symbol in the upper-right corner of the screen indicates which programming mode is active. The programming modes are not active in the testbending operation mode.V0604, 1.21.3. FrontpanelBesides the 3 operation mode buttons the controller is equipped with several pushbuttons. The outfit of your control may vary.Keyboard:Program overview. Listing of all programsclear key...., Clearance of the input data field in the left corner on the screendecimal point10 numerical keys (0-9) enter key, to confirm a programmed value.Manual control of any axis (Y + backgauge axes)Cursor path controlSoftkeys:previous next GeneralparameterconstantsTool library ProgramparametersStop button Start buttonV0604, 1.31.4. Software versions1.4.1. Version numberYou find the actual program version of the controller when you push the 'N'-button in the general program constants mode.Example of a version number: V2.2V stands for versionThe first 2 is the version numberThe second 2 is the level numberThe version number changes (incremental) in case of a program extension. The level-number changes (incremental) in case of program corrections and minor adjustments.With the access code you are able to set all the machine parameter values. Only authorized persons may use the access code to change the parameters.1.4.2. EPROM changeThe replacement of the EPROMS comes with every update of the program version number of the controller. The memory of the controller is automatically reinitialized. The only lost settings are:The data of the manual mode.There is no active product.All further parameters, program constants and products are still present and unchanged.V0604, 1.41.5. Limited warranty1. The controller has no safety provisions with respect to operator or machine.Application of the controller is totally for the responsibility of the customer. Safety measures must be taken outside the controller in order to guarantee a machine operator a safe operation, also in case of any mal-functioning of the controller.Delem can not be held responsible for eventual damages, caused directly or indirectly by the controller in normal operation or even when it fails to function according to its specifications.2. Delem provides the manual "as is" without warranty of any kind, either expressed or implied; including but not limited to the particular purpose. Delem may make improvements and/or changes in the product(s) and or program(s) described in the manual at any time.This manual could include the technical inaccuracies or typographical errors. Changes are periodically made in its information. These changes will be incorporated in new editions of the publication.Requests for copies of this product and for technical information about the products can be made to Delem employees authorised to give this information.CAUTION:The product, as described, is equipped with a grounded plug for the safety of the user.It is to be used in conjunction with a properly grounded receptacle to avoid electrical shock.V0604, 1.5INTENTIONALLYLEFTBLANKV0604, 1.62. Automatic production mode2.1. Program selectionSelect program library screen.Push the keyPush the keyThe program library screen appears. The function keys are displayed at the bottom side of the screen (Fig. 2.1.a).Figure 2.1.a□Description of 'program library'The program library screen offers an overview of the programs available in the memory. This menu has two options. The possibility to create a new bend program and a possibility to select an existing program. Both options make use of the same possibilities of the controller. Therefore only the structure for creating a new program is explained (see paragraph 2.2).□Explanation of function keysprevious pagePrevious page of program listing.next pageNext page of program listing.Back.Toggle between program listing and active program.Program parameterSelect or Delete program function (toggle).□Explanation of additional keysMove cursor up (from program 1 to new program)Move cursor down (from program 1 to program 2)2.2. Program creationCreate new program in 'program select' screenMove cursor to 'NEW' for creating a new program and type a program number (maximal 7 figures).Figure 2.2.a□Description of the general parameter screenThe general parameters are necessary for each bend program independently of the number of bendings. The number of bends you program, appears at the bottomside of the screen. The bend numbers are followed by the '*'- sign. This sign means that you still have to program the parameters of that particular bend. It is obvious that in case of a new program all bend numbers have an '*'-sign (See also Fig. 2.2.b).□ Explanation of the parameters of the general parameter screen (Fig. 2.2.a)Drawing numberEnter here a name, number or description of the product. A maximum of 20 characters is allowed. When a key has been pressed, the ‘alpha’ key can be used to enter characters.BendsSelect the number of bends of the program max. 25 bends. After entering the value the controller displays the number of bends at the bottom part of the screen.Angle selection................................................................................................m α0 = absolute, 1 = angle programming.Selection of the programming mode for the Y-axis. 0 = Y-axis bend position in absolute dimensions. 1 = Y-axis in direct angle programming.Material...........................................................................................................MaSelection of the material. The controller contains 4 preprogrammed materials. There are 2 freely programmable materials. You can change all the material values of the E-module and the tensile strength in the general parameter constants mode.E-MODULE(N/mm²)TENSILESTRENGTH (N/mm²) 1 = Steel 2 = Aluminium 3 = Zinc 4 = Stainless steel 5/6 = Materials definable by the user, which tensilestrength and E-modul are programmed under the program constants. 210.000 70.000 94.000 210.000 400 200 200 700Thickness........................................................................................................THThickness of the plate in millimeters (mm).Length.............................................................................................................LLength of the plate between the tools in millimeters (mm).Punch...............................................................................................................PnNumber of the punch in the tool library.Die....................................................................................................................DnNumber of the die in the tool library.Stock counter..................................................................................................#The number of parts to produce with the same program. The actual value is visible in the upper headerline of the screen. The programcounter counts down. Value range: 1- 9999. A value of zero de-activates the counter. This is indicated on the screen with a horizontal line.Figure 2.2.bExplanation of the function keys (Fig. 2.2.b)previous page Go to the first/next bend.next page Go to the general parameters screen/previous bend.Back To program listing.Select next screen (programming of the first bending)next page Push the key. The screen for the bend programming appears(Fig. 2.2.c).Figure 2.2.cDescription of the bend parameters screen (Fig. 2.2.c)Here you program the bend parameters. You must fill in these parameters for every bend. After finishing this screen the '*'-sign next to the '1' disappears and automatically all the parameters are copied to the parameters of the second bend. So the '*'-sign of next to the '2' disappears also. Explanation of the parameters of the bend parameters screen Opening...........................................................................................................↑The opening above the mute point. This parameter results in a certain gap openingbetween the punch and the die after the bend. A positive value is above mute, a negative value under mute.Slow opening...................................................................................................SO The program calculates the decompression stroke after the bend automatically. Thedecompression stroke is necessary to release the working pressure. You can program this slow opening distance higher than the computed decompression. Force................................................................................................................PMax. adjusted tonnage during pressing (auto calculated).Angle correction.............................................................................................Yc Correction value for the programmed angle . Angle................................................................................................................αAngle to bend.Gauge position (X)Backgauge position. When you program a value with a negative sign, this value issubtracted from the actual X-axis position.Backgauge correction....................................................................................Xc Correction value for the programmed backgauge position X.Gauge opening................................................................................................DX Opening position of backgauge during the bend. The "backgauge retract" starts at thepinching point of the plate. Speed...............................................................................................................SWorking speed (pressing speed).Dwell time.......................................................................................................H Holding time of punch at the point of the bend. Parallelism......................................................................................................Y2 Difference (Y) between the vertical position of the left- (Y1) and right (Y2) hand sidecylinder expressed by an other Y2 position. When Y is positive the right hand side islower. When Y is negative the right hand side is higher. The programmed parallelismvalue is valid for the complete stroke of the beam. This difference can you use for making conic bends of parallelism corrections.Figure 2.2.dAuxiliary axisIf you have an auxiliary axis (R-axis, Z-axis or bend support), it is displayed on this screen and between the parameters parallel (Y2) and bottoming ( ).Bottoming........................................................................................................↓0 = normal airbend.1 = bottoming operation of the bend.Note:When you select the bottoming operation, the end of the bend position of the Y-axis beam depends on the working tonnage. Or, If the force is sufficient for the beam to go to thecalculated Y-axis depth of the bend position, the beam stroke is limited by the value of that calculated position.Gauge code......................................................................................................CX The value of this parameter determines the moment at which the controller must activate the parameters for the next bend. There are several possibilities for the moment of the step change:0= at the end of decompression.1= at the mute position when the beam moves to the opening direction.2= at the upper dead point.3= at the upper dead point without movement of any axis and the controller goes to "stop".4= when the C-input signal becomes active, without movement of the beam. When there is still a beam movement the backgauge does not retract.5= when the C-input signal becomes active and the beam is at the upper dead point. When you move the beam, the backgauge retracts.10= at the end of decompression while Y-axis beam waits at the pinching point until the backgauge is at the retract position.11= at the mute position during the beam movement to the opening direction. The Y-axis beam waits at the pinching point until the backgauge is in the retract position.12= in the upper dead point while the Y-axis beam waits at the pinching point until thebackgauge is at the retract position.13= at the upper dead point without movement of any axis. The Y-axis beam will wait at the sheet clamp point until the backgauge is at the retract position. After the bend thecontroller goes to "stop".15= when the C-input signal becomes active and the beam is at the upper dead point. You may move the beam. The Y-axis beam waits at the sheet clamp point until the backgauge is at the retract position.Only the above mentioned CX-values are in use.Delay time.......................................................................................................TX Delay time before the step change 0-30 sec). Repetition........................................................................................................Cy0 = skip the specific bend1 - 99 = the number of repeats of the bendNote:By pushing the "next bend" button at this moment you select a new bend. This bend is a copy of the preceding one. So you only have to change those parameters which have to be different from the preceding bend.Explanation of the function keysprevious pagePrevious bend to programnext page Next bend to programProgram parametersZoom function (toggle). Specific for production circumstances. See also Fig. 2.2.e below.Figure 2.2.eTo the program overview screen.2.3. Tool librarySelect tool library screenPush this key. The screen for the punch editing appears (Fig. 2.3.a). To switchto the die programming screen, press this key again.Figure 2.3.aDescription of the 'tool library' screenThe tool library contains 30 punches and 30 dies. The high-lighted field at the bottomline of the screen indicates the selected tool. Select the specific punch or die with the "previous/next" buttons. The parameters are visualized in the simplified drawing of the punch or the die. This is no option in the testbending mode.Explanation of the parameters of the punchesHeight..............................................................................................................h Total height of the punch (mm).Angle................................................................................................................αPunch angle.Resistance........................................................................................................re Resistance of the punch (kN/mm).Select first die number screenPush this key again in the 'tool library' screen. The screen for the die editingappears (Fig. 2.3.b). To switch to the punch programming screen, press thiskey again.Figure 2.3.bExplanation of the parameters of the diesHeight..............................................................................................................h Total height of the die (mm).Resistance........................................................................................................re Resistance of the die (kN/mm). Width (V)V-opening of the die (mm). The V-opening of the die is the distance between the crossing points of the two touching lines.Figure 2.3.cAngle................................................................................................................αAngle of the V-opening. Radius..............................................................................................................ra Radius of the V-opening of the die. Mute................................................................................................................M Changing point from fast closing to pressing speed. This is the distance between the lowest point of the pressbeam and the upper surface of the plate to be bend.Figure 2.3.dSafety...............................................................................................................Sn Minimal distance between the backgauge and the center line of the V-opening of the die.This value is one of the conditions which prevent collision of the backgauge with the die, also if the R-axis is used.Figure 2.3.eExplanation of the function keysPrevious page Previous punch or die to program.Next page Next punch or die to program.2.4. General parameter constantsSelect general parameter constants screenPush the -key. The first screen of the general parameter constants menuappears (Fig. 2.4.a).Figure 2.4.aDescription of the general parameter constants screenWith this programming mode you adjust the parameters of the materials and the other general parameters of the controller and the equipment. This option has five screens and is only available during the hand- and automatic production-mode. Pushing the 'N'-button at one of the four screens gives the screen with the actual version number of the program.Explanation of the parameters of the first general parameter constants screen Tensile strength..............................................................................................t..Tensile strength of the material of the plate.- t1 : steel 400- t2 : aluminium 200- t3 : zinc 200E module.........................................................................................................e..E module of the material of the plate.- e1 : steel 210.000- e2 : aluminium 70.000- e3 : zinc 94.000Select other screenPush the - key. The second screen of the general parameter constants menuappears (Fig. 2.4.b).Figure 2.4.bExplanation of the parameters of the second general parameter constants screen Tensile strength..............................................................................................t..Tensile strength of the material of the plate.- t4 : stainless steel 700- t5 : material 5 .............- t6 : material 6 .............E module.........................................................................................................e..E module of the material of the plate.- e4 : stainless steel 210.000- e5 : material 5. ............- e3 : material 6. ............Select other screenPush the - key. Push . The third screen of the general parameter constantsmenu appears(Fig. 2.4.c).orThe first screen of the general parameter constants menu re-appears(Fig. 2.4.a ).Figure 2.4.cExplanation of the parameters of the third general parameter constants screenForce factor.....................................................................................................FF Percentage of the calculated tonnage which actually controls the pressure valve.Bottoming Force factor..................................................................................BF The necessary pressure for an airbend multiplied by this factor gives the coining pressure. Decompression factor....................................................................................DF The computed decompression stroke multiplied by this factor gives an adapteddecompression stroke. With this factor you can set the optimal value during the bendprocess.Clamping This controller calculates the position of the beam at the plate clamping point. It ispossible to give an offset to the calculated pinch point with this parameter to get anoptimal clamped plate. With a positive value the beam stops lower and with a negative value the beam stops higher.Default stepcode.............................................................................................DC This parameter makes a specific stepcode (CX) the default stepcode. This is the initial CX-value for each new program you create. The programmed CX-value of the bend overrules this initial value.Inch-select 1/0.................................................................................................IS1 = dimensions in inches.0 = dimensions in millimeters. Language.........................................................................................................L Selection of the language of the program text.It depends on the machine configuration which languages are available.standard:0 = English (GB)1 = German (D )2 = Danish (DK)3 = French (F )4 = Italian (I )5 = Dutch (NL)6 = Tsjechisch/Slovak (CS)7 = Turkish (TR)8 = Spanish (ESP)Asian:0 = English (GB)1 = Chinese (CHI )2 = Chinese Tr. (CHT)3 = Korean (KO)Z-distance 1/0.................................................................................................ZD The Z-distance is the distance between the backgauge fingers and the end of the plate. This distance is automatically calculated if there is an automatic Z-axis.Figure 2.4.dSelect other screenPush the - key. The fourth screen of the general parameter constants menuappears (Fig. 2.4.e).orPush the - key. The second screen of the general parameter constants menure-appears (Fig. 2.4.b).Figure 2.4.eExplanation of the parameters of the fourth general parameter constants screenX ref. correction.............................................................................................XR When the actual, mechanical X-axis position does not correspond with the displayedvalue, it is possible to adjust this position with this parameter. Program the calculateddifference.Example:When the programmed and displayed value = 250 and the actual, mechanical positionvalue = 252 the XR parameter = -2.Auxiliary ref. correction................................................................................AR When the actual, mechanical position of any auxiliary axis (X2-, R- or Z-axis) does not correspond with the displayed value, it is possible to adjust this position with thisparameter. Program the calculated difference.Example:When the programmed and displayed value = 250 and the actual, mechanical positionvalue = 252 the AR parameter = -2.Y-s. ref. search................................................................................................YR Only available on a conventional system. When a servo axis is used for a mechanical Y-stop, use this parameter to determine whether this axis must search reference at start-up or not. If there is no reference search, the last known position value before power down is remembered.0 = no reference search of Y-servo at start-up, control uses last known position1 = reference search at start-up.。
L等级考试-核心网-软交换-aL2
1. 组POOL后,如果某个端局的CP负荷接近90(用户行为导致),通常采取的应急措施?()A.用户迁移B.GRI分流C.改短周期性位置更新时长D.都不是答案:B2. AXE平台的中央处理板卡是?()A.APB.CPC.RPD.GBP答案:B3. AXE平台,只对某个模块装载几行补丁,通常采用什么方式操作?()A.correctionB.Function ChangeC.RESTARTD.RELOAD答案:A4. 在MGW上,下列哪个(些)命令用于从MO “IpAccessHostGpb”向目的地IP地址发送ping包()A.pingB.ipac_pingC.MsbHostMo_StartPingD.MsbHostMo_StopPing答案:B5. 以下哪个参数用于表征用户的AAL2-LLC?()A.CEIDB.DSAIDC.SUGR答案:A6. Q.2630信令用于?()A.TDM接口上建立用户平面承载连接B.ATM接口上建立用户平面承载连接C.IP接口上建立用户平面承载连接D.MSC-S和MGW之间的控制答案:B7. 参数PAGREPGLOB可能会影响以下哪项指标?()A.寻呼成功率B.掉话率C.切换成功率D.位置更新成功率答案:A8. 对于入MSC POOL的爱立信A口TDM电路扩容,以下说法正确的是?()A.需要在SERVER、MGW、BSC上同时做数据,电路数量一致即可。
B.需要预先规划BSC与各个SERVER的电路数以及CIC编号,且需要在SERVER、MGW、BSC上同时做数据。
C.需要预先规划BSC与各个SERVER的电路数以及CIC编号,只需在SERVER、MGW上做数据。
D.需要预先规划BSC与各个SERVER的电路数以及CIC编号,只需要在MGW、BSC上做数据。
答案:B9. AP restore指令()A.prcstateB.prcbootC.burrestoreD.DPWSP答案:C10. APG40系统的restore流程中,命令“burrestore”的作用是()A.在passive Node恢复数据盘B.在active Node恢复CP 备份文件C.将K盘的AP系统备份文件恢复到C盘,并执行一个reboot操作D.切换C盘和D盘的盘符,并执行一个reboot操作答案:D11. 检查APG告警的方法是( )。
AXE534124;AXE580124;AXE660124;AXE570124;AXE540124;中文规格书,Datasheet资料
ORDERING INFORMATIONFEATURES1. 2.5 mm wide slim two-piece style connectorsCompact and slim structure contributes overall miniaturization of product design.<Compared to F4S series (40 pin contacts, when mated)>• Width: 30% down • Footprint: 30% down2. “” ensures high resistance to various environments in lieu of slim and low profile body3. Simple lock structure provides tactile feedback to ensure excellent mating/unmating operation feel.4. Mated heights of 0.8 and 1.0 mm are available for the same foot pattern.5. Connectors for inspection availableAPPLICATIONSRecommended for board-to-FPC connections of mobile equipment, such as cellular phones, smartphones, laptops, and portable music playersSocketHeader2.0m m 2.5m mRoHS compliantSimple lock structureThe connector gives the tactile feedback when inserted, allowing reliable mating.Surface treatment (Contact portion / Terminal portion)<Socket>4: Ni plating on base, Au plating on surface (for Ni barrier available)<Header>4: Ni plating on base, Au plating on surface5: Narrow Pitch Connector A4S (0.4 mm pitch) Socket 6: Narrow Pitch Connector A4S (0.4 mm pitch) Header Mated height <Socket>1: For mated height 0.8/1.0 mm <Header>1: For mated height 0.8 mm 2: For mated height 1.0 mm AXE24Number of pins (2 digits)Functions2: Without positioning bossesAXE5, 6 PRODUCT TYPESFor volume production: 1-inner carton (1-reel) unitsSamples for mounting check: 50-connector units. Please contact our sales office.Samples: Small lot orders are possible. Please contact our sales office.2.The above part numbers are for connectors without positioning bosses, which are standard. When ordering connectors with positioning bosses, please contact oursales office.3.Please contact us for connectors having a number of pins other than those listed above.AXE5, 6 SPECIFICATIONSAXE5, 6 DIMENSIONS (Unit: mm)The CAD data of the products with a mark can be downloaded from: /ac/e ⅥSocket (Mated height: 0.8 mm/1.0 mm)General tolerance: ±0.2 Note:Since the soldering terminals has a single-piece construction,sections Y and Z are electrically connected.Ⅵ Header (Mated height: 0.8 mm)General tolerance: ±0.2CAD DataAXE5, 6Ⅵ Socket and Header are matedEMBOSSED T APE DIMENSIONS (Unit: mm) (Common for respective contact types, sockets and headers)Ⅵ Header (Mated height: 1.0 mm)0.70 (S u c t i o n f a c e )2.00(0.36)1.280.850.84(0.31)1.460.15±0.03C ±0.11.42A B ±0.10.15±0.030.40±0.05Soldering terminalsS o l d e r i n g t e r m i n a l s0.08(Post andsoldering terminals)Terminal coplanarityGeneral tolerance: ±0.2SocketHeader 0.80±0.11.00±0.1HeaderSocketⅥ Specifications for taping(In accordance with JIS C 0806-1990. However, not applied to the mounting-hole pitch of some connectors.)Ⅵ Specifications for the plastic reel (In accordance with EIAJ ET -7200B.)Tape ITape IIL e a d k a g i n gTABLE OF PRODUCT TYPESNote:When placing an order, substitute the “∗” (asterisk) in the above part number with the number of pins for the specific connector.NOTESFEATURES1. 3,000 mating and unmating cycles2. Same external dimensions and foot pattern as standard type.3. Improved matingInsertion and removal easy due to a reduction in mating retention force. This is made possible by a simple locking structure design.Note: Mating retention force cannot be warranted.APPLICATIONSIdeal for module unit inspection andequipment assembly inspectionSocket Header2.0m m 2.5m m Ⅵ Recommended PC board and metal mask patternsConnectors are mounted with high pitch density, intervals of 0.35 mm, 0.4 mm or 0.5 mm.In order to reduce solder bridges and other issues make sure the proper levels of solder is used.The figures to the right are recommended metal mask patterns. Please use them as a reference.• Socket (Mated height: 0.8mm/1.0mm)Recommended PC board pattern (TOP VIEW)Recommended metal mask opening patternMetal mask thickness: When 120µm (T erminal opening ratio: 70%)(Metal-part opening ratio: 100%)• Header (Mated height: 0.8mm/1.0mm)Recommended PC board pattern (TOP VIEW)Recommended metal mask opening patternMetal mask thickness: When 120µm (T erminal opening ratio: 70%)(Metal-part opening ratio: 100%)Please refer to the latest product specifications when designing your product./NOTES FOR USING ADVANCED SERIES NARROW-PITCH CONNECTORS (Common)Ⅵ Connector mountingExcessive mounter chucking force may deform the molded or metal part of the connector. Consult us in advance if chucking is to be applied.Ⅵ Soldering1) Manual soldering.• Due to the connector’s low profile, if an excessive amount of solder is applied during manual soldering, the solder may creep up near the contact points, or solder interference may cause imperfect contact.• Make sure that the soldering iron tip is heated within the temperature and time limits indicated in the specifications.• Flux from the solder wire may adhere to the contact surfaces during soldering operations. After soldering, carefully check the contact surfaces and clean off any flux before use.• Be aware that a load applied to the connector terminals while soldering may displace the contact.• Thoroughly clean the iron tip.2) Reflow soldering• Screen-printing is recommended for printing paste solder.• T o determine the relationship between the screen opening area and the PC-board foot pattern area, refer to the diagrams in the recommended patterns for PC boards and metal masks. Make sure to use the terminal tip as a reference position when setting. Avoid an excessive amount of solder from being applied, otherwise, interference by the solder will cause an imperfect contact.• Consult us when using a screen-printing thickness other than that recommended.• Depending on the size of the connector being used, self alignment may not be possible. Accordingly, carefully position the terminal with the PC board pattern.• The recommended reflow temperature profile is given in the figure belowRecommended reflow temperature profile• The temperature is measured on the surface of the PC board near the connector terminal.• Some solder and flux types may cause serious solder creeping. Solder and flux characteristics should be taken into consideration when setting the reflow soldering conditions.• When performing reflow soldering on the back of the PC board after reflow soldering the connector, secure the connector using, for example, anadhesive (Double reflow soldering on the same side is possible)3) Reworking on a soldered portion • Finish reworking in one operation.• For reworking of the solder bridge, use a soldering iron with a flat tip. Do not add flux, otherwise, the flux may creep to the contact parts.• Use a soldering iron whose tiptemperature is within the temperature range specified in the specifications.Ⅵ Do not drop or handle theconnector carelessly. Otherwise, the terminals may become deformed due to excessive force or appliedsolderability may be degraded during reflow.Ⅵ Do not insert or remove the connector when it is not soldered. Forcibly applied external pressure on the terminals can weaken the adherence of the terminals to themolded part or cause the terminals to lose their evenness.Ⅵ Excessive prying-force applied to one end may cause product breakage and separation of the solder joints at the terminal.When removing the connector, be sure not to tilt the connectorexceeding 15 degrees widthwise. Excessive force applied for insertion in a pivot action as shown may also cause product breakage.Align the header and socket positions before connecting them.Ⅵ When cutting or bending the PC board after mounting the connector, be careful that the soldered sections are subjected to excessive forces.Ⅵ Notes when using a FPC.• When the connector is soldered to an FPC board, during insertion and removal forces may be applied to the terminals and cause the soldering to come off. It is recommended to use a reinforcement board on the backside of the FPC board to which the connector is beingconnected. Make sure that the reinforcing plate is larger than the outline of therecommended PC board pattern (Outline + approx. 1 mm). The reinforcing plate is made of SUS, glass epoxy or polyimide that is 0.2 to 0.3 mm thick.This connector employs a simple locking structure. However, the connector may come off depending on the size and weight of the FPC, layout and reaction force of FPC, or by drop impact. Make sure to fully check the equipment’s condition. T o prevent any problem with loose connectors, adopt measures to prevent the connector from coming off inside the equipment.Ⅵ Other NotesWhen coating the PC board aftersoldering the connector (to prevent the deterioration of insulation), perform the coating in such a way so that the coating does not get on the connector.The connectors are not meant to be used for switching.Time°C °C Upper limit (Soldering heat resistance)260°230°180°150°Lower limit (Solder wettability)Please refer to the latest product specifications when designing your product.分销商库存信息:PANASONICAXE534124AXE580124AXE660124 AXE570124AXE540124AXE624124 AXE554124AXE680124AXE512124 AXE612124AXE614124AXE514124 AXE516124AXE616124AXE618124 AXE522124AXE622124AXE520124 AXE526124AXE626124AXE628124 AXE630124AXE644124AXE634124 AXE636124AXE632124AXE638124 AXE640124AXE524124AXE656124 AXE550124AXE650124AXE664124 AXE670124AXE510124AXE610124 AXE518124AXE620124AXE528124 AXE536124AXE544124AXE538124 AXE532124AXE654124AXE564124 AXE530124AXE560124。
- 1、下载文档前请自行甄别文档内容的完整性,平台不提供额外的编辑、内容补充、找答案等附加服务。
- 2、"仅部分预览"的文档,不可在线预览部分如存在完整性等问题,可反馈申请退款(可完整预览的文档不适用该条件!)。
- 3、如文档侵犯您的权益,请联系客服反馈,我们会尽快为您处理(人工客服工作时间:9:00-18:30)。
65 68 71 74 77 80 83
设备槽道物理地址
灵活的DL34链路
设备 选组集 16k
0
NTCOI:….MODE=1024;
设备 B A DL34
144Mbits/s
21
NTCOI:….MODE=256;
27
GEM内的控制结构
B
A
选组集 16k
设备
设备
SCB-RP
SCB-RP
A
B 1 2
Revision A B
Document
1. Description of subsystem OMS 2. Description of function block ROSA 1551 1551 ANT 216 08 CNT 216 10 12
3. Description of a command that belongs to function block ROSA
31
占地面积减少
100 100 50 50
0 BYB 501 (1.4) AXE 810
32
BYB501 1.3与AXE810之比较
Power consumption Group Switch Capacity
100 100 70 50
128 512 4
O ld G S, Subrate
600 400 200 0
GEM 是AXE810中的基本构筑块
GEM中的插槽
207.5 mm
265 mm
22 slots for free use
15 mm
450 mm
25
300 mm
GEM中的外部和内部链路
设备槽道编号
0 1 2 3 4 5 6 7 8 9 10 11 12 13 14 15 16 17 18 19 20 21 22 23 24 25
Sales Office
Printouts
Exchange Data Office
PC
Planning Office
Charging Data Orders
Operational Statistics Orders
New board
Printers
Charging Office
Operational Manuals
n/190 82Command Description
n/ 190 83Printout Description
2/155 181/155 18155 18Application Information
109 21Product Revision Information
56
O ld G S, 64 kbit/s AX E 810, 64 kbit/s AX E 810, Subrate
128
0 B YB 501 (1.3) AX E 810
No. of board types
Processing Capacity
15
100 100 50 50
1 2,4
0
AP Z 212 25 AP Z 212 20 AP Z 212 30 AP Z 212 33
9
10 11 12 13 14 15
4
EM= EM= EM= EM= EM= EM= EM=
EM编号
EM= EM=
DLHB-A
RP
4
0
1
2
3
4
5
6
7
8
19
GDM-F,全高设备通用机框
R P 4
D D L E H V B
D E V
D E V
D E V
D E V
D E V
D E V
D E V
D E V
使用ET155 时的辅助连 接
DL34与XDB-A接口 RP总线-SCBRP-A -48供电-SCBRP-A -48供电-SCBRP-B DL34与XDB-B接口 RP总线-SCBRP-B
02 05
08
11
14 17 20 23 26 29 32 35 38 41 44 47 50 53 56 59 62
800
双层厚 独立式单排 度机柜
400
双层厚 度机柜
11
BYB501的排和机柜编号
01 02 03 04
02
排
01
02
03
04
01
编号
机柜 编号
12
BYB501的机柜刻度
13
BYB501的机柜刻度示例
65
排 机柜 04 05 52
机框
04*05/03*52
机框
36 机框 20 10 03 00 机框 机框
28
节点示例
29
减小占地面积示例
AXE810 in BYB 501 512K
BYB202中的中转交换局 64K选组集容量
BYB 501 (1.4) 128K
30
AXE810的运营经济性
100 80 60 40
BYB 202 = 100 BYB 501 AXE810
20
0 硬件维修 功耗 板卡种类 占地面积
2. 一个参数值:
3. 两个参数值: 4. 一系列参数值:
TIME=0815,
DEV=LI3-5&-122, (5 and 122) DEV=LI3-5&&-8, (5, 6, 7, and 8)
38
命令描述中使用的括号
是可选的
39
一个或几个参数
40
核对和流程打印输出示例
41
答复打印输出示例
Switch magazine
Clock magazine
AXE 810
GEM
ET155 magazine
Echo canceller magazine
Transcoder magazine
SCB XDB ET155 ET155 TRA TRA TRA TRA TRA IRB CGB ET155 ET155 ECP ECP ECP ECP ECP IRB CGB XDB SCB
16
垂直电缆槽
架空布线
地面布线
垂直电缆槽
17
GDM-H,半高设备通用机框
0
1 2 3 4 5 6 7 8 9 10 11 12 13 14 15 16 17 18 19 Board address,
MB address
18
RP DLHB-B EM= EM= EM= EM= EM= EM= EM=
MML commands
Command Code [:Parameters];
[:Parameter [,Parameter]....]
Parameter name [= Parameter value]
Example: EXDRI:R=KEY1,DEV=BT1-55;
参数 命令代码 参数名称
参数值
04*05/03*36
04*05/03*20 04*05/12*20 04*05/03*10
14
机柜内的接头位置
57
23 00
00
34
85
05/03*36/34*23F
15
标签示例
前面
这个位置: 05/03*36/81*21F RP4H-B E9/4
后面 NTM 180 66/114
C
至该位置: (05/03*50/81*17F)
AXE市场定位
40 30 20 10 0 10 市话 中继 移动 25 40
5
AXE 产品结构
应用模块化(AM)
AXE
AM
RPM
XSS
APZ
系统模块(SM)
AXE的主要组成部分
APT
其他 交换机
设备 ET 设备 设备 ST ST
GS
ET
EAR RBS
APZ
RP RP RP RP I/O 系统
42
告警打印输出示例
43
Winfiol主窗口
44
菜单栏
45
按钮栏(工具栏)
46
状态栏
47
MML编辑器48源自信道窗口49打开一个信道
50
传输
绿色 传输完毕
蓝色
正在传输
红色 传输暂停
51
使用IE浏览ALEX
52
ALEX文档
53
搜索ALEX和结果
54
要搜索的不同信息
Document Number
14 8,4
10 5
0 B YB 501 (1.3) AX E 810
33
AXE810小结
GEM GDM
DL-34
CP
GS890
ET155-1
ECP5
DL-3
ETC5
IOG20/ APG40
TRA R6 RPP
DLEB
RPG3 M-AST
34
运营活动
AXE
Traffic Data Traffic Measurement & Statistics Charging Data Subscriber Service Orders Exchange Data Changes Orders Commands
CP
8
AXE平台演进
AXE 810
GSM R10 AXE 810 GSM R9.1 & UMTS BYB 501 phase 2 GSM R8 BYB 501
GSM R6.1/R7
BYB 202
BYB501机柜
高 1800
长 600
宽 400