Abaqus分析步step整理
(完整word版)abaqus建模流程——学习笔记
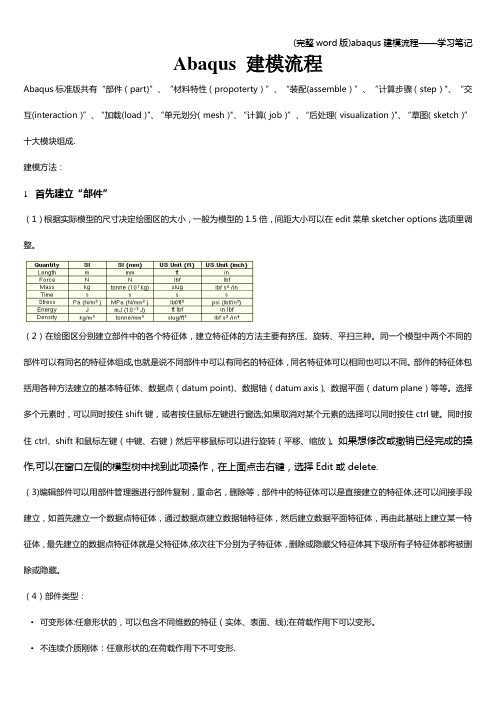
Abaqus 建模流程Abaqus标准版共有“部件(part)”、“材料特性(propoterty)”、“装配(assemble)”、“计算步骤(step)"、“交互(interaction)”、“加载(load)"、“单元划分(mesh)"、“计算(job)”、“后处理(visualization)"、“草图(sketch)”十大模块组成.建模方法:1首先建立“部件”(1)根据实际模型的尺寸决定绘图区的大小,一般为模型的1.5倍,间距大小可以在edit菜单sketcher options选项里调整。
(2)在绘图区分别建立部件中的各个特征体,建立特征体的方法主要有挤压、旋转、平扫三种。
同一个模型中两个不同的部件可以有同名的特征体组成,也就是说不同部件中可以有同名的特征体,同名特征体可以相同也可以不同。
部件的特征体包括用各种方法建立的基本特征体、数据点(datum point)、数据轴(datum axis)、数据平面(datum plane)等等。
选择多个元素时,可以同时按住shift键,或者按住鼠标左键进行窗选;如果取消对某个元素的选择可以同时按住ctrl键。
同时按住ctrl、shift和鼠标左键(中键、右键)然后平移鼠标可以进行旋转(平移、缩放)。
如果想修改或撤销已经完成的操作,可以在窗口左侧的模型树中找到此项操作,在上面点击右键,选择Edit或delete.(3)编辑部件可以用部件管理器进行部件复制,重命名,删除等,部件中的特征体可以是直接建立的特征体,还可以间接手段建立,如首先建立一个数据点特征体,通过数据点建立数据轴特征体,然后建立数据平面特征体,再由此基础上建立某一特征体,最先建立的数据点特征体就是父特征体,依次往下分别为子特征体,删除或隐藏父特征体其下级所有子特征体都将被删除或隐藏。
(4)部件类型:•可变形体:任意形状的,可以包含不同维数的特征(实体、表面、线);在荷载作用下可以变形。
(完整)总结Abaqus操作技巧总结(个人),推荐文档
Abaqus操作技巧总结打开abaqus,然后点击file——set work directory,然后选择指定文件夹,开始建模,建模完成后及时保存,在进行运算以前对已经完成的工作保存,然后点击job,修改inp文件的名称进行运算。
切记切记!!!!!!1、如何显示梁截面(如何显示三维梁模型)显示梁截面:view->assembly display option->render beam profiles,自己调节系数。
2、建立几何模型草绘sketch的时候,发现画布尺寸太小了1)这个在create part的时候就有approximate size,你可以定义合适的(比你的定性尺寸大一倍);2)如果你已经在sketch了,可以在edit菜单--sketch option ——general--grid更改3、如何更改草图精度可以在edit菜单--sketch option ——dimensions--display——decimal更改如果想调整草图网格的疏密,可以在edit菜单--sketch option ——general——grid spacing中可以修改。
4、想输出几何模型part步,file,outport--part5、想导入几何模型?part步,file,import--part6、如何定义局部坐标系Tool-Create Datum-CSYS--建立坐标系方式--选择直角坐标系or柱坐标系or球坐标7、如何在局部坐标系定义载荷laod--Edit load--CSYS-Edit(在BC中同理)选用你定义的局部坐标系8、怎么知道模型单元数目(一共有多少个单元)在mesh步,mesh verify可以查到单元类型,数目以及单元质量一目了然,可以在下面的命令行中查看单元数。
Query---element 也可以查询的。
9、想隐藏一些part以便更清楚的看见其他part,edge等view-Assembly Display Options——instance,打勾10、想打印或者保存图片File——print——file——TIFF——OK11、如何更改CAE界面默认颜色view->Grahphic options->viewport Background->Solid->choose the wite colour!然后在file->save options.12、如何施加静水压力hydrostaticload --> Pressure, 把默认的uniform 改为hydrostatic。
abaqus模态分析操作流程
abaqus模态分析操作流程Modal analysis in Abaqus is a crucial step in understanding the dynamic behavior of a structure. 模态分析是在Abaqus中理解结构动态行为的关键步骤。
It involves determining the natural frequencies and mode shapes of a structure, which are essential for predicting its response to dynamic loads. 这涉及确定结构的固有频率和模态形状,这对于预测其对动态载荷的响应是必不可少的。
The process of conducting a modal analysis in Abaqus involves several steps, from defining the materials and geometry of the structure to interpreting the results. 在Abaqus中进行模态分析的过程涉及几个步骤,从定义结构的材料和几何形状到解释结果。
In this discussion, we will explore the operation flow of modal analysis in Abaqus, highlighting the key considerations and best practices for obtaining accurate and meaningful results. 在本讨论中,我们将探讨Abaqus中模态分析的操作流程,重点介绍获得准确而有意义结果的关键考虑因素和最佳实践。
The first step in conducting a modal analysis in Abaqus is to define the materials and geometry of the structure. 在Abaqus中进行模态分析的第一步是定义结构的材料和几何形状。
abaqus帮助文档_step
abaqus帮助⽂档_stepConfiguring a dynamic, explicit procedureAn explicit, dynamic analysis is computationally efficient for the analysis of large models with relatively short dynamic response times and for the analysis of extremely discontinuous events or processes. This type of analysis allows for the definition of very general contact conditions and uses a consistent, large-deformation theory. For more information, see ? Explicit dynamic analysis,?Section 6.3.3 of the Abaqus Analysis User's Manual.To create or edit a dynamic, explicit procedure:1. Display the Edit Step dialog box following the procedure outlinedin ?Creating a step,?Section 14.9.2 (Procedure type:General;Dynamic, Explicit), or ?Editing a step,?Section 14.9.3.2. On the Basic, Incrementation, Mass scaling, and Other tabbedpages, configure settings such as the time period for the step, themaximum time increment, the increment size, mass scaling definitions, and bulk viscosity parameters as described in the following procedures. To configure settings on the Basic tabbed page:1. In the Edit Step dialog box, display the Basic tabbed page.2. In the Description field, enter a short description of the analysis step.Abaqus stores the text that you enter in the output database, and thetext is displayed in the state block by the Visualization module.3. In the Time period field, enter the time period of the step.4. Select an Nlgeom option:Toggle Nlgeom Off to perform a geometrically linear analysis during the current step.Toggle Nlgeom On to indicate that Abaqus/Explicit shouldaccount for geometric nonlinearity during the step. Once youhave toggled Nlgeom on, it will be active during all subsequentsteps in the analysis.5. Toggle on Include adiabatic heating effects if you are performing anadiabatic stress analysis. This option is relevant only for metal plasticity.For more information, see ?Adiabatic analysis,?Section 6.5.5 of theAbaqus Analysis User's Manual.To configure settings on the Incrementation tabbed page:1. In the Edit Step dialog box, display the Incrementation tabbed page.2. Choose a Type option:Choose Automatic to allow Abaqus/Explicit to determine the time incrementation automatically. For more information,see ?Automatic time incrementation” in “Explicit dynamicanalysis,?Section 6.3.3 of the Abaqus Analysis User's Manual.Choose Fixed to use a fixed time incrementation scheme. The fixed time increment size is determined either by the initial element stability estimate for the step or by a user-specified timeincrement. For more information, see ?Fixed timeincrementation” in “Explicit dynamic analysis,?Section 6.3.3 ofthe Abaqus Analysis User's Manual.3. If you selected Automatic time incrementation, perform the followingsteps:a. Choose a Stable increment estimator option:Choose Global to allow the global estimator to determinethe stability limit as the step proceeds. The adaptive,global estimation algorithm determines the maximumfrequency of the entire model using the current dilatationalwave speed. This algorithm continuously updates theestimate for the maximum frequency. The global estimatorwill usually allow time increments that exceed theelement-by-element values.Choose Element-by-element to allow Abaqus/Explicit todetermine an element-by-element estimate using thecurrent dilatational wave speed in each element.The element-by-element estimate is conservative; it willgive a smaller stable time increment than the true stabilitylimit that is based upon the maximum frequency of theentire model. In general, constraints such as boundaryconditions and kinematic contact have the effect ofcompressing the eigenvalue spectrum, and theelement-by-element estimates do not take this intoaccount.b. Choose a Max. time increment option:Choose Unlimited if you do not want to impose an upperlimit to time incrementation.Choose Value to enter a value for the maximum timeincrement allowed. Enter the value in the field provided.If you selected Fixed time incrementation, choose an option for determining increment size:Choose User-defined time increment to specify a timeincrement size directly. Enter that time increment size in the fieldprovided.Choose Use element-by-element time increment estimator to use time increments the size of the initial element-by-element stability limit throughout the step. The dilatational wave speed ineach element at the beginning of the step is used to compute thefixed time increment size.If desired, enter a Time scaling factor to adjust the stable time increment computed by Abaqus/Explicit. (This option is unavailable if you have specified a User-defined time increment for the Fixed time incrementation scheme.) For more information, see ?Scaling the time increment” in “Explicit dynamic analysis,?Section 6.3.3 of the Abaqus Analysis User's Manual.To configure settings on the Mass scaling tabbed page:2. Choose one of the following options for specifying mass scaling:Choose Use scaled mass and “throughout step” definitions from the previous step if you want mass scaling definitions from the previous step to propagate through the current step. Ifyou choose this option, you can skip the remaining steps in thisprocedure.Choose Use scaling definitions below to create one or more new mass scaling definitions for this step. If you choose this option, complete the remaining steps in this procedure.3. At the bottom of the Data table, click Create.An Edit mass scaling dialog box appears.4. Specify which type of mass scaling definition you want to create:Choose Semi-automatic mass scaling to define mass scaling for any type of analysis except bulk metal rolling.Choose Automatic mass scaling to define mass scaling for a bulk metal rolling analysis. For more information,see ?A utomatic mass scaling for analysis of bulk metal rolling”in “Mass scaling,?Section 11.6.1 of the Abaqus Analysis User'sManual.Choose Reinitialize mass to reinitialize masses of elements to their original values. This option allows you to prevent the scaledmass from a previous step from being used in the current step.For more information, see ?Reverting the mass matrix to theoriginal state” in “Mass scaling,?Section 11.6.1 of the AbaqusAnalysis User's Manual.Choose Disable mass scaling thoughout step to disable in this step all variable mass scaling definitions from previous steps.For more information, see ?Continuous mass matrix with nofurther scaling” in “Mass scaling,?Section 11.6.1 of the AbaqusAnalysis User's Manual.5. If you selected Semi-automatic mass scaling, Automatic massscaling, or Reinitialize mass, indicate the region to which you want the mass scaling definition applied:Choose Whole model to apply the mass scaling definition to all elements in the model.Choose Set to apply the mass scaling definition to a particular set of elements. Enter the set name in the field provided. 6. If you selected Semi-automatic mass scaling, indicate when, duringthe step, you want Abaqus/Explicit to scale the element masses: ?Choose At beginning of step to perform fixed mass scaling only at the beginning of the step. For more information, see ?Fixedmass scaling” in “Mass sc aling,?Section 11.6.1 of the AbaqusAnalysis User's Manual.Choose Throughout step to scale the mass of elements periodically during the step. For more information,see ?Variable mass scaling” in “Mass scaling,?Section 11.6.1of the Abaqus Analysis User's Manual.7. If you selected Semi-automatic mass scaling, indicate how you wantAbaqus/Explicit to scale the element masses:Toggle on Scale by factor to scale the elements once at the beginning of the step by the value you enter in the field provided.For more information, see ?Defining a scale factor directly” in“Mass scaling,?Section 11.6.1 of the Abaqus Analysis User'sManual.Toggle on Scale to target time increment of n to enter a desired element stable time increment in the field provided. Click the arrow to the right of the Scale element mass field, andselect how you want Abaqus/Explicit to apply that target timeincrement:Select Uniformly to satisfy target to scale the masses of the elements equally so that the smallest element stabletime increment of the scaled elements equals the targetvalue.Select If below minimum target to scale the masses of only the elements whose element stable time incrementsare less than the target value.Select Nonuniformly to equal target to scale themasses of all elements so that they all have the sameelement stable time increment equal to the target value.8. If you toggle on both Scale by factor and Scale to target timeincrement, Abaqus/Explicit first scales the masses by the factor value that you enter and then possibly scales them again, depending on the value you enter for target time increment and the option you select for applying that target.9. If you selected Automatic mass scaling, enter the following values:In the Feed rate field, enter the estimated average velocity of the workpiece in the rolling direction at steady-state conditions.In the Extruded element length field, enter the average element length in the rolling direction.In the Nodes in cross-section field, enter the number of nodes in the cross-section of the workpiece. Increasing this value decreases the amount of mass scaling.10. If you selected Semi-automatic mass scaling throughout the stepor Automatic mass scaling, specify when, during the step, you wantAbaqus/Explicit to perform mass scaling calculations:Choose Every n increments to specify the frequency, inincrements, at which Abaqus/Explicit is to perform mass scalingcalculations. Enter the desired frequency in the field provided.For example, if you enter a value of 5, Abaqus/Explicit scales themass at the beginning of the step and at increments 5, 10, 15,etc.Choose At n equal intervals to specify the number of intervals during the step at which Abaqus/Explicit is to perform mass scaling calculations. Enter the desired value in the field provided.For example, if you enter a value of 2, Abaqus/Explicit scales themass at the beginning of the step, the increment immediatelyfollowing the half-way point in the step, and the final increment inthe step.11. Click OK to close the Edit mass scaling dialog box and return tothe Mass scaling tabbed page of the Edit Step dialog box.The mass scaling definition that you have just created appears inthe Data table.12. If desired, repeat Steps 3 to 10 to create additional mass scalingdefinitions.13. Once you have created one or more mass scaling definitions, you canedit or delete them if desired. Select a particular mass scaling definition in the Data table, and click Edit or Delete at the bottom ofthe Data table.To configure settings on the Other tabbed page:1. In the Edit Step dialog box, display the Other tabbed page.2. Enter a value for the Linear bulk viscosity parameter. Linear bulkviscosity is included by default in Abaqus/Explicit.3. Enter a value for the Quadratic bulk viscosity parameter. This form ofbulk viscosity pressure is found only in solid continuum element and isapplied only if the volumetric strain rate is compressive.When you have finished configuring settings for the dynamic, explicit step, click OK to close the Edit Step dialog box.。
abaqus系列教程 多步骤分析

11 多步骤分析ABAQUS模拟分析的一般性目标是确定模型对所施加载荷的响应。
回顾术语载荷(load)在ABAQUS中的一般性含义,载荷代表了使结构的响应从它的初始状态到发生变化的任何事情;例如:非零边界条件或施加的位移、集中力、压力以及场等等。
在某些情况下载荷可能相对简单,如在结构上的一组集中载荷。
在另外一些问题中施加在结构上的载荷可能会相当复杂,例如,在某一时间段内,不同的载荷按一定的顺序施加到模型的不同部分,或载荷的幅值是随时间变化的函数。
采用术语载荷历史(load history)以代表这种作用在模型上的复杂载荷。
在ABAQUS中,用户将整个的载荷历史划分为若干个分析步(step)。
每一个分析步是由用户指定的一个“时间”段,在该时间段内ABAQUS计算该模型对一组特殊的载荷和边界条件的响应。
在每一个分析步中,用户必须指定响应的类型,称之为分析过程,并且从一个分析步到下一个分析步,分析过程也可能发生变化。
例如,可以在一个分析步中施加静态恒定载荷,有可能是自重载荷;而在下一个分析步中计算这个施加了载荷的结构对于地震加速度的动态响应。
隐式和显式分析均可以包含多个分析步骤;但是,在同一个分析作业中不能够组合隐式和显式分析。
为了组合一系列的隐式和显式分析步,可以应用结果传递或输入功能。
在ABAQUS分析用户手册(ABAQUS Analysis User’s Manual)第7.7.2节“Transfering results between ABAQUS/Explicit and ABAQUS/Standard”中讨论了这个功能。
而本指南不做进一步的讨论。
ABAQUS将它的所有分析过程主要划分为两类:线性扰动(linear perturbation)和一般性分析(general)。
在ABAQUS/Standard或在ABAQUS/Explicit分析中可以包括一般分析步;而线性扰动分析步只能用于ABAQUS/Standard分析。
总结Abaqus操作技巧总结(个人)
Abaqus操作技巧总结打开abaqus,然后点击file-—set work directory,然后选择指定文件夹,开始建模,建模完成后及时保存,在进行运算以前对已经完成的工作保存,然后点击job,修改inp文件的名称进行运算。
切记切记!!!!!!1、如何显示梁截面(如何显示三维梁模型)显示梁截面:view-〉assembly display option—〉render beam profiles,自己调节系数.2、建立几何模型草绘sketch的时候,发现画布尺寸太小了1)这个在create part的时候就有approximate size,你可以定义合适的(比你的定性尺寸大一倍);2)如果你已经在sketch了,可以在edit菜单--sketch option ——general--grid更改3、如何更改草图精度可以在edit菜单--sketch option -—dimensions--display—-decimal更改如果想调整草图网格的疏密,可以在edit菜单--sketch option -—general——grid spacing中可以修改.4、想输出几何模型part步,file,outport--part5、想导入几何模型?part步,file,import--part6、如何定义局部坐标系Tool-Create Datum-CSYS--建立坐标系方式--选择直角坐标系or柱坐标系or球坐标7、如何在局部坐标系定义载荷laod--Edit load--CSYS-Edit(在BC中同理)选用你定义的局部坐标系8、怎么知道模型单元数目(一共有多少个单元)在mesh步,mesh verify可以查到单元类型,数目以及单元质量一目了然,可以在下面的命令行中查看单元数。
Query---element 也可以查询的。
9、想隐藏一些part以便更清楚的看见其他part,edge等view-Assembly Display Options——instance,打勾10、想打印或者保存图片File——print——file——TIFF——OK11、如何更改CAE界面默认颜色view—>Grahphic options->viewport Background—>Solid->choose the wite colour!然后在file-〉save options。
ABAQUS分析步骤

1.几何模型导入File>import>part选择要导入的部件,在导入Bone与Tooth部件时,在Topology下选择Shell,而PDL为solid。
2.设置Bone、Tooth为离散刚体。
在左边的模型树中,右击Parts中Bone和Tooth,edit>Edit>Part>Type>Discrete rigid.3.在Part模块中建立Tooth和Bone的集合、参考点及面集。
在菜单栏Tools菜单下,创建Tooth和Bone的参考点(参考点可以选择外面的点/输入坐标点或者是其表面的点,并命名为RP-Tooth和RP-Bone,并创建参考点的集合为Set-RPTooth和Set-RPBone.创建Bone和PDL接触的牙槽窝内表面的面为Surf-Bone,Tooth的整个外表面设为Surf-Tooth。
4.网格划分及牙周膜偏移成体(对于PDL为给定的面时)。
进入mesh模块,首先对PDL进行面网格划分,对面进行分割与合并,使得处理后的PDL的各小面尽量成规则的四边形,然后播撒种子,种子尺寸为0.1,网格控制中选择Free格式,然后进行网格划分,(注意划分的面网格要全为四边形网格,否则在体网格生成的既有三棱柱/五面体又有四棱柱/六面体,在进行单元类型选择和材料属性赋予时会提示错误,只能选择同一种网格)由于既有面网格划分完后,创建Mesh文件,在菜单栏中Mesh>Creat Mesh Part,在出现的Mesh part name框中输入PDL,回车,Mesh>Edit>Edit Mesh>Mesh>Method>offset(creat solid layers),选择划分好的面网格,在出现的offset mesh- solid layers对话框中选择偏移的方向,由于是向内偏移,选择紫色的样本,偏移总厚度为0.2,层数为2,体网格生产后,如果都是六面体就可以选择设置单元类型为C3D20RH。
Abaqus中的分析步、接触和载荷

Abaqus中的分析步、接触和载荷Abaqus/CAE中的分析步、接触和载荷第五讲L1.2概述分析步 ? 输出 ? 接触 ? 载荷、边界条件和初始条件 ? 练习Introduction to Abaqus/CAE分析步L1.4分析步分析步模块有下面四个用途: 1. 定义分析步。
2. 指定输出需求。
3. 指定分析诊断。
4. 指定分析控制。
Introduction to Abaqus/CAE分析步分析步 ? 分析步为描述模拟历程提供了一种方便的途径。
分析的结果取决于事件的顺序。
比如,右图中的弓和箭。
整个分析过程包括四个分析步:L1.5Step 3 = Natural frequency extractionStep 1: 预拉伸弓弦 (静态响应)。
Step 2: 拉弓 (静态响应)。
Step 3: 为加载的系统提取自然频率。
Step 4: 放开弓弦 (动态响应)。
Introduction to Abaqus/CAE分析步在Abaqus/CAE中定义分析步General proceduresL1.6Linear proceduresAbaqus/Explicit proceduresIntroduction to Abaqus/CAEL1.7分析步分析步替换任何分析步都可以用其它分析步替换? 必需满足分析步的先后顺序。
? Abaqus/CAE将保留载荷、边界条件、接触等属性Introduction to Abaqus/CAEL1.8分析步分析步抑制任何分析步都可以抑制 ? 可以灵活的分析模型 (比如可以评估不同模型设置) ? 在此分析步创建的属性不参与分析Introduction to Abaqus/CAE输出输出输出到结果文件? Abaqus/Viewer将使用输出数据库。
? 对于Python和C++保留了API接口,可以用于外部的后处理(比如,在Abaqus/Viewer中添加显示数据) ? 两种类型的输出数据:场和历程数据。