Oracle11g的安装图文教程(终结版)
oracle 11gr2图文安装rac版

Oracle 11G R2 RAC实施过程图文版(本文仅限于11G R2 on redhatlinux 6.x系列)内容目录1 实施准备 (2)1.1 调研与方案制定 (2)1.2 存储划分方案(参考) (3)1.3 介质 (4)2 设置系统 (4)2.1 系统检查 (4)2.1.1 cpu信息 (4)2.1.1 确认内存大小 (5)2.1.2 检查文件系统 (5)2.1.3 检查网络设置 (6)2.2 设置操作系统 (7)2.2.1 主机正名 (7)2.2.2 配置本地主机名解析hosts文件 (7)2.2.3 修改内核参数 (7)2.2.4 关闭防火墙服务 (8)2.2.5 关闭selinux (8)2.2.6 配置时钟同步 (9)2.3 设置软件安装/运行用户 (9)2.3.1 创建用户 (9)2.3.2 设置初始密码 (10)2.3.3 设置用户进程资源配额 (10)2.4 设置存储 (10)2.4.1 多路径软件配置 (10)2.4.2 udev绑定参考 (11)3 安装软件 (12)3.1 准备安装介质 (12)3.1.1 准备目录和权限(所有节点) (12)3.1.2 上传zip包(推荐ftp方式) (12)3.1.3 使用grid用户解包 (13)3.2 安装集群软件 (13)3.2.1 运行安装程序runInstaller (13)3.2.2 设置grid用户环境变量 (37)3.2.3 验证资源和服务状态,确定成功安装 (37)3.2.4 验证缺省监听 (38)3.2.5 查看scan_listener (39)3.3 安装数据库软件 (39)3.3.1 运行交互式安装程序runInstaller (39)3.3.2 为oracle用户的添加软件环境变量 (47)4 创建数据库 (47)4.1 创建asm diskgroup (47)4.1.1 以grid用户运行asmca工具 (47)4.2 创建数据库zbwshx(在1节点操作) (49)5 应用累计补丁更新PSU (69)5.1 升级补丁工具opatch (69)5.2 补丁1节点软件 (69)5.3 补丁2节点软件 (71)5.4 升级数据库(1节点操作) (71)6 附加脚本(可选) (72)6.1 调整数据库一些缺省设置 (72)6.2 管理集群服务 (73)7 初始化业务环境(举例) (73)1 实施准备1.1 调研与方案制定1.2 存储划分方案(参考)存储要1T1T分配,超过2T会有问题1.3 介质2 设置系统2.1 系统检查2.1.1 cpu信息1 查看物理cpu数shell(root)>cat /proc/cpuinfo |grep physical\ id|sort|uniq2 查看单个cpu coresshell(root)>cat /proc/cpuinfo |grepcpu\ cores|uniq3 查看单个是否超线程shell(root)>cat /proc/cpuinfo |grepcpu\ cores|uniq4 合计cpu coresshell(root)>cat /proc/cpuinfo | grep name | cut -f2 -d: | uniq -c shell(root)>mpstat 12.1.1 确认内存大小物理内存是256Gswap取值算法为物理内存的一倍,当物理内存超过64G,建议>=物理内存,这里32G符合最小2.1.2 检查文件系统/var和/tmp空间至少2G,建议10G/dev/shm共享空间设为物理内存/2 2.1.3 检查网络设置检查1节点public网卡设置检查2节点public网卡设置检查1节点private网卡地址(第一组)检查2节点private网卡设置(第一组)检查1节点 private网卡(第二组)检查2节点private网卡(第二组)2.2 设置操作系统2.1.1 主机正名1节点(全部小写最好了)2节点注意:重新登陆确认改变生效2.1.2 配置本地主机名解析hosts文件shell(root)>vi /etc/hosts#public address192.168.9.101 zbwshx01192.168.9.102 zbwshx02#public vip address192.168.9.103 zbwshx01-vip192.168.9.104 zbwshx02-vip192.168.9.105 zbwshx-cluster-scan(建议3个,用DNS解析)#private group #110.10.11.11 zbwshx01-priv110.10.11.12 zbwshx02-priv1#private group #210.10.12.11 zbwshx01-priv210.10.12.12 zbwshx02-priv2#NTP服务器192.168.5.11 ntpserver2.1.3 修改内核参数1.编辑sysctl.confshell(root)>vi /etc/sysctl.conf#ORACLE SETTINGfs.aio-max-nr = 1048576fs.file-max = 6815744#{shmall}单位pages,命令"echo $((物理内存/$(getconf PAGESIZE)))"(计算:物理内存/4096)kernel.shmall = 67108864#{shmmax},单位bytes,为物理内存一半,echo $((256*1024*1024*1024/2))kernel.shmmax = 137438953472(物理内存/2)kernel.shmmni = 4096kernel.sem = 250 32000 100 128net.ipv4.ip_local_port_range = 9000 65500net.core.rmem_default = 262144net.core.rmem_max = 4194304net.core.wmem_default = 262144net.core.wmem_max = 1048586net.ipv4.ipfrag_high_thresh=524288net.ipv4.ipfrag_low_thresh=393216net.ipv4.tcp_rmem=4096 524288 16777216net.ipv4.tcp_wmem=4096 524288 16777216net.ipv4.tcp_timestamps=0net.ipv4.tcp_sack=0net.ipv4.tcp_window_scaling=1net.core.optmem_max=524287dev_max_backlog=2500sunrpc.tcp_slot_table_entries=128sunrpc.udp_slot_table_entries=128net.ipv4.tcp_mem=16384 16384 16384#多心跳网卡时需要多播技术net.ipv4.conf.default.rp_filter = 0#多播设备eth2,eth4net.ipv4.conf.eth2.rp_filter = 0net.ipv4.conf.eth4.rp_filter = 02.生效shell(root)>modprobesunrpcshell(root)>sysctl -p2.1.4 关闭防火墙服务shell(root)>chkconfig --level 2345 iptables offshell(root)>chkconfig --level 2345 ip6tables offshell(root)>service iptables stopshell(root)>service ip6tables stop2.1.5 关闭selinuxshell(root)>setenforce 0shell(root)>vi /etc/selinux/configSELINUX=disabled2.1.6 配置时钟同步∙配置NTP服务器<非数据库内容,略>∙配置ntp客户端shell(root)>vi /etc/ntp.conf注释掉其他restrict和server条目,增加如下serverntpserverrestrictntpserver mask 255.255.255.255nomodifynotrapnoquery ∙修改ntpd配置文件shell(root)>vi /etc/sysconfig/ntpdSYNC_HWCLOCK=yesOPTIONS="-x -u ntp:ntp -p /var/run/ntpd.pid"∙重启ntpd进程shell(root)>chkconfig --level 2345 ntpd onshell(root)>service ntpd start∙确认握手成功shell(root)>ntpq -p(初次同步需要一定时间)∙检查状态shell(root)>ntpstat2.2 设置软件安装/运行用户2.2.1 创建用户shell(root)>groupadd -g 10501 oinstallshell(root)>groupadd -g 10502 asmadminshell(root)>groupadd -g 10503 asmdbashell(root)>groupadd -g 10504 asmopershell(root)>groupadd -g 10505 dbashell(root)>groupadd -g 10506 opershell(root)>useradd -m -u 10501 -g oinstall -G asmadmin,asmdba,asmoper,dba -d /home/grid -s /bin/bash -c "Grid Infrastructure Owner" gridshell(root)>useradd -m -u 10502 -g oinstall -G dba,oper,asmdba -d /home/oracle -s /bin/bash -c "Oracle Software Owner" oracle2.2.2 设置初始密码shell(root)>password gridshell(root)>password oracle2.2.3 设置用户进程资源配额shell(root)>vi /etc/security/limits.conf#ORACLE SETTINGroot soft nproc 2047root hard nproc 16384root soft nofile 1024root hard nofile 65536root soft stack 10240root hard stack 32768grid soft nproc 2047grid hard nproc 16384grid soft nofile 1024grid hard nofile 65536grid soft stack 10240grid hard stack 32768oracle soft nproc 2047oracle hard nproc 16384oracle soft nofile 1024oracle hard nofile 65536oracle soft stack 10240oracle hard stack 327682.3 设置存储要求:✓同一个lun/vdisk在每个节点上设备名一致✓根据方案,通过scsi_id确认每一个lun/vdisk从存储上划分正确的✓共享模式要求在lun/vdisk在每个节点能同时读写✓RAC安装,lun/vdisk在操作系统上的设备名的属主是grid,组主是asmadmin,权限6602.3.1 多路径软件配置<非数据库内容,略>redhatlinux自带多路径软件multipath的参考文档官方文档:https:///documentation/zh-CN/Red_Hat_Enterprise_Linux/6/html/DM_Multipath/index.html百度搜索文档:/i6241962348353946114/绑定用户组案例:/2014/01/multipath实现设备用户组设置.html2.3.2 udev绑定参考注意:∙如果多路径软件已经实现了设备名绑定、属(组)主设置、权限设置,则不需要再配置udev∙udev不具有多路径failover能力∙本例为scsi磁盘∙∙1.shell(root)>fdisk -l|grep Disk\ /dev/sd根据系统人员告知,设备sda是本地操作系统宿主硬盘,不能使用,剩下的是共享磁盘2.查看scsi_idshell(root)>scsi_id -gvu /dev/sdN3.新建或编辑udev的rule文件shell(root)>vi /etc/udev/rules.d/99-oracle.rules(必须是99)KERNEL=="sd*", SUBSYSTEM=="block", ENV{DEVTYPE}=="disk",ENV{ID_SERIAL}=="36006016010402600126dd2e653ebe511", NAME+="crs_01", OWNER="grid", GROUP="asmadmin", MODE="0660"KERNEL=="sd*", SUBSYSTEM=="block", ENV{DEVTYPE}=="disk",ENV{ID_SERIAL}=="360060160104026004eb5b3db53ebe511", NAME+="crs_02", OWNER="grid", GROUP="asmadmin", MODE="0660"KERNEL=="sd*", SUBSYSTEM=="block", ENV{DEVTYPE}=="disk",ENV{ID_SERIAL}=="360060160104026006edcb7d153ebe511", NAME+="crs_03", OWNER="grid", GROUP="asmadmin", MODE="0660"KERNEL=="sd*", SUBSYSTEM=="block", ENV{DEVTYPE}=="disk",ENV{ID_SERIAL}=="36006016010402600f0b413ee53ebe511", NAME+="fra_data_01", OWNER="grid", GROUP="asmadmin", MODE="0660"KERNEL=="sd*", SUBSYSTEM=="block", ENV{DEVTYPE}=="disk",ENV{ID_SERIAL}=="36006016010402600162f6d1254ebe511", NAME+="zbwshx_data_01", OWNER="grid", GROUP="asmadmin", MODE="0660"4.启动udevshell(root)>udevadm control reload-rulesshell(root)>start_udev3 安装软件3.1 准备安装介质(介质上传到/u01/media/oracle/linux_x64目录)3.1.1 准备目录和权限(所有节点)shell(root)>mkdir -p /u01/media/oracle/linux_x64shell(root)>chown -R grid:oinstall /u01shell(root)>chmod -R g+w /u013.1.2 上传zip包(推荐ftp方式)✓用grid用户上传✓上传grid安装包,database安装包,补丁包,补丁工具✓上传后介质属主grid,组主oinstall3.1.3 使用grid用户解包shell(grid)>cd /u01/media/oracle/linux_x64shell(grid)>unzip p1*******_112040_Linux-x86-64_1of7.zipshell(grid)>unzip p1*******_112040_Linux-x86-64_2of7.zipshell(grid)>unzip p1*******_112040_Linux-x86-64_3of7.zip3.2 安装集群软件3.2.1 运行安装程序runInstallershell(grid)>cd gridshell(grid)>./runInstaller提示:为了把x-windows程序的界面投射到windows终端上,需要执行2个步骤1.在windows上启动本地X11Forward程序,推荐x-manager中的xpassive(端口默认6000,注意firewall)2.在服务器上设定shell环境变量:export DISPLAY=YourIP:0.03.执行xclock测试在DHCP+DNS的环境,需要激活GNS,这里关闭本方案只有一个SCAN IP,使用/etc/hosts解析(也就是说需要将SCAN IP写入到/etc/hosts 下)建立主机之间ssh互信,这样可以免密码互相登陆,oracle安装过程中会把1节点的软件自动复制到2节点。
在Linux(Rhel6.4)上安装oracle11g和was7全过程

在Linux上安装oracle11g和was7全过程目录一、安装环境 (2)1.1.IP地址 (2)1.2.硬件配置 (2)1.3.文件系统划分 (2)1.4.软件介质 (2)二、安装Linux(RedHat Enterprise Linux 6.4)操作系统 (2)2.1.系统安装过程 (2)2.2.系统参数配置 (19)2.3. yum配置 (19)三、安装Oracle11.2.0.3 (20)3.1.添加oracle用户和组 (20)3.2.创建文件夹并授权 (20)3.3.内存参数设置 (20)3.4.oracle用户环境变量设置 (20)3.5.安装oracle依赖包 (21)3.6. 安装Oracle11.2.0.3软件 (21)四、安装Websphere7.0 (28)4.1.安装过程 (28)4.2.起停脚本 (36)一、安装环境1.1.IP地址1.2.硬件配置内存8G磁盘空间:73G×41.3.文件系统划分Swap 4G/boot 512M/ 200G在/下创建/websphere、/oracle目录1.4.软件介质安装软件、应用包全部放在/home下Linux安装盘(RedHat Enterprise Linux 6.4)Oracle11.2.0.3 for linux 64bitWebsphere7.0NDXmanager4.0二、安装Linux(RedHat Enterprise Linux 6.4)操作系统2.1.系统安装过程--重起后配置界面--重起后出现登录界面2.2.系统参数配置◆关闭防火墙[root@foawas ~]# chkconfig iptables off◆Hosts配置[root@foawas ~]# vi /etc/hosts127.0.0.1 localhost localhost.localdomain localhost4 localhost4.localdomain4 ::1 localhost localhost.localdomain localhost6 localhost6.localdomain6 10.41.130.46 foawas2.3. yum配置将安装光盘整个拷贝到/home/rhel6.4/\cp -R /media/RHEL_6.4 x86_64 Disc 1/* /home/rhel6.4/配置yum[root@foawas yum.repos.d]# vi /etc/yum.repos.d/rhel-source.repo[rhel-source]name=Red Hat Enterprise Linux $releasever - $basearch - Sourcebaseurl=file:///home/rhel6.4/enabled=1gpgcheck=1gpgkey=file:///home/rhel6.4/RPM-GPG-KEY-redhat-release三、安装Oracle11.2.0.33.1.添加oracle用户和组[root@foawas oracle]# groupadd oinstall[root@foawas oracle]# groupadd dba[root@foawas oracle]# useradd -g oinstall -G dba -m oracle[root@foawas oracle]# passwd oracle3.2.创建文件夹并授权[root@foawas oracle]# mkdir /oracle/app[root@foawas oracle]# mkdir /oracle/app/oracle[root@foawas oracle]# mkdir /oracle/app/oradata[root@foawas oracle]# mkdir /oracle/app/oracle/product[root@foawas oracle]# chown -R oracle:oinstall /oracle/app[root@foawas oracle]# ls -ldrwxr-xr-x. 4 oracle oinstall 4096 May 22 16:38 app3.3.内存参数设置[root@foawas ~]# vi /etc/security/limits.conforacle soft nproc 2047oracle hard nofile 65536oracle hard memlock 52428800oracle soft memlock 52428800[root@foawas ~]# vi /etc/sysctl.confkernel.shmmni = 4096kernel.sem = 250 32000 100 128fs.file-max = 6815744net.ipv4.ip_local_port_range = 9000 65500net.core.rmem_default = 262144net.core.wmem_default = 262144net.core.rmem_max = 4194304net.core.wmem_max = 1048576fs.aio-max-nr = 1048576[root@foawas ~]# sysctl -p3.4.oracle用户环境变量设置[root@foawas /]# su - oracle[oracle@foawas ~]$ vi .bash_profileexport ORACLE_BASE=/oracle/app/oracleexport ORACLE_HOME=$ORACLE_BASE/product/11.2.0/dbhome_1export PATH=$PATH:$HOME/bin:$ORACLE_HOME/binexport NLS_LANG=AMERICAN_AMERICA.ZHS16GBKexport LD_LIBRARY_PATH=$LD_LIBRARY_PATH:$ORACLE_HOME/lib:/usr/lib:/usr/local/lib3.5.安装oracle依赖包[root@foawas ~]# yum install -y gcc[root@foawas home]# yum install -y libaio-devel[root@foawas home]# yum install -y gcc-c++[root@foawas home]# yum install -y elfutils-libelf-devel[root@foawas home]# yum install -y compat-libstdc++-33下载pdksh-5.2.14-30.x86_64.rpm包到/home目录[root@foawas home]# rpm -ivh /home/pdksh-5.2.14-30.x86_64.rpm3.6. 安装Oracle11.2.0.3软件用oracle用户登录到图形界面,打开terminal[oracle@foawas ~]$cd /home/database[oracle@foawas database]$ ./runInstaller执行脚本[root@ foawas ~]# sh /oracle/app/oraInventory/orainstRoot.shChanging permissions of /oracle/app/oraInventory.Adding read,write permissions for group.Removing read,write,execute permissions for world.Changing groupname of /oracle/app/oraInventory to oinstall.The execution of the script is complete.[root@ foawas ~]# sh /oracle/app/oracle/product/11.2.0/dbhome_1/root.sh Performing root user operation for Oracle 11gThe following environment variables are set as:ORACLE_OWNER=oracleORACLE_HOME=/oracle/app/oracle/product/11.2.0/dbhome_1Enter the full pathname of the local bin directory: [/usr/local/bin]:Copying dbhome to /usr/local/bin ...Copying oraenv to /usr/local/bin ...Copying coraenv to /usr/local/bin ...Creating /etc/oratab file...Entries will be added to the /etc/oratab file as needed byDatabase Configuration Assistant when a database is createdFinished running generic part of root script.Now product-specific root actions will be performed.Finished product-specific root actions.验证安装是否完成[oracle@foawas ~]$ sqlplus / as sysdbaSQL*Plus: Release 11.2.0.3.0 Production on Tue Jun 3 08:05:38 2014 Copyright (c) 1982, 2011, Oracle. All rights reserved.Connected to an idle instance.SQL>四、安装Websphere7.04.1.安装过程用root用户登录图形界面[root@foawas ~]# cd /home/was7/WAS/[root@foawas WAS]# ./install安装完成输出,安装验证4.2.起停脚本[root@foawas scripts]# vi was_start.sh#!/bin/shcd /websphere/AppServer/profiles/Dmgr01/bin ./startManager.shcd /websphere/AppServer/profiles/AppSrv01/bin ./startNode.sh./startServer.sh server1[root@foawas scripts]# vi was_stop.sh#!/bin/shcd /websphere/AppServer/profiles/AppSrv01/bin ./stopServer.sh server1./stopNode.shcd /websphere/AppServer/profiles/Dmgr01/bin./stopManager.sh。
Oracle_11g 安装图解(详细版)

Oracle 11g安装图文攻略呵呵,花了一个多小时,左右把11g安装折腾好了。
其中折腾SQL Developer 花了好长时间,总算搞定了。
好了,先总结下安装步骤,希望给后面的童鞋提高安装效率。
呵呵。
一、Oracle 下载注意Oracle分成两个文件,下载完后,将两个文件解压到同一目录下即可。
路径名称中,最好不要出现中文,也不要出现空格等不规则字符。
官方下地址:/technetwork/database/enterprise-edition/downloads/ index.html以下两网址来源此官方下载页网。
win 32位操作系统下载地址:/otn/nt/oracle11g/112010/win32_11gR2_database_ 1of2.zip/otn/nt/oracle11g/112010/win32_11gR2_database_ 2of2.zipwin 64位操作系统下载地址:/otn/nt/oracle11g/112010/win64_11gR2_database_ 1of2.zip/otn/nt/oracle11g/112010/win64_11gR2_database_ 2of2.zip二、Oracle安装1. 解压缩文件,将两个压缩包一起选择,鼠标右击 -> 解压文件如图2.两者解压到相同的路径中,如图:3. 到相应的解压路径上面,找到可执行安装文件【 setup.exe 】双击安装。
如图:4. 安装第一步:配置安全更新,这步可将自己的电子邮件地址填写进去(也可以不填写,只是收到一些没什么用的邮件而已)。
取消下面的“我希望通过My Oracle Support接受安全更新(W)”。
如图:5. 安全选项,直接选择默认创建和配置一个数据库(安装完数据库管理软件后,系统会自动创建一个数据库实例)。
如图:6. 系统类,直接选择默认的桌面类就可以了。
(若安装到的电脑是,个人笔记本或个人使用的电脑使用此选项) 如图:7. 典型安装。
centos下Oracle11G图文安装教程

centos下Oracle11G 图文安装教程这篇文章主要为大家详细介绍了centos 下Oracle11G 图文安装教程,具有一定的参考价值,感兴趣的小伙伴们可以参考一下本文实例为大家分享了Android 九宫格图片展示的具体代码,供大家参考,具体内容如下第一步:软件安装:本菜是在VMware 虚拟机上安装的centOS6.5,开辟的虚拟硬盘空间一定要大于30G(本菜一开始只开辟了20g ,结果最后提示空间不够,惨痛的经历,所以第二遍直接开辟了50G 硬盘空间),建议在40G~50G ,内存最低要1G!!!至于VMware 虚拟机和centOS 的安装不是本文重点,更不是难点,大家可以参考其他内容进行安装,在此不再赘述!软件准备:oracle 的下载,分为32位和64位,安装过程都是一样的。
如果你的机器是32位的,就下载32位的Oracle 软件,若是64位的就下载64位的。
下面的安装过程是完全一样的,本菜一开始在这个环节还犹豫了一些时间,汗~因为我是32位的操作系统,所以我下载的是linux_11gR2_database_1of2和linux_11gR2_database_2of2两个压缩文件。
若是64位的请下载:linux.x64_11gR2_database_1of2和linux.x64_11gR2_database_2of2(注意都是下载两个文件,缺一不可)。
如图:第二步:第二步:修改主机名以root 权限登录虚拟机,打开终端输入命令行,将主机名改为oracledb :第三步:第三步:修改网络连接方式这一步是必须要做的!因为在安装centOS (网络连接选的是桥接,不要选择NAT ,否则外网无法访问你的虚拟机)的时候我们都是动态获取IP ,但是在安装Oracle 的时候是需要更改的,我们必须要使用静态IP ,可以这样理解,装上Ora cle 数据库,你的虚拟机就是提供数据访问的服务器了,IP 就像你的身份证,如果你的每次都变换身份,谁能找得到你!知道了为什么,那么就要就行修改配置了:1.修改网卡配置:在终端输入命令行:ifconfig 可以查看网卡信息,其中inetaddr 是IP 地址的意思。
Linux系统(X64)安装Oracle11g完整安装图文教程另附基本操作

Linux系统(X64)安装Oracle11g完整安装图⽂教程另附基本操作⼀、修改操作系统核⼼参数在Root⽤户下执⾏以下步骤:1)修改⽤户的SHELL的限制,修改/etc/security/limits.conf⽂件输⼊命令:vi /etc/security/limits.conf,按i键进⼊编辑模式,将下列内容加⼊该⽂件。
oracle soft nproc 2047oracle hard nproc 16384oracle soft nofile 1024oracle hard nofile 65536编辑完成后按Esc键,输⼊“:wq”存盘退出2)修改/etc/pam.d/login ⽂件,输⼊命令:vi /etc/pam.d/login,按i键进⼊编辑模式,将下列内容加⼊该⽂件。
session required /lib/security/pam_limits.sosession required pam_limits.so编辑完成后按Esc键,输⼊“:wq”存盘退出3)修改linux内核,修改/etc/sysctl.conf⽂件,输⼊命令: vi /etc/sysctl.conf ,按i键进⼊编辑模式,将下列内容加⼊该⽂件fs.file-max = 6815744fs.aio-max-nr = 1048576kernel.shmall = 2097152kernel.shmmax = 2147483648kernel.shmmni = 4096kernel.sem = 250 32000 100 128net.ipv4.ip_local_port_range = 9000 65500net.core.rmem_default = 4194304net.core.rmem_max = 4194304net.core.wmem_default = 262144net.core.wmem_max = 1048576编辑完成后按Esc键,输⼊“:wq”存盘退出4)要使 /etc/sysctl.conf 更改⽴即⽣效,执⾏以下命令。
CentOS6.5下Oracle11G完整安装步骤

CentOS6.5下Oracle11g安装完整步骤一、硬件要求本部分内容命令,均以root用户执行。
1、内存建议内存应大于2G以上,1G可以运行,但比较吃力。
内存查看命令:[root@tsp-rls-dbserver /]# cat /proc/meminfo或[root@tsp-rls-dbserver /]# free -mtotal used free shared buffers cachedMem: 32062 1301 30760 0 40 552-/+ buffers/cache: 708 31354Swap: 16095 0 160952、交换分区交换分区大小,通常设为内存的1.5倍以上,也可以根据实际情况进行调整。
交换分区查看命令:[root@tsp-rls-dbserver /]# grep SwapTotal /proc/meminfoSwapTotal: 67682296 kB3、硬盘空间建议数据使用独立的挂载分区,本文中采用/data作为数据分区。
要求/tmp目录空间不小于400M。
磁盘空间查看命令:[root@tsp-rls-dbserver /]# df -hFilesystem Size Used Avail Use% Mounted on/dev/mapper/vg_tsprlsdbserver-lv_root 50G 4.3G 43G 10% /tmpfs 16G 348K 16G 1% /dev/shm/dev/sda1 485M 39M 421M 9% /boot/dev/mapper/vg_tsprlsdbserver-lv_home 210G 190M 199G 1% /home/dev/sdb1 1.1T 4.5G 1.1T 1% /data目录空间大小查看命令:[root@tsp-rls-dbserver tmp]# du -ch /tmp二、软件要求1、安装依赖包建议安装系统时,选择开发库。
Oracle 11gR2安装图解
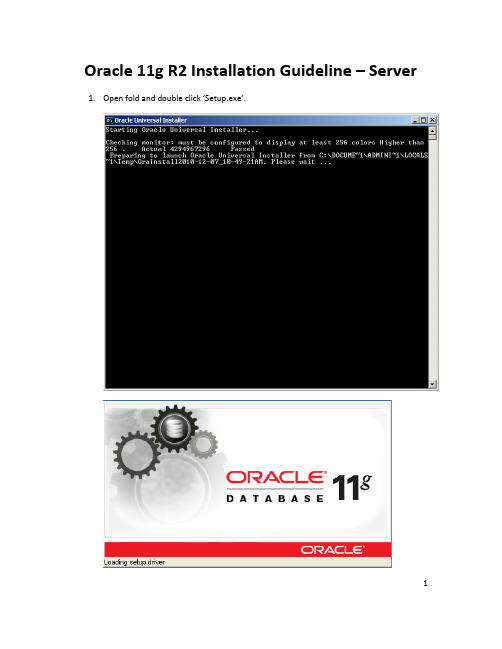
Oracle 11g R2 Installation Guideline – Server 1.Open fold and double click ‘Setup.exe’.122. Uncheck the checkbox and click ‘Next ’button.33. Click ‘Yes ’button.4. Choose Install Database software only, then click ‘Next ’button.45.Choose Single instance database installation.6. Choose the language you want to install and make sure the language which you choseare in the list at right side, then click ‘Next ’button.57. Choose Enterprise Edition and click ‘Next ’button.68. Check the options and click ‘Finish ’button, wait for install process finished.9. Click ‘Close ’ button. (Congratulations! You ’ve done this part!)7Oracle 11g R2 Guideline – Create Database1.Go to Start -> All programs -> Oracle Server -> Configuration and Migration Tools2.Click Database Configuration Assistant83. Click ‘Next ’button.4. Choose Create a Database and click ‘Next ’button.95. Choose Custom Database and click ‘Next ’button.6.Input Global Database Name.107. Click ‘Next ’button.8.Uncheck the checkbox before Configure Enterprise Manager.1110. Click the radio button before Use the same Administrative Password for All Accountsand input password.1212. Click ‘Yes ’button.1314. Click ‘Next ’button.1416. Click ‘Next ’button.1518. Click ‘Finish ’button to create a database.19.Click ‘OK’button and wait for the process finish.20.Click Exit button.1617Oracle 11g R2 Installation Guideline – Client1. Double Click ‘setup.ext ’.182. Choose ‘Administrator ’ and click ‘Next ’button.3. Choose the language you want to install and make sure the language which you choseare in the list at right side, then click ‘Next ’button.194. Change the path and click ‘Next ’button.205. Check options and click ‘Finish ’button, wait for the process finished.6. Click ‘Close ’ button. (Congratulations again!)21Oracle 11g R2 Guideline – Server Configuration1. Got to Server machine, and choose Start -> All Programs -> Oracle Server ->Configuration and Migration Tools2.Choose ‘Listener configuration’ and click ‘Next’button.3.Choose Add and click ‘Next’224.Input name of listener and click ‘Next’button. (we always set it as default.)5.Click ‘Next’236.Choose default port and click ‘Next’button.7.Choose No and click ‘Next’2425Oracle 11g R2 Guideline – Client Configuration1. Go to Client machine and choose Start -> All Programs -> Oracle Client -> Configurationand Migration Tools2.Click Net Configuration Assistant.3.Choose ‘Listener configuration’ and click ‘Next’button.4.Choose Add and click ‘Next’265.Input name of listener and click ‘Next’button. (we always set it as default.)6.Click ‘Next’277.Choose default port and click ‘Next’button.8.Choose No and click ‘Next’289.Click ‘Next’button.10.Choose Local Net Service Name configuration and click ‘Next’2911.Choose Add and click ‘Next’button.12.3013.Click ‘Next’button.14.Choose TCP and click ‘Next’3115.Input Name or IP of server in Host Name textbox.16.Click ‘Next’3217.Choose ‘Yes, perform a test’ and click ‘Next’button.18.Click ‘Change Login’3319.Change the password to be the one you set yourself before, and click OK button.20.Click ‘Next’3422.Click ‘Next’button.353624. Click ‘Finish ’ button.25.Choose Start -> All Programs -> Administrator Tools26.Click Data Sources (ODBC). (If you need to configure 32bit ODBC, please go toC:\WINDOWS\SysWOW64 and click odbcad32.exe)Go to System DSN tab.27.3728.Click ‘Add…’button.29.Choose the client installed just now and click ‘Finish’3830.Input Data Source Name. (anything you want)31.Choose the Service Name which you created just now. (I used ‘EX’394032. Input ‘system ’ in User ID textbox and click ‘Test Connection ’button.33. Input Password which you created and click ‘OK ’button.34. Click ‘OK ’button.35.Click ‘OK’button.41。
oracle安装配置教程

oracle安装配置教程新中大Oracle数据库安装配置教程本教程旨在提供一个通用的简洁明了的安装教程,有经验的读者可根据自己的实际需要进行相关调整。
本教程所使用数据库版本为Oracle11G,安装步骤可能与读者所使用的安装程序有所不同,请读者根据自己的安装程序进行调整。
重要内容已用红色进行标注。
因为排版原因可能导致图片略小,若读者想要看清图片,可以放大页面查看。
1Oracle数据库服务端安装: (2)2服务端配置数据库监听程序 (4)3Oracle客户端安装程序(同时安装64位和32位客户端) (5) 4客户端配置TNSName (6)5PL/SQL Developer的基本使用 (7)6数据库表空间和用户的建立以及用户的权限赋予脚本 (9)7数据库备份与恢复 (10)1Oracle数据库服务端安装:1.1点击下一步1.2选择创建和配置数据库,下一步1.3选择服务器类1.4选择单实例数据库1.5选择高级安装,下一步1.6根据需要选择语言1.7选择企业版1.8根据需要自行选择位置1.9选择一般用途/事务处理1.10根据自己的需求填写数据库信息一般Oracle服务标识符(SID)和全局数据库名都为orcl1.11字符集如图选择简体中文ZHS16GBK,其余选项按自己需求选择,下一步1.12选择使用Database Control管理数据库1.13按需求选择存储位置1.14不启用自动备份,下一步1.15根据需求填写口令1.16下一步(如果有不满足先决条件的在确认没有问题后点击忽略)1.17点击完成进行安装。
2服务端配置数据库监听程序配置监听程序可以使用Oracle提供的UI界面进行配置,也可以直接修改listener.ora,在此介绍如何使用Net Manager程序进行配置。
2.1打开数据库服务器上的Net Manager。
如图:2.2选中Oracle Net本地配置→本地→监听程序,点击左上角加号2.3根据实际需求输入监听程序名,点击确定2.4选中刚才添加的监听程序,点击添加地址2.5协议选择TCP/IP,主机选择127.0.0.1或者localhost,端口根据需要选择,默认端口为15212.6点击左上角文件→保存网络配置3Oracle客户端安装程序(同时安装64位和32位客户端)由于产品需求,在安装DBCNT的机子上需要安装32位和64位客户端。
- 1、下载文档前请自行甄别文档内容的完整性,平台不提供额外的编辑、内容补充、找答案等附加服务。
- 2、"仅部分预览"的文档,不可在线预览部分如存在完整性等问题,可反馈申请退款(可完整预览的文档不适用该条件!)。
- 3、如文档侵犯您的权益,请联系客服反馈,我们会尽快为您处理(人工客服工作时间:9:00-18:30)。
Oracle11g的安装图文教程(终结版)
本人在学习JAVA语言程序设计,刚学到Oracle数据库,为了方便学习,准备在我的windows7上安装一个,网上搜查了好多,写的也对,但就是对我们这种菜鸟,不太适用,下面我用图文介绍我这个菜鸟安装Oracle的过程,希望能帮到菜鸟们……
第一步,先到到Oracle管网下载安装包,我安装的是Oracle Database 11c ,要根据自己的多少位的系统来下载!
我自己电脑是64位系统,所以选择是64位的来下载。
第二步,两个文件下载下来以后,开始解压,解压完成后里面都有一个Database 文件夹,把win64_11gR2_database_2of2里面database的文件copy到win64_11gR2_database_1of2里面的database中,然后点击Setup.exe安装。
第三步,电子邮件,可以不添写MyOracleSupport口令可有可无,如
点击是即可。
下一步:
下一步:
这一步,可以给设置管理口令的密码,设置8位以内,简单易记,只供自己学习用。
设置完后下一步:
点击是即可。
这一步,点击右上角的的全部忽略。
然后下一步:
完成,就等待数据库文件的安装,安装结束就OK了,这时候我们要用sql developer的同学注意了,接下的我自己操作的图文继续看看。
第一步,点击开始菜单,找到Oracle 如图:
选择SQL Developer。
这时候弹出一个选择路径对话框,在里面找到Oracle里面的路径如图。
Java.exe;
然后进入SQL developer界面如图
这时候,我们自己要练习数据库,所以要连接数据库,从而输入一些命令等等。
连接名:这个随便,不重要
用户名:system Oracle里面的用户名,其它的也可以
口令:添你上面输入的“管理口令”
连接类型:选择TNS即可,然后如图:
这时候,注意网络别名:我上面安装的时候,选择的是myorcl,这里也应该和上面一样,选择myorcl,然后点击测试,OK!
如图:
这时候就可以练习命令了。
谢谢观看,第一次发图文写这个,希望能帮到你,写的不好,希望多多体谅。