Html、js图片轮播代码
HTML+CSS+JavaScript实现轮播图
HTML+CSS+JavaScript实现轮播图从mooc⽹站哔哩哔哩上学到的:视频BV号为BV16W41127aQ和BV1hW411y79J,up:红点⼯⼚HTML<div class="lunboContainer"><div class="lunboLeft"><!--轮播图向左移动--><img src="选择您的路径/icon-slides.png" id="leftImg"></div><div class="lunboRight"><!--轮播图向右移动--><img src="选择您的路径/icon-slides.png" id="rightImg"></div><ul id="imgList"><li class="item active"><img src="选择您的路径/1.jpg"></li><li class="item"><img src="选择您的路径/2.jpg"></li><li class="item"><img src="选择您的路径/3.jpg"></li><li class="item"><img src="选择您的路径/4.jpg"></li><li class="item"><img src="选择您的路径/5.jpg"></li></ul><ul id="pointList"><!-- 轮播图下⾯的⼩点点,点哪个点显⽰对应的图⽚--><li class="point active" data-index='0'></li><li class="point" data-index='1'></li><li class="point" data-index='2'></li><li class="point" data-index='3'></li><li class="point" data-index='4'></li></ul></div>CSS.lunboContainer{width:100%;height:400px;margin:0 auto;position:relative;}.lunboLeft{position:absolute;z-index:10;margin-left:0px;margin-top:130px;width:60px;height:100px;overflow:hidden;}.lunboLeft img{height:100px;margin-left:-120px;}.lunboRight{position:absolute;z-index:10;right:0px;margin-top:130px;width:60px;height:100px;overflow:hidden;}.lunboRight img{height:100px;margin-left:-180px;}#imgList{width:100%;height:400px;padding:0; /* padding 设置0 */margin:0; /* margin 设置0 */position:relative;}.item{position:absolute;width:100%;list-style-type: none;height:100%;float: left;opacity:0;transition:opacity 1s;}.lunboContainer ul img{width:100%;height:100%;.item.active{opacity:1;z-index:5;}#pointList{padding:0;list-style-type: none;position:absolute;right:20px;bottom:20px;z-index:10;}.point{width:8px;height:8px;border-radius:100%;background-color:rgb(10,10,10);float:left;z-index:10;margin-right:18px;border-style:solid;border-width:2px;border-color:white;cursor:pointer;}.point.active{background-color:rgba(255,255,255,0.6);}//为正在显⽰的点点设置特殊样式Javascriptvar index=0;var imgs=document.getElementsByClassName("item");//图⽚var leftImg=document.getElementById("leftImg");//向左var rightImg=document.getElementById('rightImg');//向右var points=document.getElementsByClassName("point");//⼩点点var timeOut=0;function clearActive(){for(var i=0;i<imgs.length;i++){imgs[i].className='item';points[i].className='point';}}function goNext(){clearActive();index++;index=index%imgs.length;imgs[index].className='item active';points[index].className='point active';timeOut=0;}function goPre(){clearActive();index--;if(index<0){index=imgs.length-1;}imgs[index].className='item active';points[index].className='point active';}/*当⿏标悬停在向左向右的图⽚上⽅时需要改变图⽚样式使⽤户得到相应的反馈,这⾥学习了⼩⽶商城主页轮播图的做法,只⽤⼀张图⽚,通过改变这张图⽚到边界的距离实现样式改变*/ function preHover(){leftImg.style.marginLeft="0px";}function nextHover(){rightImg.style.marginLeft="-60px";}function preHout(){leftImg.style.marginLeft="-120px";}function nextHout(){rightImg.style.marginLeft="-180px";}/*************************************************/function jmpByPoint(pointIndex){clearActive();index=pointIndex;imgs[index].className="item active";points[index].className='point active';timeOut=0;}for(var i=0;i<points.length;i++){points[i].addEventListener('click',function(){var pointIndex=this.getAttribute("data-index");jmpByPoint(pointIndex);}leftImg.addEventListener('click',function(){goPre();})leftImg.addEventListener('mouseover',function(){preHover();})leftImg.addEventListener('mouseout',function(){preHout();})rightImg.addEventListener('click',function(){goNext();})rightImg.addEventListener('mouseover',function(){nextHover();})rightImg.addEventListener('mouseout',function(){nextHout();})setInterval(function(){timeOut++;if(timeOut==10){goNext();timeOut=0;}},500)/*此⽅法使得timeOut参数每隔0.5(500ms)秒加⼀,当timeOut加到10时(即5秒)显⽰下⼀张图⽚,同时timeOut清零,使⽤timeOut参数⽽不直接使⽤setInterval(fun(),5000)函数定时的⽬的在于:假设当⽤户点击点点跳到某张图⽚时,距离到达5000毫秒只剩⼀丝丝时间,那张图⽚就马上跳⾛了,⽽⽤户可能还没来得及看清除图⽚,使⽤timeOut定时后,当⽤户通过点跳转之后,将timeOut参数清零,可实现重新计时,就不会马上跳⾛,见function jmpByPoint(pointIndex);*/。
带左右箭头图片轮播的JS代码
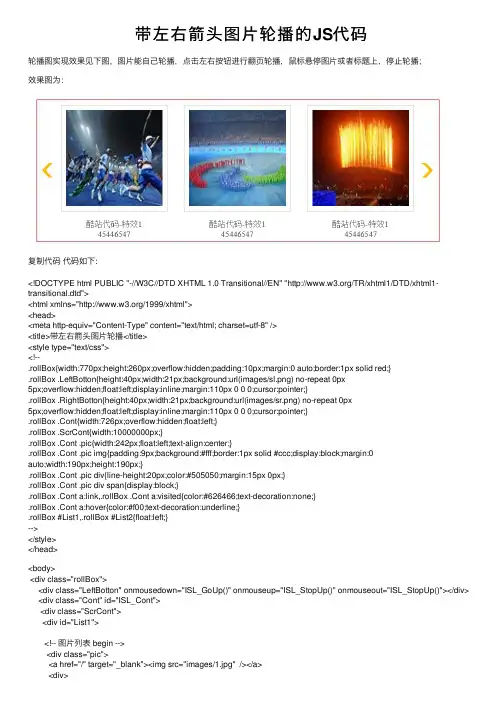
带左右箭头图⽚轮播的JS代码轮播图实现效果见下图,图⽚能⾃⼰轮播,点击左右按钮进⾏翻页轮播,⿏标悬停图⽚或者标题上,停⽌轮播;效果图为:复制代码代码如下:<!DOCTYPE html PUBLIC "-//W3C//DTD XHTML 1.0 Transitional//EN" "/TR/xhtml1/DTD/xhtml1-transitional.dtd"><html xmlns="/1999/xhtml"><head><meta http-equiv="Content-Type" content="text/html; charset=utf-8" /><title>带左右箭头图⽚轮播</title><style type="text/css"><!--.rollBox{width:770px;height:260px;overflow:hidden;padding:10px;margin:0 auto;border:1px solid red;}.rollBox .LeftBotton{height:40px;width:21px;background:url(images/sl.png) no-repeat 0px5px;overflow:hidden;float:left;display:inline;margin:110px 0 0 0;cursor:pointer;}.rollBox .RightBotton{height:40px;width:21px;background:url(images/sr.png) no-repeat 0px5px;overflow:hidden;float:left;display:inline;margin:110px 0 0 0;cursor:pointer;}.rollBox .Cont{width:726px;overflow:hidden;float:left;}.rollBox .ScrCont{width:10000000px;}.rollBox .Cont .pic{width:242px;float:left;text-align:center;}.rollBox .Cont .pic img{padding:9px;background:#fff;border:1px solid #ccc;display:block;margin:0auto;width:190px;height:190px;}.rollBox .Cont .pic div{line-height:20px;color:#505050;margin:15px 0px;}.rollBox .Cont .pic div span{display:block;}.rollBox .Cont a:link,.rollBox .Cont a:visited{color:#626466;text-decoration:none;}.rollBox .Cont a:hover{color:#f00;text-decoration:underline;}.rollBox #List1,.rollBox #List2{float:left;}--></style></head><body><div class="rollBox"><div class="LeftBotton" onmousedown="ISL_GoUp()" onmouseup="ISL_StopUp()" onmouseout="ISL_StopUp()"></div> <div class="Cont" id="ISL_Cont"><div class="ScrCont"><div id="List1"><!-- 图⽚列表 begin --><div class="pic"><a href="/" target="_blank"><img src="images/1.jpg" /></a><div><span><a href="https:///" target="_blank">酷站代码-特效1</a></span><span>45446547</span></div></div><div class="pic"><a href="/" target="_blank"><img src="images/2.jpg" /></a><div><span><a href="https:///" target="_blank">酷站代码-特效1</a></span><span>45446547</span></div></div><div class="pic"><a href="/" target="_blank"><img src="images/3.jpg" /></a><div><span><a href="https:///" target="_blank">酷站代码-特效1</a></span><span>45446547</span></div></div><div class="pic"><a href="/" target="_blank"><img src="images/4.jpg" /></a><div><span><a href="https:///" target="_blank">酷站代码-特效1</a></span><span>45446547</span></div></div><div class="pic"><a href="/" target="_blank"><img src="images/5.jpg" /></a><div><span><a href="https:///" target="_blank">酷站代码-特效1</a></span><span>45446547</span></div></div><div class="pic"><a href="/" target="_blank"><img src="images/6.jpg" /></a><div><span><a href="https:///" target="_blank">酷站代码-特效1</a></span><span>45446547</span></div></div><div class="pic"><a href="/" target="_blank"><img src="images/7.jpg" /></a><div><span><a href="https:///" target="_blank">酷站代码-特效1</a></span><span>45446547</span></div></div><div class="pic"><a href="/" target="_blank"><img src="images/8.jpg" /></a><div><span><a href="https:///" target="_blank">酷站代码-特效1</a></span><span>45446547</span></div></div><!-- 图⽚列表 end --></div><div id="List2"></div></div></div><div class="RightBotton" onmousedown="ISL_GoDown()" onmouseup="ISL_StopDown()" onmouseout="ISL_StopDown()"></div></div></body><script language="javascript" type="text/javascript"><!--//--><![CDATA[//><!--//图⽚滚动列表 var Speed = 1; //速度(毫秒)var Space = 5; //每次移动(px)var PageWidth = 726; //翻页宽度var fill = 0; //整体移位var MoveLock = false;var MoveTimeObj;var Comp = 0;var AutoPlayObj = null;GetObj("List2").innerHTML = GetObj("List1").innerHTML;GetObj('ISL_Cont').scrollLeft = fill;GetObj("ISL_Cont").onmouseover = function(){clearInterval(AutoPlayObj);}GetObj("ISL_Cont").onmouseout = function(){AutoPlay();}AutoPlay();function GetObj(objName){if(document.getElementById){return eval('document.getElementById("'+objName+'")')}else{return eval('document.all.'+objName)}}function AutoPlay(){ //⾃动滚动clearInterval(AutoPlayObj);AutoPlayObj = setInterval('ISL_GoDown();ISL_StopDown();',3000); //间隔时间}function ISL_GoUp(){ //上翻开始if(MoveLock) return;clearInterval(AutoPlayObj);MoveLock = true;MoveTimeObj = setInterval('ISL_ScrUp();',Speed);}function ISL_StopUp(){ //上翻停⽌clearInterval(MoveTimeObj);if(GetObj('ISL_Cont').scrollLeft % PageWidth - fill != 0){Comp = fill - (GetObj('ISL_Cont').scrollLeft % PageWidth);CompScr();}else{MoveLock = false;}AutoPlay();}function ISL_ScrUp(){ //上翻动作if(GetObj('ISL_Cont').scrollLeft <= 0){GetObj('ISL_Cont').scrollLeft = GetObj('ISL_Cont').scrollLeft +GetObj('List1').offsetWidth}GetObj('ISL_Cont').scrollLeft -= Space ;}function ISL_GoDown(){ //下翻clearInterval(MoveTimeObj);if(MoveLock) return;clearInterval(AutoPlayObj);MoveLock = true;ISL_ScrDown();MoveTimeObj = setInterval('ISL_ScrDown()',Speed);}function ISL_StopDown(){ //下翻停⽌clearInterval(MoveTimeObj);if(GetObj('ISL_Cont').scrollLeft % PageWidth - fill != 0 ){Comp = PageWidth - GetObj('ISL_Cont').scrollLeft % PageWidth + fill;CompScr();}else{MoveLock = false;}AutoPlay();}function ISL_ScrDown(){ //下翻动作if(GetObj('ISL_Cont').scrollLeft >= GetObj('List1').scrollWidth){GetObj('ISL_Cont').scrollLeft = GetObj('ISL_Cont').scrollLeft -GetObj('List1').scrollWidth;}GetObj('ISL_Cont').scrollLeft += Space ;}function CompScr(){var num;if(Comp == 0){MoveLock = false;return;}if(Comp < 0){ //上翻if(Comp < -Space){Comp += Space;num = Space;}else{num = -Comp;Comp = 0;}GetObj('ISL_Cont').scrollLeft -= num;setTimeout('CompScr()',Speed);}else{ //下翻if(Comp > Space){Comp -= Space;num = Space;}else{num = Comp;Comp = 0;}GetObj('ISL_Cont').scrollLeft += num;setTimeout('CompScr()',Speed);}}//--><!]]></script></html>。
前端开发技术之图片轮播效果实现
前端开发技术之图片轮播效果实现随着网页设计的重要性不断增加,用户对于页面的视觉体验要求也越来越高。
作为前端开发人员,我们常常需要通过各种方式来提升页面的吸引力。
其中,图片轮播效果是非常常见而且实用的一种手段。
本文将介绍几种常见的图片轮播效果实现方式。
一、基本的自动轮播效果自动轮播效果是最常见的一种图片轮播方式。
通过自动切换图片,可以展示多张图片内容,给用户提供更多的信息。
在实现自动轮播效果时,常常使用JavaScript和CSS来完成。
1. HTML结构首先,我们需要创建一个容器来显示图片内容。
在HTML代码中,可以使用`<div>`元素作为容器,并设置一个唯一的ID,如"slider"。
在容器内部,可以使用`<img>`元素来插入图片,并使用CSS来设置图片的样式。
```<div id="slider"><img src="image1.jpg" alt="Image 1"><img src="image2.jpg" alt="Image 2"><img src="image3.jpg" alt="Image 3"></div>```2. CSS样式接下来,我们需要通过CSS来设置容器和图片的样式。
首先,我们可以设置容器的宽度和高度,并设置`overflow: hidden`来隐藏超出容器的部分。
然后,可以设置每个图片的宽度和高度,并使用`position: absolute`将它们叠加在一起。
最后,我们可以通过设置`left`和`top`属性,将图片按需求进行定位。
```#slider {width: 500px;height: 300px;overflow: hidden;position: relative;}#slider img {width: 100%;height: 100%;position: absolute;left: 0;top: 0;transition: opacity 1s;}```3. JavaScript代码最后,我们需要使用JavaScript来实现图片的切换效果。
用javaScript实现轮播图效果包括自动变换,按钮控制,上一张下一张切换
⽤javaScript实现轮播图效果包括⾃动变换,按钮控制,上⼀张下⼀张切换javaScript实现轮播图效果(逆战总结)1.HTML代码<div id="wrap"><img src="images/1.jpg" alt="" class="on"><img src="images/2.jpg" alt=""><img src="images/3.jpg" alt=""><img src="images/4.jpg" alt=""><div class="btn"><span class="active"></span><span></span><span></span><span></span></div><i class="left" id="prev"></i><i class="right" id="next"></i></div>2.css代码#wrap{position: relative;width:590px;height: 470px;}#wrap img{position: absolute;top: 0;left: 0;/*display: none;*/opacity: 0;}#wrap .on{/*display: block;*/transition: 2s;opacity: 1;}.btn {position: absolute;bottom: 20px;left: 50%;margin-left: -44px;}.btn span{float: left;width: 8px;height: 8px;border:2px solid rgba(255,255,255,0.4);border-radius: 5px;margin-right: 10px;}.btn .active{background: white;cursor: pointer;}.left,.right{display: block;width: 37px;height: 53px;position: absolute;top: 50%;margin-top: -27px;cursor: pointer;}.left{background: url("images/arrow.png") left top;}.right{background: url("images/arrow.png") left -53px;right: 0;}3.js代码window.onload = function () {var oWrap = document.getElementById('wrap');var aImg = oWrap.getElementsByTagName('img');var aBtn = oWrap.getElementsByTagName('span');var oPrev = document.getElementById('prev');var oNext = document.getElementById('next');var iNow =0;function tab(){for (var i =0;i<aBtn.length;i++){//清空所有按钮选中样式以及图⽚显⽰样式aBtn[i].className='';aImg[i].className='';}aBtn[iNow].className='active';//设置当前按钮选中样式以及当前图⽚透明度aImg[iNow].className='on';}setInterval( function () {//每两秒循环变换下⼀张图⽚iNow++;if (iNow==aBtn.length)iNow=0;tab();},2000);for (var i =0;i<aBtn.length;i++){aBtn[i].index=i;//为按钮添加⾃定义属性(索引)⽬的是使图⽚和按钮相对应//按钮aBtn[i].οnmοuseοver= function () {iNow=this.index; //是按钮所控制显⽰的图⽚与左右箭头控制显⽰的图⽚相对应tab();}//下⼀个箭头oNext.onclick = function () {iNow++;if (iNow==aImg.length)iNow=0;tab();}//上⼀个箭头oPrev.onclick = function () {iNow--;if (iNow==-1)iNow=aImg.length-1;tab();}}}。
html图片轮播代码

<div style="position:relative; top:-50px; left:240px;">
<a href="javascript:show(1)"><span id="I1" style="width:18px; text-align:left; background:gray">1</span></a>
else
{document.getElementById('pic'+i).style.display='none'; document.getElementById('I'+i).style.backgroundColor='gray'axIndex)
}
for(var i=1;i<(maxIndex+1);i++){
if(i==nowIndex)
{document.getElementById('pic'+nowIndex).style.display=''; document.getElementById('I'+nowIndex).style.backgroundColor='red';}
<table cellpadding="0" cellspacing="0" border="0">
<tr><td id="butong_net_left1" valign="top" align="center">
js轮播图代码分享_
js轮播图代码分享_大家喜爱的js轮播图片效果,分享给大家。
一、要点:1.页面加载时,图片重合,叠在一起[肯定定位];2.第一张显示,其它隐蔽;3.设置下标,给下标设置颜色让它随图片移动;4.鼠标移动到图片上去,显示左右移动图标,鼠标移走,连续轮播;二、实现代码:html代码:!DOCTYPE htmlhtml xmlns="l"headmeta http-equiv="Content-Type" content="text/html; charset=utf-8"/title轮播图/titlelink href="css/LunBimg.css" rel="stylesheet" /script src="js/jquery-1.10.2.min.js"/scriptscript src="js/LunBimg.js"/script/headbodydiv id="allswapImg"div class="swapImg"img src="image/1.jpg" //div div class="swapImg"img src="image/2.jpg" //div div class="swapImg"img src="image/3.jpg" //div div class="swapImg"img src="image/4.jpg" //div div class="swapImg"img src="image/5.jpg" //div div class="swapImg"img src="image/6.jpg" //div /divdiv class="btn btnLeft"/divdiv class="btn btnRight"/divdiv id="tabs"div class="tab bg"1/divdiv class="tab"2/divdiv class="tab"3/divdiv class="tab"4/divdiv class="tab"5/divdiv class="tab"6/div/div/body/htmlcss代码:* {padding:0px;margin:0px;}.swapImg {position:absolute;}.btn {position:absolute;height:90px;width:60px;background:rgba(0,0,0,0.5);/*设置背景颜色为黑色,透亮度为50%*/color:#ffffff;text-align:center;line-height:90px;font-size:40px;top:155px;/*图片高度400/2-45*/cursor:pointer;/*display:none;*/}.btnRight {left:840px;/*图片宽度900-导航宽度60*/}#tabs {position:absolute; top:370px;margin-left:350px; }.tab {height:20px;width:20px;background:#05e9e2; line-height:20px; text-align:center; font-size:10px;float:left;color:#ffffff;margin-right:10px; border-radius:100%; cursor:pointer;}.bg {background:#00ff21; }js代码:/// reference path="_references.js" /var i = 0;//全局变量//定义一个变量用来猎取轮播的过程var time;$(function (){//1.页面加载后,找到Class等于swapImg的第一个对象,让它显示,它的兄弟元素隐蔽$(".swapImg").eq(0).show().siblings().hide();showTime();//当鼠标放到下标上显示该图片,鼠标移走连续轮播$(".tab").hover(function (){//猎取到当前鼠标所在的下标的索引i = $(this).index();show();//鼠标放上去之后,怎么停止呢?猎取到变量的过程,清除轮播,把变量传进去clearInterval(time);}, function (){showTime();});//要求四,当我点击左右切换$(".btnLeft").click(function (){//1.点击之前要停止轮播clearInterval(time);//点了之后,-1if (i == 0){i =6;}i--;show();showTime();});$(".btnRight").click(function () { //1.点击之前要停止轮播clearInterval(time);//点了之后,-1if (i == 5) {i = -1;}i++;show();showTime();});});function show() {//$("#allswapImg").hover(function ()//{// $(".btn").show();//}, function ()//{// $(".btn").hide();//});//fadeIn(300)淡入,fadeout(300)淡出,过滤时间0.3s$(".swapImg").eq(i).fadeIn(300).siblings().fadeOut( );$(".tab").eq(i).addClass("bg").siblings().removeClass("bg");}function showTime(){time = setInterval(function () {i++;if (i == 6) {//只有6张图片,所以i不能超过6,假如i等于6时,我们就让它等于第一张i = 0;}show();}, 3000);}以上就是本文的全部内容,盼望对大家的学习有所关心...。
最简单的JavaScript图片轮播代码(两种方法)
最简单的JavaScript图片轮播代码(两种方法)通过改变每个图片的opacity属性:素材图片:代码一:最简单的轮播广告代码二:第二步,布局好一个DIV,如:上一张下一张第三步,就到了写CSS的时候了.下面的CSS懂基础的人都看得懂.#croll{width:100%;height:180p;background-color:white;poition:relative;border-bottom:1polidgray;}、、这里是给整个大的DIV设定属性.#crollul{height:180p;lit-tyle:none;}、、DIV下的UL属性.#crollulli{width:100%;height:180p;margin:0p;padding:0p;dipla y:none;}、、DIV下的UL下的LI属性.注意:diplay:none;因为要将所有的li隐藏了先.当点击的时候在显示出来.。
ubl{poition:abolute;bottom:20p;left:40%;width:80p;height:20p;lin e-height:20p;tet-align:center;font-ize:16p;font-weight:bold;curor:pointer;}、、上一张按钮的属性.注意一个绝对定位.。
ubr{poition:abolute;bottom:20p;right:40%;width:80p;height:20p;line-height:20p;tet-align:center;font-ize:16p;font-weight:bold;curor:pointer;}、、下一张按钮的属性.注意一个绝对定位.。
ubr:hover{background:yellow;border-radiu:10p;}。
ubl:hover{background:yellow;border-radiu:10p;}、、以上两个hover是鼠标经过的效果.第四步,就是jquery代码了!也很简单.先将代码看一遍,你就会用了!四步轻松搞定一个简单的轮!。
两种方法实现显示多张图片的轮播
两种⽅法实现显⽰多张图⽚的轮播两种⽅法实现显⽰多张图⽚的轮播第⼀种:jQuery ⽅法.animate + 浮动排列布局1 <!DOCTYPE html>2 <html>3 <head>4 <meta charset="utf-8" />5 <title>显⽰多张图⽚的轮播</title>6 <style type="text/css">7 html,body{8 padding:0;9 margin:10px auto;10 }11 #warpper{12 width:1120px;/*⼀列展⽰⼏个的宽度 ,4*280 动态算*/13 height:150px;14 margin:0 auto;15 position:relative;16 overflow:hidden;17 border:1px solid red;18 }19 #inner{20/*元素个数*280(div宽度) 动态算 1120px[4个元素] 1440px[5个元素] 1680px[6个元素] 2240px[8个元素]21⽤JS动态设置改值22*/23 width:2520px;24 position:absolute;25 }26 #inner div{27 width:270px;28 height:150px;29/*使⽤浮动元素排列*/30float:left;31 margin:0 5px;32 }33 #optrbtn{34 text-align:center;35 font-size:20px;36 }37 #optrbtn span {38 display:inline-table;39 border:1px solid red;40 width:50px;41 cursor:pointer;42 margin-right:5px;43 }44 #inner div img{45 width: 100%;46 height: 100%;47 }48 </style>4950 <script type="text/javascript" src="../js/jquery-3.4.1.min.js"></script>51 <script type="text/javascript">5253 $(function(){5455var curNum=0;56var count=$("#inner").children('div').length;//85758//左滑动59 $(".btnleft").click(function(){60//如果到了最后⼀个元素,停⽌61if((count-curNum)<=4){62return false;63 }64 curNum+=1;65 $("#inner").animate({66// 每次点击都从左边裁剪280像素67 left:'-=280'68 },500);69 });7071//右滑动72 $(".btnright").click(function(){73//如果到了第⼀个元素,停⽌74if(curNum<=0){75return false;76 }77 curNum-=1;78 $("#inner").animate({79// 每次点击都从左边补充280像素80 left:'+=280'81 },500);82 });83 });8485 </script>86 </head>8788 <body>8990 <div id="main">91 <div id="warpper">92 <div id="inner">93 <div><img src="../img/sucai/full1.jpg"/></div>94 <div><img src="../img/sucai/full2.jpg"/></div>95 <div><img src="../img/sucai/full3.jpg"/></div>96 <div><img src="../img/sucai/full4.jpg"/></div>97 <div><img src="../img/sucai/full5.jpg"/></div>98 <div><img src="../img/sucai/full6.jpg"/></div>99 <div><img src="../img/sucai/full7.jpg"/></div>100 <div><img src="../img/sucai/full8.jpg"/></div>101 <div><img src="../img/sucai/full9.jpg"/></div>102 </div>103 </div>104 </div>105106 <br />107 <br />108109 <div id="optrbtn">110 <span class="btnleft">«</span>111 <span class="btnright">»</span>112 </div>113114 </body>115 </html>第⼆种:负边距 + flex排列布局1 <!DOCTYPE html>2 <html lang="en">3 <head>4 <meta charset="UTF-8">5 <title>显⽰多张图⽚的轮播</title>6 <style type="text/css" rel="stylesheet">7 *{8 margin: 0;9 padding: 0;10 }11 #main{12 width: 100%;13 height: 125px;14 display: flex;15 margin-top: 120px;16 }17 #d1{18 width: 1162px;19 height: 125px;20 display: flex;21 overflow:hidden;22 }23 #d11{24 width: 64px;25 height: 125px;26 line-height: 125px;27 text-align: center;28 font-size: 28px;29 cursor: pointer;30 z-index: 2;31 background: #FFFFFF;32 }33 #d13{34 width: 64px;35 height: 125px;36 line-height: 125px;37 text-align: center;38 font-size: 28px;39 cursor: pointer;40 z-index: 2;41 background: #FFFFFF;42 }43 #d12{44/*元素个数*207(div宽度) 动态算 828px[4个元素] 1035px[5个元素] 1242px[6个元素] 2070px[10个元素] 45⽤JS动态设置改值46*/47/*先预设⾜够放10张图⽚的宽度*/48 width: 2070px;49 height: 125px;50/*使⽤弹性布局排列*/51 display: flex;52 transition:all 0.3s linear 0s;53/*再将多出来的5张图⽚的宽度⽤负边距隐藏起来*/54 margin-right: -1035px;55 }56 #d12 .d120{57 width: 207px;58 height: 125px;59 z-index: 1;60 }61 .ddd{62 width: 170px;63 height: 80px;64 margin-left: 18px;65 margin-top: 23px;66 }67 .ddd img{68 width: 100%;69 height: 100%;70 }71 </style>72 </head>73 <body>7475 <div id="main">76 <div style="width: 102px;height:125px;background: #FFFFFF;z-index: 3;"></div>77 <div id="d1">78 <div id="d11">《</div>79 <div id="d12">80 <div class="d121 d120"><div class="ddd"><img src="../img/sucai/full1.jpg"></div></div>81 <div class="d122 d120"><div class="ddd"><img src="../img/sucai/full2.jpg"></div></div>82 <div class="d121 d120"><div class="ddd"><img src="../img/sucai/full3.jpg"></div></div>83 <div class="d122 d120"><div class="ddd"><img src="../img/sucai/full4.jpg"></div></div>84 <div class="d121 d120"><div class="ddd"><img src="../img/sucai/full5.jpg"></div></div>85 <div class="d122 d120"><div class="ddd"><img src="../img/sucai/full6.jpg"></div></div>86 <div class="d121 d120"><div class="ddd"><img src="../img/sucai/full7.jpg"></div></div>87 <div class="d122 d120"><div class="ddd"><img src="../img/sucai/full8.jpg"></div></div>88 <div class="d121 d120"><div class="ddd"><img src="../img/sucai/full9.jpg"></div></div>89 <div class="d122 d120"><div class="ddd"><img src="../img/sucai/full1.jpg"></div></div>90 </div>91 <div id="d13">》</div>92 </div>93 <div style="width: 102px;height:125px;background: #FFFFFF;z-index: 3;"></div>94 </div>9596 </body>97 <script type="text/javascript">9899 let $ = function(id){100return document.getElementById(id);101 };102103//移动的宽度104var moveLength = 0;105106// 右移107 $("d13").addEventListener("click",function () {108 moveLength +=207;109// 判断移动的宽度有没有超出5张图⽚的宽度,如果超出,则减掉⼀张图⽚的宽度110if (moveLength<=1035){111 $("d12").style = "transform:translateX(-"+moveLength+"px);"112 }else if(moveLength>1035){113 moveLength -= 207;114 }115 });116117// 定时器,每个3秒移动⼀次118 setInterval(function () {119 moveLength +=207;120if (moveLength<=1035){//是否移动到尽头121 $("d12").style = "transform:translateX(-"+moveLength+"px);"122 }else if(moveLength>1035){//是否移动到尽头123 moveLength -= 1242;124 $("d12").style = "transform:translateX(-"+moveLength+"px);"125 }126 },3000);127128// 左移129 $("d11").addEventListener("click",function () {130// ⾸先判断图⽚是不是移动过了,是否移到尽头,然后再做调整移动的宽度131if (moveLength===1035){//是否移到了尽头132 $("d12").style = "transform:translateX(-"+moveLength+"px);";133 moveLength -=207;134 $("d12").style = "transform:translateX(-"+moveLength+"px);";135 }else if(moveLength>0&&moveLength<1035){//是否在原点与尽头之间136 moveLength -=207;137 $("d12").style = "transform:translateX(-"+moveLength+"px);";138 }else if(moveLength===0){//是否回到原点139 moveLength -= 207;140 moveLength += 207;141 }142 })143144 </script>145 </html>其实⽅法并不⽌两种,这⾥只⽤两种简单的案例来实现⽽已,你也可以举⼀反三⽤多种⽅法实现。
使用html+js+css实现页面轮播图效果(实例讲解)
使⽤html+js+css实现页⾯轮播图效果(实例讲解)html 页⾯<html lang="en"><head><meta charset="UTF-8"><meta name="viewport" content="width=device-width, initial-scale=1.0"><meta http-equiv="X-UA-Compatible" content="ie=edge"><link rel="stylesheet" href="carousel.css" rel="external nofollow" ><title>轮播图效果</title></head><body><section id="main"><div id="picture"></div><!-- 添加图中按钮图⽚轮播在js中⼤致成型后再写最好--><div id="dot"><span></span><span></span><span></span><span></span><span></span></div><!-- 添加切换按钮 --><div id="an"><div class="left"><</div><div class="right">></div></div></section><script src="jquery.js"></script><script src="carousel.js"></script></body>css页⾯ carousel.css#main{width: 655px;height: 361px;position: relative;}#picture{width:100%;height: 100%;}#picture img{width:100%;height: 100%;display: none;}#picture img:nth-child(1){display: inline-block;}/* 设置圆点的样式 */#dot span{display: inline-block;width:25px;height: 25px;border-radius: 50%;background-color: gray;margin-left: 10px;opacity: 0.6}#dot{position: absolute;right: 40px;bottom: 30px;}/* 设置页⾯刚加载的圆点初始状态 1 第⼀个圆点放⼤1.2倍 2、颜⾊变成蓝⾊ */#dot :nth-of-type(1){transform: scale(1.2);background-color: blue;}.left ,.right{width: 40px;height: 40px;border-radius: 50%;font-size: 30px;color: white;position: absolute;bottom: calc((100% - 40px)/2);text-align: center;}.left{left: 15px;}.right{right: 15px;}.left:hover ,.right:hover{background-color: white;color:red;}js页⾯ carousel.jsfor(var i=1; i<6;i++){$('#picture').append("<img src='./../images/"+i+".jpg' >");}//给图⽚转化设置定时函数var index=0;var timer;function changeImageDot(){$('#picture img:nth-child('+(index+1)+')').css({display:'block',}).siblings().css({display:'none',});//设置随图⽚切换,对应的圆点样式发⽣变化// index+1 是因为索引是从0开始⽽ nth-child(i) 中的i是从1 开始的$('#dot span:nth-child('+(index+1)+')').css({transform: 'scale(1.2)','background-color': 'blue',}).siblings().css({transform: 'scale(1)','background-color':'gray',});}function produceTime(){timer=setInterval(function(){index++;if(index==5)index=0;changeImageDot();},2000);}produceTime();//⿏标悬浮在圆点上,圆点和图⽚的变化$('#dot span').mouseenter(function(){index=$(this).index();changeImageDot();clearInterval(timer);produceTime();});//缺点:点击切换按钮后,图⽚切换后,会⽴即切换到下⼀个图⽚,需要设置清除计时器后再新建⼀个计时器$('.left').click(function(){index--;if(index==-1)index=4;changeImageDot();clearInterval(timer);produceTime();});$('.right').click(function(){index++;if(index==5)index=0;changeImageDot();clearInterval(timer);produceTime();以上这篇使⽤html+js+css 实现页⾯轮播图效果(实例讲解)就是⼩编分享给⼤家的全部内容了,希望能给⼤家⼀个参考,也希望⼤家多多⽀持。
网页5张图片轮播代码
<!DOCTYPE html PUBLIC "-//W3C//DTD XHTML 1.0 Transitional//EN" "/TR/xhtml1/DTD/xhtml1-transitional.dtd"><html xmlns="/1999/xhtml"><head><title>pic player</title><script type="text/javascript" src="/jslib/jquery/jquery-1.2.6.js"></script> <script type="text/javascript" src="/jslib/jquery/tween.js"></script></head><style type="text/css">img{border:0;}</style><body><div id="picplayer" style="position:relative;overflow:hidden;width:300px;height:300px;clear:none;border:solid 1px #ccc;">there is a pic-player</div><script>var p = $('#picplayer');var pics1 = [{url:'/online/picPlayer/1.jpg',link:'',time:5000},{url: '/online/picPlayer/2.jpg',link:'',time:4000},{url:'http :///online/picPlayer/3.jpg',link:'',time:6000},{url:'http://im/online/picPlayer/2.jpg',link:'',time:6000},{url:'http://img.jb/online/picPlayer/1.jpg',link:'',time:6000}];initPicPlayer(pics1,p.css('width').split('px')[0],p.css('height').split('px')[0]);////function initPicPlayer(pics,w,h){//选中的图片var selectedItem;//选中的按钮var selectedBtn;//自动播放的idvar playID;//选中图片的索引var selectedIndex;//容器var p = $('#picplayer');p.text('');p.append('<div id="piccontent"></div>');var c = $('#piccontent');for(var i=0;i<pics.length;i++){//添加图片到容器中c.append('<a href="'+pics[i].link+'" target="_blank"><img id="picitem'+i+'" style="display: none;z-index:'+i+'" src="'+pics[i].url+'" /></a>');}//按钮容器,绝对定位在右下角p.append('<div id="picbtnHolder" style="position:absolute;top:'+(h-25)+'px;width:'+w+'px;height:20px;z-index:10000;"></div >');//var btnHolder = $('#picbtnHolder');btnHolder.append('<div id="picbtns" style="float:right; padding-right:1px;"></div>');var btns = $('#picbtns');//for(var i=0;i<pics.length;i++){//增加图片对应的按钮btns.append('<span id="picbtn'+i+'" style="cursor:pointer; border:solid 1px #ccc;background-color:#eee; display:inline-block;"> '+(i+1)+' </span> ');$('#picbtn'+i).data('index',i);$('#picbtn'+i).click(function(event){if(selectedItem.attr('src') == $('#picitem'+$(this).data('index')).attr('src')){return;}setSelectedItem($(this).data('index'));});}btns.append(' ');///setSelectedItem(0);//显示指定的图片indexfunction setSelectedItem(index){selectedIndex = index;clearInterval(playID);//alert(index);if(selectedItem)selectedItem.fadeOut('fast');selectedItem = $('#picitem'+index);selectedItem.fadeIn('slow');//if(selectedBtn){selectedBtn.css('backgroundColor','#eee'); selectedBtn.css('color','#000');}selectedBtn = $('#picbtn'+index); selectedBtn.css('backgroundColor','#000'); selectedBtn.css('color','#fff');//自动播放playID = setInterval(function(){var index = selectedIndex+1;if(index > pics.length-1)index=0; setSelectedItem(index);},pics[index].time);}}</script></body></html>黄色的地方修改显示大小和显示的图片如增加图片可以通过增加var pics1 后面的内容。
- 1、下载文档前请自行甄别文档内容的完整性,平台不提供额外的编辑、内容补充、找答案等附加服务。
- 2、"仅部分预览"的文档,不可在线预览部分如存在完整性等问题,可反馈申请退款(可完整预览的文档不适用该条件!)。
- 3、如文档侵犯您的权益,请联系客服反馈,我们会尽快为您处理(人工客服工作时间:9:00-18:30)。
Html、js图片轮播代码
现在基本上每个网站都有一个自动轮播的banner广告图,在没有任何按钮的情况下,图片在规定的时间内进行自动切换。
下面是html、js 图片轮播代码详情。
代码效果图实例:
第一秒:
第二秒:
第三秒:
详细代码如下:Html代码部分:
<body>
<ul class="banner">
<li><img src="images/1.jpg"></li>
<li><img src="images/2.jpg"></li>
<li><img src="images/3.jpg"></li>
</ul>
</body>
Css代码部分:
<style type="text/css">
ul,li{margin:0px;padding:0px}
li{list-style:none}
.banner{width:630px;height:250px;margin:100px auto;overflow:hidden;cursor:pointer} </style>
Javascript代码部分:
<script type="text/javascript"src="jquery.js"></script>
<script type="text/javascript">
$(function(){
var timer=setInterval(function(){
if($(".banner li:last").is(":hidden")){
$(".banner li:visible").addClass("on");
$(".banner li[class=on]").next().fadeIn("slow");
$(".banner li[class=on]").hide().removeClass("on");
}else{
$(".banner li:last").hide();
$(".banner li:first").fadeIn("slow");
}
},2000)
$(".banner li").hover(function(){
clearInterval(timer);
},function(){
timer=setInterval(function(){
if($(".banner li:last").is(":hidden")){
$(".banner li:visible").addClass("on");
$(".banner li[class=on]").next().fadeIn("slow");
$(".banner li[class=on]").hide().removeClass("on");
}else{
$(".banner li:last").hide();
$(".banner li:first").fadeIn("slow");
}
},2000)
})
})
</script>
【Jquery.js】是一个jquery库,只要百度一下搜索“jquery”下载这个文件就行。
以上效果中所用的图片可以根据自己的情况来进行替换,只要代码没问题,就肯定有效果的。
赵一鸣随笔博客中有更多的javascript效果写法的高清视频,搜索一下就能找到。
如果有兴趣,可以去大型网站看一下这种效果,特别是商城类网站,他们做的都很漂亮,例如聚美优品、淘宝、天猫都有,但是以上所写的代码是做这个效果最简单实用的,可以参考!。