outlook 2010 设置邮箱 outlook2010 设置网易邮箱 126 163 图片
MicrosoftOfficeOutlook2010里面怎么设置账户
MicrosoftOfficeOutlook2010里面怎么设置账户Microsoft Office Outlook 2010 里面怎么设置账户打开OUTLOOK,点击工具 - 电子邮件账户 - 新建电子邮件账户,然后选择你想用的协议。
这里以QQ的POP3为例:1、您的姓名:可以随便填一个2、电子邮件地址:你的邮箱地址,不能错3、用户名:也是可以随便填的4、密码:你的邮箱密码,不能错5、接收邮件服务器(POP3):请登陆你的服务器查找参数,一般是pop.qq.6、发送邮件服务器(SMTP):同上,一般是 *** tp.qq.以上填好后,请点右下方的其他设置 - 发送服务器,钩选我的发送服务器要求验证,点选使用与接收邮件服务器相同的设置,点确定,然后下一步,完成。
怎么设置Microsoft Outlook 的账户,我用的是QQ邮箱。
Outlook 是Office 里面的:m1.mail.qq./help/help_pop3.s这里就能帮助你.祝你成功!在Outlook 里面怎么账户属性设置?一:设置账户打开“Outlook”,点击继续点击子菜单“账户” ,进入:“工具” ,点击“添加” ,单击子菜单“邮件” ,进入:输入“显示名” ,点击“下一步” ,进入:输入“电子邮件地址” ,点击“下一步” ,进入:在两个空白处输入,点击“下一步” ,进入:你进koa 的密码输入“账户名”和你进 koa的密码,点击“下一步” ,点击“完成” 。
即完成了Outlook 里面账户的建立;二:设置属性回到一开始的画面,点击“属性” ,进入:在标记处打钩,1、打开outlook,点工具菜单选项。
2、在选项窗口中点邮件设置选项卡,点发送/接收按钮。
3、在新窗口的组“所有帐户”的设置里面,在安排自动发送/接收的时间间隔后,设置新的时间间隔,例如:设置为30分钟,那么只要在OUTLOOK打开的状态下,每隔30分钟OUTLOOK就会自动接收邮件;4、点关闭把窗口关闭。
Outlook 2010设置手册
Outlook 2010 Setup Guide (SmarshExchange)Versions Addressed: Microsoft Office Outlook 2010Document Updated: 6/17/2010Copyright © 2010 Smarsh, Inc. All rights reserved.Purpose: This document will assist the end user in configuringOutlook 2010 for accounts using the SmarshExchange serverenvironment.Outlook and Exchange are registered trademarks of MicrosoftCorporation. Other product names are trademarks or registeredtrademarks of their respective owners.Table of ContentsGetting Started 3 Exit Outlook 3 Open the Mail Control Panel Item 3 Edit Existing Profile 4Account Setup with Autodiscover 6 Finish Account Setup 8 Manual Account Setup 9 Enter Back-End Server Information 9 Enter Proxy Server Information 10 Creating a New Profile 13To set up Microsoft Outlook 2010 to access your email account, follow these instructions. You will need to know the following information before you get started:☐Your email address☐Your email passwordIt is not necessary to create a new Outlook profile to use with this account. However, if you have an existing account set up that you will no longer be using at all, or you’d simply like a fresh start, creating a new profile is easy to do.Whether you decide to create a new profile or not, follow these steps.Exit OutlookBegin by closing all Outlook windows (including email messages) and exiting out of Outlook. Outlook cannot be running during the setup process.Open the Mail Control Panel ItemClick on the Start button and open the Control Panel. If you haven’t already done so, switch to Classic View or view by icons, depending on your version of Windows:Windows XP Windows Vista Windows 7Look for an icon that says “Mail” (or “Mail (32-bit)” on 64-bit versions ofWindows 7).If you don’t see it, look for an icon labeled “View 32-bit Control Panel Items”(you’ll see this on 64-bit versions of Windows Vista), and open that.Open the Mail icon, then click Show Profiles:Edit Existing ProfileIf you would like to create a new profile, skip to the section titled “Creating a New Profile” on page 13. Otherwise, select your existing profile (if you have more than one) and click Properties.Click the “E-mail Accounts…” button.To add your new email account, click the “New…” button.Hopefully, your account is set up for automatic configuration. Simply enter your name, your email address, and your email password, then click Next.A message should pop up asking if you’d like to allow a website to configure your server settings. Check the box labeled “Don’t ask me about this website again”, and click Allow.You may be asked to enter your password again. Make sure your email address is entered correctly, type your password, and check the “Remember my credentials” box. Click OK.If automatic configuration is successful, you should get a confirmation screen that looks like this:If this works, click Finish and continue to the next page. Or, if automatic setup doesn’t work for some reason, don’t worry! J ump down to “Manual Account Setup” on page 9.Finish Account SetupIf you are adding your new account to an existing profile, you may receive this message. Just click OK.Click Close, then Close again.Click OK, and close out of the Control Panel. You are now readyto open Outlook.If the automatic setup doesn’t work for you, check the box at the bottom labeled “Manually configure server settings” and click Next.Then select “Microsoft Exchange” and click Next.Enter Back-End Server InformationEnter “” as the Microsoft Exchange server name, and make sure “Use Cached Exchange Mode” is checked. Enter your email address as the User Name, then click the “More Settings…” button.Enter Proxy Server InformationCl ick the Connection tab, then check the box labeled “Connect to Microsoft Exchange using HTTP” and click the “Exchange Proxy Settings…” button.Enter “” in the first box, and check the box labeled “On fast networks, connect using HTTP first, then connect using TCP/IP”. Click OK.Click OK again. If necessary, retype your email addr ess in the “User Name” field, then c lick the Check Name button.You should now be asked to authenticate. Enter your password, and check the “Remember my credentials” box. Click OK.If everything worked correctly, your email address should be replaced by your name, with an underline. Don’t worry if the Microsoft Exchange Server changes to something different than what you typed in; as long as your name is underlined, that’s OK. Click Next, then click Finish.Now, go back to the section on page 8 titled “Finish Account Setup.”To create a new profile, click “Add…” button and enter a name for the new profile. You can name the new profile anything you like, but you may want to call it “Smarsh” or “SmarshExchange” or the name of your company.You will now be prompted to add your new emailaccount. Follow the instructions for “Account Setup withAutod iscover” beginning on page 6.When you have created the new profile, make sure yournew profile is selected, or if you’d like to switch betweendifferent profiles, select “Prompt for a profile to be used.”Click OK, and close out of the Control Panel. You are nowready to open Outlook.。
Outlook2010邮件客户端操作说明
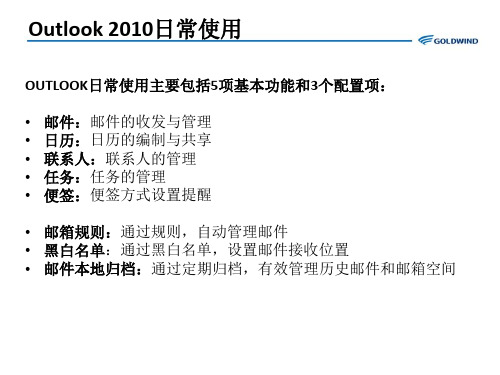
Outlook 2010日常使用-共享日历
除了编制日历,管理自己的工作时间。还可以将自己的日历共享给自己的同事,让别 人了解你的忙闲状态或工作内容:
Outlook 2010日常使用-共享日历
设置好共享人后发送即可:
Outlook 2010日常使用-共享日历
收件人收件箱中会收到共享日历的邮件,点击【打开此日历】:
邮件管理-删除邮件
选中要删除的邮件,点击【删除】。
邮件删除后,会进入【已 删除邮件】文件夹中:
邮件管理-删除邮件
在【已删除邮件】中,再次删除该邮件时,该邮件会被彻底删除。
确定永久删除:
Outlook 2010日常使用-编制日历
选择【日历】,在指定日期双击鼠标创建约会。
Outlook 2010日常使用-编制日历
建立归档文件:
Outlook 2010配置项-本地归档历史邮件
配置自动存档:
Outlook 2010配置项-本地归档历史邮件
配置自动存档规则:
1.勾选此项,并设置存档执行周期 2.不用勾选此项 4.勾选此项 3.不能勾选此项 5.勾选此项 6.配置归档多久前的邮件
7. 归档邮件存放位置
8.不能勾选此项
Outlook 2010日常使用-密送及延时邮件
• 密件抄送及延时传递:邮件编辑窗口-【选项】
Outlook 2010日常使用-邮件签名 • 邮件签名
Outlook 2010日常使用-标记和分类邮件
在日常工作中,收到邮件时,可能会在将来某个时间再去处理,为了避免到时候 忘记或不方便查找,我们可以对邮件进行分类和标记,指定一项任务与该邮件进 行对应,来提醒自己。 右键点击邮件右侧的图标 ,来标记邮件,选择将来处理的日期或提醒。
Outlook 2010 时添加电子邮件帐户
5.若要确认删除该帐户,请单击“是”。
若要将电子邮件帐户从另一个配置文件中删除,请退出 Outlook,并使用另一个配置文件重新启动 Outlook,然后按照上述步骤操作。还可通过执行以下操作将帐户从其他配置文件中删除:
1.退出 Outlook。
To exit the Add New Account dialog box, click Finish.
If your e-mail account cannot be automatically configured, you are prompted to configure it manually. For more information, see Add an e-mail account by using advanced settings.
Top of Page
Add an e-mail account in Outlook
Click the File tab.
On the Info tab, under Account Information, click Account Settings.
Click Add Account.
注释 除非已安装了 Outlook 且至少访问过一次,否则“控制面板”中的“邮件”图标不会显示。
找到“邮件”的最简单方法是在 Windows 中打开“控制面板”,然后在窗口顶部的“搜索”框中键入“邮件”。在 Windows XP 的“控制面板”中的“地址”框中键入“邮件”。
【自动账户设置-手动配置服务器设置或其他服务器类型】
如果使用的是 Exchange 帐户,除非将数据移动到 Outlook 数据文件 (.pst) 中,否则数据会一直保留在邮件服务器上。
Outlook使用方法-2010版本 - 副本

C:\Users\Administrator\Documents\Outlook 文件 \yourname@******.com.pst。
时间一久,C盘就会没有空间。想备份,但路径很长,不容易, 那么就更改一下数据库的路径,装到非C盘,那么既节约了C盘
Outlook使用方法——会议通知及邀请
选取提醒时间。 点 计划 查看会议室资源的使用情况。 若会议室资源此时为忙,则需根据现实要另外选取时间进行。 若成员时间为忙,则需根据现实要另外选取时间进行。
查找到“联系人备份”,点 打开。
Outlook使用方法——添加联系人
如上图,下一步。
Outlook使用方法——添加联系人
如上图选择联系人(其他不用改),完成。
Outlook使用方法——添加联系人
联系人添加完毕。再点 通讯簿,发现已经有联系人了。
变更数据库路径
Outlook使用方法——变更数据库路径
选择刚建立的数据库,点 设为默认值。
Outlook使用方法——变更数据库路径
在出现的警告信息中点确定。
Outlook使用方法——变更数据库路径
点关闭。
Outlook使用方法——变更数据库路径
发现左边栏的文件都不可用。此时需要关闭outlook,重新运行。
Outlook使用方法——变更数据库路径
空间,也方便日后备份查找。
Outlook使用方法——变更数据库路径
点 文件——信息——帐户设置。
Outlook使用方法——变更数据库路径
选择 数据文件 选项卡,然后点 添加。
Outlook使用方法——变更数据库路径
Outlook2010配置
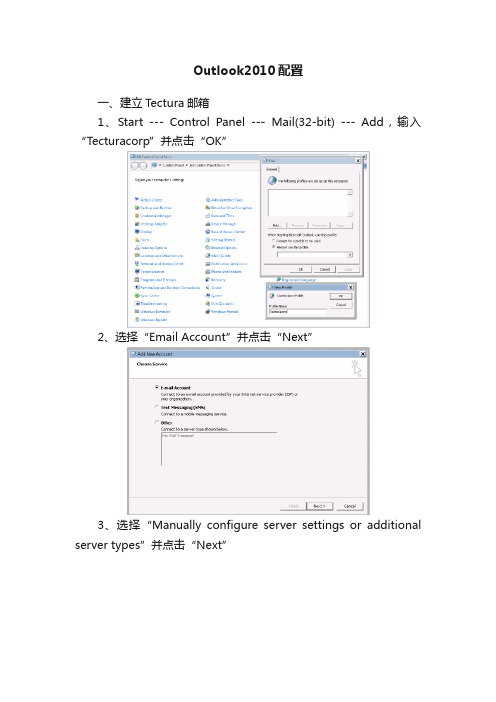
Outlook2010配置一、建立Tectura邮箱1、Start --- Control Panel --- Mail(32-bit) --- Add,输入“Tecturacorp”并点击“OK”2、选择“Email Account”并点击“Next”3、选择“Manually configure server settings or additional server types”并点击“Next”4、选择“Microsoft Exchange or compatible service”并点击“Next”5、在Server栏输入“”在User Name栏输入Tectura的登陆账户,如Hxu3920并点击“More Settings…”6、在“Advanced”页中,对于“Use Cached Exchange Mode”全部打勾7、切换到“Connection”页打勾“Connect to Microsoft Exchange using HTTP”并点击“Exchange Proxy Settings…”8、第一行地址栏输入“”打勾“Connect using SSL only”打勾“Only connect to proxy servers that have this principal name in their certificate”第二行地址栏输入“msstd:”打勾“On fast networks, connect using HTTP first, then connect using TCP/IP”打勾“On slow networks, connect using HTTP first, then connect using TCP/IP”代理服务器验证设置选择“NTLM Authentication”并点击“OK”结束设置。
二、建立本地PST文件(把mail文件保存到本地)1、打开Outlook 2010 –File –Info –Account Settings –Account Settings …2、切换到“Data Files”页,并点击“Add”3、新建一个PST文件,在File name中输入PST的文件名,建议存放在非系统盘,如D盘。
outlook邮箱帐户设置步骤
Outlook邮箱帐户设置步骤1、打开outlook,选择“下一步”2、选择“是”并单击“下一步”3、选择“手动配置服务器设置或其他服务器类型”,选择“下一步”4、选择“Internet电子邮件”,单击“下一步”5、按照下图所示填入个人邮箱的用户信息,(注:电子邮件地址和用户名填写自己的邮箱用户全称)6、单击打开“其它设置”,找到“发送服务器”,在“我的发送服务器(SMTP)要求验证”选项上打勾并选择“确定”7、单击“测试帐户设置”,看到如下界面“登录到接收邮件服务器(pop3)”前面有绿色的对勾即可关闭该界面8、反回界面后,选择“下一步”,并选择“完成”通过上面设置后,你的邮箱就可以正常的接收或者发送邮件了!下面是诗情画意的句子欣赏,不需要的朋友可以编辑删除!!谢谢1. 染火枫林,琼壶歌月,长歌倚楼。
岁岁年年,花前月下,一尊芳酒。
水落红莲,唯闻玉磬,但此情依旧。
2. 玉竹曾记凤凰游,人不见,水空流。
3. 他微笑着,在岁月的流失中毁掉自己。
4. 还能不动声色饮茶,踏碎这一场,盛世烟花。
5. 红尘嚣浮华一世转瞬空。
6. 我不是我你转身一走苏州里的不是我。
7. 几段唏嘘几世悲欢可笑我命由我不由天。
8. 经流年梦回曲水边看烟花绽出月圆。
9. 人生在世,恍若白驹过膝,忽然而已。
然,我长活一世,却能记住你说的每一话。
10. 雾散,梦醒,我终于看见真实,那是千帆过尽的沉寂。
11. 纸张有些破旧,有些模糊。
可每一笔勾勒,每一抹痕迹,似乎都记载着跨越千年万载的思念。
12. 生生的两端,我们彼此站成了岸。
13. 缘聚缘散缘如水,背负万丈尘寰,只为一句,等待下一次相逢。
14. 握住苍老,禁锢了时空,一下子到了地老天荒15. 人永远看不破的镜花水月,不过我指间烟云世间千年,如我一瞬。
16. 相逢一醉是前缘,风雨散,飘然何处。
17. 虚幻大千两茫茫,一邂逅,终难忘。
相逢主人留一笑,不相识,又何妨。
18. 天下风云出我辈,一入江湖岁月催;皇图霸业谈笑间,不胜人生一场醉。
Outlook电子邮箱账户设置方法(POP、STMP),以网易邮箱账户设置为例,一定记得在服务器上保存副本
【与你分享】Outlook电子邮箱账户设置方法(POP/STMP),以网易邮箱账户设置为例;一定记得在服务器上保存副本;本地邮件的备份方法;
1、工具→电子邮件账户→添加新电子邮件账户→POP3,按下图填写邮箱及其他信息;
图1 设置POP电子邮件账户
2、打开其他设置,进行相应设置。
163邮箱需要在“发送服务器”选项卡中,选择“我的发送服务器(SMTP)要求验证”;
图2选择“我的发送服务器(SMTP)要求验证”;
3、最后,一定要打开“高级”选项卡,将“在服务器上保留邮件的副本”选择中,然后点确定。
否则,在同步邮箱时,邮件将被从服务器删除;
图3 选择“在服务器上保留邮件的副本”
4、选择下一步,选择完成。
5、工具→发送和接收,即可将邮箱服务器中的邮件,同步到Outlook中。
6、本地邮件的存放位置可以通过以下方式查看:
工具→选项→邮件设置→数据文件→打开文件夹,该文件件即为本地邮件存储位置,如需备份邮件,将其复制即可。
在该界面,也可以更改本地邮件的存放位置。
图4 查看及备份本地邮件
小经验,与你分享,希望对你有用~。
outlook2010邮箱设置
内部服务器设置内部邮件只能在控制面板里面-------用户账户和家庭安全-----邮件里面设置,使用打开outlook 建立会出错勾选缓存exchange模式会把邮件上存到服务器上,不需要勾选这个选项确认本地备份目录是否是这个路径选择邮箱,然后更改文件夹方向,新建outlook数据文件,指向内部邮箱备份的文件,确定这个邮箱存储在这个内部邮件文件内外部服务器设置确认本地备份目录是否是这个路径选择邮箱,然后更改文件夹方向,新建outlook数据文件,指向外部邮箱备份的文件,确定这个邮箱存储在这个外部邮件文件内确认内部邮件备份和外部邮件备份的位置是不是在这个盘加载邮件使用原来的备份文件1、新建内部账户2、新建外部账号(不需要绑定备份的本地数据文件)进入账户设置里面,在数据文件栏里面打开存有的本地文件一般有四个邮箱,两个是从外部的邮箱服务器获取的,一般是空白的,两个是内部邮箱是本地的,有以前的邮件问题1发现内部邮箱使用外网邮箱的设置进行设置,因为使用了POP的原因,POP会把邮件都上存到服务器上,这种问题会导致外网邮箱的空间严重不足。
解决方法:这种情况因为有邮件存在服务器上面,需要重新用内网的方式建立邮箱,然后需要把服务器的邮件上迁移到内部邮件上,最后再把原来在服务器的邮件删除。
注意:一定要把外网的邮箱收件箱里面的子文件夹的邮件都要复制过来迁移的方式:把外网邮箱的所有邮件CTRL+ALL,然后用鼠标移到本地备份邮箱里。
问题2如果发现用户的邮箱接收不了邮件解决方法1:有可能收件箱存在子目录,邮件都发到了子目录里面,到子目录里面进行查看解决方法2:有可能用户设置了邮箱的规则,查看邮箱中的规则,跟用户确认这些规则是否需要,如果不需要就把规则给删除。
Outlook 2010 简明使用设置教程
Outlook express 2010 使用技巧所有材料来自互联网1说明本意是想通过这个简单的介绍,让读者了解Outlook 2010的基本用法,熟悉了Outlook 的基本功能后,用户就可以根据自己的需要并借助帮助文档,灵活运用Outlook。
2配置账户首次启动outlook会出现配置账户向导,这里我们可以先不管,直接下一步然后根据提示选择没有账户直接进入outlook,界面如下图1-1:在上方菜单栏我们能看到“文件”、“开始”、“发送/接收”、“文件夹”、“视图”这几个标签,每点击一个标签下面功能区就显示该标签相关的详细功能(这里不再多做介绍,可以自己下去点开看看)。
2.1添加账户第一步:选择“文件”-》“信息”下的“添加账户”按钮,如下图:会弹出“添加新账户”对话框,如图第二步:选择“手动配置服务器设置或其他服务类型(M)”选项,并点击“下一步”按钮。
其中另外两个选项:➢“电子邮件账户”选项,需要输入“您的姓名”、“电子邮件地址”、“密码”、“重复键入密码”等选项,此时Outlook会自动为你选择相应的设置信息,如邮件发送和邮件接收服务器等。
但有时候它找不到对应的服务器,那就需要手动配置了。
➢“短信(SMS)”选项,需要注册一个短信服务提供商,然后输入供应商地址,用户。
第三步”选项,并点击“下一步”按钮。
其中另外两个选项:➢“Microsoft Exchange 或兼容服务”,需要在“控制面板”里面设置。
➢“短信(SMS)”,同上第四步:输入用户信息、服务器信息、登陆信息,然后可以点击“测试账户设置…”按钮进行测试,如下图如果测试不成功(前提是用户信息、服务器信息、登陆信息正确),点击“其他设置”按钮,弹出“Internet 电子邮件设置”对话框,在“Internet 电子邮件设置”对话框中选择“发送服务器”标签页,把“我的发送服务器(SMPT)要求验证”选项打上勾,点击“确定”按钮,返回“添加账户”对话框。
- 1、下载文档前请自行甄别文档内容的完整性,平台不提供额外的编辑、内容补充、找答案等附加服务。
- 2、"仅部分预览"的文档,不可在线预览部分如存在完整性等问题,可反馈申请退款(可完整预览的文档不适用该条件!)。
- 3、如文档侵犯您的权益,请联系客服反馈,我们会尽快为您处理(人工客服工作时间:9:00-18:30)。
outlook 2010 设置邮箱 outlook2010 设置网易邮箱 126 163 图片打开 outlook 2010
点击 "文件"
点击 "账户设置" 下面的 "账户设置"
点击 "新建"
选中 "手动配置服务器设置或其他服务类型" ,点击 "下一步"
选中 "Internet 电子邮件(I)",点击 "下一步"
输入上面的信息,这个一般都会吧,
姓名:就填写自己的名了,如:
电子邮件地址:填写完整的邮件地址需要@后面的部分也要,
如:ni*****9@
账户类型:一般的外面申请的邮箱都是POP3
接收邮件服务器: 网易的126如图,163的就是,这个一般在外面申请的邮箱都是这样的格式
pop3.
发送邮件服务器:126的如图,163的是 一般格式都是 smtp.
用户名:一般填写@前面的部份就可以了,也有特别的需要填写完整的地址,试一下就知道了
密码就不用我说了吧,
注意:要求使用安全密码验证(SPA)进行登陆,前面的勾不需要勾上,我用过的邮箱,没有见过一个需要勾上的
至于右边红色的,如有旧的就先旧的,没有就选新的,有的不会出现就个也没有关系.不管管他
点击 "其它设置"
点击 "发送服务器具"
把里面设置如上图 "我的发送服务器(SMTP)需求验证"勾上,选中 "使用与接收服务器相同的设置"
点击 "高级"
如需要保留服务器上的邮件就勾上 "在服务器上保留出件的副本(L)",且下面两个勾都不需要勾上.
如不需要保存,就把勾去掉,点击 "确定"
点击 "下一步"
正在测试收发是不是正常,如有错误,点击关闭,退回重新设置,如没有问题,点击关闭
再点击 "完成"
菜鸟菜鸟,写得不怎么好,(希望老鸟不要笑话)
原文地址:
/a/office/outlook10/2011/0328/8063.html。