linux上机作业一list命令的实现
linux 驱动 list 使用方法

linux 驱动 list 使用方法1. Linux驱动list是一个重要的命令,可以列出系统中加载的所有驱动程序。
The Linux driver list is an important command that canlist all the loaded drivers in the system.2.通过使用lsmod命令,可以查看当前系统中加载的驱动程序列表。
By using the lsmod command, you can view the list of loaded drivers in the current system.3.驱动程序列表包括了每个驱动程序的名称、大小、使用次数等详细信息。
The driver list includes detailed information such as the name, size, and number of uses for each driver.4.使用modprobe命令可以动态加载或卸载驱动程序。
The modprobe command can be used to dynamically load or unload drivers.5.通过在命令后加入驱动程序的名称,可以具体操作某一个驱动程序。
By adding the name of the driver after the command, you can specifically operate on a particular driver.6.驱动程序列表对于系统管理员和开发人员来说非常有用。
The driver list is very useful for system administrators and developers.7.你可以使用grep命令来筛选特定的驱动程序。
You can use the grep command to filter specific drivers.8.使用insmod命令可以手动加载某个内核模块。
[Linux环境编程]Linux系统命令“ls-l”的实现
![[Linux环境编程]Linux系统命令“ls-l”的实现](https://img.taocdn.com/s3/m/19ec3454bf23482fb4daa58da0116c175f0e1e12.png)
[Linux环境编程]Linux系统命令“ls-l”的实现Linux系统命令“ls -l”的实现⼀、基本概念1、“ls -l”的意义 以长格式显⽰⽬录下的内容列表。
输出的信息从左到右依次包括⽂件名,⽂件类型、权限模式、硬连接数、所有者、组、⽂件⼤⼩和⽂件的最后修改时间等。
例:-rw-rw-r-- 1 using using 3102 7⽉ 22 17:06 test.c drwxrwxr-x 2 using using 4096 7⽉ 22 18:39 testdir lrwxrwxrwx 1 using using 17 7⽉ 22 18:43 shared -> /media/sf_shared/ 其中深蓝⾊为⽬录⽂件,天蓝⾊为软连接⽂件(具体颜⾊和vimrc配置有关)。
第⼀字段:⾸字母代表的是⽂件类型,其中"-"为普通⽂件、"d"为⽬录⽂件、"c"为字符设备⽂件、"b"为块设备⽂件、"p"为管道⽂件、"l"为链接⽂件、"s"为socket⽂件。
“rwx”分别代表拥有读、写和执⾏权限,“-”代表⽆对应权限。
三个“rwx”依次代表⽂件所有者、⽂件所有者所在⽤户组、其它⽤户对⽂件拥有的权限。
第⼆字段:⽂件硬连接数量 第三字段:⽂件拥有者 第四字段:⽂件拥有者所在组 第五字段:⽂件⼤⼩(以字节为单位) 第六字段:⽂件最后更改时间 第七字段:⽂件名(若为链接⽂件则追加显⽰其链接的原⽂件的路径)⼆、重要函数与结构体1、⽬录操作函数1 #include <sys/types.h>2 #include <dirent.h>34 DIR *opendir(const char *name);5 DIR *fdopendir(int fd);678 #include <dirent.h>910 struct dirent *readdir(DIR *dirp);1112struct dirent {13 ino_t d_ino; /* inode number */14 off_t d_off; /* offset to the next dirent */15 unsigned short d_reclen; /* length of this record */16 unsigned char d_type; /* type of file; not supported by all file system types */17 char d_name[256]; /* filename */18 };2、获取⽂件信息 这⾥必须使⽤int lstat(const char *path, struct stat *buf);函数,否则在处理链接⽂件时会将其链接的原⽂件作为处理对象,⽽不是它本⾝。
linux 内核list使用

linux 内核list使用
在Linux内核中,list是一种常用的数据结构,用于实现链表。
它在内核中被广泛使用,包括进程管理、文件系统、网络等多个方面。
在内核中使用list时,有几个常见的操作和用法需要注意:
1. 初始化list,在使用list之前,需要先对其进行初始化。
可以使用宏INIT_LIST_HEAD来初始化一个空的list。
2. 添加元素到list,使用list_add、list_add_tail等函数
可以将新元素添加到list中。
这些函数会在指定位置插入新元素,
并更新相关指针。
3. 遍历list,可以使用list_for_each、
list_for_each_entry等宏来遍历list中的元素。
这些宏会帮助我
们遍历整个list,并执行指定的操作。
4. 删除元素,使用list_del和list_del_init函数可以从
list中删除指定的元素。
需要注意的是,在删除元素之后,需要手
动释放相关资源,以避免内存泄漏。
除了上述基本操作外,list还支持一些高级操作,如合并两个list、反转list等。
在编写内核代码时,合理地使用list可以提高代码的可读性和性能。
总的来说,Linux内核中的list是一种非常灵活和强大的数据结构,合理地使用它可以帮助我们更好地管理和组织数据。
在实际编程中,需要根据具体的需求和场景来选择合适的list操作,以达到最佳的效果。
linux中listlist_entry
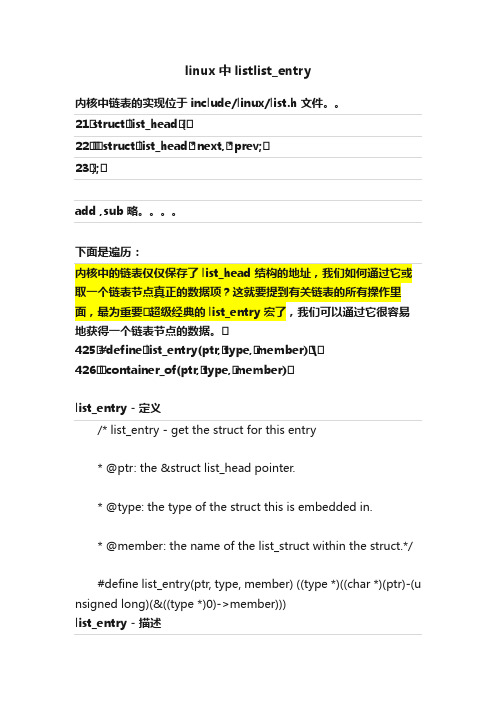
linux中listlist_entry内核中链表的实现位于include/linux/list.h 文件。
21•struct•list_head•{•22••• struct•list_head•*next,•*prev;•23•};•add ,sub 略。
下面是遍历:内核中的链表仅仅保存了list_head 结构的地址,我们如何通过它或取一个链表节点真正的数据项?这就要提到有关链表的所有操作里面,最为重要• 超级经典的list_entry 宏了,我们可以通过它很容易地获得一个链表节点的数据。
•425•#define•list_entry(ptr,•type,•member)•\•426•• container_of(ptr,•type,•member)•list_entry - 定义/* list_entry - get the struct for this entry* @ptr: the &struct list_head pointer.* @type: the type of the struct this is embedded in.* @member: the name of the list_struct within the struct.*/#define list_entry(ptr, type, member) ((type *)((char *)(ptr)-(u nsigned long)(&((type *)0)->member)))list_entry - 描述我们使用list_entry()宏在linux链表中访问链表数据。
原理为指针ptr指向结构体type中的成员member;通过指针p tr,返回结构体type的起始地址。
定义中((size_t) &(type *)0)->member)意为:把0地址转化为t ype结构的指针,然后获取该结构中member成员的指针,并将其强制转换为size_t类型list_entry - 例子如果我们有test_list结构:struct test_list{int testdata;struct list_head list;};struct test_list a;a.testdata = 5;struct test_list *pos = list_entry(&(a.testdata),struct test_list,t estdata);结果:pos = &a;可测试:pos->testdata = 5list_entry - 解释&((type *)0)->member:把“0”强制转化为指针类型,则该指针一定指向“0”(数据段基址)。
centos 内核list用法

centos 内核list用法CentOS内核list用法CentOS是一种开源的Linux发行版本,它的内核提供了一系列的list(列表)用法,用于高效地管理和操作数据。
在本文中,我们将介绍一些常用的CentOS内核list用法,并提供详细的讲解。
创建list1.使用[]符号创建一个空列表:my_list = []这将创建一个名为my_list的空列表。
2.使用list()函数创建一个空列表:my_list = list()这将创建一个名为my_list的空列表,与上述方法相同。
3.使用一系列元素创建一个列表:my_list = [1, 2, 3, 4]以上代码将创建一个名为my_list的列表,其中包含了数字1到4。
访问列表元素1.使用索引访问列表元素:my_list = [1, 2, 3, 4]print(my_list[0]) # 输出:1以上代码将输出列表my_list的第一个元素,即1。
2.使用负数索引访问列表元素:my_list = [1, 2, 3, 4]print(my_list[-1]) # 输出:4以上代码将输出列表my_list的最后一个元素,即4。
修改列表元素1.直接修改某个元素的值:my_list = [1, 2, 3, 4]my_list[0] = 5print(my_list) # 输出:[5, 2, 3, 4]以上代码将把列表my_list的第一个元素修改为5。
2.使用切片操作修改多个元素的值:my_list = [1, 2, 3, 4]my_list[1:3] = [5, 6, 7]print(my_list) # 输出:[1, 5, 6, 7, 4]以上代码将把列表my_list中索引为1至2的元素修改为5、6、7。
添加元素到列表1.使用append()方法在列表末尾添加一个元素:my_list = [1, 2, 3, 4]my_(5)print(my_list) # 输出:[1, 2, 3, 4, 5]以上代码将把元素5添加到列表my_list的末尾。
centos 内核list用法

CentOS 内核 List 用法1. 简介CentOS 是一种基于 Red Hat Enterprise Linux (RHEL) 的开源操作系统。
内核是操作系统的核心组件,负责管理计算机的硬件和软件资源。
在 CentOS 中,我们可以使用list命令来查看和管理已安装的内核版本。
本文将介绍 CentOS 内核 List 命令的用法,包括如何查看已安装的内核版本、如何切换默认内核、如何删除旧版本内核等操作。
2. 查看已安装的内核版本在 CentOS 中,我们可以使用rpm命令来查看已安装的内核版本。
打开终端,并输入以下命令:rpm -qa | grep kernel该命令会列出所有以“kernel” 开头的已安装软件包,并显示对应的版本号。
例如:kernel-3.10.0-1127.el7.x86_64kernel-3.10.0-1127.13.1.el7.x86_64kernel-3.10.0-1062.el7.x86_64以上示例中列出了三个已安装的内核版本。
3. 切换默认内核在 CentOS 中,默认情况下,系统会自动选择最新安装的内核作为默认启动选项。
但有时候我们可能需要手动切换默认内核。
3.1 查看当前默认内核要查看当前默认的内核版本,可以使用以下命令:uname -r该命令会显示当前正在运行的内核版本。
例如:3.10.0-1127.el7.x86_643.2 切换默认内核要手动切换默认内核,我们需要编辑/etc/default/grub文件。
打开终端,并输入以下命令以使用文本编辑器打开该文件:sudo vi /etc/default/grub在该文件中,找到以下行:GRUB_DEFAULT=saved将其修改为:GRUB_DEFAULT=0其中0表示第一个内核版本为默认选项。
如果你想选择其他版本作为默认选项,可以修改相应的数字。
保存并关闭文件后,运行以下命令更新 GRUB 配置:sudo grub2-mkconfig -o /boot/grub2/grub.cfg最后,重新启动系统即可生效。
Linux基本操作命令(一)
Linux基本操作命令(⼀)⽬录1.⽂件和⽬录操作命令2.⽤户和⽤户组操作命令3.vim编辑器操作命令4.打包和解压操作命令5.系统操作命令为什么要学习linux?1.linux是⼀款操作系统2.linux经常来作为服务器操作系统来⽤作⽤:1.查看⽇志(任何操作的⽇志)2.定位bug(查看⽇志,⽇志级别:info/debug/error....)3.搭建环境(搭建测试环境)以上三条就是测试⼈员会在⼯作经常要⽤的三点需要的软件1.CENTOS 6.8----linux操作系统2.Xshell 5---远程连接⼯具其它还有PYTT secureCRT3.winSCP---windows与linux传输⼯具⽂件和⽬录操作命令1.linux终端共有6个,分别tty1---tty6 通过ctrl + alt+F1~F6进⾏切换2.[root@localhost ~]# 后光标闪烁表⽰可以执⾏命令/编辑root===表⽰当前登录的⽤户名@----表⽰在localhost---主机域名~ ---- 表⽰root⽤户的家⽬录root⽤户的家⽬录路径:/root普通⽤户的家⽬录 ~普通⽤户的家⽬录 /home/普通⽤户的⽤户名⽬录# ---- 表⽰是root $ ---表⽰是普通⽤户3.快捷键ctrl+c 终⽌当前命令ctrl+l 清屏ctrl+D =exit 当前⽤户退出ctrl+z 暂停当前命令 fg---恢复执⾏TAB键----⾃动补全如果输⼊的字符串是唯⼀的,单击tab键就会⾃动补全如果输⼊的字符串不是唯⼀的,双击tab键显⽰所有以输⼊的字符开头的⽬录或⽂件linux命令⼀样的可以⾃动补全注意点:⾃动补全只补全当前⽬录下存在的⽬录或⽂件名称4.⽬录/----表⽰根⽬录常⽤⽬录/home 普通⽤户的家⽬录/root 是root⽤户的家⽬录不管是普通⽤户还是root登录成功后,所在位置都是在各⾃的家⽬录下/etc 配置⽂件位置(⽤户、密码、服务的配置⽂件等)/opt 保存第三⽅软件安装位置/usr/local 安装第三⽅软件的位置/tmp 临时⽂件,⾃动清空不管是存放软件包或者⽂件时,都去新建相应的⽬录,最好是当前登录⽤户家⽬录下⾯,不要随意删除别⼈的⽂件5.绝对路径和相对路径什么是绝对路径?什么是相对路径?绝对路径是从根⽬录开始的完整路径相对路径是从当前位置(⽤户所在的路径位置)开始的路径. 表⽰当前⽬录.. 表⽰上⼀级⽬录pwdpwd --查看当前位置的路径(是从根⽬录开始)cd ----切换⽬录ls1.ls ---list---显⽰当前⽬录或指定⽬录下⽂件和⽬录经常使⽤的选项:ls -l ==ll ---查看当前⽬录下的⽂件和⽬录,以较长格式显⽰⽂件和⽬录显⽰格式讲解:第⼀个 -/d/l 表⽰⽂件类型- ⼆进制⽂件 d ⽬录 l 软链接第⼆个部分 rwxrwxrwx 表⽰各类⽤户的权限r -read 读权限 w-wirte 写权限 x ---执⾏权限r-x 表⽰只有读和执⾏权限rwx rwx rwx第⼀个rwx表⽰⽂件或⽬录所属⽤户的权限第⼆个rwx表⽰⽂件或⽬录所属组的权限第三个rwx表⽰⽂件或⽬录其他⽤户的权限第三个部分 root 表⽰⽂件或⽬录所属⽤户的⽤户名第四个部分 root 表⽰⽂件或⽬录所属组的组名第五个部分 12288 表⽰⽂件或⽬录的⼤⼩第六个部分 Feb 25 18:41 表⽰⽂件或⽬录的最后修改时间第七个部分⽂件或⽬录的名称2.ls -a ==ls --all 查看当前⽬录下的所有⽂件和⽬录,包括隐藏⽂件3.ls -h 表⽰以容易理解的格式显⽰⽂件的⼤⼩, 必须与-l⼀起使⽤,才能有所体现4.ls -i 显⽰⽂件和⽬录的i节点每⼀个⽂件和⽬录的i节点都是唯⼀的,我们可以通过i节点来查找⽂件和⽬录mkdirmkdir --创建新⽬录格式:mkdir [-p] 路径/新⽬录名1.在当前⽬录下创建新⽬录2.在指定的⽬录下创建新⽬录3.-p, --parents no error if existing, make parent directories as needed ---递归创建⽬录rmdirrmdir ---删除空⽬录1.如果是⽬录是⾮空,不能删除[root@localhost cc]# rmdir test/rmdir: failed to remove `test/': Directory not empty'2.不能删除⾮⽬录[root@localhost ~]# rmdir install.logrmdir: failed to remove `install.log': Not a directory'rmrm ---删除⽂件和⽬录⽤法:rm [选项]... ⽂件...不管是⽂件还是⽬录,经常使⽤就是rm -rf 要删除的东西(可以是多个,中间⽤空格隔开)[root@localhost tmp]# rm -rf cc test yum.logrm -rf *---删除当前⽬录下所有⽂件和⽬录rm -rf te*--删除以te开头的所有⽂件和⽬录删除以.1og结尾的内容:rm -rf *.log使⽤rm命令时,⼀定确保这个⽂件和⽬录确定要删除,在liunx系统⾥⾯删除是不可逆的,没有回收站1.删除⽂件[root@localhost tmp]# rm ifcfg-eth0rm:是否删除普通⽂件 "ifcfg-eth0"?y[root@localhost tmp]# rm -f test.log --删除不询问2.删除⽬录--- -r 同时会询问是否删除[root@localhost test_dir]# rm -r test/rm: descend into directory `test'? yrm: remove directory `test/testt'? yrm: remove directory `test'? y'3.如果不想在删除过程⼀直有询问,可以使⽤-f---强制删除(需要更加谨慎) force[root@localhost test_dir]# rm -rf test/强制删除,并且没有询问如果有些⽂件使⽤rm 不能删除,我们也可以加上-f,同样的含义强制删除,并且没有询问cpcp --复制⽂件或⽬录⽤法:cp [选项] 原⽂件或⽬录⽬标⽬录语法:cp -rp [原⽂件或⽬录][⽬标⽬录]1.复制⽂件:[root@localhost test_dir]#cp /etc/sysconfig/network-scripts/ifcfg-eth0 /tmp/test[root@localhost test_dir]#cp /etc/sysconfig/network-scripts/ifcfg-eth0 ..[root@localhost test_dir]# cp /etc/sysconfig/network-scripts/ifcfg-eth0 /tmp2.-p 保留原⽂件或⽬录的属性,属性就是ls -l所展⽰的东西[root@localhost tmp]# cp -p /etc/sysconfig/network-scripts/ifcfg-eth0 /tmp3.-r 复制⽬录[root@localhost tmp]# cp -r ./test_dir/test .结论:cp 复制⽂件或⽬录,复制成功后,原⽂件或⽬录还存在在复制的过程中,还可以改名mvmv与cp 最⼤的区别就是⼀个不保留原⽂件,⼀个保留原⽂件1.剪切--不改名[root@localhost test_dir]# mv ../ifcfg-eth0 .2.剪切-改名[root@localhost tmp]# mv test_dir/ifcfg-eth0 ./test.log3.改名[root@localhost test_dir]# mv test tests作⽤:⽤来备份场景:放了⼀个lib⽂件运⾏,开发说你替换⼀下lib⽂件但是我们保证开发的lib的⽂件就是OK ,那这种情况最好备份mv chaa.lib chaa.lib.baktouchtouch -创建空⽂件[root@localhost test]# touch test.log这个命令不经常⽤,创建⽂件是vim编辑器catcat 显⽰⽂件内容[root@localhost test]# cat yum.conf⼀次性将⽂件内容完全展⽰出来,并且退出从⽽可得出cat不适合查看⽂件很⼤的⽂件,cat只适合于查看⽂件内容偏⼩的⽂件tactac 倒着显⽰⽂件内容[root@localhost test]# tac test.log适合查看⽂件内容偏⼩的,并且将最⼀⾏显⽰在最前⾯moremore 分页显⽰⽂件的内容空格或f 向下翻页enter键换⾏(⼀⾏⼀⾏的显⽰)同时在页⾯最下⽅的位置显⽰⽂件显⽰的当前进度q或Q 退出缺点:只能向下翻页,不能向上查看lessless 分页显⽰⽂件的内容(向上翻页)空格或f 向下翻页enter键换⾏q或Q 退出pgup/pgdn 向上/向下⼀页⼀页切换⽅向键向上/向下⼀⾏⼀⾏切换在⽂件中查找指定字符串时:2.在/后⾯输⼊要查找的指定字符串⽐如:/error3.回车⽬前显⽰的⼀个指定字符串是从当前位置查找到的第⼀个,可以按“n”继续向下查找其它的此⽅法经常⽤于在⽇志定位问题,或在修改⽂件要修改指定内容less是显⽰⽂件内容命令中⽤得最多的headhead --显⽰⽂件前⾯⼏⾏1.在不跟任何选项和参数时,默认显⽰⽂件的前⼗⾏[root@localhost test]# head services.log2.只显⽰⽂件的前⾯5⾏(⾏数前的-很重要)[root@localhost test]# head -5 services.logtailtail 显⽰⽂件最后的⼏⾏1.默认显⽰⽂件的最后⼗⾏[root@localhost test]# tail test.log2.只显⽰⽂件的最后三⾏ -n[root@localhost test]# tail -3 test.log==[root@localhost test]# tail -n 3 test.log3.-f 动态显⽰⽂件的最后⼏⾏(经常⽤)tail -400f XX.log动态就是显⽰⽂件新增的内容⽤于场景:主要⽤于实时动态显⽰操作⽇志同样是⽤于定位bugchmodchmod -改变⽂件或⽬录的权限(读写执⾏)user group other所有者所有组其它⼈+ 增加 - 删除 = 等于1.将⽂件的写权限删除[root@localhost test]# chmod u-w test.log2.给所有组增加执⾏的权限[root@localhost test]# chmod g+x test.log3.给其它⼈赋于读写执⾏的权限[root@localhost test]# chmod o=rwx test.log4.错误⽅式chmod u=rw o=r test.log这种⽅式不⾏,不能同时修改所有者、所有组和其它⼈的权限以上根据⽤户来+-=三种⽅式来修改权限,显得过于⿇烦解决⽅法:r=4 w=2 x=14+2+1=7 ⽤7这⼀个数字来代表所有权限1.给所有者赋读写权限,所有组为读执⾏权限其它⼈赋读权限[root@localhost test]# chmod 654 test.log通过数字的⽅式同时修改不同⽤户的权限2.给所有⽤户都赋于读写权限6[root@localhost test]# chmod 666 test.log⽬前更改权限最简便的⽅法,也是最常⽤的3.给⽬录赋权[root@localhost test]# chmod 764 test12/同时在⽂件或⽬录前可以加上绝对路径或相对路径4.-R 递归修改⽂件或⽬录的权限(经常使⽤)[root@localhost test]# chmod -R 644 ./test12/test是同时将⽬录下⾯所有的⽂件和⼦⽬录中内容权限⼀并修改chmod root和普通⽤户都有权限chownchown 改变⽂件的所有者(经常使⽤)1.改变test_dir.log⽂件的所有者为root[root@localhost test]# chown root test_dir.log2.普通⽤户改变log.log的所有者[test@localhost ~]$ chown test log.logchown: changing ownership of `log.log': Operation not permitted'chown普通⽤户是没权限进⾏操作这个命令,只有root才有权限去改变⽂件或⽬录的所有者chgrpchgrp 改变⽂件和⽬录的所有组[root@localhost test]# chgrp test test但是这个命令我们⼀般不⽤,因为很少会去只改变⽂件和⽬录的所有组如果要改变所有组,⼀般会同时改变所有者和所有组如果是同时改变所有者和所有组,可以⽤chown经常使⽤的⽅式[root@localhost test]# chown wq:wq testumaskumask ---显⽰⽂件和⽬录的默认权限775/755 创建⼀个⽬录664/644 创建⼀个⽂件022 umask---取反--7557-0=7 7-2=5 7-2=5代表⼀个⽬录初始的权限为755,⼀个⽂件的初始权限为644(⽂件没有可执⾏权限)findfind ---⽂件搜索格式:find [搜索范围][匹配条件]1.根据name来搜索(经常⽤)a.精确搜索[root@localhost test]# find /etc -name servicesb.模糊搜索init开头的⽂件和⽬录[root@localhost test]# find /etc -name init*c.模糊搜索init结尾的⽂件和⽬录[root@localhost test]# find /etc -name *initd.模糊搜索包含init的⽂件和⽬录[root@localhost test]# find /etc -name *init*e.模糊搜索以init开头的后⾯只有三个字符串的⽂件或⽬录 * 代表⼀组字符串代表⼀个字符[root@localhost test]# find /etc -name initlinux对⼤⼩很敏感,⽽且空格也敏感[root@localhost test]# find /etc -name INITf.根据name搜索时,不区分⼤⼩写⽤选项 -iname[root@localhost test]# find /etc -iname INIT/etc/inittab[root@localhost test]# find /etc -name INIT没有搜索出任何数据2.根据⽂件⼤⼩搜索a.⼤于4096的⽂件 +4096[root@localhost test]# find /etc -size +4096b.⼩于4096的⽂件 -4096[root@localhost test]# find /etc -size -4096c.等于4096的⽂件[root@localhost test]# find /etc -size 4096d.⼤于4096同时⼩于641020的⽂件 -a[root@localhost test]# find /etc -size +4096 -a -size -641020 e.⼤于4096或者⼩于641020的⽂件[root@localhost test]# find /etc -size +4096 -o -size -6410203.根据⽂件所有者去搜索[root@localhost test]# find /home/test -user test[root@localhost test]# find -user test如果不写搜索范围,默认搜索从当前⽬录开始,搜索下⾯匹配的⽂件和⽬录4.根据⽂件属性搜索a.搜索5分钟之内内容被修改的⽂件[root@localhost test]# find . -mmin -5⽂件内容被修改的同时,⽂件属性也会被修改b.搜索3分钟之内⽂件属性被修改的⽂件[root@localhost test]# find . -cmin -3amin cmin mmin后⾯接分钟atime ctime mtime后⾯接⼩时5.根据⽂件类型来搜索- ⼆进制⽂件f d ⽬录 l 软链接1.搜索⽬录---⽂件类型为d[root@localhost test]# find . -type d2.搜索当前⽬录下⽂件类型为⽂件 f[root@localhost test]# find . -type - ---错误find: -type 的参数未知: -[root@localhost test]# find . -type f ---正确3.搜索当前⽬录下的⽂件类型为软链接 l[root@localhost test]# find . -type l4.在根⽬录下搜索⽂件名称为services的⽂件[root@localhost test]# find / -name services -type fgrepgrep --搜索⽂件的内容1.搜索test.log这个⽂件中包含qwer字符串的⾏[root@localhost test]# grep qwer ./test.log2.不区分⼤⼩写进⾏搜索选项 -i[root@localhost test]# grep -i test test.log3.搜索不包含123的⽂件内容[root@localhost test]# grep -v 123 test.log4.搜索不包含test的⽂件内容,不区分⼤⼩写[root@localhost test]# grep -iv test test.log5.搜索不是以1开头的⽂件内容[root@localhost test]# grep -v ^1 test.log6.搜索以1开头的⾏[root@localhost test]# grep ^1 test.log^ 表⽰以什么开头在shell脚本 #表⽰注释7.屏蔽掉注释⾏ --[root@localhost test]# grep -v ^# sysctl.conf8.经常使⽤的⼀种⽅法---管道|[root@localhost test]# ps -ef |grep javaps -ef 查询进程|管道符 command1 | command2将command1的输出作为command2的输⼊[root@localhost test]# ls -l |grep testlnln --链接命令链接分为软链接和硬链接1.给⽬录创建软链接 -s[root@localhost tmp]# ln -s /tmp/test/test12/test ./test1 lrwxrwxrwx. 1 root root 21 Apr 14 21:06 test1 -> /tmp/test/test12/test 软链接的⼤⼩⾮常⼩,只是⼀个链接软链接相当于windows下⾯的快捷⽅式2.给⽂件创建软链接[root@localhost tmp]# ln -s /tmp/test/test12/test/tw.log .软链接的⽬标⽂件和原⽂件的i节点不同3.给⽂件创建⼀个硬链接[root@localhost tmp]# ln /tmp/test/test12/test/tw.log ./tw1.log硬链接的i节点相同[root@localhost tmp]# ln /tmp/test/test12/test ./test_dir ln: `/tmp/test/test12/test': hard link not allowed for directory'硬链接不能针对⽬录使⽤,只能对⽂件使⽤。
linux内核中的list详解
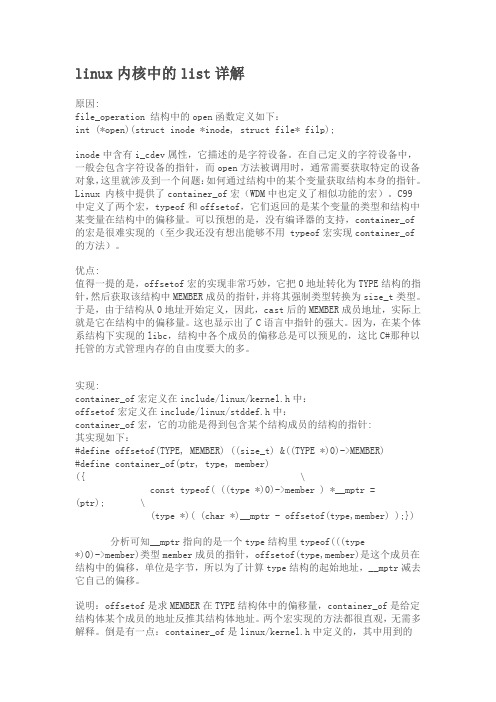
linux内核中的list详解原因:file_operation 结构中的open函数定义如下:int (*open)(struct inode *inode, struct file* filp);inode中含有i_cdev属性,它描述的是字符设备。
在自己定义的字符设备中,一般会包含字符设备的指针,而open方法被调用时,通常需要获取特定的设备对象,这里就涉及到一个问题:如何通过结构中的某个变量获取结构本身的指针。
Linux 内核中提供了container_of宏(WDM中也定义了相似功能的宏)。
C99中定义了两个宏,typeof和offsetof,它们返回的是某个变量的类型和结构中某变量在结构中的偏移量。
可以预想的是,没有编译器的支持,container_of的宏是很难实现的(至少我还没有想出能够不用 typeof宏实现container_of的方法)。
优点:值得一提的是,offsetof宏的实现非常巧妙,它把0地址转化为TYPE结构的指针,然后获取该结构中MEMBER成员的指针,并将其强制类型转换为size_t类型。
于是,由于结构从0地址开始定义,因此,cast后的MEMBER成员地址,实际上就是它在结构中的偏移量。
这也显示出了C语言中指针的强大。
因为,在某个体系结构下实现的libc,结构中各个成员的偏移总是可以预见的,这比C#那种以托管的方式管理内存的自由度要大的多。
实现:container_of宏定义在include/linux/kernel.h中:offsetof宏定义在include/linux/stddef.h中:container_of宏,它的功能是得到包含某个结构成员的结构的指针:其实现如下:#define offsetof(TYPE, MEMBER) ((size_t) &((TYPE *)0)->MEMBER)#define container_of(ptr, type, member) ({ \const typeof( ((type *)0)->member ) *__mptr = (ptr); \(type *)( (char *)__mptr - offsetof(type,member) );})分析可知__mptr指向的是一个type结构里typeof(((type *)0)->member)类型member成员的指针,offsetof(type,member)是这个成员在结构中的偏移,单位是字节,所以为了计算type结构的起始地址,__mptr减去它自己的偏移。
- 1、下载文档前请自行甄别文档内容的完整性,平台不提供额外的编辑、内容补充、找答案等附加服务。
- 2、"仅部分预览"的文档,不可在线预览部分如存在完整性等问题,可反馈申请退款(可完整预览的文档不适用该条件!)。
- 3、如文档侵犯您的权益,请联系客服反馈,我们会尽快为您处理(人工客服工作时间:9:00-18:30)。
Linux上机习题(一)
2013211313班王令聪学号:2013211534 源代码:
#include <stdio.h>
#include <stdlib.h>
#include <dirent.h>
#include <sys/stat.h>
#include <sys/types.h>
#include <string.h>
#include <time.h>
#include <errno.h>
#define TRUE 1
#define FALSE 0
//2013211313班王令聪学号:2013211534
int sel_r = 0, sel_a = 0, sel_l = 0, sel_h = 0, sel_m = 0;
int max = 0, min = 0, due = 0;
int depth = 0, count = 0;
int isnum(char *param)
{
int j;
for (j = 0; j < strlen(param); j++)
if (param[j] < '0' || param[j] > '9')
return FALSE;
return TRUE;
}
void cmd_err(void)
{
printf ("Command error!\n");
exit (1);
}
void mylist(char *path)
{
int limit, diff;
char fpath[100] = {'\0'};
DIR *dir;
struct dirent *entry;
struct stat st;
time_t now;
if (stat(path, &st) == -1) {
printf("Open \"%s\": %s (ERROR %d)\n", path, strerror(errno), errno);
exit(1);
}
else if (S_ISDIR(st.st_mode) && (depth == 0 || sel_r)) {
dir = opendir(path);
if (dir == NULL) {
printf("Open directory \"%s\": %s (ERROR %d)\n", path, strerror(errno), errno);
exit(1);
}
while ((entry = readdir(dir)) != NULL) {
if (strcmp(entry->d_name, ".") != 0 && strcmp(entry->d_name, "..") != 0 && ((! sel_a) && entry->d_name[0] != '.' || sel_a)) {
strcpy(fpath, path);
strcat(fpath, "/");
strcat(fpath, entry->d_name);
depth ++;
mylist(fpath);
depth --;
}
}
closedir(dir);
}
else if (S_ISREG(st.st_mode)) {
now = time(NULL);
limit = due*24*60*60;
diff = now - st.st_mtime;
if ((! (sel_l && st.st_size < min)) &&
(! (sel_h && st.st_size > max)) &&
(! (sel_m && diff > limit))) {
printf ("%s %d\n", path, (int)st.st_size);
count ++;
}
}
}
int main(int argc, char *argv[])
{
int i;
char path[100];
if (argc <= 10) {
for (i = 1; i < argc; i++) {
if (argv[i][0] == '-') {
if (strcmp(argv[i], "-r") == 0)
sel_r = 1;
else if (strcmp(argv[i], "-a") == 0)
sel_a = 1;
else if ((strcmp(argv[i], "-ar") == 0) || (strcmp(argv[i], "-ra") == 0)) {
sel_r = 1;
sel_a = 1;
}
else if (strcmp(argv[i], "-h") == 0) {
sel_h = 1;
i ++;
if (isnum(argv[i]))
max = atoi(argv[i]);
else
cmd_err();
if (max < min)
cmd_err();
}
else if (strcmp(argv[i], "-l") == 0) {
sel_l = 1;
i ++;
if (isnum(argv[i]))
min = atoi(argv[i]);
else
cmd_err();
}
else if (strcmp(argv[i], "-m") == 0) {
sel_m = 1;
i ++;
if (isnum(argv[i]))
due = atoi(argv[i]);
else
cmd_err();
}
else if (strcmp(argv[i], "--") == 0) {
i ++;
break;
}
}
else
break;
}
}
else
cmd_err();
if (i == argc)
strcpy(path, ".");
else if (i == (argc-1))
strcpy(path, argv[argc-1]);
else
cmd_err();
mylist(path);
printf ("Totally %d files.\n", count);
return 0;
}。