nagios监控之CheckEventLog
Nagios监控路由器和交换机设备

Nagios监控路由器和交换机设备1.功能介绍Nagios可以监控有IP可管理的交换机和路由器的设备状态.对小型无管理功能的交换机和HUB是无法监控.监控的方式是通过外部的ping所反馈的信息或者通过SNMP协议来获取相关的状态信息.能够在网络设备上获取的信息包括:包丢失率,包往返时间平均值SNMP状态信息带宽和传输数率2.概述监控的方式有两种一种是利用ping的方式,获取数据包的响应时间和丢包率另一种是利用网络设备的SNMP数据,通过check_snmp获取端口状态和check_mrtgtraf来了解带宽状况.在使用check_snmp之前必须安装snmp包到系统中.如果没有安装则需要先安装好snmp系统包,然后再重新编译nagios plugins3.配置步骤完成第一次执行需要做的操作创建新的监控设备主机和服务对象重新启动Nagios4.确认一下内容在/usr/local/nagios/etc/objects/commands.cfg里面是否包含了check_snmp和check_local_mrt gtraf的命令定义在/usr/local/nagios/etc/objects/templates.cfg里面是否包含了generic-switch5.配置Nagiosa.编辑/usr/local/nagios/etc/nagios.cfg将#cfg_file=/usr/local/nagios/etc/objects/switch.cfg前面的#去掉b.编辑/usr/local/nagios/etc/object/switch.cfg文件设定监控主机的相关内容define host{use generic-switch ; Inherit default values from a templatehost_name Gateway ; The name we're giving to this switchalias Firewall ; A longer name associated with the switchaddress 192.168.200.1 ; IP address of the switchhostgroups allhosts,switches ; Host groups this switch is associated with}监控包的丢失率和RTA响应时间define service{use generic-service ; Inherit values from a templatehost_name Gateway ; The name of the host the service is associated withservice_description PING; The service descriptioncheck_command check_ping!200.0,20%!600.0,60% ;在超过200ms或丢包率在20%上的启动警告,超过600ms或丢包达到60%的启动报警normal_check_interval 5; 在正常情况下,每五分钟监控一次retry_check_interval 1; 在异常情况下,每分钟监控一次}利用SNMP监控交换和网关设备define service{use generic-service ; Inherit values from a templatehost_name Gatewayservice_description Uptimecheck_command check_snmp!-C public -o sysUpTime.0}利用MRTG来监控网络流量信息define service{use generic-service ; Inherit values from a templatehost_name Gatewayservice_description Port 1 Bandwidth Usagecheck_commandcheck_local_mrtgtraf!/var/lib/mrtg/192.168.200.1_1.log!AVG!1000000,2000000!5000000,5000000!10 }利用command里面设定的check_local_mrtgtraf获取本地保存的mrt g流量日志信息来监控,获取文件是/var/lib/mrt g/192.168.200.1_1.log获取数据值是采取AVG的值,数值在1M~2M之间,则状态改为warning,如果超过5M的话则状态改为critical 完成配置后service nagios restart。
Nagios监控mysql的安装配置及报警

一:Nagios的安装1.安装编译所需的软件包;[root@nagios ~]#yum –y install httpd php-* gd-* mysql-devel[root@nagios ~]#setenforce 0 #关闭selinux[root@nagios ~]#sed 's/=enforcing/=permissive/' /etc/sysconfig/selinux2.创建运行nagios服务的用户;[root@nagios ~]#useradd nagios#创建运行nagios服务的用户[root@nagios ~]#usermod –G nagios apache#使apache用户对nagios目录具有写权限,不然web页面操作失败3.Nagios软件安装;[root@nagios ~]#tar zxf nagios-cn-3.2.3.tar.gz#释放nagios源码包[root@nagios ~]#cd nagios-cn-3.2.3Ps: 若在RHEL6X32位系统中安装nagios-cn-3.2.3.tar.bz2要先执行make clean操作,然后再执行./configure和make all等操作,否则执行make all时会报错![root@nagios nagios-cn-3.2.3]#./configure --enable-embedded-perl#编译nagios[root@nagios nagios-cn-3.2.3]#make all[root@nagios nagios-cn-3.2.3]#make install#安装主程序,CGI和HTML文件[root@nagios nagios-cn-3.2.3]#make install-init#在/etc/rc.d/init.d安装启动脚本[root@nagios nagios-cn-3.2.3]#make install-commandmode#配置目录权限[root@nagios nagios-cn-3.2.3]#make install-config#安装示例配置文件[root@nagios nagios-cn-3.2.3]#make install-webconf#安装nagios的web接口,会在/etc/httpd/conf.d目录中创建nagios.conf文件4.安装Nagios-plugins插件;[root@nagios ~]#tar zxf nagios-plugins-1.4.15.tar.gz[root@nagios ~]#cd nagios-plugins-1.4.15[root@nagios nagios-plugins-1.4.15]#./configure –with-nagios-user=nagios \--with-nagios-group=nagios –enable-extra-opts \--enable-libtap --enable-perl-modules [root@nagios nagios-plugins-1.4.15]#make && make install(Ps:会在”/usr/local/nagios/libexec”目录下多出一些文件,这里存放nagios所有插件)5.修改nagios的主配置文件nagios.cfg;[root@nagios ~]#vim /usr/local/nagios/etc/nagios.cfg新建cfg_file=/usr/local/nagios/etc/objects/hosts.cfg#存放主机与主机组定义cfg_file=/usr/local/nagios/etc/objects/services.cfg#存放服务与服务组定义修改#cfg_file=/usr/local/nagios/etc/objects/localhost.cfg #加”#”注释,在36行6.创建hosts.cfg文件;[root@nagios ~]#vim /usr/local/nagios/etc/objects/hosts.cfgdefine host{use linux-server#定义使用的模版host_name nagios#被监控主机名称alias nagios #别名address 127.0.0.1 #被监控主机的IP地址icon_image web.gifstatusmap_image web.gd22d_coords 100,3003d_coords 100,300,100check_command check-host-alive#监控命令,来自commands.cfg文件max_check_attempts 5#检查失败后重试的次数check_period 24x7#查看的时间段,来自timeperiods.cfg定义contact_groups admins#联系人组,在contactgroups.cfg中定义的notification_interval 10#提醒的间隔,每隔10分钟提醒一次notification_period 24x7#提醒的周期,24x7,来自timeperiods.cfg定义notification_options d,u,r #指定什么情况下提醒}define hostgroup{hostgroup_name linux-serversalias linux servermembers *}7.创建services.cfg文件;[root@nagios ~]#vim /usr/local/nagios/etc/objects/services.cfgdefine service {use local-servicehost_name nagiosservice_groups systemcheckservice_description 主机存活check_command check-host-alive}define service {use local-servicehost_name nagiosservice_groups systemcheckservice_description 登录用户数check_command check_local_users!20!50#监测远程主机当前的登录用户数量,如果大于20用户则报warning,如果大于50则报critical}define service {use local-servicehost_name nagiosservice_groups systemcheckservice_description 根分区使用率check_command check_local_disk!20%!10%!/#如果可用空间低于20%会报Warning,如果可用空间低于10%则报Critical}define service {use local-servicehost_name nagiosservice_groups systemcheckservice_description 进程总数check_command check_local_procs!250!400!RSZDT#监测远程主机当前的进程总数,如果大于250进程则报warning,如果大于400进程则报critical,S(休眠)、R(运行)、Z(僵死)、D (不可中断)、T (停止)}define service {use local-servicehost_name nagiosservice_groups systemcheckservice_description CPU负载check_command check_local_load!5.0,4.0,3.0!10.0,6.0,4.0#当1分钟多于5个进程等待,5分钟多于4个,15分钟多于3个则为warning状态#当1分钟多于10个进程等待,5分钟多于6个,15分钟多于4个则为critical状态}define service {use local-servicehost_name nagiosservice_groups systemcheckservice_description 交换空间利用率check_command check_local_swap!20%!10%#如果交换空间低于20%会报Warning,如果可用空间低于10%则报Critical}define servicegroup {servicegroup_name systemcheckalias systemcheck}[root@nagios ~]#/usr/local/nagios/bin/nagios –v /usr/local/nagios/etc/nagios.cfg#校验nagios配置文件的正确性[root@nagios ~]#htpasswd –c /usr/local/nagios/etc/ers nagiosadmin#添加一个访问nagios页面的授权用户,默认用户是nagiosadmin,创建其他用户修改/usr/local/nagios/etc/cgi.cfg文件:方法一:修改use_authentication=0 值为0 (在78行)方法二:authorized_for_system_information=nagiosadminauthorized_for_configuration_information=nagiosadminauthorized_for_system_commands=nagiosadminauthorized_for_all_services=nagiosadminauthorized_for_all_hosts=nagiosadminauthorized_for_all_service_commands=nagiosadminauthorized_for_all_host_commands=nagiosadmin(用:%s/nagiosadmin/新用户名命令替换所有nagiosadmin字符)8.启动httpd和nagios服务并设置开机自动启动[root@nagios ~]#service iptables stop[root@nagios ~]#service nagios start[root@nagios ~]#service httpd start[root@nagios ~]#chkconfig httpd on[root@nagios ~]#chkconfig nagios on[root@nagios ~]#chkconfig iptables off(Ps:如果开启了selinux需要配置如下两步:chcon -R –t httpd_sys_content_t /usr/local/nagios/sbin/chcon -R –t httpd_sys-content_t /usr/local/nagios/share/ )二:被监控端安装(以mysql为例,监控mysql服务的运行情况)1.安装并启动mysql的服务[root@mysql ~]#yum –y install mysql-server[root@mysql ~]#service mysqld start[root@mysql ~]#service iptables stop[root@mysql ~]#chkconfig mysqld on[root@mysql ~]#chkconfig iptables off2.在mysql服务器上创建监控检测帐户[root@mysql ~]#mysqlmysql> create database nagdb;mysql> grant select on nagdb.* to nagdb@’监控主机IP’;mysql> flush privileges;mysql>exit3.在nagis主机上检测是否可以链接mysql主机上的mysql服务[root@nagios ~]#/usr/local/nagios/libexec/check_mysql –H 被监控端IP–u nagdb –d nagdb 4.在nagios主机上添加对msyql服务监控的定义[root@nagios ~]#vim /usr/local/nagios/etc/objects/hosts.cfgdefine host{use linux-serverhost_name mysqlhostalias mysqlserveraddress 被监控端主机IPicon_image server.gifstatusmap_image server.gd22d_coords 100,3003d_coords 100,300,100check_command check-host-alivemax_check_attempts 5check_period 24x7contact_group adminsnotification_interval 10notification_period 24x7notification_options d,u,r}[root@nagios ~]#vim /usr/local/nagios/etc/objects/services.cfgdefine service {use local-servicehost_name mysqlhostservice_groups mysqlgroupservice_description mysqlservicecheck_command check_mysqlcontact_groups adminsnotification_interval 10notification_period 24x7notification_options w,u,r,c}define servicegroup {servicegroup_name mysqlgroupalias mysqlservices}[root@nagios ~]#vim /usr/local/nagios/etc/objects/commands.cfgdefine command{command_name check_mysqlcommand_line $USER1$/check_mysql -H $HOSTADDRESS$ -u nagdb -d nagdb }[root@nagios ~]#/usr/local/nagios/bin/nagios –v /usr/local/nagios/etc/nagios.cfg#检测无误后重新加载nagios服务[root@nagios ~]#service nagios reload三:Nagios通过NRPE监控远程主机系统状况(以mysql主机为例)1.在被监控端安装nagios-plugins和nrpe[root@mysql ~]#useradd nagios[root@mysql ~]#tar zxf nagios-plugins-1.4.15.tar.gz[root@mysql ~]#cd nagios-plugins-1.4.15[root@mysql nagios-plugins-1.4.15]#./configure --with-nagios-user=nagios \--with-nagios-group=nagios[root@mysql nagios-plugins-1.4.15]#make && make install[root@mysql nagios-plugins-1.4.15]#cd[root@mysql ~]#yum –y install xinetd[root@mysql ~]#tar zxf nrpe-2.12.tar.gz[root@mysql ~]#cd nrpe-2.12[root@mysql nrpe-2.12]#./configure[root@mysql nrpe-2.12]#make all[root@mysql nrpe-2.12]#make install-plugin[root@mysql nrpe-2.12]#make install-daemon#安装守护进程[root@mysql nrpe-2.12]#make install-daemon-config#安装配置文件[root@mysql nrpe-2.12]#make install-xinetd#安装xinetd脚本2.配置nrpe,添加nrpe服务[root@mysql ~]#vim /etc/xinetd.d/nrpe修改only_from = 127.0.0.1 监控主机IP#在后面增加监控主机(即nagios服务器)的地址,以空格间隔[root@mysql ~]#vim /etc/services添加nrpe 5666/tcp #nrpe#nrpe服务监听端口[root@mysql ~]#vim /usr/local/nagios/etc/nrpe.cfg修改command[check_disk]=/usr/local/nagios/libexec/check_disk –w 20% -c 10% -p / #在234行,将#注释去掉并修改,’/’表示根分区检测[root@mysql ~]#service xinetd restart[root@mysql ~]#netstat –at | grep nrpe[root@mysql ~]#netstat –an | grep 5666#重启xinetd服务,并查看NRPE是否已经启动3.监控主机的设置[root@nagios ~]#tar zxf nrpe-2.12.tar.gz[root@nagios ~]#cd nrpe-2.12[root@nagios nrpe-2.12]#./configure \--with-nagios-user=nagios --with-nagios-group=nagios[root@nagios nrpe-2.12]#make all && make install-plugin[root@nagios ~]#/usr/local/nagios/libexec/check_nrpe –H 被监控端IP#如输出NRPE v2.12说明连接正常[root@nagios ~]#vim /usr/local/nagios/etc/objects/command.cfgdefine command{command_name check_nrpe#定义命令名称为check_nrpe,在services.cfg中要使用这个名称command_line $USER1$/check_nrpe –H $HOSTADDRESS$ -c $ARG1$ #用$USER1$代替/usr/local/nagios/libexec,后面带的$ARG1$参数是传给nrpe daemon执行的检测命令}[root@mysql ~]#vim /usr/local/nagios/etc/nrpe.cfg#监控mysql主机的SWAP分区command[check_swap]=/usr/local/nagios/libexec/check_swap –w 20% -c 10% [root@mysql ~]#service xinetd reload[root@nagios ~]#cd /usr/local/nagios/libexec[root@nagios libexec]#./check_nrpe –H 被监控端主机IP -c check_swap[root@nagios ~]#vim /usr/local/nagios/etc/objects/services.cfgdefine service {use local-servicehost_name mysqlhostservice_groups mysqlgroupservice_description SWAP分区check_command check_nrpe!check_swapcontact_groups adminsnotification_interval 10notification_period 24x7notification_options w,u,r,c}define service {use local-servicehost_name mysqlhostservice_groups mysqlgroupservice_description CPU负载check_command check_nrpe!check_loadcontact_groups adminsnotification_interval 10notification_period 24x7notification_options w,u,r,c}define service {use local-servicehost_name mysqlhostservice_groups mysqlgroupservice_description 登录用户数check_command check_nrpe!check_userscontact_groups adminsnotification_interval 10notification_period 24x7notification_options w,u,r,c}define service {use local-servicehost_name mysqlhostservice_groups mysqlgroupservice_description 磁盘剩余空间check_command check_nrpe!check_diskcontact_groups adminsnotification_interval 10notification_period 24x7notification_options w,u,r,c}define service {use local-servicehost_name mysqlhostservice_groups mysqlgroupservice_description 总进程check_command check_nrpe!check_total_procscontact_groups adminsnotification_interval 10notification_period 24x7notification_options w,u,r,c}define service {use local-servicehost_name mysqlhostservice_groups mysqlgroupservice_description 僵尸进程check_command check_nrpe!check_zombie_procscontact_groups adminsnotification_interval 10notification_period 24x7notification_options w,u,r,c}define service{use generic-servicehost_name mysqlhostservice_description SWAPcheck_command check_nrpe!check_swap}[root@nagios ~]#/usr/local/nagios/bin/nagios –v /usr/local/nagios/etc/nagios.cfg [root@nagios ~]#service nagios reload四:通过邮件报警!1.配置nagios邮箱报警功能[root@nagios ~]#vim /usr/local/nagios/etc/object/contacts.cfgdefine contact{contact_name nagiosadminalias Nagios Adminservice_notification_period 24x7host_notification_period 24x7service_notification_options w,u,c,rhost_notification_options d,u,rservice_notification_commands notify-service-by-emailhost_notification_commands notify-host-by-emailemail 1009864@#多个管理员邮箱地址使用空格或者逗号隔开}2.配置邮件服务器(这里以postfix介绍)[root@nagios ~]#yum –y install postfix* httpd* dovecot* [root@nagios ~]#hostname [root@nagios ~]#vim /etc/postfix/main.cf修改myhostname = #在75行mydomain = #在83行myorigin = $myhostname #在98行myorigin = $mydomain #在99行inet_interfaces = all #在113行mydestination = $myhostname, $mydomain #在164行[root@nagios ~]#service sendmail stop[root@nagios ~]#service postfix start[root@nagios ~]#netstat –an | grep 25[root@nagios ~]#service dovecot restart[root@nagios ~]#postmap /etc/postfix/virtual。
nagios流程分析

nagios流程分析在大部分环境中,nagios是不需要优化的,一来监控这个东西大家都不觉得很重要,二来n agios本身已经是个很轻量级的软件,架构比较合理,三来现在的机器配置都很恐怖,一台普通的pc机撑起上千台host,上三四千service的监控那是小菜一碟,实际环境中有这么大量监控需求的地方本来就不多,就算有这么大量监控需求的公司,用nagios的并不多数吧!但是某些情况下,还是偶尔碰到需要优化的情况。
我需要监控的机器数量就超过了1000台,而且用的nagios,用了被动检查的架构以后,撑起这么多的监控本来是没有问题,但是上周的时候,做nagios和ndotuils的集成就出现了性能瓶颈,凌晨5点左右,把ndotuils架到两台nagios上之后,应用启动什么的都正常,但是到了上午8点就发现了问题,看到检查结果的last_check时间从7:20到8:20不等,而且是均匀分布,没有办法,只好把ndo mod关掉,到了上午10点左右,就恢复正常了。
既然nagios出现了瓶颈,就不妨拿源码来看一下,配置文件的选项优化,在nagios的文档里说了很多,但是还是感觉不是很直观,分析源码,只是属于个人兴趣,这里把流程跟大家分享一下,至于优化方案,还是需要大家多多指点了。
一、nagios在启动以后,载入成daemon,整个的步骤如下:1、读入配置文件(read_main_config_file)2、初始化event_broker3、载入所有broker_mod(ndomod包括在这里面)4、读入object信息(包括service,host,servicegroup,hostgroup,contact,contactgr oup等等)5、告诉broker,我启动了6、初始化daemon(例行工作,fork进程,修改根目录,设置信号量等等)7、打开cmd文件(nagios.cmd)8、初始化status数据(status.dat)9、读取保存数据(retention.dat)10、读取注释数据11、读取downtime数据12、读取性能数据13、初始化event_timing循环14、初始化check_stats15、生成status.dat(空的,不写数据)16、传输event_loop_start信息到broker(ndo:获取scheduling_info中数据)17、开始event_execution_loop,检查数据,直到捕获重启或者关闭信号如果接到了重启或者关闭的信号,则继续往下执行18、通知broker_mod,我要关闭了,或者我要重启了19、保存retention文件20、清理性能数据21、清理downtime数据22、清理注释数据23、如果是关闭信号,清理status.dat24、如果是关闭信号,删除cmd文件步骤比较简单,其中比较重要的有两个,一个是13,初始化循环,另一个就是17,nagios 在作为daemon运行的过程中,就是在不断的执行这个循环。
nagios监控端安装配置手册

一、系统环境与软件版本情况本文档使用被监控机的操作系统为rhel6.3 _64位。
监控主机操作系统为rhel6.0 _64位及windows 2003,nagios主服务版本Nagios® Core™ 3.2.3,linu被监控机与主监控通信插件NRPE版本为nrpe-2.8.1。
window被监控机与主监控服务软件为NSClient++-0.2.7所使用的软件如下nrpe-2.8.1.tar.gzNSClient++-0.2.7.zip二、安装配置过程。
因为系统安装大家都非常熟悉了此次略过操作系统安装过程,首先是linux环境下被监控机的安装配置过程。
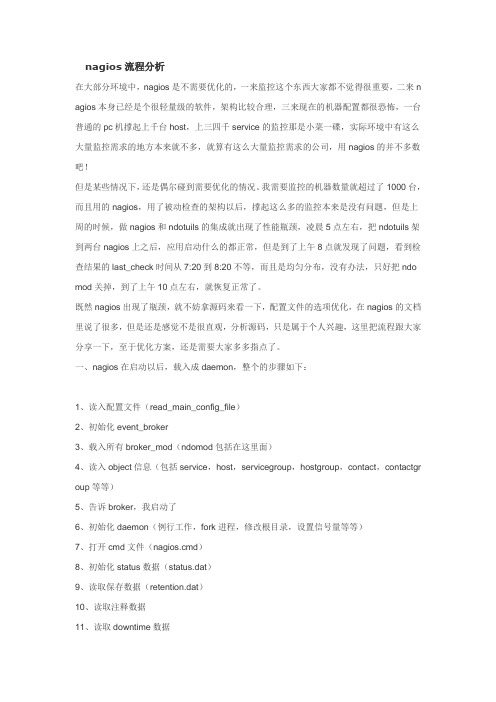
在安装之前先写个nagios监控非本地信息的原理图主监控机被监控机NRPE总共由两部分组成:–check_nrpe 插件,位于在监控主机上–NRPE daemon,运行在远程的linux主机上(通常就是被监控机)按照上图,整个的监控过程如下:当nagios需要监控某个远程linux主机的服务或者资源情况时1.nagios会运行check_nrpe这个插件,告诉它要检查什么.2.check_nrpe插件会连接到远程的NRPE daemon,所用的方式是SSL3.NRPE daemon会运行相应的nagios插件来执行检查4.NRPE daemon将检查的结果返回给check_nrpe插件,插件将其递交给nagios做处理.注意:NRPE daemon需要nagios插件安装在远程的linux主机上,否则,daemon不能做任何的监控.因为使用rehl线上的yum源安装需要授权,所以先使用iso搭个本地的yum源。
mount /dev/cdrom /mnt/cdrom/ 挂载光驱mkdir /home/rehliso 创建yum源目录。
cp -Rf /mnt/cdrom/* /home/rehliso/ 拷贝安装文件到源目录cd /etc/yum.repos.d/ 切换至yum配置文件目录cp rhel-source.repo rhel-source.repo.bak 备份配置文件vi rhel-source.repo 编辑配置文件,删除之前内容加入[rhel_6_iso]name=local isobaseurl=file:///home/rehlisogpgcheck=1gpgkey=file:///home/rehliso/RPM-GPG-KEY-redhat-release保存退出Yum clean all清除YUM缓存因为是用二进制安装包进行安装所以要先安装gcc编译器yum -y install gcc 安装gcc编译器安装完成后用sftp上传安装文件nrpe-2.8.1.tar.gz, nagios-plugins-1.4.13.tar.gz至/usr/local/src/目录下创建nagios用户Userad nagiosPasswd nagiosCd /usr/local/src 切换至/usr/local/src/目录解压安装包tar zxvf nagios-plugins-1.4.13.tar.gzcd nagios-plugins-1.4.13编译安装./configuremakemake install这一步完成后会在/usr/local/nagios/下生成两个目录libexec和share修改目录权限把权限所属chown nagios.nagios /usr/local/nagios/chown -R nagios.nagios /usr/local/nagios/libexec/至此被监控机nagios插件已经安装完成,接下来就是安装nrpe服务了切换至软件包目录Cd /usr/local/src解压安装文件tar zxvf nrpe-2.8.1.tar.gzcd nrpe-2.8.1编译安装./configurechecking for SSL... configure: error: Cannot find ssl libraries 出现了该错误主要是因为监控主机插件check_nrpe与被监控nrpe服务的通信是通过ssl方式连接的所以必须安装sslyum -y install openssl-devel 所以这个可以在gcc安装时顺便也安装了ssl安装完成后重新./configure*** Configuration summary for nrpe 2.8.1 05-10-2007 ***:General Options:-------------------------NRPE port: 5666NRPE user: nagiosNRPE group: nagiosNagios user: nagiosNagios group: nagiosReview the options above for accuracy. If they look okay,type 'make all' to compile the NRPE daemon and client.成功后会出现以上安装的基本信息接下来编译安装make allmake install-daemonmake install-daemon-configmake install-plugin 安装check_nrpe这个插件之前说过监控机需要安装check_nrpe这个插件,被监控机并不需要,我们在这里安装它是为了测试的目的安装xinetd脚本make install-xinetd这里还要补充一下因为官网的安装文档是将NRPE deamon作为xinetd下的一个服务运行的.在这样的情况下xinetd就必须要先安装好,所以还得确定系统是否已经安装了xinetd的服务[root@localhost nrpe-2.8.1]# service xinetd restartxinetd: unrecognized service服务并未安装yum -y install xinetd 安装xinetd服务安装完成后修改配置文件vi /etc/xinetd.d/nrpeservice nrpe{flags = REUSEsocket_type = streamport = 5666 端口wait = nouser = nagios 用户group = nagios 用户组server = /usr/local/nagios/bin/nrpeserver_args = -c /usr/local/nagios/etc/nrpe.cfg --inetdlog_on_failure += USERIDdisable = noonly_from = 127.0.0.1,192.168.1.243}only_from = 127.0.0.1,192.168.1.243在后面增加监控主机的地址192.168.1.243以空格间隔编辑/etc/services文件,增加NRPE服务端口添加如下信息nrpe 5666/tcp #nrpe查看防火墙是否启动chkconfig iptables –list如果启动需要添加5666端口的开放规则vi /etc/sysconfig/iptables-A INPUT -m state --state NEW -m tcp -p tcp --dport 5666 -j ACCEPT添加该条目service iptables restart 重启iptables服务重启xinetd服务service xinetd restart检查服务端口状态[root@localhost ~]# netstat -natp |grep 5666tcp 0 0 :::5666 :::* LISTEN 1959/xinetd 服务端口已经启动测试NRPE是否则正常工作之前我们在安装了check_nrpe这个插件用于测试,现在就是用的时候.执行[root@localhost ~]# /usr/local/nagios/libexec/check_nrpe -H localhostNRPE v2.8.1返回了版本信息说明nrpe已经正常的工作了。
Nagios监控Linux主机(NRPE安装与应用)

Nagios监控Linux主机(NRPE安装与应用)一、NRPE简介及工作原理NRPE是nagios的一个扩展,它被用于被监控的服务器上,向nagios监控平台提供该服务器的一些本地的情况。
例如,cpu负载、内存使用、硬盘使用等等。
NRPE可以称为nagios 的for linux 客户端。
NRPE 由两个部分组成:工作在监控机一侧的check_nrpe 插件、工作在被监控机一侧的NRPE 守护进程。
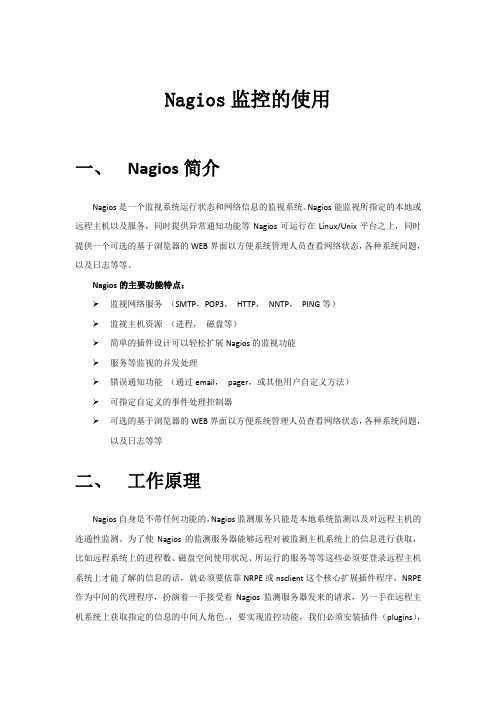
Nagios 服务器执行check_nrpe 插件并告诉他检查哪个服务,check_nrpe 插件通过SSL 连接方式联系远程服务器上的NRPE 守护进程,NRPE 守护进程执行相应的插件完成指定的检查,并返回结果。
工作原理是:插件nrpe在被监控机上开启一个daemon,通过这个daemon来和监控主机建立一条ssl加密通道,通过这条通道来传送被监控机的本地信息,达到监控的目的。
装在被监控机上的daemon就相当于一个nagios的传递员,命令行从nagios监控主机发出,然后daemon接受到信息,就会执行这条命令行,执行的方式,其实是和nagios主机是一样的,所以被监控机上也需要装一套nagios-plugins插件。
例如:nagios主机需要监控被监控机的硬盘信息,就会对被监控机发出一条命令说:“我要看你的硬盘信息。
”被监控机nrpe的daemon接到这个命令之后,就会运行一个插件,来检查被监控机本地硬盘的信息,然后插件把信息反馈到nrpe,nrpe通过ssl通道再把这些信息反馈到nagios主机。
如下图所示二、NRPE安装1、所需安装包nrpe、nagios-plugins,这两个包都可以从上得到,本例为nrpe-2.12.tar.gz2、安装openssl、openssl-devel;yum install -y opensslyum install -y openssl-devel3、安装nrpe和nagios-plugins插件1)安装nagios-plugins,在安装时首先在被监控机上新建nagios用户及组。
监控系统配置使用(Nagios)

监控系统配置使用—Nagios
讲师:吴云鹏
税友软件集团股份有限公司
课程目标
nagios体系结构认识 • 帮助运维人员对nagios体系结构有更清晰的认识
如何配置监控项 • 帮助运维人员更有效的使用和配置nagios的监控项
理解监控项含义 • 帮助运维人员更好理解现有监控项的含义
2
课程大纲
3
系统介绍 原理、结构 部署、配置 监控项简介
问题交流
Nagios介绍
Nagios介绍: Nagios是一款用于系统和网络监控的应用程序,可在设定的条件下对主机和服务
进行监控,在状态变差和变好的时候给出告警信息。 Nagios 的特征包括: 1) 监控网络服务(SMTP、POP3、HTTP、NNTP、PING 等); 2) 监控主机资源(处理器负荷、磁盘利用率等); 3) 简单地插件设计使得用户可以方便地扩展服务的检测方法; 4) 当服务或主机问题产生与解决时将告警发送给联系人(Email)、页面声音报警 Centreon介绍: centreon作为nagios的分布式监控管理平台,它的底层使用nagios监控软件,通过 centreon页面可以简单方便地管理和配置nagios;
个性类监 控
监控项
Weblogic 类监控
Oracle类 监控
15
监控插件
插件作用
• 什么是插件?插件和命令的关系?
插件存放位置
• 存放在监控机位置?存放在被监控机位置?
现有插件
• 现有哪些插件?获取插件网站
16
回顾
通用监控
主机监控项 Weblogic监控项
Oracle监控项
17
个性监控
Godengate监控项 业务监控项 接口监控项
Nagios 使用说明

– 重启apache使新设置生效。
• service httpd restart
第二章 Nagios安装和配置
• Nagios典型配置
– Nagios安装完成了,但是还需要配置。 – 修改nagios的主配置文件nagios.cfg。 – 修改CGI脚本控制文件cgi.cfg。 – 定义监控时间段,创建配置文件timeperiods.cfg。 – 定义联系人,创建配置文件contacts.cfg。
第二章 Nagios安装和配置
• nagios.cfg配置文件修改
– 注释行 #cfg_file=/usr/local/nagios/etc/localhost.cfg[2],然后把下面几行的 注释去掉:
• • • • • • cfg_file=/usr/local/nagios/etc/contactgroups.cfg //联系组配置文件路径 cfg_file=/usr/local/nagios/etc/contacts.cfg //联系人配置文件路径 cfg_file=/usr/local/nagios/etc/hostgroups.cfg //主机组配置文件路径 cfg_file=/usr/local/nagios/etc/hosts.cfg //主机配置文件路径 cfg_file=/usr/local/nagios/etc/services.cfg //服务配置文件路径 cfg_file=/usr/local/nagios/etc/timeperiods.cfg //监视时段配置文件路径
– 注意:NRPE daemon需要nagios插件安装在远程的linux主机上,否 则,daemon不能做任何的监控。 – 需要在被监控主机上安装nagios插件,NRPE。在监控主机上安装 check_nrpe插件。
nagios的使用

Nagios监控的使用一、Nagios简介Nagios是一个监视系统运行状态和网络信息的监视系统。
Nagios能监视所指定的本地或远程主机以及服务,同时提供异常通知功能等Nagios可运行在Linux/Unix平台之上,同时提供一个可选的基于浏览器的WEB界面以方便系统管理人员查看网络状态,各种系统问题,以及日志等等。
Nagios的主要功能特点:监视网络服务(SMTP,POP3,HTTP,NNTP,PING等)监视主机资源(进程,磁盘等)简单的插件设计可以轻松扩展Nagios的监视功能服务等监视的并发处理错误通知功能(通过email,pager,或其他用户自定义方法)可指定自定义的事件处理控制器可选的基于浏览器的WEB界面以方便系统管理人员查看网络状态,各种系统问题,以及日志等等二、工作原理Nagios自身是不带任何功能的,Nagios监测服务只能是本地系统监测以及对远程主机的连通性监测。
为了使Nagios的监测服务器能够远程对被监测主机系统上的信息进行获取,比如远程系统上的进程数、磁盘空间使用状况、所运行的服务等等这些必须要登录远程主机系统上才能了解的信息的话,就必须要依靠NRPE或nsclient这个核心扩展插件程序,NRPE 作为中间的代理程序,扮演着一手接受着Nagios监测服务器发来的请求,另一手在远程主机系统上获取指定的信息的中间人角色。
,要实现监控功能,我们必须安装插件(plugins),以及nrpe。
2.1 监控windows1. windows设置1)安装nsclient,然后在cmd命令台执行以下命令2)修改nsclient的nse.ini配置文件[modules] #去掉注释符号”;”除了CheckWMI.dll和RemoteConfiguration.d llFileLogger.dllCheckSystem.dllCheckDisk.dllNSClientListener.dll[Settings]allowd_host=192.168.2.2 #为nagios服务的IP[NSClient]port=12489 #去掉注释就可以了!3)启动nsclient服务并确认端口是否打开2. linux设置接下来我们开始配置nagios服务器里面的内容,因为nagios是模块化调用,先到配置文件打开windows相关模块。
- 1、下载文档前请自行甄别文档内容的完整性,平台不提供额外的编辑、内容补充、找答案等附加服务。
- 2、"仅部分预览"的文档,不可在线预览部分如存在完整性等问题,可反馈申请退款(可完整预览的文档不适用该条件!)。
- 3、如文档侵犯您的权益,请联系客服反馈,我们会尽快为您处理(人工客服工作时间:9:00-18:30)。
CheckEventLogCheckEventLog is part of the wiki:CheckEventLog module. This page describes the new syntax, for the old syntax refer to the old page: CheckEventLogOld The new syntax is a bit sketchy in the docs as of yet... I shall try to fix some better examples.. but the best idea would be for someone that uses this to help me with that :) Before you start using CheckEventLog use this command (it is long but a good place to start):CheckEventLog file=application file=system filter=new filter=outMaxWarn=1 MaxCrit=1filter-generated=>2d filter-severity==success filter-severity==informationaltruncate=1023 unique descriptions "syntax=%severity%: %source%: %message% (%count%)"This check enumerates all event in the event log and filters out (or in) events and then the resulting list is used to determine state.The CheckEventLog uses filters to define the "interesting" records from the eventlog.SyntaxA filter is made up of three things:•Filter mode Determines what happens when the filter is matched.CheckEventLog1•Filter type What the filter will match (ie. which field).•An Expression What to check for.The syntax of a filter is: filter<mode><type>=<expression>OrderOrder is important, as soon as a positive (+) or negative (-) rule is matched it is either discarded or included and the entry is "finished" and it will continue with the next entry. The best way here is to have an "idea" either remove all entries first or include all required ones first (depending on what you want to do). You can mix and such but this will probably complicate things for you unless you actually need to.Filter modesCapturing eventlog entries (or discarding them) are done with filters. There are three kinds of filters.<filter mode>title description+positive requirements All these filters must match or the row is discarded..potential matches If this matches the line is included (unless another lines overrides).-negative requirements None of these filters can match (if any do the row is discarded). Thus if you want to have: all errors and entries from the last month but not the ones from the cdrom, but if the source is MyModule? get everything. I would break this down as such: (notice there are other options). + type=error - date=older than 2 months . source=MyModule? This would pick up all errors, and drop all old records and then pickup all remaining "MyModule?" records (in this case you could have used + on the source filter since there are no more rules).other example to simplify it: if for example you want to monitor all errors and to ignore warning and success in the eventlog you can write the following: filter+severity==error filter-severity==successfilter-severity==informationaland the command with those parameters with others can be like the following: CheckEventLogfile=application file=system filter=new filter=out MaxWarn=1 MaxCrit=1 filter-generated=>2dfilter+severity==error filter-severity==success filter-severity==informational truncate=1023 unique descriptions "syntax=%severity%: %source%: %message% (%count%)"Filter TypesSyntax2An event type expression is similar to a numeric-expression but instead of a number a "keyword" is taken: error, warning, info, auditSuccess, auditFailure. So filter.eventType==warning orfilter.eventType=<>warning are examples of event type expressions. Yes this is correct the syntax is:filter<mode><type>=<expression> in this case <mode> is ".", <type> is "eventType" and <expression> is "<>warning". This IS confusing but it is "simpler to parse" some day maybe I shall improve this.filter<key><event severity expressionAn event severity expression is similar to a numeric-expression but instead of a number a "keyword" is taken: success, informational, warning or errortime expressionA time expression is a date/time interval as a number prefixed by a filter prefix (<, >, =, <>) and followed by a unit postfix (m, s, h, d, w). A few examples of time expression are: filter+generated=>2d means filter will match any records older than 2 days, filter+generated=<2h means match any records newer then 2 hours. Warning, the bash interprets the "<,>,!". Use the "\" to avoid this. e.g. filter+generated=\>2d . On the Client activate the "Nasty Metachars" Option, to allow the \.string expressionA string expression is a key followed by a string that specifies a string expression. Currently substr and regexp are supported. Thus you enter filter.message=regexp:(foo|bar) to enter a regular expression andfilter-message=substr:foo to enter a substring patter match.Filter in/outThere are two basic ways to filter:•in When you filter in it means all records matching your filter will be returned (the "simplest way")•out When you filter out it means all records matching your filter will be discarded.So:filter=in filter+eventType==warning...filter=out filter-eventType==warningWill both have the same effect as the first one filters "in" and matches all warnings and the second one filters out and discards all warnings. There is one very fundamental difference though the first one will only return the warnings where as the second one will return all entries and all warnings.Filter Types3UniqueWhen unique is present any duplicate entries matching the filter will be discarded so you will only get backone of each "kind" of error. Uniqueness is determined by log-file, event-id, event-type and event-category. ExamplesSample Eventlog CommandCheck by EventID for target errors that may have transpired over the past 2 hours.$ARG1$ = file to check ie. Application, Security, System$ARG2$ = Max Warn amount$ARG3$ = Max Critical amount$ARG4$ = eventID NumberSample Command:CheckEventLog filter=new file="application" MaxWarn=10 MaxCrit=20 filter-generated=OK: ...Nagios Configuration:define command {command_name <<CheckEventLog>>command_line check_nrpe -H $HOSTADDRESS$ -p 5666 -c CheckEventLog -a filter=new file="$ARG1$" M From Commandline (with NRPE):check_nrpe -H IP -p 5666 -c CheckEventLog -a filter=new file="application" MaxWarn=10 MaxCrit=20 Another sampleCheck the Application event log for errors over the past 48 hours. Filter out any Cdrom and NSClient Errorsas well as all Warnings. Allow 3 target Errors before firing a Warning, and 7 Errors before firing a CriticalState.This is the corresponding command: Sample Command:CheckEventLog filter=new file=system file=application MaxWarn=1 MaxCrit=1 filter-generated=>2d fi CRITICAL: 27 > critical: ESENTNagios Configuration:define command {command_name <<CheckEventLog>>command_line check_nrpe -H $HOSTADDRESS$ -p 5666 -c CheckEventLog -a filter=new file=system fil }<<CheckEventLog>>Unique4From Commandline (with NRPE):check_nrpe -H IP -p 5666 -c CheckEventLog -a filter=new file=system file=application MaxWarn=1 Ma Please note: You need to allow_nasty_meta_chars=1 in the NSC.ini to use time filters like "<2d" (last48 hours).Check if a script is running as it shouldJust to show a 'hidden' parameter ... I check that a script has successfully finished by writing into the eventlog.If after 1 day there is no new log entry, I get the message from Nagios.Sample Command:CheckEventLog filter=new file=application MinWarn=0 MinCrit=0 filter-generated=\>1d filter+eventS OK: ...Nagios Configuration:define command {command_name <<CheckEventLog>>command_line check_nrpe -H $HOSTADDRESS$ -p 5666 -c CheckEventLog -a filter=new file=applicatio }<<CheckEventLog>>From Commandline (with NRPE):check_nrpe -H IP -p 5666 -c CheckEventLog -a filter=new file=application MinWarn=0 MinCrit=0 filt Don't understand filtering ?Yes I know, there are a lot of options regarding filtering, and they are a bit hard understand. This section triesto give a more formal definition of what the various options do (form a programming perspective).OptionsThere are three different option pairs all used with the same key filter1.filter=new / filter=old This one decides the code which is used there are two completely differentconcepts and the "Old" one is preferably not to be used as it is slightly less sane.filter=all / filter=any This is NOT used with filter=new so this option is deprecated and should not be2.used unless you are using filter=old.3.filter=in / filter=out This option decides what happens if "nothing matches" if you have filter=in thatmeans if nothing matches you will still get the option where as if you have filter=out you wont. Sothis is the last thing that happens in the code.So what you end up with is:•filter=new this is default in newer versions, so you don't really need this anymore.filter=old Should not be used any more.•Don't understand filtering ?5filter=any is not used any more.••filter=all is not used any more.•filter=in Means you want everything except "something"•filter=out Means you only want "something"RulesThere are three different filter rule types all used in the same way except swapping the - for + for .1.filter+severity==error This means that any entries matching this rule is automatically included in the result. After this we instantly stop matching more rules for this entry.filter-severity==error This means that any entries matching this rule is automatically excluded in the2.result. After this we instantly stop matching more rules for this entry.3.filter.severity==error This means that any entries matching this rule is neither automatically excluded nor automatically included in the result. But after this rule we continue matching more more rules for this entry. Since this is the default behavior with filter=in there is no reason to use filter=. in thismode.How it worksPseudo code (filter=new)This is how the filtering is decided:•bFilterIn=true for filter=in and false for filter=outbool bMatch = !bFilterIn;for(<each rule>) {bTmpMatched=<result of rule evaluation>if ((mode == filter_minus)&&(bTmpMatched)) {// a -<filter> hit so thrash item and bail out!bMatch = false;break;} else if ((mode == filter_plus)&&(!bTmpMatched)) {// a +<filter> missed hit so thrash item and bail out!bMatch = false;break;} else if (bTmpMatched) {bMatch = true;}}if (bMatch) {<deciding factor> = true;}Options6。
