科勒K-4026T安装说明书
科勒厨房超滤净饮机利奥系列 K-24634T-KT700-01R 安装使用说明书
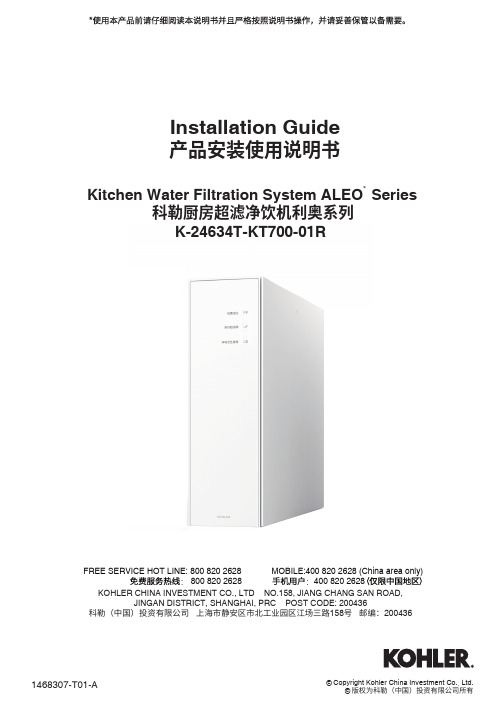
Installation Guide产品安装使用说明书KOHLER CHINA INVESTMENT CO., LTD NO.158, JIANG CHANG SAN ROAD,JINGAN DISTRICT, SHANGHAI, PRC POST CODE: 200436科勒(中国)投资有限公司 上海市静安区市北工业园区江场三路158号 邮编:200436Kitchen Water Filtration System ALEO Series科勒厨房超滤净饮机利奥系列K-24634T-KT700-01R®FREE SERVICE HOT LINE: 800 820 2628 MOBILE:400 820 2628 (China area only): 800 820 2628 :400 820 26281. PRODUCT FUNCTION (1)2. INTENDED USE (2)3. PRODUCT SPECIFICATION (3)4. INSTALLATION (7)5. OPERATION INSTRUCTIONS (11)6. FILTER CARTRIDGE REPLACEMENT (12)7. TROUBLESHOOTING GUIDE......................................13一、产品功能 (1)二、安装之前 (2)三、产品规格 (3)四、安装步骤 (7)五、产品使用 (11)六、滤芯更换 (12)七、常见问题及解决方法 (13)• Thank you for choosing the Kitchen WaterFiltration System ALEO Series.• Please read this Installation Guide carefully prior to installation and operation of this system.• You can also visit for an electronic copy of the Installation Guide or obtain the latest product information by following the official Kohler WaterFiltration wechat account: kohlerwater.• 感谢您选择科勒厨房超滤净饮机利奥系列。
科勒 产品安装说明书 1282697-2-D

18
11
16
注意:参照98699T-NA安装尺寸 安装安装盒(1)。
墙面装修好后,切掉安装盒凸出 墙面的部分,用螺丝刀旋松螺钉 (2),取下保护组件(3)。
取下阀体组件(4)底部保护板(5),注 意:不要弄丢底部O型圈(6),安装 过程中不要转动阀轴(7)。阀体底部 各孔对准安装盒底部各孔,将阀体 装入安装盒,锁紧螺钉(8)。
安装尺寸
安装好的墙面 140
安装好的墙面 140
51
51
80 180
80 180
51
51
15 79~109
99729T-9ACH/99729T-9GCH
1282697-2-D
15 79~109
99730T-9ACH/99730T-9GCH
1
安装步骤
1 2
3
4 5
4
6
9
8
10
7
13
14
12
17 15
将安装盘组件(9)套入阀体,将其后 推,直至与墙面接触。用螺钉(10, 长50mm)固定安装盘组件。
将面板(11)套在阀体上,使开槽 (12)向下(注意:不要弄丢孔内O型 圈(13,14))。将其后推,直至与墙 面接触。将把手(15,16)装到阀轴 上,把手上的圆点标识(17,18)垂 直向上。
注意:安装过程中,若发现冷热水管反接,可通过调换冷热止水 塞组件位置,使面板正常工作。如图所示。
3016134
75588
3019455
3008304
1244917 3018303
1289491 3021239
1226023 3018256**
871241
3018197
科勒卫浴置物架安装说明书
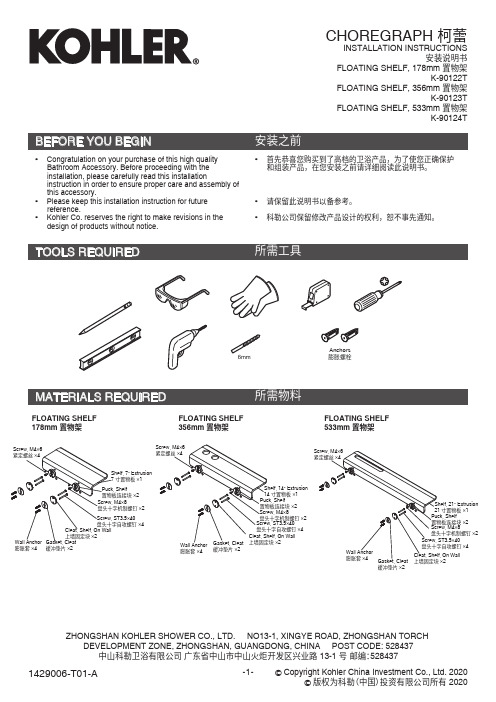
1429006-T01-A-1-© Copyright Kohler China Investment Co., Ltd. 2020© 版权为科勒(中国)投资有限公司所有 2020ZHONGSHAN KOHLER SHOWER CO., LTD. NO13-1, XINGYE ROAD, ZHONGSHAN TORCHDEVELOPMENT ZONE, ZHONGSHAN, GUANGDONG, CHINA POST CODE: 528437中山科勒卫浴有限公司 广东省中山市中山火炬开发区兴业路 13-1 号 邮编:528437CHOREGRAPH 柯蕾INSTALLATION INSTRUCTIONS安装说明书FLOATING SHELF, 178mm 置物架K-90122TFLOATING SHELF, 356mm 置物架K-90123TFLOATING SHELF, 533mm 置物架K-90124T• 首先恭喜您购买到了高档的卫浴产品,为了使您正确保护和组装产品,在您安装之前请详细阅读此说明书。
• 请保留此说明书以备参考。
• 科勒公司保留修改产品设计的权利,恕不事先通知。
• Congratulation on your purchase of this high qualityBathroom Accessory. Before proceeding with the installation, please carefully read this installationinstruction in order to ensure proper care and assembly of this accessory.• Please keep this installation instruction for futurereference.• Kohler Co. reserves the right to make revisions in thedesign of products without notice.Wall Anchor 膨胀套 ×4Gasket, Cleat 缓冲垫片 ×2Cleat, Shelf, On Wall 上墙固定块 ×2Screw, ST3.5×40盘头十字自攻螺钉 ×4Screw, M4×8盘头十字机制螺钉 ×2Screw, M4×6紧定螺丝 ×4Screw, M4×6紧定螺丝 ×4Screw, M4×6紧定螺丝 ×4Puck, Shelf 置物板连接块 ×2Shelf, 7" Extrusion 7 寸置物板 ×1FLOATING SHELF 178mm 置物架FLOATING SHELF 356mm 置物架FLOATING SHELF 533mm 置物架Shelf, 14" Extrusion14 寸置物板 ×1Puck, Shelf 置物板连接块 ×2Screw, M4×8盘头十字机制螺钉 ×2Screw, ST3.5×40盘头十字自攻螺钉 ×4Cleat, Shelf, On Wall上墙固定块 ×2Gasket, Cleat 缓冲垫片 ×2Wall Anchor膨胀套 ×4Shelf, 21" Extrusion 21 寸置物板 ×1Puck, Shelf置物板连接块 ×2Screw, M4×8盘头十字机制螺钉 ×2Screw, ST3.5×40盘头十字自攻螺钉 ×4Cleat, Shelf, On Wall 上墙固定块 ×2Gasket, Cleat 缓冲垫片 ×2Wall Anchor 膨胀套 ×4-2-1429006-T01-A• 在清洁产品时,请使用温和的清洗剂,如液体清洗剂和温水。
科勒(Kohler)厕所安装指南说明书

Read installation guide in illustration and word filecarefully,and install Z Z the tank according to instructions in the guide to avoid product damage and installation inconvenience caused by inappropriate operation.All data contained is based upon the last productinformation available at the time of publication.Kohler Company reserves the right to implement changes of product characteristics,packaging and availability at any time without further notice.Do not apply erosive cleanser and solvent in the tank,which will damage tank spares and result in leakage in the tank.Kohler will not be responsible for any damage related to above mentioned cleanser or solvent.Do not apply spares that are not provided by Kohler,and please note that glass adhesive tape shall not be applied to the installation of Kohler spares.Kohler will not be responsible for any damage related to installation with spares not provided byKohler.Function Explanation,2010Copyright Kohler China Ltd.,2010Wall-hung Toilet That Matches The Tank上海科勒电子科技有限公司上海市浦东新区金滇路18号E 幢邮编:201206海德丽100 HYDRO-TOWER 100自动感应入墙式隐藏水箱Touchless Inwall Tank with Frame安装说明书INSTALLATION INSTRUCTIONSAdvantages Of Touchless In-wall TankAnti-strike and erosion proof tank of macromolecule materials,and leak proof.Advanced tank spares,adjustable to of 3/6liters.Impact free to wall structures,and excellent sound insulation effect.Easy installation and time efficient.Easy maintenance and no necessity of removing the wall in the process of maintenance.Clean,Garbage free,and space efficient.flushing 自动感应入墙式隐藏水箱的优点3/6不仅具有单、双档手动冲水功能,还能自动感应区分大小便,并完成相应的大、小水量分档冲水。
科勒感应式冲洗阀维修零件和保养指南说明书

123340012GBL-1012-A Activation Assembly Tool1333400035GBL-1062-A Replacement Mud Guard, Sensor (4 pack)140340085GBL-66-AShut Off Sleeve (with O-Ring)* Not sold separately. ** Included with Piston.FLUSH CONNECTION PARTSItem No.Code No.Part No.Description153323183V-651 Vacuum Breaker Repair Kit 160323011V-500-A RB Vacuum Breaker Assembly1733060011F-227-A Adjustable Tube 6.5” Replacement Kit, 8158, 819833060012F-228-A Adjustable Tube 10.5” Replacement Kit, 8154180306395F-211-A CX Poly Washer and Coupling (set of 2)190306392PK F-305CX Elbow for CX Poly Washer 200306091F-2-A 1-1/2” Coupling Set with S-21 Gasket 20A0319079S-211-1/2" Rigid GasketFlange against spudFor Model 8198, UrinalsFor Model 8154, Floor Mount Exposed Rear InletITEM NO. 1 - SENSOR PISTON ASSEMBLY SELECTION GUIDECode No.Part No.DescriptionPiston Color*3340053GBL-1037-A 1.6 gpf/6.0 Lpf Closet Piston Assembly Green 33400079GBL-1098-A 1.28 gpf/4.8 Lpf Closet Piston Assembly Blue/Black 33400061GBL-1088-A 1.1 gpf/4.2 Lpf Closet Piston Assembly Burgundy/Black 3340055GBL-1039-A 0.5 gpf/1.9 Lpf Urinal Piston Assembly Red 3340056GBL-1040-A 0.25 gpf/1.0 Lpf Urinal Piston Assembly Burgundy 33400003—0.125 gpf/0.48 Lpf Urinal Piston Assembly †Red/PinkITEM NO. 2 - ACTIVATION ASSEMBLY SELECTION GUIDELEGACY CONNECTION** - PRIOR TO DECEMBER 2021Code No.Part No.DescriptionPlug Color*3340057GBL-1041-A 1.6 gpf/6.0 Lpf Closet Activation Assembly, Legacy connectionGreen 3340058GBL-1042-A1.28 gpf/4.8 Lpf Closet Activation Assembly, Legacy connectionPurple 3340059GBL-1043-A 0.5 gpf/1.9 Lpf Urinal Activation Assembly, Legacy connectionRed 3340060GBL-1044-A 0.25 gpf/1.0 Lpf Urinal Activation Assembly, Legacy connection Burgundy 33400006GBL-1070-A0.125 gpf/0.48 Lpf Urinal Activation Assembly, Legacy connectionN/A; Nickel plated brassPIGTAIL CONNECTION** - AFTER DECEMBER 2021Code No.Part No.DescriptionPlug Color*33400051GBL-1077-A 1.6 gpf/6.0 Lpf Closet Activation Assembly, Pigtail connectionGreen 33400052GBL-1078-A 1.28 gpf/4.8 Lpf Closet Activation Assembly, Pigtail connectionPurple 33400062GBL-1092-A 1.1 gpf/4.2 Lpf Closet Activation Assembly Grey 33400053GBL-1079-A 0.5 gpf/1.9 Lpf Urinal Activation Assembly, Pigtail connectionRed 33400054GBL-1080-A 0.25 gpf/1.0 Lpf Urinal Activation Assembly, Pigtail connection Burgundy 33400056GBL-1081-A0.125 gpf/0.48 Lpf Urinal Activation Assembly, Pigtail connectionN/A; Nickel plated brass* Colors may differ. Consult factory to confirm you have the correct assembly.** Includes Solenoid Repair Kit #2A.NOTE: Item No. 1 includes Item No. 5 (Conical Spring).* Colors may differ. Consult factory to confirm you have the correct Piston Assembly.† 0.125 gpf/0.48 Lpf Valve Components (Piston, Main Seat, and Activation Assembly)are NOT interchangeable with any other flush volume Valves.CONNECTION TYPESPIGTAILLEGACY 2 WIREFLUSH CONNECTION PARTS CONTINUEDItem No.Code No.Part No.Description 210306031PK F-11-1/2” x 6” Tube220396119PK F-101CP Tube Outlet 1-1/2” x 10-1/2”230306237PK F-7Tube Flange 1-1/2” x 2-3/4” with Prongs 240306146F-5-AT 1-1/2” Spud Coupling Assembly CP *24A 5306058F-3Friction Ring 1-1/2”24B 5322001VBF-5Slip Joint Gasket 1-1/2”250306396—Urinal Flush Connection Repair Kit 25A 5306055F-3Red Friction Ring 3/4”25B5306113F-5Gasket 3/4”ITEM NO. 2A - SOLENOID ASSEMBLY SELECTION GUIDECode No.Part No.Description33250013EBV-415-A Solenoid Assembly with Legacy connection 33400078GBL-1096-ASolenoid Assembly with Pigtail connectionADDITIONAL PARTSCode No.Part No.Description—F-304Poly Washer 1-1/2” (Only available in F-211-A, Item 18)33400019GBL-1050-A Sensor CX Finished Wall Plate and Button Assembly, SF ‡33400021GBL-1051-A Sensor CX Finished Wall Plate and Button Assembly, CP ‡33400022GBL-1052-A Sensor CX Finished Wall Plate and Button Assembly, BN ‡33400023GBL-1053-A Sensor CX Finished Wall Plate and Button Assembly, PB ‡33400024GBL-1054-A Sensor CX Finished Wall Plate and Button Assembly, GR ‡33400025GBL-1055-A Sensor CX Button Only Replacement Kit, SF 33400026GBL-1056-A Sensor CX Button Only Replacement Kit, CP 33400027GBL-1057-A Sensor CX Button Only Replacement Kit, BN 33400028GBL-1058-ASensor CX Button Only Replacement Kit, PB33400029GBL-1059-A Sensor CX Button Only Replacement Kit, GR ‡ Includes mounting screws and wrench.ITEM NO. 10 - SENSOR ASSEMBLY SELECTION GUIDECode No.Part No.Description0340271GBL-209-AC CX Sensor Assembly for Closet with Legacy connection 0340272GBL-210-AU CX Sensor Assembly for Urinal with Legacy connection 33400069GBL-219-A CX Sensor Assembly for Closet with Pigtail connection 33400071GBL-220-ACX Sensor Assembly for Urinal with Pigtail connectionNOTE: After December 2021, the Activation, Solenoid, and Sensor Assembly connectionswere changed to a pigtail style connection.ITEM NO. 1 - SENSOR PISTON IDENTIFICATION CHARTFlush Volume 1.6 gpf Water Closet 1.28 gpf Water Closet 1.1 gpf Water Closet 0.5 gpf Urinal 0.25 gpf Urinal 0.125 gpf Urinal Piston Body Green Light Blue Burgundy Red Burgundy Red Flow Control Green Black Cage Black Cage Red Burgundy Pink Part Number GBL-1037-A GBL-1098-A GBL-1088-A GBL-1039-A GBL-1040-A —Code Number334005333400079334000613340055334005633400003FLOW CONTROLPISTONBODYPLUGTROUBLESHOOTING GUIDE1. Sensor LED Flashes Continuously Only When User Steps Within Range.A. Unit is in start-up mode; no problem. This feature is active for the first ten (10) minutes of operation.2. Red Light Blinks Four (4) Times When User Steps Within Range.A. “AA” Batteries depleted; replace batteries, lithium or alkaline. Ensure batteries are installed with proper polarity (+) and (-). Do not mix old and new batteries or different types.B. (Hardwired) Battery Box not connected; connect Battery Box to Sensor Assembly.3. Valve Does Not Flush; Sensor Not Picking Up User.A. Verify a urinal Sensor is not used on a closet Valve. Model is marked on rear of Sensor.B. Range is too short; recalibrate range. Restart the Sensor by holding the Override Button in for 25 seconds, then release the Override Button and step away for one (1) minute; with power connected, this is considered a Soft Reset .C. For Hard Reset of Sensor, remove all power connections (battery and hardwire) for one (1) minute. Reconnect power and step away from front of Sensor for 3½ minutes. Then test Sensor activation by standing in front of Sensor for ten (10) seconds, then step away and wait for flush. Test push button.4. Valve Does Not Flush; Sensor Picking Up Opposite Wall or Surface, or Only Flushes When Someone Walks By. Red Light Flashes Continuously for First 10 Minutes Even with No One in Front of the Sensor. A. Verify a closet Sensor is not used on a urinal Valve. Model is marked on rear of Sensor.B. Range is too long; recalibrate range. Restart the Sensor by holding the Override Button in for 25 seconds, then release the Override Button and step away for one (1) minute; with power connected, this is considered a Soft Reset .C. If range needs to be manually shortened, reset the Sensor (follow Step 3B) and stand in front of the Sensor at desired range distance for one (1) minute.D. For Hard Reset of Sensor, remove all power connections (battery and hardwire) for one (1) minute. Reconnect power and step away from front of Sensor for 3½ minutes. Then test Sensor activation by standing in front of Sensor for ten (10) seconds, then step away and wait for flush. Test push button.5. Valve Does Not Flush Even After Sensor Recalibration. A. Ensure water supply to Valve is turned on.B. Activation Assembly sleeve is in closed position. Turn counter-clockwise to open water flow. Note: there is approximately 1/8-turn (45°) of free spinning as the Activation Assembly engages the Shut Off Sleeve between opening and closing the Valve.C. Solenoid wire disconnected from Sensor. Ensure Solenoid wires are intact and Solenoid plug is connected properly.D. “AA” Batteries depleted; replace batteries, lithium or alkaline. Ensure batteries are installed with proper polarity (+) and (-). Do not mix old and new batteries or different types.E. Sensor Assembly malfunctioned. Disconnect power for one (1) minute, reconnect power, and check for start-up operation (flashing red LED). See Step 4D.F. Check Solenoid for activation (clicking noise when pressing Sensor Override Button). If no clicks are heard, then contact Technical Support.6. Valve Does Not Shut Off.A. Ensure Solenoid is connected to Sensor.B. Supply line water pressure has dropped and is not sufficient to close the Valve. Close Activation Assembly until pressure is restored.C. Piston Bypass is clogged, Piston is damaged, or large debris stuck behind Piston. Turn off water at Shut Off Sleeve, release pressure, remove Safety Collar and Activation Assembly. Remove Piston and check inside Valve for large debris. Replace Piston if damaged or cleaning does not correct the problem.7. Too Much Water to Fixture.A. Excessive flow pressure. Readjust Activation Assembly by turning clockwise to decrease flow pressure.B. Long Flush. Worn Piston; replace with new proper gpf/Lpf Piston.C. Wrong model installed; i.e., 1.6 gpf model installed on 0.5 gpf/1.9 Lpf or 0.25 gpf/1.0 Lpf urinal fixture. Replace with proper model per guide.8. Not Enough Water to Fixture.A. Insufficient flow pressure. Readjust Activation Assembly by turning counter-clockwise to increase flow pressure.B. Water supply pressure is inadequate (low). Increase the water supply pressure. Contact the fixture manufacturer for minimum water supply requirements of the fixture.C. Wrong model installed; i.e., 0.5 gpf/1.9 Lpf urinal installed on a 1.6 gpf/6.0 Lpf closet fixture. Replace with proper model.D. Check lip seal for wear. Replace Piston if lip seal is worn or twisted.9. Chirping Noise is Heard at the Start or End of Flush.A. Caused by air purging from the system inside the Valve Assembly. Noise will subside with several flushes or within a day.CARE AND CLEANINGDO NOT USE abrasive or chemical cleaners (including chlorine bleach) to clean Flushometers that may dull the luster and attack the chrome or special decorative finishes. Use mild soap and water, then wipe dry with a clean soft cloth or towel. If using a cleaner in a spray bottle, DO NOT spray directly onto the Flushometer , instead spray cleaner into a clean cloth and then wipe down the Flushometer.While cleaning surrounding bathroom tile, protect the Flushometer from any splattering of cleaner. Acids and abrasive cleaning fluids will discolor or remove chrome plating.When assistance is required, please contact Sloan Technical Support at 1.888.SLOAN.14 (1.888.756.2614).IMPORTANT NOTE FOR 1.1 GPF FLUSHOMETERS & REPLACEMENT KITSSloan 1.1 gpf/4.2 Lpf ultra-high efficiency flushometers meets all applicable standards and requirements. However, with low flush volumes it is imperative that they only be used in conjunction with toilet fixtures and drain line systems designed to operate with adequate flow rates and volumes in order to effectively eliminate waste and move it out of the building. It is the responsibility of the user to ensure both of these conditions are met. Not doing so may void your warranty.Sloan 1.1 gpf diaphragm and piston kits are designed as a replacement part for Sloan 1.1 gpf/4.2 Lpf flushometers only. They are not intended to be used as a means to reduce water consumption in flushometers with higher flush volumes such as 1.28 gpf/4.8 Lpf or 1.6 gpf/6.0 Lpf or higher. Using this kit in any manner other than with a Sloan 1.1 gpf flushometer may void your warranty.。
科勒KOHLER瑞奇RWACH安装说明书
Clean the outside surface of your toilet seat with mild soap and warm water. Wipe the entire surface completely dry with a clean, soft cloth. You may use soft abrasive cleaners when necessary to clean your toilet seat. Do not use strong abrasive cleaners, as they will scratch and dull the surface. Wipe any splashes of cleaner solutions from plastic or plated surfaces immediately.
time without notice.
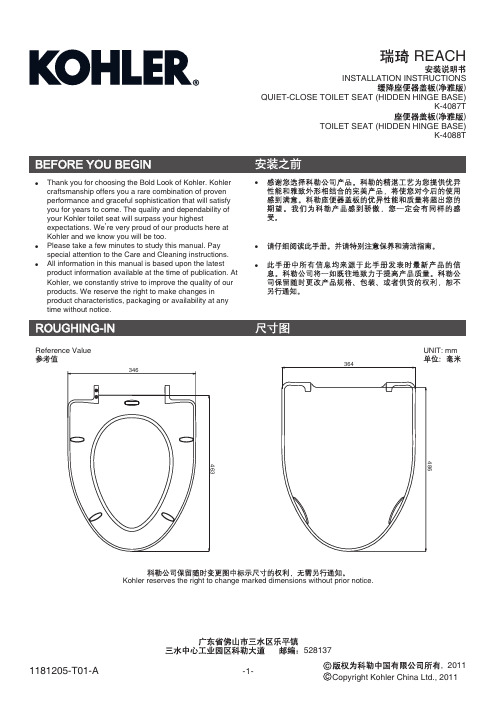
Reference Value
346
UNIT: mm
364
486 463
Kohler reserves the right to change marked dimensions without prior notice.
1181205-T01-A
528137
If the surface becomes excessively dirty, please use a general purpose cleaner.
科勒厨房净饮机奥珂芬系列安装使用说明书

Installation Guide产品安装使用说明书KOHLER CHINA INVESTMENT CO., LTD NO.158, JIANG CHANG SAN ROAD,JINGAN DISTRICT, SHANGHAI, PRC POST CODE: 200436科勒(中国)投资有限公司 上海市静安区江场三路158号 邮编:200436Aquifer Water Filtration System 科勒厨房净饮机奥珂芬系列K-24210T-KT300-01R/K-24210T-KT310-01RThis document contains important information and details concerning product installation, operation and maintenance. Please read it carefully prior to installation and obey all the instructions during operation.• Do not use with water that is microbiologically unsafe orof unknown quality without adequate disinfection before or after the system.• Make certain that installation and connectors mustcomply with local plumbing codes.• Installation and maintenance must be done by qualifiedplumbing professionals designated by dealers authorized by Kohler.• For cold water use only (Temperature Range: 5-38C);This filter must be protected from freezing, which can cause cracking of the filter and water leakage. Drain filter when room temperature drops below 5C.• Pressure Range: 100-400 kPa, If water pressureexceeds 400 kPa, please install pressure limiting valve. Otherwise, the ultrafiltration membrane may not achieve best filtration effect due to long time overpressure. (Please consult plumbing professionals or dealersauthorized by Kohler for water pressure measurement).• Do not install where water hammer conditions mayoccur. If water hammer conditions exist you must install a water hammer arrester.• Do not install in direct sunlight outdoors or whereblowtorch or other high temperature sources are nearby.• The filter must be installed with the inlet, outlet and self-cleaning ports as labeled. Make sure not to reverse connections.• Before your installation make sure cold water valve isturned off under the sink.• Water filtration faucet is not supplied with the product.you will need to purchase a water filtration faucet with a 3/8" adapter.UNIT: mm 单位:毫米Reference Value参考值Kohler reserves the right to change marked dimensions without prior notice.科勒公司保留随时变更图中标示尺寸的权利,无需另行通知。
科勒发电机操作维护手册手册

科勒动力汽油发电机使用说明本说明将告诉您如何使用,保养发电机,请您详细阅读说明书内容,使您正确地使用发电机并延长发电机的寿命。
请您特别注意带警示语的词语。
危险:表示若不遵守操作规定您将有生命危险或严重伤害。
警告:表示若不遵守操作规定您将有潜在危险,有可能危及人身安全或严重设备损坏。
注意:表示如果不能避免,在操作过程中会有潜在危险,有可能导致轻度的人身伤害或设备损坏。
一.安全注意事项危险:本机的排气具有毒性切勿在封闭的场所使用本发电机。
本发电机的排气可于短时间内导致人混民及死亡。
请在通风良好的场所使用。
危险:本机的燃油可燃性极高并具有毒性。
1.注意在加油时,务必将发电机关闭。
2.切勿在加油时抽烟或在有火焰的附近进行加油。
3.注意在加油时切勿使燃油溢出及洒漏在发动机及消音器上。
4.若吞喝汽油,吸入燃油废气或使其进入您的眼睛,务请立即求医救治。
5.在操作或移动时,请您保持发电机直立。
发电机倾斜会有从化油器及邮箱中泄漏而出危险。
警告:发动机及消音器会发热1.请将本发电机设置在过路人及儿童无法触及的地方。
2.在发电机运行时,切勿在排气口附近放置任何可燃物品。
3.本发电机与建筑物或其他装置间的距离应保持最少1米以上,否则,本发电机会产生过热现象。
4.在本发电机运转时请勿覆盖防尘罩。
危险:防止触电1.切勿在雨中及雪天下使用本发电机2.切勿湿手触摸本机,会有触电危险。
注意:务必连接好通地的地线,地线选用4mm2 以上导线。
危险:接线注意事项1.禁止将本发电机连接在商用电源插孔上。
2.禁止将本发电机与其他发电机进行连接。
3.市电,发电,负载之间切换,应采用互锁开关来连接。
二.使用前的准备和检查1.燃油:(油箱容积为21L)必须使用(无铅)汽油90#以上。
取下燃油箱盖(逆时针旋转),加注燃油,并随时观察油箱上的油位计。
加油时不要把加油口的燃油过滤网取出。
(加油时,应停止发动机,十分小心周围的烟火)注意:发动机运转或尚未冷却之间,禁止往燃油箱里加注燃油,加注燃油之前,必须关闭燃油油路开关。