安装bt5到u盘方法与步骤
打造自己的U盘backtrack5
打造自己的U盘backtrack5BY落寞[S.B.S.T]Backtrack5以下简称BT5 ,这是一款强大的黑客OS旅行杀软必备。
但是大多数朋友都安装在虚拟机里,很少有人会把它安装在自己的硬盘上,应为自己对BT5了解的还不多。
其实我们可以买个U盘,吧BT5安装在U盘里,做成U盘系统,走到哪黑到哪。
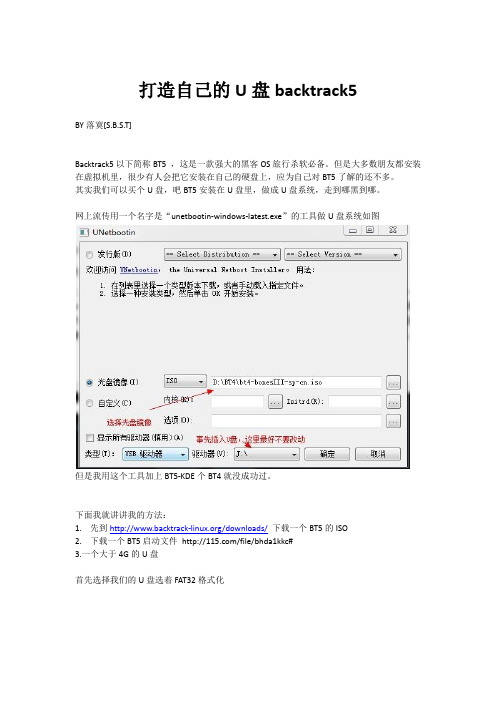
网上流传用一个名字是“unetbootin-windows-latest.exe”的工具做U盘系统如图但是我用这个工具加上BT5-KDE个BT4就没成功过。
下面我就讲讲我的方法:1.先到/downloads/下载一个BT5的ISO2.下载一个BT5启动文件/file/bhda1kkc#3.一个大于4G的U盘首先选择我们的U盘选着FAT32格式化然后用UltraISO 打开BT5启动.ISO选择启动-写入硬盘映像红色部分选择你的U盘,我们刚才格式化了这里就不格式化了,选好后点写入写完后把BT5解压到U盘里最后就OK了。
但是这样做好后是不能保存设置的,就像网吧的机子一样,每次重启就恢复了所以我们还需要个东西saveFile/file/aq7b2tgv#里面有相应大小的文件,根据你的U盘大小解压一个出来我就1G的然后改名为casper-rw 再放到U盘里在BOOT\SYSLINUX\下找到SYSLINUX.CFG 用记事本打开吧最后一句append file=/toska/preseed/custom.seed boot=casper initrd=/casper/initrd.gz text splash vga=791—改成:append file=/toska/preseed/custom.seed boot=casper initrd=/casper/initrd.gz persistent rw text splash vga=791--也就是加个persistent rw现在就可以去启动看看了,这是我的BT5另外在BT5里拨号连接要输入sudo pppoeconf然后一步一步的OK下去手工断线:sudo poff输入宽带账号输入密码OK到底就可以上网了。
BT5硬盘安装(多系统linux+win+BT5)

2
……
修改后……
#vim /etc/fstab
LABEL=/rhel
/
ext3 defaults 1 1
LABEL=/rhelboot
/boot
ext3 defaults 1 2
……
修改前……
#vim /boot/grub/grub.conf
default=0
找到linux的分区,上面的 /dev/sda1 /dev/sda2 /dev/sda3都是linux分区。 2.2、用命令查看你linux分区的labe #e2label /dev/sda1 结果可能显示: /boot #e2label /dev/sda2 结果可能显示: /root
那么就要对这两个分区的label进行修改,label的名称可以自己定。如还你还有home、var等其它linux分区也要修改。只要 分区里没有 / /boot /var /home...这样label就行 修改如: #e2label /dev/sda1 /rhelboot #e2label /dev/sda2 /rhel #e2label /dev/sda7 /susehome 为了确定,再看一下: #e2label /dev/sda1 /rhelboot
到这里,你已经可以启动BT5了,也可以用了。和我最前面提到的安装方法“装”出来的系统是一样的。如果要装到硬盘上。 得要以下步骤:
2、配置: 修改linux分区的label(重要),你要安装BT5到硬盘,那么这个一定要做,不然装不上。因为BT5 要用到 / /boot /var /home...这样label。 2.1、找出你机子里所有的linux分区l: #fdisk -l
BT5硬盘安装(多系统linux+win+BT5)
BT5安装至u盘教程(英文)
Backtrack 5 – Bootable USB Thumb Drive with “Full” Disk EncryptionUPDATE (8/14/2012): I have reports that the howto works fine with Backtrack 5 R3. Please let me know if this turns out to not be the case.UPDATE (3/3/2012): The how-to has been updated to reflect changes for Backtrack R2. They were very minor and using the previous method still works. The only real change is:∙lvm2 is now part of the ISO. That means we no longer have to use apt-get to install it. However, we still need to install hashalot, so it doesn't save us a step.∙Added a note at the end about using dd to backup your install pera very good suggestion by Richard in comment 241.UPDATE: This update has been tested with BT5R1 and works as is. Before we get started, here are a few housekeeping items:∙There is a PDF version of this article available here.∙Finally, if you want to be notified of updates to this page, subscribe to my RSS feed here.I put quotes around full in the title because technically the whole disk isn't encrypted. We use LVM and the native encryption routines included in Ubuntu to encrypt all partitions except for a small boot partition that never contains any data.This is a fairly involved process, but I have done my best to document each detail. Please let me know if I missed anything or you have any questions. I can be reached via the contact form on the 'About' page of this website or via the comments below.I strongly recommend you read through this guide at least once before starting.I will be making a PDF available in the near future.As in all my how-tos, user entered text is bold and comments are preceded by a # sign and generally not part of the output of a command. Finally, a couple of posts from the Ubuntu Community Documentation site were instrumental in getting this working.https:///community/EncryptedFilesystemOnIntrepidhttps:///community/EncryptedFilesystemLVMHowtoWARNING: Before you start, please be aware that you can cause the system you are using to build this with to not boot correctly. During the install process below there is a warning about indicating where you want the boot loader to be installed. Be very careful at this point. First we are going to need some stuff.Tools and Supplies1. A USB thumbdrive for the install - minimum capacity 16GB. Actually,you can squeeze this onto an 8GB drive, but you are out of room at that point.2. A Backtrack 5 DVD or an additional USB thumbdrive (minimum 2GB, mustbe Backtrack 5)3.Optional: UNetbootin - A tool to transfer an iso image to a USBdrive.4.Working internet connection once Backtrack 5 is booted.Let's get started!First, we need to grab a copy of the Backtrack 5 ISO.Backtrack 5 Download PageFor my tests, I used the 64-bit Gnome build. I have not tested this how-to with all versions of Backtrack 5, but they should all behave similarly with the possible exception of the ARM build. I have no experience with Backtrack on that platform.Now that we have the goods in hand, we can get to cooking.This tutorial is based on booting Backtrack 5 first. That means that you need some form of bootable Backtrack media. It can be a virtual machine, DVD, or USB drive. Use your favorite method of creating a DVD or USB drive or you can use UNetBootin to create the thumb drive. Below is a screenshot of using UnetBootin to install Backtrack, version 4 in this case, on a USB drive. Again, you will need version 5. I'm just lazy right nowIt is as simple as selecting the image we want to write to the USB drive, the drive to write it to, and then clicking the 'OK' button. Warning: Make sure you pick the correct destination drive. You don't want to shoot yourself in the foot.PartitioningThe first step is the physical partitioning of the drive. Boot up Backtrack from your DVD or USB drive. If you boot with the default menu item "Backtrack Text", you will not need to start networking as it will have started automatically. You can verify that networking is up and running by executing:ifconfigand checking that your interface is up and has an IP address assigned. If networking isn't configured, the following commands will start it./etc/init.d/networking startWe do need to start the graphical interface.startxWe will also need to figure out which drive is our target drive. The following command will show the drives available and you can determine from that which is the new USB drive. Open a terminal windows and execute the following.dmesg | egrep hd.\|sd.We need to physically partition the target drive as follows:1.The first partition needs to be a primary partition, 500 MB in size,set to type ext4. Also remember to make this partition active when you are creating it. Otherwise you might have some boot problems.2.The rest of the drive should be configured as an extended partitionand then a logical partition created on top of it.Below are the steps to take to get the drive partitioned. A '# blah blah' indicates a comment and is not part of the command and user typed commands are bolded. One note, we will need to delete any existing partitions on the drive. Also, the cylinder numbers below are specific to my test machines/thumb drives, yours may be different. Finally, if you are using this how-to to install to a internal hard drive, you probably want to add a swap partition.fdisk /dev/sdb # use the appropriate drive letter for your system# delete existing partitions. There may be more than one.Command (m for help): dPartition number (1-4): 1# create the first partitionCommand (m for help): nCommand action e extended p primary partition (1-4) pPartition number (1-4): 1First cylinder (1-2022, default 1): <enter>Using default value 1 Last cylinder, +cylinders or +size{K,M,G} (1-2022, default 2022): +500M# create the extended partitionCommand (m for help): nCommand action e extended p primary partition (1-4) ePartition number (1-4): 2First cylinder (66-2022, default 66): <enter>Using default value 66 Last cylinder, +cylinders or +size{K,M,G} (66-2022, default 2022): <enter>Using default value 2022# Create the logical partition.Command (m for help): nCommand action l logical (5 or over) p primary partition (1-4) lFirst cylinder (66-2022, default 66): <enter>Using default value 66 Last cylinder, +cylinders or +size{K,M,G} (66-2022, default 2022): <enter>Using default value 2022# Setting the partition type for the first partition to ext3 Command (m for help): tPartition number (1-4): 1Hex code (type L to list codes): 83# Setting the first partition activeCommand (m for help): aPartition number (1-4): 1Command (m for help): wIf you happen to get an error that mentions something like "..the partition table failed with error 16:...", you need to reboot before continuing with the how-to. You might be able to get away with continuing, but there is a good chance you will experience some problems. After rebooting, you willneed to re-execute the startx command and the cryptsetup luksOpen commands.If you happen to get an error with mentions something like "..the partition table failed with error 22:..." you can run partprobe to re-read things. At least, this worked in my case.It is now time to get a couple additional packages installed that we need for LVM and encryption. First we need to update the local repositories and then install lvm2 and hashalot. Output has been ommitted.# For Backtrack 5 R1 type the following.apt-get updateapt-get install hashalot lvm2# For Backtrack 5 R2 we only need hashalot. Type the following.apt-get updateapt-get install hashalotOur next step is to enable encryption on the logical partition we created above and make it available for use. Before we do that though, there is an optional step we can take if we want to make sure no one can tell where our data is on the drive. It isn't really necessary since anything written will be encrypted, but if we want to be thorough and make sure no one can see where our data even sits on the drive, we can fill the logical partition with random data before enabling encryption on it. This will take some time, as much as a couple hours or more. Execute the following command:dd if=/dev/urandom of=/dev/sdb5The following commands will setup encryption services for the partition and open it for use. There are several ciphers that can be used, but the one indicated in the command is supposed to be the most secure and quickest for Ubuntu 8.10. Please note that the case of the command luksFormat is required.cryptsetup -y --cipher aes-xts-plain --key-size 512 luksFormat /dev/sdb5WARNING! ======== This will overwrite data on /dev/sdb5 irrevocably. Are you sure? (Type uppercase yes): YESEnter LUKS passphrase: (enter passphrase) [type passphrase]Verify passphrase: (repeat passphrase) [type passphase]Command successful.cryptsetup luksOpen /dev/sdb5 pvcryptEnter LUKS passphrase: [type passphrase]key slot 0 unlocked. Command successful.If you should happen to get a "cannot access device" error when trying to perform the cryptsetup setup commands above, make sure the USB drive has not been mounted. That can happen sometimes. Now that that's all done, we can create our root and swap partitions using LVM. Again, the commands below will do so. 7.3 GB was the largest I could make my root partition. Play around with it a little and you may be able to make it a bit larger or you may have to make it a bit smaller.pvcreate /dev/mapper/pvcryptPhysical "volume /dev/mapper/pvcrypt" successfully createdvgcreate vg /dev/mapper/pvcryptVolume group "vg" successfully createdlvcreate -n root -l 100%FREE vg Logical volume "root" created.The final step is to format the logical volumes we just created. I have not included the output below for brevity's sake.mkfs.ext4 /dev/mapper/vg-rootIf you want to try and eek out every last bit of performance and help your flash drive last longer, you can alternatively use the following command to disable journaling on the root partition. I have not tested this yet, but it should work just fine. Remember that this will open you to a greater possibility of unrecoverable drive corruption. Notice that the first letter o is small case and the second is a capitol letter O.tune2fs -o journal_data_writeback /dev/mapper/vg-roottune2fs -O ^has_journal /dev/mapper/vg-roote2fsck -f /dev/mapper/vg-rootBelieve it or not, we are finally ready to start installing Backtrack. To do, double-click on the install.sh icon on the desktop. This will startthe graphical installer. Select you language of choice and click the 'Forward' button.Next, select you timezone and click the 'Forward' button.The next step is to select our keyboard layout. Pick yours and click the 'Forward' button. I can not vouch for any keyboard layout other than English.Click on 'Specify partitions manually' and click the 'Forward' button.We are not going to indicate the mount points for our partitions. First let's setup our root partition. Click on the row with vg-root in it and click the 'Change' button.Select ext4 from the dropdown menu for 'Use as:', click 'Format the partition:', enter '/' without the quotes for the mount point and click the 'OK' button. The system will re-read the partition table and redisplay it.Now for the boot partition. Click the row with you boot parition in it, /dev/sdb1 in my case, and click the 'Change' button.Again, select ext4 and click the format checkbox. Enter '/boot' without the quotes for the mount point and click the 'OK' button. The disk partition will be re-read and the display updated.Click the 'Forward' button.You will get this message if you are installing to a USB drive and not using a swap partition. Click the 'Continue' button.WARNING: You must click on the advanced tab on the next page and select your USB drive as the target for installing the bootloader. You will break your system if you do not.Don't forget! Make sure you select the target disk for your install as the device for the boot loader to be installed on or you run the risk of making the system you are doing this on non-bootable. Then click on the 'OK' button.Click the 'Install' button to start the install.This will take some time. Go get a coke or beverage or your choice and relax for a bit.More waiting.and...more waiting. If it seems like the system is stuck at 99% forever, that's normal, at least in every case where I have done the install.Finally!Important!Click on the 'Continue Testing' button. DO NOT click on the 'Restart Now' button or you have to redo a bunch of stuff.We have now installed the main distribution to our thumb drive. The next step is to configure the newly installed system to use LVM and open the encrypted partition. However, before we do that we need to figure out the UUID of our encrypted volume. We want to do this so that we don't run into problems if the device name of the drive changes from machine to machine. The command we used to use to do this was vol_id. This has changed with Backtrack 5. We now use blkid. So execute blkid as below.blkid /dev/sdb5/dev/sdb5: UUID="2c133ec5-2eb2-4261-b8ee-5f6924b24ee4"TYPE="crypto-LUKS"Make a note of the ID_FS_UUID value which is in italics above. We will need it later. Note: your output will be different than mine. Now time to configure our newly installed system. The first thing we have to do is make the newly installed system active so we can make changes to it. We do that by mounting the partitions and chrooting to it.mkdir /mnt/backtrack5mount /dev/mapper/vg-root /mnt/backtrack5mount /dev/sdb1 /mnt/backtrack5/bootchroot /mnt/backtrack5mount -t proc proc /procmount -t sysfs sys /sysTo make everything truly operational, we can mount /dev/pts, but every time I try I have problems unless I reboot first. That is a real pain, so I just don't mount /dev/pts. We will get a couple warnings/errors as we go along, but they do not affect our install. The magic to making all this work is to rebuild the initrd image that is used to boot our system. We need to include some things, load some modules, and tell it to open the encrypted volume, but first we have to go through the whole process of installing software again. We have to do this because we are essentially right back where we started when we booted the live cd. Do the following again.apt-get updateapt-get install hashalot lvm2The next step is to configure how initramfs-tools will create our initrd file. This involves editing one files, the /etc/crypttab file. We used to have to edit /etc/fstab, but it appears we don't need to do that any longer. Mine was correct with /dev/mapper/vg-root as the root entry. If my change it isn't correct in your installation, follow the directions below to correct it. I use the vi editor, but you can use your favorite editor.vi /etc/crypttabWe need to add the following line to the file. If you are new to vi, hit the o key and the type the following:pvcrypt /dev/disk/by-uuid/<uuid from above> none luksWhen you are done typing that line, hit the esc key and then type ':wq' without the quotes to save and exit vi. The file should look like this. The uuid is unique to my case. Make sure yours matches your system.# <target device> <source device> <key file> <options>pvcrypt /dev/disk/by-uuid/09330b5a-5659-4efd-8e9d-0abc404c5162 none luksFixing the /etc/fstab file if necessary If we need to edit the /etc/fstab file, do the following. Again, use your favorite editor or vi.vi /etc/fstabThe file will look something like below. The UUIDs will be different though.# /etc/fstab: static file system information.## <file system> <mount point> <type> <options> <dump> <pass>proc /proc proc defaults 0 0# /dev/mapper/vg-rootUUID=c8d9b9a0-2198-4966-bc3a-39259df6a2c2 / ext4relatime,errors=remount-ro 0 1# /dev/sdb1UUID=6af425ad-99b8-44a5-9ee1-0349141f9b1f /boot ext4 relatime 0 2We need to delete the first line that starts with UUID right after theline which contains 'vg-root.' It is bolded and in red above. We also needto remove the comment symbol from the start of the line with 'vg-root'in it. That line is just bolded above. For those new to vi, position the cursor on first 'U' of the line using your arrow keys and type 'dd', then move the cursor to the '#' in the line above and type the letter o, thentype the line below, hit the esc key and type ':wq' without the quotesto save the file. The line needs to look like below when done:/dev/mapper/vg-root / ext4 defaults 0 1Once that is done, there is one final thing we need to do before we can rebuild the initrd image and reboot. There is a bug in the cryptroot scriptthat produces an odd situation.Fixing the Passphrase Entry BugWhen we boot our USB drive, it will appear to be stuck on the splash screen. What is actually happening is that the system is waiting on us to enterour luks password. We have two choices for doing so.The first is to just type it in when we see the splash screen. This worksas long as we have waited long enough for the system to be ready for us. However, it's kind of hard to tell what's going on.The second option is to press the F8 key which takes us to the console. There we will see the system waiting for us to enter our passphrase and this is where this odd bug shows up.Initially, it will look like 4 characters have already been entered. They haven't been, but that's what it looks like. Then, every type we press a key, it will reprint the line asking us to enter our passphrase. It is actually taking the input correctly, but, man, it's annoyingWe can fix that. Greg M and James had a conversation in the comments about this topic and found the resources needed to fix it. James was kind enough to send me the changes that need to be made.As mentioned, the problem is with the cryptroot script. This script is the script that requests our passphrase and mounts the encrypted volume. Kind of important stuff.Greg and James used a patch file found in this post in the Backtrack Linux forums. Below I have included the actual changes to be made. Alternatively, you can use a patch file. The commands to perform the patch are as follows. BTW - that's a zero in the patch command.Warning: You can make your system unbootable if the cryptroot script gets corrupted.cd ~wget /cryptroot.patchpatch -u/usr/share/initramfs-tools/scripts/local-top/cryptroot ./cryptroot.p atchIf you prefer to do it the manual way, open the file/usr/share/initramfs-tools/scripts/local-top/cryptroot in yourfavorite editor. Go to line 275. You should see the following:# Try to get a satisfactory password $crypttries timescount=0while [ $crypttries -le 0 ] || [ $count -lt $crypttries ]; doAdd the following line right after 'count=0'echo "Unlocking the disk $cryptsource ($crypttarget)"The section should now look like this:count=0echo "Unlocking the disk $cryptsource ($crypttarget)"while [ $crypttries -le 0 ] || [ $count -lt $crypttries ]; doNext, skip down to line 291 and you'll see a the following:if [ -z "$cryptkeyscript" ]; thencryptkey="Unlocking the disk $cryptsource ($crypttarget)\nEnter passphrase: "if [ -x /bin/plymouth ] && plymouth --ping; thenReplace the middle line, the one that starts with cryptkey, with:cryptkey="Enter passphrase: "so that it now looks like this:if [ -z "$cryptkeyscript" ]; thencryptkey="Enter passphrase: "if [ -x /bin/plymouth ] && plymouth --ping; thenThat's it. Save the file and we are ready to rebuild initrd. To do that, execute the following command.update-initramfs -uNow, if having to press the F8 key at boot bugs you, you can change the boot sequence to go directly to the console.Warning: You can make your system unbootable playing around in hereTo make the system boot to the console, edit the /boot/grub/grub.cfg file, search for the word 'splash', without the quotes, and delete the word splash and only that word. The line will end up looking like this:linux /vmliunx-3.2.6 root=/dev/mapper/vg-root ro text vga=791If all goes well, you are now ready to cross your fingers and reboot. SUPER IMPORTANTDo not run aptitude safe-upgrade! It will remove some vital tools. Run apt-get upgrade instead which appears to leave things installed that need to be installed. If you should happen to run aptitude safe-upgrade, ignore the warning about removing packages, type 'Y' and let it do its thing,you will need to run the following command before you reboot or your install will be broken.apt-get install cryptsetup ecryptfs-utils keyutilsIf you have problems, you can use the troubleshooting directions below to get back to the state where you can try to figure out how what went wrong.System All BootedOnce you have a booting system, you are ready to login. The default userid is root and the default password is toor. You are now ready to login and being playing. Don't forget to change the root password as soon as you login the first time.That's it.You can make some final tweaks if you want like starting GNOME at boot, but for all intents and purposes you have successfully installed Backtrack 5 to a USB drive and don't have to worry about sensitive information being intercepted if it gets lost of stolen.Backing It UpRichard, in comment 241, mentioned backing up his completed install periodically just in case something goes wrong with his USB drive.This is a fantastic idea.There are several ways you can accomplish this.First, on a Linux or other UNIX variant, like OpenBSD or Mac OS X, you can use the dd command.Note: You will use the device identifier of the DRIVE, not a partition, unless you want to dd each partition separately. That seems a bit silly though. For instance, /dev/sdb is the whole drive, while /dev/sdb1 is just the first partition.# Do not boot to the USB drive for this. Execute the following to create a binary copy of your drive.dd if=/dev/[your device] of=/[destination]/backtrack5USB.imgYou will need to have free space available on the target drive equivalent to the size of the USB drive. You can compres the image after the dd is complete using gzip or bzip2.On a Windows machine, you will need to use a utility that will create a binary copy of the USB device. There are several products out there that will do this. Once such free product that will do this is USB Image Tool. This is freeware tool which creates an exact duplicate image of a USB drive. It does require .NET. There are many other options.TroubleshootingIf you run into any problems, you don't have to start over. As long as your encrypted volume is built correctly and you have the correct LUKS passphrase, you can get back to the place you were with the Live CD. Simply boot with the original Live CD/USB drive and enter the following./etc/init.d/networking startapt-get updateapt-get instal hashalot lvm2 # lvm2 not needed for R2cryptsetup luksOpen /dev/[your logical partition] pvcryptmkdir /mnt/backtrack5mount /dev/mapper/vg-root /mnt/backtrack5mount /dev/[boot partition] /mnt/backtrack5/bootchroot /mnt/backtrack5mount -t proc proc /procmount -t sysfs sys /sysmount -t devpts devpts /dev/ptsYou can now do any trouble shooting you need to do and try to reboot again. One note, if you want to check the UUID of your partition, do it before you chroot.-Kevin。
bt3 bt4 bt5 使用教程大全
软件介绍本套资源由99d软件站购买,免费提供给网友们下载。
99d软件站搜集提供,安全无毒,快捷免费无广告的软件站,请大家多多支持,推荐给你的亲朋好友们!99d软件站友情提示:作为bt5启动盘,刻盘只需要将CDlinux.iso刻盘就可以了,其他部分可以放在硬盘上看就可以了。
上次不小心打包重复了部分文件,造成100m体积的浪费,现在重新打包上传。
至于有朋友问:“里面的PDF要密码密码是多少” 99d测试了全部pdf,没看到任何一个要密码的。
如果你发现要,请说明具体的文件关键词:bt5 bt5软件 bt5下载 bt5软件下载 bt5教程 bt5破解 bt5破解版 bt5破解版下载 bt5破解教程 bt5光盘 bt5 iso bt5教程 bt5一键中文破解 bt5蹭网卡 bt5破解无线网bt4 bt4软件 bt4下载 bt4软件下载 bt4教程 bt4破解 bt4破解版 bt4破解版下载 bt4破解教程 bt4光盘 bt4 iso bt4教程 bt4一键中文破解 bt4蹭网卡 bt4破解无线网BT5(BT4)全称Back Track four,这是一个linux环境的便携系统,可以放到U盘或者盘中启动,对本身硬盘没有影响,无需在本地安装。
是圈内非常著名的黑客攻击平台,是一个封装好的Linux操作系统,内置大量的网络安全检测工具以及黑客破解软件等。
BT3~4因可以方便的破解无线网络而出名,其中内置的spoonwep是一个非常悍的图形化破解wep无线网络密的工具。
BT5(BT4)被广泛用于配合卡皇、卡王、雷凌3070、阿凡达G2000、蓝盾8G/G20、魔影5000G、幻影G3000、风影30G、雷影9000G、无线王5000G、风火轮6000G等等大功率蹭网卡用于破解无线路由密码,达到蹭网目的。
而bt5更是出色,步骤更加简化,号称一键破解。
本linux系统光盘介绍:1、可以光驱、Win下VMware虚拟机启动也可以安装到U盘或者硬盘启动2、破解工具里面集成了1940年到2012年所有8位数的生日密码,加入0-9,英文26个字母重复形式的8-10位数密码,另外加入部分常用密码3、本linux系统和破解工具全部为中文绝无文字障碍,配合我的视频教程包教会破解。
Bt5(cdlinux)U盘版制作
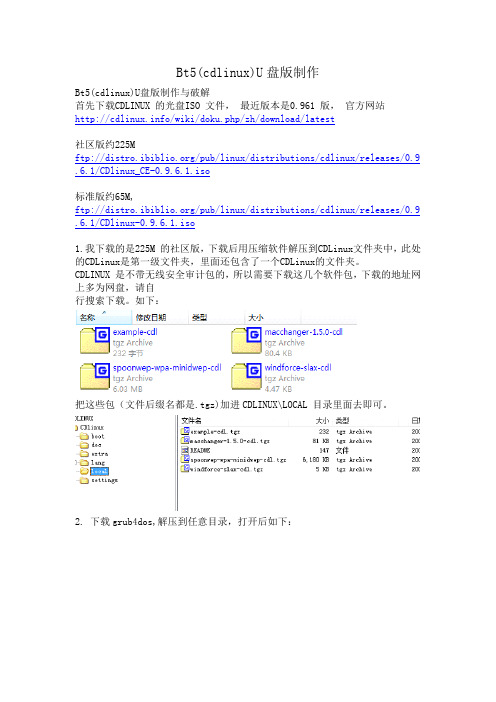
Bt5(cdlinux)U盘版制作Bt5(cdlinux)U盘版制作与破解首先下载CDLINUX 的光盘ISO 文件,最近版本是0.961 版,官方网站/wiki/doku.php/zh/download/latest社区版约225Mftp:///pub/linux/distributions/cdlinux/releases/0.9 .6.1/CDlinux_CE-0.9.6.1.iso标准版约65M,ftp:///pub/linux/distributions/cdlinux/releases/0.9 .6.1/CDlinux-0.9.6.1.iso1.我下载的是225M 的社区版,下载后用压缩软件解压到CDLinux文件夹中,此处的CDLinux是第一级文件夹,里面还包含了一个CDLinux的文件夹。
CDLINUX 是不带无线安全审计包的,所以需要下载这几个软件包,下载的地址网上多为网盘,请自行搜索下载。
如下:把这些包(文件后缀名都是.tgz)加进CDLINUX\LOCAL 目录里面去即可。
2. 下载grub4dos,解压到任意目录,打开后如下:复制上图选中的grldr, grub,两个文件到第一级的CDlinux目录中。
3. 打开cdlinux\boot 的目录复制其中的splash.xpm.gz ,menu.lst 这两文件到第一级CDLinux目录中。
4.由于原先菜单式设计好了为光盘启动,所以我们做一下简单修改,用记事本打开这个menu.lst 文件,编辑如下:default 6fallback 0timeout 20splashimage /CDlinux/boot/splash.xpm.gztitle Safe Graphics Modekernel /CDlinux/bzImage quiet CDL_SAFEG=yesinitrd /CDlinux/initrdtitle Normal, please select a language:roottitle >root……title (zh_CN) Chinesekernel /CDlinux/bzImage quiet CDL_LANG=zh_CN.UTF-8initrd /CDlinux/initrd其实就是把开头的“ splashimage (cd)/CDlinux/boot/splash.xpm.gz ”改成“ splashimage/CDlinux/boot/splash.xpm.gz”,即去掉(cd);把“title (zh_CN) Chineseroot (cd)kernel /CDlinux/bzImage quiet CDL_LANG=zh_CN.UTF-8initrd /CDlinux/initrd”改成“title (zh_CN) Chinesekernel /CDlinux/bzImage quiet CDL_LANG=zh_CN.UTF-8initrd /CDlinux/initrd”即去掉root (cd)。
bt5安装手册
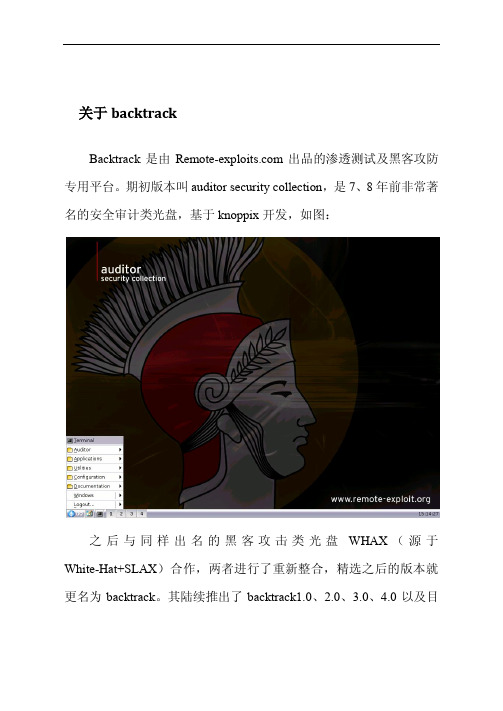
关于backtrackBacktrack是由出品的渗透测试及黑客攻防专用平台。
期初版本叫auditor security collection,是7、8年前非常著名的安全审计类光盘,基于knoppix开发,如图:之后与同样出名的黑客攻击类光盘WHAX(源于White-Hat+SLAX)合作,两者进行了重新整合,精选之后的版本就更名为backtrack。
其陆续推出了backtrack1.0、2.0、3.0、4.0以及目前最新的5.0.Backtrack 5 在国际上被誉为全方面渗透测试及攻击平台,内置大量的黑客及安全审计类工具。
在backtrack菜单里,制作者已经按照攻击顺序做了详细的分类,涵盖敏感信息收集,漏洞信息收集,漏洞工具测试,账户特权升级等,其中包括信息窃取、端口扫描、缓冲区溢出、中间人攻击、密码破解、无线攻击、VOIP攻击等方面,确为不可多得的精品。
本书就将对于backtrack5的一些常用工具的使用进行说明,并且给出相应的结果图VMware虚拟机下搭建backtrack52.1 关于培训用的虚拟机版本Backtrack 5可以安装在真实机中,也可以安装在虚拟机中,我一般建议安装在虚拟机中,这样我们可以创建快照,在操作失误或者导致工具或者系统崩溃的时候,进行相应的系统恢复,大大减少了重装的麻烦。
当然,我们此次的培训也是基于虚拟机环境的backtrack 5进行的。
虚拟机有多种,我们这里使用的是VMware Workstation虚拟机程序,他的版本有很多,我们选用7.1.3 build破解版,因为就官方给出的backtrack 5的虚拟机版本在该版本下运行正常。
2.2 下载backtrack 5接下来我们来说说backtrack 5虚拟机版本的下载位置:一般我们都会在某个软件的官网去下载,所以我们需要下载backtrack 5的虚拟机版本就要在上面下载,地址为:/downloads/进入后,我们直接点击download就行,无需注册:然后我们依次选择:WM Flavor:我们选择gnomeArch:我们选择32 bit(如果是64位CPU注意选择64bit)Image:我们选择VMWareDownload:我们选择torrent种子下载,如果您想单线程的下载的话,可以选择direct都选择好后,会出现下图,我们直接点击click download开始下载。
U盘启动BT5教程(含下载链接)
首先是下载最新版的Universal USB Installer(Ctrl单击打开链接)和BT5 (Ctrl单击打开链接)。
安装很简单,点击几个步骤就可以安装好了。
第一步:在下拉列表里选择好BT5
第二步:选择BT5镜像位置
第三步:选择U盘,勾选格式化U盘为FAT32的选项
第四步:选择用户保存资料空间大小,建议把空间调到2G以上第五步:点击Create进行安装
点击Create之后,会弹出一个窗口,要求你在创建之前,保存好U盘的资料,因为创建U盘系统的过程中会格式化U盘,点击Y 就可以了。
之后的工作就是等待了,几支烟的时间就完成了。
这个时候就可以进行汉化什么的了都可以了。
BackTrack5(BT5)在VM虚拟机下安装完美教程
期待已久的BT5发布了!这个版本的代号叫做“revolution”:下载地址:/downloads/与bt4相比,BT5不论从核上还是应用程序上都进行了升级。
bt5同时可以选择下载gnome 或者kde桌面系统,而传统bt4默认的是kde。
bt5基于Ubuntu Lucid LTS.Kernel 2.6.38,在安装上也方便了很多,尤其对于中国用户,可以选择中文安装过程。
bt5一改之前的黑色调,转为暗红,还是那潇洒的飞龙,在红色底纹上更显杀气。
记录一下vmware虚拟机中安装bt5:1.首先下载bt5的32位iso文件,选用了gnome桌面系统。
(64位的毕竟还是在一些软件支持性上有待改善,所以还是选择32位的保险)2.新建一个虚拟机,选择typical设置,安装源选择刚刚下载的iso文件这里指定的磁盘大小并不是虚拟机实际占用磁盘大小,而是它最大使用量,实际值会根据在虚拟机中安装的软件的多少进行动态的变化,所以指定大点没有关系,只要你实际在虚拟机里面不要太狠装太多东西,呵呵。
虚拟机使用的存尽量大一些,这样可以有效提高虚拟机运行的速率。
现在电脑存都够大,指定1G不会影响主机的速度。
3.启动新建的虚拟机在这个界面直接回车,进入下一个界面。
可以看到bt5的界面还是有些变化的,选择第一个选项进入。
用户名还是root,初始密码是toor,登录后输入startx启动桌面系统。
bt5的登录提示有明显改善,用颜色标记了需要输入的命令。
进入桌面系统后,双击桌面上的install BackTrack,启动硬盘安装程序:这里就选用使用整个磁盘,让系统自动进行文件系统分配。
4.重新启动系统,注意在启动过程中会提示移除磁盘文件。
5.默认bt5是没有启动网络的,所以启动后需要手动启动网络。
启动网络方法比较多:(第一种)命令行下输入:start networking;(第二种)先用命令:ifconfig eth0 up,然后使用命令:dhclient eth0。
BT5学习教程
1.BackTrack基础1.1BackTrack概述1.1.1BackTrack发展历史BackTrack是由出品的,是一个linux的便携系统可以放到U盘或者光盘中直接启动,对本身硬盘没有影响,当然也可以本地安装。
BackTrack是非常著名的安全审核工具平台,在封装好的Linux系统里内置了大量的网络安全检测工具。
BackTrack由Auditor和WHAX两种渗透测试平台合并而来,两者都是基于Linux系统的渗透测试平台。
Auditor:全称是Auditor Security Collection,是一种基于Knoppix的Live CD,由Max Moser开发,它内置了超过300种安全工具涵盖安全问题发现,网络和系统安全加固等方面。
它的用户友好性推动了渗透测试的可操作性,并因此引出了BackTrack安全测试平台的构想。
WHAX:以安全任务为中心的Linux发行版,它是由Whoppix(一种基于Knoppix的安全平台)发展而来,当Whoppix发布3.0版本时,它重命名为WHAX以表明它的系统构架从Knoppix更换为了SLAX。
在由安全顾问Mati Aharoni定制开发后,WHAX将它的核心内容调整为了渗透测试。
两者进行了重新整合,精选之后的版本被更名为BackTrack。
从2006年开始推出BackTrack1.0版本以来,之后每年都会推出一个全新版本的BackTrack系统,从BackTrack4.0,它的系统开始基于Ubuntu发行版,最初是基于Ubuntu Linux 8.10.在2011年5月10日,BackTrack推出了它的最新版5.0,代号为“Revolution”。
BackTrack5.0 以Ubuntu Lucid LTS 为基础,其Linux内核版本为2.6.28.BackTrack版本发布历史如下表所示:1.1.2BackTrack功能简介BackTrack作为最享有盛名的信息安全审计及渗透测试平台,其目的是方便人们执行渗透测试及安全任务。
BackTrack5(BT5)硬盘安装
BackTrack5(BT5)硬盘安装完美教程,于11-6-19 通过奶牛博客作者:奶牛大概一个月前吧,发了一系列的BackTrack5的文,有BT5的下载也有BT5的硬盘引导,当然还有BT5的硬盘安装咯,但是文章中存在一些错误,导致missing filesystem.size 而无法继续安装。
呃,BT5安装奶牛觉得是没有太大必要的。
为什么呢?BT5系统作为桌面系统的话不是很适合,所以对于新手奶牛还是不推荐安装的。
只要可以硬盘引导,里面所有的工具都可以正常使用的,也就没有什么安装的必要了。
当然,如果你想安装,可以用奶牛的教程,奶牛自己安装了一次,完美安装。
BackTrack5的硬盘安装奶牛分两步走,第一步是BT5的硬盘引导,第二步是BT5的硬盘安装。
过程中用到BT5的LIVE镜像,可以在这里下载BackTrack5发布,提供多种镜像下载。
第一部分BackTrack5(BT5)硬盘引导BackTrack5 (BT5)的硬盘引导我们是借助grub4dos来完成的,grub跟grub2下奶牛还木有测试。
grub4dos在xp跟win7下可以都用boot.ini的方法来完成,win7也认识boot.ini,如果你是xp,直接修改boot.ini,如果你是win7,在系统盘根目录下新建boot.ini。
写入内容:c:\grldr="GRUB4DOS Menu"xp是在文件最后加上上面这行,win7在空白文件中只写这行就可以了。
当然,win7也可以用easyBCD来安装grub4dos,可以参考奶牛的文章ubuntu11.04硬盘安装详细教程,xp、win7完美支持下面你需要下载奶牛准备好的grub4dos的配置文件:点此下载配置文件将此文件解压缩到系统盘根目录即可。
其实如果你对grub的menu.lst比较熟悉的话,可以看下menu.lst引导BT5的内容title BackTrack5 Text - Default Boot Text Moderoot (hd0,0)kernel /casper/vmlinuz file=/preseed/custom.seed boot=casper text splash vga=791-- initrd /casper/initrd.gzboot下载好CD镜像后,用UltraISO将全部文件解压缩到系统盘根目录(你的系统盘)下即可。
- 1、下载文档前请自行甄别文档内容的完整性,平台不提供额外的编辑、内容补充、找答案等附加服务。
- 2、"仅部分预览"的文档,不可在线预览部分如存在完整性等问题,可反馈申请退款(可完整预览的文档不适用该条件!)。
- 3、如文档侵犯您的权益,请联系客服反馈,我们会尽快为您处理(人工客服工作时间:9:00-18:30)。
安装bt5到u盘方法与步骤
先弄个BackTrack的Live版ISO文件,官网上有。
我选的是BackTrack5R2KDE64位(文档上介绍的GNOME版)
运行虚拟机,从ISO文件启动,BackTrack就跑起来了。
用startx命令切换到图形界面。
安装过程需要从互联网下载安装软件,所以先检查互联网连接,可用nslookup
如果域名解析成功,互联网连接就没问题了。
不行的话用ifconfig检查接口状态,用/etc/init.d/networking stop关闭网络接口,用/etc/init.d/networking start启动网络接口
在U盘上安装先要在系统中找到U盘,即找到它的路径,可以用dmesg|egrep hd.\|sd.命令,一般U盘的路径是/dev/sdb,不过不同环境不一样,例如,接了不止一个U盘的话,就不一定是这个路径了。
找到U盘。
用fisk/dev/sdb对它做分区,分区步骤如下
1)建一个主分区(primary),大小500M左右,把它toggle为83,设为active(这个区后面是用作/boot分区的,路经是/dev/sdb1)
2)建一个扩展分区(extend),大小是剩下的空间(就是直接敲回车就行了)
3)建一个逻辑分区(logical),大小跟2)的一样(也是直接敲回车就行了,这个后面是用作/分区,路经是/dev/sdb5)
4)别忘了敲w命令哦,保存分区表
后面的安装需要一些软件和工具,所以要升级一下BackTrack
apt-get update
apt-get install hashalot
升级成功后,要对U盘上的分区启用加密
cryptsetup-y--cipher aes-xts-plain--key-size512luksFormat/dev/sdb5
这里会要求建立加密口令的
接着打开加密了的分区,在它上面建VG,LV(LVM方面的东西)
1)打开加密分区cryptsetup luksOpen/dev/sdb5mybt5,这里会要求输入刚才见的加密口令
2)建PV,pvcreate/dev/mapper/mybt5
3)建VG,vgcreate vg/dev/mapper/mybt5
4)建LV,lvcreate-n swap-L1024M vg(这个LV是以后作为U盘上的swap交换空间,如果内存不够,会使用这部分空间,而影响性能;如果觉得内存足够,可以不建)
lvcreate-n root-l100%FREE vg
LV建好后,开始建文件系统
1)如果前面建了swap LV,mkswap/dev/mapper/vg-swap
2)mkfs.ext4/dev/mapper/vg-root
为了减轻U盘的读写负荷,延长它的寿命,提供性能,建议把ext文件系统的日志功能关闭
tune2fs-o journal_data_writeback/dev/mapper/vg-root
tune2fs-O^has_journal/dev/mapper/vg-root
e2fsck-f/dev/mapper/vg-root
现在,可以把BackTrack系统装到U盘上了,双击桌面的install Backtrack图标,按着指示操作
选择语言,直接点Forward就可以了
选择时区,Region选Asia(亚洲),Time Zone选China开头的
选键盘布局,直接点Forward就可以了
分区管理,这里要选Specify partitions manually(advanced)手工指定
我们要把/boot分区挂在/dev/sdb1上,把/分区挂在/dev/mapper/vg-root上,文件系统类型都是ext4
点Forward
接下来要点Advanced,在U盘上安装系统引导程序
点OK,再点Install
接下来就是漫长的等待了,所以要选读写性能好的U盘
到这一步,要点Continue Testing,因为我们还要继续,以让U盘里的BackTrack可以顺利启动
执行blkid/dev/sdb5,记住UUID串
然后
mkdir/mnt/bt5
mount/dev/mapper/vg-root/mnt/bt5
mount/dev/sdb1/mnt/bt5/boot
chroot/mnt/bt5
mount-t proc proc/proc
mount-t sysfs sys/sys
升级一下U盘里的BackTrack
apt-get update
apt-get install hashalot lvm2
接下来配置initramfs-tool创建initrd文件(这个文件在/boot目录下,是引导操作系统启动的程序)
用vi修改/etc/crypttab文件,增加这一行
mybt5/dev/disk/by-uuid/<uuid from above>none luks
(mybt5是前面创建的加密分区,<uuid from above>是前面blkid命令显示的UUID)
由于是加密盘,启动时是需要输入加密口令的,但这里有个BUG,我们需要修复一下
用vi编辑/usr/share/initramfs-tools/scripts/local-top/cryptroot文件
在275行处插入一个行echo"Unlocking the disk$cryptsource($crypttarget)"
把291行换成cryptkey="Enter passphrase:"
运行update-initramfs-u重建initrd文件
一般情况下,BackTrack启动时是图形界面的,通常要按F8切到命令行界面才能输入加密口令。
可以编辑/boot/grub/grub.cfg文件,让BackTrack启动时直接进入命令行界面。
在/boot/grub/grub.cfg文件里搜索splash(貌似只有一行有),找到后把这个“splash”删掉就可以了。
谷融网。