爱普生WF-2631中文说明书
Epson产品用户手册说明书

Read these instructions before using your product.Important Safety Instructions: When using telephone equipment, youshould always follow basic safety precautions to reduce the risk of fire, electric shock, and personal injury, including the following:• D o not use this Epson ® product near water.• A lways keep this guide handy.• A void using a telephone during an electrical storm. There may be a remote risk of electric shock from lightning.• D o not use a telephone to report a gas leak in the vicinity of the leak.Caution: To reduce the risk of fire, use only a No. 26 AWG or largertelecommunication line cord.1 Remove all protective materials from the product.2 L ift up the scanner unit and remove all protective materialsfrom inside the product, then close the scanner unit.6 Close the ink pack tray cover and lock it.7 P ress OK on the LCD screen to start charging the ink.Ink charging takes approximately 5 minutes. A messageappears when ink charging is complete.4 Load paperFor instructions on loading envelopes or legal-size paper, or using the rear paper feed slot, see the online User’s Guide .1 M ake sure the product is done charging the ink, then pullout the paper cassette.2 S lide the side edge guides all the way out and set thefront edge guide to the paper size you are using.3 I nsert paper with the glossy or printable side down.Standard paper: Thick paper:Note: Make sure the paper is under the arrow mark for your paper type and loaded against the front edge of the cassette.4 S lide the edge guides against the paper, but not tootightly.2 P ress an ink pack tray to release it, then pull the tray out.3 S hake an ink pack 10 times, then remove it from thepackaging.Note: Do not touch the green chip on the ink pack.4 M ove the handle forward, place the ink pack into the inkpack tray until it clicks, then move the handle back to itsoriginal position .Note: Make sure the ink pack is fullyinserted and level with the top of the ink pack tray.5 I nsert the ink pack tray into the printer. Repeat steps 2 to5 for the other ink packs.Note: The ink packs are keyed to fit into the correct color slot.If you cannot insert the ink pack tray all the way, do not force it. Make sure the ink pack color matches the color slot on the printer.3 F ollow the instructions on the computer screen to run thesetup program.4 W hen you see the Select Your Connection screen, selectone of the following and follow the on-screen instructions:• Wireless connectionIn most cases, the software installer automatically attempts to set up your wireless connection. If setup is unsuccessful, you may need to enter your network name (SSID) and password.• Direct USB connectionMake sure you have a USB cable (not included).• Wired network connectionMake sure you have an Ethernet cable (not included).PCL or PostScript driver (WF-C5790)Download the software and see your online User’s Guide for instructions..jm/support/wfc5790Mobile printingConnect wirelessly from your smartphone, tablet, or computer.Print documents and photos from across the room or around the world:• Print directly from your iOS device. Simply connect your printer and device to the same network and tap the action icon to select the print option.• Use Epson Print Enabler (free from Google Play™) with Android™ devices (v4.4 or later). Then connect your printer and device to the same network and tap the menu icon to select the print option.• Print remotely with Epson Connect™ and Google Cloud Print™. See your online User’s Guide for instructions or learn more at .jm/connect .Any problems?Network setup was unsuccessful.• Make sure you select the right network name (SSID).• Restart your router (turn it off and then on), then try toconnect to it again.• The printer can only connect to a network that supports 2.4 GHz connections. If your router offers both 2.4 GHz and 5 GHz connections, make sure 2.4 GHz is enabled.• If you see a firewall alert message, click Unblock or Allow to let setup continue.• If your network has security enabled, make sure you enter your network password (WEP key or WPA passphrase) correctly. Be sure to enter your password in the correct case.56 S elect the paper settings on the product’s control panel.12 I f prompted, press Proceed on the LCD screen to set upthe fax, or press Close to set it up later.Note: If your computer does not have a CD/DVD drive or you are using a Mac, an Internet connection is required to obtain the product software.To print from a Chromebook™, go to.jm/support/gcp for instructions.Standard software package1M ake sure the product is NOT CONNECTED to your computer.Windows ®: If you see a Found New Hardware screen, click Cancel and disconnect the USB cable.2 I nsert the product CD or download and run your product’ssoftware package. For the latest software, visit:WF-C5710.jm/support/wfc5710WF-C5790.jm/support/wfc5790。
epson打印机wifi如何设置

epson打印机wifi如何设置epson打印机wifi如何设置1、首先,把epsonl385打印机插上电源通电,待自检完成后,便可以设置。
如果用户家里的无线路由器带有WPS(Wi-Fi Protected Setup)或QSS(又称快速安全设置)功能,那就简单多了。
2、通过WPS或QSS无线路由器按钮连接,给无线路由器通电,待上面的指示灯交替闪烁时,证明路由器已经正式启动,按机身Wi-Fi 按键3秒钟,左侧Wi-Fi指示灯开始红灯和绿灯交替闪烁,当红灯和绿灯正常亮时打印机配置完成。
实现快速连接。
3、如果您还未安装打印机驱动,请登录爱普生网站下载L358驱动安装:按照屏幕提示完成驱动安装及设置,当出现“连接类型”界面时请选择“+其他计算机”,按照屏幕提示操作将会自动配置打印机和扫描端口设置,配置完成后就可以实现Wi-Fi无线打印和扫描。
4、如果需要单独配置打印机端口和扫描仪端口时,按下i按键,先通过打印出网络状态页来确认打印机的IP地址。
5、电脑端设置打印端电脑左下角点击开始—设置—打印机和传真,进入打印机完成驱动的图标界面,鼠标右键点击打印机图标(epsonl385)选择“打印机属性”->“端口”->“添加端口”->选择“Standard TCP/IP Port”,点击“新端口”,输入打印机的IP地址,选择“下一步”,完成端口添。
点击“应用”,无线网络打印设置完成。
6、电脑端设置扫描端口电脑左下角点击“开始”→“所有程序”→“EPSON”→“Epson Scan”→“Epson scan设置”,打开Epson Scan设置后将“本地”修改成“网络”;点击“添加”会自动搜索到一体机IP地址,用鼠标点击IP地址,再点击“确定”,完成设置。
cad里如何添加打印机的一、打开“Autodesk打印机管理器”的步骤:从“开始”菜单中选择“设置”“控制面板”。
双击“Autodesk打印机管理器”图标。
爱普生V扫描仪使用说明

爱普生V扫描仪使用说明Coca-cola standardization office【ZZ5AB-ZZSYT-ZZ2C-ZZ682T-ZZT18】爱普生V33扫描仪使用说明一、A、扫描仪部件a.扫描仪文稿盖a.文稿垫(仅PerfectionV330Photo)b.文稿台c.扫描头(在文稿台里边)B接口b.直流电入口B、指示灯和按钮此扫描仪有四个按钮用于扫描操作。
状态指示灯指示扫描仪操作是否正常a.电子邮件按钮d.PDF按钮c.复印按钮d.电源/启动按钮e.状态指示灯状态指示灯位于电源/启动按钮和PDF按钮之间。
颜色指示灯状态含义绿色亮准备扫描图像。
闪烁正在初始化或正在扫描。
橙色闪烁发生错误。
有关详细信息,参见。
(无)灭扫描仪关闭。
按钮功能电源/启动按钮电源如果按下一次可打开扫描仪电源。
当扫描仪电源打开时,按下此按钮3秒钟可关闭扫描仪。
(当扫描软件正在运行时,您不能关闭扫描仪。
)启动EpsonScan启动。
复印CopyUtility启动。
E-mail EpsonScan自动扫描,然后出现传送文件的邮件窗口。
PDF扫描至PDF窗口出现。
二、A、将文稿和照片放在文稿台上1、打开扫描仪盖2、将原始文稿或照片面朝下放置在扫描仪文稿台上。
确保将文稿或照片放置在文稿台的右下角且与箭头标记对齐。
3、轻轻地合上文稿盖,以免移动原始文稿。
注意:扫描多张照片,请将每张照片与其相邻照片之间至少距离20毫米(0.8英寸)放置保持文稿台干净请勿将照片在文稿台上放置过长时间,因为它们可能会粘在玻璃上B、放置大或厚的文稿扫描大的或厚的文稿时,可完全的打开扫描仪的文稿盖,使其平放在扫描仪的旁边1、打开扫描仪盖2、向上笔直地拉出文稿盖3、向下放置文稿盖使其平放在扫描仪的旁边。
注意:当不使用文稿盖进行扫描时,请轻轻向下按住文稿使其平整完成扫描时,放下文稿盖的相反顺序重新安上文稿盖二、A、启动EPSONScan1、使用扫描仪按钮a.邮件按钮b.PDF按钮c.复印按钮d.电源/启动按钮可通过按下下面扫描仪上的按钮来启动扫描。
EPSON无线打印机 使用手册
Epson Connect用户指南NPD4945-00 SC此手册中出现的打印机/一体机以下简称“打印机”。
爱普生产品使用说明或网页等可能描述了其他公司(非爱普生)的硬件/软件产品、功能及服务,爱普生对于其他公司生产的产品和提供的服务(包括但不限于其内容、性能、准确性、兼容性、可靠性、合法性、适当性和连续性)不做任何明示和/或默示担保。
注释:其他信息,可查看产品本身、产品包装和其他形式的资料,包括爱普生网页()Epson Connect和其他移动解决方案Epson Connect是什么?Epson Connect提供移动服务,可让您在任何地方发送任务实现打印和扫描。
您可使用智能手机、平板电脑或笔记本电脑发送任务实现打印照片和文档。
如果您发送扫描的数据到与Epson Connect兼容的打印机,此时的打印机类似于彩色传真机。
您还可使用您的爱普生打印机扫描文档并将其上传到指定的地方,如:在线存储设备或“云(Colud)”帐户。
可使用下面服务。
一旦您已注册了您的打印机和帐户,您可使用下面的所有服务。
有关如何注册到Epson Connect、如何使用服务和故障排除的详细信息,参见Epson Connect入口网页:https:///服务概述Email Print从任何地方仅通过发送邮件即可实现打印照片和文档。
扫描至云(Cloud)扫描您的文档和照片至“云(Cloud)”帐户。
Epson iPrint对于iOS或Android智能手机和平板电脑的无线打印应用软件。
Epson iPrint具有二项有用的功能。
首先是本地打印,允许您打印并扫描至与本地相同Wi-Fi网络连接的打印机作为您的设备打印。
第二是远程打印,允许您通过互联网远程打印。
如果您未安装Epson iPrint,从下面的URL下载它并安装,然后注册。
http://ipr.toRemote Print Driver通过互联网远程打印。
注释:O扫描至云(Cloud)为Scan to cloud。
爱普生打印机全系列面板按键功能设置
针式打印机面板按键功能设置EPSON LQ-300K 面板按键功能1.打印默认设置:按[字体]键开机,再按[换行/进退纸]键,将直接进入设置模式。
2.字体自检:按[换行/进退纸]键开机,可进行自检打印。
3.页首位置调整:开机先进1张纸,按住[暂停]键3秒左右,听到蜂鸣器响1声松手,字体灯开始“闪”。
再通过按[字体]键或[换行/进退纸]键调整页首的空白值,调整完后按[暂停]键存储设置。
LQ-300K+面板按键功能1.打印默认设置:按[字体]键开机,直接进入设置模式。
同时按[字体]、[进纸/退纸]键可直接打印当前设定。
2.字体自检:按[换行/换页]键开机,可进行自检打印。
3.纵向对齐调整:按[暂停]开机,放纸打印出调整方法。
4.页首位置调整:开机进1张纸,按住[暂停]键3秒钟左右,听到蜂鸣器响1声松手,暂停灯开始“闪”。
再通过[进纸/退纸]键或[换行/换页]键,可调整页首空白值,调整完后按[暂停]键存储LQ-670K+面板按键功能1.调整纸张左边空白量:开机进1张纸,按住[暂停]键约5秒,听到蜂鸣器响2声后松手,暂停灯“闪”。
再通过按[换行/换页]或[进纸/退纸]键可调整页面左空白量,每按 1 次按键约为0.2毫米调整量完成后,按暂停键存储。
2.打印默认设置:按[字体]键开机,可连续打印出3张纸的默认设置清单。
再放进一张空白纸,根据第1张清单上的说明通过按[字体]键选择修改项目,通过按[切纸/存折]键可更改默认设置。
同时按住[字体]和[切纸/存折]键开机,可直接跳过打印清单直接修改默认设置。
3.页首位置调整:开机后放进一张纸,按住[暂停]键3秒钟左右,听到蜂鸣器响1声马上松手,暂停灯开始“闪”。
再通过按[换行/换页]键或[进纸/退纸]键可连续调整页首值,调整完后按暂停键存储。
4.切纸位置调整:在连续纸状态下装上连续纸,按一下[切纸/存折]键使[切纸/存折]灯“闪”亮。
再通过按[换行/换页]键或[进纸/退纸]键调整切纸位置,调整完后按[暂停]键存储。
Epson 投影仪用户指南说明书
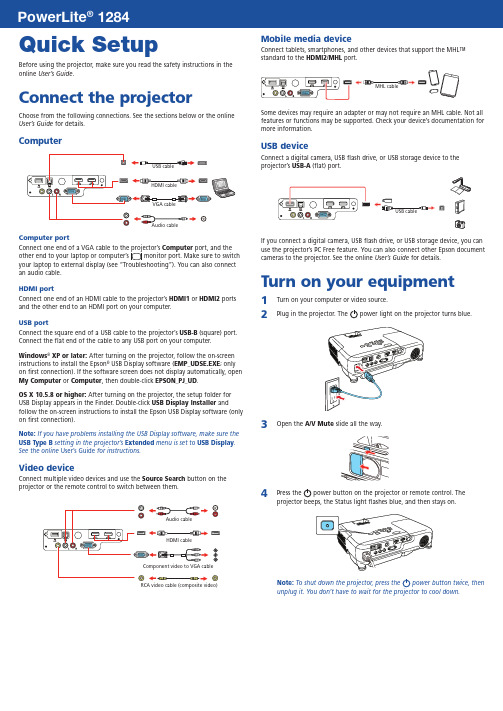
Quick SetupBefore using the projector, make sure you read the safety instructions in the online User’s Guide .Connect the projectorChoose from the following connections. See the sections below or the online User’s Guide for details.ComputerComputer portComputer port, and the an audio cable.HDMI portConnect one end of an HDMI cable to the projector’s HDMI1 or HDMI2 ports and the other end to an HDMI port on your computer.USB portConnect the square end of a USB cable to the projector’s USB-B (square) port. Connect the flat end of the cable to any USB port on your computer.Windows ® XP or later: After turning on the projector, follow the on-screen instructions to install the Epson ® USB Display software (EMP_UDSE.EXE ; only on first connection). If the software screen does not display automatically, open My Computer or Computer , then double-click EPSON_PJ_UD .OS X 10.5.8 or higher: After turning on the projector, the setup folder for USB Display appears in the Finder. Double-click USB Display Installer andfollow the on-screen instructions to install the Epson USB Display software (only on first connection).Note: If you have problems installing the USB Display software, make sure the USB Type B setting in the projector’s Extended menu is set to USB Display . See the online User’s Guide for instructions.Video deviceConnect multiple video devices and use the Source Search button on theprojector or the remote control to switch between them.RCA video cable (composite video)Mobile media deviceConnect tablets, smartphones, and other devices that support the MHL™ standard to the HDMI2/MHLport.Some devices may require an adapter or may not require an MHL cable. Not all features or functions may be supported. Check your device’s documentation for more information.USB deviceConnect a digital camera, USB flash drive, or USB storage device to the projector’s USB-A(flat) port.If you connect a digital camera, USB flash drive, or USB storage device, you can use the projector’s PC Free feature. You can also connect other Epson document cameras to the projector. See the online User’s Guide for details.Turn on your equipment1 Turn on your computer or video source.2Plug in the projector. Thepower light on the projector turns blue.3O4 PNote: To shut down the projector, press the power button twice, thenunplug it. You don’t have to wait for the projector to cool down.12845 U se the arrow buttons on the remote control to highlight any of theoptions on the Home screen that appears, then press to select it. Youcan display a QR code, switch between projection sources, and quicklyaccess various adjustment options from this screen.6 T he default language of the menu system is English. To select anotherlanguage, press the Menu button on the projector or remote control.Select Extended and press . Select Language and press . Selectyour language and press . Press the Menu button to exit the menusystem.Adjust the image1 I f you don’t see an image, press the Source Search button on theprojector or the remote control to select the image source.Note: If you still see a blank screen or have other display problems, see2 T3 To reduce or enlarge the image, turn the zoom ring.4 Turn the focus ring to sharpen the image.5 I f your image looks like or, you may have placed the projectoroff to one side of the screen at an angle. Place the projector directly infront of the center of the screen, facing the screen squarely. If you can’tmove the projector, use the horizontal keystone slider on the projector tocorrect the image shape.,Using the remote controlMake sure the batteries are installed as shown (two AA batteries).Choose which sourceto displayTurn projectoron and offAccess projectormenusTurn off projectordisplayAccess the HomescreenNavigate projectormenusFor more information on using the remote control, see the onlineUser’s Guide.Project wirelesslyFollow the steps here to connect the projector over a wireless network.If you’re projecting from a computer, it must have a wireless card or built-in wireless interface, and be running Windows 10, Windows 8, Windows 7,Windows Vista®, Windows XP Professional x64, or Windows XP, or OS X 10.5.8to 10.10.x.1 P ress the Menu button on the remote control, select the Networkmenu, and press .2 Choose Network Configurationand press .3 Select the Wireless LAN menu and press .4 C hoose Connection Mode, press , select Quick for a directconnection to a computer, tablet, or smartphone, then press again.When you’re finished, press Esc to return to the Wireless LAN menu.Note: For instructions on setting up an Advanced connection for aconnection to a router or access point, see the online User’s Guide.5 T o prevent the SSID and IP address from appearing on the networkstandby screen, set the SSID Display and IP Address Display settings to Off.6 W hen you’re finished selecting settings in the Wireless LAN menu, pressEsc.7 S elect Complete and press , then select Yes and press again tosave your settings.Install network softwareInstall links to download the network software and manuals from the projector CD. Downloads require an Internet connection. You can also install the software and manuals from the Epson website, as described in “Where to get help.”To project over the network, install the EasyMP® Network Projection software on each computer you will project from. To monitor and control your projector over the network, install the EasyMP Monitor software (Windows only). To project from multiple PCs over the network, install the EasyMP Multi PC Projection software.Click the icons on your desktop to download and install the software and their manuals. See the manuals for instructions on installing and using the software.Project wirelessly from a mobile deviceYou can connect your mobile device and projector using Epson iProjection™ and a QR code. Make sure the latest version of Epson iProjection is installed on your device.Install the Epson iProjection appTo project from an iOS or Android™ device,download and install the Epson iProjection app.Visit /projectorapp (U.S.) orepson.ca/projectorapp (Canada) for more information.Direct wireless connectionMake sure your device and Epson projector are not connected to a network and your Epson projector’s Connection Mode is set to Quick.1Tap iProjection on your device’s Home screen.2 Tap Projectorto open the Search Projector menu.3 Tap Read QR code.4 P oint your device’s camera at the QR code your projector displays; theQR code is read automatically.5 Tap OK to register your projector’s Wi-Fi profile.6 Tap Install to install your projector’s Wi-Fi profile.7 Tap Install Now at the Unsigned Profile notification.8 Tap Done to exit the Profile Installed screen.9 Tap OK to confirm the connection to the projector.10 N ote the projector network name (SSID) shown on your device’s screen.Then go to the Wi-Fi settings on your device to select that network.Your device and Epson projector are now work connectionMake sure your projector and mobile device are connected to the same network.1Tap iProjection on your device’s Home screen.2 Tap Projectorto open the Search Projector menu.3 Tap Read QR code.4 P oint your device’s camera at the QR code your projector displays; theQR code is read automatically.Your device and Epson projector are now connected. TroubleshootingIf you see a blank screen or the No signal message after turning on your computer or video device, check the following:•M ake sure the Status light on the projector is blue and not flashing, and the A/V Mute slide is open.•P ress the Source Search button on the projector or the remote control to switch to the correct image source, if necessary.•P ress the Home button on the projector or remote control to verify the source input and settings.•I f you’re using a Windows laptop, press the function key on your keyboard that lets you display on an external monitor. It may be labeled CRT/LCD or have an icon such as . You may have to hold down the Fn key while pressing it (such as Fn + F7). Wait a moment for the display to appear.•I f you’re using a Mac laptop, open System Preferences and select Displays. Click the Arrangement tab and select the Mirror Displayscheckbox.Where to get helpManualsFor more information about using the projector, click the icons on your desktop to access the online manuals (requires an Internet connection). If you don’t see icons to the manuals, you can install them from the projector CD or go to the Epson website, as described below.Telephone support servicesTo use the Epson® PrivateLine® Support service, call (800) 637-7661. This service is available for the duration of your warranty period. You may also speak with a support specialist by calling (562) 276-4394 (U.S.) or (905) 709-3839 (Canada). Support hours are 6 AM to 8 PM, Pacific Time, Monday through Friday, and7 AM to 4 PM, Pacific Time, Saturday. Days and hours of support are subject to change without notice. Toll or long distance charges may apply.Internet supportVisit /support (U.S.) or epson.ca/support (Canada) for solutions to common problems. You can download utilities and documentation, get FAQs and troubleshooting advice, or e-mail Epson.For more information on wireless projection, visit/wirelessprojectors.RegistrationRegister today to get product updates and exclusive offers. You can use the CD included with your projector or register online at /webreg.Optional accessoriesFor a list of optional accessories, see the online User’s Guide.You can purchase screens or other accessories from an Epson authorized reseller.To find the nearest reseller, call 800-GO-EPSON (800-463-7766). Or you canpurchase online at (U.S. sales) or epson.ca (Canadian sales).Wireless noticeContains wireless LAN 802.11b/g/n moduleModel: WN7122BEPThis document provides safety instructions and describes the specifications. Read thisdocument carefully before use to ensure your safety and product performance.The grantee is not responsible for any changes or modifications not expressly approvedby the party responsible for compliance. Such modifications could void the user’sauthority to operate the equipment. This equipment should be installed and operatedkeeping the radiator at least 7.9 inches (20 cm) or more away from person’s body. Thisdevice is restricted to indoor operations only.EPSON, PowerLite, and EasyMP are registered trademarks, Epson iProjection is a trademark, and EPSON ExceedYour Vision is a registered logomark of Seiko Epson Corporation. PrivateLine is a registered trademark andEpson Connection is a service mark of Epson America, Inc.Mac and OS X are trademarks of Apple Inc., registered in the U.S. and other countries.Android is a trademark of Google Inc.General Notice: Other product names used herein are for identification purposes only and may be trademarksof their respective owners. Epson disclaims any and all rights in those marks.This information is subject to change without notice.© 2015 Epson America, Inc., 9/15Printed in XXXXXX CPD-42655R1。
EPSON 操作手册
!"# $%&'(
!"#$%&'()
!"
1
2
=========
!"#$%&'()
!"#
NR
ñaJmáÅíìêÉ=`~êÇ ñaJmáÅíìêÉ=`~êÇ=qóéÉ=j ñaJmáÅíìêÉ=`~êÇ=qóéÉ=jH ñaJmáÅíìêÉ=`~êÇ=qóéÉ=e pa=jÉãçêó=`~êÇ pae`=jÉãçêó=`~êÇ jìäíájÉÇá~`~êÇ jj`éäìë jj`ãçÄáäÉG
`çãé~Åícä~ëÜ
jáÅêçÇêáîÉ
jj`ãáÅêçG
G
!"
ãáåápaG ãáåápae`G
!"#$%&'
ãáÅêçpa ãáÅêçpae`G
G
!"#$%#"&'()
!"#
!"#$%"&'
jÉãçêó=píáÅâ jÉãçêó=píáÅâ=mêç j~ÖáÅd~íÉ=jÉãçêó=píáÅâ jÉãçêó=píáÅâ=aìçG jÉãçêó=píáÅâ=mêç=aìçG jÉãçêó=píáÅâ=mêçJed=aìçG j~ÖáÅd~íÉ=jÉãçêó=píáÅâ=aìçG jÉãçêó=píáÅâ=jáÅêçG
! ==== ==== ==== ==== ==== ! ==== ==== ==== ==== ! ==== ==== ! KKKKKKKKKKKKKKKKKKKKKK OV !"# KKKKKKKKKKKKKKKKKK PN ! KKKKKKKKKKKKKKKKKKKKKK ! KKKKKKKKKKKKKKKK L `aLasa KKKKKKKKKKKKK !"#$% KKKKKKKKKKKKKK ON OP OR OT !" KKKKKKKKKKKKKKKKKKKK !" KKKKKKKKKKKKKKKKKKKK `aLasa KKKKKKKKKKKKK !" KKKKKKKKKKKKKKKKKKKK ! KKKKKKKKKKKKKKKKKKKKKK V NM NP NR NT ==== ==== ==== ==== ==== ==== ==== ==== ==== ==== ==== ==== !" KKKKKKKKK `aLasa !"# KKKKKKKKKKKKKKKKKK !"#$% KKKKKKKKKKKKKK !"#$%&'( KKKKKKKK !"#$% KKKKKKKKKKKKKK ! !" KKKKKKKKKKKKKKKKKKKK !" KKKKKKKKKKKKKKKKKKKK !"# KKKKKKKKKKKKKKKKKK !"# KKKKKKKKKKKKKKKKKK !"#$% KKKKKKKKKKKK !"#$% KKKKKKKKKKKKKK ! ! !"# KKKKKKKKKKKKKKKKKK PP PS PV QO QQ QS QU RM RN RO RP RR !" KKKKKKKKKKKKKK ==== L !" KKKKKKKKKKKKKKKKKKKK ==== KKKKKKKKKKKKKKKKK ====máÅí_êáÇÖÉ !"#$% KKKKKKKKKKKKKK ==== ! ! KKKKKKKKKKKKKKKKKKKKKK ==== ==== ! KKKKKKKKKKKKKKKKKKKKKK ==== KKKKKKKKKKKKKKKKKKKKKKKKKK ==== !" KKKKKKKKKKKKKKKKKKKK !"# KKKKKKKKKKKKKKKKKK ==== ==== !"# KKKKKKKKKKKKKKKKKK ! KKKKKKKKKKKKKKKKKKKKKK ==== ! KKKKKKKKKKKKKKKKKKKKKK ==== RS RU SM SO SQ SS SV TR TS TS TT TT
爱普生打印机说明
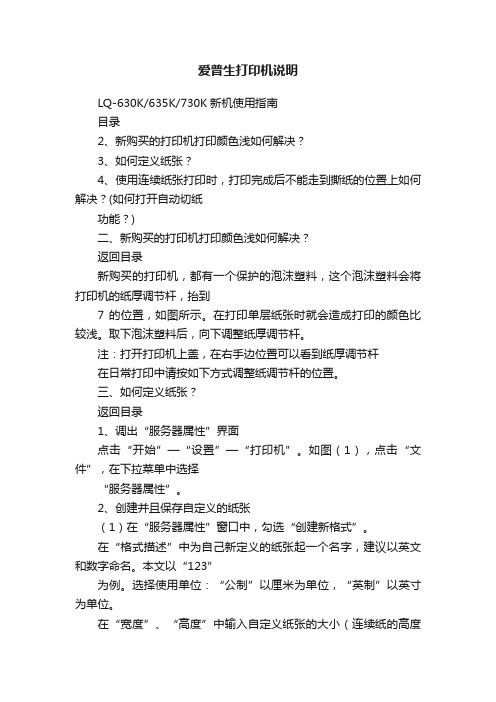
爱普生打印机说明LQ-630K/635K/730K新机使用指南目录2、新购买的打印机打印颜色浅如何解决?3、如何定义纸张?4、使用连续纸张打印时,打印完成后不能走到撕纸的位置上如何解决?(如何打开自动切纸功能?)二、新购买的打印机打印颜色浅如何解决?返回目录新购买的打印机,都有一个保护的泡沫塑料,这个泡沫塑料会将打印机的纸厚调节杆,抬到7 的位置,如图所示。
在打印单层纸张时就会造成打印的颜色比较浅。
取下泡沫塑料后,向下调整纸厚调节杆。
注:打开打印机上盖,在右手边位置可以看到纸厚调节杆在日常打印中请按如下方式调整纸调节杆的位置。
三、如何定义纸张?返回目录1、调出“服务器属性”界面点击“开始”—“设置”—“打印机”。
如图(1),点击“文件”,在下拉菜单中选择“服务器属性”。
2、创建并且保存自定义的纸张(1)在“服务器属性”窗口中,勾选“创建新格式”。
在“格式描述”中为自己新定义的纸张起一个名字,建议以英文和数字命名。
本文以“123”为例。
选择使用单位:“公制”以厘米为单位,“英制”以英寸为单位。
在“宽度”、“高度”中输入自定义纸张的大小(连续纸的高度是指两个撕纸位之间的长度)。
本文以15cm 宽、20cm 高的纸张为例。
打印机区域边距根据需要自行制定。
最后点击“保存格式”。
一个名叫“123”的格式就生成了。
其代表宽度15cm、高度20cm的纸张大小。
如图(2)。
注意:常见的纸张大小规格为:24.1*27.94cm、24.1*13.97cm、24.1*9.32cm 请按实际纸张的大小进行定义。
图(1)打开“服务器属性”3、在打印机驱动属性中选用自定义的纸张在“打印机和传真”中,鼠标右键点击所用打印机驱动图标,打开打印机属性,点击“打印首选项”,点击“高级”->“纸张大小”下拉菜单。
选择“123”纸张类型即可。
如图(3)。
图(2)创建新格式图(3)在驱动中选择自定义纸张注意:LQ-630K/635K/730K 纸张定义的范围是:宽度:7-25.7cm,高度:9-55.88cm,如果所定义的纸张过小或过大,超出进纸范围,这时在驱动属性里找不到自定义的纸型。
- 1、下载文档前请自行甄别文档内容的完整性,平台不提供额外的编辑、内容补充、找答案等附加服务。
- 2、"仅部分预览"的文档,不可在线预览部分如存在完整性等问题,可反馈申请退款(可完整预览的文档不适用该条件!)。
- 3、如文档侵犯您的权益,请联系客服反馈,我们会尽快为您处理(人工客服工作时间:9:00-18:30)。
用户指南
版权和商标
版权和商标
未经精工爱普生株式会社事先书面许可,本出版物(手册)的任何部分,不得被复制,或存储于检索系 统中,或以任何形式、任何方式传播包括电子、手工、复印、录音录像以及其他方式。本出版物(手 册)中包含的信息是专用于本爱普生产品的,爱普生公司对于将此信息应用于其他产品的任何行为不承 担任何责任。
对于本产品的购买者或第三方由于意外、误用或滥用本产品,或未经授权修理、改装本产品,以及未能 严格遵守精工爱普生株式会社的操作说明和维护说明(美国除外)所引起的本产品购买者或第三方的损 害、损失、成本、费用等,精工爱普生株式会社及其关联公司均不承担任何责任。
对于由于使用非爱普生原装正品耗材和/或选件或使用非精工爱普生株式会社认可的耗材和/或选件所导 致的任何损害或问题,精工爱普生株式会社及其关联公司不承担任何责任。
用户ቤተ መጻሕፍቲ ባይዱ南
此手册描述中出现的墨水瓶代表爱普生原装墨水补充装。 在本产品的说明书中,打印部件将简称为打印机,扫描部件将简称为扫描仪。 请妥善保管此说明书(保留备用)。 安装、使用产品前请阅读使用说明。 本产品资料中使用的示意图仅供参考,本产品实际可能与之存在差异,以包装箱内产品实际为准。 本产品使用说明和包装箱上的数据来源于爱普生实验室测试。产品驱动光盘盘面上、驱动和软件中所显 示的型号可能与实际销售产品的型号稍有不同,不影响产品的使用。 其他信息,可查看产品本身、产品包装和其他形式的资料,包括爱普生网页 ()。
本产品相关资料及光盘以针对在大陆地区销售产品的中文内容为准。英文及其他语种内容针对全球销售 产品,仅供用户对照。本资料仅供参考。除中国现行法律法规规定,爱普生(中国)有限公司不承担任 何由于使用本资料而造成的直接或间接损失的责任。
其他信息,可查看产品本身、产品包装和其他形式的资料,包括爱普生网页(http:// )。
R PRINT Image Matching™ 和 PRINT Image Matching 标识是精工爱普生株式会社的商标。
R Microsoft®、Windows® 和 Windows Vista® 是 Microsoft 公司的注册商标。
R Apple、Macintosh、Mac OS、OS X、Bonjour、Safari、iPad、iPhone、iPod touch 及 iTunes 系 Apple Inc. 于美国及其他国家/地区注册的商标。
爱普生产品使用说明或网页等可能描述了其他公司(非爱普生)的硬件/软件产品、功能及服务,爱普生 对于其他公司生产的产品和提供的服务(包括但不限于其内容、性能、准确性、兼容性、可靠性、合法 性、适当性和连续性)不做任何明示和/或默示担保。
R EPSON 和EXCEED YOUR VISION是精工爱普生株式会社在中国的注册商标。
对于由于使用非精工爱普生株式会社认可的接口线缆而产生电磁干扰所导致的任何损害,精工爱普生株 式会社及其关联公司不承担任何责任。
© 2016精工爱普生株式会社。版权所有。
本产品信息以爱普生网页( )为准,如有更改,恕不另行通知。
对其中涉及的描述和图像,以包装箱内实际内容为准,在中国法律法规允许的范围内,爱普生(中国) 有限公司保留解释权。
R 一般通告:于此涉及的所有其他产品之商标或注册商标,其权属归其各自所有者所有,此处仅作说明辨 识之用。
产品信息如有变化,恕不另行通知。
2
用户指南
No part of this publication may be reproduced, stored in a retrieval system, or transmitted in any form or by any means, electronic, mechanical, photocopying, recording, or otherwise, without the prior written permission of Seiko Epson Corporation.No patent liability is assumed with respect to the use of the information contained herein.Neither is any liability assumed for damages resulting from the use of the information herein.The information contained herein is designed only for use with this Epson product.Epson is not responsible for any use of this information as applied to other products. Neither Seiko Epson Corporation nor its affiliates shall be liable to the purchaser of this product or third parties for damages, losses, costs, or expenses incurred by the purchaser or third parties as a result of accident, misuse, or abuse of this product or unauthorized modifications, repairs, or alterations to this product, or (excluding the U.S.) failure to strictly comply with Seiko Epson Corporation's operating and maintenance instructions. Seiko Epson Corporation and its affiliates shall not be liable for any damages or problems arising from the use of any options or any consumable products other than those designated as Original Epson Products or Epson Approved Products by Seiko Epson Corporation. Seiko Epson Corporation shall not be held liable for any damage resulting from electromagnetic interference that occurs from the use of any interface cables other than those designated as Epson Approved Products by Seiko Epson Corporation. © 2016 Seiko Epson Corporation.All rights reserved. The contents of this manual and the specifications of this product are subject to change without notice.
R Google Cloud Print™、Chrome™、Chrome OS™ 及 Android™ 系 Google Inc 的商标。
R Adobe,Adobe Reader,Acrobat和Photoshop系Adobe系统公司的商标,可能在某些司法管辖区注册。
R Intel® 是 Intel 公司的注册商标。