海鸥自动机械表M186S使用说明书
腕表的使用说明
腕表的使用说明: 1、任何非专业人士请勿掀开手表后盖以防止损坏。
建议您每天佩戴该手表 2、机械表的上链与调校时间为了保证自动上链手表(自动机械表)持续运行。
如不能每天佩带,请于每次佩戴前先将手表上弦(顺时针旋转表冠20圈:左手持表,右手拇指在上食指在下调节表冠,拇指向12点方向搓动即为顺时针)请不要在手表展现早晨9点钟至凌晨3点钟时辰内履行调校日期的操纵,省得粉碎手表机械体系。
因为这个时辰段机芯齿轮系统正在运转改变位置已完成自动替代日期。
请将手表稳当保存于表盒内 3、长久闲置腕表的保留如果长时间不佩戴手表。
预防手表被摔坏或是被碰撞,这样会大大减低手表损坏的机率。
若要重新佩戴长时间处于闲置状况的机械手表时,必需先重新上紧发条,机械腕表在发条最松弛的时辰,会出现时针、分针变慢或变快的景象,以是,应该先上弦,尔后再校对间。
建议将其收藏好之前将表冠拉出。
此举将连续手表机芯的供电以便于迟误电池操纵寿命。
一旦电池耗尽,石英腕表的电池用量凡是在两年以上。
如果计划在数周或数月内将手表闲置不戴。
必需顿时售后替代电池。
应避免沾水 30米(3A TM即 3个大气压)防水表 4、防水机能腕表的防水凭借表镜、后盖、把头等处的防水胶圈而达到响应的尺度。
所有防水表均在底盖上打有 WA TERRESISTA NT或 WA TERPROOF英文字样。
无防水标记手表仅能防尘。
可用于一般梳洗或雨中使用,即水滴只溅在详情上而未有任何水压加于表上。
50米防水表可适用于拍浮及一般家务,100米防水表可用于游泳,200米以上防水表可用于潜水等水下工作。
防水胶圈的老化会影响手表的防水机能,所以腕表的防水胶圈和把头(内含防水圈)遵照操纵环境要定期更换。
石英表在每次换电池时须同时替代防水元件,以保证防水性能杰出。
任何防水表都不宜戴着洗热水浴、桑拿浴或在温度变动很大的环境中使用。
因为防水胶圈受温度影响会热胀冷缩出现空隙并加速老化从而引起进水和表内出现水凝结物,重大的将使机件损坏。
手表的基本功能及操作指南

\# 手表的基本功能及操作指南手表作为一种常见的时间显示工具,已经成为了人们日常生活中不可缺少的物品之一。
不仅可以帮助我们准确地掌握时间,还具备了许多其他实用的功能。
本文将介绍手表的基本功能和操作指南,帮助读者更好地使用手表。
手表的基本功能1. 时间显示手表最基本的功能就是显示时间。
无论是数字显示还是指针显示,手表都能准确地告诉我们当前的时间。
时针、分针和秒针的运动组合起来,形成了一个精准的时间刻度。
2. 日期显示许多手表还具备日期显示功能。
它可以显示当前的日期和星期几,让我们更方便地了解时间和日期信息。
3. 闹铃功能手表上的闹铃功能可以帮助我们在特定的时间点提醒自己。
无论是起床、上班、约会还是其他重要的事件,手表都可以准时地提醒我们。
设置闹铃只需要按照手表的说明书进行操作即可。
4. 秒表功能有些手表还配备了秒表功能,可以用来测量时间的流逝。
比如说,当我们需要计时运动耗时、煮面条的时间或者简单的游戏比赛时,秒表功能将非常实用。
5. 计时器功能手表上的计时器功能可以帮助我们设定一个特定的时间段,并在倒计时结束时发出提示。
这在做饭、运动、学习等需要严格控制时间的场景中非常有用。
6. 防水功能许多手表都具备一定的防水功能,可以抵御汗水、雨水甚至一定深度的水压。
这让我们可以在洗手、游泳或者下雨天继续佩戴手表,而不用担心损坏。
手表的操作指南1. 调整时间和日期要想手表显示准确的时间和日期,我们需要定期进行调整。
通常情况下,手表的时间和日期调整方式是通过旋转表冠或按下特定的按键来完成,具体操作方法请参考手表的说明书。
2. 设置闹铃大多数手表都具备闹铃功能,设置闹铃非常简单。
只需按照说明书的指引,找到闹铃设置按钮,并根据需要设定时间和铃声即可。
3. 使用秒表和计时器要使用手表上的秒表和计时器功能,通常需要找到相关的按键,并按照说明书进行操作。
秒表通常由开始、停止和复位按钮组成,而计时器则需要设置倒计时时间。
4. 注意防水性能手表的防水性能需要根据不同的手表来决定。
Omega 时尚手表产品说明书
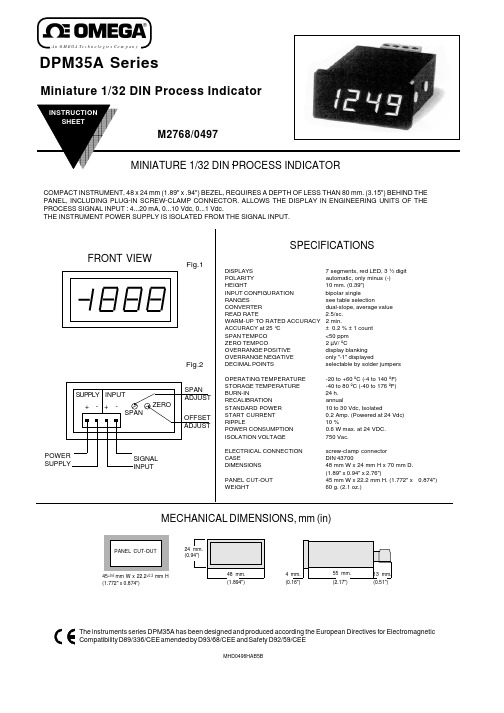
An OMEGA Te c h n o l o g ie s Co m p a n yMECHANICAL DIMENSIONS, mm (in)45+0.6 mm W x 22.2+0.3 mm H (1.772" x 0.874")MHD0496HAB5BDPM35A SeriesMiniature 1/32 DIN Process IndicatorFeatures a decimal point that can be set independently of signal range.For instance : 1 Vdc. signal on a ±2 Vdc meter can be displayed as 1.000, 10.00, 100.0, or 1000 for different engineering units. (in this example 1.000 V 10.00 mA.100.0% or 1000 mV)Fig.4a b c1 XX . X 1X . XX 1 . XX XDecimal pointposition Close Solder PadDisplay Board Components ViewDECIMAL POINT SELECTIONSignal Input Impedance ΩClose Jumpers0/4...20mA 182 1 & 20/10...50mA 68 1 & 30...2/10Vdc 200 K 10...10/200Vdc1 MNone*lower table, in function of signal input.Offset course : from -1000 to +1000To know the maximum negative Offset value, according to the Span value to be displayed apply this formula :((R3/S3) x S1) -1000.Span course for signal input :in Current, minimum 100 counts and maximum 3000 countsin Voltage, minimum 100 counts and maximum 2000 counts*Standard signal input for all orders unless specified otherwise.Display is adjusted to read 100.0WARRANTY/DISCLAIMEROMEGA warrants this unit to be free of defects in materials and workmanship and to give satisfactory service for a period of 13 months from date of purchase.OMEGA Warranty adds an additional one (1) month grace period to the normal one (1) year product warranty to cover handling and shipping time. This ensures that OMEGA's customers receive maximum coverage on each product. If the unit should malfunction, it must be returned to the factory for evaluation. OMEGA's Customer Service Department will issue an Authorized Return (AR)number immediately upon phone or written request. Upon examination by OMEGA, if the unit is found to be defective it will be repaired or replaced at no charge. However, this WARRANTY is VOID if the unit shows evidence of having been tampered with or shows evidence of being damaged as a result of excessive corrosion; or current; heat; moisture or vibration; improper specification; misapplication; misuse or other operating conditions outside of OMEGA's control. Components which wear or which are damaged by misuse are not warranted. These include contact points, fuses and triacs..OMEGA is pleased to offer suggestions on the use of its various products.However OMEGA neither assumes responsability for any omissions or errors nor assumes liability for any damages that result from the use of its products in accordance with information provided by OMEGA, either verbal or written.OMEGA only warrants that the parts manufactured by it will be as specified and free of defects. OMEGA MAKES NO OTHER WARRANTIES OR REPRE-SENTATIONS OF ANY KIND WHATSOEVER, EXPRESSED OR IMPLIED, EX-CEPT THAT OF TITLE AND ALL IMPLIED WARRANTIES INCLUDING ANY WARRANTY OF MERCHANTABILITY AND FITNESS FOR A PARTICULAR PUR-POSE ARE HEREBY DISCLAIMED.LIMITATION OF LIABILITY: The remedies of purchaser set forth herein are exclusive and the total liability of OMEGA with respect to this order, whether based on contract, warranty, negligence, indemnification, strict liability or otherwise, shall not exceed the purchase price of the component upon which liability is based. In no even shall OMEGA be liable for consequential,incidental or special damages.CONDITIONS: Equipment sold by OMEGA is not intended to be used, nor shall it be used:(1) as a "Basic Component" under 10 CFR 21 (NRC), used in or with any nuclear installation or activity; or (2) in medical applications or used on humans. Should any Product(s) be used in or with any nuclear installation or activity, medical application, used in humans, or misused in any way. OMEGA assumes no responsibility as set forth in our basic WARRANTY/DISCLAIMER language, and, additionally, purchaser will indemnify OMEGA and hold OMEGA harmlees from any liability or damage whatsoever arising out of the use of the Product(s) in such a manner.Servicing USA and Canada: Call OMEGA Toll FreeUSA CanadaOne Omega Drive, Box 4047976 BergarStamford, CT 06907-0047Laval (Quebec) H7L 5A1Telephone: (203) 359-1660Telephone: (514) 856-6928FAX: (203) 359-7700FAX: (514) 856-6886Sales Service: 1-800-826-6342 / 1-800-TC-OMEGA SM Customer Service: 1-800-622-2378 / 1-800-622-BEST SM Engineering Service: 1-800-872-9436 / 1-800-USA-WHEN SMTELEX: 996404 EASYLINK: 62968934 CABLE: OMEGAServicing Europe: One OMEGA Drive, River BendThecnology CentreNorthbank, Irlam, ManchesterM44 5EX , EnglandTelephone: 44 (161) 777-6611 FAX: 44 (161) 777-6622RETURN REQUESTS / INQUIRIESDirect all warranty and repair requests/inquiries to the OMEGA ENGINEERING Customer Service Department. BEFORE RETURNING ANY PRODUCT(S) TO OMEGA, PUR-CHASER MUST OBTAIN AN AUTHORIZED RETURN (AR) NUMBER FROM OMEGA'S CUSTOMER SERVICE DEPARTMENT (IN ORDER TO AVOID PROCESSING DELAYS).The assigned AR number should then be marked on the outside of the return package and on any correspondence.FOR WARRANTY RETURNS, please have the following information available BE-FORE contacting OMEGA:1.P.O. number under which the product was PURCHASED.2.Model and serial number of the product under warranty, and3.Repair instructions and/or specific problems relative to the product.FOR NON-WARRANTY REPAIRS, consult OMEGA for current repair charges. Have the following information available BEFORE contacting OMEGA:1.P.O. number to cover the COST of therepair,2.Model and serial number of product, and3.Repair instructions and/or specificproblems relative to the product.OMEGA's policy is to make running changes, not model changes, whenever an improve-ment is possible. This affords our customers the latest in technology and engineering.OMEGA is a registered trademark of OMEGA ENGINEERING, INC.© Copyright 1998 OMEGA ENGINEERING, INC. All rights reserved. This documentation may not be copied, photocopied, reproduced, translated, or reduced to any electronic medium or machine-readable form, in whole or in part, without prior written consent of OMEGA ENGINEERING, INC.ADJUSTMENT AND CALIBRATION PROCEDUREDetermine the lowest input (S1); highest input (S2); lowest reading (R1) and highest reading (R2).S3 = S2 - S1R3 = R2 - R11.-Select the Signal Input type installing the Jumpers according to Table2.2.-Connect a calibrator to the signal input terminals.3.-Power up the instrument with the appropriate power supply.4.-Adjust the calibrator until it generates 0 mA. or 0 Vdc.5.-Turn the "ZERO" trimmer (P1) until the display shows "0000".6.-Adjust the calibrator until it generates the S3 value (difference between the highest and lowest signal).7.-Turn the "SPAN" trimmer (P2) until the display shows the R3 value (difference between the highest and lowestreading).The adjustment procedure is finished, but if the lowest signal is different of 0 then follows with the next point.8.-Adjust the calibrator until it generates the low signal S1. (i.e. 4 mA).9.-Turn the "ZERO" trimmer (P1) until the display shows the lowest reading R1. The reading for lowest signalcan be modified as much times as wanted. The value of R3 will not be affected.10.-Close the jumper for the decimal point, according to the required decimals, see table 1.Example :Signal Input : 4...20 mA; Display Reading : 0...125.0Determine the value of S3 and R3.S3 = 20-4 = 16 mA R3 = 1250-0 = 12501.-Close Jumpers 1 &2.2.-Connect the calibrator and power up the instrument.3.-Adjust the calibrator at 0 mA and turn the trimmer P1 until the display shows "0000"4.-Adjust the calibrator at 16 mA and turn the trimmer P2 until the display shows "1250"5.-Adjust the calibrator at 4 mA and turn the trimmer P1 until the display shows "0000"6.-Close the Solder Pad "a".GENERAL CONSIDERATIONSINSTALLATIONPRECAUTIONS.- The installation and the future use of this unit must be done by suitable qualified personnel. The unit has not DC(mains) switch, neither internal protection fuse, it will be in operation as soon as power is connected. The installation mustincorporate an external mains switch with a protection fuse and also the necessary devices to protect the operator andthe process when using the unit to control a machine or process where injury to personnel or damage to equipment orprocess, may occur as a result of failure of the unit.SAFETY PRESCRIPTIONS.- The unit has been designed and tested under UNE 20553 rules and is delivered in good condition. This data sheet contains useful information for electrical connections. Do not make wiring signal changes or connections when power is applied to the unit. Make signal connections before power is applied and, is reconnection is required, disconnect the DC (mains)power before such wiring is attempted.Install the unit in a places with a good ventilation to avoid the excessive heating. And far from electrical noise source or magnetic field generators such as power relays, electrical motors, speed controls etc...The unit cannot be installed in open places. Do not use until the installation is finished.POWER SUPPLY.- The power supply must be connected to the adequate terminals (see the connection instructions). The characteristics of the power supply are showed on the side label. Please make sure that the unit is correctly connected to a power supply of the correct voltage and frequency.Do not use other power supply otherwise permanent damage may be caused to the unit. Do not connect the unit to power sources heavily loaded or to circuits which power loads in cycle ON-OFF or to circuits which power inductive loads.WARNING.- The power supply is dc voltage, be careful with the polarity indicated for each terminal.SIGNAL WIRING.- Certain considerations must be given when install the signal input wires. If the wires are longs can act like an antenna and introduce the electrical noise to the unit, therefore :Do not install the signal input wires in the same conduit with power lines, heaters, solenoids, SCR controls etc...and always far from these elements.SAFETY CONSIDERATIONSPRESCRIPTIONS.- Before starting any operation of adjustment, replacement, maintenance or repair, the unit must be disconnected from any kind of power supply.Keep the unit clean , to assure good functioning and performance.To prevent electrical or fire hazard, do not expose the unit to excessive moisture.Do not operate the unit in the presence of flammable gases or fumes, such an environment constitutes a definite safety hazard. The unit is designed to be mounted in a metal panel.If the unit shows signs of damage, or is not able to show the expected measures, or has been stored in a bad conditions or a protection failure can occur, then do not attempt to operate and keep the unit out of service.IN CASE OF FIRE1.- Disconnect the unit from the power supply.2.- Give the alarm according to the local rules.3.- Switch off all the air conditioning devices.4.- Attack the fire with carbonic snow, do not use water in any case.WARNING : In closed areas do not use systems with vaporized liquids.Signal Input :Lowest (S1) = 4 mAHighest (S2) =20 mAReading :Lowest (R1) =200Highest (R2) =1700S3 = S2 - S1 = 20 - 4 =16 mA R3 = R2 - R1= 1700 - 200 = 1500Signal Input 4...20 mAEXAMPLES OF ADJUSMENT AND CALIBRATION PROCEDUREA.- Without offsetSignal Input :Lowest (S1) =0 mAHighest (S2) =20 mAReading :Lowest (R1) =0Highest (R2) = 1700S3 = S2 - S1=20 - 0 = 20 mA R3 = R2 - R1=1700 - 0 = 17001700200020 mAD i s p l a yInput Signal Input 0...20 mA Display Reading 0 (1700)B.- With Negative OffsetSignal Input :Lowest (S1) = 4 mAHighest (S2) =20 mAReading :Lowest (R1) =0Highest (R2) =1700S3 = S2 - S1= 20 - 4 =16 mA R3 = R2 - R1= 1700 - 0 =1700Signal Input 4...20 mA Display Reading 0 (1700)C.- With Positive Offset。
多功能智能手表使用指南

多功能智能手表使用指南智能手表作为一种智能穿戴设备,具备多种功能,包括计步、心率监测、通话、信息提醒等。
然而,对于初次使用智能手表的人来说,可能对其使用方法和功能不是很了解。
本文将为您提供一份多功能智能手表的使用指南,帮助您更好地使用和享受智能手表的便利和乐趣。
一、设置和连接在开始使用智能手表之前,您需要完成一些设置和连接过程。
首先,打开手表的电源并充电。
接下来,根据手表屏幕上的指引,进行语言选择、时区设置等基本设置。
然后,通过蓝牙功能将智能手表连接到您的手机上。
二、时间和日期智能手表的一项基本功能就是显示时间和日期。
通常情况下,智能手表在与手机连接后,会自动同步时间和日期。
如果手表的时间与手机不同步,您可以在设置菜单中手动调整。
三、计步和运动监测智能手表的计步功能可以帮助您记录每天的步数和距离,并提供对您的运动状况进行监测。
在使用计步功能之前,您需要在设置中打开这一选项。
之后,智能手表会自动开始计步,并在显示屏上显示相应的步数和距离。
四、心率监测智能手表通常配备心率传感器,可以实时监测您的心率变化。
通过心率监测功能,您可以及时掌握自己的心率状况,并进行相应的调整。
在开始使用心率监测功能之前,您需要对智能手表进行设置,并确保手表与手腕贴合紧密。
五、通话和信息提醒智能手表可以与手机进行连接,使您不错过任何来电或信息。
当您接到来电时,智能手表会震动并显示来电信息。
同时,您还可以使用手表上的按钮接听或拒接来电。
对于信息提醒,智能手表可以在屏幕上显示来自手机的短信、邮件等通知。
六、健康管理智能手表还有一些健康管理功能,例如睡眠监测、饮水提醒等。
通过睡眠监测功能,智能手表可以记录您的睡眠时间和质量,并生成睡眠曲线。
饮水提醒功能则可以定时提醒您喝水,帮助您保持良好的身体状态。
七、其他功能除了以上介绍的功能外,智能手表还具备其他多种实用功能。
例如,您可以在手表上设置闹钟、查看天气预报、控制手机相机拍照等。
通过手表的操作界面和按钮,您可以轻松操作这些功能。
Suunto Ambit 中文说明书

9.2 配對模式與活動 . . . . . . . . . . . . . . . . . . . . . . . . . . . . . . . . . . . . . . . . . . . . . . 35 9.2.1 設定模式 . . . . . . . . . . . . . . . . . . . . . . . . . . . . . . . . . . . . . . . . . . . . 35 9.2.2 設定參考值 . . . . . . . . . . . . . . . . . . . . . . . . . . . . . . . . . . . . . . . . . 36
8.1.1 取得 GPS 訊號 . . . . . . . . . . . . . . . . . . . . . . . . . . . . . . . . . . . . . 22 8.1.2 GPS 網格和定位格式 . . . . . . . . . . . . . . . . . . . . . . . . . . . . . . 24 8.2 確認您的位置 . . . . . . . . . . . . . . . . . . . . . . . . . . . . . . . . . . . . . . . . . . . . . . . . . 24 8.3 新增中途點 . . . . . . . . . . . . . . . . . . . . . . . . . . . . . . . . . . . . . . . . . . . . . . . . . . . . 25 8.4 導覽至中途點 . . . . . . . . . . . . . . . . . . . . . . . . . . . . . . . . . . . . . . . . . . . . . . . . . 28 8.5 刪除中途點 . . . . . . . . . . . . . . . . . . . . . . . . . . . . . . . . . . . . . . . . . . . . . . . . . . . . 30 9 使用 Alti & Baro 模式 . . . . . . . . . . . . . . . . . . . . . . . . . . . . . . . . . . . . . . . . . . . . . . . . 33 9.1 高度計和氣壓計的運作方式 . . . . . . . . . . . . . . . . . . . . . . . . . . . . . . . . . 33 9.1.1 獲取正確讀數 . . . . . . . . . . . . . . . . . . . . . . . . . . . . . . . . . . . . . . 34 9.1.2 讀數不正確 . . . . . . . . . . . . . . . . . . . . . . . . . . . . . . . . . . . . . . . . . 34
航海仪器 操作说明
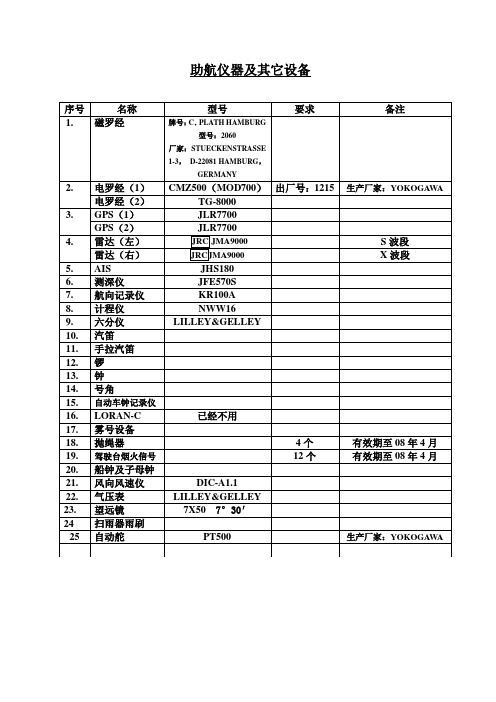
助航仪器及其它设备TG-8000电罗经操作说明一、开机1.打开罗经控制箱内的主电源开关,打开罗经操作面板上的电源开关(POWER),此时电罗经开始工作。
2.设置罗经启动时间。
3.设置罗经启动方位。
4.设置电罗经内部纬度系统。
5.调整罗经复示器与主罗经同步。
6.罗经稳定时间大约需6小时,此时禁止校正电罗经误差。
7.设置电罗经内部船速系统。
8.确认罗经系统的真方位。
9.选择罗经真方位显示模式。
二、关机1.关掉各电罗经复示器。
2.关掉主罗经操作面板上的电源开关。
3.关掉主罗经控制箱内的主电源开关,此时电罗经停止工作。
RT2048VHF操作说明一、开机1.旋转VHF操作面板上的电源及音量开关,打开电源并选择合适音量。
2.按数字键输入VHF频道。
3.调节操作面板上的SQ旋钮,进行静燥调节。
4.5.按/取消双功值守功能。
6.按二、关机旋转VHF操作面板上的电源开关,关掉电源,VHF停止工作。
KR100A航向记录仪操作说明一、开机1.向下掀开记录仪下方的盖板,将“RECORD”开关扳至“START”位置,“LIGHT”开关扳至“ON”位置,“SPEED”开关选择“NORMAL”2.向左掀开记录仪上方的盖板,按下操作面板右下角的电源开关(白色),此时记录仪开始工作并自动跟踪。
二、关机1.将上述“RECORD”开关扳至“STOP”位置,“LIGHT”开关扳至“OFF”位置。
2.按操作面板右下角的电源开关关掉电源,记录仪停止工作。
机械表使用说明和注意事项
机械表使用说明和注意事项一机械表使用说明(通用)全自动机械手表,依靠佩戴时的动能上弦。
第一次使用前或者长期闲置再次佩带前请晃动手表若干下或手动上弦,以保证有足够弦力启动。
注意无论调整日期还是时间,请保持表针和日期盘顺行针转动,尽量不要逆转。
以免损伤机芯。
如果不小心将表针调过了,应继续调整,直到循环至正确位置,而不要图省事逆行调整。
调整完毕,请按紧表钮。
手表的手动上弦:表钮处于调整日历功能位置之前时,向上旋转表钮,此时一般可以听到咝咝声音.二、必须知道的手表使用注意事项(通用)1、调整时间过程中要保持表针顺时针旋转,尽量不要让表针逆时针转动,调整日历同样如此,以避免损伤机芯。
2、日历的调整要注意22/24小时的区别,否则会造成中午变更的现象。
日历一般在22±3左右的位置开始变更。
(手表是不分昼夜的,比如指针在22点可以是中午也可能是午夜,如果调整指针到22点附近日历开始变动,说明是在午夜)特别提示:可以先将手表日历调至当前日期的前一两天,然后仅靠时针的调整来过渡到当前时间。
3、带有日历功能或多功能手表在晚上十点至凌晨二点之间的功能区禁止调整日历。
调整时,请先将表针调整至远离功能区的位置,如可以调整到6:30分位置,然后再进行日历和星期历等的调整。
否则容易造成功能区紊乱,甚至损伤机芯。
4、全自动机械表调整完毕应及时佩戴。
长时间不佩戴会造成弦力不足而停摆,再次佩戴请重新调适。
5、因为机械表受地心引力、机械摩擦等因素影响较大,所以机械表误差普遍较石英表要高,这是机械表的共同特点,请定期进行校对,机械表日误差超过220秒应进行专业校整。
6、大多数手表为一般生活防水手表(标注30米或50米防水也属于一般生活防水),除非标注200米以上专业防水。
一般生活防水手表并非潜水手表,它虽然采取了密封措施,以防止汗水和有害气体的侵入,但并非绝对不进水。
同时手表在使用过程中会出现一些不可避免的现象:每天上条拨针,柄头或柄头管内的橡皮圈会逐渐磨损;表玻璃受温度影响而热胀冷缩,会使它与表壳上框配合处出现空隙;后盖的防水胶圈老化或受汗水影响出现腐蚀,以上这些都会使防水表的防水性能降低。
全自动机械腕表通用使用说明书
全自动机械腕表使用说明书朋友们好!由于很多朋友不大明白全自动机械手表得使用!(以下全就是机械手表得说明,石英类电子式手表就请不要瞧了)。
必定中国人对奢侈品没有外国人熟!国内除了少有得几个大城市外,很多地方对手表得保养、爱护、使用、流通得认识度及场所太少了.为了您心爱得腕表能长命百岁,故障率极少得运行故请各位买家耐心瞧完本文。
谢谢!!虽然您手表在您手中可以任意所为(如调节及按钮等)表面上瞧起来没什么事,也能正常调表,表也能常运行,但就是这样很可能对您得手表进行了慢性或隐性得伤害!至少就是使用就是违反操作规则得!很多不负责任得卖家也就不说或就是她们也不大懂,因为她们只知道售表对表得内部结构不大了解,同时也瞧不懂或根本瞧不到机芯厂得外文说明书。
因为她们处在销售链得下游得零售。
故以后请大家不要这么随便调节!无论就是瑞士机芯还就是日本机芯,四针(四针,六针等称呼就是指这只手表表镜内大针小针得总数就是多少支)以下得手表相对简单,大家了解一下下文中表得动力及防水问题,故障问答就就是了,其她得文字可不瞧了!下面1—2就是介绍4针以上得多针机械表调节及使用方法!.4针以上得多针机芯手表相对要注意一下了!目前市场上得全自动机械表不管您得手表用得就是日本机芯还就是瑞士机芯!她们都自有自己得调节点,当然各厂得不一样得,要瞧官方得资料及白皮书了.日本机芯大多在8点40(左右误差5分钟都行)!白天与晚上得都可以,但最佳点就是白天得8点40。
瑞士机7点50左右.德国机芯8点45左右(以上调节点都就是多针机芯需要按钮得调节点)3针表没有调节点不用瞧1-2条1。
下而就以出货量最大得日本机为例(其她国机芯原理大多一样可借鉴)、当您要调整日期,星期,月份等功能时。
请先把当前时间调到8点40分左右(一定要顺时针调节,不能反时针调)左右再进行按钮调节(日期,星期,月份等,调完后再把表时间调回正常时间.(换句话说只要您想按钮就先得把时间调到8点40)。
SEIKO Cal. 6M25 6M26 手表说明书
Cal. 6M25, 6M26INSTRUCTIONS(P.3) INSTRUCTIONS(P.30) INSTRUCCIONES(P.58) BEDIENUNGSANLEITUNG(S.86) ISTRUZIONI(P.114) INSTRUÇÕES(P.143) (171 )E n g l i s h2You are now the proud owner of a SEIKO Analogue Quartz Watch Cal. 6M25/6M26. For best results, please read the instructions in this booklet carefully before using your SEIKO Analogue Quartz Watch. Please keep this manual handy for ready reference.Vous voici l’heureux propriétaire d’une montre quartz analogique SEIKO Cal. 6M25/6M26. Pour obtenir d’excellentes performances de cet article SEIKO, veuillez lire attentivement cette brochure que vous conserverez pour toute référence ultérieure.Enhorabuena por su adquisición de un reloj SEIKO analógico de cuarzo Cal. 6M25/6M26. Para óptimo resultado, lea detenidamente las instrucciones de este folleto antes de usar el reloj. Guarde este manual para consulta posterior.Sie sind jetzt Besitzer einer SEIKO Analog-Quarzuhr Kal. 6M25/6M26. Bitte lesen Sie diese Bedie-nungsanleitung vor Verwendung der Uhr sorgfältig durch und heben Sie sie gut auf.Siete ora in possesso di un orologio SEIKO Analogico al Quarzo Cal. 6M25/6M26. Per ottenere i migliori possibili risultati dal Vostro orologio, leggere attentamente le istruzioni di questo manuale prima di utilizzare il Vostro orologio SEIKO analogico al quarzo. Conservare poi il manuale stesso per ogni qualsiasi eventuale futuro riferimento.Você pode sentir-se orgulhoso de possuir um Relógio SEIKO Quartz Análogo Cal. 6M25/6M26.Para obter os melhores resultados, leia atentamente as instruções contidas neste opúsculo antes de usar o seu Relógio SEIKO Quartz Análogo. Queira conservar este manual para referências futuras.6M25/6M263CONTENTSPageFEATURES ..................................................................................................................4MODES AND DISPLAYS ............................................................................................5ADJUSTING THE HAND AND DATE POSITIONS.......................................................7TIME SETTING............................................................................................................9CALENDAR .................................................................................................................10ALARM .......................................................................................................................11TIMER .........................................................................................................................13STOPWATCH ..............................................................................................................15TACHYMETER ............................................................................................................18NECESSARY PROCEDURE AFTER BATTERY CHANGE ............................................20NOTES ON OPERATING THE WATCH.......................................................................22BATTERY LIFE INDICATOR ........................................................................................24BATTERY CHANGE.....................................................................................................24TO PRESERVE THE QUALITY OF YOUR WATCH......................................................26SPECIFICATIONS........................................................................................................29E n g l i s h4SEIKO ANALOGUE QUARTZCal. 6M25, 6M26FEATURESq Hour, minute & second handsq Up to 60 minutes can be set inminute increments.q Date displayed in numerals q Month indicated by handsq Calendar adjusts automaticallyexcept February of leap years.q Can be set to ring on a 12-hourbasis.q Measures up to 60 minutes in 1/10second increments.English5MODES AND DISPLAYS[Cal. 6M26]There are two buttons and a crown.a: Normal positionb: Extended position[Cal. 6M25]E n g l i s h6MODE CHANGE Turn at normal position clockwise or counterclockwise.Time setting¬Pull out CROWN .¬Adjusting hand & date positions Pull outCROWN .¬Pull outCROWN .¬Time settingPull out CROWN .Calendar settingTIME mode(Alarm disengaged)TIME mode (Alarm engaged)STOPWATCH modeALARM SETTING modeCALENDAR mode TIMER modeEnglish7ADJUS TING THE HAND AND DATE POS ITIONSq Before setting the time and calendar, be sure to use STOPWATCH mode to checkthe positions of Hour, Minute and Second hands and the date numeral.Turn to set MODE INDICATOR to “CHRONO.”.*If the stopwatch is counting, first press Button B to stop measurement and then press Button A to reset the hands.HOW TO RESET THE HAND AND DATE POSITIONSq If the hands do not return to the 12 o’clock position or the date numeral does not appear at the center of the calendar frame, reset them following the procedure below. If they do not need resetting, go on to the next section (“TIME SETTING”).Pull out.E n g l i s h8Press to select what is to be ad-justed (hands or date) in the fol-lowing order (See *1 on page 22) :Push back in to normal position .Press to reset the selected hand to the 12 o’clock position or put the date to the center of the cal-endar frame. (See *2 on page 22)English9TIME SETTINGTurn to set MODE INDICATOR to “TIME” or “ALM.ON”.Pull out.Push back in to normal position in accordance with a time signal.Press to set Minute hand. (See *2and *3 on page 22)Press to set Hour hand. (See *2and *4 on page 22)*Second hand automatically returns to the 12 o’clock position.E n g l i s h10CALENDARq The month is indicated by the hour marker that all three hands point to.q The date is indicated by the numeral shown in the calendar frame.qThe calendar automatically adjusts for odd and even months except February of leap years.Turn to set MODE INDICATOR to “DATE”.CALENDAR SETTING Pull out.Push back in to normal position .Press to set the month (Ex. De-cember). (See *2 on page 22)Press to set the date (Ex. 10th).(See *2 on page 22)English11ALARMALARM SETTINGqThe alarm can be set to ring on a 12-hour basis.Turn to set MODE INDICATOR to “ALM.ON” or “TIME” to engage or disengage the alarm. (See the following section)Turn to set MODE INDICATOR to “ALM.SET”. (See *5 on page 22)Press to set Minute hand. (See *2and *3 on page 22)Press to set Hour hand. (See *2 on page 22)E n g l i s h12ALARM ENGAGEMENT/DISENGAGEMENT • Alarm engagement•Alarm disengagementTurn to set MODE INDI-CATOR to “ALM.ON”.(See also *6 on page 22)Turn to set MODE INDI-CATOR to “TIME”.[TIME mode with alarm engaged][TIME mode with alarm disengaged]q Alarm rings at the designated time for 20 seconds.*To stop it manually, press Button A or B .q To check the designated alarm time, set MODE INDICATOR to “ALM.SET”.English13q The timer can be set to count down up to 60 minutes in minute increments.TIMERTurn to set MODE INDICATOR to “TIMER”.q Before setting the timer, check that the three hands are at “0” position.TIMER SETTINGPress to set the desired amount of time in minutes. (See *2 on page 22)*To set the timer for 60minutes, set Minute hand at “0” position.E n g l i s h14TIMER OPERATION ¬STARTSTOP¬RESTARTSTOP¬RESET*Restart and stop of timer can be repeated by pressing Button B .q When the set time is up, a warning sound beeps for approximately 5 seconds.*To stop it manually, press Button A or B .*See also *7 on page 22.English15q Stopwatch measures up to 60 minutes in 1/10 second increments.STOPWATCHTurn to set MODE INDICATOR to “CHRONO.”.q In the following cases, the stopwatch operations cannot be made:1)While the timer warning sound is beeping (for about 5 seconds).2)While the hands are moving quickly to catch up with the accumulated elapsed time after the split time is released (less than 5 seconds).*See also *8 on page 23.HOW TO READ THE HANDSq In STOPWATCH mode, each hand indicates the elapsed time as follows:E n g l i s h16• For the first 1 minute Ex.: 20 and 7/10 seconds • After the first 1 minuteEx.: during measurementEx.:when measurement isstopped or split time is measured Minute hand1/10 second hand**Minute hand 1/10 second hand***Minute hand*1/10 second hand moves from 0 to 9 (minute markers)repeatedly.**1/10 second hand stays at “0” position while the stopwatch is counting.***When the measurement isstopped or split time is measured, 1/10 second hand indicates the 1/10seconds measured.When the measurement is restarted or split time is released, it returns to “0”position.1/10 second hand*English17STARTSPLIT RELEASESTOPSPLIT*Measurement and release of split time can be repeated by pressing Button A .RESETSTARTRESTARTSTOPSTOPRESET*Restart and stop of stopwatch can be repeated by pressing Button B .STOPWATCH OPERATIONq Before using the stopwatch, be sure to reset the hands to “0” position.RESETE n g l i s h18TACHYMETER(for models with tachymeter scale on the dial)Use the stopwatch to determine how many seconds it takes to go1 km or 1 mile.Tachymeter scale indicated by Second hand gives the averagespeed per hour.Ex. 2:If the measuring distance is extended to 2 km or miles or shortened to 0.5 km or milesand Second hand indicates “90” on tachymeter scale:“90” (tachymeter scale figure) x 2 (km or mile) = 180 km/h or mph“90” (tachymeter scale figure) x 0.5 (km or mile) = 45 km/h or mph*Tachymeter scale can be used only when the time required is less than 60 seconds.English19Use the stopwatch to measure the time required to complete 1job.Tachymeter scale indicated by Second hand gives the average number of jobs accomplished perhour.Ex. 2:If 15 jobs are completed in 20 seconds:“180” (tachymeter scale figure) x 15 jobs = 2700 jobs/hourE n g l i s h20NECES S ARY PROCEDURE AFTER BATTERY CHANGEq When the battery is replaced, the information stored in the IC does not correspond with the time and date actually displayed. Before using the watch, therefore, be sureto reset the hands and date, following the procedure below.Turn to set MODE INDICATOR to “CHRONO.”.*If the stopwatch is counting, first press Button B to stop measurement and then press Button A to reset the hands.¬Pull out.ORPress and hold at the same time for 2 seconds.*A beep sounds when the buttons are released, and the h a n d s s t a r t t o s h o w demonstration movement.Press to stop the hands.English21Press to select what is to be ad-justed (hands or date) in the fol-lowing order (See *1 on page 22):Press to reset the selected hand to the 12 o’clock position or set the date to “1”. (See *2 on page 22)*After resetting the hands and date as explained above,set the time and calendar.(See “TIME SETTING” and “CALENDAR”)Push back in to normal position .E n g l i s h22NOTES ON OPERATING THE WATCH*1When a hand is selected, it will move back and forth and return to where it was.When the date is selected, it will advance one day and return to the current date.*2The hand(s)/date move(s) quickly if the corresponding button is kept pressed for 2seconds.*3As Minute hand moves, Hour hand also moves correspondingly.*4When setting Hour hand, check that AM/PM is correctly set.•Press Button A to turn Hour hand past the 12 o’clock marker to determine whether the watch is set for the A.M. or P.M. period. If the date changes, the time is set for the A.M. period. If the date does not change, the time is set for the P.M. period.While the date is changing, Hour hand stops on the 12 o’clock position even if Button A is kept pressed.*5The alarm time can be set with the CROWN both at the normal position and at theextended position.*6Alarm test: With the CROWN at “ALM.ON”, press and hold Buttons A and B atthe same time.*7Remarks on timer operation:•In TIMER mode, Hour hand stops at the 12 o’clock position.•With each press of the buttons, a beep sounds for confirmation.•Even if the mode is changed from TIMER to another while the timer is counting down, it continues counting. If the timer is stopped, however, the hands will be reset to “0” position by changing the mode.English23*8Remarks on stopwatch operation:•With each press of the buttons, a beep sounds for confirmation.•Even if the mode is changed from STOPWATCH to another while the stopwatch is measuring, it continues counting. If the split time is measured, however, it will be released and counting will be continued by changing the mode.E n g l i s h24BATTERY LIFE INDICATORBATTERY CHANGEThe miniature battery which powers your watch should last approximately 2 years . However, because the battery is inserted at the factory to check the function and performance of the watch, its actual life once in your possession may be less than the specified period. When the battery expires, be sure to replace it as soon as possible to prevent any malfunction.For battery replacement, we recommend that you contact an AUTHORIZED SEIKO DEALER and request SEIKO SR927W battery.*The battery life may be less than 2 years if:•the alarm is used more than once a day,•the timer is used for more than 5 minutes a day, and/or •the stopwatch is used for more than 5 minutes a day.2Yearsq The battery needs to be replaced when you see the Second hand moving at two-second intervals instead of normal one-second intervals.*The watch will, however, remain accurate while Second hand is moving at two-second intervals.English25E n g l i s h26TO PRESERVE THE QUALITY OF YOUR WATCHCondition of uses WATER RESISTANCEWATER RESISTANT 5 BAR WATER RESISTANT No indication Indication on case backNon-water resistant Degree of water resistance*Accidental contact with water such as rain and splashesSwimming,yachting and taking ashowerNo No No NoYes No No NoYes Yes No NoYes Yes Yes NoWATER RESISTANT 10/15/20 BARScuba diving**and saturation divingTaking a bath and shallowdiving 3 bar5 bar 10/15/20 barEnglish27q Non-water resistantq Water resistant 5/10/15/20 bar•If the watch becomes wet, have it checked by an AUTHORIZED SEIK O DEALER or SERVICE CENTER.•Before using in water, be sure the crown is pushed in completely.•Do not operate the crown and buttons when the watch is wet or in water.If used in sea water, rinse the watch in fresh water and dry it completely.•When taking a shower with a water resistant 5bar watch, or taking a bath with a water resistant 10, 15 or 20 bar watch, be sure to observe the following:*Do not operate the crown or push the buttons when the watch is wet with soapy water or shampoo.*If the watch is left in warm water, a slight time loss or gain may be caused. This condition, however, will be corrected when the watch returns to normal temperature.*Pressure in bar is a test pressure and should not be considered as corresponding to actual diving depth since swimming movement tends to increase the pressure at a given depth. Care should also be taken on diving into water.**We recommend that you wear a SEIK O Diver’s Watch for scuba diving.s TEMPERATURES°C (140°F) or below –10°C␣(+14°F) may cause a slight time loss or gain or battery leakage or shorten the battery life.However, the above conditions will be corrected when the watch returns to normal temperature.5 bar WRYour watch works with stable accuracy within a temperature range of 5°C and 35°C (41°F and 95°F).10/15/20bar WRE n g l i s h28s CARE OF CASE AND BRACELETTo prevent possible rusting of the case and bracelet, wipe them periodically with a soft dry cloth.s PERIODIC CHECKIt is recommended that the watch be checked once every 2to 3 years. Have your watch checked by an AUTHORIZEDSEIK O DEALER or SERVICE CENTER to ensure that the case, crown, buttons, gasket and crystal seal remain intact.sSHOCKS & VIBRATIONBe careful not to drop your watch or hit it against hard surfaces.s MAGNETISMYour watch will be adversely affected by strong magnetism.Keep it away from close contactwith magnetic objects.s CHEMICALSBe careful not to expose the watch to solvents, mercury,cosmetic spray, detergents,adhesives or paints. Otherwise,the case, bracelet, etc. may become discolored, deteriorated or damaged.s PRECAUTION REGARDING CASE BACK PROTECTIVE FILMIf your watch has a protective film and/or a sticker on the case back, be sure to peel them off before using your watch.2 - 3YearsEnglish29SPECIFICATIONS1Frequency of crystal oscillator...........32,768 Hz (Hz = Hertz ... Cycles per second)2Loss/gain (monthly rate)....................Less than 15 seconds at normal temperature range (5°C ~ 35°C) (41°F ~ 95°F)3Operational temperature range .........–10°C ~ +60°C (14°F ~ 140°F)4Driving system ..................................Step motor, 4 pieces5Display system“TIME”........................................TIME mode (hour, minute and second hands)“ALM.ON”..................................TIME mode (hour, minute and second hands)“ALM.SET”.................................ALARM SETTING mode (hour and minute hands)The alarm is set on a 12-hour basis.“TIMER”.....................................TIMER mode (minute and second hands)Up to 60 minutes can be set in minute increments.“DATE”.......................................CALENDAR mode (month indicated by the threehands and date displayed in numerals)“CHRONO.”................................STOPWATCH mode (minute, second and 1/10second hands)The stopwatch can measure up to 60 minutes in 1/10 second increments.6Battery...............................................SEIKO SR927W, 1 piece7IC (Integrated Circuit)........................C-MOS-LSI, 1 piece and Bipolar IC, 1 piece*The specifications are subject to change without prior notice for product improvement.。
手表使用说明
手表使用说明1、手表使用说明调校方法:时间的调整校对时间时,如果您要求时间相当精确,先让秒针走到12时位臵拉出表冠至位臵3,顺时针或逆时针转动表冠调整时针和分钟的位臵,当各指针与标准时间(以电视机或收音机为参考)一致时,将表冠推回原位(位臵1)。
日历的调整将表冠拉至位臵2,顺时针方向转动表冠调整日历。
星期日历手表的调整将表冠拉出至位臵2,逆时针转动表冠调整星期,顺时针转动调整日历。
注意事项:手表的日历、星期、月相之调整切勿在手表时间21:00PM~3:00AM之间操作,此期间日历功能正在进行运作,同时也是齿轮齿合度较低的时候,频繁的动作会损伤手表的内部零件。
星期日历跳格,由于制格不同分为快慢两种,第一种在±5分钟之内日历跳格完成,第二种在3小时内日历跳格完成。
如遇采用螺旋式表冠的手表,切勿硬拔,请先逆时针方向旋转打开锁紧的表冠,在调整好时间后,将表冠顺时针方向转动并推入锁紧,以免进水。
如遇带日历的手表需调节日期,请先将日历调到您所需要日期的前一天,之后转动时针来调节日期,当时针经过午夜12点时日期会变更,这样可以避免直接调节日期造成日夜的混淆。
如遇功能复杂的手表,请先详读专门附带的说明书。
2、防水性能的介绍手表的防水性能主要依靠表镜、后盖、表冠等处的防水胶圈,并采用螺旋式表冠,从而达到相应的防水标准。
手表的防水性能通常按其等级分为:不防水(表后盖勿标识)。
防汗(SWEAT-RESISTANT)。
一般性防水(WATER-RESISTANT),30米防水(30M、3ATM、3BAR),50米防水(50M、5ATM、5BAR)。
潜水表100米防水,200米防水,300米防水等。
关于手表的防水性能,国家标准和国际标准都有明确的规定:凡是标明防水的手表,最低要耐受2个大气压,即20米水深处不进水。
30米防水表示手表可以耐受3个大气压,依此类推。
此标准的前提是在进行测试的时候是在实验室条件下:温度保持在20-25摄氏度,且手表和水都呈静止状态。
- 1、下载文档前请自行甄别文档内容的完整性,平台不提供额外的编辑、内容补充、找答案等附加服务。
- 2、"仅部分预览"的文档,不可在线预览部分如存在完整性等问题,可反馈申请退款(可完整预览的文档不适用该条件!)。
- 3、如文档侵犯您的权益,请联系客服反馈,我们会尽快为您处理(人工客服工作时间:9:00-18:30)。
海鸥自动机械表M186S使用说明书
天时表行/ 2009-04-24
★功能
中心时分秒针日历(A)止秒/自动上链
★使用方法
(1)表冠操作方法:
①表冠在位置1:手动上条位置,向前转动表冠可上条。
②轻拉表冠至位置2:快速调校位置,向后转动可调整日期。
③轻拉表冠至位置3:秒针停走,转动表冠可拨针校时。
特别提示
●请勿在23时至1时之间调整日期。
以免损坏机芯。
海鸥表具体功能解释说明书天时表行/ 2009-04-27
○示能:指表盘上显示手表储存能量的指针指示,如指针指向40,手表可延续走时40小时。
○ 飞返日历、飞返周历:指手表上日历指针、周历指针在160度扇形面上指示,每月末、周末结束,指针飞返月历初、周初。
○ 裸摆:指在表盘面可看见手表的摆轮。
○ 飞轮:指在摆轮上方附加的一个精美的装饰轮,其转一周为60秒。
○ 止秒:手表在拉出表冠至调时位置时秒停走。
○ 自动上链:手表发生位置变化后自动上条补充能量。
敬请注意
1. 自动机械表
★自动手表是通过手臂的摆动来给手表的能源机构补充能量的,每一天一定要有适当的运动量(不必可以运动)。
★每天要连续佩戴8个小时以上。
★自动手表静放超过24小时以后,再次佩戴时首先手动上条5-6圈(表冠转动),如天天佩戴无须手动上条。
★自动手表由于零部件较多、精密,应避免强烈碰撞。
★带有日历。
周历的手表,每天23时至5时之间请勿使用快拨机构(快调按钮P),以免损坏机芯。
2. 带有单历(日历)双历、周历)无24时指示的手表的调时方法:首先将表冠拉至调时位置,顺时针方向拨动时分针至跳日历后止(此时为夜间24时),如在中午12时后调时,请将时分针逆时针方向拨至所需要的时间,(中心有飞返日历指示的手表除外),然后推进表冠至上条位置。
3. 表冠带有锁扣装置的手表,调时后必须推至上条位置后在锁紧表冠。
4. 手动上条表:非自动上条机械表必须手动上条,最好在每日早晨佩戴前上满条,可确保手表走时准确。
5. 由于机械表与石英表计时原理及制造工艺不同,所以机械表计时以日差计算(国家标准中优质表日差为-20秒至+40秒/日)。
陀飞轮表特别提示
带有日历指示功能手表的调时方法,首先将表冠拉至调时位置,顺时针方向转动表冠至跳日后止,此时为夜间24时,如在中午12时前调时。
请将时分针顺时针方向调至所需时间;如在中午12时后调时,请将时分针逆时针方向调至所需时间。
带有自动丄链功能的陀飞轮腕表,每日必须佩戴8小时以上,一保证手表的延续走时和走时的精度。
静置超过24小时,务请手动丄链。
特别注意:
★陀飞轮表由于机构精密复杂,请勿磕碰、坠地。
★为保证手表的走时准确,请您每日、定时、规律的上弦。
(自动丄链的陀飞轮腕表除外)
★有日历和星期指示功能的陀飞轮表,每晚11时至清晨5时不要使用快拨调整指示机构。