精工6R15说明书简体中文
精工光波表中文使用说明书
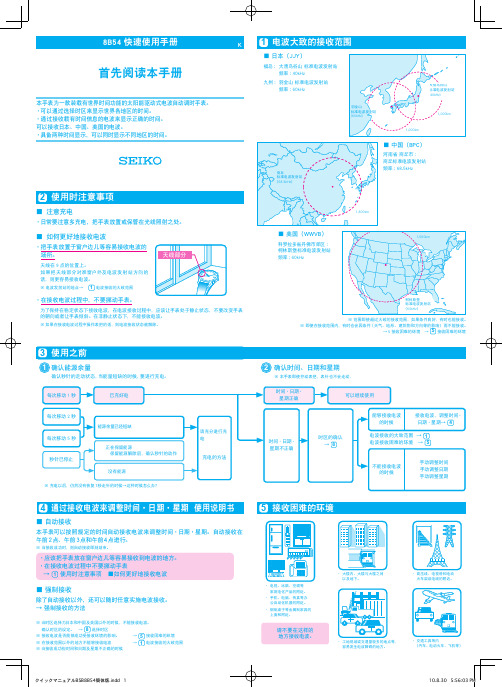
首先阅读本手册8B54快速使用手册K使用之前3确认能源余量确认时间、日期和星期确认秒针的走动状态,当能量短缺的时候,要进行充电。
※ 本手表即使拧动表把,表针也不会走动.每次移动1秒每次移动2秒每次移动5秒秒针已停止已充好电※ 充电以后,仍然没有恢复1秒走针的时候→这种时候怎么办?时间·日期·星期正确可以继续使用时间·日期·星期不正确时区的确认→ 8电波接收的大致范围 → 1电波接收困难的环境 → 5不能接收电波的时候手动调整时间手动调整日期手动调整星期能够接收电波的时候電接收电波,调整时间·日期·星期→ 412能源余量已经短缺正在保留能源 保留能源解除后,确认秒针的动作没有能源充电的方法请充分进行充电使用时注意事项2・日常要注意多充电,把手表放置或保管在光线照射之处。
■ 注意充电■ 如何更好地接收电波・ 把手表放置于窗户边儿等容易接收电波的场所。
天线在9点的位置上。
如果把天线部分对准窗户外及电波发射站方向的话,则更容易接收电波。
天线部分※ 电波发射站的地点→ 1电波接收的大致范围・在接收电波过程中,不要挪动手表。
为了保持在稳定状态下接收电波,在电波接收过程中,应该让手表处于静止状态,不要改变手表的朝向或者让手表倾斜。
在非静止状态下,不能接收电波。
※如果在接收电波过程中操作表把的话,则电波接收状态被解除。
通过接收电波来调整时间·日期·星期 使用说明书4・应该把手表放在窗户边儿等容易接收到电波的地方。
・在接收电波过程中不要挪动手表 → 1 使用时注意事项 ■如何更好地接收电波除了自动接收以外,还可以随时任意实施电波接收。
→ 强制接收的方法※ 当接收成功时,则自动接收即刻结束。
■ 自动接收■ 强制接收※ 当时区选择为日本和中国及美国以外的时候,不能接收电波。
确认时区的设定。
→ 8 选择时区※ 接收电波是否能够成功受接收环境的影响。
日本精工SPA-400原子力显微镜说明书(中文版)-D(E-3)ECCONTROLLER

日本精工SPA-400原子力显微镜说明书(中文版)-D(E-3)ECCONTROLLER编码:0903-ECX-003/9911N概要EC控制器(Electrochemical Controller)是追加在以SPI33800N Probe Station为核心的SPM系统中,使其能进行各种电化学测定(EAFM以及ESTM)的option adaptor。
连接在相应电化学测定的Unit?和SPI3800N电气部分的中间。
EC控制器全图?注:?SPA400,SPA300,STA330等。
?有时现货略有差异。
规格和构成关于EC控制器(SEC-370)规格,构成的说明。
→外观以及尺寸重量(如下所示)外观以及尺寸,重量正面盘POWER这是给EC 控制器提供电源的开关。
因使用自光式开关,处于On 的位置时,灯会点亮。
在SPI3800+STA330Unit+EC 控制器的系统中,无论是否进行电化学控制,请务必将电源开关打到On 位置。
若处于Off 位置的话,因不能检验tunnel 电流而不能正常靠近(Approach),会损坏探针和试样。
ALARM (报警灯) : SI该报警灯是为了确认试样的电化学电流是否进入了能检验的范围。
超过能检验的范围 (换算为电压 10V),灯会点亮。
灯点亮时,请按下述方法处理。
·(在“电流-电位曲线(试样)”或“电流-时间曲线”方式时),将“电流测定范围”的值增大。
→[电流-电位曲线(试样)]对话框 [电流-时间曲线]对话框·加大滤波器[ 7 SAMPLE]的值。
·确认各个电极是否浸在液体中。
·确认各个电极,连接和配线有无异常。
有时在将电源刚打到On 或EC 控制器和各个电极 (探针除外)没有互相连接(根据软件的设定)的情况下,灯会点亮,但这并非异常。
1ALARM (报警灯) : RE这是确认参照电极动作是否正常的报警灯。
相对于模拟地线[28A.GND]的参照电极的电位超过可控制范围时,灯会点亮。
Seiko Epson 产品说明书

User’s ManualAll rights reserved. No part of this publication may be reproduced, stored in a retrieval system, or transmitted in any form or by any means, electronic, mechanical, photocopying, recording, or otherwise, without the prior written permission of Seiko Epson Corporation. No patent liability is assumed with respect to the use of the information contained herein. While every precaution has been taken in the preparation of this book, Seiko Epson Corporation assumes no responsibility for errors or omissions. Neither is any liability assumed for damages resulting from the use of the information contained herein.Neither Seiko Epson Corporation nor its affiliates shall be liable to the purchaser of this product or third parties for damages, losses, costs, or expenses incurred by purchaser or third parties as a result of: accident, misuse, or abuse of this product or unauthorized modifications, repairs, or alterations to this product, or (excluding the U.S.) failure to strictly comply with Seiko Epson Corporation’s operating and maintenance instructions.Seiko Epson Corporation shall not be liable against any damages or problems arising from the use of any options or any consumable products other than those designated as Original Epson Products or Epson Approved Products by Seiko Epson Corporation.EPSON is a registered trademark of Seiko Epson Corporation in Japan and other countries/regions. NOTICE: The contents of this manual are subject to change without notice.Standards and ApprovalsThe following standard is applied only to the printers that are so labeled. (EMC is tested using the Epson power supplies.)North America:FCC/ICES-003 Class AWARNINGThe connection of a non-shielded printer interface cable to this printer will invalidate the EMC standards of this device. You are cautioned that changes or modifications not expressly approved by Seiko Epson Corporation could void your authority to operate the equipment.FCC Compliance Statement For American UsersThis equipment has been tested and found to comply with the limits for a Class A digital device, pursuant to Part 15 of the FCC Rules. These limits are designed to provide reasonable protection against harmful interference when the equipment is operated in a commercial environment.This equipment generates, uses, and can radiate radio frequency energy and, if not installed and used in accordance with the instruction manual, may cause harmful interference to radio communications. Operation of this equipment in a residential area is likely to cause harmful interference, in which case the user will be required to correct the interference at his own expense.For Canadian UsersThis Class A digital apparatus complies with Canadian ICES-003.À l’intention des utilisateurs canadiensCet appareil numérique de la classe A est conforme à la norme NMB-003 du Canada.Default Delay Times for Power Management for Epson ProductsThis product will enter low power (sleep) mode after a period of nonuse. The time interval has been set at the factory to ensure that the product meets Energy Star standards of energy efficiency and cannot be modified by the consumer.The power consumption in the sleep mode and power off mode when using the AC adapter PS-180 is described below.Serial model Parallel model USB model Ethernet modelAC 115V 60 Hz Sleep mode 1.2 W 1.4 W 1.1 W 2.9 W Power off mode0.3 W0.3 W0.3 W0.3 W© 2008 Seiko Epson CorporationPrinted in ChinaPrecautions When Installing the Power Supply BoxA description of EMI standards is on the bottom of the printer. When the optionalpower supply box (OT-BX88) is installed, it is hard to check it. In such case,uninstall the power supply box if necessary.Safety PrecautionsThis section presents important information intended to ensure safe and effective use of this product. Please read this section carefully and store it in an accessible location.WARNING:Shut down your equipment immediately if it produces smoke, a strange odor, or unusual noise. Continued use may lead to fire. Immediately unplug theequipment and contact your dealer or a Seiko Epson service center for advice.Never attempt to repair this product yourself. Improper repair work can be dangerous.Never disassemble or modify this product. Tampering with this product may result in injury or fire.Be sure to use the specified power source. Connection to an improper power source may cause fire.Do not allow foreign matter to fall into the equipment. Penetration by foreign objects may lead to fire.If water or other liquid spills into this equipment, unplug the power cordimmediately, and then contact your dealer or a Seiko Epson service center for advice. Continued usage may lead to fire.If you open the DIP switch cover, be sure to close the cover and tighten the screw after adjusting the DIP switch. Using this product with the cover open may cause fire or electric shock.Do not use aerosol sprayers containing flammable gas inside or around this product. Doing so may cause fire.CAUTION:Do not connect cables in ways other than those mentioned in this manual.Different connections may cause equipment damage and burning.Be sure to set this equipment on a firm, stable, horizontal surface. The product may break or cause injury if it falls.Do not use in locations subject to high humidity or dust levels. Excessivehumidity and dust may cause equipment damage or fire.Do not place heavy objects on top of this product. Never stand or lean on this product. Equipment may fall or collapse, causing breakage and possible injury.Take care not to injure your fingers on the manual cutter•When you remove printed paper•When you perform other operations such as loading/replacing roll paper To ensure safety, unplug this product before leaving it unused for an extended period. Restriction of UseWhen this product is used for applications requiring high reliability/safety, such as transportation devices related to aviation, rail, marine, automotive, etc.;disaster prevention devices; various safety devices, etc.; or functional/precision devices, etc.; you should use this product only after giving consideration toincluding fail-safes and redundancies into your design to maintain safety and total system reliability. Because this product was not intended for use inapplications requiring extremely high reliability/safety, such as aerospaceequipment, main communication equipment, nuclear power control equipment, or medical equipment related to direct medical care, etc., please make your own judgment on this product’s suitability after a full evaluation.Precautions on Use of Recommended Liner-free Label ❏When using the recommended liner-free label, the printer power must always be on to maintain a good print quality❏Before using thermal roll paper after using the recommended liner-free label, clean up any glue from the recommended liner-free label that is on thethermal head, paper holder, or paper path. This glue may cause paper jams.UnpackingThe following items are included with the standard specification printer. If any item is damaged, contact your dealer.❏Printer❑Roll Paper❏Power switch cover❑Connector cover❏AC adapterInstalling the Printer Horizontally or VerticallyYou can install the printer horizontally on a flat surface (with the paper exit on top) or vertically (with the paper exit at the front) by hanging it on a wall, using the optional WH-10 hanging bracket set.WARNING:When hanging the printer on the wall with the hanging bracket set, be sure to attach a connector cover to the printer.Important Installation Notes❏For a serial interface, use a null modem cable.❏For a parallel interface, use an IEEE 1284 cable.❏For a USB interface, install the driver before connecting the printer.Downloading Drivers, Utilities, and ManualsDrivers, utilities, and manuals can be downloaded from the following URL./Part NamesControl PanelFEED buttonThis button feeds paper.(Power) LEDThis LED is on when the printer is on.ERROR LEDThis indicates an error.PAPER OUT LEDOn indicates a paper out, and when you select to use thermal roll paper by DIP Switches, also indicates a paper near end. (For DIP Switch settings, See Table B on page 7.)Using the Power Switch CoverAttaching and Removing the Connector CoverThese instructions apply if a connector cover is packed with your printer to protect your cables. To attach it, follow the steps below:WARNING:If an accident occurs with the powerswitch cover attached, unplug the power cord immediately. Continued use may cause fire or shock.The enclosed power switch cover ensures that the power switch is not pressedaccidentally. To use this cover, install it as shown in the illustration on the right.1.connector cover has threeleft, and back.2.Position the two hooks on theconnector cover so that they in the illustration on the right.3.to click onto the printer casethe printer over, and push the connector cover down whilecover inward to detach the hooks from the printer case.Installing Roll Paper1.Press the cover open button to open the printer cover.2.Be sure that the paper comes off the roll in the correct direction.3.The paper will be automatically fed and cut.Removing Jammed Paper1.Turn the printer off and press the cover open button to open the printer cover.2.Remove the jammed paper, reinstall the roll, and close the printer cover.3.If paper is caught in the cutter and you cannot open the printer cover, openthe cutter cover.4.to the normal position. There is a label near the cutter to assist you.5.6.Open the printer cover and remove the jammed paper.Cleaning the Thermal HeadIf you use thermal paper, follow the steps below to clean the thermal head.to let it cool before you clean it. Do not damage the thermal head bytouching it with your fingers or any hard object.Turn off the printer, open the printer cover, and clean the thermal elements of the thermal head with a cotton swab moistened with an alcohol solvent (ethanol or IPA).Epson recommends cleaning the thermal head periodically (generally every3months) to maintain receipt print quality.TroubleshootingNo lights on the control panelCheck the power supply cable connections and the power outlet.ERROR LED on (not flashing) with no printingIf PAPER OUT is on , the roll paper is not installed or is near the end.If PAPER OUT is off , the printer cover is not closed properly.ERROR LED flashing with no printing (and no paper jam)Printing stops if the head overheats and resumes automatically when it cools.If overheating is not the cause, turn the printer off, and after 10 seconds, back on.DIP Switch Tables*Only when DIP Switches 1-7 and 1-8 are on, thetransmission speed can be selected from one of seven speeds: 2400, 4800, 9600, 19200, 38400, 57600, and 115200 bps by conrol commands. The default is 38400.*1: For USB I/F, DIP Switches 1-3 and 1-4 are Undefined.*2: For Parallel I/F, DIP Switch 1-8 is Undefined.DIP switch 1 (Serial Interface)SW FunctionON OFF 1-1Data receive error Ignored Prints “?”1-2Receive buffer capacity 45 bytes 4K bytes 1-3Handshaking XON/XOFF DTR/DSR 1-4Data word length 7 bits 8 bits 1-5Parity check Enabled Disabled 1-6Parity selectionEvenOdd1-71-8Transmission speed (See table A.)Table ATransmission speed (bps)-bits per second 1-71-8Adjustable by control commands*ON ON 4800OFF ON 9600ON OFF 19200OFFOFFDIP switch 1 (Parallel/USB Interface)SW Function ON OFF 1-1Auto line feed Always enabled Always disabled 1-2Receive buffer capacity45 bytes4KB1-3*1Select paper sensors to output paper-end signals (default value of a command) from parallel I/F.DisabledRoll Paper end sensor enabled, Roll Paper near-end sensor enabled 1-4*1Error signal outputfrom parallel I/F Disabled Enabled1-5~1-7Undefined 1-8*2Power savingfunction for USBDisabledEnabledDIP switch 2 (Serial/Parallel/USB Interface)SW Function ONOFF2-1Handshaking (BUSY condition)Receive buffer fullOffline orReceive buffer full2-2Do not change settings Fixed to OFF 2-32-4Print density/Liner-free label See Table B2-5Release condition of receive buffer BUSY (If receive buffer capacity set to 4 KB.)Releases BUSY when remaining receive buffer capacity reaches 138bytes.Releases BUSY when remaining receive buffer capacity reaches 256bytes.2-6Do not change settings.Fixed to OFFDIP switch 2-7, 2-8 (Serial Interface)SW Function ON OFF 2-7I/F pin 6 reset Enabled Disabled 2-8I/F pin 25 resetEnabledDisabledDIP switch 2-7, 2-8 (Parallel/USB Interface)SW Function ONOFF2-7Do not change Fixed to OFF 2-8Do not changeFixed to ONTable BPaperPrint density 2-32-4Recommended liner-free labelFixed ON ON Thermal roll paperNormal OFF OFF Medium ON OFF DarkOFFONSpecificationsdpi: dots per 25.4 mm (dots per inch)*1:Set DIP Switches 2-3 and 2-4 for each paper type. (See Table B on page 7.)Font Specification* Memory switches can be set with the memory switch setting utility.58mm paper width model80mm paper width modelPrinting method Thermal line printingDot density 203 dpi × 203 dpi [dots per 25.4 mm {1"}]Printing direction Unidirectional with friction feed Printing width52.5 mm {2.07"}, 420 dot positions72 mm {2.83"}, 576 dot positionsNumber of characters Alphanumeric characters: 95; International characters: 48Extended graphics: 128 × 11 pages (including user-defined page)Printing speed *1Recommended liner-free label: 150 mm/s {5.9"/s} (default)Thermal roll paper: 177 mm/s {7.0"/s} max.Ladder bar code and 2D code: 88 mm/s {3.46"/s}The above speed values are approximate.Paper feed speed Approx. 150 mm/s {approx. 5.9"/s} continuous paper feedLine spacing (default) 3.75 mm {1/6.7"}Roll paper (single-ply)Width 57.5 mm ± 0.5 mm {2.26" ± 0.02"}79.5 mm ± 0.5 mm {3.13" ± 0.02"}Diameter Maximum outside diameter:83 mm {3.27"}SpoolRoll Paper spool diameter:Inside: 12 mm {0.47"}; Outside: 18 mm {0.71"}Specified thermal roll paper typeNTP058-80NTP080-80Recommended liner-free label type MS214150MS318150Interface(compatible)Serial (RS232/RS485)/Parallel (IEEE1284)/Ethernet (10/100Base-T)/USB (Full speed)Receive buffer 4KB/45 bytes Cash drawer function 2 drivesSupply voltage DC + 24 V ± 7%Temperature Operating: 5 to 45°C {41 to 113°F}Storage:–10 to 50°C {14 to 122°F}, except for paper HumidityOperating:Recommended liner-free label:10 to 80% RH Thermal roll paper:10 to 90% RH Storage:10 to 90% RH, except for paperOverall dimensions 148 × 145 × 195 mm {5.83 × 5.71 × 7.68"} (H × W × D)Weight (mass)Approx. 1.8 kg {3.96 lb}Memory switch settingFont58mm paper width model 80mm paper width model Font structureColumnFont structureColumnMemory switch 5-2 ON (default)Font A (default)10 × 244213 × 2444Font B9 × 174610 × 1757Font C12 × 243510 × 2457Memory switch 5-2 OFF Font A (default)12 × 243512 × 2448Font B 9 × 17469 × 1764Font C10 × 244210 × 2457。
精工光动能电波表中文说明书
■ 时差修正功能・・・・・・・・・・・・・・如果设定时差的话,则显示出国外的当地时间。
1
(选择接收电波信号台站) 另外,通过设定时差,就可以在能接收到电波信号的地区,
关
→ P.34
关于基准位置 ·············································· 66 表针位置自动修正功能(时分秒针基准位置校准)······ 66 1 日期的基准位置校准 ······························ 67 这种时候怎么办? ······································ 68 2 万一出现异常走动的时候怎么办? ··········· 76 系统复位(①〜②)································ 76
接收电波信号来调整时间和日期 ················· 18 关于电池能量 ················································ 32
接收电波信号的工作原理 ························· 18 关于电池能量耗尽预告功能 ····················· 32
·如果出现了过敏、斑疹的话
应立即停止腕表的使用,并到皮肤科等专科医生之处就诊。
·其他注意事项
○金属表带的调整需要专业知识和技术,所以,调整表带时应该与购买商店联系。如果 自己调整的话,则有可能导致手或手指受伤,也有可能导致零部件遗失。 ○不要对商品做拆卸或改造 ○注意不要让婴幼儿接触腕表。 有可能会导致受伤或过敏。 ○关于使用完后的电池的处理,应遵守各地方行政部门的相关规定。 ○在使用怀表和胸饰表的话,请注意绳带和表链的使用方法。 使用不当则有可能会损坏衣服或弄伤手和颈部或者勒脖子。
精工手表说明书
154155使用本錶實施潛水前須知潛水前,確認手錶是否操作正常並要掌握以下列舉的各項注意事項。
潛水前●勿用本錶實施使用氦氣的飽和潛水。
●在水中,時時刻刻用旋轉環計量已經過的時間。
●確認:‧秒針是否以1秒鐘間隔移動。
‧錶殼上的“‧”標記是否指向更換電池的理想時間。
(請參閱173頁上的“電池之更換”。
)‧錶冠是否被完全擰緊。
‧各按鈕是否被完全擰緊。
‧水晶罩或錶帶上是否有可看到的裂痕。
‧錶帶或錶鏈是否與錶殼緊密相連。
‧錶帶或錶鏈上的鉤子是否將錶帶或錶鏈與手腕牢牢扣住。
‧旋轉環是否流暢地按逆時針方向轉動(轉環不能太鬆也不能太緊)‧時間及日曆是否設定准確。
若出現任何故障,請與指定的精工服務中心聯絡。
潛水中●勿在手錶上有水氣的狀態下或在水中操作錶冠或按鈕。
●避免使手錶撞擊到岩石等堅硬的物體上。
●旋轉環在水中的轉動會略有鈍感,此非本錶之故障。
潛水後●用清水沖洗手錶以清除海水、泥沙等。
●清洗後將手錶徹底擦幹以免錶殼生鏽。
156目錄頁設定時間及調整秒錶指針位置 (159)設定日期 (162)如何使用秒錶 (163)測距儀 (166)遙測儀 (168)旋轉環 (170)螺絲擰入錶冠 (171)安全鎖定按鈕之操作 (172)更換電池 (173)如何保護手錶品質 (175)規格 (178)☆ 關於手錶之保養,請參閱附頁的環球保修書及使用手冊上的“如何保護手錶品質”。
157精工 機件編號 7T92秒錶158159設定時間及調整秒錶指針位置在秒針處於12點鐘位置時拉出到第二格。
旋轉以設定時針和分針。
● 根據本手錶之設計,當錶冠處於第二格時可實施下列各項操作: 1)時間設定 2)秒錶指針位置調整一旦錶冠被拉出到第二格,務必要確認時間並調整時間。
若有必要,此時還可調整秒錶指針的位置。
160秒錶秒針秒針按壓2秒鐘以選擇要調整的秒錶指針。
反覆按壓以將選出的秒錶指針設定到“0”位置。
按照時間報時信號推回到正常位置。
161162●在設定日期之前,務必先設定主時間。
Seiko Cal.6R15C 6R15D技术指南说明书

[SPECIFICATION]・3 Hands (Hour, minute and second hand)Movement size ・Diameter Outside : φ27.4 mm ・Calendar (Date: Date disk)Casing : φ27.0 mm ・Height : 5.25 mmPARTS LIST / TECHNICAL GUIDECal.6R15C / 6R15DItem6R15C / 6R15D ・Instant date setting device ・Second hand stop functionCal. No.Crownposition Manual winding (clockwise only)Vibrations per hourInstantaneous rate at T0(Fully wound condition) Between +25/-15 seconds per day (worn on the wrist at temperature-range between 5℃ and 35℃)Isochronous fault 21,600 (6 beats per second) Date setting (counter clockwise only ) Time setting /Second hand stop function Normal position1st click positionDriving system Automatic winding with manual winding mechanism Additional function ±15 s/d±10 s/dRegulation systemLift angle of the escapement Daily rateStandard rate for measurement9 o’clock atthe top Dial upward ±15 s/d±10 s/d2nd click positionMeasurement (daily rate in seconds:s/d) ETACHRON system 53°Loss/GainTesting positions Dial upward6 o’clock at the top 1/18Number of Jewels 23 JewelsPower reserve From fully wound to stoppage: Approximately 50 hours2/18Cal.6R15C/D9/16Cal.6R15C/D11/1612/1613/16● How to remove and install the Balance complete with studHow to remove How to install1. Initial phase 1. Initial phaseMove the stud support toward the arrow marked Set a new balance complete with stud to the direction until it touches the balance cock.main plate.2. Make sure that the outer coil is not removed from 2. Set the Balance cock and tighten the balance the regulator arm.cock screw.3. Using sturdy tweezers, push the stud outward 3. Temporarily set the stud to the stud support. from the direction of the arrow shown in the Make sure that the balance spring passes outside illustration until it is removed from the stud support.the regulator pin.* Be careful not to damage the balance spring.4. Using sturdy tweezers, set the stud to the studsupport and press it down.Make sure that the outer coil passes throughthe regulator pin slot.* Be careful not to damage the balance spring. 4. Unscrew the Balance cock screw and remove theBalance cock.14/16Top side view Back side view Angled viewSTUD REGULATOR PINTop side view Back side view3) Rotate the REGULATOR PIN counterclockwise in order to fine-tune the clearance ofthe balance-spring passing through the slot of it. Set it to moderate gap to get the stable trend.Before rotating After rotatingBefore rotating After rotating(Maximum clearance)(Minimum clearance)15/16OPERATION MANUALCal.6R15C/D 【6R15 operation manual】1. How to manually wind the mainspring by turning the crown1) Slowly turn the crown clockwise (in the 12 o’clock direction) to wind the mainspring.2) Continue to turn the crown until the mainspring is sufficiently wound. The second hand will start moving.3) Set the time and date before putting the watch on your wrist.2. How to set the time and date• Check that the watch is operating, and then set the time and date.• The watch is provided with a date function and is so designed that the date changes once every 24 hours.The date changes around 12 o’clock midnight. If AM/PM is not properly set, the date will change around 12 o’clock noon.1) Pull out the crown to the first click. (The second hand continues moving and the accuracy of the watch is unimpaired.)2) The date can be set by turning the crown counterclockwise. Turn it until the previous day’s date appears.Ex.) If today is the 6th of the month, first set the date to ”5” by turning the crown counterclockwise.3) Pull out the crown to the second click when the second hand is at the 12 o’clock position.(The second hand stops on the spot.)Turn the crown to advance the hands until the date changes to the next.The time is now set for the a.m. period. Advance the hands to set the correct time.4) Push the crown back in to the normal position in accordance with a time signal.CAUTION• Do not set the date between 10:00 p.m. and 1:00 a.m. If you do, the date may not change properly / it may cause a malfunction.• The mechanism of mechanical watches is different from that of quartz watches. When setting the time, be sure to turn back the minute hand a little behind the desired time and then advance it to the exact time.16/16TECHNICAL GUIDECal.6R15C/D●Water resistance testCheck the water resistance according to the designated specification of the watchMarking on the case backTest method Applied pressureWATER RESISTANT(WATER RESIST)3 BARWATER RESIST 5BAR 5 BARWATER RESIST 10BAR10 BARWATER RESIST 15BAR 15 BARWATER RESIST 20BAR20 BARSCUBA DIVERIS (AIR DIVERIS )150 m18.75 BAR =150(m)times 0.125SCUBA DIVERIS (AIR DIVERIS)200 m 25 BAR =200(m)times 0.125He-GAS DIVERIS 300 m 37.5 BAR =300(m)times 0.125He-GAS DIVERIS 600 m 75 BAR =600(m)times 0.125He-GAS DIVERIS1000m125 BAR =1000(m)times 0.12517/18Air leak testWater pressure testCondensation testCondensation testCondensation testWater pressure testTECHNICAL GUIDE Cal.6R15C/D18/18。
SEIKO精工6R35使用说明书
6R35JSY6R351-A1906M-196R35说明机械手表我们真诚地感谢您购买 SEIKO 手表。
为了保证您正确地使用好您的 SEIKO 手表,请您在使用之前认真阅读说明书。
请妥善保管好说明书,以便在需要的时候可以随时拿出来阅览。
*关于金属表带的调整,可以联系购买该产品的商店为您做调整。
如果因礼品赠送或者搬家等而无法联系购买商店为您做调整,可以与 SEIKO 客户服务中心取得联系。
如果在非购买商店调整,有时可能会收取费用或者不能为您提供相关服务。
*商品上有时会贴有一层防止损伤用的保护膜。
务必要把保护膜揭下来以后再使用。
如果在贴有保护膜状态下使用,则会因沾上污渍、汗水、尘埃、水分等而导致生锈。
SC1使用注意事项 ........................... 3机械手表特性(手动上弦和自动上弦型) ... 7各部分的名称及其功能 ................... 8表冠 ................................... 9如何给主发条上弦 ...................... 10如何设置时间和日期 .................... 12月末日期调整 ........................ 15如何使用指南针(仅针对有指南针表圈或指南针内圈的型号) (16)日常保养 .............................. 17功能和型号 ............................ 18Lumibrite(智慧光能) ................. 19防水功能 .............................. 20抗磁功能 .............................. 21表带 .................................. 23如何使用针对皮革表带的三折叠式表带扣(专用表带扣) ......................... 26如何使用易调式表带扣 .................. 32售后服务 .............................. 35关于机械手表的精度 .................... 37故障排除 .............................. 39规格 . (41)SC2SC3SC41如何使用SC5SC61如何使用•这是一款用发条来提供动力的机械手表。
寺岡精工公司产品销售与维护说明书

CASE STUDYTeraoka Seiko Co., Ltd.The CustomerSince its founding in 1934, Teraoka Seiko Co., Ltd has been involved inmanufacturing, selling, and maintaining automatic spring scales, electronicscales, meters, label printers, point-of-sale (POS) systems, recycling machines,and other equipment. Its products are mainly used by customers in food-processing and by food retail business such as supermarkets. Instead of simplyfollowing market needs and manufacturing and selling products, the companydevelops products that uncover new demand. It considers the building ofnew markets a necessary condition for its business survival and continues tochallenge itself in creating new needs and new markets.The ChallengeTeraoka Seiko operates in 49 locations around the world, with 13 groupcompany bases and approximately 110 distributor bases in Japan. Currently,about 100 of these bases are connected in a network via Internet virtual privatenetworks (VPNs). The group companies manage the infrastructure and serversof the distributors as well, with the number of nodes under managementreaching several thousand.Infoblox enables next-level network experiences with its Secure Cloud-Managed Network Services. As the pioneer in providing the world’s most reliable, secure and automated networks, we are relentless in our pursuit of network simplicity. A recognized industry leader, Infoblox has 50 percent market share comprised of 8,000 customers, including 350 of the Fortune 500.Corporate Headquarters | 3111 Coronado Dr. | Santa Clara, CA | 95054+1.408.986.4000 | 1.866.463.6256 (toll-free, U.S. and Canada) | ***************** | © 2020 Infoblox, Inc. All rights reserved. Infoblox logo, and other marks appearing herein are property of Infoblox, Inc. All other marks are the property of their respective owner(s).Before Infoblox products were introduced, there was a risk that a failure in the DNS server would affect all the IT systems because a redundant configuration had not been adopted in the DNS server. Since the existing configuration usedFreeBSD/BIND, application management could only be done by IT staff with the requisite technical skills. Furthermore, updating of patches in the servers was troublesome.The fact that management had not been thoroughly carried out for IP address distribution by the DHCP server was also an issue. Because the IT system administrator has to manage the group enterprise-resource-planning (ERP) applications and client PCs in addition to DNS/DHCP, stable operations had to be ensured at all times—without the important DNS/DHCP operations in the network imposing unnecessary operating loads. In addition, the company believed that technology such as IPv6 would become more widespread in future, and the system would not be able to withstand the operating load on its own.The SolutionTeraoka Seiko’s IT organization started to look into a new solution for IP address management and finally decided to adopt the Infoblox solution. However, compared to low-cost DHCP and DNS servers such as Windows and BIND from Free BSD, it was not an easy task explaining to upper management why the adoption of the Infoblox solution was critical. DNS and DHCP are systems that are not clearly visible to employees outside IT, and so their importance is often hard to understand. However, in the event these systems were to stop working, the entire network would become inaccessible to employees. It was thus necessary to convince upper management that importance outweighed cost.IT pointed out that as long as they were running a “free” system on their own, in the event a malfunction they would have to resolve everything manually. There was also a risk of problems caused by design omissions and settings omissions. Furthermore, because stable operating 24 hours a day was going to be required in the future to cope with the increase in traffic demand and DNS queries, a system that could stably process a large volume of DNS queries and a mechanism that would allow updates to be carried out without disrupting DNS services was essential.They pointed out that management becomes complex when a system is built using Free BSD/BIND, and Infoblox products have the advantage of allowing application management to be carried out easily using a graphical interface. Considering the operability, reliability, scalability, and malfunctionsupport related to IP address management, Teraoka Seiko’s management came to the conclusion that IT should adopt the Infoblox solution.The ResultSince Infoblox uses patented Infoblox Grid™ technology, multiple Infoblox products can be divided into master and member products and managed separately. The master and members are continuously synchronized. When upgrading the software version, IT only has to update the master, and other members are automatically updated.Moreover, by adopting a configuration of high-availability (HA) pairs, even in the event of a malfunction in an active machine, the system will automatically switch to a backup machine within five seconds. Since the active machine and standby machine are both synchronized with the database, service can continue to be provided without having to inform the system that there has been a change in the user.Teraoka Seiko now uses the Infoblox Grid to manage multiple Infoblox products. The entire system is run using an Infoblox 1550 appliance as the grid master with a HA configuration. An Infoblox 550 appliance is running as a secondary DNS server with a HA configuration, and an Infoblox 1050 acts as a DHCP server with a HA configuration. The result has been a high level of reliability in the overall system. Centralized management is also an advantage, as these systems are all deployed at the information center.Since it is possible to deploy Infoblox products in multiple locations that are physically separated in a grid configuration, a system with a focus on BCP and disaster recovery is also under study.。
- 1、下载文档前请自行甄别文档内容的完整性,平台不提供额外的编辑、内容补充、找答案等附加服务。
- 2、"仅部分预览"的文档,不可在线预览部分如存在完整性等问题,可反馈申请退款(可完整预览的文档不适用该条件!)。
- 3、如文档侵犯您的权益,请联系客服反馈,我们会尽快为您处理(人工客服工作时间:9:00-18:30)。
故障
大致原因
解决方法
手表停止走行
由主发条提供的电能耗尽
转动表冠或甩动手表使其上弦。手表
将开始 操作。若手表不启动,请与出
即使每天佩带手表,手表被戴在手腕上的时间较短, 售 延此长表佩的带经手销表的店时联间络,。或取下手表给
手 表 仍 然 很 快 停 止 或手臂的运动量较少。
主发条上弦。
操 作。
手表出现暂时走慢/ 手表被长期放置在极高或极低的 当手表被放回到正常温度下时,它将
星期和日期在正午AM (上午)/PM (下午)设 定不使指针向前行进 12 个小时= 1玻2璃点罩钟模糊不清。并正 因确 垫。 圈等破损,手表内进 水。 请与出售此表的经销店联络= 转 且换 此。状态持续较长 时间。
*若出现上述内容以外的故障,请与出售此表的经销店联络。 机械手表的精确度 •机械手表的精确度由大概一个星期的日率来表示。 •机械手表的精确度可能会不在所指定的时间范围内。因为手表的走慢/走快根据使用条件而 发生变化。例如手表被戴在手腕上多长时间,手臂运动量及主发条是否上满弦等。 •机械手表内的主要组件是由金属制成的。金属的特性是根据温度的变化而申缩。此特性对 手表的精确度发生影响。机械手表在高温下易走慢,在低温下易走快。为提高手表的精确度, 则必须随时为控制齿轮速度的摆轮提供电能。此外,发动机械手表的主发条所产生的驱动力 会根据上弦状态发生变化。特别是在上满弦和未上弦之间。若主发条没上弦,则驱动力微弱。 •若要保持精确度的相对稳定,对于自卷式手表,可经常性地将手表戴在手腕上;对于上弦 式手表,可每天在一个固定时间为主发条上满弦,使其正常走行。 •若机械手表受到来自外部的强磁力的影响,它会出现暂时的走慢/走快现象。手表的部件也 会根据受影响的程度发生磁化。遇此情形,请与出售此表的经销店联络。此时需要对手表进 行包括去除磁力在内的维修。 规格 1 特征 指针时间显示(时针、分针和秒针)及日期显示 2 每小时振动数 21,600 3 走慢/走快(日率) 在正常温度范园内(5°C~35°C 之间)+25~_ 15 秒钟 4 持续操作时间 50 个小时以上 5 驱动系统 带手动卷动装置的自动卷动式 6 宝石 23 个宝石宝石 * 上述的精确度是由工厂调整的精确度。 **根据机械手表的特性,任何一个实际的曰率都可能不在以上所指定的精确度时间范围内。 这是由使用条件造成的。比如手表被戴在手腕上多长时间、温度环境、手臂运动量及主发条 是否上满弦等等。
•对金属制品或皮制品的过敏反应。 •表壳或表带上积累的灰尘、锈菌及汗水。 •若发现任何过敏现象或皮肤炎症,应立刻停止佩带手表,并应得到诊疗。 •防水性能 •无防水性能 若表壳背面上未刻有“WATER RESISTANCE”(防水)字样,则本表不具备防水性能。所以, 应特别注意勿将手表弄湿。因为水可破坏机械装置。若手表被弄湿,建议您把手表送到出售 此表的经销店或服务中心检测。
适用于入浴或浅潜水, 但不适于水肺潜水。若要实施水肺潜水,建议您利用精 工潜水手表。 *若要在水中使用防水性能 5、10、15 或 20 巴的手表,应先确认表冠是否被完全 推入。
勿在手表被弄湿或处于水中的状态下操作表冠。在海水中使用后,要用清水清洗手表,并使 其完全干燥。
*当戴着防水 5 巴的手表淋浴时,或戴着 10 巴、15 巴或 20 巴防水手表入浴时, 务必注意 下列事项: •当手表被肥皂水或洗髪剂弄湿时,勿操作表冠。 •若将手表置于热水中,它会出现一定程度的走慢或走快。但是,一旦回到正常温度下,手 表仍保持其通常的精确度。 注: 以巴为单位的压力只是一个测试压力,不要认为它与实际潜水深度相一致。因为游泳运动在 到达指定的深度时有逐渐增加压力的倾向。因此,若潜水时戴着手表,则更加要小心。 戴表须知 •若在手腕上戴着手表的同时抱幼儿或小孩子时,应特别当心。他们可能会因为与手表直接 接触而受伤或发生过敏反应。 •应避免因摔落而使手表受到过度冲击;避免使其与坚硬表面的刮摩;避免戴表做激烈的运 动。这些都会导致手表暂时操作失常。 •手腕上戴着手表也可能导致受伤。特别是你突然摔倒或撞到他人或他物上时更为如此。 于何处保管手表 •勿将手表长期置于低于 5°C 或高于 35°C 的温度环境下。 •勿将手表置于易受到强磁(例如靠近电视机、扬声器或磁性项链)或静电干扰之处。 •勿将手表置于易受到强烈振动之处。 •勿将手表置于不洁之处。 •勿使手表沾上化学物体或化学气体。 (例如轻油精和松脂油等有机溶剂、汽油、指甲油、化妆水喷剂、洗涤剂、黏着剂、水银及 碘消毒溶液) •勿将手表置于靠近温泉之处。 关于大修 •手表是一种精密装置,它拥有许多注有特制油的移动部件。若这些部件注油不足或受到磨 损,手表会出现误差,或停止操作。若出现此类情况,手表需要大修。 关于保用及维修 •若有维修或大修的必要,请与出售此表的经销店或精工顾客服务中心联络。 •若在保用期间内,请提供保用证明书以便接受维修服务。 •保用证明书内指定有保用范围。请仔细阅读并妥善保管。 故障排除
精工 6R15 机型
机械手表之特性 (自卷式,自动卷动式) •本机械手表利用主发条提供的电能操作运行。 •若手表完全停下来,可手动旋转表冠 20 次左右给主发条上弦,使手表重新启动。 •石英手表的走慢/走快是由月率或年率来表示,而机械手表的精确度通常是由日率来表示 (每天的走慢/走快)。 •机械手表其正常使用状态下的精确度根据使用条件的不同亦会出现差异(手表被戴在手腕 上的时间长短、温度环境、手臂的移动及主发条的上弦状况)。 •若手表受到强磁力的影响,它会暂时出现走慢或走快现象。若手表遭受到强磁场的冲击, 则 手表的某些部件会被磁化。遇此情形,需要排除手表内的磁性。请与出售此表的经销店联络。 使用方法 本表为带手动上弦装置的自动手表。 •当手表被戴在手腕上时,戴表者手臂的晃动可使手表的主发条上弦。 •若手表完全停止走行,此时最好转动表冠,以手动为主发条上弦。 •如何转动表冠为主发条上弦 1. 慢慢旋转表冠(12 点钟方向)为主发条上弦。 *逆时针旋转表冠(6 点钟方向)不能为主发条上弦。 2. 继续转动表冠直到主发条完全上满弦。秒针开始移动。 3. 佩带手表之前先设定时间和日期。 若主发条已经被上满弦,则没用必要继续旋转表冠。尽管如此,继续 转动表冠亦不会损坏手表的机械系统。 手表一旦被上满弦,它可走行约 50 个小时。 若手表在未上满弦的状态下使用,则手表会出现走慢或走快现象。为避免此现象的发生,最 好每天戴表 10 个小时以上。若不将手表戴在手腕上而使用手表,例如将其作为闹钟放在桌 子上,则务必每天在一个固定的时间为其上满弦。 若手表在主发条未上弦的状态下停下来、即使转动表冠给主发条上弦也不可能使手表立刻启 动。这是因为机械手表独有的特性造成主发条的转矩(动力)在其卷动初期处于微弱状态。 持续卷动主发条后,当转矩达到一定强度时,秒针开始移动。当然,若向两侧来回甩动手表 强行转动摆轮的话,则可使手表快些启动。 如何设定时间和日期 •先确认手表是否在走行,然后设定时间和日期。 •根据本手表日期功能之设计,其日期每 24 小时变换一次。变换时间大约在半夜 12 点钟。若 AM/PM 设定不正确的话,日期将在中午 12 点钟转换。 1.将表冠拉出到第一格。(秒针继续走行,手表的精确度未出现误差。) 2.逆时针旋转表冠以设定日期。持续转动直到前一天的日期出现为止。 例)若今天是这个月的 6 号,逆时针旋转表冠以将日期设定到“5”。 3. 勿在晚上 10 点钟与凌晨 1 点钟之间的时间带设定日期。否则,日期将 不能正常转换,或导致手表操作失常。 4. 按照点钟报时信号,将表冠推回到正常位置。 注意: 机械表的构造与石英表的构造不同。 设定时间时,务必要将分针向后移动,使其迟于预约时间,然后再向前移 动到准确的时间上。
•防水性能(3 巴) 若表壳背面上刻有“WATER RESISTANCE” (防水)字样,则本表按其设计和制 作可具备 3 巴的防水性能。例如与溅水或雨水的意外接触等。但本表还不可用于 游泳或潜水。 •防水性能(5 巴)* 若表壳背面上刻有“WATER RESISTANCE 5BAR”防水 5 巴)字样, 则本表按 其设计和制作可具备 5 巴的防水性能。适用于游泳、驾艇及淋浴。 •防水性能(10 巴/15 巴/20 巴)* 若表壳背面刻有“WATER RESISTANCE 10BAR”(防水 10 巴)、“ WATER RESISTANCE 15BAR (防水 15 巴)或 “WATER RESISTANCE 20BAR” (防水 20 巴)字样,则本表按其设计和制作可具备 10 巴/15 巴/20 巴的防水性能。特别
走快现象。
温度环境下
恢复其通常的精确度。
手表被搁置在与磁性物体 极其若将手表远离磁源,它将恢复其通常
接近之处
的精确 度。若仍不能改变状况,请与
出售此表的经 常精确度将无法恢复。请与出售此 或戴着手表做激烈的运动, 或者表的经销店联络 手表受到强烈震动。
手表 3 年以上未实施过大修。 请与出售此表的经销店联络
•月初的日期调整 每当一个不到 31 天的月份结束后,下个月的第一天则需要调整日期。 例)若在上午期间调整一个 30 天月份结束后的第一天的日期 1. 手表显示“31”而不是“1”。将表冠拉出到第一格。 2. 转动表冠以将日期设定到“1”,然后将表冠推回到正常位置。 如何保护手表质量 注意 •手表的保养 •手表表壳和表带直接接触皮肤。所以,应该经常保持表壳和表带的清洁。这样亦可帮助延 长手表的寿命,还可避免容易发生的皮肤过敏。 •取下手表后,立刻用一块干软布擦掉湿气、汗水或不洁物。这样可帮助延长表壳、表带和 垫圈的寿命。 <皮表带> •用一块干软布轻轻地抹掉湿气。勿摩擦表带,以免使其褪色或失去光泽。 <金属表带> •用沾上清水和肥皂水的软牙刷清洗表带以保持其清洁。注意勿使表壳沾上水。 注意 •发疹及过敏反应 •调整表带以使其与手腕之间留有一些空隙,保证适当的空气流通。 •过长时间及/或反复地接触表带会导致那些皮肤易过敏者发疹或患皮炎。 •可能引起皮炎的原因如下: