FreeHand MXa操作指引(图)
FREEhand简明教程
FREEhand 简明教程第一节:*我们首先要做的事情不是去观望遥远的将来,而是做手边的清晰之事;网点:组成图案的最基本单元。
网点是表现半色调图案的最基本单元,它担负着组织图像层次、轮廓、色彩的任务;印刷工艺决定用网点来决定图案的明暗层次;网点的大小与空间距离的大小来决定图案的深浅;过渡(渐变)挂网决定雕刻网穴的大小决定印刷的深浅1-10010,20,10%=1成20%=2成半成=5%*格言就是一种力量;*为明日做好准备的最佳方法:是集中所有的智慧,热忱,把今天的工作(学习)做得尽善尽美;*良好的开端是成功的一半*细心,耐心,责任心;并且要有自信;*软件+制版工艺;(凹版制版工艺;)承印物(印刷材料)伸缩力(太强)颜色套不准出现跑版现象;一色跑出另一色;电子文件;1,freehand,photoshop,illustrator.coreldraw*从广义上讲,印刷前期出版系统操作;*印刷定义:使用印版或其它方式将原稿的图文信息转移到承印物上的工艺技术;印刷品具有传播和存储信息的功能;*印刷五要素:原稿,印版,承印物,油墨,印刷机原稿:被印刷复制的对象,是制版印刷的基础;原稿分类:文字和图形稿,图像稿;按原稿所用的载体是否透明:透射原稿,反射原稿;彩色,黑白;如照片;媒体原稿和软件性原稿;(光盘,磁盘(U盘)三寸盘(1.2MB)-mo(230MB,640MB)-光盘(不能重复插写)-U盘(USB接口,方口1GB)-QQ 传活;)数码冲印,与数码打印;一次性照相;*印版:用于传递油墨至承印物上的印刷图文的载体;凹版(版辊一般指的是塑料包装印刷),平版(PS版,胶印一般纸张印刷)凸版(铅字版适用于票据)*承印物,油墨的载体;如:纸;*油墨;在印刷过程中,被转移到纸张或者其他承印物上形成耐久的有色图像物质;*常规的印刷分类:凸版印刷;平版印刷;孔版印刷:也称丝网印刷;版是一种网,可在平面或者曲面上印刷;感光胶凹版定义,优势及缺点*面临工作岗位:制版厂,印刷厂(胶印)广告公司,喷绘公司,输出中心(出菲林,出胶片),数码影楼等;制版厂:审稿,画稿,喷稿,电分,检验;针对的是制版厂片子线(电脑);辊子线;作业:1。
Freehand 10 基本操作(3)
Freehand 10 基本操作(3)直线网控制工具控制工具为一面板,可让您显示并更改物件及页面的属性。
几乎在所有绘图工作中都至少会用到一控制工具。
FreeHand 带来以下控制工具:「物件」控制工具会显示已选取物件或物件的位置及尺寸。
您可编辑「物件」控制工具中的数值并其套用至选取范围。
如需更详细的资讯,请参阅使用「物件」概观。
使用物件概观Macromedia FreeHand 可让您以不同的方式处理物件。
您可以将群组物件视为单一单位,并於群组巢状群组。
您可以使用滑鼠或键盘,或者指定精确的位置来移动物件。
您可相互对齐物件,或与页对齐。
FreeHand 提供增强的剪贴功能,可让您控制物件在绘图中的复制方式。
您也可以仿制或复制物件您可於绘图中搜寻特定属性的图形,例如笔触宽度或形状,以进行全域选取或取代。
「笔触」控制工具会显示已选取路径的笔触属性,包括笔触的类型(「无」、「基本」、「笔刷」「自订」、「图样」、及「PostScript」)还有笔触宽度、端点、接合、尖角限度、虚线设定、以箭头符号。
如需更详细的资讯,请参阅套用笔触。
(待续)「填色」控制工具显示已选取路径的填色属性。
填色包括「无」、「基本」、「自订」、「渐层」「滤镜」、「图样」、「PostScript」、「底纹」、与「拼贴」。
如需更详细的资讯,请参阅如下用填色。
套用色彩到未选取的物件:1 执行下列项目之一:从「调色盘」或「色泽」面板中的色块拖曳色票到物件的笔触或填色。
从色彩清单中拖曳色票到物件的笔触或填色。
2 您拖曳色票到物件之後及放开滑鼠按钮之前,可以使用下列其中一个按键变更色彩套用方式。
放开滑鼠按钮时按住 Shift 键,只会将色彩套用至物件的填色上。
放开滑鼠按钮时按住 Control-Shift (Windows) 或 Command (Macintosh),只会将色彩套用至物笔触。
若要使用滴管工具套用色彩:1 选取「工具」面板中的「滴管」。
Freehand工具介绍
Freehand中物体的造形工具操作工具栏(Xtra Operations)-----------一些对对象的整形的高级命令分形化(Fractalize)----以数学公式,生成复杂而有趣的图案补漏白(Trap)----选取所需物体,一般情况下不要运用,(用于防止两个图形之间由于误差而出现线)剪切(Crop)-------保留与最前面一个图形交叉的地方,生成新对象透明(Transparency)-------在重叠区生成新图形并以设定值生成中间值(前后两物体的中间色),原对象不变内嵌路径(Inset Path)-----在原有路径上得到一条或多条向内或向外的路径扩充路径(Expand Stroke)-----对一条路径使用此命令,得到等宽或加宽的可填充图形联合(Union)------保留所有图形并合为一个对象分割(Divide)------只要有交叉的全都分离成单个对象穿孔(Punch)-------用选中的多个对象最前面对象将其后面的对象穿一个孔,生成新对象交叉(Intersect)-------保留所有选中路径中的重叠部分,而将其它末重叠区删除混合(Blend)------可对两个或多个对象作混合命令(组合路径不能混合、开放与不开放路径不能混合、填充类型不一样不能混合,可对不同点做混合)简化节点(Simplify)-----把选取的路径的多点删除去除重叠(Remove Overlap)-----用来删除所选的一条封闭路径与自身重叠部分反向路径方向(Reverse Direction)-------把选定路径的方向反向纠正路径方向(Correct Direction)-------用来把路径的默认路径(即对矩形、圆形、星形工具)的一种顺时针的改正注释工具(Set Note)------用来对选取对象命名并加注解释放至层(Release To Layers)-------用于将混合或是复合路径将其释放到层,用于动画居多浮雕(Emboss)------用以处理选定路径,使其具有浮雕效果增加节点(Add Points)-----均匀的在其路径的每两个节点之间增加一个点外挂工具栏(Xtra Tools)弧线工具(Arc)------可以是开放、闭合、凹面、凸面鱼眼工具(Fisheye Lens)-----生成自定值的凹陷或凸起效果三维旋转(3d Rotation)-----使对象在三维空间变形拖尾工具(Smudge)-----可用两次,可控制拖出的填充色和线条色弯曲工具(Bend)-----增加一种外突或内陷的效果粗糙化工具(Roughen)---让所选对象的边缘粗糙化阴影工具(Shadow)-------可得到硬边、软边及纵深阴影三种效果镱像工具(Mirror)-------简单好用的功能,一次产生特别棒的效果图形水管工具(Graphic Hos)-----将图形、混合体、文本、图象存储,再将它们象水龙头一样喷撒图表工具(Chart)-----与外挂功能菜单中的图表命令结合运用(中有螺旋线各滴管工具箱中有可删除的)修改菜单(Modify)------重复的不讲解连接----用来把两条开放路径连成闭合路径,或将多个物体制作成重合路径(成生单的保留颜色,双的透明的效果,只保留前面的一种颜色)分离-----用来把复合路径还原,但不能把所有颜色还原混合-----对操作面板混合的进一步,把路径附连到路径其它一此命令与操作工具栏中的命令重合特效菜单(Xtras)(只说明不重复的)图表----通过此子菜单命令可重新修改图表数据、样式、定义图案用于图表颜色-----通过此命令可对对象的颜色进一步的控制删除-----没用的颜色与空的文本框重点掌握:两个外加操作,达到灵活运用.FreeHand 10快捷键文件(F): 新建(N) Ctrl+N 创建新文档或模板。
Freemaster用户指南
Freescale Semiconductor FMSTERUGRev. 2.1,6/2011 User’s GuideFreeMASTER for Embedded ApplicationsUser GuideImportant NoticeImportant NoticeFreescale provides the enclosed product(s) under the following conditions:This evaluation kit is intended for use of ENGINEERING DEVELOPMENT OR EVALUATION PURPOSES ONLY. It is provided as a sample IC pre-soldered to a printed circuit board to make it easier to access inputs, outputs, and supply terminals. This EVB may be used with any development system or other source of I/O signals by simply connecting it to the host MCU or computer board via off-the-shelf cables. This EVB is not a Reference Design and is not intended to represent a final design recommendation for any particular application. Final device in an application will be heavily dependent on proper printed circuit board layout and heat sinking design as well as attention to supply filtering, transient suppression, and I/O signal quality.The goods provided may not be complete in terms of required design, marketing, and or manufacturing related protective considerations, including product safety measures typically found in the end product incorporating the goods. Due to the open construction of the product, it is the user's responsibility to take any and all appropriate precautions with regard to electrostatic discharge. In order to minimize risks associated with the customers applications, adequate design and operating safeguards must be provided by the customer to minimize inherent or procedural hazards. For any safety concerns, contact Freescale sales and technical support services.As a prototype, this product does not fall within the scope of the European Union directive on electromagnetic compatibility and therefore may not meet the technical requirements of the directive. Please be aware that the products received may not be regulatory compliant or agency certified (FCC, UL, CE, etc.).Should this evaluation kit not meet the specifications indicated in the kit, it may be returned within 30 days from the date of delivery and will be replaced by a new kit.Freescale reserves the right to make changes without further notice to any products herein. Freescale makes no warranty, representation or guarantee regarding the suitability of its products for any particular purpose, nor does Freescale assume any liability arising out of the application or use of any product or circuit, and specifically disclaims any and all liability, including without limitation consequential or incidental damages. “Typical” parameters can and do vary in different applications and actual performance may vary over time. All operating parameters, including “Typical”, must be validated for each customer application by customer’s technical experts.Freescale does not convey any license under its patent rights nor the rights of others. Freescale products are not designed, intended, or authorized for use as components in systems intended for surgical implant into the body, or other applications intended to support or sustain life, or for any other application in which the failure of the Freescale product could create a situation where personal injury or death may occur.Should a Buyer purchase or use Freescale products for any such unintended or unauthorized application, The Buyer shall indemnify and hold Freescale and its officers, employees, subsidiaries, affiliates, and distributors harmless against all claims, costs, damages, and expenses, and reasonable attorney fees arising out of, directly or indirectly, any claim of personal injury or death associated with such unintended or unauthorized use, even if such claim alleges that Freescale was negligent regarding the design or manufacture of the part.Freescale and the Freescale Logo are registered trademarks of Freescale, Inc. Freescale, Inc. is an EqualOpportunity/Affirmative Action Employer. Freescale and the Freescale Logo are registered in the US Patent and Trademark Office. All other product or service names are the property of their respective owners.Table of ContentsParagraph Page Number NumberImportant NoticeChapter 1 Introduction1.1Overview (1)1.2Supported Platforms (1)1.2.1Going Around SCI (1)1.3Where to Find the Latest Version (1)1.4FreeMASTER Features (1)1.5License (2)Chapter 2 QUESTIONS and ANSWERS2.1Why do I need it? (4)2.2What does it do? (4)2.3Why is it such a great demonstration tool? (4)2.4What could I do with it if I follow the instructions? (4)2.5How is it connected to a target development board? (4)2.6What are all of these dialog boxes for? (4)2.7How does a project relate to my application? (5)2.8How do I set up remote control? Why would I want to? (5)2.9What is the Watch-grid? (5)2.10What is the Recorder? (5)2.11What is the Oscilloscope? (5)Chapter 3 INSTALLATION3.1System Requirements (6)3.2Enabling a FreeMASTER Connection on the Target Application (6)3.3How to Install (6)Chapter 4 FreeMASTER USAGE4.1Application Window Description (7)4.1.1Project Tree (9)4.1.2Detail View (18)4.1.3Watch-Grid (20)4.2Variables (20)4.2.1Generating Variables (23)4.3Commands (23)4.4Importing Project Files (27)4.5Menu description (29)4.5.1File Menu (29)4.5.2Edit Menu (29)Table of Contents4.5.4Explorer Menu (30)4.5.5Scope Menu (30)4.5.6Item Menu (30)4.5.7Project Menu (31)4.6Toolbars (31)4.6.1Toolbar (31)4.6.2Watch Bar (31)Chapter 5 PROJECT OPTIONS5.1Communication (32)5.2Symbol Files (33)5.2.1Regular Expression-based MAP File Parser (34)5.3Packing Resource Files into Project File (35)5.3.1Resource Files Manager (37)5.4HTML Pages (37)5.5Demo Mode (38)Chapter 6 HTML and SCRIPTING6.1Special HTML Hyperlinks (40)6.2FreeMASTER ActiveX Object (41)6.3FreeMASTER ActiveX Object Methods (42)6.3.1SendCommand (42)6.3.2SendCommandDlg (43)6.3.3ReadVariable (44)6.3.4WriteVariable (45)6.3.5ReadMemory (46)6.3.6WriteMemory (47)6.3.7ReadXxxArray (48)6.3.8WriteXxxArray (49)6.3.9GetCurrentRecorderData (50)6.3.10GetCurrentRecorderSeries (51)6.3.11StartCurrentRecorder (52)6.3.12StopCurrentRecorder (53)6.3.13GetCurrentRecorderState (54)6.3.14RunStimulators (55)6.3.15StopStimulators (56)6.4FreeMASTER ActiveX Properties (57)6.5FreeMASTER ActiveX Object Events (58)6.5.1OnRecorderDone (58)6.5.1.1Description (58)6.6Examples (58)Appendix A References (59)List of FiguresFigure Page Number Number Figure 4-1.Initial Application Window (7)Figure 4-2.Application Window (8)Figure 4-3.Project Block Properties - Main Page (9)Figure 4-4.Project Block Properties - Watch Page (10)Figure 4-5.Project Block Properties - App. commands Page (10)Figure 4-6.Scope properties - Main Page (11)Figure 4-7.Scope Properties - Set-up Page (12)Figure 4-8.Basic Oscilloscope Chart (13)Figure 4-9.Third Variable Added (13)Figure 4-10.Third Variable Added - The Result (14)Figure 4-11.Joining two Y-blocks (14)Figure 4-12.Joining two Y-blocks - The Result (15)Figure 4-13.Recorder Properties - Main Page (16)Figure 4-14.Recorder Properties - Setup Page (17)Figure 4-15.Recorder Properties - Trigger Page (17)Figure 4-16.Demo Application Control Page (18)Figure 4-17.HTML Control Page Examples (19)Figure 4-18.Variables list Dialog Box (20)Figure 4-19.Variable Dialog Box - Definition Tab (21)Figure 4-20.Variable Dialog Box - Modifying Tab (22)Figure 4-21.Generating Variables (23)Figure 4-22.Project Application Commands (24)Figure 4-23.Sending Application Command (24)Figure 4-24.Application Command - Definition Tab (25)Figure 4-25.Application Command - Arguments Tab, page 1 (25)Figure 4-26.Application Command - Arguments Tab, page 2 (26)Figure 4-27.Application Command - Return Codes Tab (27)Figure 4-28.Import Project Tree Items (28)Figure 4-29.Import Project Objects (28)Figure 4-30.File Menu (29)Figure 4-31.Export graph image Dialog (29)Figure 4-32.View Menu (30)List of FiguresFigure 4-34.Scope Menu (30)Figure 4-35.Project Menu (31)Figure 4-36.Toolbar (31)Figure 4-37.Watch Bar (31)Figure munication Options (32)Figure 5-2.Symbol Files Options (33)Figure 5-3.Regular Expression-based xMap File Parser (35)Figure 5-4.Testing Your Regular Expression (35)Figure 5-5.Pack Directory Options (36)Figure 5-6.Pack Directory Options, Example 2 (36)Figure 5-7.Resource Files Manager (37)Figure 5-8.HTML Pages Options (38)Figure 5-9.Demo Mode Options (38)Figure 5-10.Exit Demo Mode Confirmation Dialog (39)List of TablesTable Page Number Number Table 6-1. FreeMASTER ActiveX Object Properties (57)List of TablesIntroduction Chapter 1 Introduction1.1OverviewThis User Manual describes the FreeMASTER application (formerly known as PC Master) developed by Freescale engineers to allow control of an embedded application from a graphical environment running on a PC. The application was initially created for developers of hard real-time motor control applications, but many users found it very useful for their custom development.The FreeMASTER application is fully backward compatible with previous “PC Master” versions.1.2Supported PlatformsThe PC-side FreeMASTER application can be installed on any Microsoft Windows-based systems starting Windows 98. For the embedded side, there were several different serial communication (SCI) drivers for each supported platform before 2006. The drivers differed in a programming style, other software drivers requirements, and the way the drivers were configured.In March 2006, Freescale released a SCI driver common for all supported platforms: DSP56F800, MC56F800E, HC08, HCS08, HC12, HCS12, HCS12X, MPC500, MPC5500, and ColdFire V2 MCF52xx. Although it still contains some platform-specific functions, the vast majority of the driver code, the documentation, and the way how the driver is configured is the same across all supported platforms. Together with the PC-side FreeMASTER version 1.3 released in 2006, the driver brought support for new features like target memory protection, target-side data addressing, and others. The new features are described in detail in the new SCI driver User Manual.1.2.1Going Around SCIThe original PC Master application already enabled implemention of custom communication plug-in modules, which could be used to replace the native SCI communication with a custom one. The latest FreeMASTER version 1.3 contains two such plug-in modules, which proved to be very useful in application development and debugging.The BDM Communication Plug-in enables a basic memory access operations to be performed by the FreeMASTER on the HCS08 and HC12/HCS12/X targets without any target CPU intervention. In other words, no embedded-side communication driver is needed, and the FreeMASTER is still able to perform its basic tasks, which are reading and writing the target memory. Currently, only the P&E Multilink BDM cables are supported (both USB and LPT), but there is a plan to extend this support to other kinds of interface cables.The JTAG/EOnCE Communication Plug-in enables a fully-featured communication with the 56F800E hybrid microcontrollers over the JTAG interface cable (either using a direct LPT access, or a universal connection of CodeWarrior Command Converter Server). The embedded-side driver is needed in this case. The plug-in uses the Real-time Data Exchange feature ofJTAG/EOnCE, which is very similar to the SCI communication. The driver is included in the FMASTERSCIDRV as a configurable option for the 56F800E platform.See more details about the communication plug-in modules in the read-me documents installed together with the latest FreeMASTER application.1.3Where to Find the Latest Versionnew SCI driver for the embedded-side./webapp/sps/site/prod_summary.jsp?code=FREEMASTERSimilarly, the embedded-side SCI drivers can be found by the keyword FMASTERSCIDRV. The direct download link is also referred in the “downloads” section of the FreeMASTER application home page.https:///webapp/sps/download/license.jsp?colCode=FMASTERSCIDRV1.4FreeMASTER Features•Graphical environment•Easy to understand navigation•Simple RS232 native connection and other options possible on selected platforms (BDM, JTAG,...)Introduction•Visualization of real-time data in the Scope window•Acquisition of fast data changes using the on-target Recorder•Built-in support for standard variable types (integer, floating point, bit fields)•Value interpretation using custom defined text messages•Several built-in transformations for real type variables•Automatic C-application variable extraction from compiler output files (ELF/DWARF1/2, Text-based map files,...)•Demo mode with password protection support•HTML-based description or navigation pages•ActiveX interface to enable VBScript or JScript control over embedded applications•Remote Communication Server enabling a connection to target board over a network, including the Internet Features not available in the free distribution•Communication plug-in modules available for other physical media and protocols (CAN/CCP, Ethernet, TCP/IP,...)•The Matlab interface to the FreeMASTER ActiveX object1.5LicenseFREESCALE SEMICONDUCTOR SOFTWARE LICENSE AGREEMENTThis is a legal agreement between you (either as an individual or as an authorized representative of your employer) and Freescale Semiconductor, Inc. (“Freescale”). It concerns your rights to use this file and any accompanying written materials (the “Software”). In consideration for Freescale allowing you to access the Software, you are agreeing to be bound by the terms of this Agreement. If you do not agree to all of the terms of this Agreement, do not download the Software. If you change your mind later, stop using the Software and delete all copies of the Software in your possession or control. Any copies of the Software that you have already distributed, where permitted, and do not destroy will continue to be governed by this Agreement. Your prior use will also continue to be governed by this Agreement.LICENSE GRANT. Freescale grants to you, free of charge, the non-exclusive, non-transferable right (1) to use the Software exclusively in conjunction with a development, prototype, or production platform utilizing at least one processor unit from Freescale (“Exclusive Use”), (2) to reproduce the Software, (3) to distribute the Software, and (4) to sublicense to others the right to use the distributed Software. The Software is provided to you only in object (machine-readable) form. You may exercise the rights above only with respect to such object form. You may not translate, reverse engineer, decompile, or disassemble the Software except to the extent applicable law specifically prohibits such restriction. In addition, you must prohibit your sublicensees from doing the same. If you violate any of the terms or restrictions of this Agreement, Freescale may immediately terminate this Agreement, and require that you stop using and delete all copies of the Software in your possession or control.COPYRIGHT. The Software is licensed to you, not sold. Freescale owns the Software, and United States copyright laws and international treaty provisions protect the Software. Therefore, you must treat the Software like any other copyrighted material (e.g. a book or musical recording). You may not use or copy the Software for any other purpose than what is described in this Agreement. Except as expressly provided herein, Freescale does not grant to you any express or implied rights under any Freescale or third-party patents, copyrights, trademarks, or trade secrets. Additionally, you must reproduce and apply any copyright or other proprietary rights notices included on or embedded in the Software to any copies or derivative works made thereof, in whole or in part, if any.SUPPORT. Freescale is NOT obligated to provide any support, upgrades or new releases of the Software. If you wish, you may contact Freescale and report problems and provide suggestions regarding the Software. Freescale has no obligation whatsoever to respond in any way to such a problem report or suggestion. Freescale may make changes to the Software at any time, without any obligation to notify or provide updated versions of the Software to you.NO WARRANTY. TO THE MAXIMUM EXTENT PERMITTED BY LAW, FREESCALE EXPRESSLY DISCLAIMS ANY WARRANTY FOR THE SOFTWARE. THE SOFTWARE IS PROVIDED “AS IS”, WITHOUT WARRANTY OF ANY KIND, EITHER EXPRESS OR IMPLIED, INCLUDING, WITHOUT LIMITATION, THE IMPLIED WARRANTIES OF MERCHANTABILITY, FITNESS FOR A PARTICULAR PURPOSE, OR NON-INFRINGEMENT. YOU ASSUME THE ENTIRE RISK ARISING OUT OF THE USE OR PERFORMANCE OF THE SOFTWARE, OR ANY SYSTEMS YOU DESIGN USING THE SOFTWARE (IF ANY). NOTHING IN THIS AGREEMENT MAY BE CONSTRUED AS A WARRANTY OR REPRESENTATION BY FREESCALE THAT THE SOFTWARE OR ANY DERIVATIVE WORK DEVELOPED WITH OR INCORPORATING THE SOFTWARE WILL BE FREE FROM INFRINGEMENT OF THE INTELLECTUAL PROPERTY RIGHTS OF THIRD PARTIES.INDEMNITY. You agree to fully defend and indemnify Freescale from any and all claims, liabilities, and costs (including reasonable attorney’s fees) related to (1) your use (including your sublicensee’s use, if permitted) of the Software or (2) your violation of the terms and conditions of this Agreement.Introduction LIMITATION OF LIABILITY. IN NO EVENT WILL FREESCALE BE LIABLE, WHETHER IN CONTRACT, TORT, OR OTHERWISE, FOR ANY INCIDENTAL, SPECIAL, INDIRECT, CONSEQUENTIAL OR PUNITIVE DAMAGES, INCLUDING, BUT NOT LIMITED TO, DAMAGES FOR ANY LOSS OF USE, LOSS OF TIME, INCONVENIENCE, COMMERCIAL LOSS, OR LOST PROFITS, SAVINGS, OR REVENUES TO THE FULL EXTENT SUCH MAY BE DISCLAIMED BY LAW.COMPLIANCE WITH LAWS; EXPORT RESTRICTIONS. You must use the Software in accordance with all applicable U.S. laws, regulations and statutes. You agree that neither you nor your licensees (if any) intend to or will, directly or indirectly, export or transmit the Software to any country in violation of U.S. export restrictions.GOVERNMENT USE. Use of the Software and any corresponding documentation, if any, is provided with RESTRICTED RIGHTS. Use, duplication or disclosure by the Government is subject to restrictions as set forth in subparagraph (c)(1)(ii) of The Rights in Technical Data and Computer Software clause at DFARS 252.227-7013 or subparagraphs (c)(l) and (2) of the Commercial Computer Software--Restricted Rights at 48 CFR 52.227-19, as applicable. Manufacturer is Freescale Semiconductor, Inc., 6501 William Cannon Drive West, Austin, TX, 78735.HIGH RISK ACTIVITIES. You acknowledge that the Software is not fault tolerant and is not designed, manufactured or intended by Freescale for incorporation into products intended for use or resale in on-line control equipment in hazardous, dangerous to life or potentially life-threatening environments requiring fail-safe performance, such as in the operation of nuclear facilities, aircraft navigation or communication systems, air traffic control, direct life support machines or weapons systems, in which the failure of products could lead directly to death, personal injury or severe physical or environmental damage (“High Risk Activities”). You specifically represent and warrant that you will not use the Software or any derivative work of the Software for High Risk Activities.CHOICE OF LAW; VENUE; LIMITATIONS. You agree that the statutes and laws of the United States and the State of Texas, USA, without regard to conflicts of laws principles, will apply to all matters relating to this Agreement or the Software, and you agree that any litigation will be subject to the exclusive jurisdiction of the state or federal courts in Texas, USA. You agree that regardless of any statute or law to the contrary, any claim or cause of action arising out of or related to this Agreement or the Software must be filed within one (1) year after such claim or cause of action arose or be forever barred.PRODUCT LABELING. You are not authorized to use any Freescale trademarks, brand names, or logos.ENTIRE AGREEMENT. This Agreement constitutes the entire agreement between you and Freescale regarding the subject matter of this Agreement, and supersedes all prior communications, negotiations, understandings, agreements or representations, either written or oral, if any. This Agreement may only be amended in written form, executed by you and Freescale.SEVERABILITY. If any provision of this Agreement is held for any reason to be invalid or unenforceable, then the remaining provisions of this Agreement will be unimpaired and, unless a modification or replacement of the invalid or unenforceable provision is further held to deprive you or Freescale of a material benefit, in which case the Agreement will immediately terminate, the invalid or unenforceable provision will be replaced with a provision that is valid and enforceable and that comes closest to the intention underlying the invalid or unenforceable provision.NO WAIVER. The waiver by Freescale of any breach of any provision of this Agreement will not operate or be construed as a waiver of any other or a subsequent breach of the same or a different provision.QUESTIONS and ANSWERSChapter 2 QUESTIONS and ANSWERSFirst question: why place this topic immediately after an introduction? The reason is really quite practical. While writing this User Manual, the following questions were raised. Since the answers to these questions clarified terms and topics described further in the manual, it was decided to put this topic before those that are more detailed and perhaps less easily understood.2.1Why do I need it?The primary goal of developing FreeMASTER software was to deliver a tool for debugging and demonstrating Motor Control algorithms and applications. The result was a tool with the versatility to be used for multipurpose algorithms and applications. Some real-world uses include:•Real-time debugging - FreeMASTER allows users to debug applications in true real-time through its ability to watch variables. Moreover, it allows debugging at the algorithm level, which helps to shorten the development phase.•Diagnostic tool - FreeMASTER remote control capability allows it to be used as a diagnostic tool for debugging customer applications remotely across a network.•Demonstrations - FreeMASTER is an outstanding tool for demonstrating algorithm or application execution and variable outputs.•Education - FreeMASTER may be used for educational purposes. Its application control features allow students to play with the application in demonstration mode, learning how to control program execution.2.2What does it do?FreeMASTER communicates with the target system application via serial communication to read and write application internal variables. FreeMASTER provides the following visualization features for displaying variable information in a friendly format: •Oscilloscope - provides monitoring/visualization of application variables in the same manner as a classical oscilloscope with a CRT. In this case, monitoring rates are limited by the serial communication speed.•Recorder - provides monitoring/visualization of application variables that are changing at a rate faster than the sampling rate of the oscilloscope. While the Scope periodically reads FreeMASTER variable values and plots them in real-time, the Recorder is running on the target board. Variable values are sampled into a memory buffer on the board, then the sampled data is downloaded from board to FreeMASTER. This mechanism allows a much shorter sampling period and enables sampling and plotting of very quick actions.2.3Why is it such a great demonstration tool?The embedded-side algorithm can be demonstrated in one block, or divided into several blocks, depending on which possibility better reflects the algorithm structure. Each block’s input parameters may be explored to observe how they affect output parameters. Each block has a description tab for explaining algorithm details using multimedia-capable and scriptable HTML format.2.4What could I do with it if I follow the instructions?Using the demo project included with the embedded-side implementation, it is easy to learn how to use FreeMASTER by playing with the project’s defined blocks and parameters. The demo project allows you to understand how to control the application as well. You can go into details of each item, check its properties, change parameters, and determine how each can be used in your application. For a detailed explanation of the parameters, see Chapter 4, “FreeMASTER USAGE.2.5How is it connected to a target development board?FreeMASTER requires a serial communication port on the target development hardware. Connection is made using a standard RS-232 serial cable. On one side, the cable is plugged into the PC serial port (COM1, COM2 or other), and on the opposite side, into the target development board’s serial connector.In addition to RS232 link, the custom communication plug-in modules can be written and used by FreeMASTER. There are communication plug-ins available for CAN Calibration Protocol, JTAG Real-time Data Exchange port on 56F800E, BDM interface on HCS08/12 devices, etc.2.6What are all of these dialog boxes for?In Chapter 4, “FreeMASTER USAGE, you will see pictures with dialog boxes. These dialog boxes are used as a questionnaire, where you will enter parameters describing, for example, one algorithm block or application variable and its visualization.QUESTIONS and ANSWERS2.7How does a project relate to my application?There can be many FreeMASTER projects related to a single target-board application. For example, three specific FreeMASTER projects can work with the same board application to provide three different purposes:•to provide information used during debug process•to provide service maintenance capabilities•may be used for learning about your application during operator training phase2.8How do I set up remote control? Why would I want to?For remote control, you need at least two computers connected via a network, one running the standalone mini-application called FreeMASTER Remote Communication Server, and the second running the standard FreeMASTER application. The target development board is then connected to the computer running FreeMASTER Server.Remote control operation is valuable for performing remote debugging or diagnostics. An application may be diagnosed remotely by connecting the target development board to the remote PC, and then running the FreeMASTER locally with a service project for this customer’s application.2.9What is the Watch-grid?The Watch-grid is one of the panes in the FreeMASTER application window. It shows selected application variables and their content in human readable format. The application variables displayed are selected separately in the block property settings of each project block.2.10What is the Recorder?The Recorder is created in software on the target development board, and stores changes of variables in real-time. You can define the list of variables which will be recorded by the embedded-side timer periodic interrupt service routine. After the requested number of variable samples are stored within the Recorder buffer on the target board, it is downloaded from the board and displayed in FreeMASTER Recorder pane as a graph. The main advantage of the Recorder is the ability to sample very fast actions.2.11What is the Oscilloscope?FreeMASTER Oscilloscope is similar to the classical hardware oscilloscope. It shows graphically selected variables in real-time. The variable values are read from the board application in real-time through the serial communication line. The oscilloscope GUI looks similar to the Recorder, except that the sampling speed of variables is limited by the communication data link.。
FreeHand教案

三、变形(CTRL+M) 移动: 旋转: 缩放:选中“一致”即等比缩放 倾斜:H表示水平倾斜,V表示垂直倾斜 反射:(即镜像)输入角度为270度(水平镜像)角度为0度(垂直镜像) 四、复制: 1、原位复制:选中图形——CTRL+SHIFT+D 2、移动复制:在移动时,没松左键时,击右键(不适于做旋转、放缩复 制)先松左键,后松右键 3、延续复制:CTRL+ALT+D 4、放缩复制:1)选中图形—CTRL+M—放缩—输百分比,数量—点放缩 2)选中——CTRL+SHIFT+D位复制——CTRL+M放缩—CTRL+ALT+D延续复制 5、旋转复制:1)CTRL+M旋转——输入角度及数量。 2)选中——CTRL+SHIFT+D复制——CTRL+M旋转——CTRL+ALT+D延续复制 6、任何工具下,按CTRL+ALT拖动图形 7、平行复制:先按住图形,再按CTRL+SHIFT +ALT平行复制
2、CTRL+R导入几张图片,调整为相同的大小,修改——对齐——上对齐 3、CTRL+G群组,放在矩形中央 4、绘制一个小的矩形,填充为白色,CTRL+ALT+D复制一个,移动到合适 位置,CTRL+ALT+D复制多个,上对齐,CTRL+G群组,CTRL+SHIFT+D原 位复制 5、两组矩形左对齐,调整好位置 6、CTRL+SHIFT+L解锁大矩形,调整至合适大小 五、文字: 1、单击写字 缺点:没有右边距 2、画框写字:当文字放不下时,右下角显示小黑点。到右边距自动换行。 3、文字编辑器:在文字工具下,按ALT+单击页面 六、将文字加入图文框: 选中字和图框——文本菜单——在路径内分布。 从图文框中分离: 文本菜单——从路径分离。 七、沿路径写字: 选中文字及路径——文本,附加到路径 1、取消显示路径:窗口——对象——路径文本——取消“显示路径”
FreeHand MX快捷键

Macromedia FreeHand MX快捷键工具栏箭头工具【V】、【0】直接选择工具【A】、【1】页面工具【D】套索工具【L】文本工具【T】钢笔工具【P】贝塞尔曲线【B】、【8】铅笔工具【Y】线条工具【N】矩形工具【R】多边形工具【G】椭圆工具【O】、【3】自由造型工具【F】缩放工具【F10】反射工具【F9】倾斜工具【Ctrl】+【F11】刀子工具【K】、【7】手形工具【H】缩放工具【Z】临时选择工具【CTRL】临时手形工具【空格】菜单命令创建新文档或模板【Ctrl】+【N】打开现有文档或模板【Ctrl】+【O】关闭活动窗口【Ctrl】+【W】保存活动文档或模板【Ctrl】+【S】在另一个文件中保存文档的副本【Ctrl】+【Shift】+【S】导入另一个应用程序的图形【Ctrl】+【R】将文件保存为其它应用程序的格式【Ctrl】+【Shift】+【R】打印活动文档【Ctrl】+【P】退出FreeHand 【Ctrl】+【Q】, 【Alt】+【F4】反转所应用的上一个命令【Ctrl】+【Z】取消上一次撤消操作【Ctrl】+Y, 【Ctrl】+【Shift】+【Z】剪切所选对象并将其放在剪贴板上【Ctrl】+【X】复制所选对象并将其放在剪贴板上【Ctrl】+【C】在插入点处插入剪贴板内容【Ctrl】+【V】剪切内容(E) 【Ctrl】+【Shift】+【X】粘贴到内部(I) 【Ctrl】+【Shift】+【V】创建副本到与原件不重叠处【Ctrl】+【Alt】+【D】克隆副本到与原件上面【Ctrl】+【Shift】+【D】选择活动页面上未锁定的可见层上的所有对象【Ctrl】+【A】在当前文档中选择所有对象【Ctrl】+【Shift】+【A】取消选中所有选中的对象【Ctrl】+【D】查找与替换文字【Ctrl】+【Shift】+【F】查找与替换图形【Ctrl】+【F】参数选择【Ctrl】+【U】缩放到所有选中的对象都符合文档窗口【Ctrl】+【Alt】+【0】缩放到符合页面大小【Ctrl】+【Shift】+【W】缩放到符合全部【Ctrl】+【0】将缩放比例改为50% 【Ctrl】+【5】将缩放比例改为100% 【Ctrl】+【1】将缩放比例改为200% 【Ctrl】+【2】将缩放比例改为400% 【Ctrl】+【4】将缩放比例改为800% 【Ctrl】+【8】打印预览【Ctrl】+【K】最佳化屏幕显示以得到较快的重绘【Ctrl】+【Shift】+【K】显示\隐藏所有工具栏【Ctrl】+【Alt】+【T】显示\隐藏所有面板【F4】, 【Ctrl】+【Shift】+【H】显示\隐藏标尺【Ctrl】+【Alt】+【R】显示\隐藏文字标尺【Ctrl】+【/】显示\隐藏非打印网格【Ctrl】+【Alt】+【G】将对象贴紧最近的网格坐标【Ctrl】+【Alt】+【Shift】+【G】显示\隐藏引导线【Ctrl】+【;】固定引导线【Ctrl】+【Alt】+【;】将对象贴紧最近的引导线【Ctrl】+【Shift】+【;】将对象贴紧最近的控制点【Ctrl】+【'】缩小或放大所选对象【Ctrl】+【F10】沿固定点旋转所选对象【Ctrl】+【F2】重复上一次转换【Ctrl】+【,】将所选绘制对象放到当前层的前一层【Ctrl】+【Shift】+【↑】将所选对象前移一层【Ctrl】+【↑】将所选对象后移一层【Ctrl】+【↓】将所选绘制对象放到当前层的后一层【Ctrl】+【Shift】+【↓】所选对象与最上方对象的上边缘对齐【Ctrl】+【Alt】+【4】所选对象与最下方对象的下边缘对齐【Ctrl】+【Alt】+【6】所选对象与所有对象的水平中心点对齐【Ctrl】+【Alt】+【5】所选对象与所有对象的垂直中心点对齐【Ctrl】+【Alt】+【2】所选对象与最左方对象的左边缘对齐【Ctrl】+【Alt】+【1】所选对象与最右方对象的右边缘对齐【Ctrl】+【Alt】+【3】使用当前的“对齐”设置,重复对齐【Ctrl】+【Alt】+【Shift】+【A】链接两个以上路径,或连接两个端点【Ctrl】+【J】将对象分割成更小的路径或组件路径【Ctrl】+【Shift】+【J】在两个路径之间建立一些中间步骤【Ctrl】+【Shift】+【B】将混合并入路径【Ctrl】+【Alt】+【Shift】+【B】将所选对象转换为位图图象【Ctrl】+【Alt】+【Shift】+【Z】固定所选对象【Ctrl】+【L】解锁选定的被锁定对象【Ctrl】+【Shift】+【L】将两个以上的所选对象或路径控制点收集在一起【Ctrl】+【G】将组合分割为独立的对象【Ctrl】+【Shift】+【G】转换为符号【F8】所选文字的磅值减小一磅【Ctrl】+【Shift】+【,】将所选文字的磅值增大一磅【Ctrl】+【Shift】+【. 】将所选文字变为粗体【Ctrl】+【B】将所选文字变为斜体【Ctrl】+【I】将所选文字变为粗斜体【Ctrl】+【Alt】+【Shift】+【O】将突出显示效果应用到选取文字【Ctrl】+【Alt】+【Shift】+【H】将所选文字加上删除线【Ctrl】+【Alt】+【Shift】+【S】将所选文字加上下划线【Ctrl】+【Alt】+【Shift】+【U】将所选文字左对齐【Ctrl】+【Alt】+【Shift】+【L】将所选文字右对齐【Ctrl】+【Alt】+【Shift】+【R】将所选文字居中【Ctrl】+【Alt】+【Shift】+【C】将所选文字对齐【Ctrl】+【Alt】+【Shift】+【J】插入空格,其宽度为当前的字号【Ctrl】+【Shift】+【M】插入空格,其宽度为当前的字号的一半【Ctrl】+【Shift】+【N】插入空格,其宽度为当前字号的十分之一【Ctrl】+【Shift】+【T】在文字换行前,在末尾字母之后插入连字符【Ctrl】+【-】显示或隐藏“文字编辑器”【Ctrl】+【Shift】+【E】使文字在所选对象旁自动换行【Ctrl】+【Alt】+【W】使所选文字块在所选封闭路径内分布【Ctrl】+【Shift】+【U】将所选文本块附加到所选路径中【Ctrl】+【Shift】+【Y】将所选文字更改为可编辑的向量对象【Ctrl】+【Shift】+【P】以(SWF) 电影的形式显示当前文档【Ctrl】+【回车】再次应用最近执行的外加功能【Ctrl】+【Shift】+【=】为活动文档另开一个文档窗口【Ctrl】+【Alt】+【N】显示或隐藏“工具”面板【Ctrl】+【7】显示/隐藏库面板【F11】显示或隐藏“笔触检查器”【Ctrl】+【Alt】+【L】显示或隐藏“填充检查器”【Ctrl】+【Alt】+【F】显示或隐藏“文字字符检查器”【Ctrl】+【T】显示或隐藏“层”面板【F2】, 【Ctrl】+【6】显示或隐藏“样式”面板【Shift】+【F11】, 【Ctrl】+【3】显示或隐藏“样本”面【Ctrl】+【F9】显示或隐藏“颜色混合器”【Shift】+【F9】, 【Ctrl】+【Shift】+【C】显示或隐藏“半色调”面板【Ctrl】+【H】显示或隐藏“对齐”面板【Ctrl】+【Alt】+【A】显示“转换”面板【Ctrl】+【M】显示上一页【Ctrl】+【Pgup 】显示下一页【Ctrl】+【PgDn】显示或隐藏“文字段落检查器”【Ctrl】+【Alt】+【P】显示或隐藏“文字间距检查器”【Ctrl】+【Alt】+【K】显示或隐藏“文字调整列检查器”【Ctrl】+【Alt】+【C】光标置于当前单词之前【Ctrl】+【←】光标置于当前单词之后【Ctrl】+【→】光标置于句首【Ctrl】+(小)【7】光标置于句尾【Ctrl】+(小)【1】光标置于故事起始处【Ctrl】+【Home】光标置于故事结尾处【Ctrl】+【End】选择到当前单词的词首【Ctrl】+【Shift】+【←】选择到当前单词的词尾【Ctrl】+【Shift】+【→】选择到句首【Ctrl】+(小)【8】选择到句尾【Ctrl】+(小)【2】选择到故事起始处【Ctrl】+【Shift】+【Home】选择到故事结尾处【Ctrl】+【Shift】+【End】删除前一个单词【Ctrl】+【Shift】+【退格】删除后一个单词【Ctrl】+【Shift】+【Del】将所选文字的行距增大100% 或2 磅【Ctrl】+(小)【+】将所选文字的行距增大50% 或 1 磅【Ctrl】+【Alt】+(小)【+】将所选文字的行距减小100% 或2 磅【Ctrl】+(小)【–】将所选文字的行距减小50% 或 1 磅【Ctrl】+【Alt】+(小)【–】将所选文字的字距调整增加10% em 【Ctrl】+【Alt】+【Shift】+【→】将所选文字的字距调整增加1% em 【Ctrl】+【Alt】+【→】将突出显示的文字的字距调整缩小10% em 【Ctrl】+【Alt】+【Shift】+【←】将突出显示的文字的字距调整缩小1% em 【Ctrl】+【Alt】+【←】增加突出显示文字的基线调整【Ctrl】+【Alt】+【↑】减少突出显示文字的基线调整【Ctrl】+【Alt】+【↓】将突出显示的文字的水平缩放比例增大5% 【Ctrl】+(小)【6】将突出显示的文字的水平缩放比例减小5% 【Ctrl】+(小)【3】将笔触宽度减小一级【Ctrl】+【Alt】+【Shift】+【,】将笔触宽度增大一级【Ctrl】+【Alt】+【Shift】+【. 】选择、移动或调整对象大小【Shift】+【F10】。
FreeHand简明教程

排版基本流程辛苦大家了!Freehand其实并不难掌握,这篇文章入门足矣。
大家在看的时候也不用力求一下子全都记住,先大概熟悉一下就好,真正的掌握还在实战,所以,要布置作业啦:选择自己喜欢的材料(可以从网站的新闻里down),排一个A4的版面(栏目信息、页码之类先不用考虑,但出血一定要有)。
请于周日6:00前交至(别忘记署名!)FH各区域功能一、页面(文档)的建立与设置在右侧[属性]面板点击[文档]选项卡,可以查看页面布局、设置页面属性。
面板左上角为页面缩略视图,双击该视图上的页面可在编辑区查看该页,拖动页面可以改变该页在粘贴板上的位置。
如看不到所需要的页面,可用左下角的三个按钮调整该视图中每个页面的大小。
·页面属性的设置。
点击欲设置的页面编号,页面大小依次选择A4、自定义,所有页面尺寸为210*285,扩印为3(排版中,所有延伸在边角的图片、色块要向外延出3毫米)。
·新增页面用右键点小视图中的任意页面,选添加新页面,之后拖动新添加的页面使其左侧贴紧原来的页面,拼版完成。
(并排两张A4纸称为一版,版内对象可跨页)二、文字的置入与修改⑴文本的置入和修改·文本的置入点击工具栏上文字工具(A),在设计区画出一个矩形,粘贴或录入内容。
(如果直接用文字工具点击,出现的文本块是不会自动换行的,须双击右侧中间的空心控制点,将其变为实心。
)·文本的修改双击文本块或用文字工具点击文本块,可进入文字编辑模式。
也可用右键点击文本块,选[编辑器],在弹出的窗口中进行设置。
·文本块的链接当文本块不能全部显示其中的内容时,右下角的方块会变为实心。
从该方块上拖动到另一个文本块(最好为空),可在两个文本块中创建链接。
⑵文本本格式的设置在右侧[属性]面板点击[对象]选项卡,可以看到属性的设置有三个级别(对于新建的文本框):·文本块(精确设置文字块位置、大小,横/竖排、四周边距)·文本(设置字体、段落、分栏、行/字距)字体、字号(10号为标准字)、对齐方式、行距(通常为120%)、字距、特殊效果(勿选突出显示)段前间距、段后间距、左缩进、右缩进、首行缩进(10号字为7.4或7.5)字符间距(请谨慎使用)分栏(可上下或左右分栏)选择[平衡]可以让两栏内容基本相同,为版面整齐请不要选择修改行距·文本填充:点小色块选择新的文本颜色,点下拉菜单可选择已经存在的样本色(详见下文)。
freehand使用方法
基础的绘图工具可以创建出你所需要的任何复杂图形,但前提就是你必需熟练的掌握他们。
这些工具中包括Line(直线工具)、Freehand(手绘工具)、Pen(钢笔工具)、Beaigon(贝塞尔工具)四种。
现在,我们来分别看看这几种工具。
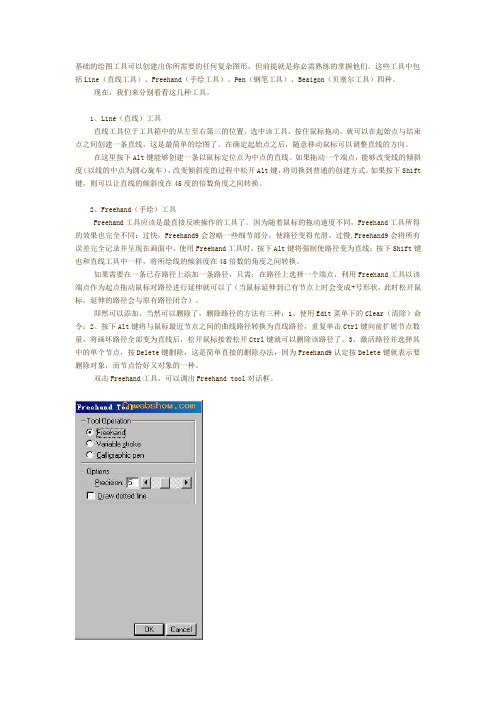
1、Line(直线)工具直线工具位于工具箱中的从左至右第三的位置,选中该工具,按住鼠标拖动,就可以在起始点与结束点之间创建一条直线,这是最简单的绘图了。
在确定起始点之后,随意移动鼠标可以调整直线的方向。
在这里按下Alt键能够创建一条以鼠标定位点为中点的直线。
如果拖动一个端点,能够改变线的倾斜度(以线的中点为圆心旋车),改变倾斜度的过程中松开Alt键,将切换到普通的创建方式。
如果按下Shift 键,则可以让直线的倾斜度在45度的倍数角度之间转换。
2、Freehand(手绘)工具Freehand工具应该是最直接反映操作的工具了。
因为随着鼠标的拖动速度不同,Freehand工具所得的效果也完全不同:过快,Freehand9会忽略一些细节部分,使路径变得光滑。
过慢,Freehand9会将所有误差完全记录并呈现在画面中。
使用Freehand工具时,按下Alt键将强制使路径变为直线;按下Shift键也和直线工具中一样,将所绘线的倾斜度在45倍数的角度之间转换。
如果需要在一条已存路径上添加一条路径,只需:在路径上选择一个端点,利用Freehand工具以该端点作为起点拖动鼠标对路径进行延伸就可以了(当鼠标延伸到已有节点上时会变成+号形状,此时松开鼠标,延伸的路径会与原有路径闭合)。
即然可以添加,当然可以删除了,删除路径的方法有三种:1、使用Edit菜单下的Clear(清除)命令;2、按下Alt键将与鼠标最近节点之间的曲线路径转换为直线路径,重复单击Ctrl键向前扩展节点数量,将画坏路径全部变为直线后,松开鼠标接着松开Ctrl键就可以删除该路径了。
3、激活路径并选择其中的单个节点,按Delete键删除,这是简单直接的删除办法,因为Freehand9认定按Delete键就表示要删除对象,而节点恰好又对象的一种。
- 1、下载文档前请自行甄别文档内容的完整性,平台不提供额外的编辑、内容补充、找答案等附加服务。
- 2、"仅部分预览"的文档,不可在线预览部分如存在完整性等问题,可反馈申请退款(可完整预览的文档不适用该条件!)。
- 3、如文档侵犯您的权益,请联系客服反馈,我们会尽快为您处理(人工客服工作时间:9:00-18:30)。
红色色块已 做外边框压 印
3:软件补漏白法:①pdf里面再做补漏白.②打印到Ps时可以在打 印时给补漏白:在扩张尺寸里面可以输入适当的补漏白数值(0.030.08),当文件中有使用虚线时须注意可能会变成实线。
补漏白数值一 般为0.03-0.08
十九、刀模。刀模是否压印、正确、是否有多余的线条,线条颜
七、图层
1:打开图层对话框的方法:A.点击窗口 “层”图标。 面板下的层.B.也可以点击主工具拦上的
B A
2:A:打开窗口->层,显示图层 对话框,①“√”=显示图层; ②“锁”是否锁定图层;③“⊙” 框架显示图层。B:框选所有内 容->修改->解锁,解锁所有内容。 C:打开视图->显示全部,显示所 有内容。
二、用相应的PC、MAC及相应的版本打开文件。
打开文档时的界面如下图:A NhomakorabeaB
三、字体问题:
1、打开文档时如报缺字体,取消打开文件,重新安装新字体。
打开文档时如果缺字体,按需要可以替换字体。一般情况 下都不要替换字体,以防字体跳位。
2、安装新字体。
PC:在控制面板->字体-> 文件->安装新字体-> 选择相应的字体安 装即可。
2:Ctrl+P打开分色预览->高级->分色->确定颜色(此处 有时会有多余的分色版,需多注意)
九、查看文字:查看文字是否单色黑。
1:窗口->样本,查看是否有4C黑,如有->打开查找与替换对话框,查找 4C黑所用在哪些地方->选中4C黑文字->窗口->对象t->填充成k100(有外 框时,外框也要填成相应的颜色)。2:打开查找与替换对话框>选择>属性->颜色->黑色->查找,查看黑色文字颜色是否正确。
Macromedia FreeHand MXa 操作指引
一、接到稿件后,将客户文件抄入相应的文件夹中。
一般客来文件分为二部分:一为原始文件以RAW命名;二为改好的文件, 以OK命名;均存放在工作站本地硬盘上。路径如下: 本机\客户文件+年\月日\工单号\RAW 本机\客户文件+年\月日\工单号\ok
五、成品尺寸
1、按页面大小
页面尺寸和 出血大小
2、按裁切线大小
宽=180
高=150
3、按刀模
凡有刀模的文件成品尺寸一般以盒的长、宽、高为准。
六、单位转换
在Freehand整个窗口左下角有单位转换的菜单,打开可以选择 相应的单位,通常默认单位为:磅。
Macromedia FreeHand MXa
二十二、主页的设置。
主页的设置:打开文档右上角的倒三角形选项可以设置主页
第四页应用了主 页面-01 设置了主页后可以在相应页面里放置主页里面的内容,方便 设计制作。
二十三、打印PS.Ctrl+P打印到ps
Ctrl+P打开打印面板如下图: Ctrl+P打开打印面板如下图: 打开打印面板如下图 通常不 使用此 处页面 设置
色是否统一单专(最好统一命名),线条宽度是否合理。
1:选中刀模线打开窗口->对象->笔触->修改线宽 (0.08mm) 并选中压印选项。 2:凡新开刀模->割盒机->割盒->成形。如不 能成形,则须修改刀模。 3:隐藏刀模图层,4c图层无刀模线;隐藏4c图 层,刀模图层无4c内容。 4:选中刀模线,颜色一致并统一命名为Diecut。 5:注意收位大小。
1、Photoshop->open图片。1:打开窗口->通道,此时 显示通道对话框,正常是:c/m/y/k+cmyk合成通道。如图 片中做了专色,通道中会有相应的专色通道,如果有多余 通道直接拖到对话框右下角的垃圾筒删除即可。2:打开 image->image size,显示图片大小及精度对话框。3:放 大图片(以130%和70%为准)检查是否有撞网、烂图、 起线,正常是没有上述情况。
二十、特殊效果。检查特殊效果能否正常输出
渐变、效果填充(笔触填充)等输出时需要多注意,有时 不能正常输出;eps图片上面做的透明效果一般都不能正常 输出。
红色透镜 不见了
原文件
输出后文件
二十一、页面设置。按内容设置相应页面,将内容移到页面中
如果文档内容不在页面中,须重将内容放到页面中,打开 窗口->文档对话框,打开页面尺寸下拉框,选中自定义, 按内容大小设置相应大小的页面,框选所有内容,群组 (ctrl+G,小心群组时会有内容上的变化)->窗口->对齐,选 中对齐至页面->点击对齐对话框中心方框->应用,居中页面 或按刀模线放置。
因为是非 直接打印 墨稿,而 是要打印 到PS文 件,故选 中此选项。
有时客户为 了打齐内容 而改变此处 数值,以适 应纸张大小, 输出时一定 要改成“一 “ ”“100” 致”“ ”
选择适应的PPD
打印复合PS文件时: 打印复合 文件时: 文件时
点击设置打开打印设置 选中 时将 专色 转成 四色
十五、成品线到内容的距离。
一般情况下,成品线到内容的距离必须≥5mm,测量方法 同出血方法一样。 ≥5mm
十六、压印。
1:打开查找和替换对话框->选择->属性->压印->查找,查找出所有压 印。如不需要压印可以删除压印,切换到查找和替换->属性->删除、 压印,删除所有压印。
2:大块黑色不能直接压印在不同 颜色上面,否则颜色会发生变化, 出现阴阳色。方法:选中色块, 打开样本,双击选中的颜色左边色 块打开混色器,CMY版上各加1个 网点,再把黑色色块填充成 c=1m=1y=1k=100的颜色,在样 本中切换到外框,对色块加外边框 (k100),切换到对象对话框, 压印外框,以防漏白,线宽为极 细线(0.076mm)。
此处 黑色 100 叠印 只对 分色 打印 有效
打印分色PS文件时: 打印分色 文件时: 文件时
选中时将专色转成四色
此处 黑色 100 叠印 只对 分色 打印 有效
点击方点打开叠 印墨水选项,设 置叠印墨水的百 分比
图像选项设置如下图: 图像选项设置如下图:
此处为 阴阳片 和药膜 方向选 项,当 前所选 为输出 阳片, 正看药 膜向下
配
图
2、正常印刷图片精度:300dpi 格式: CMYK或CMYK+(n)专色
十四、出血。
一般情况下,说明书成品以外出血为3mm,彩盒为5mm 1:画个3mm正方形,一边对齐 成品边,另一边应该与出血外边对 齐。2:辅助线方法:视图->版面标 尺->显示,显示标尺,移动光标至标 尺交界处,按左键不放拖“0”点至 成品边线上,再从标尺上读数,确 定出血。3:色块直接拉大,图片 到Photoshop里面修改。4:渐变 做出血时要小心:当渐变垂直方向 时,左右方向做出血时可以拉大, 上下不能直接拉大;当渐变左右方 向时,上下做出血可以拉大。5: 页面的出血设置:打开文档对话框, 点击相应页面,在出血选项里可以 输入相应大小的出血。 此处 数值 为页 面出 血位 的大 小
3、安装新字体。
点击此处添加 相应字体
PC:使用字体软件(FontSuit)安装新字体:用字体软件安装的字体在系统重启动后 会自动删除,所以安装完后一般不要重新启动。
4、安装新字体。
MAC:将字体放到系统-> 资源库-> Font里面即可。
5、安装新字体。
点击此处添加 相应字体
MAC:使用字体软件(Suitcase Fusion)安装新字体:用字体软件安装的字体在系统 重启动后会自动删除,所以安装完后一般不要重新启动。
1:如专色要求压印,选中专色->打开窗口->对象->点击笔触或填充 ->选中填充或外框的压印。2:如专色要求掏穿,专色与四色互叠 时须做补漏白。补漏白范围:0.03-0.08mm。3:专色做透明效果 可能会变成4C或根本不能输出。
已做补漏白
未做补漏白
十八、由于套准方面原因,文件一般要求做补漏白
1:手动做色块补漏白:选中色块->窗口->样本->切换到外框, 将外框填成与色块相同颜色,切换到对象对话框并修改线宽(通 常为0.03-0.08mm)2:手动做线条补漏白:原地复制线条,加 大线宽(在补漏白范围以内),压印,放在原线条后面,原线条 取消压印。
6、删除文件中空文本框。
空文本框有时会影响正常输出,所在文件中 的空文本通常都要删除。
7、查找文件中字体。
点击如图所示工具打开查找与替换对话框, 查找文件中的文本。
四、旋转:所有内容一般情况下都不要旋转。
A:正常未旋转
B:旋转45°后
上图是做了填充效果的图形,旋转时只旋转了外框而里面 的填充效果没有旋转。所以在修改制作过程中,一定不能 旋转页面或内容,以防有特殊效果发生变化。
B
C
A
如有隐藏内容或图层,须确定隐藏内容或图 层是否需要输出
八、确定印色
1:打开窗口->样本(图-A),执行外加功能->颜色->命 名所有颜色(图-B),执行外加功能->删除->未使用颜 色(图-C),查看样本里面的颜色情况(图-D)。如印色数 量不对,须确定如何转换。
图-A 图-B
图-C
图-D
3:查找文档中是否用了文字效果。打开查找与替换功能,查找文字效果。
文字效果
文字转曲线后的效果
十、条码:查看条码是否单色实地。
选中条形码,填充K100或相应颜色,不能修改的eps条形码须 到ai里面修改。条码颜色为专色白和专色黑时需转成4色里面的 白色和黑色
十一、图片链接。
打开编辑->链接对话框。链接选项里如有斜体文字的图片 链接,表示该图片缺图。在此对话框中可以查看图片格式、 所在页面