AD-902B电子狗使用说明书
AD_902B电子狗使用说明书
AD-902B电子狗使用说明书概述‘电子狗’在警戒区域检测到人体运动时发出30秒的现场报警声,恐吓非法入侵者。
电子狗采用双元红外传感器及红外专用IC处理器,可靠性高,误报率低,性价比优,适用于家庭、办公室、商店等防盗场所。
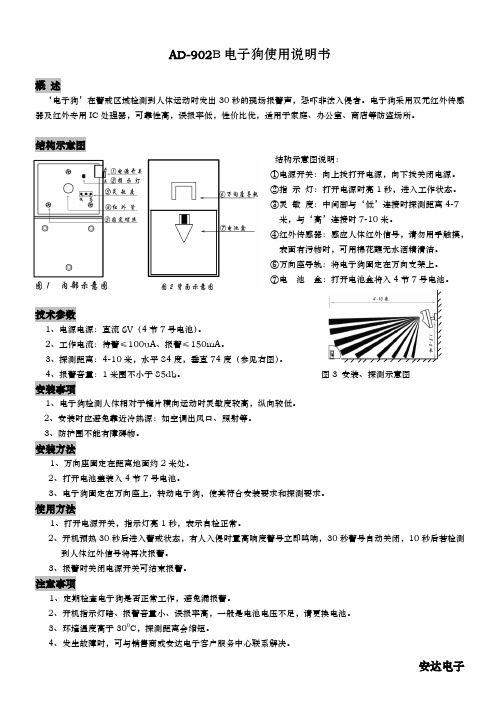
结构示意图结构示意图说明:①电源开关:向上拨打开电源,向下拨关闭电源。
②指示灯:打开电源时亮1秒,进入工作状态。
③灵敏度:中间脚与‘低’连接时探测距离4-7米,与‘高’连接时7-10米。
④红外传感器:感应人体红外信号,请勿用手触摸,表面有污物时,可用棉花蘸无水酒精清洁。
⑥万向座导轨:将电子狗固定在万向支架上。
⑦电池盒:打开电池盒将入4节7号电池。
技术参数1、电源电源:直流6V(4节7号电池)。
2、工作电流:待警≤100uA、报警≤150mA。
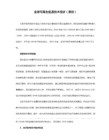
3、探测距离:4-10米,水平84度,垂直74度(参见右图)。
4、报警音量:1米围不小于85db。
图3 安装、探测示意图安装事项1、电子狗检测人体相对于镜片横向运动时灵敏度较高,纵向较低。
2、安装时应避免靠近冷热源:如空调出风口、照射等。
3、防护围不能有障碍物。
安装方法1、万向座固定在距离地面约2米处。
2、打开电池盖装入4节7号电池。
3、电子狗固定在万向座上,转动电子狗,使其符合安装要求和探测要求。
使用方法1、打开电源开关,指示灯亮1秒,表示自检正常。
2、开机预热30秒后进入警戒状态,有人入侵时置高响度警号立即鸣响,30秒警号自动关闭,10秒后若检测到人体红外信号将再次报警。
3、报警时关闭电源开关可结束报警。
注意事项1、定期检查电子狗是否正常工作,避免漏报警。
2、开机指示灯暗、报警音量小、误报率高,一般是电池电压不足,请更换电池。
3、环境温度高于300C,探测距离会缩短。
4、发生故障时,可与销售商或安达电子客户服务中心联系解决。
安达电子。
电子狗使用指南

电子狗使用指南随着汽车的普及和道路交通的增加,安全驾驶成为每个驾驶员的首要任务。
为了提高驾驶安全性,许多汽车配备了电子狗。
本文将为您介绍电子狗的使用指南,帮助您更好地理解和使用这一工具。
一、电子狗概述电子狗是一种安装在汽车上的智能导航设备,其主要功能是提供超速警示和道路限速信息。
通过GPS定位和地图数据,电子狗能够准确识别当前车辆所处的位置,显示道路限速信息,并在超速时发出警示,有效避免交通违规和事故发生。
二、电子狗使用方法1. 安装:根据电子狗的安装说明,将其正确安装在汽车上。
通常,电子狗应该安装在离驾驶员较近的位置,如仪表板上方或挡风玻璃上方。
确保安装牢固,不会妨碍驾驶员的视线。
2. 开机与设置:按照电子狗的使用手册操作,将其启动并进行基本设置。
包括选择语言、导入地图数据等。
根据个人喜好和需要,可以进行进一步的设置,如警示声音的音量和类型等。
3. GPS定位:电子狗使用GPS定位来确定车辆位置,因此在使用电子狗之前,确保车辆在开阔地带或没有高楼大厦的地方,以获得更准确的定位信息。
4. 路线输入:如果需要导航功能,可以输入目的地的地址或选择已保存的常用地址。
根据电子狗的操作界面,选择正确的目的地,并确认导航路线。
电子狗将指导您按照最优路线到达目的地。
5. 超速警示:电子狗可以识别当前道路限速,并在超速时发出警示。
在驾驶过程中,注意观察电子狗上的显示,确保您的车速不会超过道路限速。
6. 更新地图:定期更新电子狗的地图数据,以保证导航信息的准确性和及时性。
根据电子狗品牌和型号,可以通过官方网站或专门的软件进行地图更新。
7. 维护与保养:定期清洁电子狗的屏幕和机身,防止灰尘和污垢影响显示效果。
同时,避免将电子狗暴露在高温、阳光直射或潮湿环境中,以免损坏设备。
三、使用电子狗的注意事项1. 电子狗是驾驶辅助工具,但并不能完全代替驾驶员的判断和责任。
在任何时候,驾驶员都应保持警觉,遵守交通规则,并根据实际情况做出正确的驾驶决策。
贝尔一号_蓝牙电子狗说明书

功能介绍
1 2 3 4 5 6 7 8 9 10 11 12 13 14 15 开机 搜星定位完成 闯红灯拍照
语音播报内容及含义
叮~咚——(音效)安全预警系统启动中,请系好安全带 卫星连接完成,祝旅途平安! 叮叮叮叮——前方XX米有闯红灯拍照,限速XX公里,请小心驾驶
高架桥下闯红灯拍照 叮叮叮叮——前方XX米高架桥下有闯红灯拍照,限速XX公里,请小心驾驶
LED显示效果
GPS电子预警系统常见术语说明:
起报点:遇到有警示点时语音开始播报提示的那个地点称起报点,即整个警示过程的开头。 照相点:也称PASS点、结束点,多指电子监控或闯红灯拍照的点,也是整个警示过程的结束 点。但照相点不一定照相,也指易肇事路段、加油站、学校路段等其它安全警示点。 X,K,KA,KU,La频段:指各种不同频率的雷达信号。 雷达静音设定:播报雷达相关语音的临界速度,即雷达静音速度。如:设置40公里表示如果 当前车速在40公里以下,在遇到雷达信号的时候,预警系统就不会播报语音提示,但屏幕上 仍然有提示;车速如果高于40公里(包含),则会语音播报,而且屏幕也有提示。设置为0公 里或GPS不正常的情况下(如进入隧道)则任何车速情况下,遇到雷达信号都会播报。在市区 ,为了消除银行自动门等雷达干扰引起的频繁播报,只要调高速度就可以了。 模式设定:分照相系统模式,安全驾驶模式(部分版本有GPS关闭功能。)安全系统模式播报 所有类别的警示点(含闯红灯拍照、固定测速、流动测速区、高架桥上测速、电子监控、越线 变换车道拍照、单向道、禁左、禁右、收费站、服务区、隧道、学校路段、易肇事路段、铁路 道口、合并道、交流道出口、汽车修理厂等);照相系统模式只播报闯红灯拍照、固定测速、流 动测速区、高架桥上测速、高架桥下闯红灯拍照等与测速有关的照相信息点;关闭GPS则不播报 任何固定点,只作雷达机使用。 感度设定:对雷达的敏感度设置。分高、中和关闭三个选项。关闭则不播报任何接收到的雷 达信号。 巡航超速设定:自定义的超速值,系统定期检测用户是否超过自定的超速值。如:设置80公 里,表示如果当前车速超过80km/h,则会提示已经超速;如果低于80km/h,则不会提示超速 (如果这个时候有警示点,前提是车速不超过这个警示点的限速值)。 速度微调:当实际速度与显示速度不一致时,可能导致误报或超速不报,可通过微调来调节 屏幕上显示的速度。如:当前车速为40km/h,而屏幕上显示45,此时可设置速度微调为-5。 音量自动:音量大小随速度的变化而变化。开启此功能则音量随车速变化,手动调节无效。 语音播报选择:分简洁播报和完整播报。简洁播报开机只播报欢迎词,当前设定值不一一播 报,完整播报则除了欢迎词之外还会播报当前的设定值,各警示点播报完成后会加上“请小 心驾驶”,“请依规定行驶”等温馨提示语。 GPS车载电子预警系统根据GPS卫星定位汽车位置,经过安全警示点附近时(起报点)给出相 应提示。根据限速公里数及路况,提前200-1000米开始播报语音,让使用者有足够的时间减 速,并且在屏幕上显示当前点距警示点倒计距离,离警示点50-100米时再次提示,经过警示 点后(照相点)给出语音提示,警示过程结束。(语音播报和LED内容详见后面章节)。
PetSafe 无线电子犬培训系统收音机塑料罩装置说明书

wireless pet containment system receiver collar operating guideModel NumberPIF-275-192 1-800-732-2677Important Safety InformationExplanation of Attention Words and Symbols used in this guideThis is the safety alert symbol. It is used to alert you to potential personal injury hazards. Obey all safety messages that follow this symbol to avoid possible injuryor death.WARNING indicates a hazardous situation which, if not avoided, could result in death orserious injury.CAUTION, used without the safety alert symbol, indicates a hazardous situation which, if not avoided, could result in harm to your pet. 3Not for use with aggressive dogs. Do not use this product if your dog is prone to aggressive behavior. Aggressive dogs can cause severe injury or death to their owners and others. If you are not sure that this product is right for your dog, please talk to your veterinarian or acertified trainer.• This PetSafe ® Wireless Pet Containment System ® is NOT a solid barrier. The system is designed to act as a deterrent to remind pets by Static Correction to remain in the boundary established. It is important that you reinforce training with your pet on a regular basis. Since the tolerance level to Static Correction varies from pet to pet, Radio Systems ® Corporation CANNOT guarantee that the system will, in all cases, keep a pet within the established boundary. Not all pets can be trained to avoid crossing the boundary! Therefore, if you have reason to believe that your pet may pose a danger to others or harm himself if he is not4 1-800-732-2677kept from crossing the boundaries, you should NOT rely solely upon the PetSafe ® Wireless Pet Containment System ® to confine your pet. Radio Systems ® Corporation shall NOT be liable for any property damage, economic loss or any consequential damages, sustained as a result of any animal crossing the boundary.• Proper fit of the collar is important. A collar worn for too long or made too tight on the pet’s neck may cause skin damage. Ranging from redness to pressure ulcers; this condition is commonly known as bed sores.- Avoid leaving the collar on the dog for more than 12 hours per day.- When possible reposition the collar on the pet’s neck every 1 to 2 hours.- Check the fit to prevent excessive pressure; follow the instructions in this manual.- Never connect a lead to the electronic collar; it will cause excessive pressure on the contacts.- When using a separate collar for a lead, don’t put pressure on the electronic collar. - Wash the dog’s neck area and the contacts of the collar weekly with a damp cloth.- Examine the contact area daily for signs of a rash or a sore.- If a rash or sore is found, discontinue use of the collar until the skin has healed.- If the condition persists beyond 48 hours, see your veterinarian.- For additional information on bed sores and pressure necrosis, please visit our website. 56 1-800-732-2677These steps will help keep your pet safe and comfortable. Millions of pets are comfortable while they wear stainless steel contacts. Some pets are sensitive to contact pressure. Y ou may find after some time that your pet is very tolerant of the collar. If so, you may relax some of these precautions. It is important to continue daily checks of the area. If redness or sores are found, discontinue use until the skin has fully healed.• Y ou may need to trim the hair in the area of the Contact Points. Never shave the dog’s neck; this may lead to a rash or infection.• Always remove your dog’s Receiver Collar before performing any Transmitter testing.• If you use a collar and leash for training, be sure the extra collar does not put pressure on the contact points.• Never remove power from the system when the collar is on the pet. This may activate the Receiver Collar.Thank you for choosing PetSafe® brand. You and your pet deserve a companionship that includes memorable moments and a shared understanding together. Our products and training tools promote a lifestyle of protection, teaching, and love — essentials that influence memories for a lifetime. If you have any questions about our products or training your pet, please visit our website at or contact our Customer Care Center at 1-800-732-2677.To get the most protection out of your warranty, please register your product within 30 days at . By registering and keeping your receipt, you will enjoy the product’s full warranty and should you ever need to call the Customer Care Center, we will be able to help you faster. Most importantly, we will never give or sell your valuable information to anyone. Complete warranty information is available online at . 7How the System WorksThe PetSafe® Wireless Pet Containment System® has been proven safe, comfortable, and effective for pets over 8 pounds. The system works by transmitting a radio signal up to 90 feet in all directions. You temporarily define the Pet Area with Boundary Flags for a visual aid in training your pet. Your pet wears a Receiver Collar with Contact Points that touch his neck, and, once trained, is allowed to roam freely in the Pet Area. When your pet reaches the Boundary Zone, the Receiver Collar gives a warning beep before deliveringa safe Static Correction through the Contact Points to get his attention until he returns to the Pet Area.8 1-800-732-2677Prepare the Receiver Collarlong or thick hair. Tighten the Contact Pointsusing the Test Light Tool (A) one-halffinger tight. Check the tightness weekly. 9To Insert and Remove the Receiver Collar BatteryNote: Do not install the battery while the Receiver Collar is on your pet.This Receiver Collar utilizes a replaceable PetSafe® battery (RFA-67). This unique battery is designed to make battery replacement easier and increase water protection.To insert the battery, align the symbols on the battery (arrow) and Receiver Collar (triangle) (B). Use the edge of the Test Light Tool (B) to turn the battery clockwise until the arrow lines up with the lock symbol on the housing. B CTo remove the battery, turn the battery counter-clockwise using the edge of the Test Light Tool (C). DO NOT attempt to cut into or pry open the battery. Be sure to discard the used battery properly.A replacement PetSafe® battery (RFA-67) can be found at many retailers. Contact the Customer Care Center at 1-800-732-2677 or visit our web site at to locate a retailer near you.10 1-800-732-2677T o Set the Static Correction LevelRead all steps before attempting to set the Static Correction Level.1. Remove the clear plastic cover with the edgeof the Test Light Tool to expose the CorrectionLevel Button (D).2. With the battery installed, press the CorrectionLevel Button and release when the Receiver LED Indicator Light lights up (E).3. The Receiver LED Indicator Light will emita series of flashes representing the StaticCorrection Level.4. Increase the Static Correction Level by pressingand releasing the Correction Level Button within5 seconds of the previous series of flashes.5. After setting the Static Correction Level, replacethe cover to protect the Correction LevelButton. The Static Correction levels increase in strength from 1 to 6. Pushing the CorrectionLevel Button while the Receiver Collar is on D Elevel 6 will cause the Receiver Collar to revert to level 1. Refer tothe Function and Response Table to choose the Static Correction level that best fits your pet. The Receiver Indicator Light acts as a low battery indicator. The light will flash every 4 to 5 seconds when battery replacement is required.Battery Contact VerificationRemove Receiver Collar from your pet. Press the button and verify that the LED light illuminates. If the LED light does not come on remove the battery. Locate the metal tabs in the battery well. Gently lift the tabs to ensure that the battery will make good contact. Replace the battery into the Receiver Collar. Press the button and check that the LED light illuminates.Fit the Receiver CollarImportant: The proper fit and placement of your Receiver Collar is important for effective training. The Contact Points must have direct contact with your pet’s skin on the underside of his neck.See important safety information on pages 4-6.To assure a proper fit, please follow these steps: 1. Make sure that the battery is not installed inthe Receiver Collar.2. Start with your pet standing comfortably (F).3. To make it easier to hear the warning tone,place the Receiver Collar on your pet withthe logo side of Receiver facing up.4. Center the Contact Points underneathyour pet’s neck, touching the skin.FYou may need to trim the hair in the area of the Contact Points. Never shave the dog’s neck; this may lead to a rash or infection.5. Check the tightness of the Receiver Array Collar by inserting one fingersnug but not constricting (G).6.several minutes then recheck thefit. Check the fit again as your petReceiver Collar.7. Trim the collar as follows (H):a. Mark the desired length of theb.the excess.c.the frayed edge.8. Put battery in Receiver Collar.To Re-Thread the CollarThe slide buckle preventsthe collar from becomingloose around your pet’sneck.The ridges must be facingup; the collar will slip if it isnot properly threaded.Taking Your Pet Out of the Pet Area Important: Remove the Receiver Collar and leave it in the Pet Area. Once your pet learns the Boundary Zone, he will be reluctant to crossit for walks or car rides.Option 1: Replace the Receiver Collar with a regular collar. Put your pet in a car that is within the Pet Area and drive himout of the Pet Area.Option 2: Replace the Receiver Collar with aregular collar and leash. Walk your pet out of thePet Area while giving a command such as “OK”at a specific place of the Boundary Zone (the endof your driveway, sidewalk, etc.). Always leave thePet Area with a leash at this place and your petwill associate leaving the Pet Area only on a leash,only at this place, and only with a person. You mayinitially need to convince your pet to leave the Pet Area with a food treat and lots of praise.Note: You may also carry your pet out of the Pet Area.Please refer to your PetSafe® Wireless Pet Containment System Operating and Training Guide for a complete list of Frequently AskedQuestions and Troubleshooting or visit The Receiver Collar is beeping everywhere.• Check that the Transmitter is pluggedinto a working standard 120-volt outlet, turned on, the Power Light is on, and the Transmitter controls are set at your desired settings.• Bring Receiver Collar while standing within 5-10 feet of the Transmitter to reset.• Re-Synchronize the System. (Page 22)The Receiver Collar is beeping but my pet is not responding to the Static Correction.• Make sure the Static Correction Level is set at 2 or above.• Test the Receiver Collar with the Test Light.• If the Test Light flashes, check the fit of the Receiver Collar.• Trim your pet’s fur where the Contact Points touch the neck and/or switch to the longer Contact Points.• Increase the Static Correction Level.• Repeat training steps to reinforce training.My pet reacts strongly to the Static Correction and has become fearful.• Lower the Static Correction Level.• Make sure you are in control of the situation when your pet receives his first Static Corrections (have him on a leash attached to a separate, non-metallic collar) and lead him into the Pet Area and praise him. If your pet remains fearful, suspend training and start again the next day. Make sure to end all training sessions on a positive note with lots of praise and play.are touching the Contact Points (I1.to 2 or above.2.Kthe Contact Points (I).3. Walk toward the BoundaryZone holding the Receivercollar at your pet’s neck level (Juntil the Test Light flashes (K).Save Test Light for future testing.Note: If the Test Light does not flash, install a new battery and re-test. If Test Light still does not flash, contact the Customer Care Center at 1-800-732-2677. 21Re-synchronize the System1. Remove the Receiver Collar from your pet.2. Remove the battery from the Receiver Collar. Discharge all powerby holding the correction level button down until the LED is nolonger illuminated.3. At the transmitter, move the Boundary Switch from the low to thehigh position.4. Slowly adjust the Boundary Control Dial up to 8, down to 1 andthen back to the #4 position.5. Standing within 5-10 feet of the Transmitter, reinsert the batteryinto the Receiver Collar.6. Test the Boundary and verify operation by walking out into the PetArea until your Receiver Collar responds. (With the Transmitter set to 4, it should activate approximately 40-50 feet away).Once you are confident that the system is working, reset the Transmitter controls to the original setting.22 1-800-732-2677Terms of Use and Limitation of Liability1. Terms of UseThis Product is offered to you conditioned upon your acceptance without modification of the terms, conditions and noticescontained herein. Usage of this Product implies acceptance of all such terms, conditions, and notices.2. Proper UseThis Product is designed for use with pets where training isdesired. The specific temperament of your pet may not work with this Product. If you are unsure whether this is appropriate for your pet, please consult your veterinarian or certified trainer.3. No Unlawful or Prohibited UseThis Product is designed for use with pets only. This pet training device is not intended to harm, injure or provoke. Using thisProduct in a way that is not intended could result in violation ofFederal, State or local laws. 234. Limitation of LiabilityIn no event shall Radio Systems® Corporation be liable for anydirect, indirect, punitive, incidental, special or consequentialdamages, or any damages whatsoever arising out of or connected with the use or misuse of this Product. Buyer assumes all risksand liability from the use of this Product.5. Modification of Terms and ConditionsRadio Systems® Corporation reserves the right to change theterms, conditions and notices under which this Product is offered.24 1-800-732-2677ComplianceUSA/CanadaThis equipment has been tested and found to comply with the limits for a Class B digital device, pursuant to Part 15 of the FCC Rules. These limits are designed to provide reasonable protection against harmful interference when the equipment is operated in a residential environment. This equipment generates, uses, and can radiateradio frequency energy and, if not installed and used in accordance with the instruction guide, may cause harmful interference to radio communications. However, there is no guarantee that interference will not occur in a practical installation. If this equipment causes harmful interference to radio or television reception, which can be determined by turning the equipment off and on, the user is encouraged to try to correct the interference by one or more of the following measures:• Relocate the interfered receiving antenna.• Increase the separation between the equipment and receiver.• Connect the equipment into an outlet on a circuit different from that to which the receiver is connected.• Contact the Customer Care Center at 1-800-732-2677. 25This device complies with part 15 of the FCC Rules. Operation is subject to the following two conditions: (1) This device may not cause harmful interference, and (2) this device must accept any interference received, including interference that may cause undesired operation.This device complies with Industry Canada licence-exempt RSS standard(s). Operation is subject to the following two conditions: (1) this device may not cause interference, and (2) this device must accept any interference, including interference that may cause undesired operation of the device.Unauthorized changes or modifications to the equipment, not approved by Radio Systems® Corporation, could result in not meeting compliance with FCC or IC regulations and void the user’s authority to operate the equipment.AustraliaThis device complies with the applicable EMC requirements specified by the ACMA (Australian Communications and Media Authority).26 1-800-732-2677Customer Care InternationalUSA & Canada - Tel: 800-732-2677Monday - Friday 8 AM - 8 PM / Saturday 9 AM – 5 PMAustralia - Tel: 1800 786 608Monday - Friday 7:30 AM - 5 PMNew Zealand - Tel: 0800 543 054Monday - Friday 10:30 AM - 7 PMThis product has the benefit of a limited manufacturer’s warranty. Details of the warranty applicable to this product and its terms can be found at and/or are available by sending a stamped addressed envelope to PetSafe® Ltd. Redthorn House, Unit 9, Chorley West Business Park, Ackhurst Road, Chorley, Lancashire PR7 1NL, United Kingdom.Perchlorate BatteryPerchlorate Material – special handling may apply.See /hazardouswaste/perchlorate. 27Radio Systems® Corporation10427 PetSafe WayKnoxville, TN 379321-800-732-2677 Protected by US Patents 6,879,300; 6,921,089; 7,142,167 and D515,027.400-1423/1©2013 Radio Systems Corporation。
电子狗简介

电子狗“电子狗”是一种车载装置,作用是提前提醒车主电子眼或测速雷达的存在,可防止因为超速或违规而被罚款和扣分,又叫安全驾驶提醒仪。
目录狭义的电子狗:在红绿灯下面埋了发射器广义的电子狗:GPS+流动测速(1)全频反测速雷达(2)GPS反测速雷达(3)GPS全频反测速雷达(4):GPS导航反测速雷达原理国内常用测速设备的工作原理地面埋设感应圈(或感应棒)视频检测微波雷达超声波检测红外线检测和激光检测常见的摄像头架设方式和工作原理雷达测速国内目前测速系统频道以及其出现的方式1、K band2、Ka band全频9频段:X、K、Ku、Ka1、Ka2、Ka3、VG-2、LASER1、LASER2狭义的电子狗是指以早期无线发射及接收原理制成的反测速产品,只能在一些地区起有限的作用。
这种电子狗准确地说只是无线信号接收机,比收音机的原理和成本还简单,通常厂商会将发射器预先埋设在固定式照相前300到1000公尺处,只要行经路段的车上装有语音型预警机,便可收到预警讯号。
市面上卖100元人民币左右,对于流动式照相的根本无法预警。
由于依靠接收厂商预先埋设发射器信号,只能在厂商埋有发射器的地区使用。
这种产品的缺点是比较明显的:第一,预先埋设埋放的发射器得经常换电池,这是一个麻烦危险的工作,厂商对此工作已越来越不愿干,发射器没电池就不工作,这也是一些早期的购买者觉得越越来越不好用的原因。
第二,由于道路的变化、商业竞争的激烈,厂商彼此破坏对方的发射机,预警机根本不会产生报警,会对消费者带来巨大的损失,因此要特别小心这类商品。
另外,在中国无线电频率的使用也需要经过无委会的批准,但是P频并没有报批,所以会被无委会的侦测车探测到,随时可以被取缔或干扰。
广义的电子狗是指许多人习惯上将所有的反测速产品统称电子狗,这种产品现在一般叫反测速雷达,产品包装上写的是安全驾驶仪或雷达警示器。
中关宝经过对此类产品的研究,将其分为以下几种类型:(1)全频反测速雷达全频反测速雷达是伴随雷达测速仪大量使用而产生的一种车用设备,雷达测速仪是根据接收到的反射波频移量的计算而得出被测物体的运动速度。
电子狗说明
1. 水箱前镀铬饰条 , 一般分离式雷达主机安装位置,大致上会置于车头水箱罩内处,因为镀铬型水箱罩,会造成行进波形变化,或改变原有雷波的行进方向,等于具有外在的干扰因素,雷达行进的方向因而改变,进而影响安装于水箱罩内的分离式主机接收距离的表现。
2. 水箱前空间不足 , 水箱室内除温度偏高外,水箱狭窄或空间不足固定分离式主机或集波放大器时,请选择安装于气霸进风口。
3. 导波管前障碍物 , 雷达导波管是一个集波器,就像电视天线,安装位置及安装角度都会影响接收效果。另外在导波管前如果有金属障碍物则会影响雷达接收效果。
4. 电流放大器处置 , 由于本分离式主机采用智慧电源管理系统,具有专利的脉冲启动开关,对正负极电源安装就会特别敏感,安装前应特别注意,尽可能排除电源横越逆电流器或各式电流放大整流器的位置,减少阻抗,可避免 GPS 主机与分离式主机发生传递异常发生。
5. 负极接地阻抗数 , 由于本分离式产品,采用智慧型电源管理系统,电话启动关闭是采用脉冲式开关,车子启动后,因为品冲电压造成电流不稳定,系统自动关闭电源,单因具有专利精密脉冲式启闭开关,对正负极电源安装就会特别敏感,原则上尽可能安装于电瓶上的正负极接点,减少负极接点阻抗过大,影响雷达电源启动与否。
1-4 当地时间显示,目前时间 XX:XX
1-5 驾驶模式显示,预设值为 [ 安全驾驶限速模式 ]
1-6 雷达讯号侦测设定提示,目前雷达讯号设定 [ 高 ] ,预设值为高
2. 卫星启动状态
2-1 当卫星连接成功时,会先播报祝旅途平安。
2-2 当机器处于卫星连结状态时,时间中的‘:'会持续闪烁,反之当无法与卫星连接时,时间中的‘:'将不会持续闪烁,在无法与卫星连接的状态时,电子罗盘的东、西、南、北会持续轮流闪烁,当与卫星连接时,电子罗盘会依据车子行进的方向而显示方位。
电子狗使用说明书

T306型 电子狗使用说明书T306型 电子狗针对目前市场上同类产品的缺点进行彻底改进的低价格高性能报警器。
采用双元红外传感器结合先进的单片机数字信号技术,具有误报率低、可靠性高、性价比高、外型美观大方等特点。
适合家庭、办公室、楼梯口和沿街店面等场所防盗报警使用。
功能特点:----遥控器代码学习及记忆。
彻底解决遥控器丢失没有地方配制给用户带来的不便 ----可以增加其它无线发射频率为315MHZ 探头或门磁----报警声音大能有效吓阻非法入侵者----报警时可输出开关信号联动其它报警设备(选配)结构示意图:①电源变压器②状态指示灯:警戒延时灯闪烁,报警时常亮 ③输出接口:开关信号接口 ④PUSH2短路插针:在电子狗未上电之前拨掉处于无线编码学习状态 ⑤红外传感器:感应人体释放的热红外信号,请保持其表面干净,请勿用手触摸。
在其表面有污物时,可用棉花球蘸75%的酒精清洁。
⑥万向座导轨:将电子狗固定在万向座上⑦蜂鸣腔:报警后发出报警声⑧电池盒:将电池盖打开,安装电池盒内部的标识将9V 叠层电池装入。
安装工艺要求:——由于电子狗在人体相对于镜片横向运动时红外探测灵敏度最高,而纵向运动灵敏度较差,所以安装时应注意探测器和水平面的夹角和高度,这对防护区域有很大的影响。
安装高度与角度如下图所示:——安装使应避免电子狗靠近冷热源,如冷热出风口、空调出风口、电暖器、冷气机等,避免直对门窗;——电子狗对所防护的范围应可直视,不能有障碍物;——电子狗应与墙面成10-30度的夹角,此时探测距离最远,实际安装时根据情况 调整安装角度。
安装方法:—— 将万向座固定在探测器安装在欲安装的位置,安装高度为2米(如左图所示),将探测器固定在万向座上。
——参照探测器覆盖区域图,调整万向支架以达到最佳的探测效果。
——插上探测器电源插头,探测器上电工作。
使用方法:1、 上电后本机发出一声“嘀”提示声,指示灯闪烁。
如果不进行任何操作,30秒后自动进入“布防”状态。
Fluke 902_用户手册中文版(钳表)

有限担保和有限责任
本产品自购买之日起,将可享受三年材料上及工艺上的质 保,本担保不适用于保险丝,一次性电池,或由于意外、疏 忽、误用、改装、污染及非正常操作或处理引起的损坏。经 销商无权以 Fluke 的名义给予其它任何担保。如在保修期内 需要保修服务,请与您就近的 Fluke 授权服务中心联系, 获得产品退还授权 信息;然后将产品寄至该服务中心,并附 上产品问题描述。
交流和直流电压测量....................................... 10 电阻与通断 ..................................................... 11 微安 µA测量 ................................................... 12 温度................................................................ 13 电容................................................................ 16 交流电流测量 ................................................. 16 背照灯 ............................................................ 18 MIN MAX(最小值最大值)记录模式............. 18 显示保持......................................................... 19 自动关闭......................................................... 19 维护 .................................................................. 20 清洁钳表......................................................... 20 更换电池......................................................... 21 技术指标 ........................................................... 23 电气指标......................................................... 23 一般指标......................................................... 24
- 1、下载文档前请自行甄别文档内容的完整性,平台不提供额外的编辑、内容补充、找答案等附加服务。
- 2、"仅部分预览"的文档,不可在线预览部分如存在完整性等问题,可反馈申请退款(可完整预览的文档不适用该条件!)。
- 3、如文档侵犯您的权益,请联系客服反馈,我们会尽快为您处理(人工客服工作时间:9:00-18:30)。
AD-902B电子狗使用说明书
概述
‘电子狗’在警戒区域内检测到人体运动时发出30秒的现场报警声,恐吓非法入侵者。
电子狗采用双元红外传感器及红外专用IC处理器,可靠性高,误报率低,性价比优,适用于家庭、办公室、商店等防盗场所。
结构示意图
结构示意图说明:
①电源开关:向上拨打开电源,向下拨关闭电源。
②指示灯:打开电源时亮1秒,进入工作状态。
③灵敏度:中间脚与‘低’连接时探测距离4-7
米,与‘高’连接时7-10米。
④红外传感器:感应人体红外信号,请勿用手触摸,
表面有污物时,可用棉花蘸无水酒精清洁。
⑥万向座导轨:将电子狗固定在万向支架上。
⑦电池盒:打开电池盒将入4节7号电池。
技术参数
1、电源电源:直流6V(4节7号电池)。
2、工作电流:待警≤100uA、报警≤150mA。
3、探测距离:4-10米,水平84度,垂直74度(参见右图)。
4、报警音量:1米范围内不小于85db。
图3 安装、探测示意图
安装事项
1、电子狗检测人体相对于镜片横向运动时灵敏度较高,纵向较低。
2、安装时应避免靠近冷热源:如空调出风口、阳光照射等。
3、防护范围内不能有障碍物。
安装方法
1、万向座固定在距离地面约2米处。
2、打开电池盖装入4节7号电池。
3、电子狗固定在万向座上,转动电子狗,使其符合安装要求和探测要求。
使用方法
1、打开电源开关,指示灯亮1秒,表示自检正常。
2、开机预热30秒后进入警戒状态,有人入侵时内置高响度警号立即鸣响,30秒警号自动关闭,10秒后若检测
到人体红外信号将再次报警。
3、报警时关闭电源开关可结束报警。
注意事项
1、定期检查电子狗是否正常工作,避免漏报警。
2、开机指示灯暗、报警音量小、误报率高,一般是电池电压不足,请更换电池。
3、环境温度高于300C,探测距离会缩短。
4、发生故障时,可与销售商或安达电子客户服务中心联系解决。
泉州安达电子有限公司。