
GIS二次开发经典代码
1、保存栅格数据(注意:保存的时候不要忘记要将栅格数据保存到栅格数据集工作空间中,同时还有栅格的扩展名一定要加上。
)Public Sub SaveRaster()Dim pMxDoc As IMxDocumentDim pMap As IMapSet pMxDoc = Application.DocumentSet pMap = pMxDoc.FocusMappMap.DeleteLayer yer(0)Dim pRasterDataset As IRasterDatasetDim pWks As IRasterWorkspaceDim pWksFact As IWorkspaceFactorySet pWksFact = New RasterWorkspaceFactorySet pWks = pWksFact.OpenFromFile("D:\Projects\ZLS\temp", 0)Dim pRBC As IRasterBandCollectionSet pRasterDataset = pWks.OpenRasterDataset("test")'Dim pRBC As IRasterBandCollectionDim pRLayer As IRasterLayerSet pRLayer = New RasterLayerpRLayer.CreateFromDataset pRasterDatasetDim pRaster As IRasterSet pRaster = pRLayer.RasterSet pRBC = pRasterDim pDs As IDatasetSet pDs = pRBC.SaveAs("test", pWks, "TIFF") copyright pMap.AddLayer pRLayerEnd Sub2、根据已有数据字段,创建shape文件,并将数据插入到shape文件中(delphi代码)function CreateNewShape(pCursor: IFeatureCursor; pFCls: IFeatureClass; pPath: WideString; pNewFClsName:WideString): IFeatureClass;varpShapeFieldName, ConfigKeyword: WideString;pNewFCls: IFeatureClass;pFeature: IFeature;pNewFCursor: IFeatureCursor;pFeatureBuffer: IFeatureBuffer;pFields: IFields;pShape: IGeometry;pGeoType: esriGeometryType;pWFact: IWorkspaceFactory;pWorkspace: IWorkspace;pWorkspaceEdit: IWorkspaceEdit;pFWks: IFeatureWorkspace;pDataset: IDataset;pCLSID: IUID;pEXTCLSID: IUID;pNewID: OleVariant;bl: wordbool;i, pFieldCount: integer;pValue: OleVariant;beginConfigKeyword := '';//Determine the appropriate geometry type corresponding the the feature typeif pCLSID = nil thenbeginpFCls.Get_CLSID(pCLSID);pFCls.Get_ShapeType(pGeoType);end;//create fields collectionif pFields = nil thenbeginpFCls.Get_Fields(pFields);end;//get geometry field namepFCls.Get_ShapeFieldName(pShapeFieldName);pEXTCLSID := nil;pWFact:=CoshapefileWorkspaceFactory.create as IWorkspaceFactory;pWFact.OpenFromFile(pPath, 0, pWorkspace);pFWks := pWorkspace as IFeatureWorkspace;bl := NameExits(pWorkspace, pNewFClsName);//create shapefile in the temp folderif not bl thenbeginpFWks.CreateFeatureClass(pNewFClsName, pFields, pCLSID, pEXTCLSID, pGeoType, pShapeFieldName,ConfigKeyword, pNewFCls);endelsebeginpFWks.OpenFeatureClass(pNewFClsName, pNewFCls);pDataset := pNewFCls as IDataset;pDataset.Delete; copyright pFWks.CreateFeatureClass(pNewFClsName, pFields, pCLSID, pEXTCLSID, pGeoType, pShapeFieldName,ConfigKeyword, pNewFCls);end;//Add the features to this ShapeFilepWorkspaceEdit := pWorkspace as IWorkspaceEdit;pWorkspaceEdit.StartEditing(true);pWorkspaceEdit.StartEditOperation;pNewFCls.CreateFeatureBuffer(pFeatureBuffer);pNewFCls.Insert(true, pNewFCursor);pCursor.NextFeature(pFeature);pFeature.Get_Fields(pFields);pFields.Get_FieldCount(pFieldCount);while not (pFeature = nil) dobeginfor i := 0 to pFieldCount - 1 dobeginpFeature.Get_Value(i, pValue);pFeatureBuffer.Set_Value(i, pValue);end;内容来自GIS公园pFeature.Get_Shape(pShape);pFeatureBuffer.Set_Shape(pShape);pNewFCursor.InsertFeature(pFeatureBuffer, pNewID);pCursor.NextFeature(pFeature);end;pNewFCursor.Flush;pWorkspaceEdit.StopEditOperation;pWorkspaceEdit.StopEditing(true);//Get ResaultCreateNewShape := pNewFCls;end;3、渲染栅格图层Public Sub SetRasterRenderer()Dim NumOfClass As IntegerNumOfClass = 5' Get MapDim pMxDoc As IMxDocumentSet pMxDoc = ThisDocumentDim pMap As IMapSet pMap = pMxDoc.FocusMap' Get raster input from layerDim pRLayer As IRasterLayerSet pRLayer = yer(0)Dim pRaster As IRasterSet pRaster = pRLayer.Raster' Create classfy renderer and QI RasterRenderer interface Dim pClassRen As IRasterClassifyColorRampRenderer Set pClassRen = New RasterClassifyColorRampRenderer Dim pRasRen As IRasterRendererSet pRasRen = pClassRencopyright ' Set raster for the render and updateSet pRasRen.Raster = pRasterpClassRen.ClassCount = NumOfClasspRasRen.Update' Create a color ramp to useDim pRamp As IAlgorithmicColorRampSet pRamp = New AlgorithmicColorRamppRamp.Size = NumOfClassDim pFColor As IColorDim pTColor As IColorSet pFColor = New RgbColorSet pTColor = New RgbColorpFColor.RGB = RGB(10, 100, 10)pTColor.RGB = RGB(60, 0, 60)pRamp.FromColor = pFColorpRamp.ToColor = pTColorpRamp.CreateRamp True' Create symbol for the classesDim pFSymbol As IFillSymbolSet pFSymbol = New SimpleFillSymbol' loop through the classes and apply the color and label Dim i As IntegerFor i = 0 To pClassRen.ClassCount - 1pFSymbol.Color = pRamp.Color(i)pClassRen.Symbol(i) = pFSymbolbel(i) = "Class" & CStr(i)Next i' Update the renderer and plug into layerpRasRen.UpdateSet pRLayer.Renderer = pClassRenpMxDoc.ActiveView.RefreshpMxDoc.UpdateContents' Release memeorySet pMxDoc = Nothing本文来GIS公园Set pMap = NothingSet pRLayer = NothingSet pRaster = NothingSet pRasRen = NothingSet pClassRen = NothingSet pRamp = NothingSet pFSymbol = Nothing End Sub内容来自GIS公园。
C# GIS二次开发代码1

ESRI.ArcGIS.Display.CancelTracker pCancel = new ESRI.ArcGIS.Display.CancelTracker(); mapGIS.ActiveView.Output(pExport.StartExporting(), (int)pScreenResolution, ref pExportFrame, mapGIS.ActiveView.Extent, pCancel); pExport.FinishExporting(); } catch //()Exception ex { } }
3. 地图的空间查询
添加一个窗体,Name 为 QueryFrm。
在该窗体中添加控件,具体添加控件如下 空间名 GroupBox(Panel) 5 个 RadioButton Name groupBox rdoNormol rdoLine rdoEnvo rdoCircle rdoPoly Button btnOK 备注 一个容器,可以自行选择 Text 属性为:默认状态 Text 属性为:线选查询 Text 属性为:框选查询 Text 属性为:圆选查询 Text 属性为:多边形查询 Text 属性为:确定
2. 地图保存
在 menu 中添加 File,在 File 的中添加 Export Data,Name 为 exportDataMenu, 为其添加单击事件,代码如下 private void exportDataMenu_Click(object sender, EventArgs e) { SaveFileDialog sfd = new SaveFileDialog(); //设置可以保存的文件类型 sfd.Filter = "TIF FIles(*.TIF)|*.TIF|SVG FIles(*.SVG)|*.SVG|PNG FIles(*.PNG)|*.PNG|PDF FIles(*.PDF)|*.PDF|JPEG FIles(*.JPEG)|*.JPEG|GIF FIles(*.GIF)|*.GIF|EMF FIles(*.EMF)|*.EMF|BMP FIles(*.BMP)|*.BMP|AI FIles(*.AI)|*.AI"; //显示对话框 sfd.ShowDialog(); //判断路径为空,返回 if (sfd.FileName == null) return; //获取保存文件路径 string path = sfd.FileName; string pathExtention = System.IO.Path.GetExtension(path); try { ESRI.ArcGIS.Output.IExport pExport; pExport = (ESRI.ArcGIS.Output.IExport)new ESRI.ArcGIS.Output.ExportTIFF(); //根据文件拓展名选择保存的格式 switch (pathExtention) { case ".SVG": pExport = (ESRI.ArcGIS.Output.IExport)new ESRI.ArcGIS.Output.ExportSVG(); break; case ".PS": pExport = (ESRI.ArcGIS.Output.IExport)new ESRI.ArcGIS.Output.ExportPS(); break; case ".PNG": pExport = (ESRI.ArcGIS.Output.IExport)new ESRI.ArcGIS.Output.ExportPNG();
用C 实现混合使用MAPGIS的多种二次开发方式

图3 然后选择GisEdit Contrl控件并插入,如图4、图5所示。
图4
图5 调整对话框大小及GisEdit控件大小,添加几个功能按钮,如图6所示。 白色部分为GisEdit控件。
图6 用C++实现混合使用MAPGIS的多种二次开发方式(二) 为了操作GisEdit控件,在ClassWizard中,将GisEdit控件添加为成员变 量。变量名为m_MapGIS。如图7所示
图1 注册成功后,出现图2所示对话框:
图2 如果没成功的话,看看是否和MAPGIS的DLL文件放在同一目录下,因为 它还要依赖MAPGIS的DLL库。 然后用VC中的MFC AppWizard生成一个对话框架的应用程序。打开 所生成的对话框资源,在对话框资源上右击,并选择Insert ActiveX Control…菜单。如图3所示。
} 为了在视窗改变大小时,m_MapGIS控件也改变大小,为视类添加一个 WM_SIZE消息,在其生成的OnSize函数中添加如下代码。 void CMapView::OnSize(UINT nType, int cx, int cy) { CView::OnSize(nType, cx, cy); // TODO: Add your message handler code here m_MapGIS.MoveWindows(cx,cy);// GisEdit控件中新增的改变窗口大小 函数 } 在菜单资源中,修改“打开文件”项,改成“打开工程文件”;并将其(资 源ID号:ID_FILE_OPEN) 在视窗类中(本例为CMapView)建立消息 映射。在映射函数中加入如下代码: void CMapView::OnFileOpen() { // TODO: Add your command handler code here m_MapGIS.LoadProject(); } 编译整个工程并运行,打开一个MAPGIS工程文件,运行结果如图11, 所示
GIS二次开发—空间分析窗体代码
namespace MapAnalyse{public class Function{//打开通过属性查询地图窗口public static void SelectByAttribute(AxMapControl axMapControl){frmSelectByAttributes frmselectbyattrib = new frmSelectByAttributes(axMapControl);frmselectbyattrib.Show();}//打开通过位置查询地图窗口public static void SelectByLocation(AxMapControl axMapControl){frmSelectByLocation frmselectbylocation = new frmSelectByLocation(axMapControl);frmselectbylocation.Show();}//打开缓冲区分析窗口public static void BufferAnalyse(AxMapControl axMapControl){//frmBufferAnalyse frmbuffer = new frmBufferAnalyse(axMapControl);//frmbuffer.Show();frmBufferAnalyse frmbuffer = new frmBufferAnalyse(axMapControl);frmbuffer.Show();}//打开叠置分析窗口public static void OverLayerAnalyse(AxMapControl axMapControl){frmOverLayerAnalyse frmoverlayer = new frmOverLayerAnalyse(axMapControl);frmoverlayer.Show();}//打开网络分析窗口public static void NetAnalyse(AxMapControl axMapControl){frmNetAnalyse frmnetanalyse = new frmNetAnalyse(axMapControl);frmnetanalyse.Show();}//转换像素到地图单位public static double ConvertPixelsToMapUnits(IActiveView pActiveView, double pixelUnits){tagRECT pRect = pActiveView.ScreenDisplay.DisplayTransformation.get_DeviceFrame();int pixelExtent = pRect.right - pRect.left;double realWorldDisplayExtent =pActiveView.ScreenDisplay.DisplayTransformation.VisibleBounds.Width;double sizeOfOnePixel = realWorldDisplayExtent / pixelExtent;return pixelUnits * sizeOfOnePixel;}public static IFeatureLayer GetLayerByNameFromGroupLayer(string strLayerName, ILayer iLayer) {ILayer _iLayer = iLayer;ICompositeLayer pGroupLayer = _iLayer as ICompositeLayer;for (int j = 0; j < pGroupLayer.Count; j++){_iLayer = pGroupLayer.get_Layer(j) as IFeatureLayer;if (_iLayer is IGroupLayer){GetLayerByNameFromGroupLayer(strLayerName, _iLayer);}else if (_iLayer is IFeatureLayer){if (_ == strLayerName){return _iLayer as IFeatureLayer;}}}return null;}private static int count = 0;//在图层组中通过索引获得图层public static IFeatureLayer GetLayerNumFromGroupLayer(int index, ILayer iLayer) {ILayer _iLayer = iLayer;ICompositeLayer pGroupLayer = _iLayer as ICompositeLayer;for (int j = 0; j < pGroupLayer.Count; j++){_iLayer = pGroupLayer.get_Layer(j) as IFeatureLayer;if (_iLayer is IGroupLayer){IFeatureLayer pFeatLyr = GetLayerNumFromGroupLayer(index, _iLayer);if (pFeatLyr != null){return pFeatLyr;}}else if (_iLayer is IFeatureLayer){count++;if (count == index){return _iLayer as IFeatureLayer;}}}return null;}//通过索引获得图层public static IFeatureLayer GetLayerByIndex(int index, AxMapControl axMap){count = 0;IFeatureLayer pFeatLyr = null;if (yerCount > 0){for (int i = 0; i < yerCount; i++){ILayer _iLayer = axMap.Map.get_Layer(i);if (_iLayer is IGroupLayer){pFeatLyr = GetLayerNumFromGroupLayer(index, _iLayer);if (pFeatLyr != null){return pFeatLyr;}}else if (_iLayer is IFeatureLayer){count++;if (count == index){return _iLayer as IFeatureLayer;}}}}return pFeatLyr;}//通过名称获得图层public static IFeatureLayer GetLayerByName(string strLayerName, AxMapControl axMap) {IFeatureLayer pFeatLyr = null;if (yerCount > 0){for (int i = 0; i < yerCount; i++){ILayer _iLayer = axMap.Map.get_Layer(i);if (_iLayer is IGroupLayer){pFeatLyr = GetLayerByNameFromGroupLayer(strLayerName, _iLayer);if (pFeatLyr != null)return pFeatLyr;//ICompositeLayer pGroupLayer = _iLayer as ICompositeLayer;//for (int j = 0; j < pGroupLayer.Count; j++)//{// _iLayer = pGroupLayer.get_Layer(j) as IFeatureLayer;// if (_ == strLayerName)// {// pFeatLyr = _iLayer as IFeatureLayer;// }//}}else if (_iLayer is IFeatureLayer){if (_ == strLayerName){pFeatLyr = _iLayer as IFeatureLayer;return pFeatLyr;}}}}return pFeatLyr;}//得到地图中的指定特征图成指定字段的不重复值public static IEnumVariantSimple GetUniqueValue(string strFieldName, AxMapControl axMap, string strLayerName){IFeatureLayer pFeatLayer = GetLayerByName(strLayerName, axMap);ICursor pCursor = pFeatLayer.Search(null, false) as ICursor;IDataStatistics pDatasetStat = new DataStatisticsClass();pDatasetStat.Field = strFieldName;pDatasetStat.Cursor = pCursor;return pDatasetStat.UniqueValues as IEnumVariantSimple;}//颜色转换public static IRgbColor GetRGBColor(int red, int green, int blue){IRgbColor pColor = new RgbColorClass();pColor.Red = red;pColor.Green = green;pColor.Blue = blue;return pColor;}}public class BufferAnalyse{public void CreateGraphicBuffersAroundSelectedFeatures(ESRI.ArcGIS.Carto.IActiveView activeView, System.Double distance)//缓冲区分析?{if (activeView == null || distance < 0){return;}ESRI.ArcGIS.Carto.IMap map = activeView.FocusMap;ESRI.ArcGIS.Carto.IGraphicsContainer graphicsContainer =(ESRI.ArcGIS.Carto.IGraphicsContainer)map; // Explicit CastgraphicsContainer.DeleteAllElements();if (map.SelectionCount == 0){return;}ESRI.ArcGIS.Geodatabase.IEnumFeature enumFeature =(ESRI.ArcGIS.Geodatabase.IEnumFeature)map.FeatureSelection; // Explicit CastenumFeature.Reset();ESRI.ArcGIS.Geodatabase.IFeature feature = enumFeature.Next();ESRI.ArcGIS.Geometry.ITopologicalOperator topologicalOperator;ESRI.ArcGIS.Carto.IElement element;while (!(feature == null)){topologicalOperator = (ESRI.ArcGIS.Geometry.ITopologicalOperator)feature.Shape; // Explicit Castelement = new ESRI.ArcGIS.Carto.PolygonElementClass();element.Geometry = topologicalOperator.Buffer(distance);graphicsContainer.AddElement(element, 0);feature = enumFeature.Next();}activeView.PartialRefresh(ESRI.ArcGIS.Carto.esriViewDrawPhase.esriViewGraphics, null, null);}}private AxMapControl axMapControl1;private string m_OutputFilename;private string m_OutputPath;public frmOverLayerAnalyse(AxMapControl axMapControl){InitializeComponent();axMapControl1 = axMapControl;InitForm();}//初始化窗体数据private void InitForm(){this.cmb_OverLayMethod.SelectedIndex = 0;InitLayer();}//初始化地图图层private void InitLayer(){this.cmb_InputLayer1.Items.Clear();this.cmb_InputLayer2.Items.Clear();if (yerCount > 0){for (int i = 0; i < yerCount; i++){ILayer _iLayer = axMapControl1.Map.get_Layer(i);if (_iLayer is IGroupLayer){ICompositeLayer pGroupLayer = _iLayer as ICompositeLayer;for (int j = 0; j < pGroupLayer.Count; j++){_iLayer = pGroupLayer.get_Layer(j) as IFeatureLayer;cmb_InputLayer1.Items.Add(_);cmb_InputLayer2.Items.Add(_);}}else if (_iLayer is IFeatureLayer){//_iLayer = axMapControl1.Map.get_Layer(i) as IFeatureLayer;cmb_InputLayer1.Items.Add(_);cmb_InputLayer2.Items.Add(_);}}}else{MessageBox.Show("未找到地图图层");}}//获取生成图层路径和文件名private bool GainTheOutputPath(){string _file = this.txt_OutputLayerPath.Text;if (_file == ""){return false;}else{m_OutputFilename = _file.Split('\\')[_file.Split('\\').Length - 1];m_OutputPath = this.txt_OutputLayerPath.Text.Substring(0, _file.Length -m_OutputFilename.Length - 1);return true;}}private void btn_Apply_Click(object sender, EventArgs e){if (yerCount < 2){MessageBox.Show("添加至少两个图层后再做叠层分析", "提示");return;}if (this.cmb_InputLayer1.SelectedIndex == -1 || this.cmb_InputLayer2.SelectedIndex == -1){MessageBox.Show("请选择需要叠置分析的图层", "提示");return;}if (!GainTheOutputPath()){MessageBox.Show("请设置分析结果输出位置", "提示");return;}OverLayer();}private void OverLayer(){IFeatureLayer pInputFLayer;IFeatureLayer pOverlayFLayer;string strWorkspaceFactoryProgID;string strPathName;bool useSelectedInput;bool useSelectedOverlay;double dTolerance;useSelectedInput = false;useSelectedOverlay = false;//pInputFLayer = axMapControl1.get_Layer(4) as IFeatureLayer;//pOverlayFLayer = axMapControl1.get_Layer(5) as IFeatureLayer;//选?中D图ª?层?1string _layer = cmb_InputLayer1.SelectedItem.ToString();pInputFLayer = Function.GetLayerByName(_layer, axMapControl1);//选?中D图ª?层?2string _layer2 = cmb_InputLayer2.SelectedItem.ToString();pOverlayFLayer = Function.GetLayerByName(_layer2, axMapControl1);dTolerance = 0.01;strWorkspaceFactoryProgID = "esriDataSourcesFile.ShapefileWorkspaceFactory.1";//strPathName = @"D:\Download\_AEtemp\overlay";strPathName = m_OutputPath;ITable pInputTable = GetFeatureLayerTable(pInputFLayer, false);if (pInputTable == null)return;ITable pOverlayTable = GetFeatureLayerTable(pOverlayFLayer, false);if (pOverlayTable == null)return;//创建输出要素类的名称指定输出位置IFeatureClassName pFCName = new FeatureClassNameClass();IWorkspaceName pWSName = new WorkspaceNameClass();pWSName.WorkspaceFactoryProgID = strWorkspaceFactoryProgID;pWSName.PathName = strPathName;IDatasetName pDatasetName = (IDatasetName)pFCName;// = "Intersect_result"; = m_OutputFilename.Substring(0, m_OutputFilename.Length - 4);pDatasetName.WorkspaceName = pWSName;//执行叠置IBasicGeoprocessor pBGP = new BasicGeoprocessorClass();IFeatureClass pOutFClass = null;try{switch (this.cmb_OverLayMethod.SelectedIndex){case 0: //Union 分割组合pOutFClass = pBGP.Union(pInputTable, useSelectedInput, pOverlayTable, useSelectedOverlay, dTolerance, pFCName);break;case 1: //Intersect 相交pOutFClass = pBGP.Intersect(pInputTable, useSelectedInput, pOverlayTable, useSelectedOverlay, dTolerance, pFCName);break;case 2: //SpatialJoin{Geoprocessor gp = new Geoprocessor();gp.OverwriteOutput = true;SpatialJoin pSJ = new SpatialJoin(pInputFLayer, pOverlayFLayer,m_OutputPath + "\\" + m_OutputFilename);pSJ.join_operation = "JOIN_ONE_TO_ONE";//gp.Execute(pSJ, null);pOutFClass = pSJ.out_feature_class as IFeatureClass;IGeoProcessorResult igpr = gp.Execute(pSJ, null) as IGeoProcessorResult;if (igpr == null){string strerror = "";for (int i = 0; i < gp.MessageCount; i++){strerror = strerror + "\n" + gp.GetMessage(i);}MessageBox.Show("未成功\n" + strerror, "出错了?");return;}}break;case 3: //Erase擦除{Geoprocessor gp = new Geoprocessor();gp.OverwriteOutput = true;Erase erase = new Erase(pInputFLayer, pOverlayFLayer, m_OutputPath + "\\" + m_OutputFilename);gp.Execute(erase, null);IGeoProcessorResult igpr = gp.Execute(erase, null) as IGeoProcessorResult;if (igpr == null){string strerror = "";for (int i = 0; i < gp.MessageCount; i++){strerror = strerror + "\n" + gp.GetMessage(i);}MessageBox.Show("未成功,错误信息如下? \n" + strerror, "出错了?");return;}}break;}//Add the output layer to the mapif (this.cb_AddOutputLayerToCurMap.Checked == true){IFeatureLayer pOutputFLayer;pOutputFLayer = new FeatureLayerClass();pOutputFLayer.FeatureClass = pOutFClass; = pOutFClass.AliasName;axMapControl1.AddLayer(pOutputFLayer);}MessageBox.Show("通过" + this.cmb_OverLayMethod.SelectedItem + " 方法叠置分析生成的图层保存在\n" + m_OutputPath + "\\" + m_OutputFilename, "分析成功!");}catch (Exception ex){MessageBox.Show(ex.ToString(), "叠置求交失败");return;}if (pOutFClass == null)return;//axMapControl1.AddLayer(pOutFClass);/*//返回叠置求交结果?IFeatureLayer pOutputFLayer = new FeatureLayerClass();pOutputFLayer.FeatureClass = pOutFClass;string strFCAliasName = pOutFClass.AliasName; = strFCAliasName;return pOutputFLayer;*/}private ITable GetFeatureLayerTable(IFeatureLayer pFLayer, bool IsUnion){if (pFLayer == null)return null;IFeatureClass pFC = pFLayer.FeatureClass;if (IsUnion == true && pFC.ShapeType != esriGeometryType.esriGeometryPolygon){MessageBox.Show("图层的类型必须是面图层请重新设置?");return null;}ITable pTable = (ITable)pFLayer;return pTable;}private void btn_OutputLayer_Click(object sender, EventArgs e){//set the output layerSaveFileDialog saveDlg = new SaveFileDialog();saveDlg.CheckPathExists = true;saveDlg.Filter = "Shapefile (*.shp)|*.shp";saveDlg.OverwritePrompt = true;saveDlg.Title = "Output Layer";saveDlg.RestoreDirectory = true;saveDlg.FileName = (string)this.cmb_InputLayer1.SelectedItem + "_" +this.cmb_OverLayMethod.SelectedItem + ".shp";DialogResult dr = saveDlg.ShowDialog();if (dr == DialogResult.OK)this.txt_OutputLayerPath.Text = saveDlg.FileName;}private void btn_Calcel_Click(object sender, EventArgs e){this.Close();}}。
arcgis二次开发算法
arcgis二次开发算法
以下是一个基本的 ArcGIS 二次开发算法,该算法演示了如何使用 C 和ArcGIS Engine 创建和运行一个自定义的地图算法:
```csharp
using System;
using ;
using ;
using ;
using ;
public class MyMapAlgorithm :
{
protected override void CreateMap( mapDocument)
{
// 创建一个新的图层,并设置其数据源
layer = (new ());
= "My Layer";
= "C:\Data\";
// 创建一些新的空间查询条件,以选择地图上的特定区域
spatialFilter = new ();
= ; // 仅选择整个地图区域
= ;
// 应用空间过滤器到图层,并执行空间查询以获取满足条件的要素
(spatialFilter);
}
}
```
在这个示例中,我们创建了一个名为“MyMapAlgorithm”的自定义地图
算法,它继承自类。
在CreateMap 方法中,我们首先创建一个新的图层,并设置其数据源为一个 Shapefile 文件。
然后,我们创建一个空间过滤器,用于选择地图上的特定区域。
最后,我们将空间过滤器应用到图层上,并执行空间查询以获取满足条件的要素。
arcgis二次开发符号化代码

在ArcGIS 中,符号化是通过改变图形的颜色,线宽,类型等属性来使地图更具视觉效果的过程。
下面是一个基本的ArcGIS 二次开发符号化代码的示例,它使用了C# 和ArcObjects。
csharp复制代码using ESRI.ArcGIS.Carto;using ESRI.ArcGIS.Geodatabase;using ESRI.ArcGIS.DataSourcesFile;public void SymbolizeFeatureLayer(ILayer layer, stringlayerFilePath){// 创建图层工厂ILayerFile layerFile = new LayerFileClass();// 打开指定的图层文件if (layerFile.IsLayerFile[layerFilePath]){layerFile.Open(layerFilePath);// 获取图层ILayer layerTemp = yer;// 符号化图层SymbolLayerList symbolLayers = layerTemp.SymbologyType asSymbolLayerList;if (symbolLayers != null){for (int i = 0; i < symbolLayers.Count; i++){ISymbolLayer symbolLayer = symbolLayers[i];symbolLayer.Symbol.Color = new RgbColorClass(255, 0, 0); // 设置颜色为红色symbolLayer.Symbol.OutlineColor = new RgbColorClass(0, 0, 0); // 设置轮廓颜色为黑色}}// 刷新图层以应用更改layer.Refresh();}}在这个例子中,我们首先打开一个指定的图层文件,然后遍历该图层的所有符号图层。
C# GIS二次开发代码4
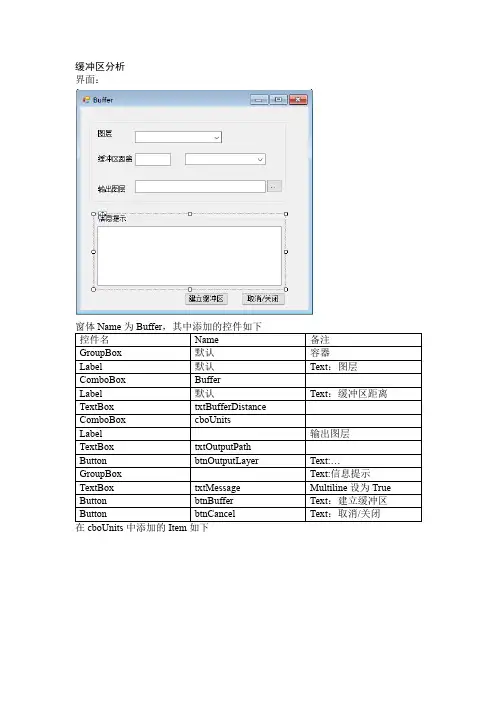
备注 容器 Text:图层 Text:缓冲区距离
输出图层 Text:… Text:信息提示 Multiline 设为 True Text:建立缓冲区 Text:.Geoprocessor ESRI.ArcGIS.AnalysisTools ESRI.ArcGIS.Geoprocessing 添加命名空间 using ESRI.ArcGIS.Geodatabase; using ESRI.ArcGIS.Controls; using ESRI.ArcGIS.Carto; using System.Runtime.InteropServices; using ESRI.ArcGIS.esriSystem; using ESRI.ArcGIS.Geoprocessor; using ESRI.ArcGIS.AnalysisTools; using ESRI.ArcGIS.Geoprocessing; 在 Buffer 类下添加如下代码: [DllImport("user32.dll")] private static extern int PostMessage(IntPtr wnd, uint Msg, IntPtr wParam, IntPtr iParam); private IHookHelper m_hookHelper = null; private const uint WM_VSCROLL = 0x115; private const uint SB_BOTTOM = 7; 修改默认的构造函数,通过构造函数传值 public Buffer(IHookHelper hookHelper) { InitializeComponent(); m_hookHelper = hookHelper; }
private void btnBuffer_Click(object sender, EventArgs e) { double bufferDistance; double.TryParse(txtBufferDistance.Text, out bufferDistance); if (bufferDistance == 0.0) { MessageBox.Show("不适当的缓冲区距离"); return; } if ((!System.IO.Directory.Exists(System.IO.Path.GetDirectoryName(txtOutputPath.Text ))) || ".shp" != System.IO.Path.GetExtension(txtOutputPath.Text)) { MessageBox.Show("无效的输出文件名!"); return; } if (m_yerCount == 0) return; IFeatureLayer layer=GetFeatureLayer((string)cboLayers.SelectedItem); if (layer == null) { txtMessage.Text = "图层" + (string)cboLayers.SelectedItem + " 无法找到\r\n"; return; } ScrollToBottom(); txtMessage.Text = "缓冲区图层:"++"\r\n"; txtMessage.Text += "\r\n正在处理中.这需要几秒钟时间...\r\n"; txtMessage.Update(); Geoprocessor gp = new Geoprocessor(); gp.OverwriteOutput=true; txtMessage.Text += "正在建立缓冲区...\r\n"; txtMessage.Update(); ESRI.ArcGIS.AnalysisTools.Buffer buffer=new ESRI.ArcGIS.AnalysisTools.Buffer(layer,txtOutputPath.Text,Convert.ToString(buffe rDistance)+" "+(string)cboUnits.SelectedItem);
C# GIS二次开发代码6
mapGIS.Visible = false;
layoutMain.Visible = true; toolGIS.SetBuddyControl(layoutMain); dataViewMenu.Checked = false; layoutViewMenu.Checked = true; CopyMapFromMaptoPageLayout();
} catch (Exception) {
} }Leabharlann mapGIS.Visible = true; toolGIS.SetBuddyControl(mapGIS); layoutMain.Visible = false; dataViewMenu.Checked = true; layoutViewMenu.Checked = false;
} layoutViewMenu 的单击事件: private void layoutViewMenu_Click(object sender, EventArgs e) {
layoutMain.Left = mapGIS.Left; layoutMain.Top = mapGIS.Top; layoutMain.Width = mapGIS.Width; layoutMain.Height = mapGIS.Height;
给 dataViewMenu 添加单击事件 在此事件中,改变 mapGIS 和 layoutMain 的 visible,并在菜单上选中相应的菜单。并设置与 toolGIS 关联的控件。 private void dataViewMenu_Click(object sender, EventArgs e) {
pFileName.Path = pFillePaths[i]; CreateLayer((IName)pFileName); } } } else if (pDadaObject.CanGetNames()) { pEnumName = pDadaObject.GetNames(); pEnumName.Reset(); pName = pEnumName.Next(); do { CreateLayer(pName); pName = pEnumName.Next(); } while (pName!=null); } } } public void CreateLayer(IName pName) { try { mapGIS.MousePointer = esriControlsMousePointer.esriPointerHourglass; ILayerFactoryHelper pLayerFactoryHelper; pLayerFactoryHelper = new LayerFactoryHelperClass(); IEnumLayer pEnumLayer; pEnumLayer = pLayerFactoryHelper.CreateLayersFromName(pName); pEnumLayer.Reset(); ILayer pLayer; pLayer = pEnumLayer.Next(); do { mapGIS.AddLayer(pLayer); pLayer = pEnumLayer.Next(); } while (pLayer!=null); mapGIS.MousePointer = esriControlsMousePointer.esriPointerDefault;
优-ArcGIS Engine 的一些实现代码C#二次开发ArcGis
IQueryFilter pQueryFilter = new QueryFilter(); pQueryFilter.WhereClause = "POP > 10"; IFeatureSelection pFeatSel = pFeatureLayer as IFeatureSelection; pFeatSel.SelectFeatures(pQueryFilter, esriSelectionResultEnum.esriSelectionResultNew, false); axMapControl1.Refresh(esriViewDrawPhase.esriViewGeoSelection, null, null); //在新定义图层的基础上进行的查询
●·● 实现:只显示筛选的要素:
--------------------------------------------------------------------------------------------------------
●·● IFeatureLayerDefinition 接口:
●·● 实现:鼠标滑过显示要素 tip:
对于这个有两个方法: 第一种:通过将 axmapcontrol 自带的 ShowMapTips 属性设置为 true 来实现。 第二种:通过 .NET 自带的控件 ToolTip 来实现! 第一种代码:
GIS二次开发实验指导书(实验5)
实验五PageLayout属性设置与元素绘制1、新建项目,设置窗体界面如下:2、在主窗体的Load事件中添加如下代码:private void FormMain_Load(object sender, EventArgs e){Microsoft.Win32.RegistryKey pRegKey =Microsoft.Win32.Registry.LocalMachine.OpenSubKey("SOFTWARE\\ESRI\\CoreRuntime", true);axSymbologyControl1.LoadStyleFile(pRegKey.GetValue("InstallDir") +"\\Styles\\ESRI.ServerStyle");axSymbologyControl1.GetStyleClass(esriSymbologyStyleClass.esriStyleClassBackgrounds).Update ();axSymbologyControl1.GetStyleClass(esriSymbologyStyleClass.esriStyleClassBorders).Update();axSymbologyControl1.GetStyleClass(esriSymbologyStyleClass.esriStyleClassShadows).Update(); }3、在“设置边框”按钮的Click事件中添加如下代码:private void ButtonBorder_Click(object sender, EventArgs e){axSymbologyControl1.StyleClass = esriSymbologyStyleClass.esriStyleClassBorders; }4、在“设置阴影”按钮的Click事件中添加如下代码:private void ButtonShadows_Click(object sender, EventArgs e){axSymbologyControl1.StyleClass = esriSymbologyStyleClass.esriStyleClassShadows; }5、在“设置背景”按钮的Click事件中添加如下代码:private void ButtonBackground_Click(object sender, EventArgs e){axSymbologyControl1.StyleClass =esriSymbologyStyleClass.esriStyleClassBackgrounds;}6、在axSymbologyControl1控件的OnItemSelected事件中添加如下代码:private void axSymbologyControl1_OnItemSelected(object sender, ISymbologyControlEvents_OnItemSelectedEvent e){IStyleGalleryItem pStyleGalleryItem = e.styleGalleryItem as IStyleGalleryItem;IFrameProperties pFrameProperties =axPageLayoutControl1.GraphicsContainer.FindFrame(axPageLayoutControl1.ActiveView.FocusMap) as IFrameProperties;if (pStyleGalleryItem.Item is IBackground){pFrameProperties.Background = pStyleGalleryItem.Item as IBackground;}else if (pStyleGalleryItem.Item is IBorder){pFrameProperties.Border = pStyleGalleryItem.Item as IBorder;}else if (pStyleGalleryItem.Item is IShadow){pFrameProperties.Shadow = pStyleGalleryItem.Item as IShadow;}axPageLayoutControl1.Refresh(esriViewDrawPhase.esriViewBackground, null, null); }7、在“设置网格”按钮的Click事件中添加如下代码:private void ButtonGrid_Click(object sender, EventArgs e){IActiveView pActiveView = axPageLayoutControl1.PageLayout as IActiveView;IMap pMap = pActiveView.FocusMap;IMeasuredGrid pMeasuredGrid = new MeasuredGridClass();IMapGrid pMapGrid = pMeasuredGrid as IMapGrid;pMeasuredGrid.FixedOrigin = true;pMeasuredGrid.Units = pMap.MapUnits;pMeasuredGrid.XIntervalSize = 10;pMeasuredGrid.YIntervalSize = 10;pMeasuredGrid.XOrigin = -180;pMeasuredGrid.YOrigin = -90;IProjectedGrid pProjectedGrid = pMeasuredGrid as IProjectedGrid;pProjectedGrid.SpatialReference = pMap.SpatialReference; = "Measured Grid";IGraphicsContainer pGraphicsContainer = pActiveView as IGraphicsContainer;IMapFrame pMapFrame = pGraphicsContainer.FindFrame(pMap) as IMapFrame;IMapGrids pMapGrids = pMapFrame as IMapGrids;pMapGrids.AddMapGrid(pMapGrid);pActiveView.PartialRefresh(esriViewDrawPhase.esriViewBackground, null, null); }8、程序运行最终界面如下:思考题:1、IStyleGalleryItem接口有哪些属性,各属性有何作用?2、叙述实现“设置网格”功能的编程思路。
ArcGIS二次开发测量功能
ArcGIS二次开发之实现测量功能ArcGIS二次开发之实现测量功能,源代码如下:copyright dedecmspublic override void OnMouseDown(int Button, int Shift, int X, int Y) {// TODO: Add Tool2.OnMouseDown implementationm_bInUse = true;m_pStartPoint =m_hookHelper.ActiveView.ScreenDisplay.DisplayTransformation.ToMapPoint(X, Y);}public override void OnMouseMove(int Button, int Shift, int X, int Y){// TODO: Add Tool2.OnMouseMove implementationbFirstTime = false;IPoint pPoint;IRgbColor pRGBColor;ILine pLine;ISymbol pSymbol = null;double dAngle;double dDeltaX;double dDeltaY;double dDistance;IPolyline pPolyline;ISegmentCollection pSegmentCollection;内容来自dedecmsif (m_pLinePolyline == null){bFirstTime = true;}pPoint = m_hookHelper.ActiveView.ScreenDisplay.DisplayTransformation.ToMapPoint(X, Y);m_hookHelper.ActiveView.ScreenDisplay.StartDrawing(m_hookHelper.ActiveView.ScreenDis play.hDC, -1);if (bFirstTime){m_pLineSymbol = new SimpleLineSymbolClass();m_pLineSymbol.Width = 1;pRGBColor = new RgbColorClass();pRGBColor.Red = 222;pRGBColor.Green = 222;pRGBColor.Blue = 222;m_pLineSymbol.Color = pRGBColor;pSymbol = m_pLineSymbol as ISymbol;pSymbol.ROP2 = esriRasterOpCode.esriROPXOrPen;m_pTextSymbol = new TextSymbolClass();织梦好,好织梦m_pTextSymbol.HorizontalAlignment = esriTextHorizontalAlignment.esriTHACenter;m_pTextSymbol.VerticalAlignment = esriTextVerticalAlignment.esriTVACenter;m_pTextSymbol.Size = 10;pSymbol = m_pTextSymbol as ISymbol;System.Drawing.Font pFont = new System.Drawing.Font("Arial", 10, FontStyle.Bold);m_pTextSymbol.Font = (stdole.IFontDisp)OLE.GetIFontDispFromFont(pFont);pSymbol.ROP2 = esriRasterOpCode.esriROPXOrPen;copyright dedecmsm_pTextPoint = new PointClass();}else{m_hookHelper.ActiveView.ScreenDisplay.SetSymbol((ISymbol)m_pTextSymbol);m_hookHelper.ActiveView.ScreenDisplay.DrawText(m_pTextPoint, m_pTextSymbol.Text);m_hookHelper.ActiveView.ScreenDisplay.SetSymbol((ISymbol)m_pLineSymbol);if (m_pLinePolyline.Length > 0){m_hookHelper.ActiveView.ScreenDisplay.DrawPolyline(m_pLinePolyline);}}pLine = new LineClass();pLine.PutCoords(m_pStartPoint, pPoint);dAngle = pLine.Angle;dAngle = dAngle * (180.0 / 3.14159);if ((dAngle > 90.0) && (dAngle < 180.0))dAngle = dAngle + 180.0;else if ((dAngle < 0.0) && (dAngle > -90.0))dAngle = dAngle - 180.0;else if ((dAngle < -90.0) && (dAngle > -180.0))dAngle = dAngle - 180.0;else if (dAngle > 180)dAngle = dAngle - 180;织梦好,好织梦dDeltaX = pPoint.X - m_pStartPoint.X;dDeltaY = pPoint.Y - m_pStartPoint.Y;m_pTextPoint.X = m_pStartPoint.X + dDeltaX / 2.0;m_pTextPoint.Y = m_pStartPoint.Y + dDeltaY / 2.0;m_pTextSymbol.Angle = dAngle;dDistance = System.Math.Round(pLine.Length, 3);m_pTextSymbol.Text = "[" + dDistance + "]";m_hookHelper.ActiveView.ScreenDisplay.SetSymbol((ISymbol)m_pTextSymbol);m_hookHelper.ActiveView.ScreenDisplay.DrawText(m_pTextPoint, m_pTextSymbol.Text);织梦内容管理系统object o=Type.Missing;pPolyline = new PolylineClass();pSegmentCollection = pPolyline as ISegmentCollection;pSegmentCollection.AddSegment((ISegment)pLine, ref o, ref o);m_pLinePolyline = GetSmashedLine(m_hookHelper.ActiveView.ScreenDisplay, (ISymbol)m_pTextSymbol, m_pTextPoint, pPolyline);m_hookHelper.ActiveView.ScreenDisplay.SetSymbol((ISymbol)m_pLineSymbol);if (m_pLinePolyline.Length > 0)m_hookHelper.ActiveView.ScreenDisplay.DrawPolyline(m_pLinePolyline);m_hookHelper.ActiveView.ScreenDisplay.FinishDrawing();}public override void OnMouseUp(int Button, int Shift, int X, int Y){// TODO: Add Tool2.OnMouseUp implementationm_bInUse = false;m_hookHelper.ActiveView.ScreenDisplay.StartDrawing(m_hookHelper.ActiveView.ScreenDis play.hDC, -1);m_hookHelper.ActiveView.ScreenDisplay.SetSymbol((ISymbol)m_pTextSymbol);m_hookHelper.ActiveView.ScreenDisplay.DrawText(m_pTextPoint, m_pTextSymbol.Text);m_hookHelper.ActiveView.ScreenDisplay.SetSymbol((ISymbol)m_pLineSymbol);if (m_pLinePolyline.Length > 0)m_hookHelper.ActiveView.ScreenDisplay.DrawPolyline(m_pLinePolyline);织梦内容管理系统m_hookHelper.ActiveView.ScreenDisplay.FinishDrawing();}public override bool Deactivate(){m_pTextSymbol = null;m_pTextPoint = null;m_pLinePolyline = null;m_pLineSymbol = null;m_bInUse = false;return true;}private IPolyline GetSmashedLine(IScreenDisplay pDisplay, ISymbol pTextSymbol, IPoint pPoint, IPolyline pPolyline){IPolygon pBoundary;ITopologicalOperator pTopologicalOperator;IPolyline pIntersect;本文来自织梦pBoundary=new PolygonClass();pTextSymbol.QueryBoundary(pDisplay.hDC,pDisplay.DisplayTransformation,pPoint,pBoundar y);pTopologicalOperator=pBoundary as ITopologicalOperator;pIntersect = pTopologicalOperator.Intersect(pPolyline,esriGeometryDimension.esriGeometry1Dimension) as IPolyline;pTopologicalOperator = pPolyline as ITopologicalOperator;return pTopologicalOperator.Difference(pIntersect) as IPolyline;}public override void OnDblClick(){m_hookHelper.ActiveView.Refresh();}#endregion}距离的测量:要实现的是测量两个点之间的距离。