CC2430核心板电路原理图
zigbeeCC243031模块使用说明书

nd注意事项:1,使用时请轻拿轻放,切勿扔摔。
2,轻拨轻推电源开关。
3,电池电压最好不要低于2.7V,因为cc2430芯片分辨哪个按键被按下时,是通过模拟量来分辨的,如果电压低于2.7V时,容易造成按键分辨不准确。
虽说CC2430芯片手册上说可以在2.0V工作,但那是最低电压,最好不要在芯片的最低电压点来工作。
最好使用碱性干电池,如南孚牌的等等。
4,做按键闪灯实验时,请不要太快速连续按键,按键动作尽量到位可靠,连续按键的间隔时间最好不少于5秒。
5,当使用电池供电的时候(也就是模块上的那个蓝色的开关按下的时候),请不要用仿真器给模块供电。
6、最好也好多看看光盘内的资料,在改动跳线帽等相关硬件连接的时候,请先多看看原理图。
最好在你熟悉了模块之后再改动跳线帽。
7、一定要顺着本模块使用说明书pdf文档仔细往下看,请不要急于求成,一定要仔细的照着本文档仔细操作,切不可急躁!!!安装软件篇:一、安装开发环境:在光盘cc2430模块资料\软件工具\IAR730目录下有730b注册机,具体用法看其里面的说明文本文件。
下面就安装过程做一简要介绍:在光盘cc2430模块资料\软件工具\IAR730目录下,双击EW8051-EV-730B.exe进入画面:点击next点击Accept:此时需要输入License,那么先解压730b注册机文件(在软件工具目录下),双击其里面的iarid.exe,可得到本机的ID,将此ID号保留好,等下有用。
然后在右击key.cmd文件,在弹出的下拉菜单中选择编辑,然后选择文本编辑器。
将上面得到的本机ID号替换掉key.cmd文件中的相应部分,也就是介于@IARKG.exe 和>key.txt之间的部分。
保存文件退出。
再双击key.cmd。
然后再打开key.txt文本。
其中的第二个Installserial就是需要的License。
将其填入即可Next将key.txt文本第二个key:之后的一段复制粘贴到License Key内然后一路Next即可完成安装。
CC2430仿真器 swru133
CC2430DK Development Kit User ManualRev. 1.0Table of contents1INTRODUCTION (3)2ABOUT THIS MANUAL (3)3DEFINITIONS (4)4KIT CONTENT (5)4.1H ARDWARE (5)5SMARTRF®04EB (6)5.1USB MCU (7)5.1.1Bootloader (7)5.1.2Programming USB controller (7)5.2USB MCU SIGNAL NAMES (8)6HARDWARE DESCRIPTION SMARTRF®04EB (9)6.1P OWERING S MART RF®04EB (10)6.2USB I NTERFACE (11)6.3RS-232 INTERFACE (11)6.4U SER INTERFACE (11)6.5A UDIO INTERFACE (11)6.6SPI INTERFACE SWAP JUMPERS ON S MART RF®04EB (12)6.7I/O CONNECTORS (13)6.8EM CONNECTORS (14)6.9S IGNAL FLOW (14)6.10EM LCD CONNECTION (15)7APPLICATION EXAMPLES AND RF TESTING (16)7.1S ETUP (16)7.2E XAMPLES (16)7.3RF TESTING (16)7.3.1Output power testing (16)8IAR EMBEDDED WORKBENCH (17)8.1D OWNLOAD THE LATEST IAR SOFTWARE (17)8.2I NSTALLATION OF DOWNLOADED EVALUATION VERSION FROM WEB (17)8.3I NSTALLATION FROM THE CD (19)8.4O BTAINING 60 DAYS ADDITIONAL LICENSE (20)8.5IAR E MBEDDED W ORKBENCH –K ICK S TART EDITION (20)9USING SMARTRF®04EB FOR PROTOTYPING (21)9.1U SING S MART RF®04EB AS AN I N-C IRCUIT E MULATOR (ICE) (21)9.2D EBUG INTERFACE (21)9.3S YSTEM-ON-C HIP D EBUG P LUG-I N BOARD (SOC_DEM) (22)10PROGRAMMING THE SOC WITH A HEX FILE (23)11SMARTRF®04EB TROUBLESHOOTING (23)12SMARTRF04DK SCHEMATICS (24)13EVALUATION MODULES (31)14DOCUMENT HISTORY (31)1 IntroductionThank you for purchasing a SmartRF®04DK Development Kit.Please note that Texas Instruments uses the term SmartRF®04DK as a collective term for all development kits on the Chipcon SmartRF®04 platform. This development platform supports evaluation, development and prototyping using the Chipcon SmartRF®04 products from Texas Instruments.Make sure to subscribe to the Low-Power RF eNewsletter to receive information about updates to documentation, new product releases and more. Sign up on the Texas Instruments RF/IF Components web site.2 About this manualThis manual contains both tutorial and reference information, and covers both the hardware and software components of the development kit.Further background information can be found in the the device datasheets.SmartRF® Studio has its own user manual.The Chipcon Flash Programmer has its own user manual.3 DefinitionsSmartRF ®04EBCC2430EMEvaluation Board. Main board with LCD, USB interface, LEDs, pot-meter etc. Platform for the Evaluation Modules (EM).CC2430 Evaluation Module, a small plug-in module for CC2430DK. Should be used as reference design for antenna and RF layout. SOC_DEM debug plug in boardSystem-on-Chip debug plug-in module, a small plug-in module that should be used together with SmartRF ®04EB when programming external target boards.SmartRF ®04EB Evaluation Board. Main board with LCD, USB interface, LEDs, pot-meter etc. Platform for the Evaluation Modules (EM, see below).SmartRF ®04DK A collective term used for all development kits for the SmartRF ®04platform, i.e. SmartRF ®04EB + EM.CC2430EM CC2430 Evaluation Module, a small plug-in module forSmartRF04DK, should be used as reference design for RF layout.USB MCU The Silicon Labs C8051F320 MCU used to provide a USB interfaceon the SmartRF04DK.Factory firmware The firmware that is supplied programmed into the USB MCU fromthe factory. This firmware supports SmartRF ® Studio operation as well as a stand-alone PER tester.PER Packet Error Rate. Counts the number of lost and/or faulty packetsand displays the ratio: (lost/faulty packets)/number of packets sent.SoC System on a Chip. A collective term used to refer to TexasInstruments ICs with on-chip MCU and RF transceiver. Used in this document to reference the CC2430.SoC_DEM SoC Debug plug-in Module ICE In Circuit Emulator.4 Kit content4.1 HardwareThe development kit contains the following:• 2 x SmartRF®04EB• 2 x evaluation module (CC2430EM)• 2 x 2.4GHz Antennas• 2 x USB cables• 1 x 10-wire flat cable for usingSmartRF®04EB as emulator forexternal target systems• 2 x SOC_DEM System on Chipdebug plug-in board•Quick start guideSmartRF®04EB with EMThe SmartRF04DK Development Kit includes a number of functions and applications that allows quick testing of the RF interface and peripherals of the chip.•Evaluate the SmartRF®04 products. Right out of the box, the kit can be used for range testing.• Use SmartRF® Studio to perform RF measurements. The radio can be easily configured to measure sensitivity, output power and other RF parameters.•Prototype development. The SmartRF04DK includes a USB interface that can be used as emulator interface for the CC2430. All CC2430 I/O ports are available on pin connectors on the edge of the board to allow external applications easy access to the CC2430. These connectors are also compatible with logic analyser probes for easy debugging.5 SmartRF®04EBThis chapter includes overall information that applies to SmartRF®04EB. In the following SoC means Chipcon System on Chip, i.e. CC2430.Figure 1: Main componentsFigure 1 shows the main components on the SmartRF®04EB. A USB cable from a PC is connected directly to the USB controller. When a SoC evaluation module is plugged into the SmartRF®04EB, the only purpose of the USB controller is to “translate” USB signals to the SoC 2-wire debug interface. This interface includes Debug Clock (DC) and Debug Data (DD). The USB controller also controls the Reset_n line connected to the SoC.Most of the peripherals on the SmartRF®04EB are connected to both the USB controller and to the SoC. This means that I/O ports on both controllers can drive the same pin. When the USB controller detects that a SoC is connected, it will therefore set all the I/O in three-state (high impedance) mode. The connection to the USB controller may anyhow somewhat influence these I/O lines.5.1 USB MCU5.1.1 BootloaderThe USB controller is programmed with a bootloader when it is shipped from the factory. The bootloader allows programming of new code into the USB MCU without the Silicon Labs’ serial adapter. The bootloader communicates with SmartRF® Studio or a custom program via USB.5.1.2 Programming USB controllerIf it is required to update the firmware of the USB MCU, this can be done using the SmartRF®04 programming software (Chipcon Flash Programmer or SmartRF® Studio). For use of Chipcon Flash Programmer please refer to Chipcon Flash Programmer user manual for instructions. The USB controller can only be updated via USB when no EM is connected to the SmartRF®04EB.To download firmware to the USB MCU without using the bootloader or to download the bootloader in the first place, a Silicon Labs’ EC2 serial adapter (Figure 2) is required. This adapter should be connected to P301, marked “USB MCU debug”, on the SmartRF®04EB.Figure 2: EC2 serial adapter5.2 USB MCU signal namesThe USB MCU is a C8051F320 from Silicon Labs. Please see the Silicon Labs web site for detailed information about this MCU.The following table shows the usage of I/O pins on the USB MCU.Pin no. Pin name(USB MCU)Signal nameSmartRF®04EB0-ohmresistorFunction1 P0.1 P1.7/SO/GDO1/MISO R117 SPI MISO signal,transceiver/transmitter SO/GDO22 P0.0 P1.5/SCLK R115 SPI Serial clock10 P3.0/C2D USB MCU Debug pin11 P2.7 P1.3/LED3 R113 LED3 (yellow), active low12 P2.6 P0.4/RTS R10013 P2.5 RS232_POWER Turns RS-232 level converter on/off14 P2.4 P2.0/LED_4 R120 LED4 (Blue), active low15 P2.3 RESET_N LCD Power on reset signal, SoCRESET16 P2.2 SOC_PRESENT Tells USB MCU whether a SoC ispresent.0 = transmitter/transceiver1 = SoC17 P2.1 P0.6/JOY R106 Joystick input (analogue codedvoltage)18 P2.0 P1.2/LED2 R111 LED2 (Red), active low19 P1.7 P1.0/LED1 R110 LED1, (Green), active low20 P1.6 P0.7/POT R107 Potentiometerinput21 P1.5 P0.5/JOY_PUSH R112 Joystickpushed22 P1.4 P1.1/PWM_OUTPUT R105 PWM audio output23 P1.3 P0.1/BUTTON_PUSH R101 Buttonpushed24 P1.2 P0.0/MIC_INPUT R104 Audioinput25 P1.1 P2.4/SCL R124 I2S clock (for LCD)26 P1.0 P2.3/SDA R123 I2S data (for LCD)27 P0.7 P2.2/GDO2/DC R122 Transceiver/transmitter GDO3, SoCdebug signal28 P0.6/CNVSTR P2.1/GDO1/DD R121 Transceiver/transmitter GDO1, SoCdebug signal29 P0.5 P0.2/UART_RD R102 UARTRD30 P0.4 P0.3/UART_TD R103 UARTTD31 P0.3/XTAL2 P1.4/CSn/SS R114 SPI slave select signal32 P0.2/XTAL1 P1.6/MOSI R116 SPI MOSI signal,Transceiver/Transmitter SITable 1: USB MCU pin-outAs mentioned in the table, the joystick output is coded as an analogue voltage. This has been done in order to save the number of pins required on the MCU to interface with the joystick. The SoC software libraries contain functions to decode the ADC values and indicate in what direction the joystick is moved. The push function of the joystick is treated as a separate digital signal.6 Hardware description SmartRF ®04EBFigure 3: SmartRF04DK overviewThe figure above shows the major parts of the SmartRF ®04EB. The SmartRF ®04EB serves as main platform in the development kit.connector Joystick LEDsI/O connector AI/O connector BVolume controlUSB MCU USB MCUSmartRF®04EB6.1 PoweringIf several power sources are connected to SmartRF®04EB the board will be powered from the supply that supplies the highest voltage.Figure 4: Power switch settingThe Power Switch S3 must be set according to what power source is used. If 3.3V is applied using the power terminal block, the switch should be set to the left position. In all other cases, the switch should be set to the right position for power to be applied to the SmartRF®04EB. This switch can be used to turn off the SmartRF®04EB by switching it to the opposite position of that used to turn it on.Figure 5: Power connectorThe SmartRF®04EB can be powered in several different ways:•DC jack connector with standard DC jack power connectors with a 2.5mm centre pin. The centre pin is used for the positive voltage. A 4-10V DC power supply should be used. The onboard voltage regulator supplies 3.3V to the board.•Laboratory power supply. Ground should be connected to the 0V terminal on the power connector (see Figure 5). A 4-10V supply can be connected to the “4-10V” terminal, or a3.3V supply can be connected to the “3.3V” terminal. The on-board voltage regulators willbe bypassed when using the “3.3V” terminal. Therefore it is important that the voltage level is within these limits:o 2.7V-3.6V when the USB interface is not active.o 3.0V-3.6V when the USB interface is active.•USB power. If the SmartRF®04EB is connected to a USB socket on a PC, it will draw power from the USB bus. The onboard voltage regulator supplies 3.3V to the board. •Battery power. The evaluation board includes a 9V-type battery connector on the bottom side of the PCB. A 9V battery or a battery pack that uses a 9V-type connector can be connected to this battery connector. The onboard voltage regulator supplies 3.3V to the board.Please note that while the SmartRF®04 devices have a wide supply range, the components on the SmartRF®04EB limit the total voltage supply range to 2.7V – 3.6V (3.0V – 3.6V while the USB is active). The SmartRF®04EB has been designed for a temperature range of –40°C to +85°C (excluding the LCD display). The EM is designed for a temperature range of -40°C to +85°C.Interface6.2 USBThe USB interface is used to interface to a PC to run SmartRF® Studio and for programming and debugging using the PC debugging tools and programmers. If SmartRF® Studio connects to the SmartRF®04EB and detects an old version of the USB MCU firmware, the USB MCU will be upgraded via this interface. The SmartRF®04EB can be bus-powered from the USB interface.interface6.3 RS-232The RS-232 can be used by custom applications for communication with other devices. The RS-232 interface utilises a voltage translation device so that the RS-232 port is compatible with bipolar RS-232 levels.Note that this RS-232 level converter contains a charge-pump power supply that generates electrical noise. The RS-232 voltage converter can be disabled by driving pin P2.5 on the USB MCU low (the same pin is used to disable the headphone amplifier).interface6.4 UserThe SmartRF®04EB includes a joystick and a push button as user input devices, and four LEDs and a 2x16 character LCD display as user output devices. The display and user interface is by default controlled by the factory firmware in the SoC.interface6.5 AudioThe SmartRF®04EB includes a microphone input and headphone output.The audio output section consists of a volume control, followed by a 4th order Chebychev filter. This filter serves to attenuate frequencies above 6 kHz, and so converts the PWM signal to an analogue audio signal. A headphone amplifier IC (TPA4411 from Texas Instruments) is used to drive the headphones.Note that the headphone amplifier IC uses switch-mode power supply techniques to generate negative voltages, and this may cause electrical noise. The headphone amplifier can be disabled by driving pin P2.5 on the USB MCU low (the same pin is used to disable the RS-232 voltage converter).The audio input section consists of a microphone amplifier that also includes a low-pass anti-aliasing filter. In order to use the audio/microphone input, a resistor (preferably 0 Ohm) has to be mounted at position R104 on the backside of the SmartRF®04EB. The R104 resistor connects the audio/microphone input (an analogue signal) to an associated EM pin. When a SoC EM is used together with a SmartRF®04EB, the audio/microphone input may generate interrupts and e.g. wake the SoC up from Power Mode 2. Therefore the R104 resistor is not mounted on SmartRF®04EB rev. 2.0.1 (and newer revisions). Note that the SmartRF®04EB revision is stated on a stick-on label located on the backside of the board.A standard PC-type headset with separate microphone and headphone mini-jacks can be connected directly to the audio interface.6.6 SPI interface swap jumpers on SmartRF®04EBThe SPI swap jumpers at P3 shall be set according to Figure 6.Figure 6: SPI jumper setting6.7 I/OconnectorsThe I/O connectors bring out all the signals from the EM connectors. These connectors are compatible with Agilent logic analyser probes. The connectors allow easy access to I/O signals and to connect prototyping boards.Pin Function1 N/C2 N/C3 P0_0/MIC_IN4 VDD5 VDD6 N/C7 P0_1/BUTTON_PUSH8 N/C9 P0_2/UART_RD10 N/C11 P0_3/UART_TD12 N/C13 P0_4/RTS14 N/C15 P0_5/JOY_PUSH16 N/C17 P0_6/JOY18 N/C19 P0_7/POT20 GNDTable 2: I/O connector A (P10) pin-outPin Function1 N/C2 N/C3 VDD4 P2_0*/LED45 P1_0/LED16 P2_1/DD7 P1_1/PWM_OUTPUT8 P2_2/DC9 P1_2*/LED210 P2_3*/SDA11 P1_3/LED312 P2_4*/SCL13 P1_4/CSn14 N/C15 P1_5/SCLK16 RESET_N17 P1_6/MOSI18 Debug Data Direction(DD_DIR)19 P1_7/MISO20 GNDTable 3: I/O connector B (P11) pin-out,* see chapter 6.10.connectors6.8 EMThe EM connectors are used for connecting the EM to the SmartRF®04EB. The connectors P1 and P2 are used as the main interface.The EM should be used as an RF reference design with the Chipcon SoC, decoupling, and all required RF circuitry. It is recommended to copy this reference design when designing applications with Chipcon RF devices in order to achieve best RF performance.Note that while it is physically possible to plug an EM not belonging to the SmartRF®04 product range into the SmartRF®04EB, the factory firmware and SmartRF® Studio do not support the use of older devices. The SmartRF®04EB can be used with custom firmware for prototyping using older Chipcon RF devices.flow6.9 SignalFigure 7: Evaluation Board Signal flowThe signal lines from the EM connectors run via 0-ohm resistors to the USB MCU and the various peripherals on the SmartRF®04EB. This allows connecting an EM module to other applications. The USB MCU can be disconnected from the signal pins by removing the 0-ohm resistors. The I/O connectors are located on the “outside” of the 0-ohm resistors, so they are still connected to the EM connectors even if the 0-ohm resistors are removed. Please refer to Table 1 on page 8 for a list of 0-ohm resistors and corresponding signals.The SmartRF®04EB may not work with In-Circuit Emulator (ICE), SmartRF® Studio or the SW examples when the 0-ohm resistors are removed.6.10 EM LCD connectionPlease note that the I/O pins P2_3 and 2_4 on the SoC are connected to a 32 kHz X-oscillator on the CC2430EM boards. The LCD display is therefore internally, on the EM, swapped from P1_2 to P2_3 and P2_0 to P2_4 as shown in Figure 8. Therefore there is no access to LED2 (red) and LED4 (blue) from the SoC.P2_3P2_4Figure 8: EM LCD connection7 Application examples and RF testingThis section identifies what example software comes with the CC2430 development kit and also describes how to use the kit for fundamental RF testing.7.1 Setup1. Plug two Evaluation Modules into the two Evaluation Boards.2. Connect antennas to both EM boards3. Apply power to the Development Kits. See chapter 6.1 for more information aboutvarious ways of powering the Development Kit.4. Turn on power by setting the power switch correctly.For a more detailed explanation, see the “Quick Start Instructions” for the development kit in question.7.2 ExamplesThe CC2430 development kit is accompanied by the IEEE 802.15.4 MAC and Z-Stack software. These together with a corresponding user guide can be downloaded from the Texas Instruments web site.testing7.3 RFRF testing is best performed by using SmartRF® Studio together with the Development Kit. Connect the SmartRF04DK to a PC using the USB interface. Start the SmartRF® Studio and select the SmartRF®04 tab. Select the correct Development Kit (several Development Kits can be connected to a PC at once), it should be listed as “CC2430 – new device”, and click the Start button. In the main SmartRF® Studio window settings can be changed, tests performed and registers adjusted. RF measurement equipment may be connected to the SMA connector on the EM.Please see the SmartRF® Studio documentation for more information about the operation of SmartRF® Studio.7.3.1 Output power testingFigure 9: Output power measurement set upPlug an EM into the SmartRF04DK, and connect the Development Kit to a PC using USB. Start SmartRF® Studio. Connect the antenna port of the EM board to a spectrum analyser using a 50-ohm RF coaxial cable. Use the simple TX function in SmartRF® Studio to set up the RF chip to emit a carrier at the desired frequency. An accurate measure of the output power can now be made. Enable the “Unmodulated carrier” checkbox to ensure that all the RF energy is included in the measurement. Using good-quality RF cabling, the loss in the cabling should be negligible. However make sure that the spectrum analyser is calibrated. If possible, check it against a calibrated instrument such as an RF signal generator. Uncalibrated spectrum analysers can display errors of several dBs.8 IAR Embedded WorkbenchAn evaluation version of IAR Embedded Workbench is included in the CC2430 development kit. This chapter describes how to obtain an IAR license number, how to install the IAR evaluation version and how to obtain a license for 60 days additional evaluation.The 60 days additional evaluation time is provided to all TI Low Power Wireless development kit customers.8.1 Download the latest IAR softwareThe latest evaluation version of IAR Embedded Workbench for 8051 can be downloaded from: /Download/SW/?item=EW8051-EVAL8.2 Installation of downloaded evaluation version from webRun the downloaded installation program and follow the instructions. You will have to register with IAR to get an e-mail with a link to a “Registration confirmed” web site. This is the web site that contains your license number and license key. An example is shown in Figure 10.Figure 10: IAR registration confirmed web site exampleThe license number and license key from the “Registration confirmed” web page are required during the installation.Please note that you shall use the license number from the “Registration confirmed” web site even though the installation program states that the license number can be found on the CD cover.Figure 11: IAR installation screen shot8.3 Installation from the CDIt’s recommended to install the latest version as described above. But if you anyhow prefer to install from the IAR CD delivered with the kit, please follow the procedure below.1. Insert the CD2. Click “Install the IAR Embedded Workbench”Figure 12: IAR installation from CD, step 13. Click “IAR online registration”Figure 13: IAR installation from CD, step 24. Follow the instructions given on screen. The registration and licensing procedure isequal to the procedure explained in chapter 8.2.8.4 Obtaining 60 days additional licenseTo obtain a license for additional 60 days evaluation, please contact your local IAR sales representative. For a list of sales offices and distributors in your country, please see this site: /contact8.5 IAR Embedded Workbench – KickStart editionAs an alternative to the time limited evaluation version, IAR also offers a code size limited version that you can use as long as you want. This is called the IAR Embedded Workbench – KickStart edition. The code size limitation for the KickStart edition for 8051 is currently 4 kB.The kickstart edition of IAR Embedded Workbench is a code size limited but fully functional integrated development environment, ideal for creating small applications or for getting started fast on a new project. The kickstart eidition is completely free of charge and you may use it for as long as you want. The only requirement is that you register to get a license key.The kickstart edition of IAR Embedded Workbench includes project manager, editor, C/C++ compiler, assembler, linker, librarian and debugger tools. A complete set of user guides is included in PDF format.More information is found on this web site: /p89661/p89661_eng.php#ks. Please choose the version for the 8051 processor family / core, not the version for the Texas Instruments MSP430 processor family / core.9 Using SmartRF®04EB for prototypingSmartRF®04EB includes a debug and programming interface. The debug interface is controlled by 2 communication pins. On the SmartRF®04EB the interface is controlled by the USB MCU. This allows both programming and an emulator interface using the USB port.Table 1 on page 8 shows which pins on the MCU that are used for various peripheral functions. P10 and P11 pin-row connectors can be used to connect the SmartRF®04EB to another PCB or prototyping board.SmartRF®04EB as an In-Circuit Emulator (ICE)9.1 UsingThe SmartRF®04EB can be used as ICE both for devices connected to the EM socket and for external systems with custom applications. Figure 14 shows the main components on SmartRF®04EB when it’s used as ICE. Please notice that if the SmartRF®04EB is used to debug an external system, the EM shall be removed, and vice versa. It is strongly recommended to use the SOC_DEM in the EM connector slot when the SmartRF®04EB is used to debug an external system, please see section 9.3.Figure 14: SmartRF®04EB used as ICEIf several SmartRF®04EB boards are connected to the USB ports simultaneously a selection window will display the connected SmartRF®04EBs, and the user can select which device to load. This is valid for all Chipcon PC software.interface9.2 DebugWhen designing applications with Chipcon SoC’s it is recommended to include a pin header or test points to allow in-circuit emulation or programming using SmartRF®04EB or other programming tools.The pin-out used on the SmartRF®04EB is explained in Table 4. The connector includes 4 SPI control signals. These are currently not used, but they are included for flexibility.The SmartRF®04EB includes a voltage converter to support programming and debugging of external systems with different operating voltage than the SmartRF®04EB. The debug connector (P14, “SoC debug/ flash”) includes two VDD connections on pin 2 and pin 9. The function is different for these connections.Pin 2 VDD supplies voltage to the voltage converter. This pin should be connected to VDD, on the external board to assure that the correct supply voltage is used for the voltage converter. This pin must always be connected. The voltage on the target system must be above 2.7 V when debugged from SmartRF®04EB.Pin 9 VDD supplies VDD (3.3 V) from the SmartRF ®04EB. If the target application is powered from the SmartRF ®04EB supply during programming and debugging this pin should be connected. If the target voltage differs from 3.3V, this pin should not be connected.The pin out used on the SmartRF ®04EB is explained in Table 4 and Figure 15. All signals in bold in the table are required. Figure 15 shows the required signals for a minimum connector layout.Pin Function Note 1 GND2 VDDUsed to set correct voltage for the voltage level converter3 Debug Clock (DC)4 Debug Data (DD)5 CSn6 SCLK7 Reset_N8 MOSI9 3.3V VDD, alt. NC Delivers VDD from SmartRF ®04EB 10 MISOTable 4: P14 SoC debug connector pin-outFigure 15: Recommended debug connector layout (Top view)9.3System-on-Chip Debug Plug-In board (SOC_DEM)The CC2430 DK is equipped with two System on Chip Debug Plug-in boards (SOC_DEM) asshown in Figure 16.The SOC_DEM provides an additional physical SoC debug/programming interface for the SmartRF ®04EB. These boards are included because the original debug interface on the SmartRF04®EB P14 is known to be unreliable in certain situations.When programming and/or debugging a target board using the SmartRF ®04EB as In Circuit Emulator (ICE) it is recommended to always use the SOC_DEM board in stead of the SmartRF ®04EB P14 SoC debug/flash connector.Figure 16: SOC_DEM boardPlease note that the SmartRF ®04EB P14 SoC debug/flash connector provides an SPI interface in addition to the Chipcon debug interface. This SPI interface is NOT provided by the SOC_DEM. However, it is neither needed for programming nor debugging of Chipcon System-on-Chip products.10 Programming the SoC with a HEX fileThe SoC can be programmed from the USB interface using the Chipcon programming software. Figure 17 shows the user interface of the Chipcon Flash Programmer. For additional information regarding the Chipcon Flash Programmer please refer to the Chipcon Flash Programmer User Manual.Figure 17: Chipcon Flash programmer software11 SmartRF®04EB TroubleshootingPlease refer to Texas Instruments Design Note, DN300 for SmartRF®04EB troubleshooting: DN300 - SmartRF04EB Troubleshooting。
基于CC2430的串口无线模块的设计
3 hij 4& 56 (%2[ " kMNlmnopqr
? s t u v w x y !z { | } ~ " !t
&&&&( n ! g u 4 56 #4& 56 ( s
y !ntuvwx " !"56P. .0$%$ VN !+, ! . ,’-$%$ A .0$%$ 2[4 117 2[ "
90;").I #(’JK/J"’9 L> 9 DMAN1 V Ç #9 L> 9 $*)#*O. #O)* # È É Ê Ë " ..’/(0 ? Ì > ’:/ PQR Í Î ! w K Ï Ð S’:0 TU(:K TV Ñ Ò [ Ó Ô Ï % lm2 ’F @*! *lm2 ’; @* &# Õ
98*720:7’,1? 1ABX‘AB? A6X N5aC‘AB? X?N2=626=N 5a A ‘2B?M?NN $D _62C ZAN?X 56 ..’/(0 AB? 26CB5X_4?X: ,1? ZAN2N 41ABA4C?B2NC24N 5a ..’/(0 2N =2b?6! A6X C1? @?AN_B?N 5a B?NCBA2626= a5B ?M?4CB@A=6?C24 26C?B# a?B? X2N4_NN?X: ;)< 1.2=*’ ‘2B?M?NN $D _62Cc ..’/(0c I*$, ..’/(0 « ¬ ® .123456 ¯ ° ! U = ± ² ³ ´ µ 788890’:";:/ ¶¦’·¨ <2=>?? ¸¹ " ..’/(0 w K .123456 ¯ ° º » 9 %@ABC$D 0( & 0 0:"9 !@ .)E% ? ¼ D ½ ! w K F @@ !F @@ G-H/9 ¾
CC2430芯片简介
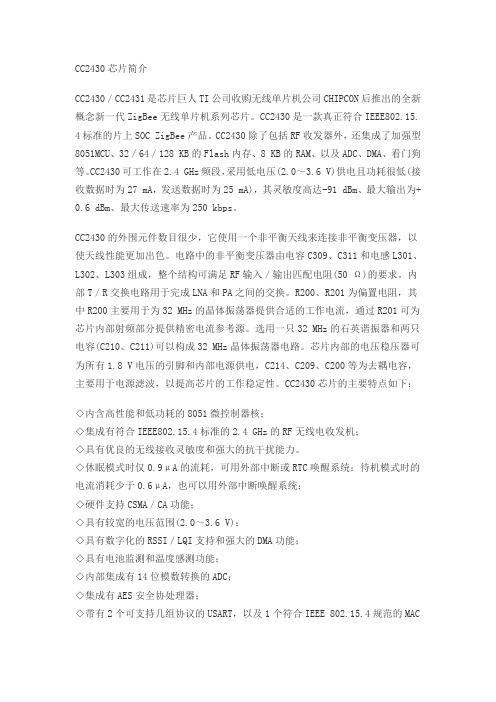
CC2430芯片简介CC2430/CC2431是芯片巨人TI公司收购无线单片机公司CHIPCON后推出的全新概念新一代ZigBee无线单片机系列芯片。
CC2430是一款真正符合IEEE802.15. 4标准的片上SOC ZigBee产品。
CC2430除了包括RF收发器外,还集成了加强型8051MCU、32/64/128 KB的Flash内存、8 KB的RAM、以及ADC、DMA、看门狗等。
CC2430可工作在2.4 GHz频段,采用低电压(2.0~3.6 V)供电且功耗很低(接收数据时为27 mA,发送数据时为25 mA),其灵敏度高达-91 dBm、最大输出为+ 0.6 dBm、最大传送速率为250 kbps。
CC2430的外围元件数目很少,它使用一个非平衡天线来连接非平衡变压器,以使天线性能更加出色。
电路中的非平衡变压器由电容C309、C311和电感L301、L302、L303组成,整个结构可满足RF输入/输出匹配电阻(50 Ω)的要求。
内部T/R交换电路用于完成LNA和PA之间的交换。
R200、R201为偏置电阻,其中R200主要用于为32 MHz的晶体振荡器提供合适的工作电流,通过R201可为芯片内部射频部分提供精密电流参考源。
选用一只32 MHz的石英谐振器和两只电容(C210、C211)可以构成32 MHz晶体振荡器电路。
芯片内部的电压稳压器可为所有1.8 V电压的引脚和内部电源供电,C214、C209、C200等为去耦电容,主要用于电源滤波,以提高芯片的工作稳定性。
CC2430芯片的主要特点如下:◇内含高性能和低功耗的8051微控制器核;◇集成有符合IEEE802.15.4标准的2.4 GHz的RF无线电收发机;◇具有优良的无线接收灵敏度和强大的抗干扰能力。
◇休眠模式时仅0.9μA的流耗,可用外部中断或RTC唤醒系统:待机模式时的电流消耗少于0.6μA,也可以用外部中断唤醒系统;◇硬件支持CSMA/CA功能;◇具有较宽的电压范围(2.0~3.6 V);◇具有数字化的RSSI/LQI支持和强大的DMA功能;◇具有电池监测和温度感测功能;◇内部集成有14位模数转换的ADC;◇集成有AES安全协处理器;◇带有2个可支持几组协议的USART,以及1个符合IEEE 802.15.4规范的MAC计时器。
基于Zigbee协议的无线温度传感器设计

关键词:ZigBee,CC2430,DS18B20
Design of temperature wireless detection device based on ZigBee
推荐 CC2430 简介 芯片的典型应用电路图 精品

cc2430引脚排列图及典型电路CC2430是一颗真正的系统芯片(SoC)CMOS解决方案。
这种解决方案能够提高性能并满足以ZigBee为基础的2.4GHz ISM波段应用,及对低成本,低功耗的要求。
它结合一个高性能2.4GHz DSSS(直接序列扩频)射频收发器核心和一颗工业级小巧高效的8051控制器。
CC2430的设计结合了8Kbyte的RAM及强大的外围模块,并且有3种不同的版本,他们是根据不同的闪存空间32,64和128kByte来优化复杂度与成本的组合。
CC2430尺寸CC2430的尺寸只有7×7mm 48-pin的封装,采用具有内嵌闪存的0.18µm CMOS标准技术。
这可实现数字基带处理器,RF、模拟电路及系统存储器整合在同一个硅晶片上。
MCU和存储器子系统针对协议栈,网络和应用软件的执行对MCU处理能力的要求,CC2430包含一个增强型工业标准的8位8051微控制器内核,运行时钟32MHz。
由于更快的执行时间和通过除去被浪费掉的总线状态的方式,使得使用标准8051指令集的CC2430增强型8051内核,具有8倍的标准8051内核的性能。
CC2430包含一个DMA控制器。
8k字节静态RAM,其中的4k字节是超低功耗SRAM。
32k,64k或128k字节的片内Flash块提供在电路可编程非易失性存储器。
CC2430集成了4个振荡器用于系统时钟和定时操作:一个32MHz晶体振荡器,一个16MHz RC-振荡器,一个可选的32.768kHz晶体振荡器和一个可选的32.768kHz RC 振荡器。
CC2430也集成了用于用户自定义应用的外设。
一个AES协处理器被集成在CC2430,以支持IEEE802.15.4 MAC 安全所需的(128位关键字)AES 的运行,以实现尽可能少的占用微控制器。
中断控制器为总共18个中断源提供服务,他们中的每个中断都被赋予4个中断优先级中的某一个。
cc2430硬件设计

硬件设计本系统将CC2430/1芯片进行了模块化设计,即每片芯片均采用单独的PCB,将PCB预留足够的外部接口引脚,再通过这些外部接口引脚将贴装有CC2430/1的PCB与各种不同功能主板连接,实现不同的功能设备。
同时由于CC2430与CC2431的引脚兼容,所以上图的设计同样适用于CC2431。
本系统的参考节点(RN)采用CC2430芯片,盲点(BN)采用CC2431芯片,但是这两种设备的芯片外围设计(PCB模块设计)是完全一致的。
RN模块电路包括外围电路设计和功放设计两部分。
CC2430 RF模块的外围电路设计按照芯片技术手册,CC2430/1的外围电路设计如下图所示。
图中,除P2_3和P2_4引脚留出外接晶振之外,P0_0至P2_2引脚全部引出作为接口。
其它引脚连接方法均按照CC2430/1芯片手册所述规则设计,相关的偏置阻容值和匹配阻容值均参照TI公司与CC2430/1相关的应用笔记。
RF输入输出为高阻抗差分式,引脚分别为RF_n与RF_p,内部含有T/R选择开关电路,用于收发电路切换,这种切换操作大致需要192μS的时间。
本设计采用单极天线,为了获得最好的通信性能,应采用非平衡变压器。
分立器件L321、L331、L341以及C341构成非平衡变压器,用来连接差分输出端和单极天线。
由于天线距离RF引脚有一段距离,所以需要针对天线到RF引脚的反馈传输线设计阻抗匹配,由于是单极天线,所以匹配阻抗为50Ω,这部分阻抗由非平衡变压器和PCB微带传输线组成,微带传输线实际上就是λ/2阻抗匹配,λ为PCB传输线上微波波长。
在选配天线方面,除了单极天线之外,还可以使用平衡天线(偶极天线),TI同样推荐使用这种方案并提供参考设计。
如果采用平衡天线,那么就可以省略非平衡电压器,但是天线的长度要比单极天线长近一倍(天线长度的计算可参见CC2430技术数据手册)。
其它天线方案经尝试均有各种弊端,不宜采用。
如,PCB 天线会占用较大面积,增加设备尺寸;线圈天线很难设计阻抗匹配;螺旋天线很难调试到最优状态。
基于CC2430的无线家居系统的设计

本科毕业论文题目:基于CC2430的无线家居系统的设计院(部):信息与电气工程学院专业:电子信息工程班级:姓名:学号:指导教师:完成日期:目录摘要 (III)ABSTRACT........................................................................................................................... I V 1前言.. (1)1.1课题研究的背景及意义 (1)1.2国内外研究现状 (1)1.3论文的研究思路与文章结构 (2)1.4文章结构 (3)2 ZigBee技术研究 (4)2.1ZigBee技术概述 (4)2.2ZigBee技术的特点 (5)2.3ZigBee协议框架 (6)2.3ZigBee技术的应用 (7)2.4本章小结 (8)3无线家居系统硬件设计 (9)3.1系统硬件组成 (9)3.2CC2430核心电路设计 (9)3.2.1 CC2430电源电路设计 (11)3.2.2时钟部分设计 (12)3.2.3射频天线单元设计 (12)3.2.4串口通信单元设计 (13)3.3传感器设计 (13)3.4电源电路的设计 (23)3.5窗帘控制节点硬件设计 (24)3.6万能遥控器控制节点硬件设计 (25)3.7本章小结 (26)4 无线家居系统系统软件设计 (27)4.1系统功能 (27)4.2数据发送 (28)4.3数据接收 (30)4.4本章小结 (31)结论 (32)致谢 (33)参考文献 (34)附录 (35)摘要随着计算机技术、通信技术和自动化技术的不断发展,作为集这三种技术于一体的智能家居系统逐渐成为热门话题,智能家居行业也得到很好的发展。
近几年来,人们对生活品质的要求也日益提高,他们对智能家居系统的需求不仅仅局限于只能提供自动控制,更希望还能提供舒适、安全、方便控制的居家环境。