spring cloudspring boot同时支持http和https访问
springboot配置多个请求服务代理的完整步骤
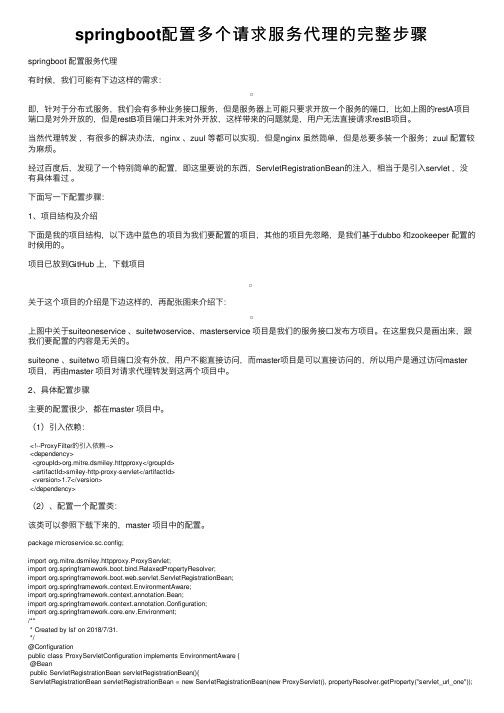
springboot配置多个请求服务代理的完整步骤springboot 配置服务代理有时候,我们可能有下边这样的需求:即,针对于分布式服务,我们会有多种业务接⼝服务,但是服务器上可能只要求开放⼀个服务的端⼝,⽐如上图的restA项⽬端⼝是对外开放的,但是restB项⽬端⼝并未对外开放,这样带来的问题就是,⽤户⽆法直接请求restB项⽬。
当然代理转发,有很多的解决办法,nginx 、zuul 等都可以实现,但是nginx 虽然简单,但是总要多装⼀个服务;zuul 配置较为⿇烦。
经过百度后,发现了⼀个特别简单的配置,即这⾥要说的东西,ServletRegistrationBean的注⼊,相当于是引⼊servlet ,没有具体看过。
下⾯写⼀下配置步骤:1、项⽬结构及介绍下⾯是我的项⽬结构,以下选中蓝⾊的项⽬为我们要配置的项⽬,其他的项⽬先忽略,是我们基于dubbo 和zookeeper 配置的时候⽤的。
项⽬已放到GitHub 上,下载项⽬关于这个项⽬的介绍是下边这样的,再配张图来介绍下:上图中关于suiteoneservice 、suitetwoservice、masterservice 项⽬是我们的服务接⼝发布⽅项⽬。
在这⾥我只是画出来,跟我们要配置的内容是⽆关的。
suiteone 、suitetwo 项⽬端⼝没有外放,⽤户不能直接访问,⽽master项⽬是可以直接访问的,所以⽤户是通过访问master 项⽬,再由master 项⽬对请求代理转发到这两个项⽬中。
2、具体配置步骤主要的配置很少,都在master 项⽬中。
(1)引⼊依赖:<!--ProxyFilter的引⼊依赖--><dependency><groupId>org.mitre.dsmiley.httpproxy</groupId><artifactId>smiley-http-proxy-servlet</artifactId><version>1.7</version></dependency>(2)、配置⼀个配置类:该类可以参照下载下来的,master 项⽬中的配置。
springboot配置https
精心整理精心整理Springbootssl 配置一、 内置tomcat 配置:1、生成证书(本地jdk 生成),并放到工程下:keytool-genkey-aliastomcat-storetypePKCS12-keyalgRSA-keysize2048-keystorekeystore.p12-validit y3650-storetype 指定密钥仓库类型-keyalg 生证书的算法名称,RSA 是一种非对称加密算法-keysize 证书大小2、3在}};tomcat.addAdditionalTomcatConnectors(httpConnector());returntomcat;}@BeanpublicConnectorhttpConnector(){Connectorconnector=connector.setScheme("http");//Connector 监听的http 的端口号connector.setPort(80);精心整理精心整理connector.setSecure(false);//监听到http 的端口号后转向到的https 的端口号connector.setRedirectPort(443);returnconnector;}重新启动工程,访问会自动跳转到上二、 外部tomcat 配置ssl1、生成证书,方法如同“一”中所述。
2、修改tomcat/config/server.xml 中内容maxThreads="150"SSLEnabled="true"scheme="https"secure="true" clientAuth="false"sslProtocol="TLS"Ssl 3、配置修改修改。
springboot静态资源访问,和文件上传,以及路径问题
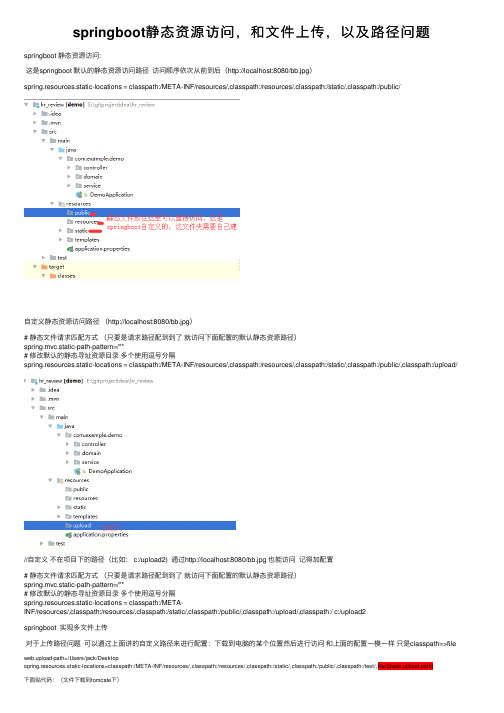
springboot静态资源访问,和⽂件上传,以及路径问题springboot 静态资源访问:这是springboot 默认的静态资源访问路径访问顺序依次从前到后(http://localhost:8080/bb.jpg)spring.resources.static-locations = classpath:/META-INF/resources/,classpath:/resources/,classpath:/static/,classpath:/public/⾃定义静态资源访问路径(http://localhost:8080/bb.jpg)# 静态⽂件请求匹配⽅式(只要是请求路径配到到了就访问下⾯配置的默认静态资源路径)spring.mvc.static-path-pattern=/**# 修改默认的静态寻址资源⽬录多个使⽤逗号分隔spring.resources.static-locations = classpath:/META-INF/resources/,classpath:/resources/,classpath:/static/,classpath:/public/,classpath:/upload///⾃定义不在项⽬下的路径(⽐如: c:/upload2) 通过http://localhost:8080/bb.jpg 也能访问记得加配置# 静态⽂件请求匹配⽅式(只要是请求路径配到到了就访问下⾯配置的默认静态资源路径)spring.mvc.static-path-pattern=/**# 修改默认的静态寻址资源⽬录多个使⽤逗号分隔spring.resources.static-locations = classpath:/META-INF/resources/,classpath:/resources/,classpath:/static/,classpath:/public/,classpath:/upload/,classpath:/ c:/upload2springboot 实现多⽂件上传对于上传路径问题可以通过上⾯讲的⾃定义路径来进⾏配置:下载到电脑的某个位置然后进⾏访问和上⾯的配置⼀模⼀样只是classpath=>file web.upload-path=/Users/jack/Desktopspring.resources.static-locations=classpath:/META-INF/resources/,classpath:/resources/,classpath:/static/,classpath:/public/,classpath:/test/,file:${web.upload-path}下⾯贴代码:(⽂件下载到tomcate下)html:<body><form enctype="multipart/form-data" method="post" action="/upload">⽂件:<input type="file" name="head_img"/>姓名:<input type="text" name="name"/><input type="submit" value="上传"/></form></body>下载⼯具类:/*** 提取上传⽅法为公共⽅法* @param uploadDir 上传⽂件⽬录* @param file 上传对象* @throws Exception*/private void executeUpload(String uploadDir,MultipartFile file) throws Exception{//⽂件后缀名String suffix = file.getOriginalFilename().substring(file.getOriginalFilename().lastIndexOf("."));//上传⽂件名String filename = UUID.randomUUID() + suffix;//服务器端保存的⽂件对象File serverFile = new File(uploadDir + filename);//将上传的⽂件写⼊到服务器端⽂件内file.transferTo(serverFile);}controller:@RequestMapping(value = "/uploads",method = RequestMethod.POST)public @ResponseBody String uploads(HttpServletRequest request,MultipartFile[] file){try {//上传⽬录地址// 随意 String uploadDir = C:/img/;String uploadDir=ResourceUtils.getURL("classpath:").getPath()+"/static/up/";System.out.println(uploadDir);//如果⽬录不存在,⾃动创建⽂件夹File dir = new File(uploadDir);if(!dir.exists()){dir.mkdir();}//遍历⽂件数组执⾏上传for (int i =0;i<file.length;i++) {if(file[i] != null) {//调⽤上传⽅法executeUpload(uploadDir, file[i]);}}}catch (Exception e){//打印错误堆栈信息e.printStackTrace();return "上传失败";}return "上传成功";}然后⽂件下载路径就到了tomcate 下。
tomcat同时使用http和https访问的配置方法
tomcat同时使⽤http和https访问的配置⽅法针对⼀个tomcat中有的项⽬需要使⽤ssl加密有些可以直接访问的情况,可通过修改tomcat/conf下的server.xml来实现。
具体配置可参考下⾯这段代码,注意<Service name=”Catalina1″>这个标签中的配置。
<?xml version='1.0' encoding='utf-8'?><Server port="8005" shutdown="SHUTDOWN"><Listener className="org.apache.catalina.core.AprLifecycleListener" SSLEngine="on" /><Listener className="org.apache.catalina.core.JasperListener" /><Listener className="org.apache.catalina.core.JreMemoryLeakPreventionListener" /><Listener className="org.apache.catalina.mbeans.GlobalResourcesLifecycleListener" /><Listener className="org.apache.catalina.core.ThreadLocalLeakPreventionListener" /><GlobalNamingResources><Resource name="UserDatabase" auth="Container"type="erDatabase"description="User database that can be updated and saved"factory="ers.MemoryUserDatabaseFactory"pathname="conf/tomcat-users.xml" /></GlobalNamingResources><Service name="Catalina"><!-- 此处使⽤了ssl配置,需⽤https才可访问 --><Connector port="8284" protocol="HTTP/1.1"connectionTimeout="20000"redirectPort="8443" URIEncoding="UTF-8"clientAuth="false" sslProtocol="TLS"SSLEnabled="true" scheme="https" secure="true"keystoreFile="conf/tomcat.jks" keystorePass="pico2012server"truststoreFile="conf/tomcat.jks" truststorePass="pico2012server"/><Connector port="8009" protocol="AJP/1.3" redirectPort="8443" /><Engine name="Catalina" defaultHost="localhost"><Realm className="org.apache.catalina.realm.LockOutRealm"><Realm className="erDatabaseRealm"resourceName="UserDatabase"/></Realm><Host name="localhost" appBase="webapps"unpackWARs="true" autoDeploy="true"><Valve className="org.apache.catalina.valves.AccessLogValve" directory="logs"prefix="localhost_access_log." suffix=".txt"pattern="%h %l %u %t "%r" %s %b" /></Host></Engine></Service><!-- 加⼊⼀个新的⽹站服务配置,每个service都可以单独配置⼯程加载⽬录、端⼝等 --><Service name="Catalina1"><!-- 此处表⽰加载的⼯程仍使⽤原始的http⽅式访问 --><Connector port="8484" protocol="HTTP/1.1"connectionTimeout="20000"redirectPort="8443" URIEncoding="UTF-8"/><Connector port="18009" protocol="AJP/1.3" redirectPort="18443" /><Engine name="Catalina1" defaultHost="localhost"><Realm className="org.apache.catalina.realm.LockOutRealm"><Realm className="erDatabaseRealm"resourceName="UserDatabase"/></Realm><!-- 该service加载的⼯程放置⽬录,与webapps同⽬录的webapps1 --><Host name="localhost" appBase="webapps1"unpackWARs="true" autoDeploy="true"><Valve className="org.apache.catalina.valves.AccessLogValve" directory="logs"prefix="localhost_access_log." suffix=".txt"pattern="%h %l %u %t "%r" %s %b" /><!-- 此处要显⽰的指定加载webapps1下的GS-Web⼯程 --><Context path="" docBase="GS-Web" debug="0" reloadable="true"/></Host></Engine></Service></Server>以上就是本⽂的全部内容,希望对⼤家的学习有所帮助,也希望⼤家多多⽀持。
SpringCloud和SpringBoot版本对应
SpringCloud和SpringBoot版本对应⼀、Spring Cloud 和 Spring BootSpring Cloud 集成了 Spring Boot ,如果需要使⽤到 Spring Boot 集成的库,我们需要配置 Spring Boot 的版本,如果版本不对应会出现问题。
我们可以到 Spring Cloud 官⽹找到对应的说明:https://docs.spring.io/spring-cloud/docs打开页⾯后显⽰ Spring Cloud 全部的版本:我们选择我们需要的 Spring Cloud 的版本,点击进去reference/html/后打开页⾯。
例如我使⽤的版本Hoxton.SR8,对应的地址就是下⾯这个:https://docs.spring.io/spring-cloud/docs/Hoxton.SR8/reference/html/往下⾯翻,还列出了对应组件的对应版本,点击组件名称还可以查看对应的说明⽂档:⼆、Spring Cloud Alibaba + Spring Cloud如果项⽬中使⽤ Spring Cloud Alibaba ,也需要配置Alibaba的版本。
Spring Cloud Alibaba ⽂档托管在github ,可以在下⾯的⽹址看到版本说明:https:///alibaba/spring-cloud-alibaba/wiki/%E7%89%88%E6%9C%AC%E8%AF%B4%E6%98%8E根据wiki说明,我们可以得出我们使⽤Hoxton.SR8对应的版本关系:Spring Cloud Version:Hoxton.SR8Spring Cloud Alibaba Version:2.2.5.RELEASESpring Boot Version:2.3.2.RELEASE三、第三⽅依赖的版本假设我们现在需要使⽤mybatis-spring-boot-starter这个依赖,这个依赖的版本在对应的官⽹有说明。
spring接口通过配置支持返回多种格式(xml,json,html,excel)

spring接⼝通过配置⽀持返回多种格式(xml,json,html,excel)1. 简介本⽂主要给⼤家介绍使⽤SpringMVC的后端服务如何通过配置来⽀持多种返回值类型(xml,json,html,excel)2. 基础概念2.1 HttpHeader中Content-Type和Accept设置的区别Accept:接⼝要返回给客户端的数据格式curl --header 'Accept:application/json' http://localhost:8080/todoContent-Type:客户端发送给服务器端的数据格式curl -X PUT --header 'Content-Type:application/json' -d '{"title":"周末⽇程","content":"睡觉"}' http://localhost:8080/todo2.2 SpringMVC⽣成输出的两种⽅式1)当服务端使⽤Restful的⽅式,只为客户端的ajax或其他服务端请求提供数据时,通常会使⽤@ResponseBody来标识你的返回,这时候Spring使⽤HttpMessageConverter来把返回的对象格式化成所需的格式。
2)当你需要提供表现层(⽐如:HTML),这时候SpringMVC使⽤ViewResolver来将处理你的返回。
有时候你的应⽤程序这两者都要提供2.3 SpringMVC输出格式判定很多时候为了⽀持多个系统或多个终端,你需要让相同的数据已不同的表现形式输出。
SpringMVC使⽤ContentNegotationStrategy来判定⽤户请求希望得到什么格式的数据。
ContentNegotationStrategy通过三种⽅式来识别⽤户想要返回什么样的数据通过请求URL后缀:http://myserver/myapp/accounts/list.html 返回html格式通过请求的参数:http://myserver/myapp/accounts/list?format=xls 该设置默认不开启,默认key是format。
springboot集成springCloud中gateway时启动报错的解决
springboot集成springCloud中gateway时启动报错的解决在项⽬中引⼊springcloud中的gateway时报以下错误Description:Parameter 0 of method modifyRequestBodyGatewayFilterFactory in org.springframework.cloud.gateway.config.GatewayAutoConfigurationrequired a bean of type 'org.springframework.http.codec.ServerCodecConfigurer' that could not be found.Action:Consider defining a bean of type 'org.springframework.http.codec.ServerCodecConfigurer' in your configuration.这个是由于依赖冲突,spring-cloud-starter-gateway与spring-boot-starter-web和spring-boot-starter-webflux依赖冲突解决⽅式:在引⼊gateway时过滤掉上⾯两个依赖<dependency><groupId>org.springframework.cloud</groupId><artifactId>spring-cloud-starter-gateway</artifactId><exclusions><exclusion><groupId>org.springframework.boot</groupId><artifactId>spring-boot-starter-web</artifactId></exclusion><exclusion><groupId>org.springframework.boot</groupId><artifactId>spring-boot-starter-webflux</artifactId></exclusion></exclusions></dependency>springboot整合gateway启动失败问题:springboot整合gateway启动失败***************************APPLICATION FAILED TO START***************************Description:An attempt was made to call a method that does not exist. The attempt was made from the following location:org.springframework.cloud.gateway.config.GatewayAutoConfiguration$NettyConfiguration.gatewayHttpClient(GatewayAutoConfiguration.java:622) The following method did not exist:ty.resources.ConnectionProvider.elastic(Ljava/lang/String;Ljava/time/Duration;Ljava/time/Duration;)Lreactor/netty/resources/ConnectionProvider;The method's class, ty.resources.ConnectionProvider, is available from the following locations:jar:file:/C:/Users/Administrator/.m2/repository/io/projectreactor/netty/reactor-netty/0.9.1.RELEASE/reactor-netty-0.9.1.RELEASE.jar!/reactor/netty/resources/ConnectionProvider.classIt was loaded from the following location:file:/C:/Users/Administrator/.m2/repository/io/projectreactor/netty/reactor-netty/0.9.1.RELEASE/reactor-netty-0.9.1.RELEASE.jarAction:Correct the classpath of your application so that it contains a single, compatible version of ty.resources.ConnectionProviderDisconnected from the target VM, address: '127.0.0.1:55875', transport: 'socket'Process finished with exit code 1这块主要是版本兼容的问题,最初⽤的版本是:<dependency><groupId>ty</groupId><artifactId>reactor-netty</artifactId><version>0.9.4.RELEASE</version></dependency>⽹上有的是需要把这个版本降低,我这是降低了也不⾏最后升⾼了版本改成了:<dependency><groupId>ty</groupId><artifactId>reactor-netty</artifactId><version>0.9.14.RELEASE</version></dependency>本项⽬⾥springboot版本为:2.3.1,根据⾃⼰项⽬需要吧,看⼀下⾃⼰项⽬中各个版本之间的问题以上为个⼈经验,希望能给⼤家⼀个参考,也希望⼤家多多⽀持。
后端服务面试题目和答案(3篇)
第1篇1. 问题:请简要描述一下什么是RESTful API?答案:RESTful API是基于REST(Representational State Transfer)架构风格的API。
它使用HTTP协议进行通信,遵循一定的设计原则,如无状态、客户端-服务器模式、资源导向等。
RESTful API通过URI(统一资源标识符)来定位资源,通过HTTP方法(如GET、POST、PUT、DELETE等)来操作资源。
2. 问题:什么是Spring框架?请列举Spring框架的主要模块。
答案:Spring框架是一个开源的Java企业级应用开发框架,它简化了企业级应用的开发过程。
Spring框架的主要模块包括:(1)Spring Core Container:核心容器,包括BeanFactory和ApplicationContext,负责管理Bean的生命周期和依赖注入。
(2)Spring AOP:面向切面编程,提供声明式事务管理和日志记录等功能。
(3)Spring Data Access/Integration:数据访问和集成模块,提供ORM(对象关系映射)和JPA(Java持久化API)等功能。
(4)Spring Web:Web模块,提供Web应用程序开发所需的组件,如Spring MVC 和Spring WebFlux。
(5)Spring Test:测试模块,提供对Spring应用程序的测试支持。
3. 问题:请解释一下Spring框架中的依赖注入(DI)?答案:依赖注入(DI)是Spring框架的核心概念之一。
它通过将对象的依赖关系从代码中分离出来,使得对象可以在运行时动态地注入依赖。
依赖注入主要有以下几种方式:(1)构造器注入:通过在对象的构造函数中注入依赖。
(2)设值注入:通过setter方法注入依赖。
(3)字段注入:通过字段直接注入依赖。
4. 问题:请描述一下Spring MVC的工作流程。
答案:Spring MVC的工作流程如下:(1)用户发送请求到前端控制器(DispatcherServlet)。
- 1、下载文档前请自行甄别文档内容的完整性,平台不提供额外的编辑、内容补充、找答案等附加服务。
- 2、"仅部分预览"的文档,不可在线预览部分如存在完整性等问题,可反馈申请退款(可完整预览的文档不适用该条件!)。
- 3、如文档侵犯您的权益,请联系客服反馈,我们会尽快为您处理(人工客服工作时间:9:00-18:30)。
spring cloudspring boot同时支持http和https访问
前言
关于spring boot同时支持http和https访问,在spring boot官网73.9已经有说明文档了,同样在github上也有官网的例子。
在这里,我向大家讲述一下,我是怎么实现的。
方式一
一、相关配置
server:
port: 4000
https:
port: 8443
ssl:
key-store: classpath:sample.jks
key-store-password: secret
key-password: password
可以看到,只是简简单单添加端口的信息,sample.jks可以
自己生成(记得对应密码),也可以在官网例子里面下载。
二、spring boot启动文件读取配置信息(注:请添加必要的jar)
@SpringBootApplication
public class GatewayApplication {
public static void main(String[] args) throws Exception {
SpringApplication.run(GatewayApplication.class, args);
}
@Value("${https.port}")
private Integer port;
@Value("${https.ssl.key-store-password}")
private String key_store_password;
@Value("${https.ssl.key-password}")
private String key_password;
/* --------------------请按照自己spring boot版本选择start--------------------- */
// 这是spring boot 1.5.X以下版本的添加了这个,下一个就不用添加了
@Bean
public EmbeddedServletContainerFactory servletContainer() {
TomcatEmbeddedServletContainerFactory tomcat = new TomcatEmbeddedServletContainerFactory();
tomcat.addAdditionalTomcatConnectors(createSslConnec tor()); // 添加http
return tomcat;
}
// 这是spring boot 2.0.X版本的添加这个,上一个就不用添加了
@Bean
public ServletWebServerFactory servletContainer() { TomcatServletWebServerFactory tomcat = new
TomcatServletWebServerFactory();
tomcat.addAdditionalTomcatConnectors(createSslConnec tor()); // 添加http
return tomcat;
}
/* -------------------请按照自己spring boot版本选择
end---------------------- */
// 配置https
private Connector createSslConnector() {
Connector connector = new
Connector("org.apache.coyote.http11.Http11NioProtocol");
Http11NioProtocol protocol = (Http11NioProtocol) connector.getProtocolHandler();
try {
File keystore = new
ClassPathResource("sample.jks").getFile();
/*File truststore = new ClassPathResource("sample.jks").getFile();*/
connector.setScheme("https");
connector.setSecure(true);
connector.setPort(port);
protocol.setSSLEnabled(true);
protocol.setKeystoreFile(keystore.getAbsolutePath());
protocol.setKeystorePass(key_store_password);
protocol.setKeyPass(key_password);
return connector;
}
catch (IOException ex) {
throw new IllegalStateException("can't access keystore: [" + "keystore"
+ "] or truststore: [" + "keystore" + "]", ex);
}
}
}
启动项目后,可以看到两个端口,说明已经成功
方式二
一、相关配置
server:
port: 8443
ssl:
key-store: classpath:sample.jks
key-store-password: secret
key-password: password
http:
port: 8080
二、spring boot启动文件读取配置信息(注:请添加必要的jar)
@SpringBootApplication
public class SampleTomcatTwoConnectorsApplication {
@Value("${http.port}")
private Integer port; /* --------------------请按照自己spring boot版本选择start--------------------- */
// 这是spring boot 1.5.X以下版本的添加了这个,下一个就不用添加了
@Bean
public EmbeddedServletContainerFactory servletContainer() {
TomcatEmbeddedServletContainerFactory tomcat = new TomcatEmbeddedServletContainerFactory();
tomcat.addAdditionalTomcatConnectors(createStandardC onnector()); // 添加http
return tomcat;
}
// 这是spring boot 2.0.X版本的添加这个,上一个就不用添加了
@Bean
public ServletWebServerFactory servletContainer() { TomcatServletWebServerFactory tomcat = new TomcatServletWebServerFactory();
tomcat.addAdditionalTomcatConnectors(createStandardC onnector()); // 添加http
return tomcat;
}/* --------------------请按照自己spring boot版本选择end--------------------- */
// 配置http
private Connector createStandardConnector() {
Connector connector = new
Connector("org.apache.coyote.http11.Http11NioProtocol");
connector.setPort(port);
return connector;
}
public static void main(String[] args) throws Exception {
SpringApplication.run(SampleTomcatTwoConnectorsAppli cation.class, args);
}
}
启动项目后,可以看到两个端口,说明已经成功
总结
对比两种方法可以看出方式二比方式一简单一点,主要是因为方式二用的代码比较少,我也不知道这两种方式有什么区别,我自己测试过,无论是spring boot还是spring cloud,这两个方式都没问题,就算是方式二,同样可以帮服务注册到eureka上。
不一样的是方式一注册到eureka的端口是4000,方式二注册到eureka的端口是8443。
作为一个强迫的人士,在我自己的项目上,用的方式二,因为我的eureka 用的http注册服务。
如果你只是spring boot,当然选择少一点代码的方式二啦。
这只是我在做项目时,遇到的需求,拉出来给大家分享,如果发现问题,请大家提一下意见,让我完善一下,谢谢。