OracleBIEE12c安装配置手册簿
oracle12c安装、启动、卸载图文教程
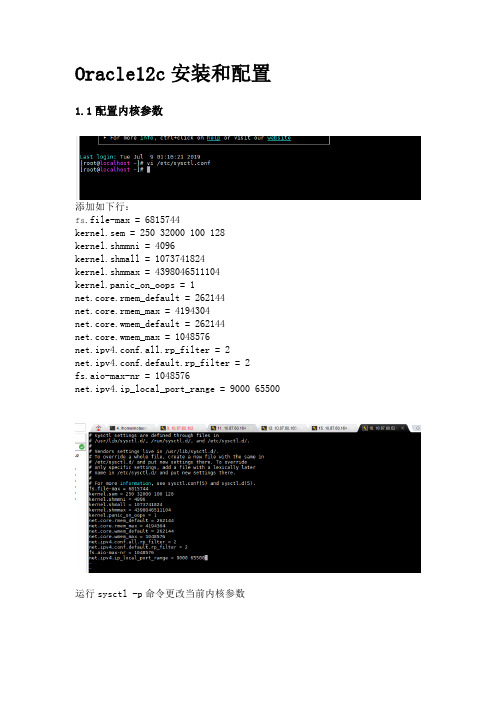
Oracle12c安装和配置1.1配置内核参数添加如下行:fs.file-max = 6815744kernel.sem = 250 32000 100 128kernel.shmmni = 4096kernel.shmall = 1073741824kernel.shmmax = 4398046511104kernel.panic_on_oops = 1net.core.rmem_default = 262144net.core.rmem_max = 4194304net.core.wmem_default = 262144net.core.wmem_max = 1048576net.ipv4.conf.all.rp_filter = 2net.ipv4.conf.default.rp_filter = 2fs.aio-max-nr = 1048576net.ipv4.ip_local_port_range = 9000 65500 运行sysctl -p命令更改当前内核参数1.2限制oracle用户资源使用vi /etc/security/limits.conf添加如下行:oracle soft nofile 1024oracle hard nofile 65536 oracle soft nproc 16384 oracle hard nproc 16384 oracle soft stack 10240 oracle hard stack 32768 oracle hard memlock 134217728 oracle soft memlock 1342177281.3安装依赖软件包yum install binutils -yyum install compat-libcap1 -yyum install compat-libstdc++-33 -yyum install compat-libstdc++-33.i686 -y yum install glibc -yyum install glibc.i686 -yyum install glibc-devel -yyum install glibc-devel.i686 -yyum install ksh -yyum install libaio -yyum install libaio.i686 -yyum install libaio-devel -yyum install libaio-devel.i686 -yyum install libX11 -yyum install libX11.i686 -yyum install libXau -yyum install libXau.i686 -yyum install libXi -yyum install libXi.i686 -yyum install libXtst -yyum install libXtst.i686 -yyum install libgcc -yyum install libgcc.i686 -yyum install libstdc++ -yyum install libstdc++.i686 -yyum install libstdc++-devel -yyum install libstdc++-devel.i686 -y yum install libxcb -yyum install libxcb.i686 -yyum install make -yyum install nfs-utils -yyum install net-tools -yyum install smartmontools -yyum install sysstat -yyum install unixODBC -yyum install unixODBC-devel -y1.4创建新组和新用户groupadd -g 54321 oinstallgroupadd -g 54322 dbagroupadd -g 54323 operuseradd -u 54321 -g oinstall -G dba,oper oracle2附加设置2.1为oracle用户设置密码2.2修改设置SELINUXvi /etc/selinux/config## 将`SELINUX`修改为permissiveSELINUX=permissivesetenforce Permissive2.3确保禁用防火墙systemctl stop firewalldsystemctl disable firewalld2.4创建Oracle安装目录mkdir -p /usr/local/products/oracle12cchown -R oracle:oinstall /usr/localchmod -R 775 /usr/local/2.5配置Oracle环境变量并验证切换到新添加的oracle用户名下,在oracle用户下配置环境变量su oraclevi .bash_profileexport TMP=/tmpexport TMPDIR=$TMPexport ORACLE_HOSTNAME=DEV-ORACLE-12C-164export ORACLE_UNQNAME=orclexport ORACLE_BASE=/usr/local/productsexport ORACLE_HOME=$ORACLE_BASE/oracle12cexport ORACLE_SID=orclexport PATH=/usr/sbin:/usr/local/bin:$PATHexport PATH=$ORACLE_HOME/bin:$PATHexport LD_LIBRARY_PATH=$ORACLE_HOME/lib:/lib:/usr/lib export CLASSPATH=$ORACLE_HOME/jlib:$ORACLE_HOME/rdbms/jlib使配置立即生效source .bash_profileecho $ORACLE_HOME/usr/local/products/oracle12c3 Oracle安装3.1上传解压将下载的linuxx64_12201_database.zip上传到Linux系统/home/oracle目录下解压unzip linuxx64_12201_database.zip如果没有unzip要先安装yum install zip unzip3.2修改响应文件压缩包解压完成后得到名为database的文件夹,其中包含安装文件。
BIEE 12c (12.2.1.0.0) Linux 安装指南
BIEE 12c 12.2.1.0.0 Linux 安装指南作者:风在身后博客:/biplusplus安装前准备环境要求,请参见如下excelfmw-1221certmatrix-2739738.xlsx/technetwork/middleware/ias/downloads/fusion-certification-100350.html本文使用操作系统:Oracle Linux Server release 6.5 X64下载所需软件访问OTN/technetwork/middleware/bi-enterprise-edition/downloads/business-intelligence-2717951.html分别下载下图所示内容注:如遇下载速度慢,请使用讯雷下载,下载方法请参见:Oracle OTN软件迅雷下载方法/biplusplus/article/details/7082445下载完成之后,一共有4个文件,分别是:JDK:jdk-8u65-linux-x64.tar.gzWeblogic:fmw_12.2.1.0.0_infrastructure_Disk1_1of1.zip (内含RCU)BIEE:fmw_12.2.1.0.0_bi_linux64_Disk1_1of2.zipfmw_12.2.1.0.0_bi_linux64_Disk1_2of2.zip理解安装目录推荐采用如下安装目录:其中/home/oracle被称为基目录(base),可以根据自己的需要更改,本文中为/home/biee12c/Oracleproduct目录是Oracle_home,一般一个产品对应一个Oracle_home;例如可以在product下安装biee和oracle数据库,这样就会有两个Oracle_home。
Oracle_home目录之下主要是存放对应产品的主程序和一些公共文件。
Config目录主要用于存放配置信息,例如Domain_Home,默认的domain_home是ORACLE_HOME/user_projects/domains/domain_name;不建议使用默认目录,建议配置和程序分离,即采用本例中的目录结构,将其放置于config目录之下。
Oracle12c在Win10上的安装配置实践

Oracle12c在Win10上的安装配置实践1、环境操作系统:Win10专业版(64位)数据库:Oracle 12c Release 2(Version 12.2.0.1.0,64位)2、下载Oracle12c3、安装3.1、右键以管理员⾝份运⾏setup.exe3.2、配置安全更新在安装界⾯⾥,取消勾选“我希望通过My Oracle Support接收安全更新”,点击下⼀步。
提⽰出现尚未提供电⼦邮件地址,选择是。
3.3、安装选项选择“创建和配置数据库”(默认),点击下⼀步。
3.4、系统类选择“桌⾯类”(默认),如果是安装到服务器上,请选择“服务器类”,点击下⼀步。
3.5、Oracle主⽬录⽤户使⽤虚拟账户:⽤于 Oracle 数据库单实例安装的 Oracle 主⽬录⽤户。
使⽤现有windows⽤户:如果选择该项,则需要指定没有管理权限的⽤户。
创建新Windows⽤户:创建⼀个新⽤户,输⼊⽤户名和密码,这个新建的⽤户没有Windows登录权限。
使⽤Windows内置账户:微软在开Windows时预先为⽤户设置的能够登录系统的账户。
此处本⼈选择虚拟账户,也是oracle的官⽅建议之⼀。
注意:如果选择第⼆项,创建的⽤户名和已有的不能发⽣冲突,否则后⾯的安装会报错!3.6、典型安装设置oracle安装位置,字符集选择AL32UTF8或者ZHS16GBK,设置密码,如果密码过于简单会报警告,忽略即可,点击下⼀步。
注意:字符集AL32UTF8,sqlplus会存在乱码问题,需要配置TNS环境变量。
本⽂后⾯有字符集如何更改相关内容。
图省事的话建议此处选择ZHS16GBK字符集。
3.7、先决条件检查3.8、概要3.93.104、测试Oracle是否安装成功两种⽅式4.1、SQL Plus4.2、em5、相关问题5.1、PLSQL Developer⽆法连接64位Oracle数据库5.1.1、PLSQL数据库选项为空如图所⽰:原因在于:PLSQL不可以直接连接64位Oracle数据库,只能连接32位的。
WindowsSever2012下Oracle12c安装配置方法图文教程
WindowsSever2012下Oracle12c安装配置⽅法图⽂教程分享Oracle 12c安装配置⽅法图⽂教程,具体内容如下1、我们开启虚拟机2、Windows Sever 2012启动中。
3.看到Windows Sever 2012的桌⾯。
4.我们解压缩两个⽂件,winx64_12c_database_1of2.zip,winx64_12c_database_2of2.zip.也就是oracle的安装⽂件。
5.这个时候我们可以看到服务器启动以后的仪表板。
6.然后我们合并两个解压缩以后⽂件夹的内容,进⾏合并。
可以查看⼤⼩2G多。
7.我们可以看到合并后应该是这样。
8.然后启动setup.exe进⾏安装。
9.然后选择是启动。
10.这个时候命令⾏正在启动中。
11.oracle正在启动中。
12.我们配置安全更新,其实是幌⼦,哥没有银⼦付费,不更新,先装了再说。
13.接下来我们单击下⼀步。
14.我们单击是,继续。
15.我们选择跳过软件更新,我们使⽤my oracle support⾝份证明需要很多银⼦啊,穷⼈买不起。
16.我们创建与配置数据库。
17.然后选择服务器类,安装功能最强⼤的。
18.我们选择单实例数据库安装。
19. 我们选择典型安装。
20.我们选择使⽤windows内置账户。
21.接下来我们单击是。
22.我们如下配置,安装企业版,另外我们基于学习,密码不必太复杂。
23.接下来我们单击是。
跳过⼝令检测。
24.我们检测下环境看看是否够装。
25.我们可以看到我们安装的选项全部定制完成。
26.这个时候安装进⾏中。
27.这个时候单击确定。
28.安装成功。
29.我们查看所有的选项,可以看到Oracle的所有组件。
30.在这我们可以看到数据库ORCL。
31.这个时候我们看到所有的本地⾓⾊,ORacle对于权限管理很精细。
32.在这个我们接着启动数据库设置助⼿。
33.我们可以对数据库任意操作。
34.我们还可以配置数据库的⽹络服务。
Win10_64bit安装ORACLE12c

Win10 64位系统安装ORCLE 12c数据库1.版本信息本文档主要介绍WIN10系统64位安装ORACLE12c数据库1.1.电脑操作系统●本机信息(OS):WIN10_64bit1.2.数据库版本●数据库信息:ORCLE12c2.下载2.1.下载网址●下载版本:Oracle Database 12c Release 1 ( for Microsoft Windows(x64) ●下载网址:/database2.2.注册账号●首次登录:ORACLE账号注册●具有ORACLE账号的用户可以直接登录2.3.版本选择3.安装3.1.下载包解压●ORACLE下载包两个●ORACLE下载包解压到同一文件夹database中3.2.ORACLE安装校验Step1:点击“setup.exe”,以管理员的身份运行Step2.1:安装启动,检查监视器参数Step2.2:经初步校验,达到数据库配置要求,加载安装程序3.3.ORACLE安装程序Step1:配置安装更新●推荐:取消“我希望通过My Oracle Support接受安全更新”,单击“下一步”●根据实际需求,确定是否勾选●弹出“未指定My Oracle Support 用户名/电子邮件地址”,单击“是”继续Step2:选择安装选项本次为初次安装,选择“创建和配置数据库”,单击“下一步”Step3:系统类本机为PC,选择“桌面类”,单击“下一步”Step4:指定ORACLE主目录用户确保ORACLE管理安全,选择“创建新Windows用户”,输入用户名和口令,单击“下一步”Step5:典型安装配置输入口令,建议使用“大小写字母”+“数据组”,单击下一步选择“是”Step6:先决条件检查Step7:概要单击“安装”Step8:安装产品 安装过程耗时较长安装进度70%时安装进程慢,需要耐心等待安装进度88%时,弹出“Database ConfigurationAssistant”窗口,耗时最长约30min。
oracle 12c r2 RAC配置手册
ORACLE 12C R2 Real Application Cluster Installation Guide朱海清StarTimes Software Technology Co., LtdASM磁盘空间最低要求12C R2相比前一版本,OCR的磁盘占用需求有了明显增长。
为了方便操作,设置如下:External: 1个卷x40GNormal: 3个卷x30GHight: 5个卷x25GFlex: 3个卷x30GOCR+VOLTING+MGMT存储通常放到一个磁盘组,且选择Normal的冗余方式,也即最少3块asm磁盘80G空间。
操作系统安装操作系统安装时把“Server with GUI“和”Compatibility Libraries”勾上,其他都不用选择。
版本采用CentOS 7、RHEL 7或者Oracle Linux 7安装oracle预安装包yum install -y oracle-rdbms-server-12cR1-preinstall创建用户和组oracle用户和dba、oinstall组已经在上一步创建完毕。
rac所有节点的oracle用户和grid用户的uid和gid必须一致,所以创建的时候最好制定uid和gid。
groupadd --gid 54323 asmdbagroupadd --gid 54324 asmopergroupadd --gid 54325 asmadmingroupadd --gid 54326 opergroupadd --gid 54327 backupdbagroupadd --gid 54328 dgdbagroupadd --gid 54329 kmdbausermod --uid 54321 --gid oinstall --groups dba,oper,asmdba,asmoper,backupdba,dgdba,kmdba oracle useradd --uid 54322 --gid oinstall --groups dba,asmadmin,asmdba,asmoper grid安装目录mkdir -p /u01/app/12.2.0/gridmkdir -p /u01/app/gridmkdir -p /u01/app/oraclechown -R grid:oinstall /u01chown oracle:oinstall /u01/app/oraclechmod -R 775 /u01/用户环境变量grid环境变量cat <<EOF >>/home/grid/.bash_profileORACLE_SID=+ASM1ORACLE_HOME=/u01/12.2.0/gridPATH=$ORACLE_HOME/bin:$PATHLD_LIBRARY_PATH=$ORACLE_HOME/lib:/lib:/usr/libCLASSPATH=$ORACLE_HOME/JRE:$ORACLE_HOME/jlib:$ORACLE_HOME/rdbms/jlibexport ORACLE_SID CLASSPATH ORACLE_HOME LD_LIBRARY_PATH PATHEOF在节点2,ORACLE_SID=+ASM2oracle环境变量cat <<EOF >>/home/oracle/.bash_profileORACLE_SID=starboss1ORACLE_HOME=/u01/app/oracle/product/12.2.0/db_1ORACLE_HOSTNAME=rac01PATH=$ORACLE_HOME/bin:$PATHLD_LIBRARY_PATH=$ORACLE_HOME/lib:/lib:/usr/libCLASSPATH=$ORACLE_HOME/JRE:$ORACLE_HOME/jlib:$ORACLE_HOME/rdbms/jlibexport ORACLE_SID ORACLE_HOME ORACLE_HOSTNAME PATH LD_LIBRARY_PATH CLASSPATH EOF在节点2,ORACLE_SID=starboss2,ORACLE_HOSTNAME=rac02修改logind.conf# vi /etc/systemd/logind.confRemoveIPC=no# systemctl daemon-reload# systemctl restart systemcd-logind加载pam_limits.so模块echo "session required pam_limits.so" >> /etc/pam.d/login禁用selinuxsetenforce 0vi /etc/sysconfig/selinux禁用防火墙# systemctl stop firewalld && systemctl disable firewalld 修改ulimitcat <<EOF >> /etc/security/limits.d/99-grid-oracle-limits.conf oracle soft nproc 16384oracle hard nproc 16384oracle soft nofile 1024oracle hard nofile 65536oracle soft stack 10240oracle hard stack 32768grid soft nproc 16384grid hard nproc 16384grid soft nofile 1024grid hard nofile 65536grid soft stack 10240grid hard stack 32768EOF创建自定义的ulimitcat <<EOF >> /etc/profile.d/oracle-grid.sh if [ $USER = "oracle" ]; thenif [ $SHELL = "/bin/ksh" ]; thenulimit -u 16384ulimit -n 65536elseulimit -u 16384 -n 65536fifiif [ $USER = "grid" ]; thenif [ $SHELL = "/bin/ksh" ]; thenulimit -u 16384ulimit -n 65536elseulimit -u 16384 -n 65536 fifiEOF修改共享内存分区大小将如下参数添加到/etc/fstab,具体大小数值根据实际情况调整,因为这个数值和物理内存以及MEMORY_TARGET有关。
Oracle Enterprise Manager Cloud Control 12c 产品说明书

Copyright © 2014 Oracle and/or its affiliates. All rights reserved. | Oracle Confidential – Restricted
2
Evolution of Datacenter
Changing Dynamics of Database Maintenance
Ever growing database population
Multiple versions and patch levels Compliance challenges Poor resource utilization High cost of deployment and operation
3. Self Service users or Admin can choose to migrate DBs over to the new home
Benefits:
– Scale: Subscription based, automated deployment and at mass scale
Distinct configs.
OHs are Different !!!
X with version and platform 9 Versions, 3 Platforms avg.
Copyright © 2014 Oracle and/or its affiliates. All rights reserved. | Oracle Confidential – Restricted
downtime and rollback/switch back Mass automation - multiple targets with multiple patches
Oracle Forms 12c客户端部署配置选项说明书
Oracle Forms 12cClient Deployment Configuration Options O R A C L E W H I T E P A P E R|M A Y2016Table of ContentsIntroduction 2 Oracle Forms 12c Client Deployment Configuration Options 3 Java Applet Embedded in HTML 3 JNLP Embedded in HTML 4 Java Web Start 4 Forms Standalone Launcher 5 Conclusion 8IntroductionIn the early 1990’s, the Internet (World Wide Web) began to evolve from a system designed and used by government organizations to one used globally by the public. This transition began a wave of related technologies being born. The Internet allowed people to have immediate access to information once thought to be out of reach. Web technology, specifically Web browsers, gave developers an opportunity to deliver their applications to end-users without the need to install software on the end-user’s machine.Until the 1990’s, Oracle Forms was delivered as a t wo-tier technology. With its client and server concept, Oracle Forms required that the technology’s runtime software be installed and configured on the end-user’s machine. This meant that each end-user machine would require an administrator to install runtime software one machine at a time. Often this was a difficult task given that an organization could have thousands of end-users, who could be located anywhere in the world. As we moved toward and into the twenty first century, Oracle realized that Oracle Forms customers would begin expecting to have access to their applications in the same way as so many other applications, through a web browser. Oracle Forms 6i was the first version to fully support application deployment via a web browser. Because of the need for tight integration on the client tier, it was necessary to use Java Applet technology to host the applications. So, although applications were launched from a browser, it was actually the Java Runtime Environment (JRE) on the client that ran or hosted the applications. After more than fifteen years of web browsers supporting integration with the Java Plug-in, many browser vendors are moving to a plugin-free model. As a result, Oracle Forms needs new ways of being deployed if it is to continue using Java technology on the client tier.Beginning with Oracle Forms 12c, product users can now choose from several client configuration options. With several options available, administrators can choose which option best suits their needs. This document aims to describe each of the configuration options and how to use them. It will also explain the advantages and limitations of each.Oracle Forms 12c Client Deployment Configuration OptionsBeginning with Oracle Forms 12c, there are now four supported client deployment configuration options. The available options are as follows.»Java Applet embedded in HTML»JNLP embedded in HTML»Java Web Start (JWS)»Forms Standalone Launcher (aka Standalone or FSAL)Although each option will have minimal to no impact on the appearance and behavior of any application, each will be contained slightly differently. Enabling and configuring any of these can be accomplished in the Forms Web Configuration page (i.e. formsweb.cfg) in Fusion Middleware Control.Any examples provided in this paper assume that you have properly configured Secure Socket Layer (SSL) in the server environment, as this is the most secure way to run any web deployed application. All options can also be used with non-SSL, but this is not recommended. Refer to the Oracle HTTP Server and WebLogic Server Administration Guides for details on properly configuring SSL in your environment.Java Applet Embedded in HTMLThis option was the first offered when browsers began supporting the Java Plug-in. Its configuration is the default for any Oracle Forms installation, 12.2.1 and older. This option can be used to give the appearance that the Forms application (applet) is embedded in a web page. This is often desirable when the HTML content surrounding the Forms application contains related or integrated information. This can also be helpful when using the Forms JavaScript integration feature. Single sign-on and single sign-off are also fully supported in this configuration.Disadvantages of using this option include the requirement of a Java Plug-in and the need for a certified browser that supports the Java Plug-in. The loss of usable space taken up by the browser’s window, toolbar, and menu will also need to be tolerated.Using the Applet embedded in HTML option is simple because this is the default configuration. Simply enter a URL in the browser that appears something like one of the following.»https:///forms/frmservlet»https:///forms/frmservlet?config=defaultThese parameters/values are required for this configuration and are found in the Forms Web Configuration page of Fusion Middleware Control.Non-WebUtil Enabled Forms WebUtil Enabled FormsJNLP Embedded in HTMLEmbedded JNLP is very similar to embedded Applet, however the application is treated more like a Java Web Start application although embedded within a web page. Like an embedded Applet, embedded JNLP fully supports JavaScript integration, single sign-on, single sign-off, and the ability to visually embed the form in a web page. Embedded JNLP has the added advantage of base-64 encoding the JNLP content. This content includes most of the parameter/value pairs configured for the application. Because the base-64 encoded text is not human readable, curious end-users will be discouraged from attempting to alter any of the parameters. It should be understood that the base-64 encoding is not a security mechanism. The base-64 encoding used in this configuration is required by Java and helps to improve the performance of delivery from server to client. This configuration requires the Java Plug-in and a certified browser that supports the Java Plug-in.To use this configuration you can either use the provided example configuration named “jnlp” or create your own.»https:///forms/frmservlet?config=jnlpThese parameters/values are required for this configuration and are found in the Forms Web Configuration page of Fusion Middleware Control.Non-WebUtil Enabled Forms WebUtil Enabled FormsWhen using Java Web Start or Embedded JNLP, if the application uses custom jar files (e.g. jacob.jar, icons.jar, example.jar, etc), these should be added to extensions.jnlp. The file is located in Oracle_Home\forms\java. Open this file in a text editor and make the appropriate entries. An example is included in the file. Each entry should be added on its own line.Java Web StartJava Web Start is considered a semi-browserless configuration. The use of Java Web Start will give an Oracle Forms application the appearance of being a natively installed application rather than a web app because when running, the application is not contained by the boundaries of the browser. This is often desirable with Point of Sale applications where the only application used on the device is the POS application or in cases where the application is designed to use the full screen. Different from the functionality provided by the use of separateFrame=true (available in the previous two configurations only), the use of Web Start allow you to close the browser window used to call the application once it has started.Oracle Forms’ use of Java Web Start allows applications to be called from a browser using a hyperlink or by directly entering a URL. Alternatively, the application can be run from a JNLP file stored on the end-user machine. This method eliminates the need for a browser, except when the application is single sign-on protected. Java Web Start can also be used to call an Oracle Forms application from the command line. Although there are several variations of how Java Web Start can be used, if the application requires the use of single sign-on, it must be called from a browser. Attempts to call an SSO protected application from a static JNLP file or the command line will fail.Because this is a mostly browser-less configuration, features like single sign-off and JavaScript integration are not supported when using the Java Web Start configuration.This configuration requires the Java Plug-in be installed if calling from a browser. If not calling from a browser, either the Java Plug-in or Java Development Kit (JDK) installation is required. A browser is optional and would only be required if single sign-on is used.To use this configuration you can either use the provided example configuration named “webstart” or create your own. The application can be called from a browser or you can use the command line or custom script.»jnlps:///forms/frmservlet?config=webstart»https:///forms/frmservlet?config=webstart»javaws “https:///forms/frmservlet?config=webstart”The “jnlp” and “jnlps” protocols (used in above example) are supported with Java 8u92+ on Microsoft Windows.The following are required parameters/values for this configuration and are found in the Forms Web Configuration page of Fusion Middleware Control.Non-WebUtil Enabled Forms WebUtil Enabled FormsWhen using Java Web Start or Embedded JNLP, if the application uses custom jar files (e.g. jacob.jar, icons.jar, example.jar, etc), these should be added to extensions.jnlp. The file is located in Oracle_Home\forms\java. Open this file in a text editor and make the appropriate entries. An example is included in the file. Each entry should be added on its own line.Forms Standalone LauncherThe Forms Standalone Launcher is a fully browser-less configuration. Further, it does not require that the Java Plug-in be installed. It does require Java on the client, but it can be any one of the following; JRE, JDK, or Server JRE.With this configuration, applications are launched from the command line or custom script files by calling the platform specific “java” executable. This con figuration fully isolates the application from the Java Plug-in or Java Web Start and the browser. Using the Forms Standalone Launcher can provide the appearance of a fully native application. Single sign-on, single sign-off, and JavaScript integration are not supported with this configuration.This configuration requires that a small jar file (frmsal.jar) be stored on the end-user machine. The file can be transferred to the end-user machine using any desirable method (e.g. web download, email, ftp, etc). This file is the Forms Standalone Launcher. It is version specific, so it cannot be used with other Forms versions or patch levels.The file is staged on the server in the Oracle_Home\forms\java directory. However, a helpful usage guide that includes a download link can be easily accessed when the server is running. Administrators can easily disable, remove, or edit this page if desired. Navigate to the following to display the page.»https:///forms/html/fsal.htmTo use this configuration you can either use the provided example configuration named “standaloneapp” or create your own. The application can be called from the command line or custom script. You cannot use a browser with this configuration. The command line entry would look something like the following.»java –jar frmsal.jar –url “https:///forms/frmservlet?config=standaloneapp”»java –jar frmsal.jar –url “https:///forms/frmservlet?config=standaloneapp” –t 30000Refer to the Usage Guide mentioned above for more details on command line syntax.The following are key parameters/values used by this configuration and are found in the Forms Web Configuration page of Fusion Middleware Control.Non-WebUtil Enabled Forms WebUtil Enabled FormsIn this release, the Forms Standalone Launcher does not have the ability to determine which Java version is being used. It will be up to the Administrator and/or user to ensure that an appropriate Java version is used. Refer to Figure 1 below for a simple Microsoft Windows script (batch) example.Figure 1 - Microsoft Windows script example.ConclusionOracle Forms 12c offers a variety of possible client configurations options. Choosing which is best will depend on the application’s needs and desired appearance at runtime. Because users can choose which option suits them best, no longer will they be constrained to a single possibility. If choosing the Java Web Start or Forms Standalone Launcher options, administrators no longer have to be concerned about compatibility between browser and Java versions. This should make application deployment and manageability easier.Oracle Corporation, World Headquarters Worldwide Inquiries 500 Oracle ParkwayPhone: +1.650.506.7000 Redwood Shores, CA 94065, USAFax: +1.650.506.7200Copyright © 2016, Oracle and/or its affiliates. All rights reserved. This document is provided for information purposes only, and the contents hereof are subject to change without notice. This document is not warranted to be error-free, nor subject to any other warranties or conditions, whether expressed orally or implied in law, including implied warranties and conditions of merchantability or fitness for a particular purpose. We specifically disclaim any liability with respect to this document, and no contractual obligations are formed either directly or indirectly by this document. This document may not be reproduced or transmitted in any form or by any means, electronic or mechanical, for any purpose, without our prior written permission.Oracle and Java are registered trademarks of Oracle and/or its affiliates. Other names may be trademarks of their respective owners.Intel and Intel Xeon are trademarks or registered trademarks of Intel Corporation. All SPARC trademarks are used under license and are trademarks or registered trademarks of SPARC International, Inc. AMD, Opteron, the AMD logo, and the AMD Opteron logo are trademarks or registered trademarks of Advanced Micro Devices. UNIX is a registered trademark of The Open Group. 0116Oracle Forms 12c Client Deployment Configuration Options May 2016Author: Michael FerranteContributing Authors: Oracle Forms DevelopmentC O N N E C T W I T H U S/oracle/oracle/oracle。
- 1、下载文档前请自行甄别文档内容的完整性,平台不提供额外的编辑、内容补充、找答案等附加服务。
- 2、"仅部分预览"的文档,不可在线预览部分如存在完整性等问题,可反馈申请退款(可完整预览的文档不适用该条件!)。
- 3、如文档侵犯您的权益,请联系客服反馈,我们会尽快为您处理(人工客服工作时间:9:00-18:30)。
Oracle BIEE 12c系统安装配置文档
仇辉
2015年12月
1文档控制
编制
日期作者版本变更参考
2015-12-18 仇辉V1.0
2015-12-18 V2.0
审核
职位
发布
位置/岗位
项目指导委员会
项目指导委员会
项目指导委员会
项目指导委员会
目录
1文档控制 (2)
2安装环境准备 (4)
2.1操作系统 (4)
2.2JDK安装 (4)
2.3介质下载及解压 (4)
2.4禁用UAC (4)
2.5安装M ICROSOFT V ISUAL C++2010X64 (5)
3BIEE软件安装 (6)
3.1安装WEBLOGIC (6)
3.2安装BIEE12C (17)
3.3使用RCU创建资料档案库 (26)
3.4配置BIEE12C (32)
2安装环境准备
2.1操作系统
此次操作系统环境为:Windows 2012 Server R2 x64
2.2JDK安装
官网下载JDK1.8版本jdk-8u66-windows-x64,进行安装
2.3介质下载及解压
在edelivery.oracle. 下载安装介质。
fmw_12.2.1.0.0_infrastructure_Disk1_1of1
fmw_12.2.1.0.0_bi_windows64_Disk1_1of2
fmw_12.2.1.0.0_bi_windows64_Disk1_2of2
解压后如下图所示:
2.4禁用UAC
调整系统UAC至最低,以方便在以后的安装过程中不会出现报警通知而打断安装。
2.5安装Microsoft Visual C++2010x64
注意:如果之前没有安装Microsoft Visual C++2010x64,安装过程中会自动安装。
3BIEE软件安装
3.1安装weblogic
3.1.1Windows服务器安装
1)打开cmd命令窗口,进入安装介质文件夹C:\Soft\BIEE12c,执行java -jar
fmw_12.2.1.0.0_infrastructure.jar;
2)点击下一步
3)选择跳过自动更新,点击下一步
4)选择安装目录,点击下一步
5)选择含示例的(注:此处根据安装情景不同请自行选择),点击下一步
6)通过系统检查,点击下一步
7)如图示选择,点击下一步
8)此步骤可以检查安装信息,如没有问题,点击安装进行安装
9)安装过程进行中,请等待
10)安装过程进行中,请等待
11)安装完成,点击下一步
12)显示安装配置完成的信息,weblogic安装完成。
3.2安装BIEE 12c
3.2.1点击setup_bi_platform-12.2.1.0.0_win6
4.exe进行安装
3.2.2点击下一步,进入下一安装步骤
3.2.3选择跳过自动更新,点击下一步,进入下一安装步骤
3.2.4选择安装目录(此处需要与weblogic目录一致),点击下一步,进入下一安装步骤
3.2.5选择安装类型,点击下一步,进入下一安装步骤
3.2.6通过系统检查,点击下一步,进入下一安装步骤
3.2.7检查安装信息,无误,点击安装
3.2.8点击下一步
3.2.9点击完成,完成BIEE 12c软件安装
3.3使用RCU创建资料档案库
BIEE 12c之后已经不需要单独下载RCU(安装BIEE 12c后自带),也可以不需要提前通过RCU创建,可以在配置BIEE 过程中进行创建。
以下操作为配置BIEE之前,通过自带的RCU工具进行创建资料库。
3.3.1执行RCU程序
RCU目录位于C:\oracle\Middleware\Oracle_Home\oracle_common\bin
3.3.2填写数据库类型及数据库连接信息
3.3.3通过检查后点击确定
3.3.4选择组件及填写前缀
3.3.5检查通过后点击确定
3.3.6设置方案口令
3.3.7点击下一步
3.3.8点击确定
3.3.9点击创建进行资料档案库创建
3.3.10创建完成,点击关闭
3.4配置BIEE 12c
配置工具位置:C:\oracle\Middleware\Oracle_Home\bi\bin
执行config.bat
3.4.1选择需要配置的组件
由于暂时不需要使用Essbase,此处不选择配置Essbase
3.4.2通过检查后,点击下一步
3.4.3输入账号密码信息,点击下一步
3.4.4此处选择使用现有方案,填入前缀 DEV及数据库连接信息,点击下一步
3.4.5此处可以选择修改端口号,点击下一步
3.4.6选择是否需要示例,点击下一步
3.4.7查看配置信息,如无误,点击配置
3.4.8配置进行中
3.4.9配置完成,配置完成后服务会自动启动,点击下一步
3.4.10将配置信息保存后,点击完成
3.4.11安装配置过程到此结束
使用之前配置的账号密码,登录网址进行检查。
在此可以看到BIEE 12c的新的Data Exploration & Discovery。