高清1080P钢笔摄像机、高清摄像笔中英文双版说明书
高清摄像笔录音笔中英文说明书

User Manual Before operating the unit,pleasereadthismanualcarefullyand understandthoroughly. Retain it for future use1 / 152 / 15Product FeaturesSuper image sensor for low illumination video recording. Auto focus, quick light response Full HD 1080P up to 30fps,720P up to 60fps H.264 compressionBuilt-in micro SD card,support up to 32GB Only one button, easy operationultra-integrated pen type design, suitable formeeting recording, evidence recording, andoutdoor sports scenes, etc.Easy download to PC/MAC with USB plugProduct OverviewLens MicrophoneLens Cover SliderReset Hole LED Indicator USB PlugFunction ButtonBasicOperations1.T urning The UnitOn/ Video Recording Press and hold the Function button tillthe blue indicatorturns on,release the button, the green indicator will blink and then turn off, the unitstarts videorecording.Click the Function button again, will stop recording, the blue indicator turns on and the unit ison standby mode.When the video clip lengthis over10 minutes,the unit will save the current clip file, and then restart video recording automatically.Note: Be sure to open the lens cover before recording.2.P hotoShootingEnter Photo Mode:When the unit ison standby mode(the blue indicator keeps on),doubleclick the Function button,the blue and green indicators will blink alternately, the unit entered Photo Mode.3 / 15.Click the Function button once to take a photo, the blue indicator blinks rapidly.Quit the Photo mode:Double click the Function button, the unit will back to Standby Mode, the blue indicator keeps on.3.T urning The Unit OffWhen the unit is on, press and hold the Function button for about 3 seconds,the unit will shut down. Auto power off function:The unit will shut down automatically in following conditions:(1). The battery power is low. The blueindicatorwill blink for seconds, and then the unit will shut down.(2). The memory is full. The blue and greenindicatorswill blinkfor seconds, and then the unit will shut down.(3).If no operation for one minute in Standby Mode, the unit will shut down to save power.4.C harging The Battery4 / 15The unit has an internal, rechargeable battery.The battery can be charged byfollowing ways:1). Plug the unit into your computer USB port.2). Plug the unit to DC5Vbattery charger.During charging, the blue indicator will blink, when the battery power is full, the blue indicator keeps on.5.R eset FunctionWhen the unit works abnormal for illegal operation or other unknown reasons, it needs to bereset.Use a thin stick (e.g. toothpick) to press the Reset button inside the Reset hole. Restart the unit, it will work normally again.6.S etting The UnitPlug the unit into the computer USB port, a new removable disk will appear on the computer screen. Open the removable disk, you will find the file setup.exe under the root directory, double-click the file to run it, following window will appear:5 / 15You can set date/time, frame size, image quality, audiovolume, etc.When thesetting is completed, click the button on the lower left to save the settings.To make the settings take effect, disconnect the unit with computer, and turn the unit on.6 / 157 / 15upgrade and update. Please base on real object.)Caution:Your device is a product of superior design and craftsmanship and should be treated with care. The following suggestions will help you protect your warrantycoverage.Keep the device dry. Precipitation, humidity, and all types of liquids or moisturecan contain minerals that will corrode electronic circuits. If your device doesget wet,allow it to dry completely.The unit may become fairly hot during recording –this is normal. To ensure proper cooling do not block the flow of air to the cover of the unit.Do not drop, knock, or shake the device. Rough handling can break internalcircuit boards and fine mechanics.Do not use harsh chemicals, cleaning solvents, or strong detergents to clean thedevice.*Please follow State′s law. Do not use the unit8 / 15illegally.使用说明书使用时请详细阅读本说明书,以免因不熟悉或不对操作,导致未达成使用目的。
高清摄像笔使用中英文说明书ppt

录制视频:摄像机进入摄像等待状态,此时绿灯长亮,长按按钮,绿灯闪烁三下,开始录 像;再次短按按钮,停止录像,保存文件,此时红绿恢复长亮;为了保证拍摄文件的 大小和安全,系统将每隔50分钟自动保存一次文件,并继续录像。
Recording Video: camera into the camera to wait for the state, this time a long green light, long press the button, the green light flashes three times to start video; short press the button again to stop recording, save the file, this time to restore a long bright red and green; In order to ensure shot file size and security, the system will automatically save every 50 minutes, once a file, and continue recording.
充电:连接电脑USB接口或充电器,即可对摄像机进行充电,当电池处于充电状 态时,红灯将慢速闪烁,当电池充满电后,红灯变为长亮;
Charging: Connecting a computer USB port or charger, can charge the camera, when the battery is charging state, the red light will blink slowly when the battery is fully charged, the red light into a long-Liang;
Aiptek3D iH3 全高清3DHD摄像头 1080p 全高清3D摄像机说明书

Aiptek3D iH3FullHD 3D HD Camcorder1080p FullHD 3D CamcorderRecords pictures and videos in 3D or 2DPlayback 3D files on 3.2’’ 3D display without glasses Software for watching 3D on 2D TV or PC Sharing 3D image on YouTube 3DArt ‐ No: 400420Technical Details Product FeaturesSensor Type 2x 5 mega‐pixel (2592x1944) CMOS sensor, 1/3.2 ’’Video Resolution Full HD: 1920x1080, 30fps, 16:9 720p: 1280x720 60fps, 16:9Still ImageResolution3.7 MP, 16:93D File Format AVC (Advanced Video Coding) H.264 (*.mp4), JPEG, Side‐by‐Side2D File Format AVC (Advanced Video Coding) H.264 (*.mp4), JPEGInternal Memory 128 MB (not for storage) External Memory SD/SDHC up to 32 GBDigital Zoom 10X in 2D 4X in 3DLens 2x Fix Lens Stereobase 2 cmFocus Range 1 m ~ ∞ Shutter Speed 1 ~ 1/2000 sec Aperture Range F3.2; f=5.23 mm Flash Light Auto/Off/On LED Light 2 x LED Microphone Build in, stereo Speaker Yes DisplayLCD Display 8.1 cm (3.2 ’’) diagonal 2D/3D TFT display, 480 x 320 pixelsDisplay Technology Parallax Barrier Display viewingdistancebest ca. 30 cm Product FunctionsNight Mode Auto, OffWhite Balance Auto, Sunny, Cloudy, Fluorescent, TungstenExposure Control AutoPower save mode Yes, 3 min auto offRecording time Max. 29.59 min by every sequence ConnectionsHDMI Yes, 2D or 3D outputPC Connection & Charger Micro USB 2.0Product DetailsBattery NP‐40, 1200 mAh Li‐Ion rechargeablebatteryDimension 130 mm x 53 mm x 67 mm (LxWxH)Color BlackWeight 350 g (w/o battery)OSD Language EN/DE/FR/IT/ES/PT/NL/TR/RU/SVModel Code VI3ASoftware & System RequirementsSoftware ArcSoft Total Media HD CamOperating System Windows XP SP2 / Vista / Win7CPUIntel Core 2 Duo with 2.66 GHz orhigher(Intel Core i CPU recommended)RAM 2 GBOtherDirectX 9.0c or aboveOptical driveGraphic card with min. 512 MB RAMPackage ContentPackage ContentsAiptek3D iH3, Battery, Power supply,HDMI cable, Micro USB cable, pouch,3D glasses for 2D screen, quick startguide, CDLogistic DataGiftbox Language EN/DE/FR/IT/ES/PT/RU/TR/NLManual Language EN/DE/FR/IT/ES/PT/RU/TRDimension/Giftbox 195 mm x 168 mm x 83 mm (LxWxH)Weight/Giftbox 1.10 kgPieces per carton 20Dimension/carton 454 mm x 405mm x 405 mm (LxWxH)Weight/carton 22.30 kgAIPTEK‐Art. No. 400420EAN‐Code 4719851876523Warranty 24 Months (for EU only)Version: EN 30/11/2011We reserve the right for technical changes and mistakesFor information about our products concerning § 33 (EC) No.1907/2006 (REACH) please refer to www.aiptek.eu/reachinfo。
Intensifier T Series HD-TVI 1080p 2MP 传统摄像头说明书
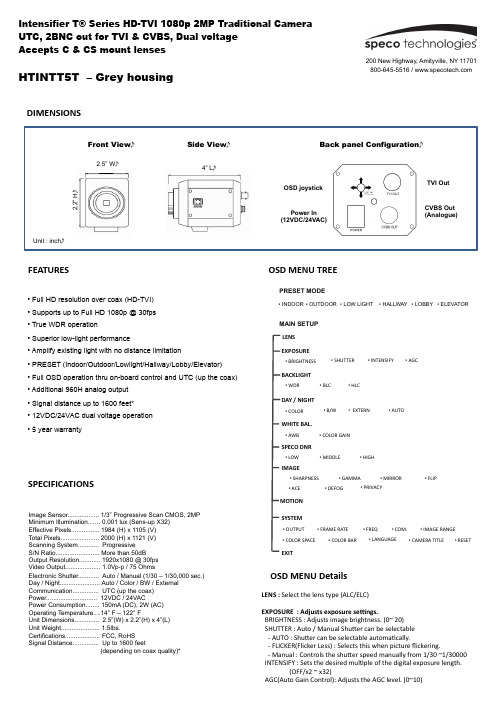
DIMENSIONSFEATURESHTINTT5T – Grey housingSPECIFICATIONSImage Sensor.................. 1/3” Progressive Scan CMOS, 2MP Minimum Illumination....... 0.001 lux (Sens-up X32) Effective Pixels................ 1984 (H) x 1105 (V) Total Pixels...................... 2000 (H) x 1121 (V) Scanning System............ Progressive S/N Ratio......................... More than 50dB Output Resolution............ 1920x1080 @ 30fps Video Output.................... 1.0Vp-p / 75 OhmsElectronic Shutter............ Auto / Manual (1/30 – 1/30,000 sec.) Day / Night....................... Auto / Color / BW / External Communication............... UTC (up the coax) Power............................. 12VDC / 24VACPower Consumption........ 150mA (DC), 2W (AC) Operating Temperature....14° F – 122° FUnit Dimensions.............. 2.5”(W) x 2.2”(H) x 4”(L) Unit Weight...................... 1.5Ibs.Certifications.................... FCC, RoHS Signal Distance............... Up to 1600 feet(depending on coax quality)*• Full HD resolution over coax (HD-TVI) • Supports up to Full HD 1080p @ 30fps • True WDR operation• Superior low-light performance• Amplify existing light with no distance limitation• PRESET (Indoor/Outdoor/Lowlight/Hallway/Lobby/Elevator) • Full OSD operation thru on-board control and UTC (up the coax) • Additional 960H analog output • Signal distance up to 1600 feet* • 12VDC/24VAC dual voltage operation • 5 year warrantyOSD M ENU T REEEXPOSURE• B /W• E XTERN• L OW• M IDDLE• H IGH• S HARPNESS • G AMMA • M IRROR • F LIPDAY / N IGHTWHITE B AL.SPECO D NRIMAGEEXIT• B RIGHTNESS• S HUTTERBACKLIGHT• H LC• B LC• W DR• A UTO• A WB• C OLOR G AIN• A CE• D EFOGSYSTEM• C OM.• I MAGE R ANGE • C OLOR S PACE• F RAME R ATE• I NTENSIFY• A GC• C OLOR• P RIVACYLENS MOTION • O UTPUT • L ANGUAGE• C OLOR B AR• R ESET• C AMERA T ITLE• F REQLENS : S elect t he l ens t ype (ALC/ELC)EXPOSURE : A djusts e xposure s eEngs.B RIGHTNESS : A djusts i mage b rightness. (0~ 20) S HUTTER : A uto / M anual S huTer c an b e s electable -‐ A UTO : S huTer c an b e s electable a utomaVcally.-‐ F LICKER(Flicker L ess) : S elects t his w hen p icture flickering.-‐ M anual : C ontrols t he s huTer s peed m anually f rom 1/30 ~1/30000 I NTENSIFY : S ets t he d esired m ulVple o f t he d igital e xposure l ength. (OFF/x2 ~ x 32)A GC(Auto G ain C ontrol): A djusts t he A GC l evel. (0~10)OSD M ENU D etailsPRESET MODE• INDOOR • OUTDOOR • LOW LIGHT • LOBBY • HALLWAY • ELEVATORMAIN SETUP Side ViewFront ViewBack panel ConfigurationUnit : inchTVI OutCVBS Out (Analogue)Power In (12VDC/24VAC)OSD joystick4” L2.5” W2.2” HSpeco T echnologies i s c onstantly d eveloping p roduct i mprovements. We r eserve t he r ight t o m odify p roduct d esign a nd s pecificaRons w ithout noRce a nd w ithout i ncurring a ny o bligaRon. R ev. 160809OSD M ENU D etailsDAY / N IGHT : A djust D ay / N ight o pRons . C OLOR : A lways C olor m ode. B /W : A lways B /W m ode.-‐ A NTI-‐SAT. : A djusts t he A nV S aturaVon l evel (0~20) E XT : p lease d o n ot u se t his m ode f or t his i temA UTO : D ay / N ight i s s witching a utomaVcally b y A GC l evel. -‐ A NTI-‐SAT. : A djusts t he A nV S aturaVon l evel (0~20) -‐ A GC T HRES : A djusts A GC T HRES (0~20) -‐ A GC M ARGIN : A djusts A GC m argin (0~20)-‐ D ELAY : A djusts t he c hanging d elay V me (LOW/MIDDLE/HIGH)WHITE B AL. : A djusts w hite b alancing o pRons.A WB : i t g oes t o o pVmized c olor l evel a utomaVcally.C OLOR G AIN : S ets t he d esired C olor G ain v alue (0~20)S PECO D NR : U ses t o r educe t he b ackground n oise i n a l ow l uminance e nvironment w ith 2D + 3D filtering s ystem.BACKLIGHT : A djusts b acklight o pRons.W DR : W DR i lluminates d arker a reas o f a n i mage w hile r etaining t hes ame l ight l evel f or b righter a reas t o e ven o ut t he o verall b rightness o f i mages w ith h igh c ontrast b etween b right a nd d ark a rea -‐ A djusts t he W DR W eight (LOW/MIDDLE/HIGH) * C VBS o ut c annot a djust t his f uncVon.B LC : P roduces a c learer i mage o f a n o bject d arkened b y s trong b acklighVng. -‐ H -‐POS : A djusts t he h orizontal p osiVon(0~20) -‐ V -‐POS : A djusts t he V erVcal p osiVon(0~20) -‐ H -‐SIZE : A djusts t he h orizontal b lock s ize (0~20) -‐ V -‐SIZE : A djusts t he v erVcal b lock s ize (0~20)H LC : U ses t o c ontain e xtremely b right a reas s uch a s f rom c ar h eadlight, t he l ight c an b e m asked o ut m uch o f t he o n-‐screen d etails. IMAGE : A djusts v arious i mage o pRons.S HARPNESS: A djusts s harpness l evel. I ncreasing t his v alue, t he p icture o utline b ecomes s tronger a nd c lear. (0~10) G AMMA : S ets t he d esired G amma v alue. (0.45 ~ 0.75) M IRROR : C hange t he v ideo d irecVon h orizontally. F LIP: C hange t he v ideo d irecVon p erpendicularly.A CE (D-‐WDR) : U ses a d igital w ide d ynamic r ange t o b alance d ark a nd o ver s aturated a reas w ithin t he i mage.D EFOG : A cVvated t his m ode w hen t he v ideo o r t he w eather i s f oggy. P RIVACY : U sed t o h ide r egions o f t he i mage. -‐ Z ONE N UM : S elects t he z one n umber u p 15. -‐ Z ONE D ISP : S elects d esired z one w ith O N o r O FF -‐ H -‐POS : A djusts t he h orizontal p osiVon(0~60) -‐ V -‐POS : A djusts t he v erVcal p osiVon(0~40) -‐ H -‐SIZE : A djusts t he h orizontal s ize(0~40) -‐ V -‐SIZE : A djusts t he v erVcal s ize(0~40)-‐ Y -‐LEVEL : A djusts t he y ellow c olor l evel (0~20) -‐ C B L EVEL : A djusts t he b lue c olor l evel (0~20) -‐ C R L EVEL : A djusts t he r ed c olor l evel (0~20)SYSTEM : A djusts v arious c amera s ystem o pRons. O UTPUTF RAME R ATE: S elect t he f rame r ate 30fps/60fps a ccording t o t he v ideooutput m ode. F REQ C OM.-‐ C AM I D : S ets t he c amera I D f or t he R S-‐485 (0~255)-‐ B AUD R ATE : S ets t he b aud r ate f or t he R S-‐485 (2400~115200). I MAGE R ANGE C OLOR S PACEC OLOR B AR : M anufacturer’s o pVonL ANGUAGE : S ets t he d esired O SD l anguage C AMERA T ITLER ESET: P ress w ith l ong t o r eset a ll s elngs t o f actory d efaults.MOTION : A djust m oRon d etecRon s eEngs.-‐ S ENSITIVITY : S ets t he d esired o f “MoVon” (0~20)-‐ W INDOW T ONE : A djusts t he w indow t one v alue (0~60) -‐ W INDOW U SE : A djusts t he w indow s elng s ize (0~3) -‐ W INDOW Z ONE : a cVvate o r d eacVvate m oVon w indow -‐ D ET H -‐POS :Adjusts t he h orizontal p osiVon(0~60) -‐ D ET V -‐POS : A djusts t he v erVcal p osiVon(0~40) -‐ D ET H -‐SIZE : A djusts t he h orizontal s ize(0~60) -‐ D ET V -‐SIZE : A djusts t he v erVcal s ize(0~40) -‐ A LARM : S elect A larm b etween O N o f O FFHTINTT5T – Grey housing。
1080p高清数码摄像机用户手册说明书

User manualThe smallest high definition camera in the worldPrefaceThank you for purchasing our product, high definition digital camcorder, exquisite special sport design with multi-function.This user manual will give you full instruction of using the product, and also provide you information of the product in detail. Please read this manual carefully before using the product. Please keep this manual well. We hope our product could satisfy your need and wish to serve you for long-term.No further notice will be informed if technical specification or appearance of this product changed. SummaryThis high-tech mini HD camcorder is designed for the demand of the market. This product has the most electronic functions such as HD digital video, digital photo, USB data transfer, HDMI output…Large range of application, memorize every wonderful moment......Features●High Definition videos or photos●Lens: 5.0 mega pixel, CMOS●Video format: 1280×720, 30Fps, MOV●Photo format: 3200×2400 jpeg, 8.0 mega pixel.●Interface: USD2.0 / HDMI●HDMI Port: Support to display on high definition TV directly●High capacity Lithium-ion rechargeable battery●Support micro SD cardConfigurationA MODEB RESETC FAST FORWARDD FAST BACKWARDE RECORDF POWEROPERATING INSTRUCTION◆Charging the Battery1. Using the charger: One end of the USB cable connects the charger and another links to the USB port ofthe camcorder, camcorder light will flash when charging. After full charge, red light keeps on.2. Connect computer: Connecting the USB cable to computer could charge too, red indicator light flashwhen charging.◆Inserting &Taking out Storage Card( Micro SD card)1. Carefully insert the storage card into the card slot.2. To remove the card, push the card in lightly, and then release it, when the card is rebounded then pull itout.Note:1. Before using micro SD card. Please check whether it is locked;2. Please make sure micro SD card is oriented in the right direction. Inserting micro SDcard in the wrong direction might cause damage to the product and the micro SD card;3. If the card is not compatible with the product, it might not be read. In this case, take outthe card and insert it again, or change another micro SD card.◆Power onPress the POWER button slightly, red light on and off quickly then turn to blue, this device is powered on.◆Video mode1. This product automatically goes to video mode after it is powered on. The blue indicator light begins to light always.2. Press RECORD button to start taking video, the blue and red indicator light begin to bright always. Press RECORD button again to stop recording, the blue indicator light always on and red light off.◆Photo mode1. After power on this device, press the MODE button. The blue indicator light begins to flash always.2. Press RECORD button to take photo, the red light bright always and the blue light flash twice, And then enter to the standby mode again, the red light off and blue indicator light flash always.◆HDMI mode1. Connect the product to the TV or PC using HDMI line. Turn on the product to go to Video mode, then can see the frames which the same with the product’s lens. Press the Record button, It begin to take video. And can see the frames in the TV or PC immediately. Press the Record button can play the current video.2. Press the Mode button, enter into photo mode. Press the mode button again to enter into review mode. Press direction key forwards and backwards to review pictures and video taken.◆Review mode1. Turn on the product to go to Video mode. Press mode key to enter into Photo mode. And then press mode key to enter into Review mode. Press direction key forwards and backwards to review pictures or videos taken.2. User can press direction key to review taken pictures or videos. Press Record key to play the video in the TV. Press mode to exit.3. Delete While reviewing (reviewing pictures/video), press Mode key for 3 seconds, it will enter into setting mode. Press mode key to go to deleting display. Press the direction key to choose deleting option, press mode key to confirm.◆Setting mode1. Regardless of video/camera/review mode, press Mode key for 3 seconds to enter into setting mode. Pressing Mode key could enter each setting Menu (For detailed setting information, please refer to setting table).2. At any menu mode, pressing direction key will enable user to go to menu setting options to choose desired setting, then press Mode to confirm.3. At any mode or menu setting, press the record key can exit current setting to original mode.File storing◆USB Storage ModeIf had inserted micro SD card into product, after connect with computer, you can find two removable disks from “My computer” (one is internal storage, the other is external storage card); find the stored videos and pictures under “Removable hard disk/ DCIM/100MEDIA”, data can be saved, transferred, cut, copied and deleted through computer system.Tips:If the displayed picture is tagged with" ", then it is a video. Press Record key to play the video. Pressing Record key again it will come to pause. While playing video, you can use direction key to forward or backward playing. To exit playing mode, you have to press Record key to pause first, and then press direction key to go to the next file.◆Connecting product to TV or PC1. Connecting product to TV with an HDMI cable to review pictures and videos.2. Connecting product to PC with an HDMI cable to review pictures and videos. Functions of keysVideo ModePower Button Turn on or off the productRecord Button Take Video or Pause take videoMode Button Enter into photo modePhoto ModeRecord Button Take Video or Pause take videoMode Button Enter into review modeHDMI ModePower Button Turn on or off the productRecord Button Take Video or Pause take video or play video Mode Button Enter into photo mode/enter into review mode Forwards Next video or pictureBackwards Last video or pictureMode & Menu settingMode Menu SettingTaking Videos Size1280*720/848*480/640*480/320*240EV+0/-0.3/-0.7/-1/-1.3/-1.7/-2/+2.0/+1.7/+1.3/+1/+0.7/0.3 White B Auto/Sunny/Cloudy/Tungsten/FluorescentContrast Standard/Hard/SoftSharpness Standard/Hard/SoftEffect Vivid/monochrome/negative/sepia/art/offDuration No/15min/30min/45minRecycle No/1min/5min/10min/15min/20minPictures Size8M/5MEV+0/-0.3/-0.7/-1/-1.3/-1.7/-2/+2.0/+1.7/+1.3/+1/+0.7/0.3 Quality Fine/good/normalWhite B Auto/Sunny/Cloudy/Tungsten/FluorescentContrast Standard/Hard/SoftSharpness Standard/Hard/SoftEffect Off/Art/Sepia/Negative/ Monochrome/Vivid Selftimer No/YesBurst No/3pics/5picsTips:1.No drive is needed to be installed. U disc can only be used when the video camerais on.2. The TV and PC must have the HDMI port then the product can connect to it.Review Delete No/YesSlide Show No/1Second/3Second/5SecondSystem Volume0/1/2/3 (8)Language English/Japanese/Simplified Chinese/Chinese Traditional Date000 00 00Clock00:00Format Cancel/YesSys.reset No/YesAuto off Off/1minute/3minute/5minuteLight Freq50HZ/60HZVersion V.0000 00 0000SpecificationsSensor5M pixel CMOS sensorVideo Video format: 1280 * 720 30fps, MOV Photo Photo format: 3200 * 2400, jpeg Video output HDMI, support 720P output modeStorage Internal: 32MExternal: support 32GB (Max.)Interface: HDMI / USB2.0Battery500mAh lithium-ion rechargeable batteryWorking temperature-10℃ - 50℃Working humility 15% - 85%Product size: 108mm (L) * 28mm (W) * 18mm (H) (Approx.)Products weight36gTroubleshooting◆Cannot take pictures, videos and record voice?Please check if had inserted the micro SD already, and if this micro SD card have enough place.◆Images cannot be transferred to HDTV screen?Please make sure that HDMI cable is completely plugged into TV’S HDMI port. Please use the HDMI cable comes along with the HDDV.◆Pictures and videos taken are not clear?Please check whether lens is covered with any dirty. If so, clean the lens before using it.。
录像笔的使用方法
录像笔的使用方法1. 录像笔的使用方法之一:打开录像笔开关,按下录像按钮即可开始录像。
在录像过程中,请注意保持笔的稳定,以确保录像画面清晰。
2. 使用方法二:连接笔到电脑或移动设备,可以实时查看录像、下载、编辑或分享录像文件。
3. 录像笔的使用方法还包括:确保笔内置存储空间足够,以确保能够完整存储录像内容。
4. 使用方法四:调整录像笔的分辨率和画质,以根据不同的拍摄需求选择合适的参数。
5. 使用方法五:保持适当的光线环境,以获得高质量的录像效果。
6. 使用方法六:录像过程中,注意观察录像笔屏幕上的指示灯,以确保录像状态正常。
7. 使用方法七:为了保护隐私,遵守当地法律法规,避免未经允许的录像行为。
8. 使用方法八:在录像前清理镜头,以确保录像画面清晰、无污点。
9. 录像笔的使用方法之一:了解录像笔的存储容量和电池续航能力,以便合理安排拍摄时间和内容。
10. 使用方法十:学会使用录像笔的变焦功能,以适应不同拍摄场景的需要。
11. 使用方法十一:在录像过程中,保持笔的对焦稳定,避免出现模糊或晃动的画面。
12. 使用方法十二:了解录像笔的特殊功能,例如夜视、运动模式等,以便在特定环境下得到最佳的录像效果。
13. 使用方法十三:在录像结束后,及时保存和备份录像文件,以免意外丢失重要内容。
14. 使用方法十四:学会使用录像笔的快捷功能,如快速启动录像、暂停录像等,以方便操作。
15. 使用方法十五:定期清理录像笔的表面和接口,以保持良好的使用状态。
16. 使用方法十六:了解录像笔的音频记录功能,并在需要时进行相关设置,以确保录像内容的完整性。
17. 使用方法十七:避免在低温或高温环境下长时间使用录像笔,以防对设备造成损坏。
18. 使用方法十八:了解录像笔的存储格式和文件类型,以便在后期编辑和处理时选择合适的软件和工具。
19. 使用方法十九:结合使用手机或平板等设备,通过应用程序实现远程控制、实时查看和分享录像文件。
摄像笔使用说明书

摄像笔使用说明书1.按钮2.指示灯3.复位孔4.摄像头5.麦克风B.注:本图示仅作参考,产品请以实物为准,如有变更,恕不另行通知。
一、产品简介本产品是世界上第一款内置存储器的摄像笔,既能用于文字书写,也能用于数码有声视频拍摄,十分方便,是现代科技与传统文具的完美结合。
产品操作简便,小巧精致,美观实用,便于携带,是商务、教育、安防、媒体、司法、旅游、医疗、生活等领域必备的实用工具。
二、操作说明1.开机与摄像:短按按钮,指示灯变黄,开始进入摄像准备阶段,准备完成后,指示灯变成蓝色,进入摄像状态,开始摄像。
注意:每一次开机后的第一次摄像都会有一段系统准备时间,在此期间,系统处于忙碌状态,请勿进行其他操作,如多次按按钮,连接计算机等;准备时间与存储器大小有关,存储器容量越大,准备时间会越长;2.摄像:请在有充足照明的环境下,保持笔身的竖直与稳定,与被摄景物保持50cm以上的距离,这样将会得到方向正确、色彩自然、景物清晰、画面稳定的影像,持续录像时间超过一个半小时,会自动保存一次,然后继续录像。
3.停止摄像:在指示灯为蓝色的状态下,短按一下按钮,开始文件存盘,存盘完成后,指示灯由蓝色变为黄色,等待下一次录像,为节省电力,在指示灯为黄色的状态下,一分钟左右无任何操作,系统将自动关机。
注意:文件存盘需要一定的时间,请勿在指示灯由蓝变黄的过程中进行其他操作,如:按按钮、连接计算机等;这样将会导致刚刚录制的视频文件无法顺利保存,可能导致生成文件不完整、丢失、死机等情况。
4.继续摄像:在指示灯为黄色状态下,短按按钮,指示灯即刻由黄色变为蓝色,模式由待机转变为摄像,在该状态下,再次短按按钮,停止摄像,保存文件,等待下一次录像。
注意:每次摄像时,均需参照第二条与第三条的注意事项,每一次开始摄像和停止摄像的循环操作,系统将生成一个新的视频文件。
5.关机:在指示灯为蓝灯或者指示灯为黄灯状态下,长按按钮,指示灯熄灭,完成关机。
_高清摄像笔使用说明书_内置存储_2010102701
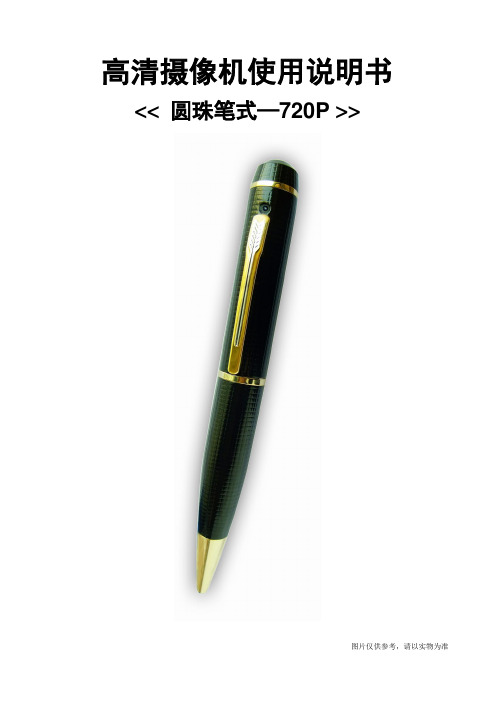
高清摄像机使用说明书<< 圆珠笔式—720P >>图片仅供参考,请以实物为准一、 产品简介感谢您选购本产品,作为一款数码摄录一体机,它有多种实用的功能,时尚精致的外观,稳定卓越的品质,广泛多样的用途,将给您带去全新难忘的使用体验,是您身边不可缺少的实用工具。
本机有的功能为:高清摄像、高清拍照、优质录音、电脑摄像头、可移动磁盘。
本产品具有的特点为:多功能、多用途、外观时尚酷炫、摄录效果卓越、小巧便携、易于使用、稳定可靠、响应快速等。
本产品适用于:记者采访、精彩抓拍、突发事件记录、生活片段记录、娱乐休闲记录、体育运动记录、教学辅助记录、家庭安防监控、执法刑侦取证、旅行人文风景记录、户外探险记录、辅助记忆,等等。
二、 结构概述编号名称 描述 1操作键 它是一个多功能按键,在不同模式以及状态下具有不同功能,包括:开机、关机、开始摄像、停止摄像、拍照、开始录音、停止录音。
2摄像头 用于拾取图像信号。
3麦克风 用于拾取音频信号。
4状态指示灯孔 内置红绿蓝三色指示灯,3种颜色的灯通过不同的组合方式指示产品的不同工作状态。
5模式开关 通过拨动模式开关,改变设备当前工作模式 6 Standard 4 Pin USB 接口 连接数据线、电源线的接口。
三、 操作说明1. 开关机:1.1 开机A. 长按操作键(部件1)2秒钟,再松开按键。
图片仅供参考,请以实物为准B. 产品电源被打开,绿灯亮起,进入产品的初始化状态。
C. 初始化完成,绿灯熄灭。
D. 开机后,设备进入默认的摄像功能待机状态,红灯亮起。
E. 完成开机。
注意:本产品的开机类似于电脑的启动,有一个启动过程,在此期间,请勿进行任何操作,直到开机动作完成。
开机初始化的时间长短,视存储容量大小而异。
1.2 关机A. 长按操作键(部件1)2秒钟,再松开按键。
B. 状态指示灯全部熄灭,完成关机。
注意:如果您的产品正在工作中,关机时,产品会自动为您保存正在录制的文件。