HP-UX 11.23内核参数设置标准
HP HP-UX 说明书

HP-UX 11.0内核参数篇
P-UX 11.0内核参数篇1.1 内核配置的概念抽象地讲,内核配置是管理员所有选项和设置的集合,这些选项和设置用于确定HP-UX 内核行为和功能。
1.1.1 内核配置包括:1. 一组内核可调参数值分配2. 一组内核模块,每个均具有所需的状态1.1.2 内核配置的名称和选项说明:从物理上讲,内核配置是一个位于/stand下的目录,其中包括实现特定行为所需的文件。
此目录包括:1. HP-UX 内核可执行程序2. 一组HP-UX 内核模块文件3. 内核注册表数据库,包含以上所有设置4. 系统文件,以用户可读的形式说明上述设置5. 特定于实现的各种其他文件6. 除运行中的内核的配置之外,还可保存任意数目的HP-UX 系统内核配置,这只受/stand 目录中磁盘空间的限制。
1.2 HP的核心参数存放在哪些文件中这两个文件中的信息比较的全:/usr/conf/master.d/core-hpux ./var/sam/boot.config ./stand/vmunix是内核文件,参数当然包含在里面,但是它并不是一个文本文件,只能间接看到系统内核参数(如sysdef/sam)。
/stand/system是修改内核参数的一个文本文件,按要求编辑好这个文件以后,再运行kmtune 重新按system的值编译内核,以达到修改内核参数的目的。
这是通过命令行方式修改内核参数的一个方法,如果用sam修改,则方便许多。
不信你可以修改/stand/system的pty值试试,不kmtune就打开sam看pty的值,根本就没改变。
1.3 HP-UX的内核参数的修改/usr/conf/master.d/core-hpux设定HP-UX的核心环境,对核心环境进行管理。
但修改后不能立即对核心参数进行管理。
因为系统会向boot.config读出参数,所以只有移走boot.config,然后再用getkinfo重建boot.config文件。
HP-UX操作系统安装说明.
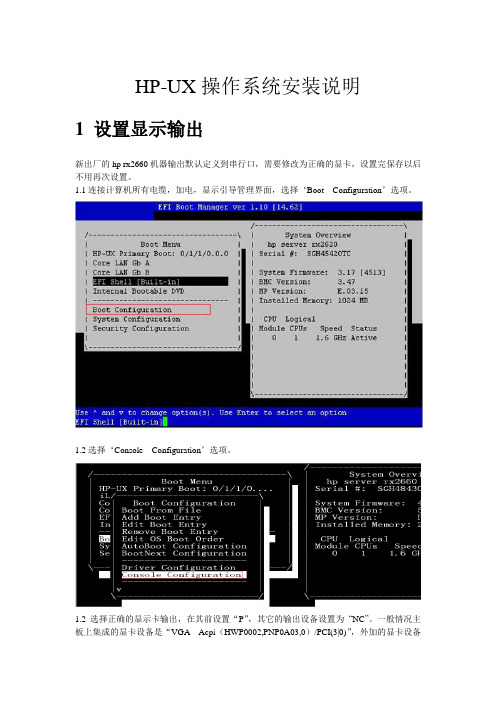
HP-UX操作系统安装说明1 设置显示输出新出厂的hp rx2660机器输出默认定义到串行口,需要修改为正确的显卡,设置完保存以后不用再次设置。
1.1连接计算机所有电缆,加电,显示引导管理界面,选择‘Boot Configuration’选项。
1.2选择‘Console Configuration’选项。
1.2选择正确的显示卡输出,在其前设置“P”,其它的输出设备设置为“NC”。
一般情况主板上集成的显卡设备是“VGA Acpi(HWP0002,PNP0A03,0)/PCI(3|0)”,外加的显卡设备是“VGA Acpi(HWP0002,PNP0A03,300)/PCI(1|0)”。
设置完成后保存设置。
2 做SAS卡磁盘镜像(此步可选)如果不做镜像此步可以略高。
如果HP rx2660小机配置多块硬盘,并且没有配置raid卡,两块硬盘做镜像可以通过主板上的SAS卡进行配置。
2.1从引导菜单中选择EFI Shell (Built In)2.2回车进入shell界面,键入drvcfg –s命令。
2.3选择做镜像的SAS卡2.4选择“RAID Properties”2.4选择“RAID Properties”2.5默认“RAID DISK”为“NO”,用空格键将其改为“Yes”,键入“c”创建镜像盘,保存配置。
3做RAID卡磁盘镜像(此步可选)如果机器配置了RAID卡,用RAID卡做磁盘RAID 1或RAID 5。
3.1 在机器启动期间看屏幕提示按“F8”键,进入设置界面,根据屏幕提示操作。
3 操作系统安装3.1 准备HP-UX操作系统光盘(两张DVD),版本2007年12月份以后(HP-UX 11i V2B.11.23)。
3.2 连接计算机所有电缆,加电,把可引导的第一张DVD光盘放入光驱3.3 系统开始引导,(如果系统没有自动引导)它会转到引导菜单。
这是一个限时菜单,按任意键可以使计时器停止运行。
3.4 可以按下列步骤从EFI shell 手动进行安装。
Linux和Unix下核心参数的调整

核心参数说明shmmax - 共享内存段.shmmin - 最小的共享内存段.shmmni - 共享内存标志符的数量.shmseg - 一个进程可分配的最大内存段数.shmall - 最大可允许的内存数.semmns - 信号量.semmsl- 一个信号灯集中最大的信号量数.共享内存SHMMAX:单个共享内存段的最大字节数。
SHMSEG:每个进程可链接的最多共享内存段数SHMALL:操作系统内全部共享内存的大小,应大于SHMMAX*SHMSEG。
消息队列MSGTQL:一个队列中可存放消息的个数MSGMAX:一个消息队列的最大字节数, 大于消息个数×一个消息的字节数。
MSGMNB:一个消息队列的最大字节数,大于消息个数*一个消息的字节数。
信号灯SEMMNI:信号灯集的个数。
SEMMSL:每个信号灯集中信号灯的最大个数SEMMNS:操作系统中信号灯的总数一、Linux下核心参数的调整1)操作对于正在运行内核 2.4 或更高版本的 Linux 系统,作为 root 用户在命令行上发出下列命令:∙sysctl -w kernel.msgmni=2048∙sysctl -w kernel.shmmax=1073741824∙sysctl -w fs.file-max=32768∙sysctl -w kernel.sem="512 32000 32 1024"要自动执行命令,编辑/etc/rc.d/rc.local文件,并将上述命令放在文件末尾。
在后续的每次系统引导时,就会自动设置这些值。
二.Solaris下核心参数的调整修改Solaris里/etc/system,设置格式如下:set shmsys:shminfo_shmmax=4294967295set shmsys:shminfo_shmmin=1set shmsys:shminfo_shmmni=100set shmsys:shminfo_shmseg=15set semsys:seminfo_semmns=200set semsys:seminfo_semmni=70set ulimit=3000000set semsys:seminfo_semmni=315set semsys:seminfo_semmsl=300set semsys:seminfo_semmns=630set semsys:seminfo_semopm=315set semsys:seminfo_semvmx=32767set shmsys:shminfo_shmmax=4294967295set shmsys:shminfo_shmmni=315set shmsys:shminfo_shmseg=10set shmsys:shminfo_shmmin=1set maxusers = <以MB为单位计的可用物理内存数量>set max_nprocs = 10 + 16 * maxusers//set max_nprocs=1200 系统所允许的最大进程数,通常最多30000set maxuprc = max_nprocs –10//每个用户可以拥有的最大进程数(为超级用户保留10个)set rlim_fd_max=2048set rlim_fd_cur=1024solaris 7下select()可以使用最多达65536的文件句柄,64-bit 应用程序缺省情况如此。
HP-Unix安全配置规范

HP-Unix安全配置规范1.概述1.1. 目的本规范明确了HP-UX主机安全配置方面的基本要求。
为了提高HP-UX主机的安全性而提出的。
1.2. 范围如无特别说明,本规范适用于HP-UX 10.20以及以上版本。
2.配置规范2.1. 用户账号和环境2.1.1.系统账户UUCP和nuucp账号通常是不需要的,可以把它们删除。
其它账号视具体情况而定,选择锁定或者删除。
操作命令如下:for user in uucp nuucp adm daemon bin lp \nobody noaccess hpdb useradmdo/usr/lbin/modprpw -w "*" "$user"/usr/sbin/usermod –s /bin/false "$user"done2.1.2.删除属于root用户存在潜在危险文件/.rhost、/.netrc或/root/.rhosts、/root/.netrc文件都具有潜在的危险,应该使用如下命令删除:rm /.[rs]hosts /.netrc ~root/.[rs]hosts ~root/.netrc2.1.3.用户home权限限制用户home目录的许可权限限制不严可能会导致恶意用户读/修改/删除其它用户的数据或取得其它用户的系统权限,因此需要使用以下命令严格限制用户home目录的权限:logins -ox | cut -f6 -d: | while read homedo chmod og-w "$home"done2.1.4.UMASK设置为用户设置缺省的umask值有助于防止用户建立所有用户可写的文件而危及用户的数据。
设置命令如下:cd /etcumask 022for file in profile csh.login d.profile d.logindoecho umask 022 >> "$file"done2.2. 基线控制基线控制是利用数据完整性检测工具对系统的变化进行监控。
HP-UX系统nfile参数说明和调整

* The requested changes have been applied to the currently
running configuration.
Tunable Value Expression Changes
nfile设置为0后,其实是表示HP-UX将废弃该内核可调参数,HP-UX系统将会自动的调整系统资源来协调工作。
从man nfile的信息中,也可以看出在将来的版本中会废弃nfile这个参数,如下:
...
WARNINGS
This tunable is obsolete and will be removed in a future release of
db178.cm2:/home/fengjing/kmif>#kctune -v nfile
Tunable nfile
Description Maximum number of file descriptors (system-wide)
Module fs_filedscrp
* Future operations will update the backup without prompting.
WARNING: The tunable nfile has been deprecated and should not be tuned
to a non-default value. See nfile(5) for details on this
Message Table (msgmni) 4096 2 0 0
Semaphore Table (semmni) 8192 32 0 0
HP UX 安腾11.23根镜像
HPUX 11.23下根盘镜像全过程(上)分类:HPUX 2009-04-27 16:17 395人阅读评论(0) 收藏举报、知识准备HPUX 11.23与11.22版本配置根盘镜像的最大的不同:1. 新增加了HPSP分区;11.22系统根盘只划分了两个分区EFI/HP-UX,在11.23系统中,划分了3个分区,分别为EFI/HP-UX/HPSP.相应在使用idisk命令划分硬盘分区时使用的/tmp/partitionfile 文件中的内容也做了相应调整.2. EFI分区大小从原先的100M,增加到500M二、实验目的对一台HP rx8640机器的2号分区根盘(146GB)镜像;三、操作过程1. From HPUX, use vgdisplay to identify the disk that is in vg00. Use ioscan to find the spare disk.# vgdisplay -v --> vg00 is on /dev/dsk/c0t6d0s2# ioscan -efunC disk --> c2t6d0Class I H/W Path Driver S/W State H/W Type Description========================================================================disk 1 0/0/0/2/0.6.0 sdisk CLAIMED DEVICE HP 146 GST3146855LC/dev/dsk/c0t6d0 /dev/rdsk/c0t6d0/dev/dsk/c0t6d0s1 /dev/rdsk/c0t6d0s1/dev/dsk/c0t6d0s2 /dev/rdsk/c0t6d0s2/dev/dsk/c0t6d0s3 /dev/rdsk/c0t6d0s3Acpi(HWP0002,PNP0A03,0)/Pci(2|0)/Scsi(Pun6,Lun0)/HD(Part1,Sig0E481F42-F04C-11DC-8002-D6217B60E5 88)//EFI/HPUX/HPUX.EFIdisk 0 0/0/0/2/1.2.0 sdisk CLAIMED DEVICE Optiarc DVD RW AD-5170A/dev/dsk/c1t2d0 /dev/rdsk/c1t2d0disk 2 0/0/0/3/0.6.0 sdisk CLAIMED DEVICE HP 146 GST3146855LC/dev/dsk/c2t6d0 /dev/rdsk/c2t6d02. Create the system, OS, and service partitions.# vi /tmp/partitionfile3EFI 500MBHPUX 100%HPSP 400MB# idisk -wf /tmp/partitionfile /dev/rdsk/c2t6d0idisk version: 1.31********************** WARNING ***********************If you continue you may destroy all data on this disk.Do you wish to continue(yes/no)? yes <-- Answer "yes" and not "y"3. Create device files needed for the new partitions.# insf -eC diskinsf: Installing special files for sdisk instance 1 address 0/0/0/2/0.6.0 insf: Installing special files for sdisk instance 0 address 0/0/0/2/1.2.0 insf: Installing special files for sdisk instance 2 address 0/0/0/3/0.6.0 insf: Installing special files for sdisk instance 3 address 0/0/12/1/0/4/1.0.0 insf: Installing special files for sdisk instance 4 address 0/0/12/1/0/4/1.1.0 insf: Installing special files for sdisk instance 5 address 0/0/12/1/0/4/1.2.0 insf: Installing special files for sdisk instance 6 address 0/0/12/1/0/4/1.3.0 insf: Installing special files for sdisk instance 7 address 0/0/14/1/0/4/1.0.0 insf: Installing special files for sdisk instance 8 address 0/0/14/1/0/4/1.1.0 insf: Installing special files for sdisk instance 9 address 0/0/14/1/0/4/1.2.0 insf: Installing special files for sdisk instance 10 address 0/0/14/1/0/4/1.3.04. Verify the partition table.# idisk /dev/rdsk/c2t6d0idisk version: 1.32EFI Primary Header:Signature = EFI PARTRevision = 0x10000HeaderSize = 0x5cHeaderCRC32 = 0xe51d545dMyLbaLo = 0x1MyLbaHi = 0x0AlternateLbaLo = 0x1117732fAlternateLbaHi = 0x0FirstUsableLbaLo = 0x22FirstUsableLbaHi = 0x0LastUsableLbaLo = 0x1117730cLastUsableLbaHi = 0x0Disk GUID = 711f04da-2190-11dd-8001-d6217b60e588PartitionEntryLbaLo = 0x2PartitionEntryLbaHi = 0x0NumberOfPartitionEntries = 0xcSizeOfPartitionEntry = 0x80PartitionEntryArrayCRC32 = 0x280b786cPrimary Partition Table (in 512 byte blocks):Partition 1 (EFI):Partition Type GUID = c12a7328-f81f-11d2-ba4b-00a0c93ec93bUnique Partition GUID = 711f066a-2190-11dd-8002-d6217b60e588 Starting Lba Lo = 0x22Starting Lba Hi = 0x0Ending Lba Lo = 0xfa021Ending Lba Hi = 0x0Partition 2 (HP-UX):Partition Type GUID = 75894c1e-3aeb-11d3-b7c1-7b03a0000000 Unique Partition GUID = 711f0688-2190-11dd-8003-d6217b60e588 Starting Lba Lo = 0xfa022Starting Lba Hi = 0x0Ending Lba Lo = 0x110af30bEnding Lba Hi = 0x0Partition 3 (HPSP):Partition Type GUID = e2a1e728-32e3-11d6-a682-7b03a0000000 Unique Partition GUID = 711f06a6-2190-11dd-8004-d6217b60e588 Starting Lba Lo = 0x110af30cStarting Lba Hi = 0x0Ending Lba Lo = 0x1117730bEnding Lba Hi = 0x0EFI Alternate Header:Signature = EFI PARTRevision = 0x10000HeaderSize = 0x5cMyLbaLo = 0x1117732fMyLbaHi = 0x0AlternateLbaLo = 0x1AlternateLbaHi = 0x0FirstUsableLbaLo = 0x22FirstUsableLbaHi = 0x0LastUsableLbaLo = 0x1117730cLastUsableLbaHi = 0x0Disk GUID = 711f04da-2190-11dd-8001-d6217b60e588PartitionEntryLbaLo = 0x1117730ePartitionEntryLbaHi = 0x0NumberOfPartitionEntries = 0xcSizeOfPartitionEntry = 0x80PartitionEntryArrayCRC32 = 0x280b786cAlternate Partition Table (in 512 byte blocks):Partition 1 (EFI):Partition Type GUID = c12a7328-f81f-11d2-ba4b-00a0c93ec93b Unique Partition GUID = 711f066a-2190-11dd-8002-d6217b60e588 Starting Lba Lo = 0x22Starting Lba Hi = 0x0Ending Lba Lo = 0xfa021Ending Lba Hi = 0x0Partition 2 (HP-UX):Partition Type GUID = 75894c1e-3aeb-11d3-b7c1-7b03a0000000 Unique Partition GUID = 711f0688-2190-11dd-8003-d6217b60e588 Starting Lba Lo = 0xfa022Starting Lba Hi = 0x0Ending Lba Lo = 0x110af30bEnding Lba Hi = 0x0Partition 3 (HPSP):Partition Type GUID = e2a1e728-32e3-11d6-a682-7b03a0000000 Unique Partition GUID = 711f06a6-2190-11dd-8004-d6217b60e588 Starting Lba Lo = 0x110af30cStarting Lba Hi = 0x0Ending Lba Hi = 0x0Legacy MBR (MBR Signatures in little endian):MBR Signature = 0x6c041f71Protective MBR5. Verify that the device files were created properly.# ioscan -efnC disk --> c2t6d0 is 0/0/0/3/0.6.06. Populate the /efi/hpux/ directory in the new EFI system partition.# mkboot -e -l /dev/rdsk/c2t6d07. Change the auto file for the mirror to boot without quorum.NOTE: Using "s1"# echo "boot vmunix -lq" > /tmp/AUTO.lq# efi_cp -d /dev/rdsk/c2t6d0s1 /tmp/AUTO.lq /EFI/HPUX/AUTONOTE: We assume that if we boot from the primary, the mirror is fullyfunctional and therefore we don't need to override quorum. Your site mightrequire that both disks override quorum.8. Verify the contents of the auto file on the primary and the mirror.NOTE: Using "s1"# efi_cp -d /dev/rdsk/c0t6d0s1 -u /EFI/HPUX/AUTO /tmp/AUTO.pri# efi_cp -d /dev/rdsk/c2t6d0s1 -u /EFI/HPUX/AUTO /tmp/AUTO.alt# cat /tmp/AUTO.priboot vmunix# cat /tmp/AUTO.altboot vmunix -lq分享到:∙上一篇:HPUX下定位网卡位置∙下一篇:HPUX 11.23下根盘镜像全过程(下)HPUX 11.23下根盘镜像全过程(下)分类:HPUX 2009-04-27 16:19 300人阅读评论(0) 收藏举报9. Add the new partition to vg00.NOTE: Using "s2"# pvcreate -fB /dev/rdsk/c2t6d0s2Physical volume "/dev/rdsk/c2t6d0s2" has been successfully created.# vgextend vg00 /dev/dsk/c2t6d0s2Volume group "vg00" has been successfully extended.Volume Group configuration for /dev/vg00 has been saved in /etc/lvmconf/vg00.conf10. Mirror all logical volumes in vg00.NOTE: Using "s2"# lvextend -m 1 /dev/vg00/lvol1 /dev/dsk/c2t6d0s2The newly allocated mirrors are now being synchronized. This operation willtake some time. Please wait ....Logical volume "/dev/vg00/lvol1" has been successfully extended.Volume Group configuration for /dev/vg00 has been saved in /etc/lvmconf/vg00.conf # lvextend -m 1 /dev/vg00/lvol2 /dev/dsk/c2t6d0s2The newly allocated mirrors are now being synchronized. This operation willtake some time. Please wait ....Logical volume "/dev/vg00/lvol2" has been successfully extended.Volume Group configuration for /dev/vg00 has been saved in /etc/lvmconf/vg00.conf # lvextend -m 1 /dev/vg00/lvol3 /dev/dsk/c2t6d0s2The newly allocated mirrors are now being synchronized. This operation willtake some time. Please wait ....Logical volume "/dev/vg00/lvol3" has been successfully extended.Volume Group configuration for /dev/vg00 has been saved in /etc/lvmconf/vg00.conf # lvextend -m 1 /dev/vg00/lvol4 /dev/dsk/c2t6d0s2The newly allocated mirrors are now being synchronized. This operation willtake some time. Please wait ....Logical volume "/dev/vg00/lvol4" has been successfully extended.Volume Group configuration for /dev/vg00 has been saved in /etc/lvmconf/vg00.conf # lvextend -m 1 /dev/vg00/lvol5 /dev/dsk/c2t6d0s2The newly allocated mirrors are now being synchronized. This operation willtake some time. Please wait ....Logical volume "/dev/vg00/lvol5" has been successfully extended.Volume Group configuration for /dev/vg00 has been saved in /etc/lvmconf/vg00.conf # lvextend -m 1 /dev/vg00/lvol6 /dev/dsk/c2t6d0s2The newly allocated mirrors are now being synchronized. This operation willtake some time. Please wait ....Logical volume "/dev/vg00/lvol6" has been successfully extended.Volume Group configuration for /dev/vg00 has been saved in /etc/lvmconf/vg00.conf # lvextend -m 1 /dev/vg00/lvol7 /dev/dsk/c2t6d0s2The newly allocated mirrors are now being synchronized. This operation willtake some time. Please wait ....Logical volume "/dev/vg00/lvol7" has been successfully extended.Volume Group configuration for /dev/vg00 has been saved in /etc/lvmconf/vg00.conf # lvextend -m 1 /dev/vg00/lvol8 /dev/dsk/c2t6d0s2The newly allocated mirrors are now being synchronized. This operation willtake some time. Please wait ....Logical volume "/dev/vg00/lvol8" has been successfully extended.Volume Group configuration for /dev/vg00 has been saved in /etc/lvmconf/vg00.conf11. Add the new disk to /stand/bootconf.NOTE: Using "s2"# vi /stand/bootconfl /dev/dsk/c0t6d0s2l /dev/dsk/c2t6d0s212. Verify that the new disk was added to vg00, and the lv's are in sync.# vgdisplay -v vg00--- Volume groups ---VG Name /dev/vg00VG Write Access read/writeVG Status availableMax LV 255Cur LV 8Open LV 8Max PV 16Cur PV 2Act PV 2VGDA 4PE Size (Mbytes) 32Total PE 8692Alloc PE 2330Free PE 6362Total PVG 0Total Spare PVs 0Total Spare PVs in use 0--- Logical volumes ---LV Name /dev/vg00/lvol1LV Status available/syncd LV Size (Mbytes) 1792 Current LE 56Allocated PE 112Used PV 2LV Name /dev/vg00/lvol2LV Status available/syncd LV Size (Mbytes) 8192 Current LE 256Allocated PE 512Used PV 2LV Name /dev/vg00/lvol3LV Status available/syncd LV Size (Mbytes) 992 Current LE 31Allocated PE 62Used PV 2LV Name /dev/vg00/lvol4LV Status available/syncd LV Size (Mbytes) 512 Current LE 16Used PV 2LV Name /dev/vg00/lvol5LV Status available/syncd LV Size (Mbytes) 128 Current LE 4Allocated PE 8Used PV 2LV Name /dev/vg00/lvol6LV Status available/syncd LV Size (Mbytes) 9184 Current LE 287Allocated PE 574Used PV 2LV Name /dev/vg00/lvol7LV Status available/syncd LV Size (Mbytes) 7776 Current LE 243Allocated PE 486Used PV 2LV Name /dev/vg00/lvol8LV Status available/syncd LV Size (Mbytes) 8704 Current LE 272Allocated PE 544Used PV 2--- Physical volumes ---PV Name /dev/dsk/c0t6d0s2 PV Status available Total PE 4346Free PE 3181Proactive Polling OnPV Name /dev/dsk/c2t6d0s2PV Status availableTotal PE 4346Free PE 3181Autoswitch OnProactive Polling On13. Verify that the BDRA was updated properly. Take note of the HW paths for step 14.# lvlnboot -vBoot Definitions for Volume Group /dev/vg00:Physical Volumes belonging in Root Volume Group:/dev/dsk/c0t6d0s2 (0/0/0/2/0.6.0) -- Boot Disk/dev/dsk/c2t6d0s2 (0/0/0/3/0.6.0) -- Boot DiskBoot: lvol1 on: /dev/dsk/c0t6d0s2/dev/dsk/c2t6d0s2Root: lvol3 on: /dev/dsk/c0t6d0s2/dev/dsk/c2t6d0s2Swap: lvol2 on: /dev/dsk/c0t6d0s2/dev/dsk/c2t6d0s2Dump: lvol2 on: /dev/dsk/c0t6d0s2, 014. Add EFI primary and high availability boot path menu entries.# setboot -p 0/0/0/2/0.6.0# setboot -h 0/0/0/3/0.6.0# setboot -b on15. Verify that the primary and mirror boot paths are configured properly.# setbootPrimary bootpath : 0/0/0/2/0.6.0HA Alternate bootpath : 0/0/0/3/0.6.0Alternate bootpath : 0/0/0/1/0Autoboot is ON (enabled)16. Test the new mirror by booting off of it.# cd /# shutdown -ry 0SHUTDOWN PROGRAM05/14/08 17:19:51 EATBroadcast Message from root (console) Wed May 14 17:19:51...SYSTEM BEING BROUGHT DOWN NOW ! ! !# grep "Boot device" /var/adm/syslog/syslog.logvmunix: Boot device's HP-UX HW path is: 0/0/0/2/0.6.017. Change the boot sequence in order to boot from mirror disk /dev/dsk/c2t6d0:# setboot -p 0/0/0/3/0.6.0# setboot -h 0/0/0/2/0.6.0# setboot -b on# setbootPrimary bootpath : 0/0/0/3/0.6.0HA Alternate bootpath : 0/0/0/2/0.6.0Alternate bootpath : 0/0/0/1/0# cd /# shutdown -ry 018. Verify which disk/kernel you booted from.# grep "Boot device" /var/adm/syslog/syslog.logvmunix: Boot device's HP-UX HW path is: 0/0/0/3/0.6.0overhpux 11.23安腾做mirror步骤详细说明,见全文...HPUX 11.23与11.22版本配置根盘镜像的最大的不同:1. 新增加了HPSP分区11.22系统根盘只划分了两个分区EFI / HP-UX,在11.23系统中,划分了3个分区,分别为EFI / HP-UX / HPSP相应在使用idisk命令划分硬盘分区时使的/tmp/partitionfile 文件中的内容也做了相应调整。
HP-UX11i MC ServiceGuard双机调测指南(RAC方式和FailOver方式)

HP-UX 11i双机调测指南HP-UX 11i双机调测指南HP-UX11i双机调测指南目录第1章系统要求 (1)1.1 操作系统要求 (1)1.2 磁盘 (1)1.3 内存 (1)1.4 存储 (1)1.5 JDK & JRE (1)1.6 补丁/包的要求 (1)1.7 内核参数 (4)1.8 创建X-LIBRARY的LINK (5)第2章安装命名规则 (6)2.1 主机名 (6)2.2 VG划分 (6)2.3 Cluster (7)2.4 Package (7)2.4.1 RAC方式 (7)2.4.2 FailOver方式 (7)第3章空间划分 (8)3.1 本地文件系统 (8)3.2 交换区 (8)3.3 根盘镜像 (8)3.4 磁盘阵列 (10)第4章网卡规划 (13)4.1 RAC方式 (13)4.2 FailOver方式 (13)第5章用户、组 (14)5.1 创建oracle用户及dba组 (14)5.2 创建/var/opt/oracle目录,并赋oracle:dba权限 (16)5.3 创建启动、关闭Oracle的脚本 (16)5.4 修改root用户的profile (16)5.5 修改/etc/hosts文件 (16)5.5.1 RAC方式 (16)5.5.2 FailOver方式 (17)5.6 建立双机信任关系 (17)第6章异步IO设置 (19)6.1 创建/dev/async 字符设备 (19)HP-UX11i双机调测指南6.2 用SAM在内核中配置async driver (19)6.3 检查参数 (19)6.4 检查是否给oracle组(dba)赋MLOCK权限 (19)6.5 创建/etc/privgroup文件,文件内容如下: (19)6.6 赋权限 (20)第7章 NTP设置 (21)7.1 在双机系统中,选择一台小型机做主小型机(即时间源) (21)7.1.1 在这台小型机上,编辑/etc/ntp.conf文件,做如下设置 (21)7.1.2 修改/etc/rc.config.d/netdaemons (21)7.1.3 启动XNTPD进程 (21)7.1.4 运行ntpq -p 查看NTP运行情况 (21)7.2 另外一台小型机(客户端)的配置: (21)7.2.1 编辑/etc/ntp.conf (21)7.2.2 修改/etc/rc.config.d/netdaemons (22)7.2.3 启动xntpd进程 (22)7.2.4 运行ntpq -p检查ntp工作情况 (22)第8章双机配置 (23)8.1 RAC方式 (23)8.1.1 cluster配置 (23)8.1.2 cluster配置检查 (24)8.1.3 cluster配置应用 (24)8.1.4 package配置 (25)8.1.5 package配置检查 (28)8.1.6 package配置应用 (28)8.2 FailOver方式 (28)8.2.1 cluster配置 (28)8.2.2 cluster配置检查 (30)8.2.3 cluster配置应用 (30)8.2.4 package配置 (30)8.2.5 创建包的监控文件 (33)8.2.6 package配置检查 (36)8.2.7 package配置应用 (36)第9章现场修改主机名时间及IP地址 (37)9.1 修改主机名 (37)9.2 修改时间 (37)9.3 修改时区 (37)9.4 修改IP地址 (37)9.5 请注意修改icdnode2上的/etc/ntp.conf中的NTP服务器的IP地址,修改完毕后,运行如下命令: (37)HP-UX11i双机调测指南关键词:HP-UX oracle RAC FAILOVER摘要:本文详细描述了在HP平台安装数据库前,对操作系统以及双机的安装调测要求。
- 1、下载文档前请自行甄别文档内容的完整性,平台不提供额外的编辑、内容补充、找答案等附加服务。
- 2、"仅部分预览"的文档,不可在线预览部分如存在完整性等问题,可反馈申请退款(可完整预览的文档不适用该条件!)。
- 3、如文档侵犯您的权益,请联系客服反馈,我们会尽快为您处理(人工客服工作时间:9:00-18:30)。
2.1 HP-UX操作系统
2.1.1 HP-UX 11.23内核参数设置标准
请遵循以下标准设置HP-UX 11.23内核参数。
2.1.2 HP-UX内核参数设置方法
为安全起见,请统一使用SAM进行HP-UX的内核参数设置。
1. HP-UX 11.23设置方法
【启动SAM命令】
# set term=vt100
# sam
启动后选择:
Kernel Configuration => Kernel Configuration(character mode) => View or modify
kernel tunables
在参数列表中找到相应的参数,点击m键,依据上述标准进行参数的修
改。
HP内核参数分为动态和静态两种,Dynamic显示为“yes”的是动态参数,
修改后立即生效;Dynamic显示为“no”的是静态参数,修改后必须重启
才能生效。
【参数列表示例】
---------------------------------------------------------------------
Current Planned Dynamic Auto Tuning
Value Value
=====================================================================
NSTREVENT 50 50 no
aio_listio_max 256 256 yes
【示例:设置动态参数aio_max_ops(HP-UX11.11是静态参数)】
SAM -> Kernel Configuration -> Tunable -> Modify (aio_max_ops)
-----------------------------------------------------------------
Tunable aio_max_ops
Description Maximum number of async IO operations that can be queued at any time
Dynamic yes
Subsystem io
Default Value 2048
Current Value 1000
Planned Value 1000
Last Boot Value 1000
Constraints aio_max_ops >= 2
Constraints aio_max_ops <= 1048576
Constraints aio_max_ops >= aio_listio_max
Auto Tuning Not Supported
Enter Value/Expression OR q(quit) = 2048
Do you want to hold this change till next boot ? (y/n/q)[y] = n
Do you want to save the current kernel configuration ? (y/n/q)[y] = y Enter Comments =
Command Preview: /usr/sbin/kctune -B aio_max_ops=2048
Do you want to proceed ? (y/n) [n] = y
* The automatic 'backup' configuration has been updated.
* The requested changes have been applied to the currently
running system.
press enter to continue...
回车,可以看到Current Value和Planned Value的值都为2048,说明此修改已经生效。
【说明】
Current Value:参数当前生效的值
Planned Value:参数在下次系统重启后生效的值
Current Planned Dynamic Auto Tuning
Value Value
========================================================================= aio_max_ops 2048 2048 yes
【示例:设置动态参数aio_max_ops】
SAM -> Kernel Configuration -> Tunable -> Modify (max_async_ports)
-----------------------------------------------------------------
Tunable max_async_ports
Description Maximum number of open asyncdsk ports
Dynamic no
Subsystem io
Default Value 50
Current Value 1000
Planned Value 1000
Last Boot Value 1000
Auto Tuning Not Supported
Enter Value/Expression OR q(quit) = 2048
Do you want to save the current kernel configuration ? (y/n/q)[y] = y
Enter Comments =
Command Preview: /usr/sbin/kctune -h -B max_async_ports=2048
Do you want to proceed ? (y/n) [n] = y
* The automatic 'backup' configuration has been updated.
* The requested changes have been saved, and will take effect at next boot.
press enter to continue...
回车,可以看到Current Value值仍为1000,Planned Value值为2048,说明此修改没有生效,需要重启操作系统。
Current Planned Dynamic Auto Tuning
Value Value
===================================================================== max_async_ports 1000 2048 no
使用以下命令进行重启:
# shutdown -ry 0
重启后再进入SAM进行观察,或使用以下命令进行确认:
# /usr/sbin/kmtune | grep max_async_ports
建议,在修改完全部内核参数以后,使用kmtune对所有内核参数都进行一次确认:
# /usr/sbin/kmtune。