TP70TP76使用说明书
DT70数字式重量变送器使用说明书V1.19
DT70数字式重量变送器使用说明书V01.19/2009.10天津市丽景微电子设备有限公司-2-DT70数字式重量变送器使用说明书用前须知:�初次使用前,请详细阅读本说明书,现场使用许多疑难问题,在本说明书中将找到答案。
�使用前,请检查称重系统其他部件是否匹配。
�使用本仪表,注意防晒、防雨水、防撞击。
�使用本仪表,请尽可能配备常用安装、检修工具:小型一字螺丝刀,数字式万用表,称重传感器模拟器(mV信号发生器)。
目录 (11)1概述.......................................................................................................................................................................1-1简介 (1)2技术参数 (2)2-1一般参数 (2)2-2数字部分 (2)2-3模拟部分 (2)3安装与接线说明 (3)3-1安装注意事项 (3)3-2安装尺寸图 (3)3-3接线图及接线端子列表 (4)3-4显示面板 (5)4基本操作图 (7)4-1DT70功能框架图 (7)4-2DT70操作流程 (8)4-3DT70功能树图 (9)5一般功能设置 (10)5-1功能设定步骤 (10)5-2功能设定列表 (11)6通讯参数设定及通讯协议 (13)6-1RS232/RS485通讯选择 (13)6-2串口1通讯参数设定 (13)6-3串口1通讯参数列表 (14)6-4串口1通讯协议 (15)6-4-1志美协议 (15)6-1-1-1讯号形式 (15)6-4-1-2数据包格式 (15)6-4-1-3志美协议指令集 (15)6-4-2Modbus协议 (16)6-4-2-1讯号形式 (16)6-4-2-2数据包格式 (16)6-4-3lascaux协议 (20)6-4-3-1讯号形式 (20)6-4-3-2数据包格式 (20)6-4-3-3lascaux协议指令集 (20)7仪表标定 (33)7-1标定的意义 (33)7-2标定操作 (34)7-2-1标定操作步骤 (34)7-2-1-1实物标定 (35)7-2-1-2数字标定 (37)7-2-1-3修改标定系数 (38)7-2-2-4CAL的总图 (39)7-2-2-6实物标定参数列表 (39)7-2-2-6数字标定参数列表 (39)7-2-2标定错误提示 (40)8诊断功能 (41)8-1诊断功能操作步骤 (41)8-2诊断功能列表 (42)8-3诊断功能具体描述 (42)8-3-1毫伏值显示 (42)8-3-2按键测试 (42)8-3-3显示测试 (42)8-3-4通讯口测试 (42)8-3-5显示版本号 (43)8-3-6显示序列号 (43)8-3-7外部控制输入测试 (43)8-3-8继电器输出测试 (43)8-3-9参数恢复出厂设定 (43)44 9称重定值比较量设置.......................................................................................................................................... (44)9-1设置参数步骤 (44)9-2高低限参数设置列表 (46) (4747)10开关量输入/输出............................................................................................................................................10-1外部控制输入 (47)10-1-2输入接口与外接开关的联接 (47)10-1-3输入接口与PLC的联接 (47)10-2控制输出 (48)10-2-1输出说明 (48)10-2-2比较条件说明 (48)10-3模拟输出 (49)10-3-1技术规格 (49)10-3-2输出实例 (49) (5050)11附表...................................................................................................................................................................11-1功能表 (50)11-1-1一般功能设定参数列表 (50)11-1-2RS232/RS485通讯参数列表 (51)11-1-3实物标定参数列表 (52)11-1-4数字标定参数列表 (52)11-2标准ASCII码一览表 (53) (5454)12记录...................................................................................................................................................................注:本公司保留对此产品进行修改和改进的权力,因此,技术上的改进,恕不另行通知。
3G路由TL-TR761设置指南

TL-TR761 网络存储共享使用方法TL-TR761内置Micro SD卡槽,最大可支持32G卡扩充存储,具备网络存储共享功能,已经接入TL-TR761的无线设备可通过Wi-Fi共享放置在TL-TR761中的Micro SD卡内部的资料,轻松分享照片、电影、音乐等文件。
首先登陆TL-TR761管理界面192.168.1.1,在“存储控制”页面,选择“WiFi共享模式”,然后保存配置,然后在无线终端上再来访问TL-TR761的共享资源。
下面分别以Windows、Android、IOS三种操作系统举例:1. Windows系统2. Android系统3. IOS系统(苹果设备)1.Windows 系统(以XP系统为例)步骤一:电脑无线连接到TL-TR761。
步骤二:点击电脑右下角“开始”,选择“运行”。
步骤三:在“运行”输入“\\192.168.1.1”,点击“确定”,如下图:按照上述操作,电脑已经可以访问到TL-TR761的网络共享资源。
2.Android系统安卓手机不能直接访问TL-TR761的网络共享资源,在App上下载相应的应用软件可以实现访问,此处推荐使用“ES文件浏览器”。
步骤一:手机无线连接到TL-TR761。
步骤二:安装软件,在安卓手机上下载应用程序“ES文件浏览器”。
步骤三:搜索共享服务器,打开“ES文件浏览器”点击左上角,选择“共享”。
步骤四:打开共享服务器,打开“192.168.1.1”,选择“mifi”,如下图:按照上述操作,通过第三方软件“ES文件浏览器”可以实现安卓手机访问TL-TR761共享的照片、电影、音乐等文件。
3.IOS系统(以iPad2为例)苹果设备不能直接访问TL-TR761的网络共享资源,在App Store中下载相应的应用软件可以实现访问,此处推荐“Ace Player 、File Explorer、File Browser”,在App Store还有许多类似的收费或者免费的应用软件可实现网络共享功能,下面以“Ace Player”举例说明。
TP-701使用手册说明书
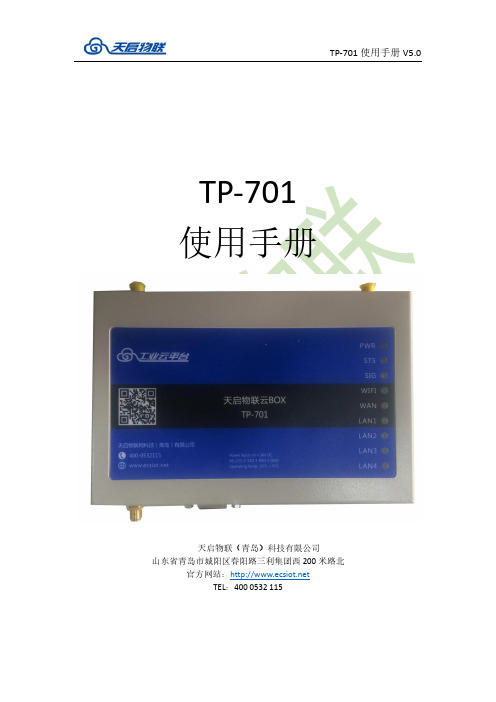
TP-701使用手册天启物联(青岛)科技有限公司山东省青岛市城阳区春阳路三利集团西200米路北官方网站:TEL:400 0532 115目录第一章产品介绍 (2)1.1产品简介 (2)1.2产品外观 (3)1.3安装尺寸 (4)1.4工作原理 (4)1.5技术优势 (5)1.6规格参数 (5)1.6.1技术参数 (5)1.6.2指示灯说明 (6)1.6.3串口定义 (6)第二章设备配置 (7)2.1配置方法 (7)2.1.1准备工作 (7)2.1.2配置TP-701(远程配置请看附录2) (7)2.2恢复出厂设置 (17)2.2.1配置恢复出厂设置 (17)2.2.2RESET按钮恢复出厂设置 (17)附录1 TP-701与西门子S7-200 SMART PLC云平台连接案例 (18)附录2 进入BOX的配置界面多种方法设置 (24)2.1 常规网线直连配置 (24)2.2 通过路由器局域网进入配置 (25)2.3 通过WIFI热点进入BOX的配置 (26)2.4 云BOX虚拟网口工具远程配置 (28)附录3 通过云BOX实现触摸屏VNC远程监控应用 (30)3.1 准备工作 (31)3.2 配置BOX (31)附录4 云BOX以VPN 的方式实现远程接入局域网 (34)4.1 准备工作 (34)4.2 操作步骤 (34)附录5 网口通软件使用手册 (36)5.1 安装 (36)5.2 注册帐号 (36)5.3 添加终端 (36)附录6 串口通软件使用手册 (39)6.1 安装 (39)6.2 注册帐号 (39)6.3 添加终端 (39)附录7 防拆功能应用 (42)7.1 BOX配置 (42)7.2 PLC配置 (43)第一章产品介绍本章主要介绍TP-701的外观、配件、规格参数和使用原理。
1、产品外观2、外观3、标准配件4、安装尺寸5、工作原理6、规格参数1.1产品简介TP-701 是采用工业级设计,专门为工业PLC产品配套使用,为具备RJ-45网口、RS232的PLC产品提供远程下载程序和远程数据采集功能,如西门子、三菱、欧姆龙、松下、台达、永宏等品牌的PLC,通过高速的4G运营商网络,结合PLC配套软件或天启物联云平台,实现远程下载程序、采集数据。
迅捷无线路由器说明书
详细配置指南商标、版权声明为深圳市友佳联科技有限公司的注册商标。
本产品的所有组成部分,包括配件和软件在内,其版权都归深圳市友佳联科技有限公司所有,未经深圳市友佳联科技有限公司许可,不得任意仿制、拷贝、誊抄或转译。
本手册所提到的产品规格和资讯仅供参考,如有内容更新,恕不另行通知,可随时查阅我们的万维网页/。
版权所有,不得翻印目录第1章产品概述 (1)1.1.产品简介 (1)1.2.特性和规格说明 (1)1.2.1.主要特性 (1)1.2.2.规格 (3)第2章硬件描述 (4)2.1.面板布置 (4)2.1.1.前面板 (4)2.1.2.后面板 (5)2.2.复位 (5)2.3.系统需求 (6)2.4.安装环境 (6)第3章配置指南 (7)3.1.启动和登录 (7)3.2.运行状态 (7)3.3.设置向导 (9)3.4.网络参数 (9)N口设置 (9)3.4.2.WAN口设置 (10)3.4.3.MAC地址克隆 (18)3.5.无线参数 (19)3.5.1.基本设置 (19)3.5.2.MAC地址过滤 (24)3.5.3.主机状态 (26)3.6.DHCP服务器 (26)3.6.1.DHCP服务 (26)3.6.2.客户端列表 (27)3.6.3.静态地址分配 (28)3.7.转发规则 (29)3.7.1.虚拟服务器 (29)3.7.2.特殊应用程序 (31)3.7.3.DMZ主机 (32)3.7.4.UPnP设置 (33)3.8.安全设置 (34)3.8.1.防火墙设置 (34)3.8.2.IP地址过滤 (35)3.8.3.域名过滤 (37)3.8.4.MAC地址过滤 (39)3.8.5.远端WEB管理 (40)3.8.6.高级安全设置 (41)3.9.路由功能 (43)3.9.1.静态路由表 (43)3.10.动态DNS (44)3.11.系统工具 (46)3.11.1.时间设置 (47)3.11.2.软件升级 (48)3.11.3.恢复出厂设置 (48)3.11.4.备份和载入配置 (49)3.11.5.重启路由器 (51)3.11.6.修改登录口令 (51)3.11.7.系统日志 (52)3.11.8.流量统计 (52)附录A FAQ (54)附录B IE浏览器设置 (57)第1章 产品概述1.1. 产品简介首先感谢您购买FW54R 无线宽带路由器!FW54R 无线宽带路由器是专为满足小型企业、办公室和家庭办公室的无线上网需要而设计,它功能实用、性能优越、易于管理。
TP-Link 网络测试设备说明书
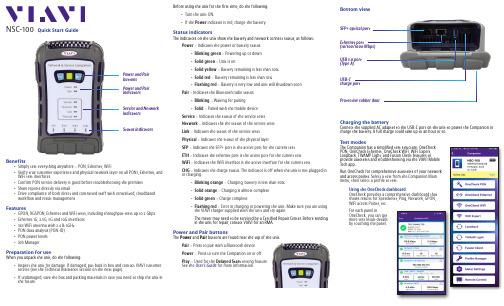
Before using the unit for the first time, do the following:y Turn the unit ON.y If the Power indicator is red, charge the battery.Status indicatorsThe indicators on the unit show the battery and network connect status, as follows:Power – Indicates the power or battery statusy Blinking green – Powering up or down y Solid green – Unit is ony Solid yellow – Battery remaining is less than 30%y Solid red – Battery remaining is less than 10%y Flashing red – Battery is very low and unit will shutdown soon Pair – Indicates the Bluetooth radio statusy Blinking – Waiting for pairingy Solid – Paired with the mobile device Service – Indicates the status of the service tests Network – Indicates the the status of the service testsLink – Indicates the status of the service tests Physical – Indicates the status of the physical layerSFP – Indicates the SFP+ port is the active port for the current test ETH – Indicates the ethernet port is the active port for the current testWiFi – Indicates the WiFi interface is the active interface for the current testCHG – Indicates the charge status. The indicator is off when the unit is not plugged in or charging.y Blinking orange – Charging, battery is less than 90% y Solid orange – Charging is almost complete y Solid green – Charge completey Flashing red – Error in charging or powering the unit. Make sure you are using the VIAVI charger supplied with the unit and try again.The meter may need to be serviced by a Certified Repair Center. Before sending in the unit for repair, contact VIAVI for an RMA.Power and Pair buttonsThe Power and Pair buttons are found near the top of the unit.Pair – Press to pair with a Bluetooth device Power – Press to turn the Companion on or off Play – Used for the Delayed Start testing feature. See the User’s Guide for more information.NSC-100Quick Start GuideBenefitsy Simply test everything anywhere – PON, Ethernet, WiFiy Verify true customer experience and physical network layer on all PON1, Ethernet, and WiFi test interfaces y Confirm PON service delivery is good before troubleshooting the premises y Share reports directly via emaily Drive compliance of both direct and contracted staff with centralized, cloudbased workflow and result managementFeaturesy GPON, XGSPON, Ethernet and WiFi tests, including throughput tests up to 2 Gbps y Ethernet 1G, 2.5G, 5G and 10G interfaces y 3x3 WiFi antenna with 2.4 & 5GHz y PON data analysis (PON-ID) y PON power levels y Job ManagerPreparation for useWhen you unpack the unit, do the following:y Inspect the unit for damage. If damaged, put back in box and contact VIAVI customer service (see the Technical Assistance section on the next page). y If undamaged, save the box and packing materials in case you need to ship the unit in the future.Power and Pair indicatorsService and Network indicatorsPower and Pair buttons Status indicatorsBottom viewEthernet port(10/100/1000 Mbps)USB-Ccharge portUSB 3.0 port (Type A)SFP+ optical port Protective rubber doorCharging the batteryConnect the supplied AC adapter to the USB-C port on the unit to power the Companion or charge the battery. A full charge could take up to an hour or so.Test modesThe Companion has a simplified test structure: OneCheck PON, OneCheck Ethernet, OneCheck WiFi, WiFi Expert, Loopback, TWAMP Light, and Fusion Client features toprovide autotests and troubleshooting via the VIAVI Mobile Tech app.Run OneCheck for comprehensive autotests of your network and access points. S elect a test from the Companion Main menu, then select a profile to test.Using the OneCheck dashboardOneCheck provides a comprehensive dashboard that shows results for Speedtests, Ping, Network, GPON, WiFi access Points, etc.For each panel inOneCheck, you can get more test result details by touching the panel.Pairing the Companion to your mobile deviceTo control the user interface of the Companion, the mobile device must be paired with the unit over Bluetooth.1.On the Companion, press and hold the Pairbutton for 3 seconds to enter pairing mode. The blue Pair indicator blinks.2.On the mobile device, do the following:y Go to the Settings menu, then select Bluetooth .y Verify that the device is not paired with any NSC-100 Companion unit.3.From the Mobile Tech Main menu, under My Devices , find the Companion, shown as “NSC-100”, and select Connect .If you don’t see the device, you may need to select Discover Devices .4. When the Companion is connected, the Pair indicator will be solid.5.On the mobile device, the Companion should be paired and the Main menu will now show the Companion menu.You can now control the instrument through the Mobile Tech app and run all tests on the Companion.© 2021 VIAVI Solutions Inc.Product specifications and descriptions in this document are subject to change without notice.22137285 July 2021EnglishVIAVI SolutionsNorth America 1.844.GO VIAVI / 1.844.468.4284Latin America +52 55 5543 6644EMEA +49 7121 862273APAC+1 512 201 6534All Other Regions/contacts***************************Mobile Tech Main menuIn the Main menu, you can see details of the instrument, run Companion tests, sync to StrataSync, manage files on the unit, and even view documentation.You’ll also see the date and time of the last time your meter synced to StrataSync.Near the top of the Main menu, you can select Show more to see details on your instrument, including all of the installed options.Using the Companion with a mobile deviceThe Companion is designed to be paired with a mobile device or tablet(such as an iPhone, iPad, or similar Android device), and leverages the user interface of those devices along with the VIAVI Mobile Tech app to provide a smooth user experience.You can view test results, set up the Companion, sync files, update the meter, and configure test parameters from the app.To get started, download the VIAVI Mobile Tech app from the App Store or Google Play.Connecting to StrataSyncYou can connect to StrataSync using your smartphone or tablet anytime, anywhere using the VIAVI Mobile Tech app.Once your instrument is connected to the Mobile Tech app via Bluetooth, geo locationinformation can be added to reports and files when syncing to StrataSync. If configuration files or work orders are set to be deployed from StrataSync to your meter, you can check those here, as well as browsing files from the unit itself.Once you download the application, log in to StrataSync just as you do on the website. To operate the tests, follow the instructions on the application screens.Mobile T echUsing the Mobile Tech appLogging in to StrataSyncTo get started using the Mobile Tech app, you need to log in to StrataSync.1. Launch the Mobile Tech app on your mobile device.2. Select the Login to StrataSync button. The Login screen will be displayed.3.Enter your Username and Password, then select the Sign In button. The Mobile Tech Main menu will be displayed.y – Run tests and configure profiles for the CompanionBefore doing any tests, you may need to set up profiles for your network. Companion > Profile y Job Manager – Attach jobs to tests, including customer info and work orders, and track test results y Instrument Sync – Sync your instrument to StrataSync and deploy configuration filesy NSC-100 Files and Mobile Tech Files – Manage the files on the unit you can save to your phone or tablet. Use the NSC-100 Files menu to manage filesstored on your meter, use the Mobile Tech Files menu to manage those stored on your mobile device. y Documentation – View and download various documentation for your instrument, including applications notes, software release notes, and quick reference guidesTechnical assistanceIf you require technical assistance, call 1-844-GO-VIAVI / 1.844.468.4284.For the latest TAC information, visit/en/services-and-support/support/technical-assistanceConnect buttonNSC-100。
TPLINK路由器说明书
TPLINK路由器说明书用户手册简介感谢您购买tl-r402m soho宽带路由器!tl-r402m soho宽带路由器专为渴望实现高速上网、方便管理的经济型soho(小型办公室和家庭)用户而设计,允许多台计算机共享1条单独宽带线路和一个isp帐号。
tl-r 402msoho宽带路由器性能卓越、功能实用、易于操作、管理方便,为您提供经济高效的网络连接。
tl-r402m soho宽带路由器极易配置,无需专业人员即可按照本手册安装配置完成。
在您准备安装使用本产品之前,请先仔细阅读本手册,以全面利用本产品的所有功能。
用途本手册的用途是帮助您熟悉和正确使用tl-r402m soho宽带路由器。
约定在本手册中所提到的路由器,如无特别说明,系指tl-r402m路由器。
用户手册概述第一章:用户手册简介。
第二章:产品概述。
简述路由器的主要特性和规格。
第三章:硬件安装。
帮助您进行路由器的硬件安装。
第四章:快速安装指南。
帮助您配置路由器的基本网络参数。
第五章:配置指南。
帮助您配置路由器的高级特性。
附录a:faq。
附录b:windows95/98环境下的tcp/ip设置。
产品简介tl-r402m soho宽带路由器专为渴望实现高速上网、方便管理的经济型soho(小型办公室和家庭)用户而设计,功能实用、易于操作。
tl-r402msoho宽带路由器提供多方面的管理功能,可对系统、dhcp 服务器、d mz主机、防火墙、静态路由表等进行管理。
tl-r402m路由器可以过滤不良网站,限制员工(对于企业用户)或孩子(对于家庭用户)浏览某些指定的网站,确保网络资源的合理利用。
可以对不同计算机者制定不同的上网权限,在权限设置下,部分人员或家长可不受控制的浏览任何内容;另一部分人员只能浏览指定网站,进行指定的操作。
tl-r402m路由器可以根据上网动作自动连通和断开上网连接,在网络开通期间,没有上网动作时自动断线,适时节约上网费用;重新点击ie浏览器,即可恢复上网功能。
TP-Link LTE-Advanced Mobile Wi-Fi M7650 说明书
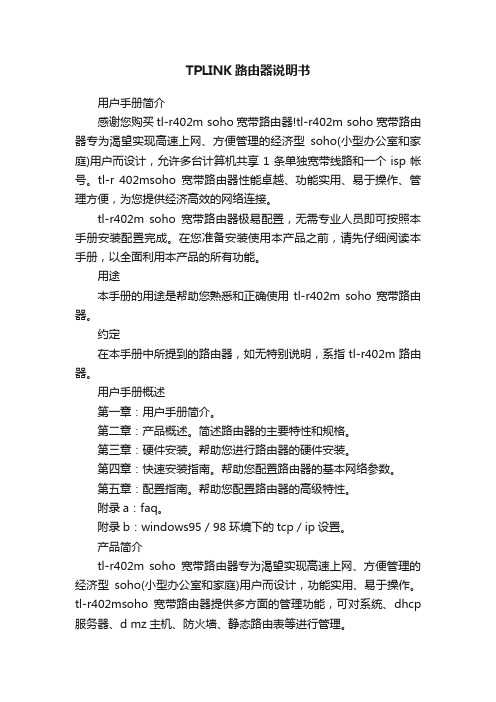
LTE-Advanced Mobile Wi-FiM7650600Mbps to Go:the Fastest Mobile Wi-Fi Around4G LTE 600Mbps AC1200 Dual Band Wi-Fi 15hrs UsageThe M7650 features a compact, elegant design very suitable for travel, business trips, outdoor activities or wherever you may be. Share LTE-Advanced Connection on the GoThe1.44 inch TFT intuitive screen display of M7650 makes it easy to stay within your data budget and helps avoid going over the monthly data cap. The screen also displays other much more information of battery life, signal strength, Wi-Fi status, connected users and more.All Useful Info at a Color ScreenBattery LifeData RoamingDownload SpeedData Usage560MBConnected DevicesMessageSignal StrengthNetwork Type4G/3G/2G50M/S* Parameters above are only for demonstration.With the tpMiFi App, you can easily access and manage the M7650 from your connected iOS/Android devices. The tpMiFi app allows you to establish data limits, control which devices can access your Wi-Fi, send messages, and sharemedia files to/from a removable Micro SD card.Easy Management with the tpMiFi App· The latest generation 4G LTE Advanced – Supports 4G LTE Advanced network, compatible with 3G/2G network· The Faster Connections – reaches up to 600Mbps download speed and 50Mbps upload one, to enjoy HD movies without interruption, download files in seconds, and hold a video chat without dropouts.· Dual Band Wi-Fi – Selectable 2.4GHz or 5GHz dual band Wi-Fi, achieves better network connectivity when you are in network interference.· High-Speed Hotspots – Shares 2.4GHz 300Mbps or 5GHz 867Mbps Wi-Fi with up to 32 Wi-Fi devices.Lightning 4G LTE AdvancedDual Band Wi-Fi15 Hours Usage· 3000mAh – 3000mAh battery capacity · 15 hours – 15 hours of 4G sharing · 720 hours – 720 hours of standby* Actual battery time may vary due to different using environments· One-Key Setup – To create a hotspot, just insert a SIM card and press the power button.· 32 devices – Supports up to 32 devices simultaneously to share 4G/3G/2G network· Compact design – Suitable for travel, business trips, outdoor activities or wherever you may be · Storage Sharing – Easily share photos, music, videos and more wirelessly across your network· Up to 32GB – Equipped with a micro SD card slot for up to 32GB of optional storageEasy Using Storage Wireless SharingHardware· Interface : 1 micro USB port for power supply, 1 micro SIM card slot, 1 micro SD card slot· Button: Power On/Off Button, Menu Button, Reset Button· Screen Display: Traffic statistics, Wi-Fi status, user numbers, network type (2G/3G/4G), signal strength, Internet connection status, messages, battery life, Wi-Fi name, Wi-Fi password.· External Power Supply: 5V/1A· Dimensions (W x D x H): 4.2 × 2.6 × 0.6 in. (106 × 66 × 16mm) · Antenna: Internal Antennas Wireless· Network Type:4G: FDD-LTE B1/B3/B7/B8/B20 (2100/1800/2600/900/800MHz) 3G: DC-HSPA+/HSPA/UMTS B1/B8 (2100/900MHz)2G: EDGE/GPRS/GSM (850/900/1800/1900MHz)· Wireless Standards: IEEE 802.11n/a/ac 5GHz, IEEE 802.11b/g/n 2.4GHz· Frequency: 5GHz and 2.4GHz· Signal Rate: Selectable dual band, 300Mbps at 2.4GHz or 867Mbps at 5GHz· Transmit Power: <20dBm· Reception Sensitivity:5GHz: 11a 54Mbps: -70dBm;11n HT20 MCS7: -68dBm;11n HT40 MCS7: -65dBm.2.4GHz: 11b 11Mbps: -86dBm;11g 54Mbps: -71dBm;11n HT20 MCS7: -68dBm;11n HT40 MCS7: -65dBm;· Wireless Security: Support WPA-PSK/WPA2-PSK,Wireless MAC Filtering, Enable/Disable SSID Broadcast· DHCP: Server, Client, DHCP Client ListOthers· Certification: CE, RoHS· System Requirements:Windows 10/8/7/vista/XP, Mac OS, Android, iOS, Windows Phone· EnvironmentOperating Temperature: 0℃~35℃ (32℉ ~95℉)Storage Temperature: -20℃~60℃ (4℉ ~140℉)Operating Humidity: 10%~90% non-condensingStorage Humidity: 5%~90% non-condensing· Package ContentsLTE-Advanced Mobile Wi-Fi M7650Micro USB CableNano to Micro SIM Card AdapterQuick Installation Guide3000mAh BatteryFor more information, please visit/en/products/details/M7650.html。
硕方 SUPVAN TP70 TP76i线号机使用手册说明书
硕方SUPVAN使用手册APP下载硕方公众号声明1.“硕方”和“SUPVAN”为硕方科技(北京)有限公司的注册商标。
2.有关本手册的内容,我公司将保留因线号机升级而有所变化的权利。
3.我公司将不对您未按使用手册要求操作而引起的任何后果负责。
4.所引用的其他公司的标记或商标均为其他公司所有。
5.想了解任何有关本机或我公司的相关信息均可访问。
6.无线电发射设备型号核准代码可在产品产地标签进行查看。
硕方SUPVAN注意事项警告1.请使用单一的电源插座,不要使用已插进多个设备的多联插座,这样可能会引起火灾或触电。
2.请不要让金属或液体进入线号机,这样可能会引起火灾或触电以及损坏内部零件,造成机器损毁。
3.请不要用湿手去插拔电源插头,以防触电。
4.当打开“上盖”操作时,请不要让任何物体接触线号机本身的动作部分。
5.请不要使用超出180-240V的AC电源。
6.严禁未经授权拆卸或改装本线号机,这可能会带来由高压部件引起的火灾或触电。
7.请让线号机远离酒精、汽油等易燃溶剂,否则触碰到打印机内部电气部件,引起火灾。
8.清洁线号机时,请用拧干的湿纱布,不能使用有机的易燃溶剂。
9.在使用时,发现异味或异响,请立即关掉线号机,拔掉插头,并联络您的供货商或硕方售后服务中心。
10.请在清洁的地方使用线号机,不要在地毯或毛毡上使用,否则大量灰尘极易引起短路造成火灾。
11.当有异物进入线号机内部时,请立即停止使用,以免损坏线号机。
12.本机建议打印国标1平方到6平方的套管以及Φ≤6.0mm热缩管。
警示1.并不是所有耗材均适用于您的线号机,这取决于耗材的相关性能与规格。
请选用硕方原厂耗材,以保证不降低打印质量和损坏线号机。
2.请不要用手去触摸打印头。
3.在使用切刀时,请小心使用,防止划伤。
4.线号机打印头刚刚结束工作时,如果触摸,可能会造成皮肤灼伤。
5.请在远离潮湿炎热的地方操作线号机,以防触电。
6.长时间不使用您的线号机,请拔出电源连线。